使用camunda开源工作流引擎有:通过docker运行、使用springboot集成、部署camunda发行包、基于源代码编译运行等多种方式。
其中,通过源代码编译运行的方式最为复杂,具体参考:https://lowcode.blog.csdn.net/article/details/136206057
文本重点介绍如何在Spring Boot应用程序中如何集成Camunda Platform开源流程平台,这也是项目中最为常见的一种使用方式。
在本教程中,我们假设您熟悉 Java Web 应用程序开发和 Spring Boot 的基础知识。前提条件是您已经安装了 Eclipse/IDEA等Java开发工具和 Camunda Modeler流程设计器。
1、新建Spring Boot 项目集成camunda
首先,让我们在您选择的 IDE 中设置您的第一个流程应用程序项目。
该项目需要 Java jdk8以上版本。我本地使用的JDK版本为11,使用的开发工具IDEA2023。
1.1、创建新的 Maven 项目
首先,用IDEA工具建立了一个新的基于 Apache Maven 的项目,项目名称命名为camunda7-springboot。

1.2、添加 Camunda 平台和 Spring Boot 依赖项
下一步包括为新项目设置 Maven 依赖项。需要将 Maven 依赖添加到项目的文件中。由于本示例要使用camunda流程引擎、web界面、Rest服务接口,所以需要导入camunda-bpm-spring-boot-starter-rest、camunda-bpm-spring-boot-starter-webapp依赖包。我们在“依赖管理”部分添加了 Spring Boot BOM和camunda相关依赖,这将自动将 camunda 引擎、rest服务接口和 Web 应用程序包含在应用程序中。
我们使用camunda7.19.0版本,该版本支持jdk8和springboot2。camunda和springboot版本的依赖对应关系,查看官方文档说明:Spring Boot Version Compatibility | docs.camunda.org
<?xml version="1.0" encoding="UTF-8"?>
<project xmlns="http://maven.apache.org/POM/4.0.0"
         xmlns:xsi="http://www.w3.org/2001/XMLSchema-instance"
         xsi:schemaLocation="http://maven.apache.org/POM/4.0.0 http://maven.apache.org/xsd/maven-4.0.0.xsd">
    <modelVersion>4.0.0</modelVersion>

    <groupId>com.yuncheng</groupId>
    <artifactId>camunda7-springboot</artifactId>
    <version>1.0-SNAPSHOT</version>

    <properties>
        <maven.compiler.source>11</maven.compiler.source>
        <maven.compiler.target>11</maven.compiler.target>
        <project.build.sourceEncoding>UTF-8</project.build.sourceEncoding>
        <camunda.spring-boot.version>7.19.0</camunda.spring-boot.version>
        <spring-boot.version>2.7.9</spring-boot.version>
    </properties>

    <dependencyManagement>
        <dependencies>
            <dependency>
                <groupId>org.springframework.boot</groupId>
                <artifactId>spring-boot-dependencies</artifactId>
                <version>${spring-boot.version}</version>
                <type>pom</type>
                <scope>import</scope>
            </dependency>
        </dependencies>
    </dependencyManagement>

    <dependencies>
        <dependency>
            <groupId>org.camunda.bpm.springboot</groupId>
            <artifactId>camunda-bpm-spring-boot-starter-webapp</artifactId>
            <version>${camunda.spring-boot.version}</version>
        </dependency>
        <dependency>
            <groupId>org.camunda.bpm.springboot</groupId>
            <artifactId>camunda-bpm-spring-boot-starter-rest</artifactId>
            <version>${camunda.spring-boot.version}</version>
        </dependency>
        <dependency>
            <groupId>org.springframework.boot</groupId>
            <artifactId>spring-boot-starter-jdbc</artifactId>
        </dependency>
        <dependency>
            <groupId>com.h2database</groupId>
            <artifactId>h2</artifactId>
        </dependency>
        <dependency>
            <groupId>com.mysql</groupId>
            <artifactId>mysql-connector-j</artifactId>
        </dependency>
        <dependency>
            <groupId>com.sun.xml.bind</groupId>
            <artifactId>jaxb-impl</artifactId>
            <version>2.3.6</version>
        </dependency>
    </dependencies>

    <build>
        <finalName>${project.artifactId}</finalName>
        <plugins>
            <plugin>
                <groupId>org.springframework.boot</groupId>
                <artifactId>spring-boot-maven-plugin</artifactId>
            </plugin>
            <!--指定JDK编译版本 -->
            <plugin>
                <groupId>org.apache.maven.plugins</groupId>
                <artifactId>maven-compiler-plugin</artifactId>
                <configuration>
                    <source>1.8</source>
                    <target>1.8</target>
                    <encoding>UTF-8</encoding>
                </configuration>
            </plugin>
        </plugins>
    </build>
</project>注意:camunda官方帮助文档中少一个spring-boot-starter-jdbc配置,如果没有这个配置,启动项目,会报如下错误:
Field transactionManager in org.camunda.bpm.spring.boot.starter.configuration.impl.DefaultDatasourceConfiguration required a bean of type 'org.springframework.transaction.PlatformTransactionManager' that could not be found.
需要在pom.xml配置文件里把spring-boot-starter-jdbc加上
        <dependency>

            <groupId>org.springframework.boot</groupId>

            <artifactId>spring-boot-starter-jdbc</artifactId>

        </dependency>
1.3、配置 Spring Boot 项目
在项目中src/main/resources新建application.yaml或者application.properties配置文件
让我们在文件夹中创建一个包含以下内容的文件:application.yaml
server:
  port: 8080
spring:
  datasource:
    url: jdbc:h2:mem:camunda;DB_CLOSE_DELAY=1000;LOCK_TIMEOUT=10000
    username: sa
    password:
    driver-class-name: org.h2.Driver
camunda:
  bpm:
    database:
      type: h2 #可改成 mysql
      schema-update: true
    auto-deployment-enabled: false # 自动部署 resources 下的 bpmn文件
    admin-user:
      id: demo
      password: demo
此配置将导致以下结果:
- 将创建具有提供的密码和名字的管理员用户“demo”。
- 默认使用h2数据库,启动时自动创建数据库。
1.4、编写Spring Boot启动类
接下来,我们添加一个带有 main 方法的应用程序类,该方法将成为启动 Spring Boot 应用程序的入口点。该类上有@SpringBootApplication注解,它隐含地添加了几个方便的功能(自动配置、组件扫描等 - 参见 Spring Boot 文档)。
package com.yuncheng;

import org.springframework.boot.SpringApplication;
import org.springframework.boot.autoconfigure.SpringBootApplication;
import org.springframework.context.ConfigurableApplicationContext;
import org.springframework.core.env.Environment;

@SpringBootApplication
public class Camunda7Application {
    public static void main(String... args) {
        ConfigurableApplicationContext application =  SpringApplication.run(Camunda7Application.class, args);
        Environment env = application.getEnvironment();
        String port = env.getProperty("server.port");
        String path = env.getProperty("server.servlet.context-path");
        if (path == null || "".equals(path)) {
            path = "/";
        }
        System.out.println("\n----------------------------------------------------------\n" +
                "\tCamunda7Application is running!\n" +
                "\tPort:\t" + port + "\n" +
                "\tPath:\t" + path + "\n" +
                "----------------------------------------------------------");
    }
}
1.5、启动Spring Boot工程
在IDEA的maven操作窗口,执行mvn clean install命令,下载相关的第三方Jar包。

我们的第一个 Camunda Spring Boot 应用程序现已准备就绪,此程序是一个 Spring Boot 应用程序,它作为 Web 容器、Camunda 引擎和 Camunda Web 应用程序资源嵌入到 Tomcat 中,并使用了H2 数据库。您可以通过右键单击该类并选择Camunda7Application 来运行应用程序。

现在,当您在浏览器中打开 http://localhost:8080/ 时,您可以使用我们之前配置的登录名和密码“demo/demo”来访问 Camunda Web 应用程序。

能正常登录访问这个界面,表示基于springboot集成camunda成功了。
1.6、切换成mysql数据库
camunda流程引擎默认使用的是h2数据库,我们把它切换成大家比较熟悉的mysql数据库,我本地使用的是mysql8.0版本数据库进行测试验证。
首先在pom.xml配置文件里增加mysql数据库Jar包引用
<dependency>
    <groupId>com.mysql</groupId>
    <artifactId>mysql-connector-j</artifactId>
</dependency>
然后,修改application.yaml配置文件,改为mysql数据库
server:
  port: 8080
spring:
  datasource:
    url: jdbc:mysql://127.0.0.1:3306/camunda719?characterEncoding=UTF-8&useUnicode=true&useSSL=false&zeroDateTimeBehavior=convertToNull&serverTimezone=Asia/Shanghai
    username: root
    password: root
    driver-class-name: com.mysql.cj.jdbc.Driver
camunda:
  bpm:
    database:
      type: mysql
      schema-update: false
    auto-deployment-enabled: false # 自动部署 resources 下的 bpmn文件
    admin-user:
      id: demo
      password: demo
这里我们设置了schema-update: false,表示不自动执行数据库脚本,需要手动创建数据库。先创建一个数据库,命名为camunda719。

然后找到camunda-bpm-platform-7.19.0\engine\src\main\resources\org\camunda\bpm\engine\db\create文件夹下的数据库脚本,选择mysql脚本依次执行即可。

执行完成后,通过工具打开数据库控制台查看,一共有49张表。
再次执行mvn clean install命令,并启动Springboot工程,浏览器中打开 http://localhost:8080/ 时,通过登录名和密码“demo/demo”来访问 Camunda Web 应用程序,验证是否成功。
2、设计并部署一个BPMN流程
在本节中,我们将学习如何使用camunda流程设计器设计一个BPMN2的业务流程,并部署流程。
2.1、下载安装流程设计器
下载地址:https://downloads.camunda.cloud/release/camunda-modeler/5.19.0/camunda-modeler-5.19.0-win-x64.zip
下载 流程设计器后camunda-modeler后,只需将下载内容解压缩到您选择的文件夹中即可。
成功解压缩后,对于 Windows 用户运行Camunda Modeler.exe,对于 Mac 用户或 Linux 用户运行.sh文件,启动流程建模器。
2.2、设计BPMN流程
首先使用 Camunda Modeler 对可执行流程进行建模。设置两个人工任务节点,配置流程处理人为demo用户。

流程模型bpmn内容:
<?xml version="1.0" encoding="UTF-8"?>

<bpmn:definitions xmlns:bpmn="http://www.omg.org/spec/BPMN/20100524/MODEL" xmlns:bpmndi="http://www.omg.org/spec/BPMN/20100524/DI" xmlns:dc="http://www.omg.org/spec/DD/20100524/DC" xmlns:camunda="http://camunda.org/schema/1.0/bpmn" xmlns:di="http://www.omg.org/spec/DD/20100524/DI" xmlns:modeler="http://camunda.org/schema/modeler/1.0" id="Definitions_0lwtj60" targetNamespace="http://bpmn.io/schema/bpmn" exporter="Camunda Modeler" exporterVersion="5.19.0" modeler:executionPlatform="Camunda Platform" modeler:executionPlatformVersion="7.20.0">

  <bpmn:process id="Process_15r7d3m" name="UserTask Flow1" isExecutable="true" camunda:historyTimeToLive="180">

    <bpmn:startEvent id="StartEvent_1">

      <bpmn:outgoing>Flow_11x673q</bpmn:outgoing>

    </bpmn:startEvent>

    <bpmn:sequenceFlow id="Flow_11x673q" sourceRef="StartEvent_1" targetRef="Activity_10ell5p" />

    <bpmn:sequenceFlow id="Flow_0foitiz" sourceRef="Activity_10ell5p" targetRef="Activity_09u1so2" />

    <bpmn:endEvent id="Event_0e68o48">

      <bpmn:incoming>Flow_01cgzte</bpmn:incoming>

    </bpmn:endEvent>

    <bpmn:sequenceFlow id="Flow_01cgzte" sourceRef="Activity_09u1so2" targetRef="Event_0e68o48" />

    <bpmn:userTask id="Activity_10ell5p" name="申请" camunda:assignee="demo">

      <bpmn:incoming>Flow_11x673q</bpmn:incoming>

      <bpmn:outgoing>Flow_0foitiz</bpmn:outgoing>

    </bpmn:userTask>

    <bpmn:userTask id="Activity_09u1so2" name="审批" camunda:assignee="demo">

      <bpmn:incoming>Flow_0foitiz</bpmn:incoming>

      <bpmn:outgoing>Flow_01cgzte</bpmn:outgoing>

    </bpmn:userTask>

  </bpmn:process>

  <bpmndi:BPMNDiagram id="BPMNDiagram_1">

    <bpmndi:BPMNPlane id="BPMNPlane_1" bpmnElement="Process_15r7d3m">

      <bpmndi:BPMNShape id="Activity_1xzvv8s_di" bpmnElement="Activity_10ell5p">

        <dc:Bounds x="270" y="77" width="100" height="80" />

      </bpmndi:BPMNShape>

      <bpmndi:BPMNShape id="Activity_1h27nqt_di" bpmnElement="Activity_09u1so2">

        <dc:Bounds x="460" y="77" width="100" height="80" />

      </bpmndi:BPMNShape>

      <bpmndi:BPMNShape id="Event_0e68o48_di" bpmnElement="Event_0e68o48">

        <dc:Bounds x="652" y="99" width="36" height="36" />

      </bpmndi:BPMNShape>

      <bpmndi:BPMNShape id="_BPMNShape_StartEvent_2" bpmnElement="StartEvent_1">

        <dc:Bounds x="152" y="99" width="36" height="36" />

      </bpmndi:BPMNShape>

      <bpmndi:BPMNEdge id="Flow_11x673q_di" bpmnElement="Flow_11x673q">

        <di:waypoint x="188" y="117" />

        <di:waypoint x="270" y="117" />

      </bpmndi:BPMNEdge>

      <bpmndi:BPMNEdge id="Flow_01cgzte_di" bpmnElement="Flow_01cgzte">

        <di:waypoint x="560" y="117" />

        <di:waypoint x="652" y="117" />

      </bpmndi:BPMNEdge>

      <bpmndi:BPMNEdge id="Flow_0foitiz_di" bpmnElement="Flow_0foitiz">

        <di:waypoint x="370" y="117" />

        <di:waypoint x="460" y="117" />

      </bpmndi:BPMNEdge>

    </bpmndi:BPMNPlane>

  </bpmndi:BPMNDiagram>

</bpmn:definitions>
2.3、发布BPMN流程
点击流程设计器左下方的发布流程按钮:

3、验证camunda流程引擎
3.1、通过camunda web控制台测试
现在,当您在浏览器中打开 http://localhost:8080/camunda/app/tasklist/ 时,您可以使用我们之前配置的登录名和密码“demo/demo”来访问 Camunda Web 应用程序。
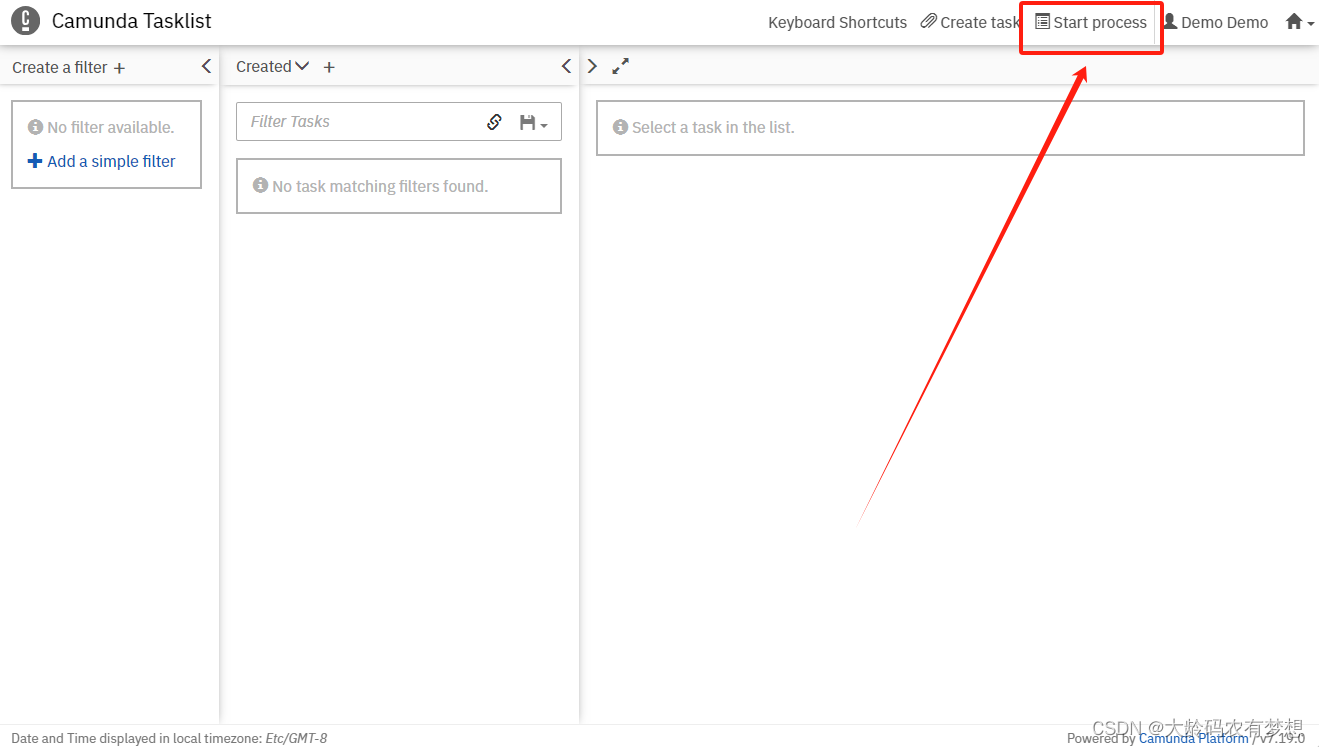
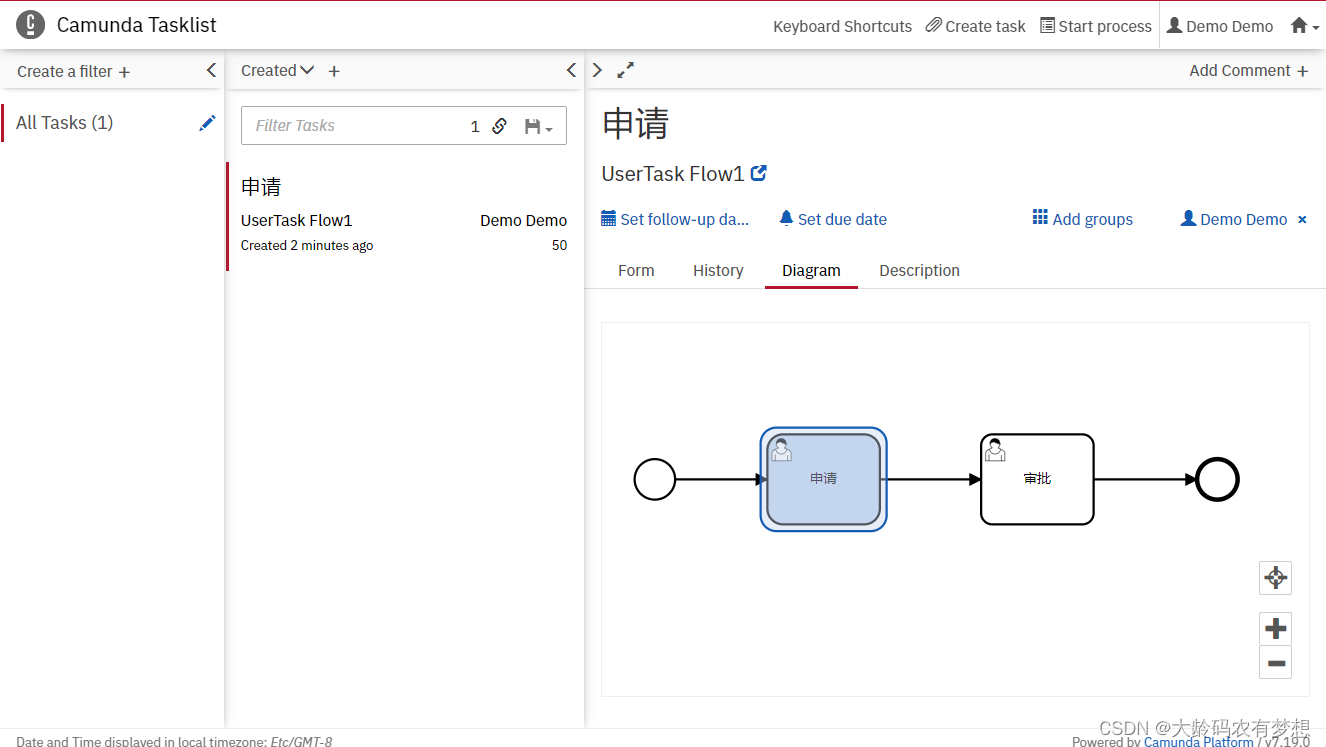
选择刚刚设计的的流程“UserTask Flow1”,发起一个流程实例。点击左侧“Add a simple filter”添加一个默认待办任务过滤器,就可以查看到刚刚提交的流程待办任务了。
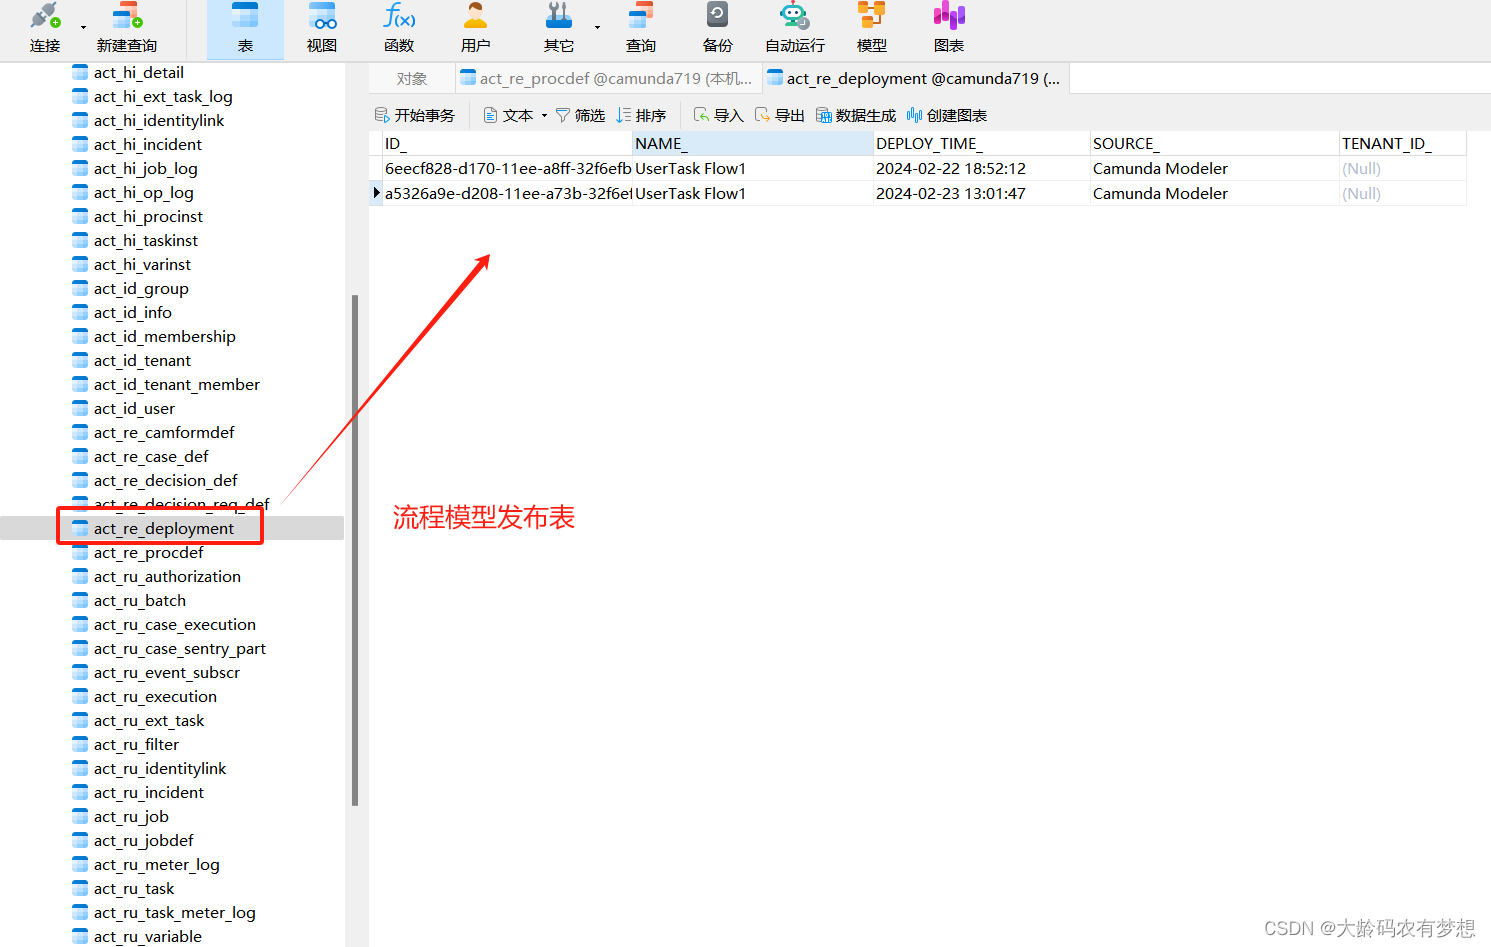
此时,我看打开mysql数据库表,查看camunda数据库表里的数据:
打开流程定义发布表act_re_deployment,看到我们刚刚发布的这个流动定义模型。
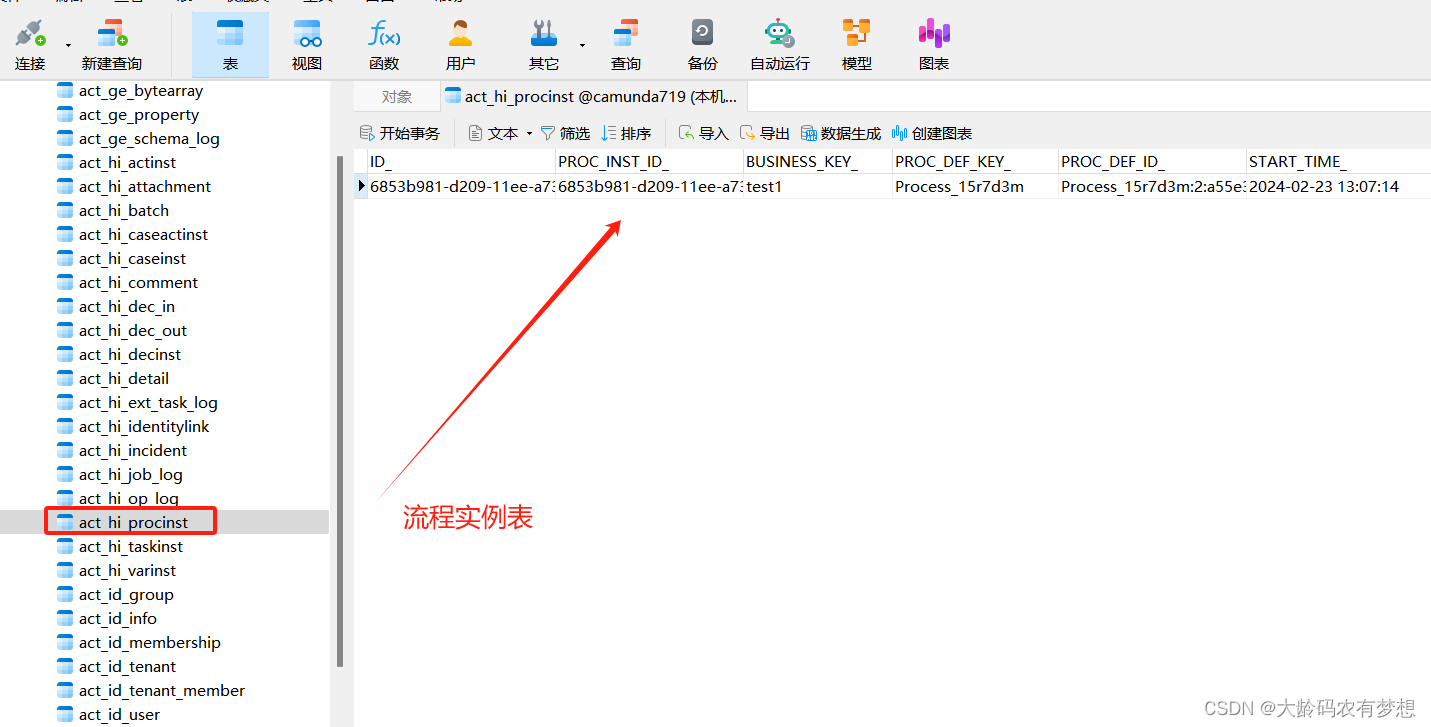
打开流程实例历史表act_hi_procinst,看到我们刚刚发起的这个流程实例数据。
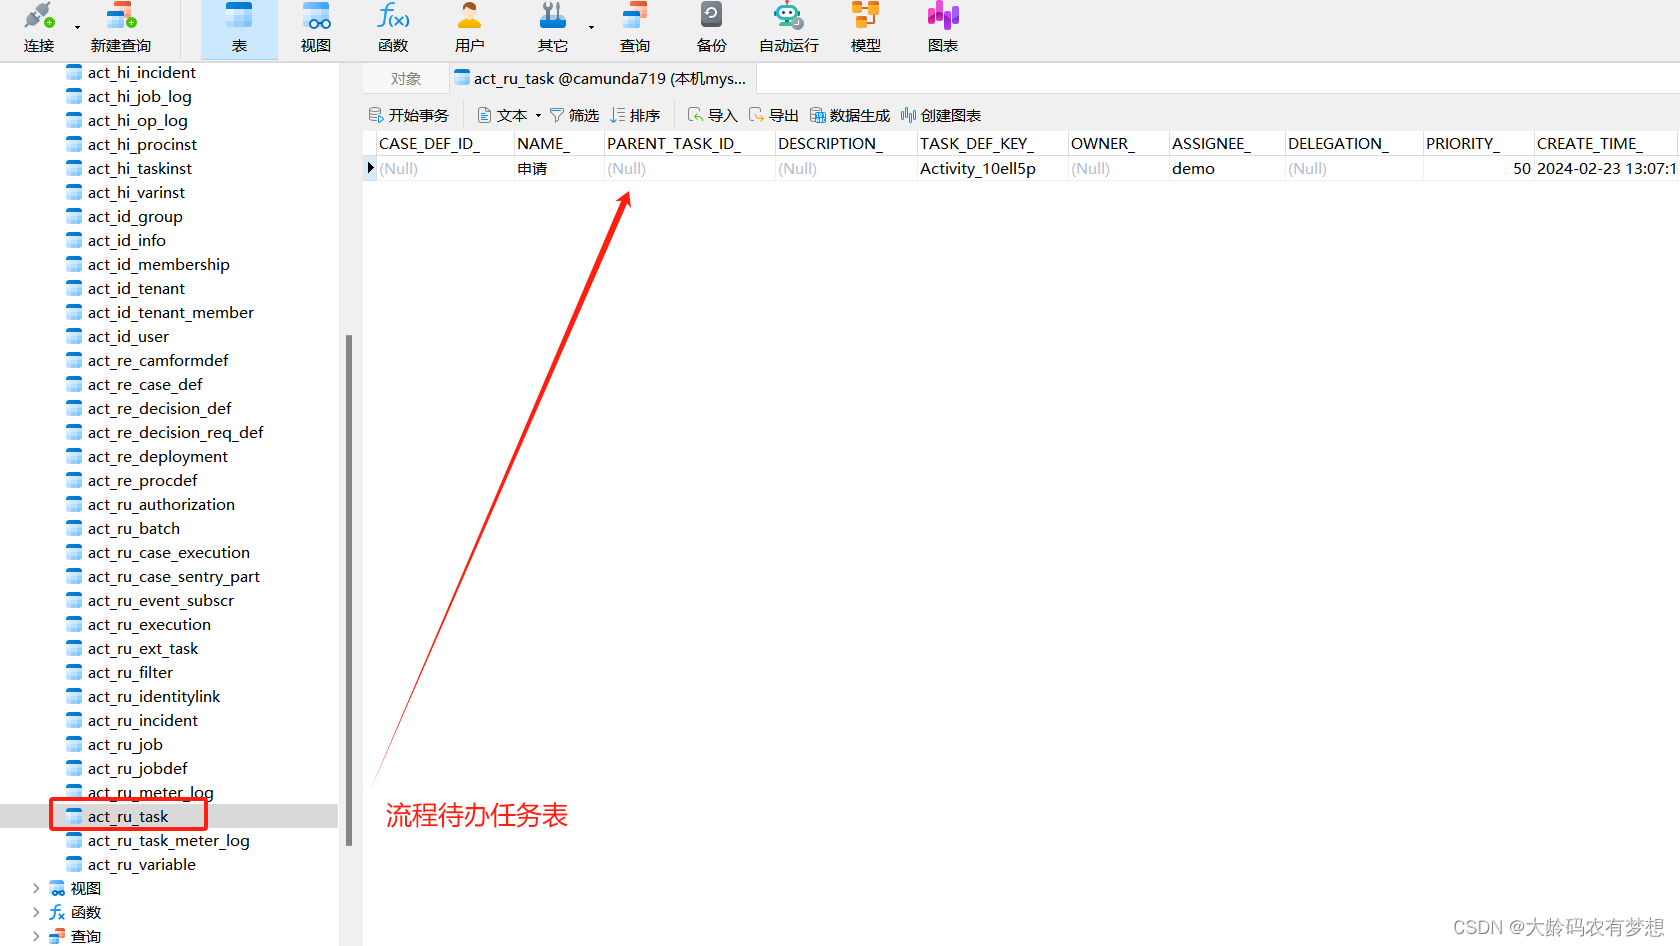
打开流程待办任务表act_ru_task,多了一条demo用户待处理的任务。
3.2、通过camunda rest接口测试
以上我们通过camunda的web界面进行了发起流程测试验证,下面我们通过Camunda REST API的方式进行测试验证。
Camunda Platform REST API官方说明文档:Camunda Platform REST API

3.2.1、查询流程定义
查看流程定义rest接口:http://{host}:{port}/{contextPath}/process-definition
用Postman测试验证:http://localhost:8080/engine-rest/process-definition
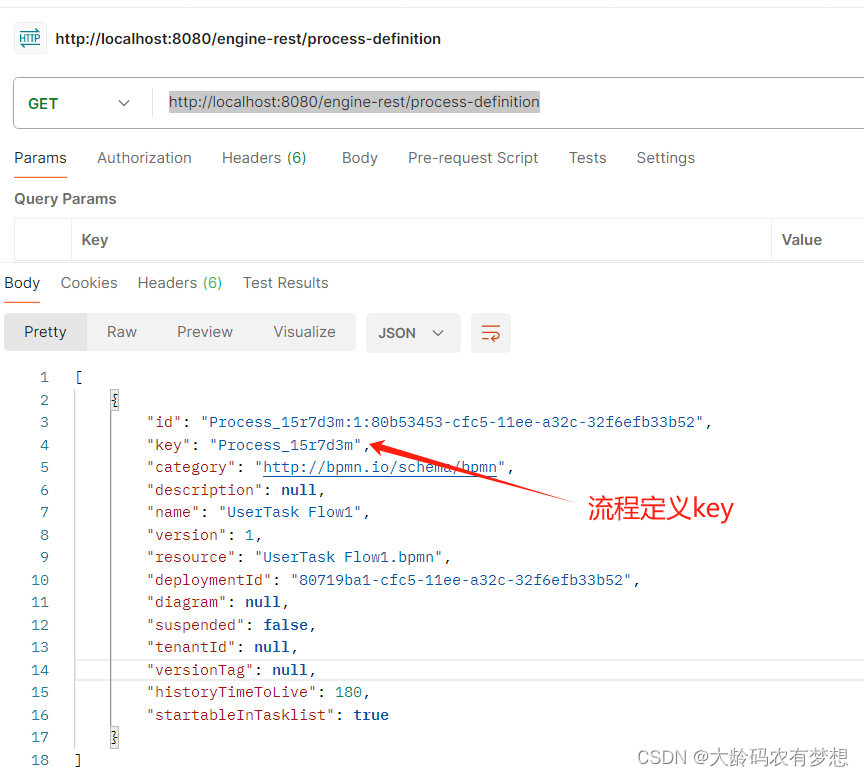
返回结果:
[

    {

        "id": "Process_15r7d3m:1:80b53453-cfc5-11ee-a32c-32f6efb33b52",

        "key": "Process_15r7d3m",

        "category": "http://bpmn.io/schema/bpmn",

        "description": null,

        "name": "UserTask Flow1",

        "version": 1,

        "resource": "UserTask Flow1.bpmn",

        "deploymentId": "80719ba1-cfc5-11ee-a32c-32f6efb33b52",

        "diagram": null,

        "suspended": false,

        "tenantId": null,

        "versionTag": null,

        "historyTimeToLive": 180,

        "startableInTasklist": true

    }

]
3.2.2、发起流程实例
流程发起的rest接口为:http://{host}:{port}/{contextPath}/process-definition/key/{key}/start
详细接口描述见官方文档:Camunda Platform REST API
打开postman工具进行测试验证:http://localhost:8080/engine-rest/process-definition/key/Process_15r7d3m/start
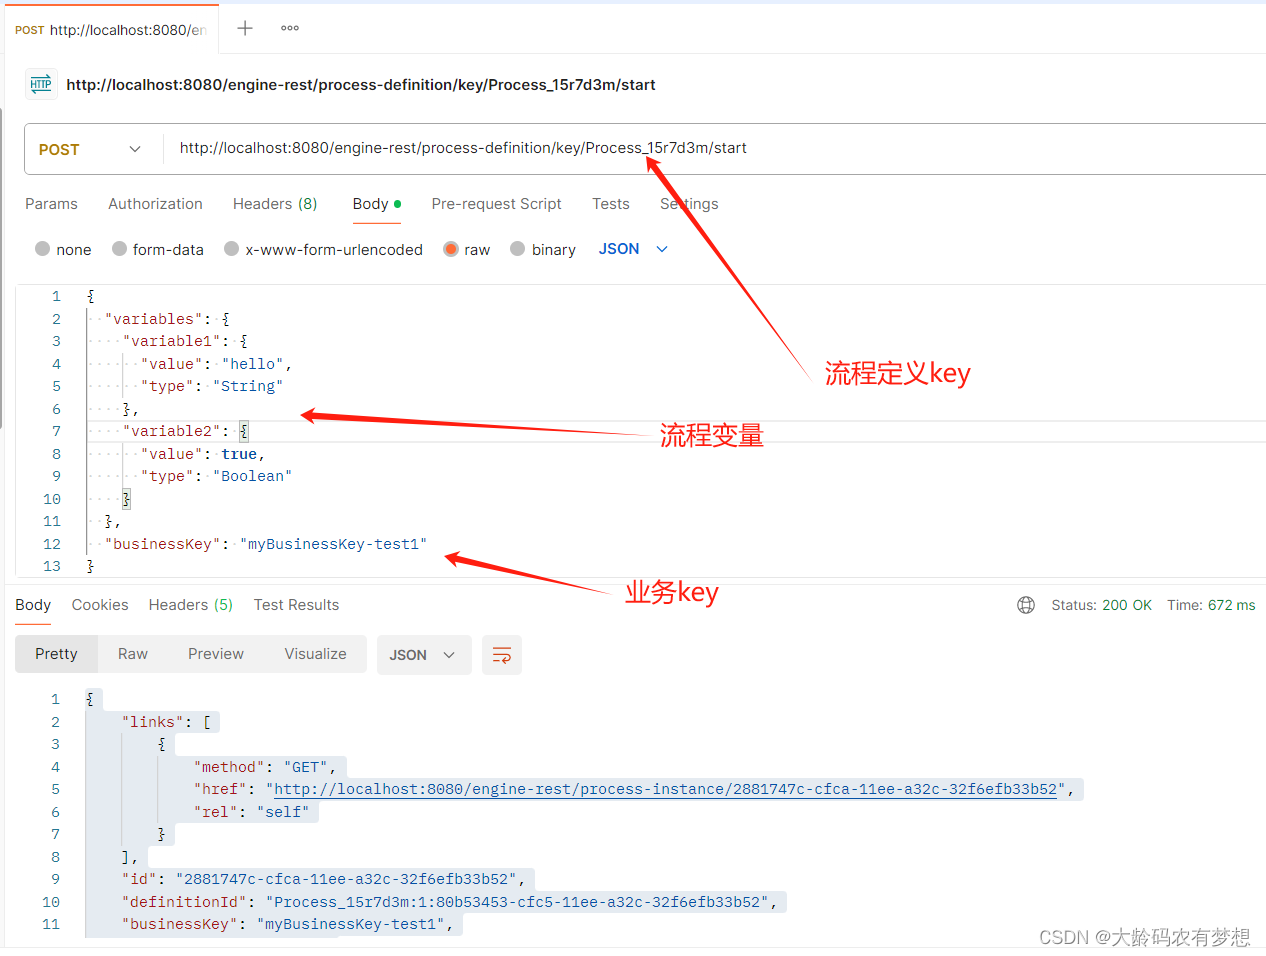
输入JSON:
{

  "variables": {

    "variable1": {

      "value": "hello",

      "type": "String"

    },

    "variable2": {

      "value": true,

      "type": "Boolean"

    }

  },

  "businessKey": "myBusinessKey-test1"

}
返回结果:
{

    "links": [

        {

            "method": "GET",

            "href": "http://localhost:8080/engine-rest/process-instance/2881747c-cfca-11ee-a32c-32f6efb33b52",

            "rel": "self"

        }

    ],

    "id": "2881747c-cfca-11ee-a32c-32f6efb33b52",

    "definitionId": "Process_15r7d3m:1:80b53453-cfc5-11ee-a32c-32f6efb33b52",

    "businessKey": "myBusinessKey-test1",

    "caseInstanceId": null,

    "ended": false,

    "suspended": false,

    "tenantId": null

}
3.2.3、查询待办任务
通过上面接口得知,流程当前流转到了人工节点上,那么需要查询待办任务:
查询待办任务的rest接口:http://{host}:{port}/{contextPath}/task
用Postman测试:http://localhost:8080/engine-rest/task
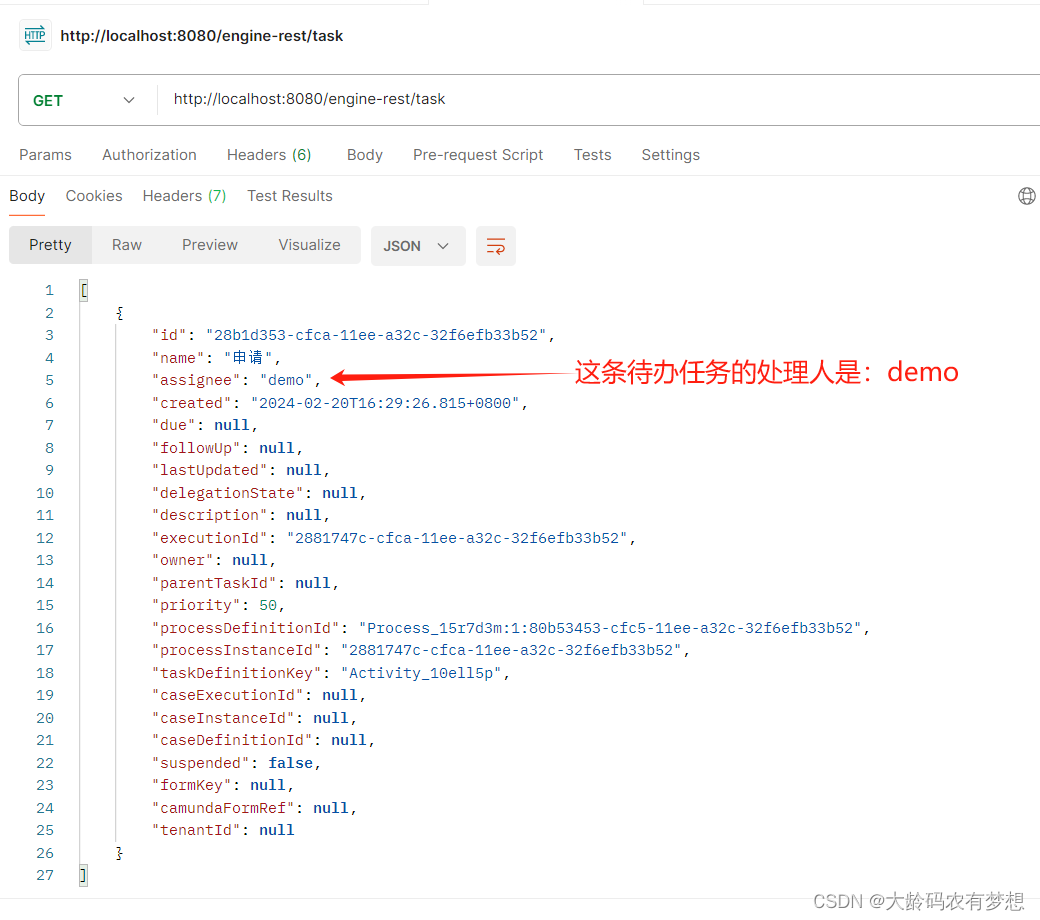
返回所有的流程待办任务列表:
[
{
"id": "28b1d353-cfca-11ee-a32c-32f6efb33b52",
"name": "申请",
"assignee": "demo",
"created": "2024-02-20T16:29:26.815+0800",
"due": null,
"followUp": null,
"lastUpdated": null,
"delegationState": null,
"description": null,
"executionId": "2881747c-cfca-11ee-a32c-32f6efb33b52",
"owner": null,
"parentTaskId": null,
"priority": 50,
"processDefinitionId": "Process_15r7d3m:1:80b53453-cfc5-11ee-a32c-32f6efb33b52",
"processInstanceId": "2881747c-cfca-11ee-a32c-32f6efb33b52",
"taskDefinitionKey": "Activity_10ell5p",
"caseExecutionId": null,
"caseInstanceId": null,
"caseDefinitionId": null,
"suspended": false,
"formKey": null,
"camundaFormRef": null,
"tenantId": null
}
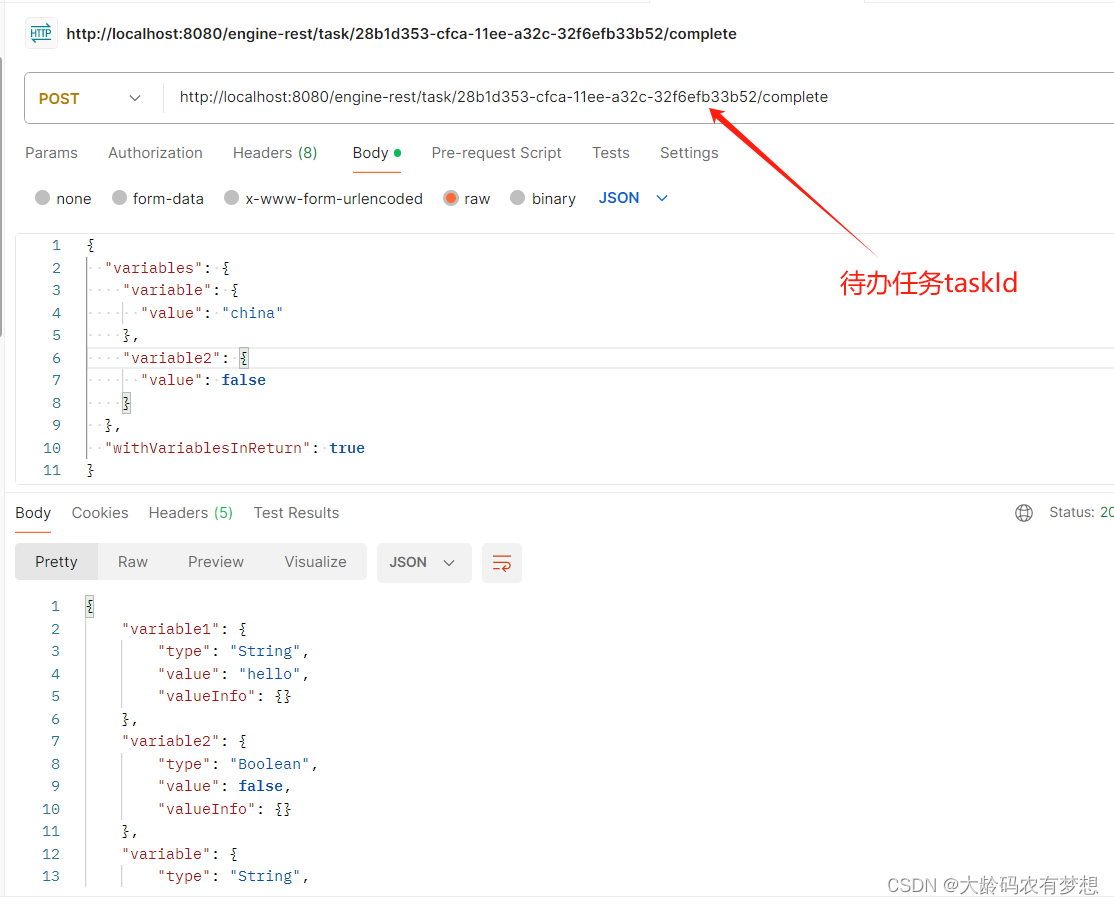
]3.2.4、完成待办提交流程
完成待办任务,提交流程往下走,提交流程的rest服务接口为:
http://{host}:{port}/{contextPath}/task/{id}/complete
用Postman测试:http://localhost:8080/engine-rest/task/28b1d353-cfca-11ee-a32c-32f6efb33b52/complete
参数:
{

  "variables": {

    "variable": {

      "value": "china"

    },

    "variable2": {

      "value": false

    }

  },

  "withVariablesInReturn": true

}
3.3、通过Java API接口测试
上面介绍了通过Camunda Web控制台界面和Camunda提供的rest接口两种方式,来调用流程引擎服务。以下介绍第三种方式,即Java编码方式,直接调用Camunda提供的Service接口。
我们自己开发一个RestController服务类,类里注入RuntimeService和TaskService的SpringBean,然后调用这两个类的API接口,实现发起流程和查询待办的逻辑。
import org.camunda.bpm.engine.RuntimeService;
import org.camunda.bpm.engine.TaskService;
import org.camunda.bpm.engine.impl.persistence.entity.TaskEntity;
import org.camunda.bpm.engine.runtime.ProcessInstance;
import org.camunda.bpm.engine.task.Task;
import org.springframework.web.bind.annotation.*;

import javax.annotation.Resource;
import java.util.List;

@RestController
@RequestMapping
public class TestController {
    @Resource
    private RuntimeService runtimeService;
    @Resource
    private TaskService taskService;
    /**
     * 通过流程定义key,发起一个流程实例
     * @param processKey 流程定义key
     * @return 流程实例ID
     */
    @GetMapping(value = "/startProcessInstanceByKey/{processKey}")
    public String startProcessInstanceByKey(@PathVariable("processKey") String processKey) {
        ProcessInstance instance = runtimeService.startProcessInstanceByKey(processKey);
        return instance.getRootProcessInstanceId();
    }

    /**
     * 查询某个用户的待办任务
     * @param assignee 用户ID
     * @return 待办任务列表
     */
    @GetMapping(value = "/getTaskByAssignee/{assignee}")
    public String getTaskByAssignee(@PathVariable("assignee") String assignee) {
        List<TaskEntity> taskList = (List)taskService.createTaskQuery().taskAssignee(assignee).list();
       StringBuffer sb = new StringBuffer();
        for (Task task : taskList) {
            String taskTitle = "待办任务ID="+task.getId()+",流程实例ID="+task.getProcessInstanceId()+"\n";
            System.out.println(taskTitle);
            sb.append(taskTitle);
        }
        return sb.toString();
    }
}重启启动Springboot程序,调用刚刚开发的流程接口进行测试。
发起一个流程实例:http://localhost:8080/startProcessInstanceByKey/Process_15r7d3m

执行成功,返回了流程实例ID,接着查询用户demo的待办任务:
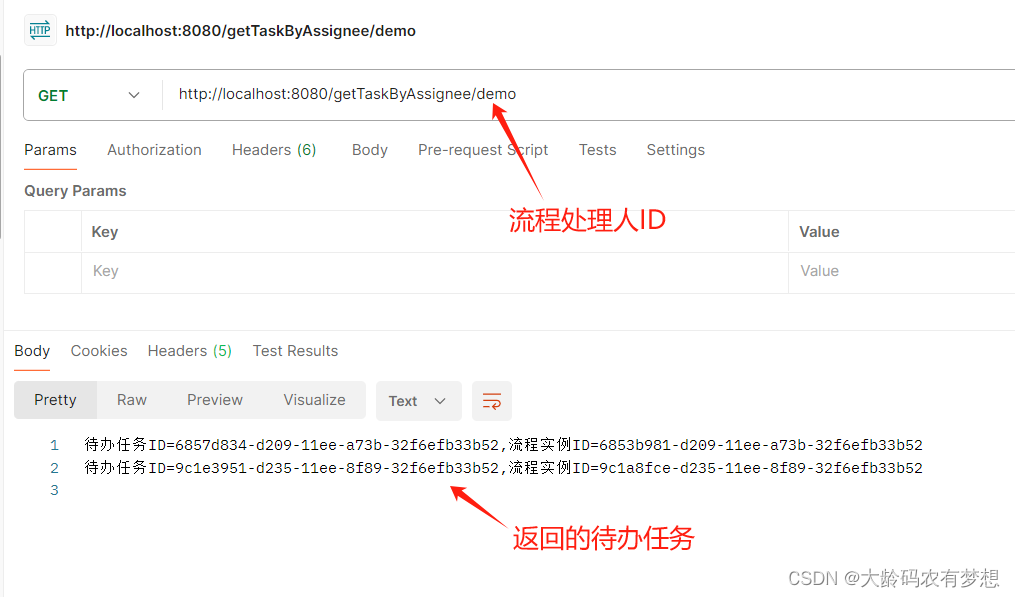
可以看到也返回了demo用户的待办任务数据,说明通过直接调用camunda的API接口RuntimeService和TaskService也是成功的。
camunda更多的API接口介绍:https://lowcode.blog.csdn.net/article/details/130048156
至此,基于springboot集成camunda7.19开源工作流引擎完成。
关于camunda开源流程引擎数据库表结构详细介绍,请查看:https://lowcode.blog.csdn.net/article/details/109048818
关于camunda流程引擎功能体验:请查看:http://www.yunchengxc.com