配置WLAN AC和AP之间VPN穿越示例
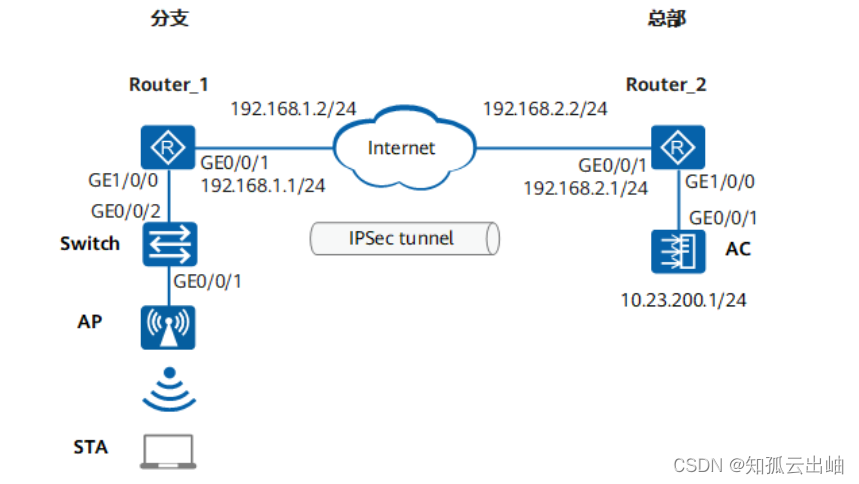
组网图形
数据规划
| 配置项 | 数据 |
|---|---|
| AC上WLAN无线业务数据规划 | |
| AP管理VLAN | VLAN200 |
| STA业务VLAN | VLAN101 |
| DHCP服务器 | Router_1作为AP和STA的DHCP服务器 |
| AP地址池 | 10.23.100.2~10.23.100.254/24 |
| STA地址池 | 10.23.101.2~10.23.101.254/24 |
| AC源地址 | VLANIF200:10.23.200.1/24 |
| AP组 |
|
| 域管理模板 |
|
| SSID模板 |
|
| 安全模板 |
|
| VAP模板 |
|
| Router_2上IPSec数据规划 | |
| IKE参数 |
|
| IPSec参数 |
|
| IPSec策略 |
IPSec连接名称:map1
|
配置注意事项
-
建议在与AP直连的设备接口上配置端口隔离,如果不配置端口隔离,尤其是业务数据转发方式采用直接转发时,可能会在VLAN内形成大量不必要的广播报文,导致网络阻塞,影响用户体验。
-
隧道转发模式下,管理VLAN和业务VLAN不能配置为同一VLAN,且AP和AC之间只能放通管理VLAN,不能放通业务VLAN。
- V200R021C00版本开始,配置CAPWAP源接口或源地址时,会检查和安全相关的配置是否已存在,包括DTLS加密的PSK、AC间DTLS加密的PSK、登录AP的用户名和密码、全局离线管理VAP的登录密码,均已存在才能成功配置,否则会提示用户先完成相关的配置。
- V200R021C00版本开始,AC默认开启CAPWAP控制隧道的DTLS加密功能。开启该功能,添加AP时AP会上线失败,此时需要先开启CAPWAP DTLS不认证方式(capwap dtls no-auth enable)让AP上线,以便AP获取安全凭证,AP上线后应及时关闭该功能(undo capwap dtls no-auth enable),避免未授权AP上线。
操作步骤
- 配置周边设备
# 配置Switch的GE0/0/1、GE0/0/2加入VLAN100、VLAN101,GE0/0/1的缺省VLAN为VLAN100。
<span style="color:#333333"><span style="background-color:#ffffff"><span style="background-color:#dddddd"><HUAWEI> <strong id="ZH-CN_TASK_0176912374__b214275661190921">system-view</strong>
[HUAWEI] <strong id="ZH-CN_TASK_0176912374__b1865000890190921">sysname Switch</strong>
[Switch] <strong id="ZH-CN_TASK_0176912374__b821356064190921">vlan batch 100 101</strong>
[Switch] <strong id="ZH-CN_TASK_0176912374__b806518261190921">interface gigabitethernet 0/0/1</strong>
[Switch-GigabitEthernet0/0/1] <strong id="ZH-CN_TASK_0176912374__b985873023190921">port link-type trunk</strong>
[Switch-GigabitEthernet0/0/1] <strong id="ZH-CN_TASK_0176912374__b402237438190921">port trunk pvid vlan 100</strong>
[Switch-GigabitEthernet0/0/1] <strong id="ZH-CN_TASK_0176912374__b2016261018190921">port trunk allow-pass vlan 100 101</strong>
[Switch-GigabitEthernet0/0/1] <strong id="ZH-CN_TASK_0176912374__b290287582190921">port-isolate enable</strong>
[Switch-GigabitEthernet0/0/1] <strong id="ZH-CN_TASK_0176912374__b1989272359190921">quit</strong>
[Switch] <strong id="ZH-CN_TASK_0176912374__b1623215900190921">interface gigabitethernet 0/0/2</strong>
[Switch-GigabitEthernet0/0/2] <strong id="ZH-CN_TASK_0176912374__b239660969190921">port link-type trunk</strong>
[Switch-GigabitEthernet0/0/2] <strong id="ZH-CN_TASK_0176912374__b1500702096190921">port trunk allow-pass vlan 100 101</strong>
[Switch-GigabitEthernet0/0/2] <strong id="ZH-CN_TASK_0176912374__b1646779978190921">quit</strong></span></span></span>
# 配置Router_1的GE1/0/0加入VLAN100和VLAN101,假设接口GE0/0/1对端的Internet IP地址为192.168.1.2/24,在接口GE0/0/1上配置IP地址192.168.1.1/24。<span style="color:#333333"><span style="background-color:#ffffff"><span style="background-color:#dddddd"><Huawei> <strong id="ZH-CN_TASK_0176912374__b1318968140190921">system-view</strong> [Huawei] <strong id="ZH-CN_TASK_0176912374__b836839358190921">sysname Router_1</strong> [Router_1] <strong id="ZH-CN_TASK_0176912374__b1561381150190921">vlan batch 100 101</strong> [Router_1] <strong id="ZH-CN_TASK_0176912374__b1964950768190921">interface gigabitethernet 1/0/0</strong> [Router_1-GigabitEthernet1/0/0] <strong id="ZH-CN_TASK_0176912374__b326456138190921">port link-type trunk</strong> [Router_1-GigabitEthernet1/0/0] <strong id="ZH-CN_TASK_0176912374__b721632309190921">port trunk allow-pass vlan 100 101</strong> [Router_1-GigabitEthernet1/0/0] <strong id="ZH-CN_TASK_0176912374__b747948746190921">quit</strong> [Router_1] <strong id="ZH-CN_TASK_0176912374__b443887167190921">interface gigabitethernet 0/0/1</strong> [Router_1-GigabitEthernet0/0/1] <strong id="ZH-CN_TASK_0176912374__b1802330456190921">ip address 192.168.1.1 255.255.255.0</strong> [Router_1-GigabitEthernet0/0/1] <strong id="ZH-CN_TASK_0176912374__b1949488140190921">quit</strong></span></span></span># 配置Router_1上的缺省路由,下一跳地址为192.168.1.2。<span style="color:#333333"><span style="background-color:#ffffff"><span style="background-color:#dddddd">[Router_1] <strong id="ZH-CN_TASK_0176912374__b775225273190921">ip route-static 0.0.0.0 0.0.0.0 192.168.1.2</strong></span></span></span># 配置Router_2的GE1/0/0加入VLAN200,并创建VLANIF200接口地址为10.23.200.2/24,假设接口GE0/0/1对端的Internet IP地址为192.168.2.2/24,在接口GE0/0/1上配置IP地址192.168.2.1/24。<span style="color:#333333"><span style="background-color:#ffffff"><span style="background-color:#dddddd"><Huawei> <strong id="ZH-CN_TASK_0176912374__b916736472190921">system-view</strong> [Huawei] <strong id="ZH-CN_TASK_0176912374__b630282277190921">sysname Router_2</strong> [Router_2] <strong id="ZH-CN_TASK_0176912374__b2118286847190921">vlan batch 200</strong> [Router_2] <strong id="ZH-CN_TASK_0176912374__b1135881526190921">interface gigabitethernet 1/0/0</strong> [Router_2-GigabitEthernet1/0/0] <strong id="ZH-CN_TASK_0176912374__b920445876190921">port link-type trunk</strong> [Router_2-GigabitEthernet1/0/0] <strong id="ZH-CN_TASK_0176912374__b1499093054190921">port trunk allow-pass vlan 200</strong> [Router_2-GigabitEthernet1/0/0] <strong id="ZH-CN_TASK_0176912374__b146042512190921">quit</strong> [Router_2] <strong id="ZH-CN_TASK_0176912374__b717113523190921">interface gigabitethernet 0/0/1</strong> [Router_2-GigabitEthernet0/0/1] <strong id="ZH-CN_TASK_0176912374__b1281683461190921">ip address 192.168.2.1 255.255.255.0</strong> [Router_2-GigabitEthernet0/0/1] <strong id="ZH-CN_TASK_0176912374__b1075782585190921">quit</strong> [Router_2] <strong id="ZH-CN_TASK_0176912374__b1612181943190921">interface vlanif 200</strong> [Router_2-Vlanif200] <strong id="ZH-CN_TASK_0176912374__b1025487207190921">ip address 10.23.200.2 24</strong> [Router_2-Vlanif200] <strong id="ZH-CN_TASK_0176912374__b970919734190921">quit</strong></span></span></span># 配置Router_2到AP侧的静态路由,下一跳地址为192.168.2.2。<span style="color:#333333"><span style="background-color:#ffffff"><span style="background-color:#dddddd">[Router_2] <strong id="ZH-CN_TASK_0176912374__b2032648930190921">ip route-static 10.23.100.0 255.255.255.0 192.168.2.2</strong> [Router_2] <strong id="ZH-CN_TASK_0176912374__b1421719087190921">ip route-static192.168.1.0 255.255.255.0 192.168.2.2 </strong></span></span></span> - 配置AC与其它网络设备互通
# 配置AC的接口GE0/0/1加入VLAN200,创建接口VLANIF200并配置IP地址10.23.200.1/24。
<span style="color:#333333"><span style="background-color:#ffffff"><span style="background-color:#dddddd"><AC> <strong>system-view</strong>
[AC] <strong>sysname AC</strong>
[AC] <strong>vlan batch 101 200</strong>
[AC] <strong>interface gigabitethernet 0/0/1</strong>
[AC-GigabitEthernet0/0/1] <strong>port link-type trunk</strong>
[AC-GigabitEthernet0/0/1] <strong>port trunk allow-pass vlan 200</strong>
[AC-GigabitEthernet0/0/1] <strong>quit</strong>
[AC] <strong>interface vlanif 200</strong>
[AC-Vlanif200] <strong>ip address 10.23.200.1 24</strong>
[AC-Vlanif200] <strong>quit</strong></span></span></span>
# 配置AC到AP侧的静态路由,下一跳地址为10.23.200.2。<span style="color:#333333"><span style="background-color:#ffffff"><span style="background-color:#dddddd">[AC] <strong>ip route-static 10.23.100.0 255.255.255.0 10.23.200.2</strong></span></span></span> - 配置DHCP服务器为STA和AP分配IP地址
# 在Router_1上配置DHCP服务器,为AP和STA分配IP地址。
<span style="color:#333333"><span style="background-color:#ffffff"><span style="background-color:#dddddd">[Router_1] <strong id="ZH-CN_TASK_0176912374__b278967097190921">dhcp enable</strong> [Router_1] <strong id="ZH-CN_TASK_0176912374__b452041200190921">interface vlanif 100</strong> [Router_1-Vlanif100] <strong id="ZH-CN_TASK_0176912374__b1227135408190921">ip address 10.23.100.1 255.255.255.0</strong> [Router_1-Vlanif100] <strong id="ZH-CN_TASK_0176912374__b727510669190921">dhcp select global</strong> [Router_1-Vlanif100] <strong id="ZH-CN_TASK_0176912374__b966516186190921">quit</strong> [Router_1] <strong id="ZH-CN_TASK_0176912374__b277550800190921">ip pool ap</strong> [Router_1-ip-pool-ap] <strong id="ZH-CN_TASK_0176912374__b1416242333190921">gateway-list 10.23.100.1</strong> [Router_1-ip-pool-ap] <strong id="ZH-CN_TASK_0176912374__b714490441190921">network 10.23.100.0 mask 24</strong> [Router_1-ip-pool-ap] <strong id="ZH-CN_TASK_0176912374__b1883507180190921">option 43 sub-option 3 ascii 10.23.200.1</strong> [Router_1-ip-pool-ap] <strong id="ZH-CN_TASK_0176912374__b1289689437190921">quit</strong> [Router_1] <strong id="ZH-CN_TASK_0176912374__b1236770207190921">interface vlanif 101</strong> [Router_1-Vlanif101] <strong id="ZH-CN_TASK_0176912374__b1592258061190921">ip address 10.23.101.1 255.255.255.0</strong> [Router_1-Vlanif101] <strong id="ZH-CN_TASK_0176912374__b428517198190921">dhcp select interface</strong> [Router_1-Vlanif101] <strong id="ZH-CN_TASK_0176912374__b989781329190921">quit</strong></span></span></span>DNS服务器地址请根据实际需要配置。常用配置方法如下:- 接口地址池场景,需要在VLANIF接口视图下执行命令dhcp server dns-list ip-address &<1-8>。
- 全局地址池场景,需要在IP地址池视图下执行命令dns-list ip-address &<1-8>。
- 配置ACL,定义需要IPSec隧道保护的数据流
# 在Router_2上配置ACL,定义由总部AC(10.23.200.0/24)去分支AP(10.23.100.0/24)的数据流。
<span style="color:#333333"><span style="background-color:#ffffff"><span style="background-color:#dddddd">[Router_2] <strong id="ZH-CN_TASK_0176912374__b397033507190921">acl number 3101</strong>
[Router_2-acl-adv-3101] <strong id="ZH-CN_TASK_0176912374__b2102298401190921">rule permit ip source 10.23.200.0 0.0.0.255 destination 10.23.100.0 0.0.0.255</strong>
[Router_2-acl-adv-3101] <strong id="ZH-CN_TASK_0176912374__b1369467853190921">quit</strong></span></span></span>
# 在Router_1上配置ACL,定义由分支AP(10.23.100.0/24)去总部AC(10.23.200.0/24)的数据流。<span style="color:#333333"><span style="background-color:#ffffff"><span style="background-color:#dddddd">[Router_1] <strong id="ZH-CN_TASK_0176912374__b1708015814190921">acl number 3101</strong> [Router_1-acl-adv-3101] <strong id="ZH-CN_TASK_0176912374__b969979589190921">rule permit ip source 10.23.100.0 0.0.0.255 destination 10.23.200.0 0.0.0.255</strong> [Router_1-acl-adv-3101] <strong id="ZH-CN_TASK_0176912374__b1866057864190921">quit</strong></span></span></span> - 配置IPSec
- 分别在Router_2和Router_1上创建IPSec安全提议
# 在Router_2上配置IPSec安全提议。
<span style="color:#333333"><span style="background-color:#ffffff"><span style="background-color:#dddddd">[Router_2] <strong id="ZH-CN_TASK_0176912374__b583791630190921">ipsec proposal tran1</strong>
[Router_2-ipsec-proposal-tran1] <strong id="ZH-CN_TASK_0176912374__b1462250876190921">esp authentication-algorithm sha2-256</strong>
[Router_2-ipsec-proposal-tran1] <strong id="ZH-CN_TASK_0176912374__b622661980190921">esp encryption-algorithm aes-128</strong>
[Router_2-ipsec-proposal-tran1] <strong id="ZH-CN_TASK_0176912374__b35427758190921">quit</strong></span></span></span>
# 在Router_1上配置IPSec安全提议。<span style="color:#333333"><span style="background-color:#ffffff"><span style="background-color:#dddddd">[Router_1] <strong id="ZH-CN_TASK_0176912374__b139819425190921">ipsec proposal tran1</strong> [Router_1-ipsec-proposal-tran1] <strong id="ZH-CN_TASK_0176912374__b1452234278190921">esp authentication-algorithm sha2-256</strong> [Router_1-ipsec-proposal-tran1] <strong id="ZH-CN_TASK_0176912374__b1140016291190921">esp encryption-algorithm aes-128</strong> [Router_1-ipsec-proposal-tran1] <strong id="ZH-CN_TASK_0176912374__b1865393971190921">quit</strong></span></span></span> - 分别在Router_2和Router_1上配置IKE对等体
# 在Router_2上配置IKE安全提议。
<span style="color:#333333"><span style="background-color:#ffffff"><span style="background-color:#dddddd">[Router_2] <strong id="ZH-CN_TASK_0176912374__b1606178070190921">ike proposal 5</strong>
[Router_2-ike-proposal-5] <strong id="ZH-CN_TASK_0176912374__b182421504190921">authentication-algorithm sha2-256 </strong>
[Router_2-ike-proposal-5] <strong id="ZH-CN_TASK_0176912374__b655460419190921">encryption-algorithm aes-128</strong>
[Router_2-ike-proposal-5] <strong id="ZH-CN_TASK_0176912374__b181648080190921">dh group14</strong>
[Router_2-ike-proposal-5] <strong id="ZH-CN_TASK_0176912374__b31158208190921">quit</strong></span></span></span>
# 在Router_2上配置IKE对等体,并根据默认配置,配置预共享密钥和对端ID。<span style="color:#333333"><span style="background-color:#ffffff"><span style="background-color:#dddddd">[Router_2] <strong id="ZH-CN_TASK_0176912374__b1870718951190921">ike peer spub</strong> [Router_2-ike-peer-spub] <strong id="ZH-CN_TASK_0176912374__b1517647258190921">undo version 2 </strong> [Router_2-ike-peer-spub] <strong id="ZH-CN_TASK_0176912374__b772017619190921">ike-proposal 5</strong> [Router_2-ike-peer-spub] <strong id="ZH-CN_TASK_0176912374__b1599311400190921">pre-shared-key cipher huawei@1234</strong> [Router_2-ike-peer-spub] <strong id="ZH-CN_TASK_0176912374__b1475728565190921">remote-address 192.168.1.1</strong> [Router_2-ike-peer-spub] <strong id="ZH-CN_TASK_0176912374__b1780777266190921">quit</strong></span></span></span># 在Router_1上配置IKE安全提议。<span style="color:#333333"><span style="background-color:#ffffff"><span style="background-color:#dddddd">[Router_1] <strong id="ZH-CN_TASK_0176912374__b418590325190921">ike proposal 5</strong> [Router_1-ike-proposal-5] <strong id="ZH-CN_TASK_0176912374__b836119906190921">authentication-algorithm sha2-256 </strong> [Router_1-ike-proposal-5] <strong id="ZH-CN_TASK_0176912374__b2076210588190921">encryption-algorithm aes-128</strong> [Router_1-ike-proposal-5] <strong id="ZH-CN_TASK_0176912374__b623799734190921">dh group14</strong> [Router_1-ike-proposal-5] <strong id="ZH-CN_TASK_0176912374__b2135127076190921">quit</strong></span></span></span># 在Router_1上配置IKE对等体,并根据默认配置,配置预共享密钥和对端ID。<span style="color:#333333"><span style="background-color:#ffffff"><span style="background-color:#dddddd">[Router_1] <strong id="ZH-CN_TASK_0176912374__b575600183190921">ike peer spua</strong> [Router_1-ike-peer-spub] <strong id="ZH-CN_TASK_0176912374__b1570315392190921">undo version 2</strong> [Router_1-ike-peer-spub] <strong id="ZH-CN_TASK_0176912374__b1546145067190921">ike-proposal 5</strong> [Router_1-ike-peer-spua] <strong id="ZH-CN_TASK_0176912374__b1096926564190921">pre-shared-key cipher huawei@1234</strong> [Router_1-ike-peer-spua] <strong id="ZH-CN_TASK_0176912374__b1751295969190921">remote-address 192.168.2.1</strong> [Router_1-ike-peer-spua] <strong id="ZH-CN_TASK_0176912374__b1965179299190921">quit</strong></span></span></span> - 分别在Router_2和Router_1上创建安全策略
# 在Router_2上配置IKE动态协商方式安全策略。
<span style="color:#333333"><span style="background-color:#ffffff"><span style="background-color:#dddddd">[Router_2] <strong id="ZH-CN_TASK_0176912374__b786818396190921">ipsec policy map1 10 isakmp</strong>
[Router_2-ipsec-policy-isakmp-map1-10] <strong id="ZH-CN_TASK_0176912374__b1328345859190921">ike-peer spub</strong>
[Router_2-ipsec-policy-isakmp-map1-10] <strong id="ZH-CN_TASK_0176912374__b1666733307190921">proposal tran1</strong>
[Router_2-ipsec-policy-isakmp-map1-10] <strong id="ZH-CN_TASK_0176912374__b964066032190921">security acl 3101</strong>
[Router_2-ipsec-policy-isakmp-map1-10] <strong id="ZH-CN_TASK_0176912374__b1560463008190921">quit</strong></span></span></span>
# 在Router_1上配置IKE动态协商方式安全策略。<span style="color:#333333"><span style="background-color:#ffffff"><span style="background-color:#dddddd">[Router_1] <strong id="ZH-CN_TASK_0176912374__b1131217806190921">ipsec policy use1 10 isakmp</strong> [Router_1-ipsec-policy-isakmp-use1-10] <strong id="ZH-CN_TASK_0176912374__b1665134320190921">ike-peer spua</strong> [Router_1-ipsec-policy-isakmp-use1-10] <strong id="ZH-CN_TASK_0176912374__b776546322190921">proposal tran1</strong> [Router_1-ipsec-policy-isakmp-use1-10] <strong id="ZH-CN_TASK_0176912374__b1791383655190921">security acl 3101</strong> [Router_1-ipsec-policy-isakmp-use1-10] <strong id="ZH-CN_TASK_0176912374__b1742019934190921">quit</strong></span></span></span> - 分别在Router_2和Router_1的接口上应用各自的安全策略组,使接口具有IPSec的保护功能
# 在Router_2的接口上引用安全策略组。
<span style="color:#333333"><span style="background-color:#ffffff"><span style="background-color:#dddddd">[Router_2] <strong id="ZH-CN_TASK_0176912374__b839559069190921">interface gigabitethernet 0/0/1</strong>
[Router_2-GigabitEthernet0/0/1] <strong id="ZH-CN_TASK_0176912374__b1789942937190921">ipsec policy map1</strong>
[Router_2-GigabitEthernet0/0/1] <strong id="ZH-CN_TASK_0176912374__b1337042778190921">quit</strong></span></span></span>
# 在Router_1的接口上引用安全策略组。<span style="color:#333333"><span style="background-color:#ffffff"><span style="background-color:#dddddd">[Router_1] <strong id="ZH-CN_TASK_0176912374__b758835624190921">interface gigabitethernet 0/0/1</strong> [Router_1-GigabitEthernet0/0/1] <strong id="ZH-CN_TASK_0176912374__b355599860190921">ipsec policy use1</strong> [Router_1-GigabitEthernet0/0/1] <strong id="ZH-CN_TASK_0176912374__b1691806318190921">quit</strong></span></span></span>
- 分别在Router_2和Router_1上创建IPSec安全提议
- 配置AP上线
# 创建AP组,用于将相同配置的AP都加入同一AP组中。
<span style="color:#333333"><span style="background-color:#ffffff"><span style="background-color:#dddddd">[AC] <strong id="ZH-CN_TASK_0176912374__zh-cn_task_0176912351_b1451837292190921">wlan</strong>
[AC-wlan-view] <strong id="ZH-CN_TASK_0176912374__zh-cn_task_0176912351_b1710308668190921">ap-group name ap-group1</strong>
[AC-wlan-ap-group-ap-group1] <strong id="ZH-CN_TASK_0176912374__zh-cn_task_0176912351_b294415960190921">quit</strong></span></span></span>
# 创建域管理模板,在域管理模板下配置AC的国家码并在AP组下引用域管理模板。<span style="color:#333333"><span style="background-color:#ffffff"><span style="background-color:#dddddd">[AC-wlan-view] <strong id="ZH-CN_TASK_0176912374__zh-cn_task_0176912351_b1815954045190921">regulatory-domain-profile name default</strong> [AC-wlan-regulate-domain-default] <strong id="ZH-CN_TASK_0176912374__zh-cn_task_0176912351_b1765454957190921">country-code cn</strong> [AC-wlan-regulate-domain-default] <strong id="ZH-CN_TASK_0176912374__zh-cn_task_0176912351_b464951690190921">quit</strong> [AC-wlan-view] <strong id="ZH-CN_TASK_0176912374__zh-cn_task_0176912351_b1132959133190921">ap-group name ap-group1</strong> [AC-wlan-ap-group-ap-group1] <strong id="ZH-CN_TASK_0176912374__zh-cn_task_0176912351_b4510754102210">regulatory-domain-profile default</strong> Warning: Modifying the country code will clear channel, power and antenna gain configurations of the radio and reset the AP. Continue?[Y/N]:<strong id="ZH-CN_TASK_0176912374__zh-cn_task_0176912351_zh-cn_task_0175818418_b17491131153716">y</strong> [AC-wlan-ap-group-ap-group1] <strong id="ZH-CN_TASK_0176912374__zh-cn_task_0176912351_b101836067190921">quit</strong> [AC-wlan-view] <strong id="ZH-CN_TASK_0176912374__zh-cn_task_0176912351_b465166413190921">quit</strong></span></span></span># 配置AC的源接口。<span style="color:#333333"><span style="background-color:#ffffff"><span style="background-color:#dddddd">[AC] <strong id="ZH-CN_TASK_0176912374__zh-cn_task_0176912370_b2076192014190921">capwap source interface vlanif 200</strong></span></span></span># 在AC上离线导入AP,并将AP加入AP组“ap-group1”中。假设AP的MAC地址为60de-4476-e360,并且根据AP的部署位置为AP配置名称,便于从名称上就能够了解AP的部署位置。例如MAC地址为60de-4476-e360的AP部署在1号区域,命名此AP为area_1。ap auth-mode命令缺省情况下为MAC认证,如果之前没有修改其缺省配置,可以不用执行ap auth-mode mac-auth。
举例中使用的AP为AP5030DN,具有射频0和射频1两个射频。AP5030DN的射频0为2.4GHz射频,射频1为5GHz射频。
<span style="color:#333333"><span style="background-color:#ffffff"><span style="background-color:#dddddd">[AC] <strong id="ZH-CN_TASK_0176912374__zh-cn_task_0176912351_b763711121190921">wlan</strong>
[AC-wlan-view] <strong id="ZH-CN_TASK_0176912374__zh-cn_task_0176912351_b1389711844190921">ap auth-mode mac-auth</strong>
[AC-wlan-view] <strong id="ZH-CN_TASK_0176912374__zh-cn_task_0176912351_b1382708357190921">ap-id 0 ap-mac 60de-4476-e360</strong>
[AC-wlan-ap-0] <strong id="ZH-CN_TASK_0176912374__zh-cn_task_0176912351_b1272920990190921">ap-name area_1</strong>
Warning: This operation may cause AP reset. Continue? [Y/N]:<strong id="ZH-CN_TASK_0176912374__zh-cn_task_0176912351_zh-cn_task_0175818418_b460951517190906">y</strong>
[AC-wlan-ap-0] <strong id="ZH-CN_TASK_0176912374__zh-cn_task_0176912351_b614746147190921">ap-group ap-group1</strong>
Warning: This operation may cause AP reset. If the country code changes, it will clear channel, power and antenna gain configuration s of the radio, Whether to continue? [Y/N]:<strong id="ZH-CN_TASK_0176912374__zh-cn_task_0176912351_zh-cn_task_0175818418_b1651706244190906">y</strong>
[AC-wlan-ap-0] <strong id="ZH-CN_TASK_0176912374__zh-cn_task_0176912351_b959850628190921">quit</strong></span></span></span>
# 将AP上电后,当执行命令display ap all查看到AP的“State”字段为“nor”时,表示AP正常上线。<span style="color:#333333"><span style="background-color:#ffffff"><span style="background-color:#dddddd">[AC-wlan-view] <strong id="ZH-CN_TASK_0176912374__zh-cn_task_0176912351_b482061123190921">display ap all</strong> Total AP information: nor : normal [1] Extra information: P : insufficient power supply -------------------------------------------------------------------------------------------------- ID MAC Name Group IP Type State STA Uptime ExtraInfo -------------------------------------------------------------------------------------------------- 0 60de-4476-e360 area_1 ap-group1 10.23.100.254 AP5030DN nor 0 10S - -------------------------------------------------------------------------------------------------- Total: 1</span></span></span> - 配置WLAN业务参数
# 创建名为“wlan-net”的安全模板,并配置安全策略。
举例中以配置WPA-WPA2+PSK+AES的安全策略为例,密码为“a1234567”,实际配置中请根据实际情况,配置符合实际要求的安全策略。
<span style="color:#333333"><span style="background-color:#ffffff"><span style="background-color:#dddddd">[AC-wlan-view] <strong id="ZH-CN_TASK_0176912374__zh-cn_task_0176912351_b1991067776190921">security-profile name wlan-net</strong>
[AC-wlan-sec-prof-wlan-net] <strong id="ZH-CN_TASK_0176912374__zh-cn_task_0176912351_b851752672190921">security wpa-wpa2 psk pass-phrase a1234567 aes</strong>
[AC-wlan-sec-prof-wlan-net] <strong id="ZH-CN_TASK_0176912374__zh-cn_task_0176912351_b337241812190921">quit</strong></span></span></span>
# 创建名为“wlan-net”的SSID模板,并配置SSID名称为“wlan-net”。<span style="color:#333333"><span style="background-color:#ffffff"><span style="background-color:#dddddd">[AC-wlan-view] <strong id="ZH-CN_TASK_0176912374__zh-cn_task_0176912351_b69022931190921">ssid-profile name wlan-net</strong> [AC-wlan-ssid-prof-wlan-net] <strong id="ZH-CN_TASK_0176912374__zh-cn_task_0176912351_b36723145190921">ssid wlan-net</strong> [AC-wlan-ssid-prof-wlan-net] <strong id="ZH-CN_TASK_0176912374__zh-cn_task_0176912351_b1738903244190921">quit</strong></span></span></span># 创建名为“wlan-net”的VAP模板,配置业务数据转发模式、业务VLAN,并且引用安全模板和SSID模板。<span style="color:#333333"><span style="background-color:#ffffff"><span style="background-color:#dddddd">[AC-wlan-view] <strong>vap-profile name wlan-net</strong> [AC-wlan-net-prof-wlan-net] <strong><strong>forward-mode direct-forward</strong></strong> [AC-wlan-net-prof-wlan-net] <strong><strong>service-vlan vlan-id 101</strong></strong> [AC-wlan-net-prof-wlan-net] <strong>security-profile wlan-net</strong> [AC-wlan-net-prof-wlan-net] <strong>ssid-profile wlan-net</strong> [AC-wlan-net-prof-wlan-net] <strong>quit</strong></span></span></span># 配置AP组引用VAP模板,AP上射频0和射频1都使用VAP模板“wlan-net”的配置。<span style="color:#333333"><span style="background-color:#ffffff"><span style="background-color:#dddddd">[AC-wlan-view] <strong id="ZH-CN_TASK_0176912374__zh-cn_task_0176912351_b2051092768190921">ap-group name ap-group1</strong> [AC-wlan-ap-group-ap-group1] <strong id="ZH-CN_TASK_0176912374__zh-cn_task_0176912351_b1753511747190921">vap-profile wlan-net wlan 1 radio 0</strong> [AC-wlan-ap-group-ap-group1] <strong id="ZH-CN_TASK_0176912374__zh-cn_task_0176912351_b1212706755190921">vap-profile wlan-net wlan 1 radio 1</strong> [AC-wlan-ap-group-ap-group1] <strong id="ZH-CN_TASK_0176912374__zh-cn_task_0176912351_b729861449190921">quit</strong></span></span></span> - 配置AP射频的信道和功率
射频的信道和功率自动调优功能默认开启,如果不关闭此功能则会导致手动配置不生效。举例中AP射频的信道和功率仅为示例,实际配置中请根据AP的国家码和网规结果进行配置。
# 关闭AP射频0的信道和功率自动调优功能,并配置AP射频0的信道和功率。<span style="color:#333333"><span style="background-color:#ffffff"><span style="background-color:#dddddd">[AC-wlan-view] <strong id="ZH-CN_TASK_0176912374__zh-cn_task_0176912356_b1423607009190921">ap-id 0</strong> [AC-wlan-ap-0] <strong id="ZH-CN_TASK_0176912374__zh-cn_task_0176912356_b1534489953190921">radio 0</strong> [AC-wlan-radio-0/0] <strong id="ZH-CN_TASK_0176912374__zh-cn_task_0176912356_b733594144190921">calibrate auto-channel-select disable</strong> [AC-wlan-radio-0/0] <strong id="ZH-CN_TASK_0176912374__zh-cn_task_0176912356_b1154293079190921">calibrate auto-txpower-select disable</strong> [AC-wlan-radio-0/0] <strong id="ZH-CN_TASK_0176912374__zh-cn_task_0176912356_b1858200296190921">channel 20mhz 6</strong> Warning: This action may cause service interruption. Continue?[Y/N]<strong id="ZH-CN_TASK_0176912374__zh-cn_task_0176912356_zh-cn_task_0175818418_b1384307436190906">y</strong> [AC-wlan-radio-0/0] <strong id="ZH-CN_TASK_0176912374__zh-cn_task_0176912356_b554899294190921">eirp 127</strong> [AC-wlan-radio-0/0] <strong id="ZH-CN_TASK_0176912374__zh-cn_task_0176912356_b1779547689190921">quit</strong></span></span></span># 关闭AP射频1的信道和功率自动调优功能,并配置AP射频1的信道和功率。<span style="color:#333333"><span style="background-color:#ffffff"><span style="background-color:#dddddd">[AC-wlan-ap-0] <strong id="ZH-CN_TASK_0176912374__zh-cn_task_0176912356_b33229250190921">radio 1</strong> [AC-wlan-radio-0/1] <strong id="ZH-CN_TASK_0176912374__zh-cn_task_0176912356_b327597144190921">calibrate auto-channel-select disable</strong> [AC-wlan-radio-0/1] <strong id="ZH-CN_TASK_0176912374__zh-cn_task_0176912356_b1164564697190921">calibrate auto-txpower-select disable</strong> [AC-wlan-radio-0/1] <strong id="ZH-CN_TASK_0176912374__zh-cn_task_0176912356_b201103780190921">channel 20mhz 149</strong> Warning: This action may cause service interruption. Continue?[Y/N]<strong id="ZH-CN_TASK_0176912374__zh-cn_task_0176912356_zh-cn_task_0175818418_b1384307436190906_1">y</strong> [AC-wlan-radio-0/1] <strong id="ZH-CN_TASK_0176912374__zh-cn_task_0176912356_b652286665190921">eirp 127</strong> [AC-wlan-radio-0/1] <strong id="ZH-CN_TASK_0176912374__zh-cn_task_0176912356_b1440636620190921">quit</strong> [AC-wlan-ap-0] <strong id="ZH-CN_TASK_0176912374__zh-cn_task_0176912356_b904227301190921">quit</strong></span></span></span> - 检查配置结果
WLAN业务配置会自动下发给AP,配置完成后,通过执行命令display vap ssid wlan-net查看如下信息,当“Status”项显示为“ON”时,表示AP对应的射频上的VAP已创建成功。
<span style="color:#333333"><span style="background-color:#ffffff"><span style="background-color:#dddddd">[AC-wlan-view] <strong id="ZH-CN_TASK_0176912374__zh-cn_task_0176912351_b367333496190921">display vap ssid wlan-net</strong> WID : WLAN ID -------------------------------------------------------------------------------- AP ID AP name RfID WID BSSID Status Auth type STA SSID -------------------------------------------------------------------------------- 0 area_1 0 1 60DE-4476-E360 <strong id="ZH-CN_TASK_0176912374__zh-cn_task_0176912351_b1874482883190921">ON</strong> WPA/WPA2-PSK 0 wlan-net 0 area_1 1 1 60DE-4476-E370 <strong id="ZH-CN_TASK_0176912374__zh-cn_task_0176912351_b1628414885190921">ON</strong> WPA/WPA2-PSK 0 wlan-net ------------------------------------------------------------------------------- Total: 2</span></span></span>STA搜索到名为“wlan-net”的无线网络,输入密码“a1234567”并正常关联后,在AC上执行display station ssid wlan-net命令,可以查看到用户已经接入到无线网络“wlan-net”中。
<span style="color:#333333"><span style="background-color:#ffffff"><span style="background-color:#dddddd">[AC-wlan-view] <strong id="ZH-CN_TASK_0176912374__zh-cn_task_0176912351_b1120837202190921">display station ssid wlan-net</strong>
Rf/WLAN: Radio ID/WLAN ID
Rx/Tx: link receive rate/link transmit rate(Mbps)
---------------------------------------------------------------------------------
STA MAC         AP ID Ap name   Rf/WLAN  Band  Type  Rx/Tx      RSSI  VLAN  IP address
---------------------------------------------------------------------------------
e019-1dc7-1e08  0     area_1    1/1      5G    11n   46/59      -68   101   10.23.101.254
---------------------------------------------------------------------------------
Total: 1 2.4G: 0 5G: 1</span></span></span>
# 配置成功后,在AC执行ping操作仍然可以ping通AP,它们之间的数据传输将被加密,执行命令display ipsec statistics可以查看数据包的统计信息。
# 在Router_2上执行display ike sa操作,结果如下。<span style="color:#333333"><span style="background-color:#ffffff"><span style="background-color:#dddddd"><Router_2> <strong>display ike sa</strong> Conn-ID Peer VPN Flag(s) Phase --------------------------------------------------------- 16 192.168.1.1 0 RD|ST v1:2 14 192.168.1.1 0 RD|ST v1:1 Number of SA entries : 2 Number of SA entries of all cpu : 2 Flag Description: RD--READY ST--STAYALIVE RL--REPLACED FD--FADING TO--TIMEOUT HRT--HEARTBEAT LKG--LAST KNOWN GOOD SEQ NO. BCK--BACKED UP M--ACTIVE S--STANDBY A--ALONE NEG--NEGOTIATING </span></span></span>
配置文件
-
AC的配置文件
<span style="color:#333333"><span style="background-color:#ffffff"><span style="background-color:#dddddd"># sysname AC # vlan batch 101 200 # interface Vlanif200 ip address 10.23.200.1 255.255.255.0 # interface GigabitEthernet0/0/1 port link-type trunk port trunk allow-pass vlan 200 #ip route-static 10.23.100.0 255.255.255.0 10.23.200.2 # capwap source interface vlanif200 # wlan security-profile name wlan-net security wpa-wpa2 psk pass-phrase %^%#m"tz0f>~7.[`^6RWdzwCy16hJj/Mc!,}s`X*B]}A%^%# aes ssid-profile name wlan-net ssid wlan-net vap-profile name wlan-net service-vlan vlan-id 101 ssid-profile wlan-net security-profile wlan-net regulatory-domain-profile name default ap-group name ap-group1 radio 0 vap-profile wlan-net wlan 1 radio 1 vap-profile wlan-net wlan 1 ap-id 0 type-id 35 ap-mac 60de-4476-e360 ap-sn 210235554710CB000042 ap-name area_1 ap-group ap-group1 radio 0 channel 20mhz 6 eirp 127 calibrate auto-channel-select disable calibrate auto-txpower-select disable radio 1 channel 20mhz 149 eirp 127 calibrate auto-channel-select disable calibrate auto-txpower-select disable # return</span></span></span> -
Router_1的配置文件
<span style="color:#333333"><span style="background-color:#ffffff"><span style="background-color:#dddddd"># sysname Router_1 # vlan batch 100 to 101 # dhcp enable # acl number 3101 rule 5 permit ip source 10.23.100.0 0.0.0.255 destination 10.23.200.0 0.0.0.255 # ipsec proposal tran1 esp authentication-algorithm sha2-256 esp encryption-algorithm aes-128 # ike proposal 5 encryption-algorithm aes-128 dh group14 authentication-algorithm sha2-256 authentication-method pre-share integrity-algorithm hmac-sha2-256 prf hmac-sha2-256 # ike peer spua undo version 2 pre-shared-key cipher %@%@HCf#WZWU9A;yLoD#V$8G*i_/%@%@ ike-proposal 5 remote-address 192.168.2.1 # ipsec policy use1 10 isakmp security acl 3101 ike-peer spua proposal tran1 # ip pool ap gateway-list 10.23.100.1 network 10.23.100.0 mask 255.255.255.0 option 43 sub-option 3 ascii 10.23.200.1 # interface Vlanif100 ip address 10.23.100.1 255.255.255.0 dhcp select global # interface Vlanif101 ip address 10.23.101.1 255.255.255.0 dhcp select interface # interface GigabitEthernet0/0/1 ip address 192.168.1.1 255.255.255.0 ipsec policy use1 # interface GigabitEthernet1/0/0 port link-type trunk port trunk allow-pass vlan 100 to 101 # ip route-static 0.0.0.0 0.0.0.0 192.168.1.2 # return</span></span></span> -
Router_2的配置文件
<span style="color:#333333"><span style="background-color:#ffffff"><span style="background-color:#dddddd"># sysname Router_2 # vlan batch 200 # acl number 3101 rule 5 permit ip source 10.23.200.0 0.0.0.255 destination 10.23.100.0 0.0.0.255 # ipsec proposal tran1 esp authentication-algorithm sha2-256 esp encryption-algorithm aes-128 # ike proposal 5 encryption-algorithm aes-128 dh group14 authentication-algorithm sha2-256 authentication-method pre-share integrity-algorithm hmac-sha2-256 prf hmac-sha2-256 # ike peer spub v1 undo version 2 pre-shared-key cipher %@%@HCf#WZWU9A;yLoD#V$8G*i_/%@%@ ike-proposal 5 remote-address 192.168.1.1 # ipsec policy map1 10 isakmp security acl 3101 ike-peer spub proposal tran1 # interface Vlanif200 ip address 10.23.200.2 255.255.255.0 # interface GigabitEthernet0/0/1 ip address 192.168.2.1 255.255.255.0 ipsec policy map1 # interface GigabitEthernet1/0/0 port link-type trunk port trunk allow-pass vlan 200 # ip route-static 10.23.100.0 255.255.255.0 192.168.2.2 ip route-static 192.168.1.0 255.255.255.0 192.168.2.2 # return</span></span></span> -
Switch的配置文件
<span style="color:#333333"><span style="background-color:#ffffff"><span style="background-color:#dddddd">#
 sysname Switch
#
vlan batch 100 to 101
#
interface GigabitEthernet0/0/1
 port link-type trunk
 port trunk pvid vlan 100
 port trunk allow-pass vlan 100 to 101
port-isolate enable group 1
#
interface GigabitEthernet0/0/2
 port link-type trunk
 port trunk allow-pass vlan 100 to 101
#
return</span></span></span>


![[力扣 Hot100]Day33 排序链表](https://img-blog.csdnimg.cn/direct/7b58508b39b248b98d490404718911b5.png)