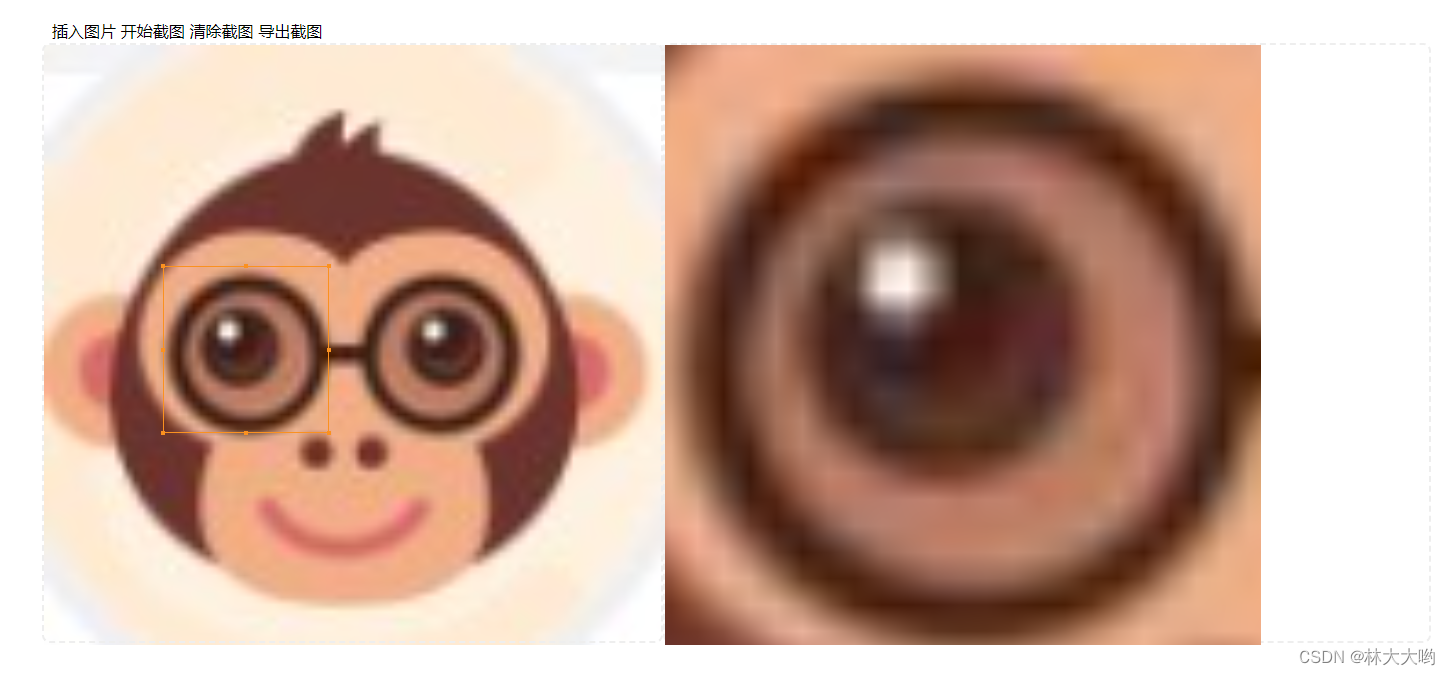
input[file]太丑了,又不想去改button样式,那就自己实现一个上传按钮的div,然后点击此按钮时,去触发file上传的事件, 以下就是 原生js实现图片前端上传 并且按照最佳宽高比例展示图片,然后可以自定义截取图片,右侧预览区域 可以看到截图,最后还可以导出图片
1、效果图:
左侧为编辑区域,右侧为预览区域
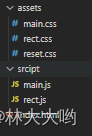
2、文件目录
3、实现源码:
1、index.html
<!DOCTYPE html>
<html lang="en">
<head>
  <meta charset="UTF-8">
  <meta name="viewport" content="width=device-width, initial-scale=1.0">
  <title>image-cut</title>
  <link rel="stylesheet" href="./assets/reset.css" />
  <link rel="stylesheet" href="./assets/main.css" />
  <link rel="stylesheet" href="./assets/rect.css" />
</head>
<!-- 图片裁剪 -->
<body>
  <div id="root">
    <div id="tool" class="tool">
      <span id="insert-img" title="插入你想要截图的图片">插入图片</span>
      <span id="start-paint" title="绘制矩形框并在右侧展示区生成canvas">开始截图</span>
      <span id="clear" title="清除矩形框并清除右侧截图">清除截图</span>
      <span id="export-clip" title="将右侧截图下载到本地">导出截图</span>
    </div>
    <div class="container">
      <div id="control" class="area">
        <div id="rect" class="rect">
          <span class="left-top dot"></span>
          <span class="middle-top dot"></span>
          <span class="right-top dot"></span>
          <span class="right-middle dot"></span>
          <span class="right-bottom dot"></span>
          <span class="middle-bottom dot"></span>
          <span class="left-bottom dot"></span>
          <span class="left-middle dot"></span>
        </div>
        <div class="img-box">
          <img />
        </div>
      </div>
      <div id="display" class="area display">
        <canvas></canvas>
      </div>
    </div>
  </div>
  <!-- 矩形框脚本 -->
  <script type="module" src="./srcipt/rect.js"></script>
  <!-- 主控制区脚本 -->
  <script type="module" src="./srcipt/main.js"></script>
</body>
</html>
2、/script/rect.js
import {
  methods
} from './main.js'

const dom = document.querySelector('#control')
const rect  = document.querySelector('#rect')
const origin = dom.getBoundingClientRect()
const parentBorder = Number(getComputedStyle(dom, null).borderWidth.split('px')[0]) // 父元素边框 如果你明确知道边框宽度,就不需要这行,直接赋值就行
const childBorder = Number(getComputedStyle(rect, null).borderWidth.split('px')[0]) // 子元素边框 如果你明确知道边框宽度,就不需要这行,直接赋值就行
let finallPoint
/**
 * 开始绘制
 */
const startMouse = () => {
  dom.style.cursor = 'crosshair'
  dom.onmousedown = e => {
    if (e.target !== dom) return
    const left = e.offsetX
    const top = e.offsetY
    rect.style.left = left + 'px'
    rect.style.top = top + 'px'
    rect.style.borderColor = getCurrentColor() // 绘制时使用选择的框的颜色
    const childs = rect.children
    for (let i = 0; i < childs.length; i++) {
      childs[i].style.borderColor = getCurrentColor() // 绘制时使用选择的框的颜色
    }
    dom.onmousemove = e => {
      // 宽高边界限制
      const widthArea = e.clientX - origin.x > dom.offsetWidth - (parentBorder * 2) ? dom.offsetWidth - (parentBorder * 2) : e.clientX - origin.x
      const heightArea = e.clientY - origin.y > dom.offsetHeight - (parentBorder * 2) ? dom.offsetHeight - (parentBorder * 2) : e.clientY - origin.y
      rect.style.width = widthArea - left + 'px'
      rect.style.height = heightArea - top + 'px'
    }
    dom.onmouseup = e => {
      generatePoint()
      dom.onmousedown = null
      dom.onmousemove = null
      dom.onmouseup = null
      dom.style.cursor = ''
      editMouse()
    }
  }
}
const editMouse = () => {
  rect.onmousedown = e => {
    if (e.target !== rect && e.target.className.indexOf('dot') === -1) return // 类名中包含被放行的dot除外
    const flag = mousedownHandle(e)
    let left = e.clientX
    let top = e.clientY
    const width = rect.offsetWidth
    const height = rect.offsetHeight
    const [dragX, dragY] = flag
    // 拖动
    if (dragX === -1 && dragY === -1) {
      left -= rect.offsetLeft // 要保持之前矩形框的坐标值
      top -= rect.offsetTop
    }
    const child = e.target.getBoundingClientRect()
    document.onmousemove = e => {
      // 取消浏览器因回流导致的默认事件及冒泡事件
      e.preventDefault()
      if (e.stopPropagation) {
        e.stopPropagation()
      } else {
        e.cancelable = true
      }
      finallPoint = {
        left: 0,
        top: 0,
        width: 0,
        height: 0
      }
      if (dragX === -1 && dragY === -1) {
        rect.style.cursor = 'move'
        const rightArea = dom.offsetWidth - rect.offsetWidth // 右边界
        const bottomArea = dom.offsetHeight - rect.offsetHeight // 下边界
        const leftArea = 0 // 左边界
        const topArea = 0 // 上边界
        finallPoint.left = e.clientX - left > rightArea ? rightArea : (e.clientX - left< leftArea ? leftArea : e.clientX - left)
        finallPoint.top = e.clientY - top > bottomArea ? bottomArea : (e.clientY - top < topArea ? topArea : e.clientY - top)
        rect.style.left = finallPoint.left + 'px'
        rect.style.top = finallPoint.top + 'px'
      } else if (dragX === 0 && dragY === 0) { // 左上角拉伸
        finallPoint.left = e.clientX > origin.x ? ((e.clientX > (left + width)) ? left + width - origin.x : e.clientX - origin.x) : 0
        finallPoint.top = e.clientY > origin.y ? ((e.clientY > (top + height)) ? top + height - origin.y : e.clientY - origin.y) : 0
        finallPoint.width = e.clientX > origin.x ? ((e.clientX > (left + width)) ? 0 : width + (left - e.clientX)) : width + (left - origin.x)
        finallPoint.height = e.clientY > origin.y ? ((e.clientY > (top + height)) ? 0 : height + (top - e.clientY)) : height + (top - origin.y)
        rect.style.left = finallPoint.left + 'px'
        rect.style.top = finallPoint.top + 'px'
        rect.style.width = finallPoint.width + 'px'
        rect.style.height = finallPoint.height + 'px'
      } else if (dragX === 1 && dragY === 0) { // 中上拉伸
        finallPoint.top = e.clientY > origin.y ? ((e.clientY > (top + height)) ? top + height - origin.y : e.clientY - origin.y) : 0
        finallPoint.height = e.clientY > origin.y ? ((e.clientY > (top + height)) ? 0 : height + (top - e.clientY)) : height + (top - origin.y)
        rect.style.top = finallPoint.top + 'px'
        rect.style.height = finallPoint.height + 'px'
      } else if (dragX === 2 && dragY === 0) { // 右上角拉伸
        finallPoint.top = e.clientY > origin.y ? ((e.clientY > (top + height)) ? top + height - origin.y : e.clientY - origin.y) : 0
        finallPoint.width = (e.clientX - left + width > dom.offsetWidth - rect.offsetLeft - (parentBorder * 2) ? dom.offsetWidth - rect.offsetLeft - (parentBorder * 2) : e.clientX - left + width)
        finallPoint.height = e.clientY > origin.y ? ((e.clientY > (top + height)) ? 0 : height + (top - e.clientY)) : height + (top - origin.y)
        rect.style.top = finallPoint.top + 'px'
        rect.style.width = finallPoint.width + 'px'
        rect.style.height = finallPoint.height + 'px'
      } else if (dragX === 2 && dragY === 1) { // 右中拉伸
        finallPoint.width = (e.clientX - left + width > dom.offsetWidth - rect.offsetLeft - (parentBorder * 2) ? dom.offsetWidth - rect.offsetLeft - (parentBorder * 2) : e.clientX - left + width)
        rect.style.width = finallPoint.width + 'px'
      }else if (dragX === 2 && dragY === 2) { // 右下角拉伸
        finallPoint.width = (e.clientX - left + width > dom.offsetWidth - rect.offsetLeft - (parentBorder * 2) ? dom.offsetWidth - rect.offsetLeft - (parentBorder * 2) : e.clientX - left + width)
        finallPoint.height = (e.clientY- top + height > dom.offsetHeight - rect.offsetTop - (parentBorder * 2) ? dom.offsetHeight - rect.offsetTop - (parentBorder * 2) : e.clientY- top + height)
        rect.style.width = finallPoint.width + 'px'
        rect.style.height = finallPoint.height + 'px'
      } else if (dragX === 1 && dragY === 2) { // 中下拉伸
        finallPoint.height = (e.clientY- top + height > dom.offsetHeight - rect.offsetTop - (parentBorder * 2) ? dom.offsetHeight - rect.offsetTop - (parentBorder * 2) : e.clientY- top + height)
        rect.style.height = finallPoint.height + 'px'
      } else if (dragX === 0 && dragY === 2) { // 左下角拉伸
        finallPoint.left = e.clientX > origin.x ? ((e.clientX > (left + width)) ? left + width - origin.x : e.clientX - origin.x) : 0
        finallPoint.width = e.clientX > origin.x ? ((e.clientX > (left + width)) ? 0 : width + (left - e.clientX)) : width + (left - origin.x)
        finallPoint.height = (e.clientY- top + height > dom.offsetHeight - rect.offsetTop - (parentBorder * 2) ? dom.offsetHeight - rect.offsetTop - (parentBorder * 2) : e.clientY- top + height)
        rect.style.left = finallPoint.left + 'px'
        rect.style.width = finallPoint.width + 'px'
        rect.style.height = finallPoint.height + 'px'
      } else if (dragX === 0 && dragY === 1) { // 左中拉伸
        finallPoint.left = e.clientX > origin.x ? ((e.clientX > (left + width)) ? left + width - origin.x : e.clientX - origin.x) : 0
        finallPoint.width = e.clientX > origin.x ? ((e.clientX > (left + width)) ? 0 : width + (left - e.clientX)) : width + (left - origin.x)
        rect.style.left = finallPoint.left + 'px'
        rect.style.width = finallPoint.width + 'px'
      }
      generatePoint()
    }
    document.onmouseup = e => {
      document.onmousemove = null
      document.onmouseup = null
      rect.style.cursor = 'move'
    }
  }
}
/**
 * mousedown逻辑处理
 */
const mousedownHandle = (e) => {
  let flag = 0 // 点击的是除边角以外的其他部分 拖动
  let startX = e.offsetX
  let startY = e.offsetY
  let width = e.target.offsetWidth
  let height = e.target.offsetHeight
  if (e.target !== rect) {
    flag = 1 // 点击的是边角 缩放
    const parent = e.target.offsetParent.getBoundingClientRect()
    const child = e.target.getBoundingClientRect()
    startX = child.x - parent.x
    startY = child.y - parent.y
    width = e.target.offsetParent.offsetWidth
    height = e.target.offsetParent.offsetHeight
  }
  const difference = 12 // 点击四边角12 px范围为拉伸,其他为拖动,这个值可以根据你需要的来调整
  let left = 0 // 0 => left, 1 => middle, 2 => right, -1 => 点击的位置不能被拖动
  let top = 0 // 0 => top, 1 => middle, 2 => bottom, -1 => 点击的位置不能被拖动
  if (startX < difference) { // 点击的位置为矩形左侧
    left = 0
  } else if (startX > width / 2 - difference && startX < width / 2 + difference) { // 点击的位置为矩形中间 width/2 - 6px ~ width/2 + 6px
    left = 1
  } else if (startX < width && startX > width - difference){ // 点击的位置为矩形右侧 width - 6px ~ width
    left = 2
  } else {
    left = -1
  }

  if (startY < difference) { // 点击的位置为矩形上侧
    top = 0
  } else if (startY > height / 2 - difference && startY < height / 2 + difference) { // 点击的位置为矩形中间 height/2 - 6px ~ height/2 + 6px
    top = 1
  } else if (startY < height && startY > height - difference){ // 点击的位置为矩形下侧 height - 6px ~ height
    top = 2
  } else {
    top = -1
  }
  if (left === -1 || top === -1 || (left === 1 && top === 1)) {
    return [-1, -1]
  }
  return [left, top] // 只会有八个位置能被准确返回,其余都是返回[-1, -1]
}

const clear = document.querySelector('#clear') // 清除截图
const startPaint = document.querySelector('#start-paint') // 开始绘制

const getCurrentColor = () => {
  return '#fa9120'
}
/** 生成最终坐标 */
const generatePoint = () => {
  const rectArgs = {
    left: parseInt(getComputedStyle(rect).left),
    top: parseInt(getComputedStyle(rect).top),
    width: parseInt(getComputedStyle(rect).width),
    height: parseInt(getComputedStyle(rect).height),
  }
  methods.generateImg(rectArgs)
}
/** 清除矩形框 */
export const clearRect = () => {
  rect.style.left = '-9999px'
  rect.style.top = 0
  rect.style.width = 0
  rect.style.height = 0
}

clear.onclick = e => {
  methods.clearCanvas()
  clearRect()
}
startPaint.onclick = e => {
  startMouse()
}
3、/script/main.js
import {
  clearRect
} from './rect.js';

// 编辑区dom
const control = document.querySelector('#control')
// 编辑区显示的图片dom
const controlImg = document.querySelector('#control img')
// 预览区dom
const display = document.querySelector('#display')
// 预览区显示的canvas dom
const canvas = document.querySelector('#display canvas')
const ctx = canvas.getContext('2d')
// 插入图片的dom
const insertImg = document.querySelector('#insert-img')
// 导出截图的dom
const exportClip = document.querySelector('#export-clip')
// 图片对象
let imgObj = null
// 最佳显示比例
let bestScale = 0
const methods = {
  /** ------ 图片上传模块 开始 ------ */
  doInput() {
    const inputObj = document.createElement('input');
    inputObj.addEventListener('change', this.readFile, false);
    inputObj.type = 'file';
    inputObj.accept = 'image/*';
    inputObj.click();
  },
  readFile() {
    const file = this.files[0]; // 获取input输入的图片
    if(!/image\/\w+/.test(file.type)){
        alert("请确保文件为图像类型");
        return false;
    } // 判断是否图片
    const reader = new FileReader();
    reader.readAsDataURL(file); // 转化成base64数据类型
    reader.onload = function(e){
      methods.drawToCanvas(this.result); // lve为当前实例
    }
  },
  drawToCanvas(imgData) {
    imgObj = new Image()
    controlImg.src = imgObj.src = imgData
    imgObj.onload = () => {
      bestScale = methods.calcBestScale(imgObj, control.offsetWidth, control.offsetHeight)
      // 图片按最佳比例展示
      controlImg.width = imgObj.width * bestScale
      controlImg.height = imgObj.height * bestScale
      // 外部盒子也按照最佳比例展示
      control.style.width = controlImg.width + 'px'
      control.style.height = controlImg.height + 'px'
    }
  },
  /** ------ 图片上传模块 结束 ------ */
  /**
   * 随机id
   */
  uuid() {
    let d = new Date().getTime();
    const uuid = 'xxxxxxxx-xxxx-4xxx-yxxx-xxxxxxxxxxxx'.replace(/[xy]/g, function(c) {
      const r = (d + Math.random() * 16) % 16 | 0;
      d = Math.floor(d / 16);
      return (c === 'x' ? r : (r & 0x3 | 0x8)).toString(16);
    });
    return uuid
  },
  /**
   * canvas转base64
   * @param {*} blob
   * @param {*} type
   * @param {*} name
   */
  blob2file(blob, type = 'png', name = '') {
    const fileName = name || this.uuid() + '.' + type
    const file = new File([blob], fileName, { type: blob.type, lastModified: Date.now() })
    return file
  },
  /**
   * 计算最佳的图片显示比例
   * @param {*} img
   * @param {*} deviceWidth
   * @param {*} deviceHeight
   * @returns
   */
  calcBestScale(img, deviceWidth, deviceHeight) {
    return Math.min(deviceWidth / img.width, deviceHeight / img.height)
  },
  /**
   * 清除canvas
   */
  clearCanvas() {
    canvas && ctx.clearRect(0, 0, display.offsetWidth, display.offsetHeight)
  },
  /**
   * 生成图片
   * @param {*} src
   */
  generateImg(rect) {
    if (!imgObj) return
    const {
      left,
      top,
      width,
      height
    } = rect
    const displayRect = {
      left: left / bestScale,
      top: top / bestScale,
      width: width / bestScale,
      height: height / bestScale
    }
    // 当截图矩形框宽度大于高度时,以预览区宽度为限制,高度按比例缩放
    if (displayRect.width >  displayRect.height) {
      canvas.width = display.offsetWidth
      canvas.height = display.offsetWidth * displayRect.height / displayRect.width
    // 当截图矩形框高度大于宽度时,以预览区高度为限制,宽度按比例缩放
    } else {
      canvas.height = display.offsetHeight
      canvas.width = display.offsetHeight * displayRect.width / displayRect.height
    }
    ctx.drawImage(imgObj, displayRect.left, displayRect.top, displayRect.width, displayRect.height, 0, 0, canvas.width, canvas.height)
  }
}
/** 点击插入图片触发逻辑 */
insertImg.addEventListener('click', () => {
  clearRect()
  methods.doInput()
})

/** 点击导出截图触发逻辑 */
exportClip.addEventListener('click', () => {
  if (canvas) {
    // 创建一个 a 标签,并设置 href 和 download 属性
    const el = document.createElement('a');
    // 设置 href 为图片经过 base64 编码后的字符串,默认为 png 格式
    el.href = canvas.toDataURL('image/png', 1.0);
    el.download = '截图.png';
    // 创建一个点击事件并对 a 标签进行触发
    const event = new MouseEvent('click');
    el.dispatchEvent(event);
  }
})

export {
  methods
}
4、/assets/rect.css
.rect{
  position: absolute;
  /* box-shadow: 0 0 0 1999px rgba(0, 0, 0, .4); */
  left: -9999px;
  top: 0;
  width: 0;
  height: 0;
  border: 1px solid #d79751;
  cursor: move;
  z-index: 1;
}
.rect > span{
  position: absolute;
  width: 4px;
  height: 4px;
  /* border-radius: 50%; */
  border: 1px solid #fa9120;
  background-color: #fa9120;
}
.rect .left-top{
  left: -3px;
  top: -3px;
  cursor: nwse-resize;
}
.rect .middle-top{
  left: 50%;
  top: -3px;
  transform: translateX(-50%);
  cursor: n-resize;
}
.rect .right-top{
  right: -3px;
  top: -3px;
  cursor: nesw-resize;
}
.rect .right-middle{
  right: -3px;
  top: 50%;
  transform: translateY(-50%);
  cursor: e-resize;
}
.rect .right-bottom{
  right: -3px;
  bottom: -3px;
  cursor: nwse-resize;
}
.rect .middle-bottom{
  left: 50%;
  bottom: -3px;
  transform: translateX(-50%);
  cursor: s-resize;
}
.rect .left-bottom{
  left: -3px;
  bottom: -3px;
  cursor: nesw-resize;
}
.rect .left-middle{
  left: -3px;
  top: 50%;
  transform: translateY(-50%);
  cursor: w-resize;
}
5、/assets/main.css
body {
  position: relative;
  width: 100vw;
  height: 100vh;
}

#root {
  width: 80%;
  height: 624px;
  position: absolute;
  left: 50%;
  top: 50%;
  transform: translate(-50%, -50%);
}

.tool {
  padding: 0 10px;
  line-height: 24px;
  height: 24px;
  width: 100%;
}

.tool span {
  cursor: pointer;
}

.tool span:hover {
  color: #fa9120;
}

.container {
  width: 100%;
  height: calc(100% - 24px);
  position: relative;
  display: flex;
}

.area {
  width: 50%;
  max-width: 50%;
  height: 100%;
  border: 2px dashed #eee;
  border-radius: 8px;
  position: relative;
}

.area .img-box {
  position: absolute;
  left: 0;
  height: 0;
  z-index: -1;
  pointer-events: none;
}

.area img {
  pointer-events: none;
}

#control canvas {
  width: 100%;
  height: 100%;
  position: absolute;
  left: 0;
  top: 0;
  z-index: -1;
}
6、/assets/reset.css(初始化样式表,这个可以你自行实现)
* {
  box-sizing: border-box;
}

body,
h1,
h2,
h3,
h4,
h5,
h6,
hr,
p,
blockquote,
dl,
dt,
dd,
ul,
ol,
li,
pre,
form,
fieldset,
legend,
button,
input,
textarea,
th,
td {
    margin: 0;
    padding: 0;
}

body,
button,
input,
select,
textarea {
    font: 12px/1.5tahoma, arial, \5b8b\4f53;
}

h1,
h2,
h3,
h4,
h5,
h6 {
    font-size: 100%;
}

address,
cite,
dfn,
em,
var {
    font-style: normal;
}

code,
kbd,
pre,
samp {
    font-family: couriernew, courier, monospace;
}

small {
    font-size: 12px;
}

ul,
ol {
    list-style: none;
}

a {
    text-decoration: none;
}

a:hover {
    text-decoration: none;
}

legend {
    color: #000;
}

fieldset,
img {
    border: 0;
}

button,
input,
select,
textarea {
    font-size: 100%;
}

table {
    border-collapse: collapse;
    border-spacing: 0;
}