文章目录
- 前言
- 操作系统简述
- 学习指令的原因
- ls 指令
- pwd 指令
- cd 指令
- touch 指令
- tree 命令
- mkdir 指令
- rmdir 和 rm 指令
- nano 指令
- clear 指令
- whoami 指令
- 常用键位
- 结语
前言
今天,我们开始 Linux 的学习。本篇博客内容为 操作系统简述、Linux 基本指令、和几个 Linux 常用键位 。
操作系统简述
操作系统概念:一款进行软硬件资源管理的软件。
为什么这么说?比如买来一台电脑,电脑的硬件是直接存在的,但是操作系统只有在开机后,才会被加载,这就说明操作系统是一个软件。
再看下图:

操作系统处于软硬件之间,起承上启下的效果。对上给应用提供接口,所以软件可以被编写出来。
而操作系统存在的意义就是:对软硬件进行合理的管理。以达到为上层用户提供良好的、稳定的、安全的运行环境的目的。
学习指令的原因
从时间上看,我们是先有键盘才有鼠标的,没有鼠标就代表着当时的操作系统并不需要鼠标来点击,即并没有图形化界面,这就意味着先有命令行才有图形化界面。
那么学习命令行指令究竟是在干什么?其实就相当于我们小学刚接触电脑时,信息课上教的打开文件,创建文件夹等基本操作。
对于 Linux操作系统,我们大多就是依靠指令来进行操作,所以学习指令是必不可少的!
接下来,我们就开始学习~
ls 指令
语法:ls [选项] [目录或文件]
功能:对于目录,该命令列出该目录下的所有子目录与文件。对于文件,将列出文件名以及其他信息。
[root@VM-4-3-centos ~]# ls
// 显示当前路径下的文件或目录名称
homework1  testdel1
ls 为命令,后面可以跟 命令选项,如-a,-d… 存在指令选项是正常的事情。
常用指令:
-a 列出目录下的所有文件,包括以 . 开头的隐含文件。
-d 将目录象文件一样显示,而不是显示其下的文件。 如:ls –d 指定目录
-i 输出文件的 i 节点的索引信息。 如 ls –ai 指定文件
-k 以 k 字节的形式表示文件的大小。ls –alk 指定文件
-l 列出文件的详细信息。
-n 用数字的 UID,GID 代替名称。 (介绍 UID, GID)
-F 在每个文件名后附上一个字符以说明该文件的类型,“*”表示可执行的普通文件;“/”表示目录;“@”表
示符号链接;“|”表示FIFOs;“=”表示套接字(sockets)。(目录类型识别)
-r 对目录反向排序。
-t 以时间排序。
-s 在l文件名后输出该文件的大小。(大小排序,如何找到目录下最大的文件)
-R 列出所有子目录下的文件。(递归)
-1 一行只输出一个文件。
常见选项:
ls -l:显示出更多的文件信息
ls -l 的 l 相当于 list,就是使用列表的形式,列出文件的更多信息。
[root@VM-4-3-centos ~]# ls -ll
total 8
drwxr-xr-x 2 root root 4096 Nov 13 22:07 homework1
drwxr-xr-x 3 root root 4096 Nov 12 20:54 testdel1
文件 = 内容 + 属性
这些文件信息就相当于文件属性,如文件名,修改时间等。
简写为ll也可以:
[root@VM-4-3-centos ~]# ll
total 8
drwxr-xr-x 2 root root 4096 Nov 13 22:07 homework1
drwxr-xr-x 3 root root 4096 Nov 12 20:54 testdel1
ls -l -a:显示出更多的隐藏文件(./…)
ls -l -a 可简写为:ls -al / ls -la
[root@VM-4-3-centos blogtest]# ls -la
total 8
drwxr-xr-x  2 root root 4096 Nov 13 23:08 .
dr-xr-x---. 7 root root 4096 Nov 13 23:08 ..
-rw-r--r--  1 root root    0 Nov 13 23:08 hello.txt
. 和 … 为隐藏文件,我们手动创建一个 隐藏目录 和 隐藏文件 试试:
// 初始状态
[root@VM-4-3-centos blogtest]# ll
total 0
-rw-r--r-- 1 root root 0 Nov 13 23:08 hello.txt
[root@VM-4-3-centos blogtest]# touch .oops.txt // 创建文件
[root@VM-4-3-centos blogtest]# mkdir .hiddendir // 创建文件夹
[root@VM-4-3-centos blogtest]# ll // 显示信息,没有隐藏文件
total 0
-rw-r--r-- 1 root root 0 Nov 13 23:08 hello.txt
[root@VM-4-3-centos blogtest]# ls -la // 显示隐藏信息,就有了
total 12
drwxr-xr-x  3 root root 4096 Nov 13 23:17 .
dr-xr-x---. 7 root root 4096 Nov 13 23:08 ..
-rw-r--r--  1 root root    0 Nov 13 23:08 hello.txt
drwxr-xr-x  2 root root 4096 Nov 13 23:17 .hiddendir
-rw-r--r--  1 root root    0 Nov 13 23:17 .oops.txt
其中 . 为当前路径,.. 为上级路径。
拓展:
stat获取文件的所有属性
[root@VM-4-3-centos ~]# stat blogtest
  File: ‘blogtest’
  Size: 4096      	Blocks: 8          IO Block: 4096   directory
Device: fd01h/64769d	Inode: 655920      Links: 3
Access: (0755/drwxr-xr-x)  Uid: (    0/    root)   Gid: (    0/    root)
Access: 2022-11-13 23:17:39.312325048 +0800
Modify: 2022-11-13 23:17:37.527325030 +0800
Change: 2022-11-13 23:17:37.527325030 +0800
 Birth: -
stat 指令列出的信息中有三个时间:Acess、、Change、Modify,它们被戏称为"acm"时间,它们的意思分别为:
-
access time:最后一次 访问 (仅访问,没有改动)文件的时间
-
change time:最后一次 文件属性改变 的时间,包括权限,大小,属性等
-
modify time:最后一次修改 文件 的时间
pwd 指令
语法: pwd
功能:显示用户当前所在路径
[root@VM-4-3-centos blogtest]# pwd
/root/blogtest
Linux 下的路径和 Windows 下有所不同:
Linux:/root/blogtest
Windows:D:\Anduin_code\data-structure\日常代码
Linux 下路径分隔符为 /,Windows 下路径分隔符为 \ 。
cd 指令
c - change d - directory
语法:cd 目录名
功能:更改路径,进入或退出某些目录。
cd 的指令的本质就是切换路径,对于 Linux 操作系统的目录结构,整体就是一个多叉树的样子:
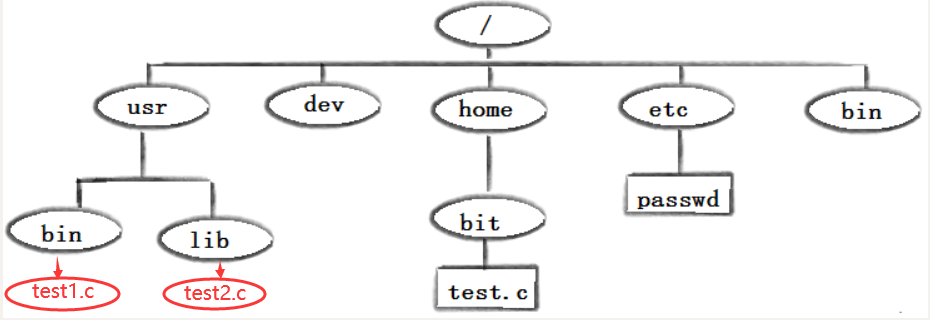
我们平常标识文件位置的最好方式就是使用 路径,因为 路径具有唯一性。
而路径又分为两种:绝对路径、相对路径
绝对路径:从根目录开始,定位文件的路径,为绝对路径。(准确但麻烦,无论在哪个目录下都有效)
相对路径:由当前文件所在的路径引起的跟其它文件(或文件夹)的路径关系。(方便,在不同目录下可能会无效)
绝对路径演示:
[root@VM-4-3-centos blogtest]# pwd
/root/blogtest
[root@VM-4-3-centos blogtest]# cd /root/blogtest/blogtt
[root@VM-4-3-centos blogtt]# pwd
/root/blogtest/blogtt
[root@VM-4-3-centos blogtt]# cd ~
[root@VM-4-3-centos ~]# pwd
/root
[root@VM-4-3-centos ~]# cd /root/blogtest/blogtt
[root@VM-4-3-centos blogtt]# pwd
/root/blogtest/blogtt
相对路径演示:
[root@VM-4-3-centos blogtest]# pwd
/root/blogtest
[root@VM-4-3-centos blogtest]# cd ../testcd
[root@VM-4-3-centos testcd]# pwd
/root/testcd
[root@VM-4-3-centos testcd]# cd ~
[root@VM-4-3-centos ~]# cd ../testcd
-bash: cd: ../testcd: No such file or directory
归纳:
绝对路径:麻烦,一般是在某些配置文件中,进行对某种文件进行配置的时候采用。
相对路径:用起来简单,后续指令操作的时候,常用的路径定位方案。
cd 的其他用法:
cd .:进入当前目录,相当于路径不变
[root@VM-4-3-centos blogtest]# pwd
/root/blogtest
[root@VM-4-3-centos blogtest]# cd .
[root@VM-4-3-centos blogtest]# pwd
/root/blogtest
cd ..:回退到上级路径
[root@VM-4-3-centos blogtest]# pwd
/root/blogtest
[root@VM-4-3-centos blogtest]# cd ..
[root@VM-4-3-centos ~]# pwd
/root
cd 最多只能回退到根目录
/(长得和路径分隔符一样,但不是)
[root@VM-4-3-centos ~]# pwd
/root
[root@VM-4-3-centos ~]# cd ..
[root@VM-4-3-centos /]# pwd
/
[root@VM-4-3-centos /]# cd ..
[root@VM-4-3-centos /]# pwd
/
cd ~:直接进入当前用户的家目录
root(超级用户):
[root@VM-4-3-centos /]# cd ~
[root@VM-4-3-centos ~]# pwd
/root
普通用户:
[lx@VM-4-3-centos ~]$ cd ~
[lx@VM-4-3-centos ~]$ pwd
/home/lx
(注:当前只需要知道 root 用户权限更大,它们是不同的用户,用户之间的区别之后我会在权限管理部分讲)
cd -:回退到上一次所处路径
[root@VM-4-3-centos blogtt]# pwd
/root/blogtest/blogtt
[root@VM-4-3-centos blogtt]# cd ~
[root@VM-4-3-centos ~]# pwd
/root
[root@VM-4-3-centos ~]# cd -
/root/blogtest/blogt
touch 指令
语法:touch [选项]… 文件…
功能:touch命令参数可更改文档或目录的日期时间,包括存取时间和更改时间,或者新建一个不存在的文件。
常用选项:
-a 或–time=atime或–time=access或–time=use只更改存取时间。
-c 或–no-create 不建立任何文档。
-d 使用指定的日期时间,而非现在的时间。
-f 此参数将忽略不予处理,仅负责解决BSD版本touch指令的兼容性问题。
-m 或–time=mtime或–time=modify 只更改变动时间。
-r 把指定文档或目录的日期时间,统统设成和参考文档或目录的日期时间相同。
-t 使用指定的日期时间,而非现在的时间。
touch :在当前路径下,创建一个普通文本文件。
[root@VM-4-3-centos blogtt]# pwd
/root/blogtest/blogtt
[root@VM-4-3-centos blogtt]# touch hello.txt
[root@VM-4-3-centos blogtt]# ll
total 0
-rw-r--r-- 1 root root 0 Nov 14 00:10 hello.txt
touch 也可以 指定路径 创建,如在 上级目录(相对路径) 创建一个文本文件:
[root@VM-4-3-centos lesson3]# pwd
/root/lesson3
[root@VM-4-3-centos lesson3]# touch ../test.c
[root@VM-4-3-centos lesson3]# cd ..
[root@VM-4-3-centos ~]# pwd
/root
[root@VM-4-3-centos ~]# ll
total 8
drwxr-xr-x 2 root root 4096 Nov 17 15:13 dir
-rw-r--r-- 1 root root    0 Nov 17 15:31 file.txt
drwxr-xr-x 2 root root 4096 Nov 17 15:27 lesson3
-rw-r--r-- 1 root root    0 Nov 17 15:32 test.c
使用 绝对路径 创建:
[root@VM-4-3-centos ~]# pwd
/root
[root@VM-4-3-centos ~]# touch /root/lesson3/abs.txt
[root@VM-4-3-centos ~]# cd lesson3
[root@VM-4-3-centos lesson3]# ll
total 0
-rw-r--r-- 1 root root 0 Nov 17 15:33 abs.txt
-rw-r--r-- 1 root root 0 Nov 17 15:22 file.txt
-rw-r--r-- 1 root root 0 Nov 17 15:18 test.c
tree 命令
tree:使当前目录往后的文件夹和文件以树状结构呈现出来
root 账户下安装 tree 命令:
yum install -y tree
Linux 目录是树状结构,这个指令很好理解:
[root@VM-4-3-centos ~]# pwd
/root
[root@VM-4-3-centos ~]# tree
.
|-- blogtest
|   |-- blogtt
|   |   |-- hello.txt
|   |   `-- test.txt
|   |-- hello.txt
|   `-- testcd
`-- testcd
    `-- file.txt

4 directories, 4 files
mkdir 指令
语法:mkdir [选项] dirname…
功能:在当前目录下创建一个名为 “dirname”的目录
常用选项:
p, --parents 可以是一个路径名称。此时若路径中的某些目录尚不存在,加上此选项后,系统将自动建立好那些尚不存在的目录,即一次可以建立多个目录
mkdir 目录名:在 当前路径 下,创建一个目录(相当于 Windows 下的文件夹)
[root@VM-4-3-centos ~]# ll
total 8
drwxr-xr-x 5 root root 4096 Nov 14 00:28 blogtest
drwxr-xr-x 2 root root 4096 Nov 14 00:30 testcd
[root@VM-4-3-centos ~]# mkdir helloguys
[root@VM-4-3-centos ~]# ll
total 12
drwxr-xr-x 5 root root 4096 Nov 14 00:28 blogtest
drwxr-xr-x 2 root root 4096 Nov 14 00:42 helloguys
drwxr-xr-x 2 root root 4096 Nov 14 00:30 testcd
mkdir -p dir1/dir2/dir3...:递归创建一段路径
dir1/dir2等为目录名,名字随意。
[root@VM-4-3-centos helloguys]# pwd
/root/helloguys
[root@VM-4-3-centos helloguys]# mkdir -p a/b/c/d/e
[root@VM-4-3-centos helloguys]# tree // tree 命令展示结果
.
`-- a
    `-- b
        `-- c
            `-- d
                `-- e

5 directories, 0 files
rmdir 和 rm 指令
rmdir:
语法:rmdir [-p] [dirName]
适用对象:具有当前目录操作权限的所有使用者
功能:删除 空目录
[root@VM-4-3-centos ~]# mkdir del // 创建 del
[root@VM-4-3-centos ~]# ll
total 16
drwxr-xr-x 5 root root 4096 Nov 14 00:28 blogtest
drwxr-xr-x 2 root root 4096 Nov 14 00:52 del
drwxr-xr-x 3 root root 4096 Nov 14 00:43 helloguys
drwxr-xr-x 2 root root 4096 Nov 14 00:30 testcd
[root@VM-4-3-centos ~]# cd del // del 目录为空
[root@VM-4-3-centos del]# ll
total 0
[root@VM-4-3-centos del]# cd ..
[root@VM-4-3-centos ~]# rmdir del // 删除del
[root@VM-4-3-centos ~]# ll
total 12
drwxr-xr-x 5 root root 4096 Nov 14 00:28 blogtest
drwxr-xr-x 3 root root 4096 Nov 14 00:43 helloguys
drwxr-xr-x 2 root root 4096 Nov 14 00:30 testcd
// 成功
注意 rmdir 只能删除空目录,反例演示:
// blogtest 非空
[root@VM-4-3-centos ~]# cd blogtest
[root@VM-4-3-centos blogtest]# ll
total 8
drwxr-xr-x 2 root root 4096 Nov 14 00:11 blogtt
-rw-r--r-- 1 root root    0 Nov 13 23:08 hello.txt
drwxr-xr-x 2 root root 4096 Nov 14 00:28 testcd
[root@VM-4-3-centos blogtest]# cd ..
[root@VM-4-3-centos ~]# rmdir blogtest
rmdir: failed to remove ‘blogtest’: Directory not empty // 无法删除
rm:
语法:rm [-f-i-r-v] [dirName/dir]
适用对象:所有使用者
功能:删除文件或目录
rm 文件名:删除文件(仅文本文件,无法删除目录)
删除文件时,会让你确定是否删除文件,确认删除为 y,不删除为 n。
[root@VM-4-3-centos blogtest]# ll
total 8
drwxr-xr-x 2 root root 4096 Nov 14 00:11 blogtt
-rw-r--r-- 1 root root    0 Nov 13 23:08 hello.txt
drwxr-xr-x 2 root root 4096 Nov 14 00:28 testcd
[root@VM-4-3-centos blogtest]# rm hello.txt
rm: remove regular empty file ‘hello.txt’? y // y - yes,确认
[root@VM-4-3-centos blogtest]# ll
total 8
drwxr-xr-x 2 root root 4096 Nov 14 00:11 blogtt
drwxr-xr-x 2 root root 4096 Nov 14 00:28 testcd
rm -r 文件名:递归删除,目录(包括 非空目录)和文件都能删除
// 非空目录 bolgtt 的删除
[root@VM-4-3-centos blogtest]# tree
.
|-- blogtt
|   |-- hello.txt
|   `-- test.txt
|-- testcd
`-- test.txt

2 directories, 3 files
[root@VM-4-3-centos blogtest]# rm -r blogtt // 以下为确认过程
rm: descend into directory ‘blogtt’? y
rm: remove regular empty file ‘blogtt/test.txt’? y
rm: remove regular empty file ‘blogtt/hello.txt’? y
rm: remove directory ‘blogtt’? y
[root@VM-4-3-centos blogtest]# tree
.
|-- testcd
`-- test.txt

1 directory, 1 file
rm -rf 文件(目录名):无视权限强制删除。
比如在 普通用户 在 root 用户的目录下创建文件,测试在权限不同的角度能否删除:
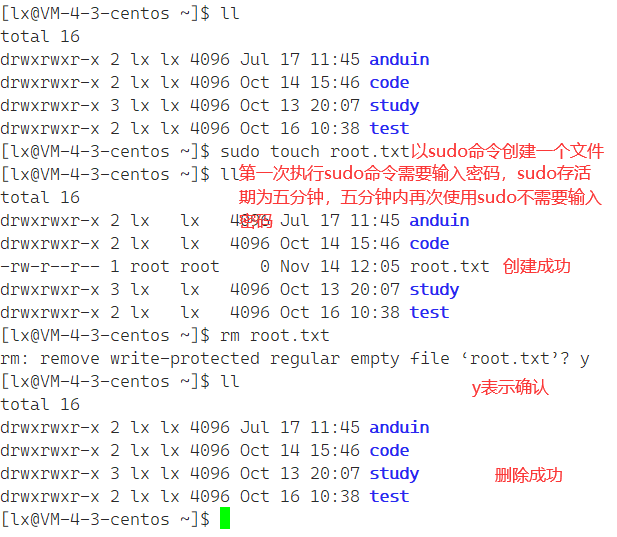
由于 root.txt 是以 sudo命令创建的,所以这个文件是被保护的,会给出提示,如果我们不想给提示,就可以用 rm -rf 进行 无视权限强制删除 。
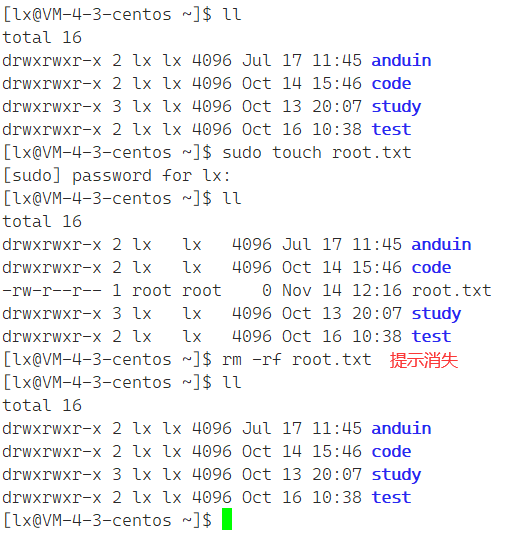
rm -rf ./*:删除当前目录下文件及其所有子文件
// 递归创建
[root@VM-4-3-centos blogtest]# mkdir -p a/b/c/d/e
[root@VM-4-3-centos blogtest]# tree
.
`-- a
    `-- b
        `-- c
            `-- d
                `-- e

5 directories, 0 files
[root@VM-4-3-centos blogtest]# rm -rf ./*
[root@VM-4-3-centos blogtest]# tree
.

0 directories, 0 files
rm -rf/:把从根目录开始的所有文件删除,也就是删库跑路,大家可以试试,很刑的~
nano 指令
在没有学习 vim 之前,可以先用 nano 在 Linux 上编写代码。
root 账户下安装 nano:
yum install -y nano
nano文件名:对文件进行编辑
ctrl + x 为退出,ctrl + x 后会提示是否保存,y(保存),n(不保存),c(取消),然后按下回车 enter 退出。
注:如果 nano 的文件不存在,会保存该文件。
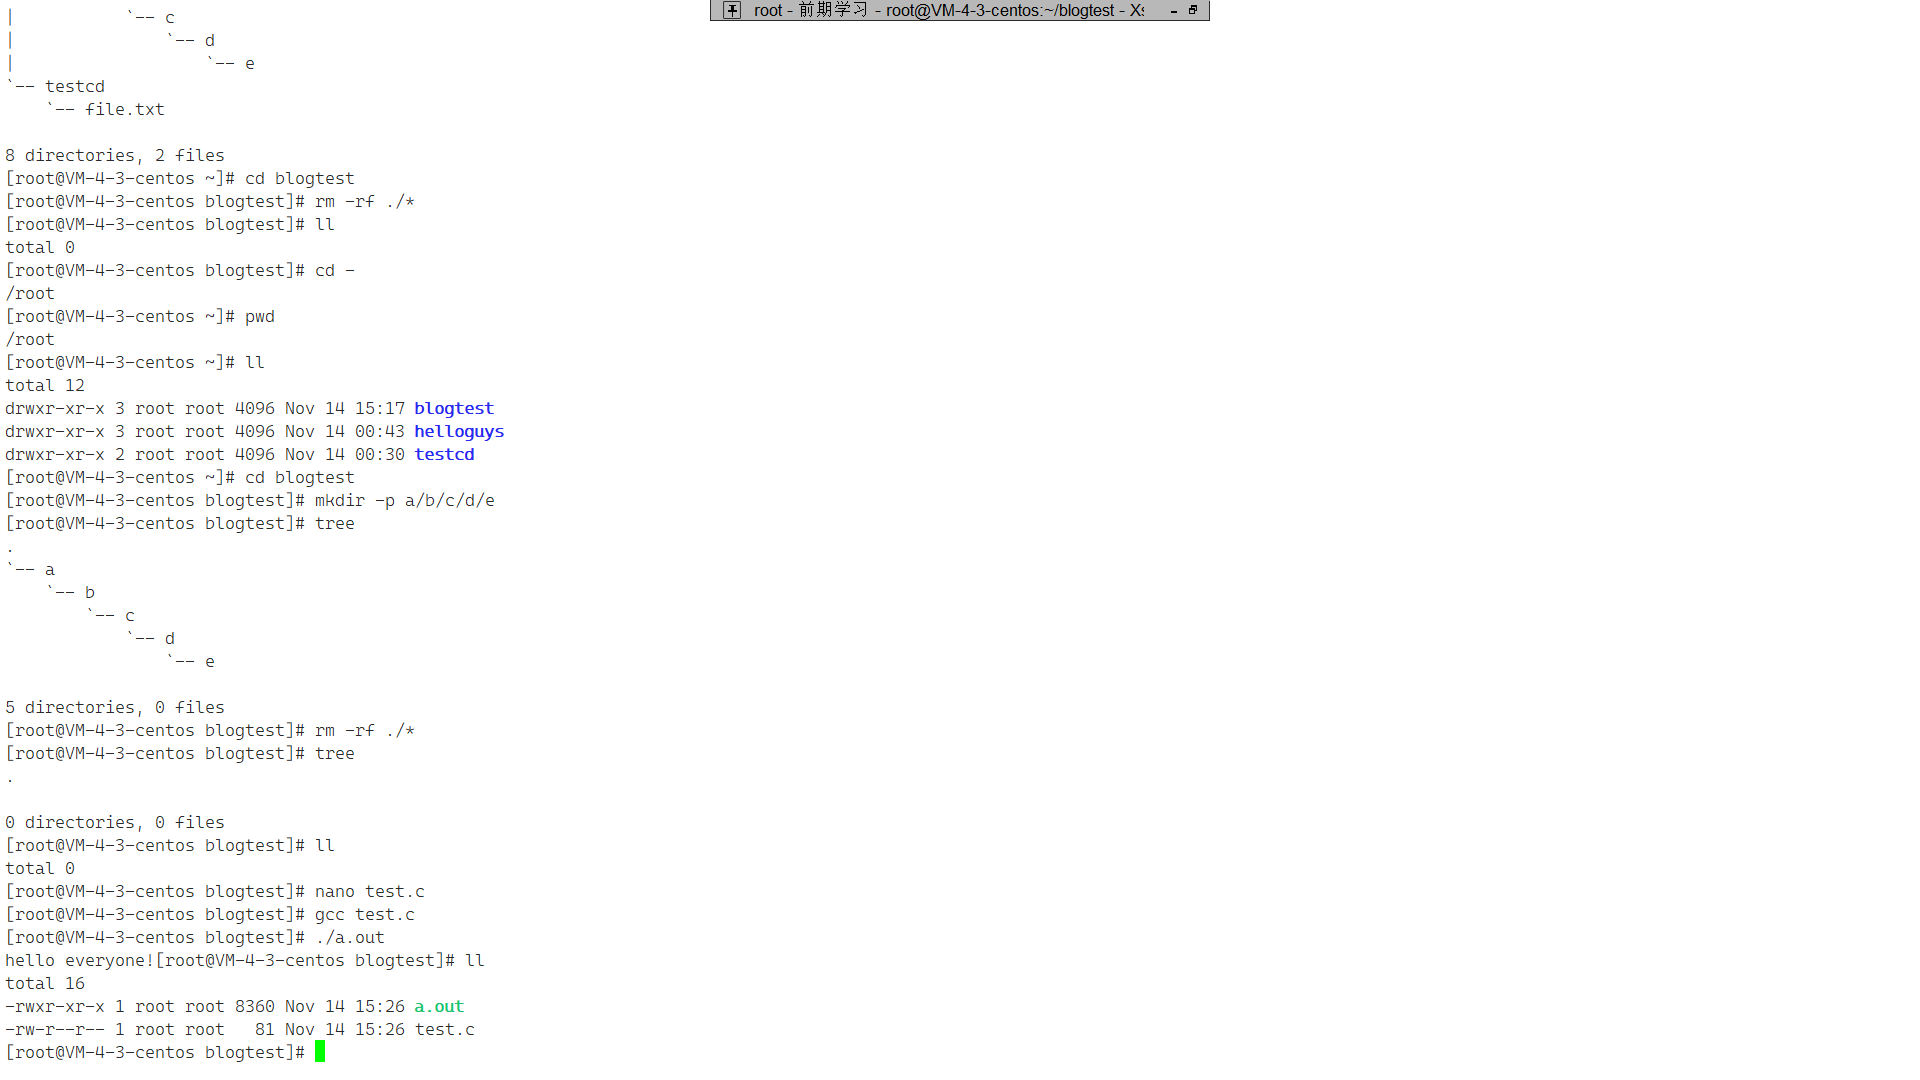
[root@VM-4-3-centos blogtest]# ll
total 0
[root@VM-4-3-centos blogtest]# nano test.c
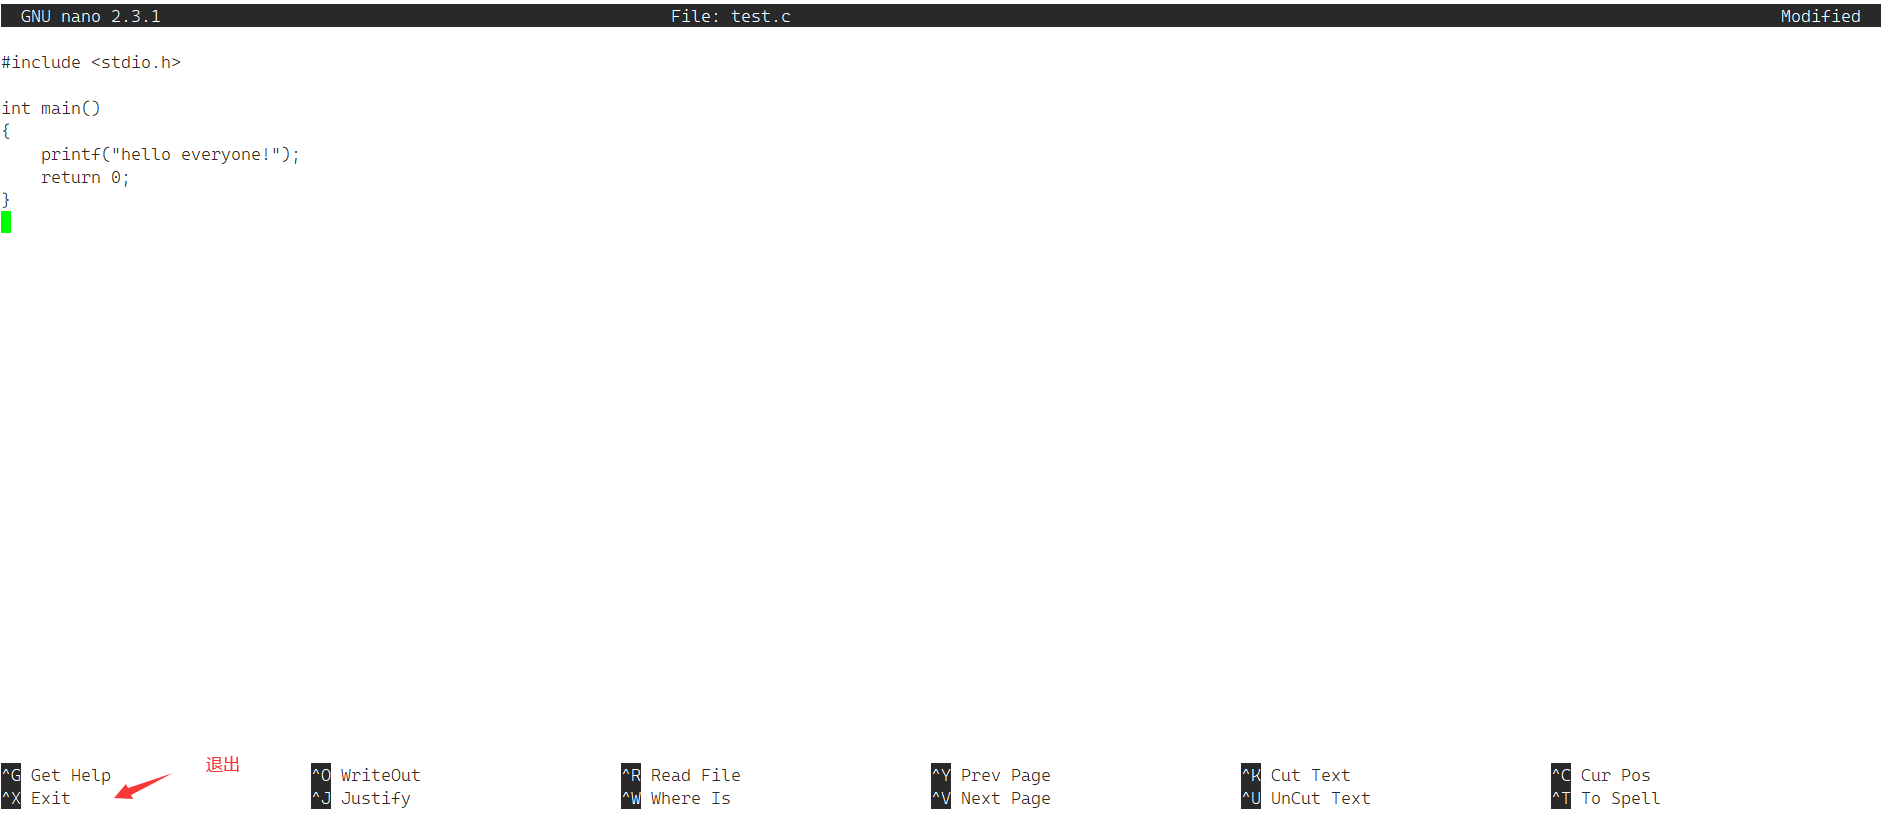
ctrl + x 后:

选择 y 保存,按 enter 退出。
接着编译代码,并输出:
[root@VM-4-3-centos blogtest]# nano test.c
[root@VM-4-3-centos blogtest]# gcc test.c
[root@VM-4-3-centos blogtest]# ./a.out
hello everyone![root@VM-4-3-centos blogtest]# ll
total 16
-rwxr-xr-x 1 root root 8360 Nov 14 15:26 a.out
-rw-r--r-- 1 root root   81 Nov 14 15:26 test.c
这里我们发现了 test.c 被创建了,还有编译产生的 a.out 文件。
简单提一下:gcc test.c 为使用 gcc 编译器对 test.c 进行编译,./a.out 是执行当前路径下的 a.out 程序。
注:使用 nano 时右侧小键盘无法使用。
clear 指令
clear:清理屏幕
whoami 指令
whoami:显示当前用户
root:
[root@VM-4-3-centos ~]# whoami
root
普通用户:
[lx@VM-4-3-centos ~]$ whoami
lx
常用键位
alt + enter:全屏,退出全屏也是 alt + enter
tab:智能补全
当指令忘记时,例如 mkdir,只输入了 mk,这时快速按两次 tab 就会列出和 mk 相关的指令,并保留输入。
相当于一个查字典的热键,非常好用。

cd + tab 可以列出目录下的内容
技巧:遇到路径问题时,不断的tab看能不能tab出来,没有就说明路径写错了。
ctrl + c:处理疯狂刷屏的情况,终止程序运行
结语
到这里,本篇博客就到此结束了。看到这里,我们也对Linux的部分基本指令有了一定的认识,大家下去可以练习一下。指令的熟练程度和熟练使用操作系统完全挂钩,还是得练。
如果觉得anduin写的还不错的话,还请一键三连!如有错误,还请指正!
我是anduin,一名C语言初学者,我们下期见!


