上一篇已经讲述了实现死信队列的rabbitMQ服务配置,可以点击: RabbitMQ的延迟队列实现(笔记一)
目录
- 搭建一个新的springboot项目
- 模仿订单延迟支付过期操作
- 启动项目进行测试
搭建一个新的springboot项目
1.相关核心依赖如下
		<dependency>
            <groupId>org.springframework.boot</groupId>
            <artifactId>spring-boot-starter-web</artifactId>
        </dependency>

        <dependency>
            <groupId>org.springframework.boot</groupId>
            <artifactId>spring-boot-starter-test</artifactId>
            <scope>test</scope>
        </dependency>

        <!--mq依赖-->
        <dependency>
            <groupId>org.springframework.boot</groupId>
            <artifactId>spring-boot-starter-amqp</artifactId>
        </dependency>

        <!-- lombok 依赖 -->
        <dependency>
            <groupId>org.projectlombok</groupId>
            <artifactId>lombok</artifactId>
            <optional>true</optional>
        </dependency>
2.配置文件如下
server:
  port: 8080

spring:
  #MQ配置
  rabbitmq:
    host: ip
    port: 5673
    username: root
    password: root+12345678
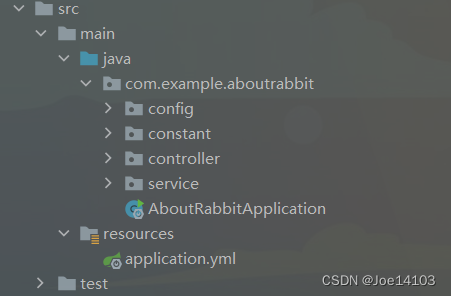
3.目录结构
模仿订单延迟支付过期操作
1.创建OrderMqConstant.java,设定常量,代码如下
package com.example.aboutrabbit.constant;
/**
 * @description 订单队列常量
 * @author lxh
 * @time 2024/2/7 17:05
 */
public interface OrderMqConstant {
    /**
     *交换机
     */
    String exchange = "order-event-exchange";
    /**
     * 队列
     */
    String orderQueue = "order.delay.queue";
    /**
     * 路由
     */
    String orderDelayRouting = "order.delay.routing";
}
2.创建OrderDelayConfig.java,配置绑定
package com.example.aboutrabbit.config;

import com.example.aboutrabbit.constant.OrderMqConstant;
import org.springframework.amqp.core.Binding;
import org.springframework.amqp.core.BindingBuilder;
import org.springframework.amqp.core.CustomExchange;
import org.springframework.amqp.core.Queue;
import org.springframework.context.annotation.Bean;
import org.springframework.context.annotation.Configuration;

import java.util.HashMap;
import java.util.Map;

/**
 * @author lxh
 * @description 配置绑定
 * @time 2024/2/7 17:15
 **/
@Configuration
public class OrderDelayConfig {
    /**
     * 延时队列交换机
     * 注意这里的交换机类型:CustomExchange
     */
    @Bean
    public CustomExchange maliceDelayExchange() {
        Map<String, Object> args = new HashMap<>();
        args.put("x-delayed-type", "direct");
        // 属性参数 交换机名称 交换机类型 是否持久化 是否自动删除 配置参数
        return new CustomExchange(OrderMqConstant.exchange, "x-delayed-message", true, false, args);
    }

    /**
     * 延时队列
     */
    @Bean
    public Queue maliceDelayQueue() {
        // 属性参数 队列名称 是否持久化
        return new Queue(OrderMqConstant.orderQueue, true);
    }

    /**
     * 给延时队列绑定交换机
     */
    @Bean
    public Binding maliceDelayBinding() {
        return BindingBuilder.bind(maliceDelayQueue()).to(maliceDelayExchange()).with(OrderMqConstant.orderDelayRouting).noargs();
    }
}
3、创建 OrderMQReceiver.java监听过期的消息
package com.example.aboutrabbit.config;

import com.example.aboutrabbit.constant.OrderMqConstant;
import lombok.extern.slf4j.Slf4j;
import org.springframework.amqp.rabbit.annotation.RabbitListener;
import org.springframework.stereotype.Component;

import java.text.SimpleDateFormat;
import java.util.Date;

/**
 * @author lxh
 * @description 接收过期订单
 * @time 2024/2/7 17:21
 **/
@Component
@Slf4j
public class OrderMQReceiver {
    @RabbitListener(queues = OrderMqConstant.orderQueue)
    public void onDeadMessage(String infoId) {
        SimpleDateFormat sdf = new SimpleDateFormat("yyyy-MM-dd HH:mm:ss");
        log.info("收到头框过期时间:{},消息是:{}", sdf.format(new Date()), infoId);
    }
}
4.分别创建MQService.java和MQServiceImpl.java,处理消息发送
package com.example.aboutrabbit.service;
/**
 * @description MQ发消息服务
 * @author lxh
 * @time 2024/2/7 17:26
 */
public interface MQService {
    /**
     * 发送或加队列
     * @param orderId 订单主键
     * @param time 毫秒
     */
    void sendOrderAddInfo(Long orderId, Integer time);
}
package com.example.aboutrabbit.service.impl;

import com.example.aboutrabbit.constant.OrderMqConstant;
import com.example.aboutrabbit.service.MQService;
import lombok.extern.slf4j.Slf4j;
import org.springframework.amqp.rabbit.core.RabbitTemplate;
import org.springframework.beans.factory.annotation.Autowired;
import org.springframework.stereotype.Service;

import java.text.SimpleDateFormat;
import java.util.Date;

/**
 * @author lxh
 * @description MQ发消息服务实现
 * @time 2024/2/7 17:26
 **/
@Slf4j
@Service
public class MQServiceImpl implements MQService {
    @Autowired
    private RabbitTemplate rabbitTemplate;
    /**
     * 发送或加队列
     * @param orderId 订单主键
     * @param time 毫秒
     */
    @Override
    public void sendOrderAddInfo(Long orderId, Integer time) {
        SimpleDateFormat sdf = new SimpleDateFormat("yyyy-MM-dd HH:mm:ss");
        log.info("过期队列添加|添加时间:{},内容是:{},过期毫秒数:{}",sdf.format(new Date()),orderId, time);
        rabbitTemplate.convertAndSend(OrderMqConstant.exchange, OrderMqConstant.orderDelayRouting,
                orderId,
                message -> {
                    message.getMessageProperties().setDelay(time);
                    return message;
                }
        );
    }
}
5.创建控制层进行测试TestController.java
package com.example.aboutrabbit.controller;

import com.example.aboutrabbit.service.MQService;
import org.springframework.beans.factory.annotation.Autowired;
import org.springframework.web.bind.annotation.GetMapping;
import org.springframework.web.bind.annotation.RequestMapping;
import org.springframework.web.bind.annotation.RequestParam;
import org.springframework.web.bind.annotation.RestController;


/**
 * @author lxh
 * @description 测试
 * @time 2024/2/7 17:36
 **/
@RestController
@RequestMapping("/test")
public class TestController {
    @Autowired
    private MQService mqService;
    @GetMapping("/send")
    public String list(@RequestParam Long orderId,@RequestParam Integer fenTime) {
        //默认
        Integer time = fenTime * 60 * 1000;
        mqService.sendOrderAddInfo(orderId, time);
        return "success";
    }
}
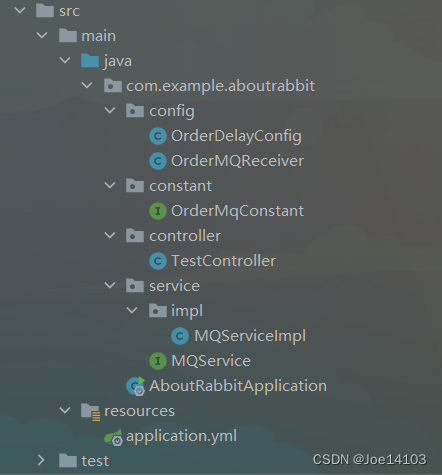
6.全部结构展示
启动项目进行测试
1.示例:localhost:8080/test/send?orderId=1&fenTime=1
订单id为1的延迟一分钟过期,如下

2.查看日志


