与数组对比
◼ 数组:
要存储多个元素,数组(或选择链表)可能是最常用的数据结构。
我们之前说过,几乎每一种编程语言都有默认实现数组结构。
◼ 但是数组也有很多缺点:
数组的创建通常需要申请一段连续的内存空间(一整块的内存),并且大小是固定的(大多数编程语言数组都是固定的),所以当当前数组不能满足容量需求时,需要扩容。 (一般情况下是申请一个更大的数组,比如2倍。 然后将原数组中的元素复制过去,比如 Java 的 ArrayList)
而且在数组开头或中间位置插入数据的成本很高,需要进行大量元素的位移。
尽管JavaScript的Array底层可以帮我们做这些事,但背后的原理依然是这样。
概念
◼ 要存储多个元素,另外一个选择就是链表。
◼ 但不同于数组,链表中的元素在内存中不必是连续的空间。
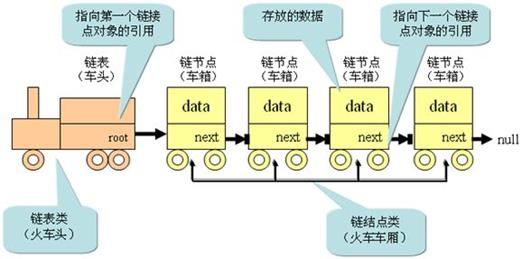
链表的每个元素由一个存储元素本身的节点和一个指向下一个元素的引用(有些语言称为指针或者链接)组成。
◼ 相对于数组,链表有一些优点:
内存空间不是必须连续的。
✓ 可以充分利用计算机的内存,实现灵活的内存动态管理。
链表不必在创建时就确定大小,并且大小可以无限的延伸下去。
链表在插入和删除数据时,时间复杂度可以达到O(1)。
✓ 相对数组效率高很多。
◼ 相对于数组,链表有一些缺点:
链表访问任何一个位置的元素时,都需要从头开始访问。(无法跳过第一个元素访问任何一个元素)。
无法通过下标直接访问元素,需要从头一个个访问,直到找到对应的元素。
实现
基本结构
实现链表包含两个类,一个是节点类,一个就是链表本身。
class Node<T> {
    value: T;
    next: Node<T> | null = null;

    constructor(value: T) {
        this.value = value;
    }
}

export class LinkedList<T> {
    head: Node<T> | null = null;
    size: number = 0;

    get length(): number {
        return this.size;
    }

    // 链表方法
}
常见操作
append(element):向链表尾部添加一个新的项
insert(position,element):向链表的特定位置插入一个新的项。
get(position) :获取对应位置的元素
indexOf(element):返回元素在链表中的索引。如果链表中没有该元素则返回-1。
update(position,element) :修改某个位置的元素
removeAt(position):从链表的特定位置移除一项。
remove(element):从链表中移除一项。
isEmpty():如果链表中不包含任何元素,返回true,如果链表长度大于0则返回false。
size():返回链表包含的元素个数。与数组的length属性类似。
可以看到,链表的方法和数组的基础方法几乎是一样的。因为链表本身就是数组的替代数据结构,只是两者的底层存储结构不一样罢了。
append 添加 、traverse 遍历
追加有两种情况:
- 链表为空,直接追加在 head 后面
- 不为空,在末尾追加
export class LinkedList<T> {
    head: Node<T> | null = null;
    size: number = 0;

    get length(): number {
        return this.size;
    }

    append(value: T): void {
        const newNode = new Node(value);
        if (!this.head) {
            this.head = newNode;
        } else {
            let current = this.head;
          	// 临时变量 current 指向最后一个节点
            while (current.next) {
                current = current.next;
            }
            current.next = newNode;
        }
        this.size++;
    }

    traverse() {
        const result: T[] = [];
        let current = this.head;
        while (current) {
            result.push(current.value);
            current = current.next;
        }
        console.log(result.join(" -> "));
        return result;
    }
}
insert 插入
插入也有两种种情况:
- 从头插入
- 中间和尾部插入
注意:插入位置 position 或 index 是从 0 开始的。position 为 2,表示插入完成后,插入的新数据处于链表索引为 2 的地方。也就是插入操作是在原先 2 位置节点的前面插入。
实现:头插入不用说,中间或尾部插入,只要找到原位置上节点的前一个节点,然后把这个节点它的 next ,也就是原位置上的节点给新节点的 next;它的 next 重新指向新节点即可。
insert(value: T, position: number): boolean {
    if (position < 0 || position > this.size) return false;
    if (position === 0) {
        const newNode = new Node(value);
        newNode.next = this.head;
        this.head = newNode;
    } else {
        const newNode = new Node(value);
        let preNode = this.head;
        for (let i = 0; i < position - 1; i++) {
            preNode = preNode!.next;
        }
        newNode.next = preNode!.next;
        preNode!.next = newNode;
    }
    this.size++;
    return true;
}
removeAt 删除
根据给定索引删除元素,并返回被删除的元素。
和插入差不多,有两种情况。首位和非首位,非首位情况核心就是找到前一个节点。
removeAt(position: number): T | null {
    if (position < 0 || position >= this.size) return null;
    let deletedValue: T;
    if (position === 0) {
        deletedValue = this.head!.value;
        this.head = this.head!.next;
    } else {
        let preNode = this.head;
        for (let i = 0; i < position - 1; i++) {
            preNode = preNode!.next;
        }
        deletedValue = preNode!.next!.value;
        preNode!.next = preNode!.next?.next ?? null;
    }
  	this.size--;
    return deletedValue;
}
get 读取
根据索引获取值。
这个就更简单了,直接遍历到索引的节点即可。
get(position: number): T | null {
    if (position < 0 || position >= this.size) return null;
    let current = this.head;
    for (let i = 0; i < position; i++) {
        current = current!.next;
    }
    return current!.value;
}
封装私有方法:根据索引获取节点
可以看到上面的几个方法实现中,都有一个共同的核心逻辑,就是根据索引获取节点。因此可以将这个逻辑封装成一个私有方法。
private getNode(position: number): Node<T> | null {
    if (position < 0 || position >= this.size) return null;
    let node = this.head;
    for (let i = 0; i < position; i++) {
        node = node!.next;
    }
    return node;
}
update 更新
update(value: T, position: number): boolean {
    const node = this.getNode(position);
    if (!node) return false;
    node.value = value;
    return true;
}
indexOf 根据值获取索引
while 循环,只要节点存在就比较它的值。
indexOf(value: T): number {
    let current: Node<T> | null = this.head;
    let index = 0;
    while (current) {
        if (value === current.value) return index;
        current = current.next;
        index++;
    }
    return -1;
}
remove 根据值删除
remove(value: T): T | null {
    const index = this.indexOf(value);
    return this.removeAt(index);
}
isEmpty 判空
isEmpty(): boolean {
    return !!this.head;
}
链表完整实现
class Node<T> {
    value: T;
    next: Node<T> | null = null;
    constructor(value: T) {
        this.value = value;
    }
}

export class LinkedList<T> {
    private head: Node<T> | null = null;
    size: number = 0;

    get length(): number {
        return this.size;
    }

    private getNode(position: number): Node<T> | null {
        if (position < 0 || position >= this.size) return null;
        let node = this.head;
        for (let i = 0; i < position; i++) {
            node = node!.next;
        }
        return node;
    }

    append(value: T): void {
        const newNode = new Node(value);
        if (!this.head) {
            this.head = newNode;
        } else {
            let current = this.head;
            while (current.next) {
                current = current.next;
            }
            current.next = newNode;
        }
        this.size++;
    }

    traverse() {
        const result: T[] = [];
        let current = this.head;
        while (current) {
            result.push(current.value);
            current = current.next;
        }
        console.log(result.join(" -> "));
        return result;
    }

    insert(value: T, position: number): boolean {
        if (position < 0 || position > this.size) return false;
        if (position === 0) {
            const newNode = new Node(value);
            newNode.next = this.head;
            this.head = newNode;
        } else {
            const newNode = new Node(value);
            // let preNode = this.head;
            // for (let i = 0; i < position - 1; i++) {
            //     preNode = preNode!.next;
            // }
            const preNode = this.getNode(position - 1);
            newNode.next = preNode!.next;
            preNode!.next = newNode;
        }
        this.size++;
        return true;
    }

    removeAt(position: number): T | null {
        if (position < 0 || position >= this.size) return null;
        let deletedValue: T;
        if (position === 0) {
            deletedValue = this.head!.value;
            this.head = this.head!.next;
        } else {
            // let preNode = this.head;
            // for (let i = 0; i < position - 1; i++) {
            //     preNode = preNode!.next;
            // }
            const preNode = this.getNode(position - 1);

            deletedValue = preNode!.next!.value;
            preNode!.next = preNode!.next?.next ?? null;
        }
        this.size--;
        return deletedValue;
    }

    get(position: number): T | null {
        // if (position < 0 || position >= this.size) return null;
        // let current = this.head;
        // for (let i = 0; i < position; i++) {
        //     current = current!.next;
        // }
        const node = this.getNode(position);
        return node?.value ?? null;
    }

    update(value: T, position: number): boolean {
        const node = this.getNode(position);
        if (!node) return false;
        node.value = value;
        return true;
    }

    indexOf(value: T): number {
        let current: Node<T> | null = this.head;
        let index = 0;
        while (current) {
            if (value === current.value) return index;
            current = current.next;
            index++;
        }
        return -1;
    }

    remove(value: T): T | null {
        const index = this.indexOf(value);
        return this.removeAt(index);
    }

    isEmpty(): boolean {
        return !!this.head;
    }
}
题目
设计链表
- https://leetcode.cn/problems/design-linked-list/description/
删除链表中的节点
- https://leetcode.cn/problems/delete-node-in-a-linked-list/description/
这个题目的难点在于,它不给你头节点,只给你要删除的节点。说白了就是不让你拿到要删除节点的前一个节点。
显然,拿不到前一个节点,那么不可能做到真的删除该节点,所以题目也说了该节点可以不必在内存中删除,只要删除值就可以。
那么我们就可以删除本该被删除节点的下一个节点,因为目标删除节点是下一个节点的前节点,做到删除很容易。
那这样岂不是删除了不该删除的内容?
是的,所以提前将下一个节点的内容保存到目标删除节点即可,这样目标删除节点的内容就被覆盖删除了,然后内存释放的节点其实是下一个节点。
以 1234 4个节点为例,删除节点2:
- 把节点 3 的内容覆盖节点 2 的内容,这样节点 2 算是删除了
- 然后让节点 2 的 next 指向节点 4,
function deleteNode(node: ListNode | null): void {
    node.val = node.next.val;
    node.next = node.next.next;
};
反转链表
- https://leetcode.cn/problems/reverse-linked-list/description/
非递归解法
笨笨解法:先用数组保存所有链表值,然后重新生成链表。
这其实是栈的解法:
function reverseList(head: ListNode | null): ListNode | null {
    const val = [];
    let node = head;
    while(node) {
        val.push(node.val);
        node = node.next;
    }
    let _head = new ListNode();
    let curNode = _head;
    while(val.length > 0) {
        const item = val.pop();
        const newNode = new ListNode();
        newNode.val = item;
        curNode.next = newNode;
        curNode = newNode;
    }
    _head = _head.next;
    return _head;
};
优化一下:原地修改链表。
反转链表的本质是什么?是遍历链表,然后一个一个从头插入进新链表。
function reverseList(head: ListNode | null): ListNode | null {
    if (head === null || head.next === null) return head;
    let _head: ListNode | null = null;
    let nextNode: ListNode | null;
    while (head) {
        nextNode = head.next;
        head.next = _head;
        _head = head;
        head = nextNode;
    }
    return _head;
};
原地反转,没有使用栈结构:
- 准备新链表头指针 _head(默认为 null) 和 指向下一个节点的变量 nextNode,以及当前处理节点变量 cur。(实际没有使用 cur 变量,直接操作头指针 head,作为 cur)。
- 这里假设使用了 cur 变量,因为便于理解。
let cur = head;
- 这里假设使用了 cur 变量,因为便于理解。
- nextNode 指向下一个节点,比如索引 1 的节点。
nextNode = cur.next; - 此时 0 号节点被卸下,应挂在新链表 head 上_。_
cur.next = head;- 为啥被卸下节点直接指向新链表头指针head?因为head 将会一直指向新链表头节点,从头插入实现反转。
- 另外末尾节点应指向 null,所以 _head 默认值应为 null。
- 让新链表头指针 head 指向被卸下的节点 cur,也就是head 重新指向新链表的头。
_head = cur; - 当前处理节点指针往后移动
cur = nextNode; - 以 cur 节点是否存在循序上述步骤。
递归解法
function reverseList(head: ListNode | null): ListNode | null {
    // 1 个节点或者空节点,直接返回该链表
    if (head === null || head.next === null) return head;
    // 开始递归,每次传入的都是下一个节点,相当于一路往后遍历
    const _head = reverseList(head?.next ?? null);
    // 此处是递归结束会执行的代码,递归结束的条件是链表只有一个节点
    // 因此此时的 head.next 指向的就是整条链表的最后一个节点。那 head 指向的就是倒数第二个节点。
    // 并且递归结束条件都是返回参数 head,最后一个递归的 reverseList 函数,它的参数 head 接收的就是最后一个节点
    // 然后它被返回了 return head,因此递归函数返回的就是反转后的头结点指针。
    // 现在问题就简化成了怎么反转两个节点。倒数第一个和最后一个。
    head.next.next = head;
    head.next = null;
    return _head;
};
递归的一些感悟:
递归是缩小问题规模的思维方式。因此我们使用递归,直接看递归结束后的状态,不要关注中间过程,会把人弄晕。
递归函数这一行代码之前之后有很大区别,递归函数之后的代码,变量的状态已经变成递归结束后的状态,具体变成什么样,要看递归函数最后的结束条件是什么。
