史上最完整的《苍穹外卖》项目实操笔记系列【下篇】,跟视频的每一P对应,全系列10万字,涵盖详细步骤与问题的解决方案。如果你操作到某一步卡壳,参考这篇,相信会带给你极大启发。
上篇:P1~P65《苍穹外卖》项目实操笔记【上】
中篇:P66~P122《苍穹外卖》项目实操笔记【中】
一、订单状态定时处理、来单提醒和客户催单
Spring Task -> 订单状态定时处理 -> WebSocket ->来单提醒 -> 客户催单。
1.1 Task_介绍 P123
Spring Task是Spring框架提供的任务调度工具,可以按照约定的时间自动执行某个代码逻辑。
定位:定时任务框架。
作用:定时自动执行某段Java代码。
应用场景:信用卡每月还款提醒。银行贷款每月还款提醒。火车票售票系统处理未支付订单(自动取消超时支付的订单)。入职纪念日为用户发送通知。
1.2 Task_cron表达式 P124
cron表达式是一个字符串,通过cron表达式可以定义任务触发的时间。
构成规则:分为6或7个域,由空格分隔开,每个域代表一个含义。
每个域的含义分别为:秒、分钟、小时、日、月、周、年(可选)

cron表达式可以上在线Cron表达式生成器生成。
1.3 Task_入门案例 P125
①导入maven坐标,spring-context(已存在)
②启动类添加注解@EnableScheduling开启任务调度
③自定义定时任务类
在sky-server下面的src/main/java/com/sky下面创建一个task包,在该包下创建MyTask类,写入如下代码:
@Component //实例化,自动生成bean交给容器管理
@Slf4j
public class MyTask {
    @Scheduled(cron="0/5 * * * * ?")
    public void executeTask(){
        log.info("定时任务开始执行:{}",new Date());
    }
}
0/5的意思是从0秒开始,每隔5秒触发一次。
直接启动启动类,然后控制台会每隔5秒输出一次:

1.4 (订单状态定时)设计分析 P126
用户下单后可能出现的问题:
1.下单后未支付,订单一直处于“待支付”状态。
应该通过定时任务每分钟检查一次是否存在支付超时的订单,如果存在则将订单状态修改为“已取消”。
2.用户收货后管理端未点击完成按钮,订单一直处于“派送中”状态。
每天凌晨1点检查一次是否存在“派送中”的订单,如果存在则修改订单状态为“已完成”。
1.5 (订单状态定时)代码开发 P127
生成工具:在线Cron表达式生成器-奇Q工具网 (qqe2.com)
可以用生成工具直接生成:
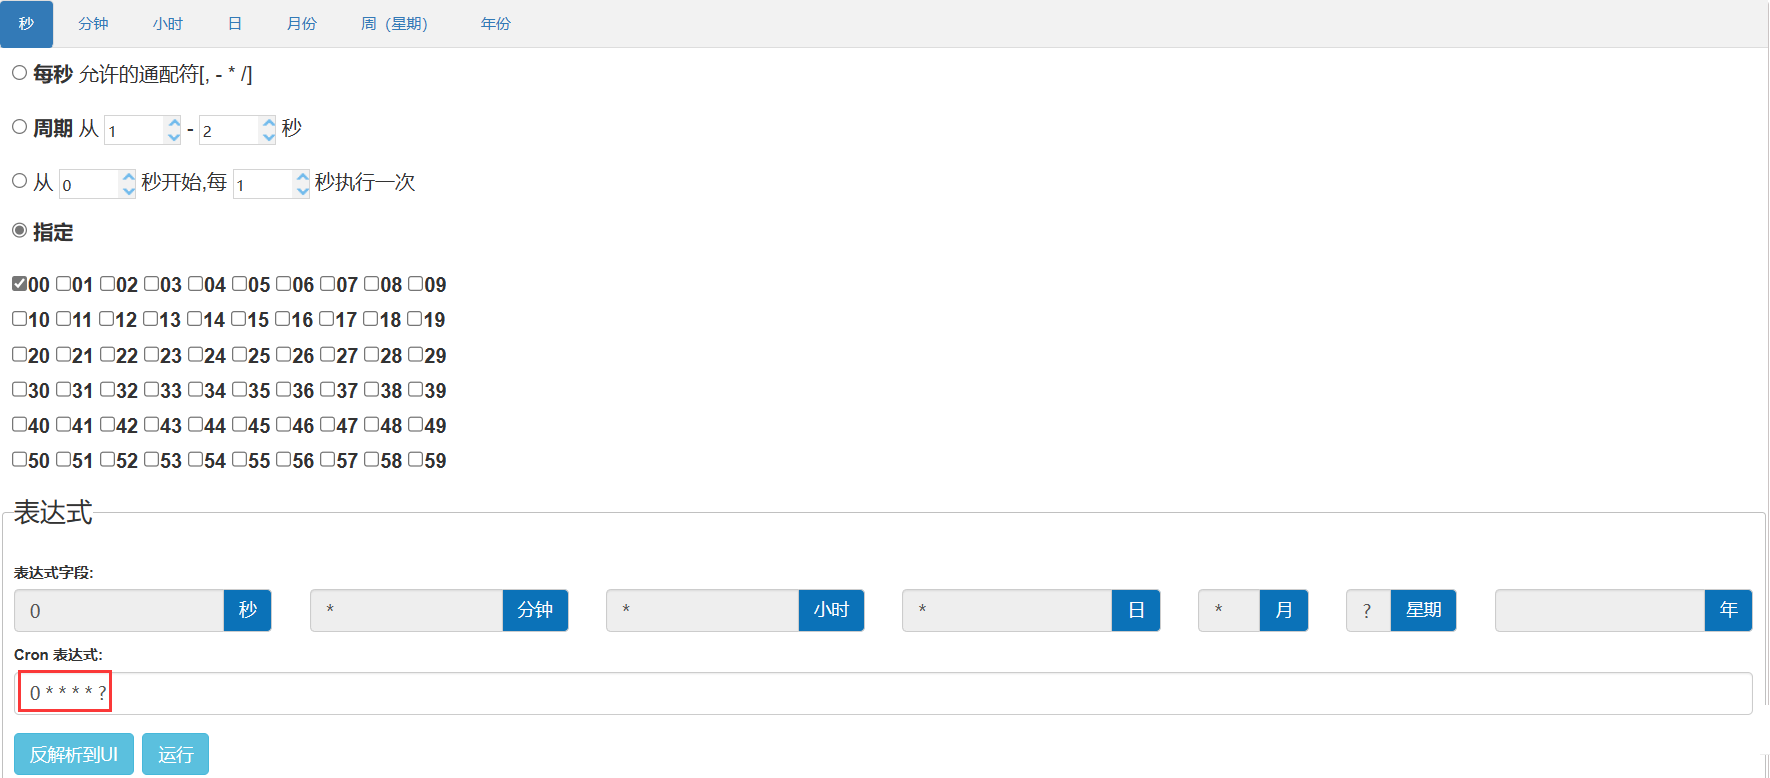
在sky-server的task包(P125创建的)下创建一个OrderTask类,写入如下代码:
@Component
@Slf4j
public class OrderTask {
    @Autowired
    private OrderMapper orderMapper;
    //处理超时订单的方法
    @Scheduled(cron="0 * * * * ? ")
    public void processTimeoutOrder(){
        log.info("定时处理超时订单:{}", LocalDateTime.now());
        LocalDateTime time = LocalDateTime.now().plusMinutes(-15);
        //select * from orders status = ? and order_time < (当前时间 - 15分钟)
        List<Orders> ordersList = orderMapper.getByStatusAndOrderTimeLT(Orders.PENDING_PAYMENT, time);
        if(ordersList != null && ordersList.size()>0){
            for(Orders orders : ordersList){
                orders.setStatus(Orders.CANCELLED);
                orders.setCancelReason("订单超时,自动取消");
                orders.setCancelTime(LocalDateTime.now());
                orderMapper.update(orders);
            }
        }
    }

    @Scheduled(cron="0 0 1 * * ?")//每天凌晨1点触发一次
    public void processDeliveryOrder(){
        log.info("定时处理处于派送中的订单:{}",LocalDateTime.now());
        LocalDateTime time = LocalDateTime.now().plusMinutes(-60);
        List<Orders> ordersList = orderMapper.getByStatusAndOrderTimeLT(Orders.DELIVERY_IN_PROGRESS, time);
        if(ordersList != null && ordersList.size()>0){
            for(Orders orders : ordersList){
                orders.setStatus(Orders.COMPLETED);
                orderMapper.update(orders);
            }
        }
    }
}
然后在sky-server的mapper包下的OrderMapper中加入如下方法:
@Select("select * from orders where status=#{status} and order_time < #{orderTime}")
List<Orders> getByStatusAndOrderTimeLT(Integer status, LocalDateTime orderTime);
1.6 (订单状态定时)功能测试 P128
首先要把原先task包下的MyTask注释掉,避免影响。然后复制下面的注解:
@Scheduled(cron="0/5 * * * * ?")因为每隔1分钟,和每天凌晨1点这个时间设置不太容易观察。
所以在processTimeoutOrder(处理超时订单)上注释掉原先注解,加注解如下:
@Scheduled(cron="1/5 * * * * ?")在processDeliveryOrder(处理派送中的订单)上注释掉原先注解,加注解如下:
@Scheduled(cron="0/5 * * * * ?")控制台输出结果如下,可见没啥问题:

测试完要改回来。
1.7 WebSocket介绍 P129
WebSocket是基于TCP的一种新的网络协议。它实现了浏览器域服务器全双工通信——浏览器和服务器只需要完成一次握手,两者之间就可以创建持久性的链接,并进行双向数据传输。
HTTP是短连接,是单向的,基于请求响应模式;WebSocket是长连接(有点像打电话,双向消息),支持双向通信。HTTP和WebSocket底层都是TCP连接。

应用:视频弹幕,网页聊天(聊天窗口和客服聊天),体育实况更新,股票基金报价实时更新。
1.8 WebSocket入门案例 P130
资料在day10下面都有现成的:

①直接使用websocket.html页面作为WebSocket客户端
②导入WebSocket的maven坐标(已导入)
<dependency>
    <groupId>org.springframework.boot</groupId>
    <artifactId>spring-boot-starter-websocket</artifactId>
</dependency>
③导入WebSocket服务端组件WebSocketServer,用于和客户端通信
④导入配置类WebSocketConfiguration,注册WebSocket的服务端组件
⑤导入定时任务类WebSocketTask,定时向客户端推送数据
1.9 WebSocket入门案例 P131
1.在sky-server的src/main/java/com/sky下创建websocket包,然后把资料里的WebSocketServer复制到下面。
通过sid来区分不同的客户端。加入@OnOpen注解,就变成了回调方法。加入@OnMessage注解,收到客户端的消息后会调这个方法。
2.然后在sky-server下的config下把WebSocketConfiguration拷入。
WebSocketServer需要通过配置类来注册。
3.然后在sky-server下的task下把WebSocketTask拷入。
4.最后把启动类运行,打开下图的html文件,自动会进行连接。

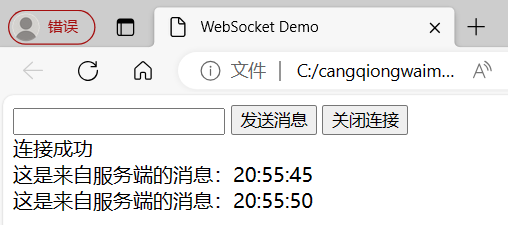
可以建立连接,断开连接,发送消息,接收消息。
![]()
![]()
1.10 (来单提醒)分析设计 P132
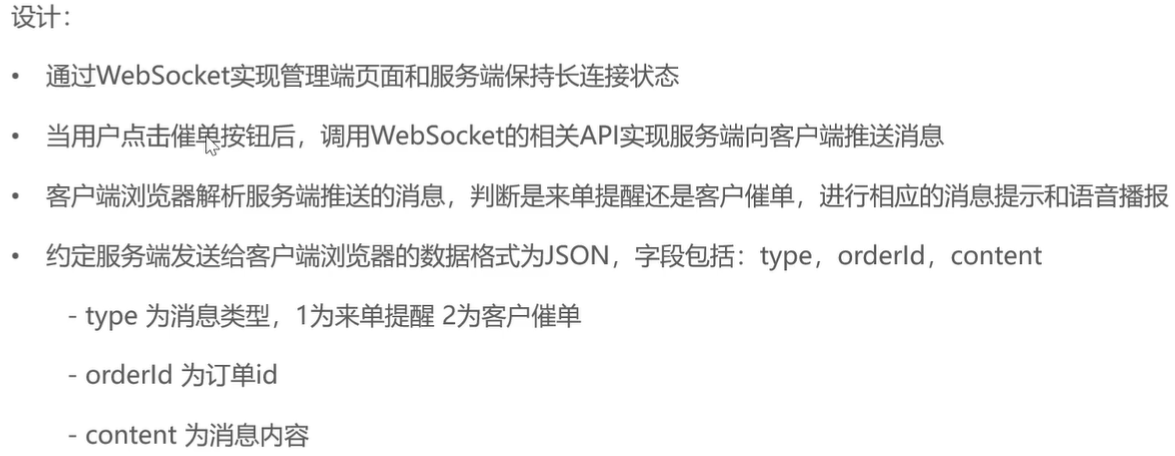
用户下单并且支付成功后,需要第一时间通知外卖商家,通知的形式有如下2种:语音播报,弹出提示框。
通过WebSocket实现管理端页面和服务端保持长连接状态。
当客户支付后,调用WebSocket的相关API实现服务端向客户端推送消息。
客户端浏览器解析服务端推送的消息,判断是来单提醒还是客户催单,进行相应的消息提示和语音播报。
约定服务期发送给客户端浏览器的数据格式位JSON,字段包括:type(消息类型,1来单提醒,2客户催单),orderId,content。
1.11 (来单提醒)代码开发 P133
下面是具体的代码:
在sky-server的service下的OrderServiceImpl中先自动导入WebSocketServer:
@Autowired
private WebSocketServer webSocketServer;
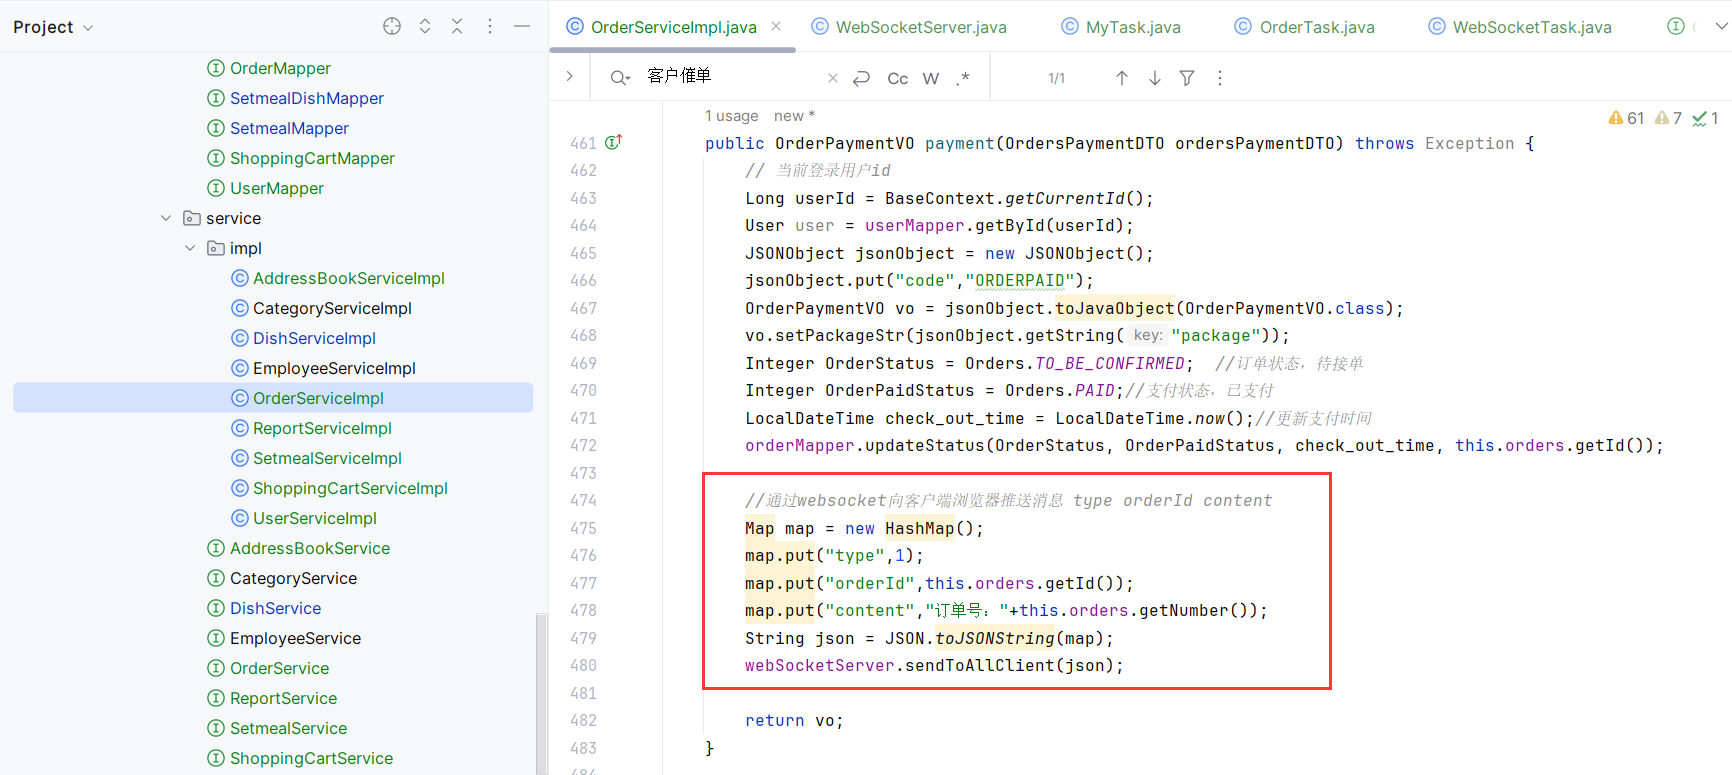
在serviceOrderServiceImpl的payment方法中写入如下代码:
//通过websocket向客户端浏览器推送消息 type orderId content
Map map = new HashMap();
map.put("type",1);
map.put("orderId",this.orders.getId());
map.put("content","订单号:"+this.orders.getNumber());
String json = JSON.toJSONString(map);
webSocketServer.sendToAllClient(json);
如下图(在用户下单后点击支付就立即提示接单,因为在前面设置支付的时候,默认都是直接支付成功,所以跳过了paySuccess方法):
1.12 (来单提醒)功能测试 P134
我最后测试是没问题的。

但一开始碰了2个坑,下面是我遇到的坑和解决方法:
1.没办法建立连接,看不到下面语句输出:

2.提示音一直响,不停

对于第1个问题,要确保下面2点:
1.Redis的服务端要开启
2.nginx.conf配置的端口必须是:80(如果不是80,也可以更改前端页面中写的URL)。

对于第2个问题:
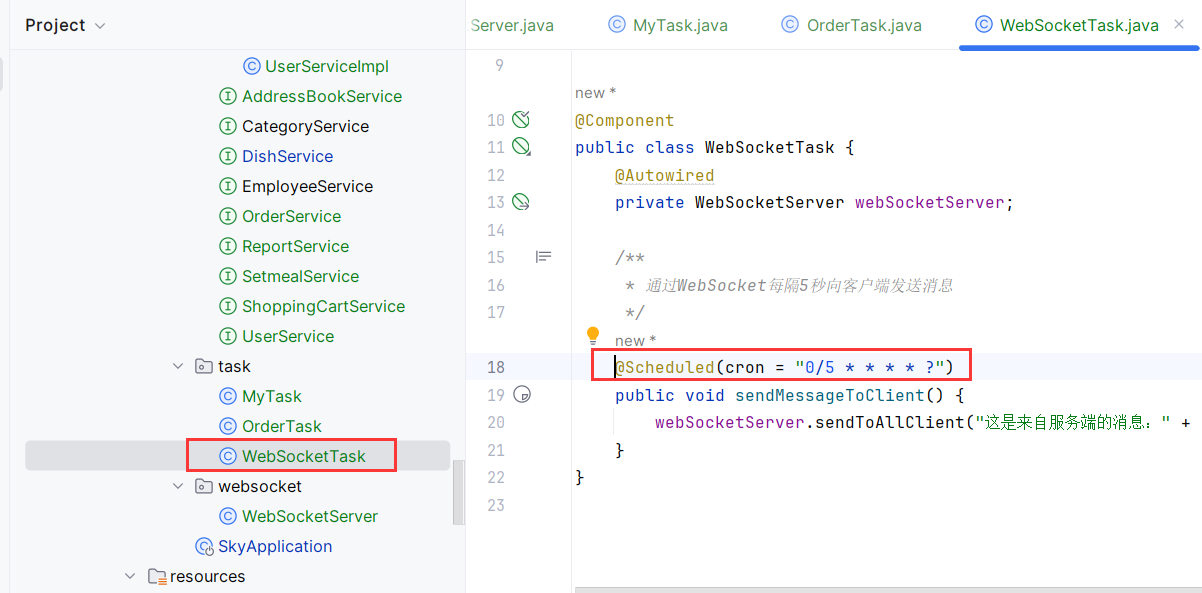
提示音一直响不停是因为设置了5秒钟重复发送的缘故,只需要把注解注释掉即可:
1.13 (客户催单)分析设计 P135
用户在小程序中点击催单按钮后,需要第一时间通知外卖商家。通知的形式有如下两种:语音波高,弹出提示框。
条件:待接单状+用户已付款。
![]()
传入参数:订单id。
1.14 (客户催单)代码开发 P136
在controller的user下的OrderController中写入如下代码:
@GetMapping("/reminder/{id}")
@ApiOperation("客户催单")
public Result reminder(@PathVariable("id") Long id){
    orderService.reminder(id);
    return Result.success();
}
在service下的OrderService中写入如下代码:
//客户催单
void reminder(Long id);
在service下的impl下的OrderServiceImpl中写入如下代码:
//客户催单
public void reminder(Long id){
    // 根据id查询订单
    Orders ordersDB = orderMapper.getById(id);
    // 校验订单是否存在
    if (ordersDB == null) {
        throw new OrderBusinessException(MessageConstant.ORDER_STATUS_ERROR);
    }
    Map map = new HashMap();
    map.put("type",2);
    map.put("orderId",id);
    map.put("content","订单号:"+ordersDB.getNumber());
    webSocketServer.sendToAllClient(JSON.toJSONString(map));
}
前提:在orderMapper已有getById方法,在webSocketServer中已有sendToAllClient
1.15 (客户催单)功能测试 P137
这里如果测试不通过,可以看1.12 (来单提醒)功能测试 P134这节,一般来单提醒能调通的话,客户催单顺其自然。

二、数据统计-图形报表
Apache ECharts -> 营业额统计 -> 用户统计 ->订单统计 ->销量排名统计top10
2.1 Apache ECharts介绍 P138
![]()
柱形图,饼状图,折线图。
2.2 ECharts入门案例 P139
在给的资料里有现成的:

点击html会展示最终效果:

html的代码如下:
<!DOCTYPE html>
<html>
  <head>
    <meta charset="utf-8" />
    <title>ECharts</title>
    <!-- 引入刚刚下载的 ECharts 文件 -->
    <script src="echarts.js"></script>
  </head>
  <body>
    <!-- 为 ECharts 准备一个定义了宽高的 DOM -->
    <div id="main" style="width: 600px;height:400px;"></div>
    <script type="text/javascript">
      // 基于准备好的dom,初始化echarts实例
      var myChart = echarts.init(document.getElementById('main'));
      // 指定图表的配置项和数据
      var option = {
        title: {
          text: 'ECharts 入门示例'   //标题
        },
        tooltip: {},
        legend: {
          data: ['销量']   //用例
        },
        xAxis: {
          data: ['衬衫', '羊毛衫', '雪纺衫', '裤子', '高跟鞋', '袜子']   //x轴
        },
        yAxis: {},
        series: [
          {
            name: '销量',
            type: 'bar',
            data: [5, 20, 36, 10, 10, 20]   //具体数据
          }
        ]
      };
      // 使用刚指定的配置项和数据显示图表。
      myChart.setOption(option);
    </script>
  </body>
</html>
使用Echarts重点在于研究当前图表所需的数据格式。通常是需要后端提供符合格式要求的动态数据,然后响应给前端展示图表。
2.3 (营业额统计)分析设计 P140
业务规则:
1.营业额指的是订单状态为已完成的订单金额合计。
2.X轴为日期,Y轴为营业额。
3.根据时间选择区间,展示每天的营业额数据。
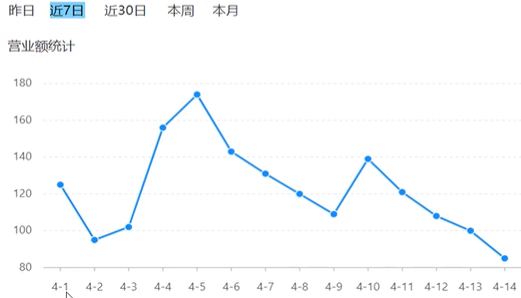
传入的是开始日期和结束日期。
后端返回的值要有日期列表和营业额列表。营业额和日期之间用逗号分隔。
2.4 (营业额统计)代码开发 P141
本节主要是搭建一个基本的代码框架:
在sky-server的controller层下的admin下新建ReportController类,写入如下代码:
@RestController
@RequestMapping("/admin/report")
@Api(tags="数据统计相关接口")
@Slf4j
public class ReportController {
    @Autowired
    private ReportService reportService;
    //营业额统计
    @GetMapping("/turnoverStatistics")
    @ApiOperation("营业额统计")
    public Result<TurnoverReportVO> turnoverStatistics(
            @DateTimeFormat(pattern="yyyy-MM-dd") LocalDate begin,
            @DateTimeFormat(pattern="yyyy-MM-dd") LocalDate end){
        log.info("营业额数据统计:{},{}",begin,end);
        return Result.success(reportService.getTurnoverStatistics(begin,end));

    }
}
在sky-server的service层下新建ReportService接口,写入如下代码:
public interface ReportService {
    //统计指定时间区间内的营业额数据
    TurnoverReportVO getTurnoverStatistics(LocalDate begin,LocalDate end);
}
在sky-server的service层下的Impl下新建ReportServiceImpl类,写入如下代码:
@Service
@Slf4j
public class ReportServiceImpl implements ReportService {
    @Autowired
    private OrderMapper orderMapper;
    //统计指定时间区间内的营业额数据
    public TurnoverReportVO getTurnoverStatistics(LocalDate begin,LocalDate end){
        return null;
    }
}
2.5 (营业额统计)代码开发 P142
完善sky-server的service层下的Impl下的ReportServiceImpl类,代码修改后如下:
@Service
@Slf4j
public class ReportServiceImpl implements ReportService {
    @Autowired
    private OrderMapper orderMapper;
    //统计指定时间区间内的营业额数据
    public TurnoverReportVO getTurnoverStatistics(LocalDate begin,LocalDate end){
        //当前集合用于存放从begin到end范围内的每天的日期
        List<LocalDate> dateList = new ArrayList<>();
        dateList.add(begin);
        while(!begin.equals(end)) {
            //日期计算,计算指定日期的后一天对应的日期
            begin = begin.plusDays(1);
            dateList.add(begin);
        }
        return TurnoverReportVO.builder().dateList(StringUtils.join(dateList,",")).build();
    }
}
2.6 (营业额统计)代码开发 P143
完善sky-server的service层下的Impl下的ReportServiceImpl类,代码修改后如下:
@Service
@Slf4j
public class ReportServiceImpl implements ReportService {
    @Autowired
    private OrderMapper orderMapper;
    //统计指定时间区间内的营业额数据
    public TurnoverReportVO getTurnoverStatistics(LocalDate begin,LocalDate end){
        //当前集合用于存放从begin到end范围内的每天的日期
        List<LocalDate> dateList = new ArrayList<>();
        dateList.add(begin);
        while(!begin.equals(end)) {
            //日期计算,计算指定日期的后一天对应的日期
            begin = begin.plusDays(1);
            dateList.add(begin);
        }
        //存放每天的营业额
        List<Double> turnoverList = new ArrayList<>();
        for(LocalDate date : dateList){
            //查询date日期对应的营业额数据,营业额是指:状态为“已完成”的订单金额合计。
            //LocalDate只有年月日
            LocalDateTime beginTime = LocalDateTime.of(date, LocalTime.MIN); //LocalTime.MIN相当于获得0点0分
            LocalDateTime endTime = LocalDateTime.of(date,LocalTime.MAX);//无限接近于下一个日期的0点0分0秒
            //select sum(amount) from orders where order_time > ? and order_time < ? and status = 5
            //status==5代表订单已完成
            Map map = new HashMap();
            map.put("begin",beginTime);
            map.put("end",endTime);
            map.put("status", Orders.COMPLETED);
            Double turnover = orderMapper.sumByMap(map); //算出当天的营业额
            turnoverList.add(turnover);
        }
        //封装返回结果
        return TurnoverReportVO
                .builder()
                .dateList(StringUtils.join(dateList,","))
                .turnoverList(StringUtils.join(turnoverList,","))
                .build();
    }
}
2.7 (营业额统计)代码开发 P144
完善sky-server的service层下的Impl下的ReportServiceImpl类,代码最终版本如下:
@Service
@Slf4j
public class ReportServiceImpl implements ReportService {
    @Autowired
    private OrderMapper orderMapper;
    //统计指定时间区间内的营业额数据
    public TurnoverReportVO getTurnoverStatistics(LocalDate begin,LocalDate end){
        //当前集合用于存放从begin到end范围内的每天的日期
        List<LocalDate> dateList = new ArrayList<>();
        dateList.add(begin);
        while(!begin.equals(end)) {
            //日期计算,计算指定日期的后一天对应的日期
            begin = begin.plusDays(1);
            dateList.add(begin);
        }
        //存放每天的营业额
        List<Double> turnoverList = new ArrayList<>();
        for(LocalDate date : dateList){
            //查询date日期对应的营业额数据,营业额是指:状态为“已完成”的订单金额合计。
            //LocalDate只有年月日
            LocalDateTime beginTime = LocalDateTime.of(date, LocalTime.MIN); //LocalTime.MIN相当于获得0点0分
            LocalDateTime endTime = LocalDateTime.of(date,LocalTime.MAX);//无限接近于下一个日期的0点0分0秒
            //select sum(amount) from orders where order_time > ? and order_time < ? and status = 5
            //status==5代表订单已完成
            Map map = new HashMap();
            map.put("begin",beginTime);
            map.put("end",endTime);
            map.put("status", Orders.COMPLETED);
            Double turnover = orderMapper.sumByMap(map); //算出当天的营业额
            //考虑当天营业额为0的情况,会返回空
            turnover = turnover == null ? 0.0:turnover;
            turnoverList.add(turnover);
        }
        //封装返回结果
        return TurnoverReportVO
                .builder()
                .dateList(StringUtils.join(dateList,","))
                .turnoverList(StringUtils.join(turnoverList,","))
                .build();
    }
}
完善sky-server的mapper层下的OrderMapper类,新增如下:
//根据动态条件统计营业额数据
Double sumByMap(Map map);
完善sky-server的resources的mapper下的ReportMapper.xml,新增如下:
<select id="sumByMap" resultType="java.lang.Double">
select sum(amount) from orders
<where>
<if test="begin != null">and order_time > #{begin}</if>
<if test="end != null">and order_Time < #{end}</if>
<if test="status != null"> and status = #{status} </if>
</where>
</select>2.8 (营业额统计)功能测试 P145
运行项目后前后端联调没问题:


2.9 (用户统计)分析设计 P146
蓝线代表用户总量,绿线代表新增的用户量。

业务规则:x为日期,y轴为用户数。根据时间选择区间,展示每天用户总量和新增用户数。
2.10 (用户统计)代码开发 P147
本节主要是搭建一个基本的代码框架:
在sky-server的controller层的admin下的ReportController类,写入如下代码:
//用户统计
@GetMapping("/userStatistics")
@ApiOperation("用户统计")
public Result<UserReportVO> userStatistics(
        @DateTimeFormat(pattern="yyyy-MM-dd") LocalDate begin,
        @DateTimeFormat(pattern="yyyy-MM-dd") LocalDate end){
    log.info("用户数据统计:{},{}",begin,end);
    return Result.success(reportService.getUserStatistics(begin,end));
}
在sky-server的service层的ReportService接口,写入如下代码:
//统计指定时间区间内的营业额数据
UserReportVO getUserStatistics(LocalDate begin, LocalDate end);
在sky-server的service层的Impl下的ReportServiceImpl类,写入如下代码:
//统计指定时间区间内的用户数据
public UserReportVO getUserStatistics(LocalDate begin,LocalDate end){
     return null;
}
2.11 (用户统计)代码开发 P148
完善sky-server的service层的Impl下的ReportServiceImpl类,写入如下代码:
//统计指定时间区间内的营业额数据
@Autowired
private UserMapper userMapper;

//统计指定时间区间内的用户数据
public UserReportVO getUserStatistics(LocalDate begin,LocalDate end){
    //存放从begin到end之间的每天对应的日期
    List<LocalDate> dateList = new ArrayList<>();
    dateList.add(begin);
    while(!begin.equals(end)){
        begin = begin.plusDays(1);
        dateList.add(begin);
    }
    //存放每天的新增用户数量 select count(id) from user where create_time < ? and create_time> ?
    List<Integer> newUserList = new ArrayList<>();
    //存放每天的总用户数量 select count(id) from user where create_time < ?
    List<Integer> totalUserList = new ArrayList<>();
    return null;
}
完善sky-server的mapper层下的UserMapper类,写入如下代码:
//根据动态条件统计用户数量
Integer countByMap(Map map);
在sky-server的resources的mapper层下的UserMapper.xml,写入如下代码:
<select id="countByMap" resultType="java.lang.Integer">
select count(id) from user
<where>
<if test="begin != null">
and create_time > #{begin}
</if>
<if test="end != null">
and create_time < #{end}
</if>
</where>
</select>2.12 (用户统计)代码开发 P149
最终完善sky-server的service层的Impl下的ReportServiceImpl类,写入如下代码:
//统计指定时间区间内的用户数据
public UserReportVO getUserStatistics(LocalDate begin,LocalDate end){
        //存放从begin到end之间的每天对应的日期
        List<LocalDate> dateList = new ArrayList<>();
        dateList.add(begin);
        while(!begin.equals(end)){
            begin = begin.plusDays(1);
            dateList.add(begin);
        }
        //存放每天的新增用户数量 select count(id) from user where create_time < ? and create_time> ?
        List<Integer> newUserList = new ArrayList<>();
        //存放每天的总用户数量 select count(id) from user where create_time < ?
        List<Integer> totalUserList = new ArrayList<>();
        for(LocalDate date : dateList){
            LocalDateTime beginTime = LocalDateTime.of(date, LocalTime.MIN);
            LocalDateTime endTime = LocalDateTime.of(date, LocalTime.MAX);
            Map map = new HashMap();
            map.put("end",endTime);//只加一个end(1个参数)自动匹配统计总计的SQL语句
            //总用户数量
            Integer totalUser = userMapper.countByMap(map);
            map.put("begin",beginTime);//再加一个参数匹配统计每日新增的SQL语句
            //新增用户数量
            Integer newUser = userMapper.countByMap(map);
            totalUserList.add(totalUser);
            newUserList.add(newUser);
        }
        return UserReportVO
                .builder()
                .dateList(StringUtils.join(dateList,","))
                .totalUserList(StringUtils.join(totalUserList,","))
                .newUserList(StringUtils.join(newUserList,","))
                .build();
    }
2.13 (用户统计)功能测试 P150
简单测试没问题,不过多赘述。

2.14 (订单统计) 分析设计 P151

业务规则:
1.有效订单指状态为已完成的订单
2.x轴为日期,y轴为订单数量
3.在时间选择区间内,展示每天的订单总数和有效订单数。
4.展示区间内有效订单数、总订单数、订单完成率,订单完成率=有效订单数/总订单数x100%
2.15 (订单统计) 代码开发 P152 P153
因为比较简单,所以直接给出完整代码。
在sky-server的controller层的admin下的ReportController类,写入如下代码:
//订单统计
@GetMapping("/ordersStatistics")
@ApiOperation("订单统计")
public Result<OrderReportVO> ordersStatistics(
        @DateTimeFormat(pattern="yyyy-MM-dd") LocalDate begin,
        @DateTimeFormat(pattern="yyyy-MM-dd") LocalDate end){
    log.info("订单数据统计:{},{}",begin,end);
    return Result.success(reportService.getOrderStatistics(begin,end));
}
在sky-server的service层的ReportService接口,写入如下代码:
//统计指定时间区间内的订单数据
OrderReportVO getOrderStatistics(LocalDate begin, LocalDate end);
在sky-server的service层的Impl下的ReportServiceImpl类,写入如下代码:
//统计指定时间区间内的订单数据
public OrderReportVO getOrderStatistics(LocalDate begin, LocalDate end) {
    List<LocalDate> dateList = new ArrayList<>();
    dateList.add(begin);
    while(!begin.equals(end)){
        begin = begin.plusDays(1);
        dateList.add(begin);
    }
    //存放每天的订单总数
    List<Integer> orderCountList = new ArrayList<>();
    //存放每天的有效订单数
    List<Integer> validOrderCountList = new ArrayList<>();
    //便利dateList集合,查询每天的有效订单数和订单总数
    for(LocalDate date : dateList){
        //查询每天的订单总数 select count(id) from orders where order_time > ? and order_time < ?
        LocalDateTime beginTime = LocalDateTime.of(date, LocalTime.MIN);
        LocalDateTime endTime = LocalDateTime.of(date, LocalTime.MAX);
        Integer orderCount = getOrderCount(beginTime, endTime, null);
        //查询每天的有效订单数select count(id) from orders where order_time > ? and order_time < ? and status = 5
        Integer validOrderCount = getOrderCount(beginTime, endTime, Orders.COMPLETED);
        orderCountList.add(orderCount);
        validOrderCountList.add(validOrderCount);
    }
    //计算时间区间内的订单总数量
    Integer totalOrderCount = orderCountList.stream().reduce(Integer::sum).get();
    //计算时间区间内的有效订单数量
    Integer validOrderCount = validOrderCountList.stream().reduce(Integer::sum).get();

    //计算订单完成率
    Double orderCompletionRate = 0.0;
    if(totalOrderCount != 0){
        //计算订单完成率
        orderCompletionRate = validOrderCount.doubleValue() / totalOrderCount;
    }

    return OrderReportVO.builder()
            .dateList(StringUtils.join(dateList,","))
            .orderCountList(StringUtils.join(orderCountList,","))
            .validOrderCountList(StringUtils.join(validOrderCountList,","))
            .totalOrderCount(totalOrderCount)
            .validOrderCount(validOrderCount)
            .orderCompletionRate(orderCompletionRate)
            .build();
}
//根据条件统计订单数量
private Integer getOrderCount(LocalDateTime begin,LocalDateTime end,Integer status){
    Map map = new HashMap();
    map.put("begin",begin);
    map.put("end",end);
    map.put("status",status);
    return orderMapper.countByMap(map);
}
在sky-server的mapper层下的orderMapper类,写入如下代码:
//根据动态条件统计订单数量
Integer countByMap(Map map);
在sky-server的resources的mapper层下的UserMapper.xml,写入如下代码:
<select id="countByMap" resultType="java.lang.Integer">
select count(id) from orders
<where>
<if test="begin != null">and order_time > #{begin}</if>
<if test="end != null">and order_time < #{end}</if>
<if test="status != null">and status=#{status}</if>
</where>
</select>2.16 (订单统计) 功能测试 P154
简单测试没问题,不过多赘述。

2.17 (销售排名统计) 分析设计 P155
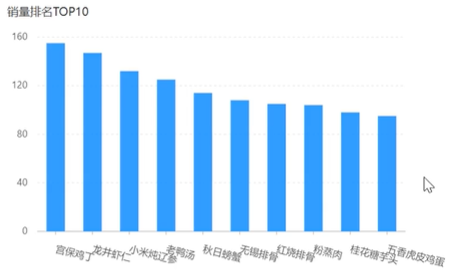
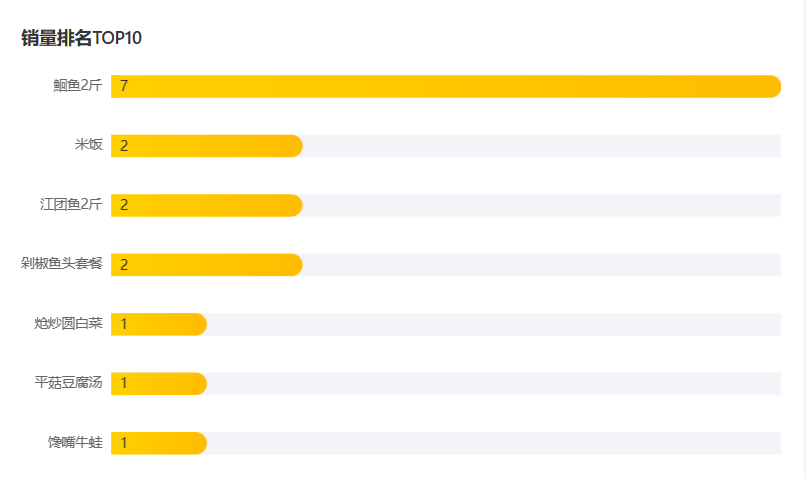
根据时间选择区间,展示销量前10的商品(包括菜品和套餐)。
基于柱状图展示商品销量。
此处的销量为商品销售的份数。
2.18 (排名统计) 代码开发 P156 P157
因为比较简单,所以直接给出完整代码。
在sky-server的controller层的admin下的ReportController类,写入如下代码:
//销量排名top10
@GetMapping("/top10")
@ApiOperation("销量排名top10")
public Result<SalesTop10ReportVO> top10(
        @DateTimeFormat(pattern="yyyy-MM-dd") LocalDate begin,
        @DateTimeFormat(pattern="yyyy-MM-dd") LocalDate end){
    log.info("销量排名top10:{},{}",begin,end);
    return Result.success(reportService.getSalesTop10(begin,end));
}
在sky-server的service层的ReportService接口,写入如下代码:
//统计指定时间区间内的销量排名前10
SalesTop10ReportVO getSalesTop10(LocalDate begin, LocalDate end);
在sky-server的service层的Impl下的ReportServiceImpl类,写入如下代码:
//统计指定时间区间内的销量排名前10
public SalesTop10ReportVO getSalesTop10(LocalDate begin, LocalDate end) {
    LocalDateTime beginTime = LocalDateTime.of(begin, LocalTime.MIN);
    LocalDateTime endTime = LocalDateTime.of(end,LocalTime.MAX);
    List<GoodsSalesDTO> salesTop10 = orderMapper.getSalesTop10(beginTime, endTime);
    List<String> names = salesTop10.stream().map(GoodsSalesDTO::getName).collect(Collectors.toList());
    String nameList = StringUtils.join(names, ",");
    List<Integer> numbers = salesTop10.stream().map(GoodsSalesDTO::getNumber).collect(Collectors.toList());
    String numberList = StringUtils.join(numbers, ",");
    return SalesTop10ReportVO.builder().nameList(nameList).numberList(numberList).build();
} 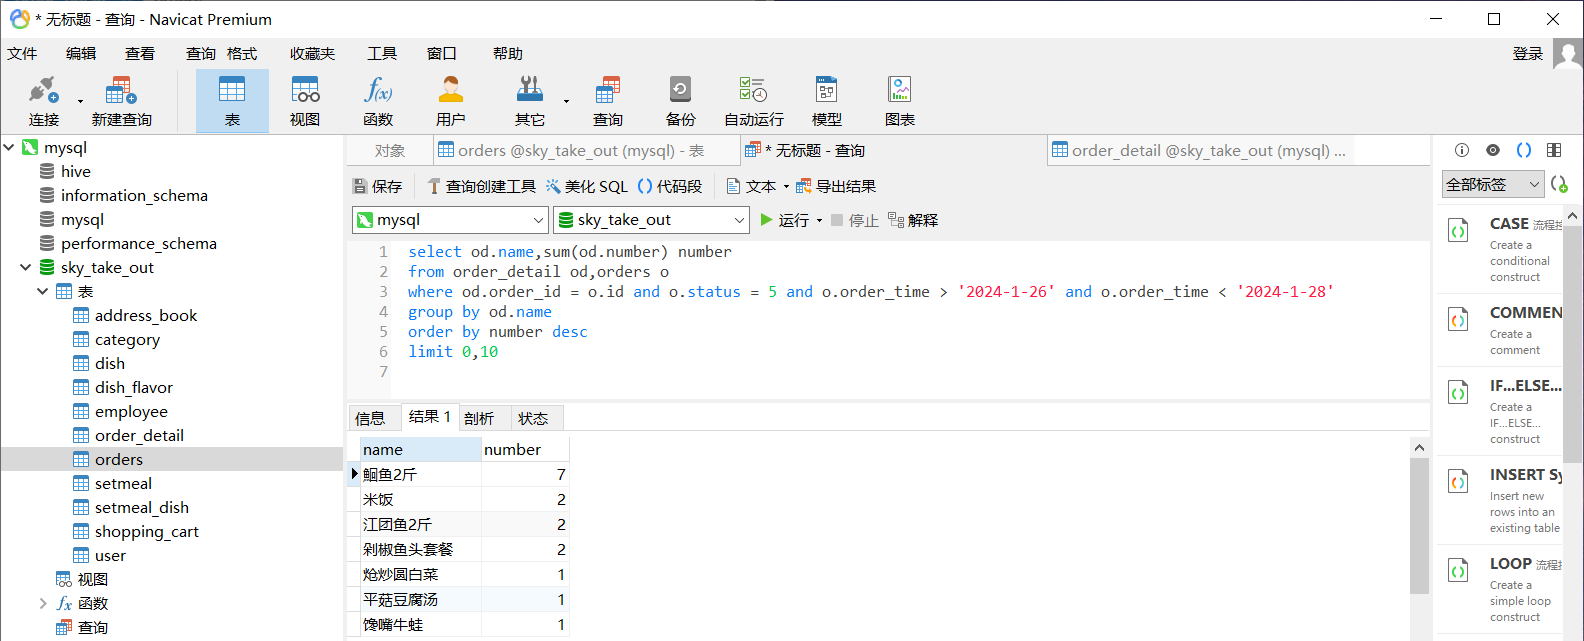
select od.name,sum(od.number) number
from order_detail od,orders o
where od.order_id = o.id and o.status = 5 and o.order_time > '2024-1-26' and o.order_time < '2024-1-28'
group by od.name
order by number desc
limit 0,10
在sky-server的mapper层下的orderMapper类,写入如下代码:
//统计指定时间区间内的销量排名前10
List<GoodsSalesDTO> getSalesTop10(LocalDateTime begin,LocalDateTime end);
在sky-server的resources的mapper层下的UserMapper.xml,写入如下代码:
<select id="getSalesTop10" resultType="com.sky.dto.GoodsSalesDTO">
select od.name,sum(od.number) number
from order_detail od,orders o
where od.order_id = o.id and o.status = 5
<if test="begin != null">
and o.order_time > #{begin}
</if>
<if test="end != null">
and o.order_time < #{end}
</if>
group by od.name
order by number desc
limit 0,10
</select>2.19 (排名统计) 功能测试 P158
简单测试没问题,不过多赘述。
三、数据统计-Excel报表
3.1 本章内容介绍
实现工作台的功能+数据统计菜单的数据导出到Excel文件的功能。
3.2 (工作台) 分析设计 P160
工作台是系统运营的数据看板,并提供快捷操作入口,可以有效提高商家的工作效率。
工作台展示的数据:今日数据(当天营业数据),订单管理(不同状态订单个数),菜品总览(起售停售的菜品),套餐总览,订单信息(只显示待接单和待派送的)。
名词解释:营业额:已完成订单的总金额。有效订单:已完成订单的数量。订单完成率:有效订单数/总订单数x100%。平均客单价:营业额/有效订单数。
3.3 (工作台) 代码导入 P161
1.把WorkSpaceController导入controller/admin
2.把WorkspaceService导入service
3.把WorkspaceServiceImpl导入serviceImpl
4.把DishMapper中的countByMap单独导入mapper下的DishMapper
5.把DishMapper.xml中的countByMap单独导入resources/mapper下
6.把SetmealMapper中的countByMap单独导入mapper下的SetmealMapper
7.把SetmealMapper.xml中的countByMap单独导入resources/mapper下
3.4 (工作台) 功能测试 P162
简单测试没问题,不过多赘述。

3.5 (Apache POI) 介绍 P163
一般情况下,POI都是用于操作Excel文件。
![]()
应用场景:
银行网银系统导出交易明细;各种业务系统导出Excel报表;批量导入业务数据。
3.6 (Apache POI) 入门案例 P164
使用POI需要导入下面2个坐标:
<dependency>
    <groupId>org.apache.poi</groupId>
    <artifactId>poi</artifactId>
</dependency>
<dependency>
    <groupId>org.apache.poi</groupId>
    <artifactId>poi-ooxml</artifactId>
</dependency>
在sky-server\src\test\java\com\sky\test下面创建一个POITest类,写入如下代码:
public class POITest {
    /*
    * 通过POI创建Excel文件并且写入文件内容
    * */
    @Test
    public void writeTest() throws IOException {
        //在内存中创建一个Excel文件
        XSSFWorkbook excel = new XSSFWorkbook();
        //在Excel文件中创建一个Sheet页
        XSSFSheet sheet = excel.createSheet("info");
        //在Sheet中创建行对象,rownum编号从0开始
        XSSFRow row = sheet.createRow(1); //1代表第2行
        row.createCell(1).setCellValue("姓名");//创建单元格写入内容
        row.createCell(2).setCellValue("城市");
        //创建一个新行
        row = sheet.createRow(2);//第3行
        row.createCell(1).setCellValue("张三");//创建单元格写入内容
        row.createCell(2).setCellValue("厦门");

        row = sheet.createRow(3);//第4行
        row.createCell(1).setCellValue("李四");//创建单元格写入内容
        row.createCell(2).setCellValue("南京");
        //上面写的都是在内存,现在想在磁盘看到
        FileOutputStream out = new FileOutputStream(new File("C://software/info.xlsx"));//设置文件
        excel.write(out);//写入到文件
        //关闭资源
        out.close();
        excel.close();

    }
}
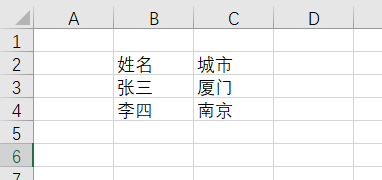
最终效果如下:
3.7 (Apache POI) 入门案例 P165
把文本读取出来。
在sky-server\src\test\java\com\sky\test下面的POITest类,写入如下代码:
@Test
public void readTest() throws IOException{
    FileInputStream in = new FileInputStream(new File("C://software/info.xlsx"));
    //读取磁盘上已经存在的Excel文件
    XSSFWorkbook excel = new XSSFWorkbook(in);
    //读取Excel文件中的第一个Sheet页
    XSSFSheet sheet = excel.getSheetAt(0);
    //获取Sheet中最后一行行号
    int lastRowNum = sheet.getLastRowNum();
    for(int i=1;i<=lastRowNum;i++){
        //获得某一行
        XSSFRow row = sheet.getRow(i);
        //获得单元格对象
        String cellValue1 = row.getCell(1).getStringCellValue();
        String cellValue2 = row.getCell(2).getStringCellValue();
        System.out.println(cellValue1+" "+cellValue2);
    }
    //关闭资源
    in.close();

}
3.8 (导出Excel表) 分析设计 P166
导出Excel形式的报表文件;导出最近30天的运营数据。

![]()
接口没有返回数据,导出报表本底是文件下载。服务端会通过输出流将Excel文件下载到客户端浏览器。
一般是先创建原始的Excel文件,这个文件被称为模板文件,先设置好包括颜色和字体等。
步骤:①设计Excel模板文件②查询近30天的运营数据③将查询到的运营数据写入模板文件④通过输出流将Excel文件下载到客户端浏览器。
下面这个是模板文件:

先在resources下面创建一个template包,然后把运营数据报表模块.xlsx复制进去。

3.9 (导出Excel表) 代码开发 P167 P168 P169
在sky-server的controller层的admin下的ReportController类,写入如下代码:
//导出运营数据报表
@GetMapping("/export")
@ApiOperation("导出运营数据报表")
public void export(HttpServletResponse response){
    reportService.exportBusinessData(response);
}
在sky-server的service层的ReportService接口,写入如下代码:
void exportBusinessData(HttpServletResponse response);在sky-server的service层的Impl下的ReportServiceImpl类,写入如下代码:
@Autowired
private WorkspaceService workspaceService;
//统计指定时间区间内的销量排名前10
public SalesTop10ReportVO getSalesTop10(LocalDate begin, LocalDate end) {
    LocalDateTime beginTime = LocalDateTime.of(begin, LocalTime.MIN);
    LocalDateTime endTime = LocalDateTime.of(end,LocalTime.MAX);
    List<GoodsSalesDTO> salesTop10 = orderMapper.getSalesTop10(beginTime, endTime);
    List<String> names = salesTop10.stream().map(GoodsSalesDTO::getName).collect(Collectors.toList());
    String nameList = StringUtils.join(names, ",");
    List<Integer> numbers = salesTop10.stream().map(GoodsSalesDTO::getNumber).collect(Collectors.toList());
    String numberList = StringUtils.join(numbers, ",");
    return SalesTop10ReportVO.builder().nameList(nameList).numberList(numberList).build();
}
@Autowired
private WorkspaceService workspaceService;
//导出运营数据报表
public void exportBusinessData(HttpServletResponse response){
    //1.查询数据库,获取营业数据--查询最近30天的运营数据
    LocalDate dateBegin = LocalDate.now().minusDays(30); //减30天的时间
    LocalDate dateEnd = LocalDate.now().minusDays(1);
    BusinessDataVO businessDatavo = workspaceService.getBusinessData(LocalDateTime.of(dateBegin, LocalTime.MIN), LocalDateTime.of(dateEnd, LocalTime.MAX));
    //2.通过POI将数据写入到Excel文件中
    InputStream in = this.getClass().getClassLoader().getResourceAsStream("template/运营数据报表模板.xlsx");//在类路径下读取资源返回输入流对象

    try {
        //基于模板文件创建一个新的Excel文件
        XSSFWorkbook excel = new XSSFWorkbook(in);
        //获取表格文件的Sheet文件
        XSSFSheet sheet = excel.getSheet("Sheet1");
        //填充数据--时间
        sheet.getRow(1).getCell(1).setCellValue("时间:"+dateBegin+"至"+dateEnd);
        //获得第4行
        XSSFRow row = sheet.getRow(3);
        row.getCell(2).setCellValue(businessDatavo.getTurnover()); //第3个单元格
        row.getCell(4).setCellValue(businessDatavo.getOrderCompletionRate());
        row.getCell(6).setCellValue(businessDatavo.getNewUsers());
        //获得第5行
        row = sheet.getRow(4);
        row.getCell(2).setCellValue(businessDatavo.getValidOrderCount());
        row.getCell(4).setCellValue(businessDatavo.getUnitPrice());
        //填充明细数据
        for(int i=0;i<30;i++){
            LocalDate date = dateBegin.plusDays(i);
            //查询某一天的营业数据
            workspaceService.getBusinessData(LocalDateTime.of(date,LocalTime.MIN),LocalDateTime.of(date,LocalTime.MAX));
            //获得某一行
            row = sheet.getRow(7+i);
            row.getCell(1).setCellValue(date.toString());
            row.getCell(2).setCellValue(businessDatavo.getTurnover());
            row.getCell(3).setCellValue(businessDatavo.getValidOrderCount());
            row.getCell(4).setCellValue(businessDatavo.getOrderCompletionRate());
            row.getCell(5).setCellValue(businessDatavo.getUnitPrice());
            row.getCell(6).setCellValue(businessDatavo.getNewUsers());
        }
        //3.通过输出流将Excel文件下载到客户端浏览器
        ServletOutputStream out = response.getOutputStream();
        excel.write(out);
        //关闭资源
        out.close();
        excel.close();
    } catch (IOException e) {
        throw new RuntimeException(e);
    }

}
3.12 (导出Excel表) 功能测试 P170
点击数据导出后会有一个xlsx文件被下载下来
![]()

下面是数据的效果:

四、前端
4.1 课程介绍 P171
1.VUE基础知识回顾+VUE进阶(router、vuex、typescript)
2.苍穹外卖前端项目环境搭建+开发员工管理模块
3.开发套餐管理模块
4.2 脚手架创建前端 P172
1.环境配置
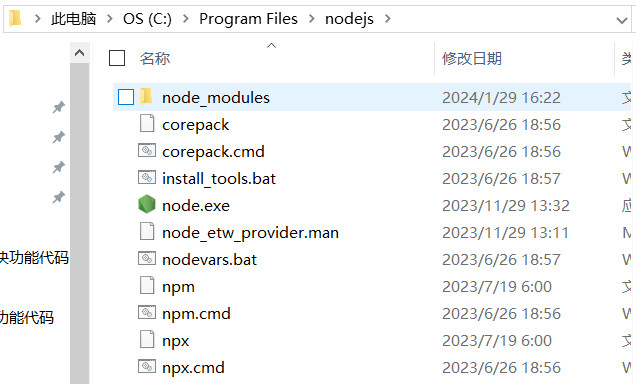
node.js : 前端项目的运行环境
Node.js安装与配置(详细步骤)_nodejs安装及环境配置-CSDN博客
npm : JavaScript的包管理工具
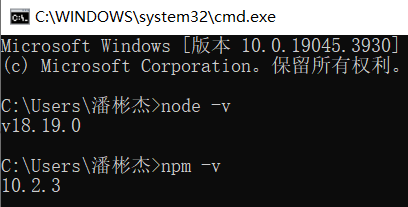
(Node自带npm)安装完后输入如下命令检查没问题:
Vue CLI :基于Vue进行快速开发的完整系统,实现交互式的项目脚手架
npm i @vue/cli -g
2.使用 Vue CLI 创建前端工程
我先在C盘下创建了code/vue_project文件。然后在这个目录下打开一个cmd窗口:

方法1:vue create 项目名称
输入下面代码:
vue create vue-demo1选择Vue 2,然后选择npm
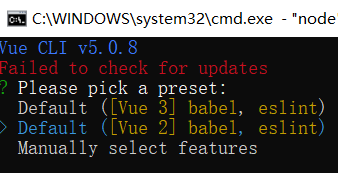
生成的脚手架工程大概是下面这样的:
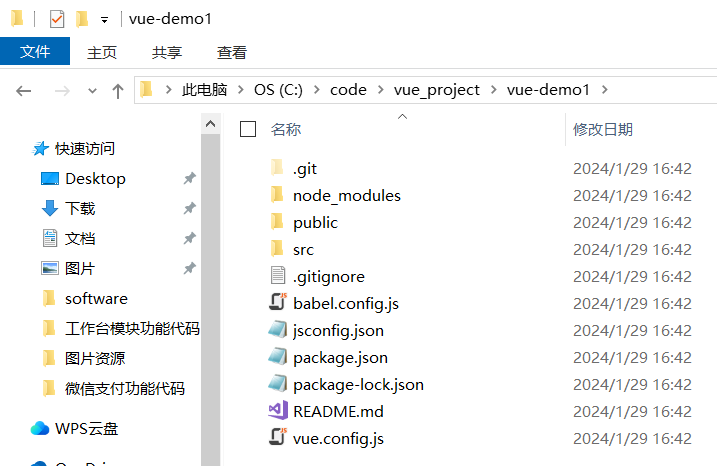
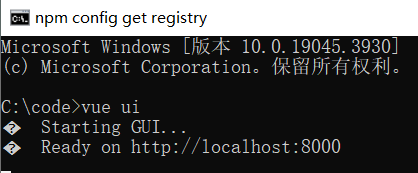
方法2:vue ui (网页界面创建)
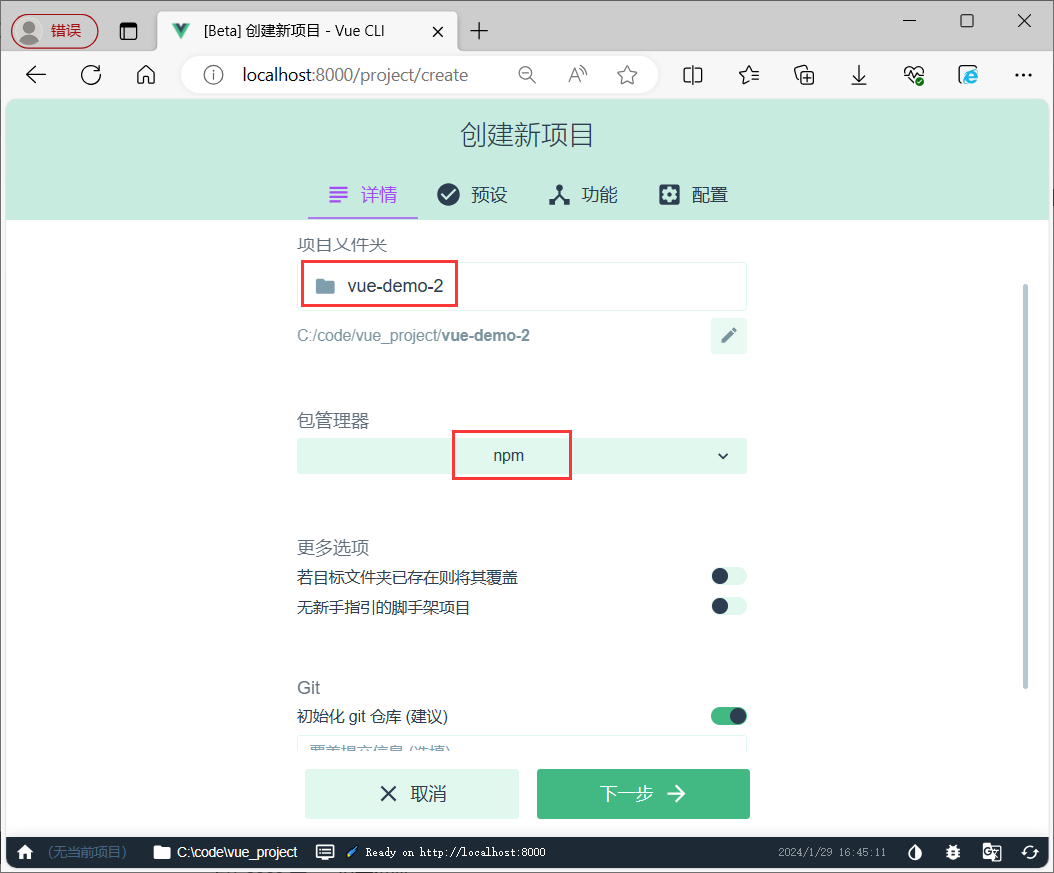
输入vue ui会弹出一个网页,进入code/vue_project点击“在此创建新项目”,

填写名称,选择好包管理器,选择Vue2 即可:

项目结构和重点文件目录:
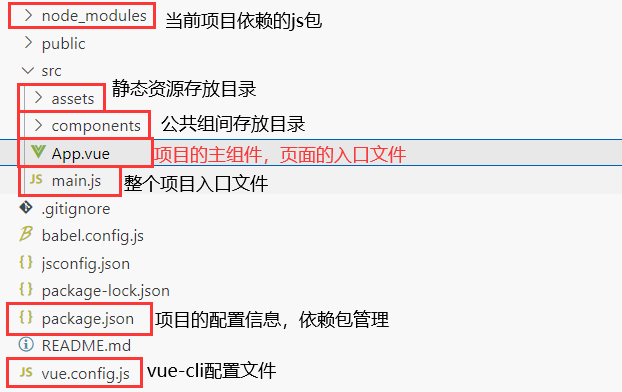
3.启动前端项目
使用vscode打开文件,点击右上角那个按钮:

输入(注意serve对应的是package.json里面的serve):
npm run serve
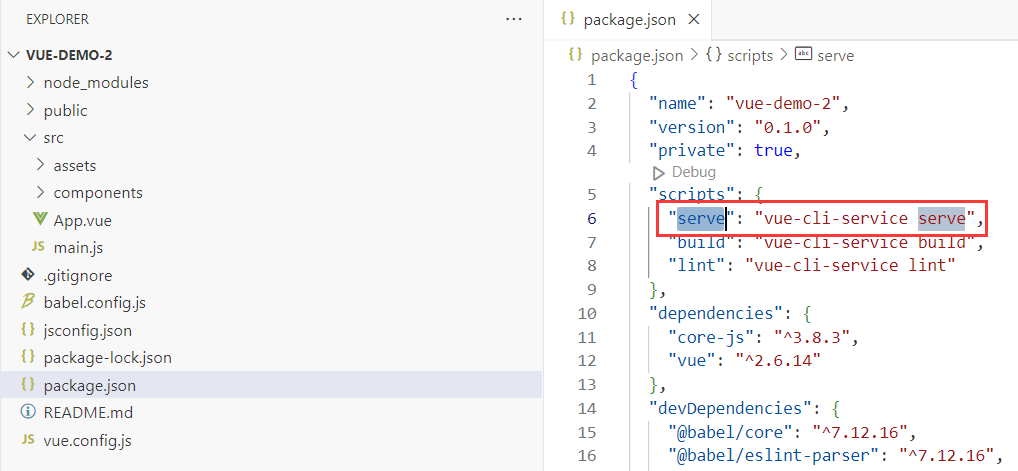
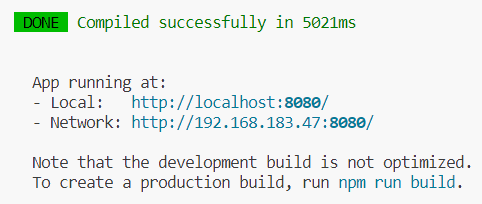
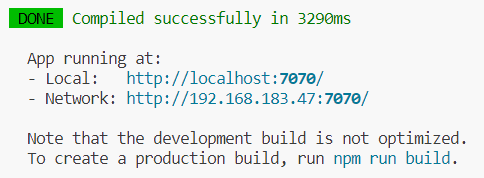
出现下面表示成功(记得下载完vscode和nodejs后要重启电脑),点击链接后可进入网页:
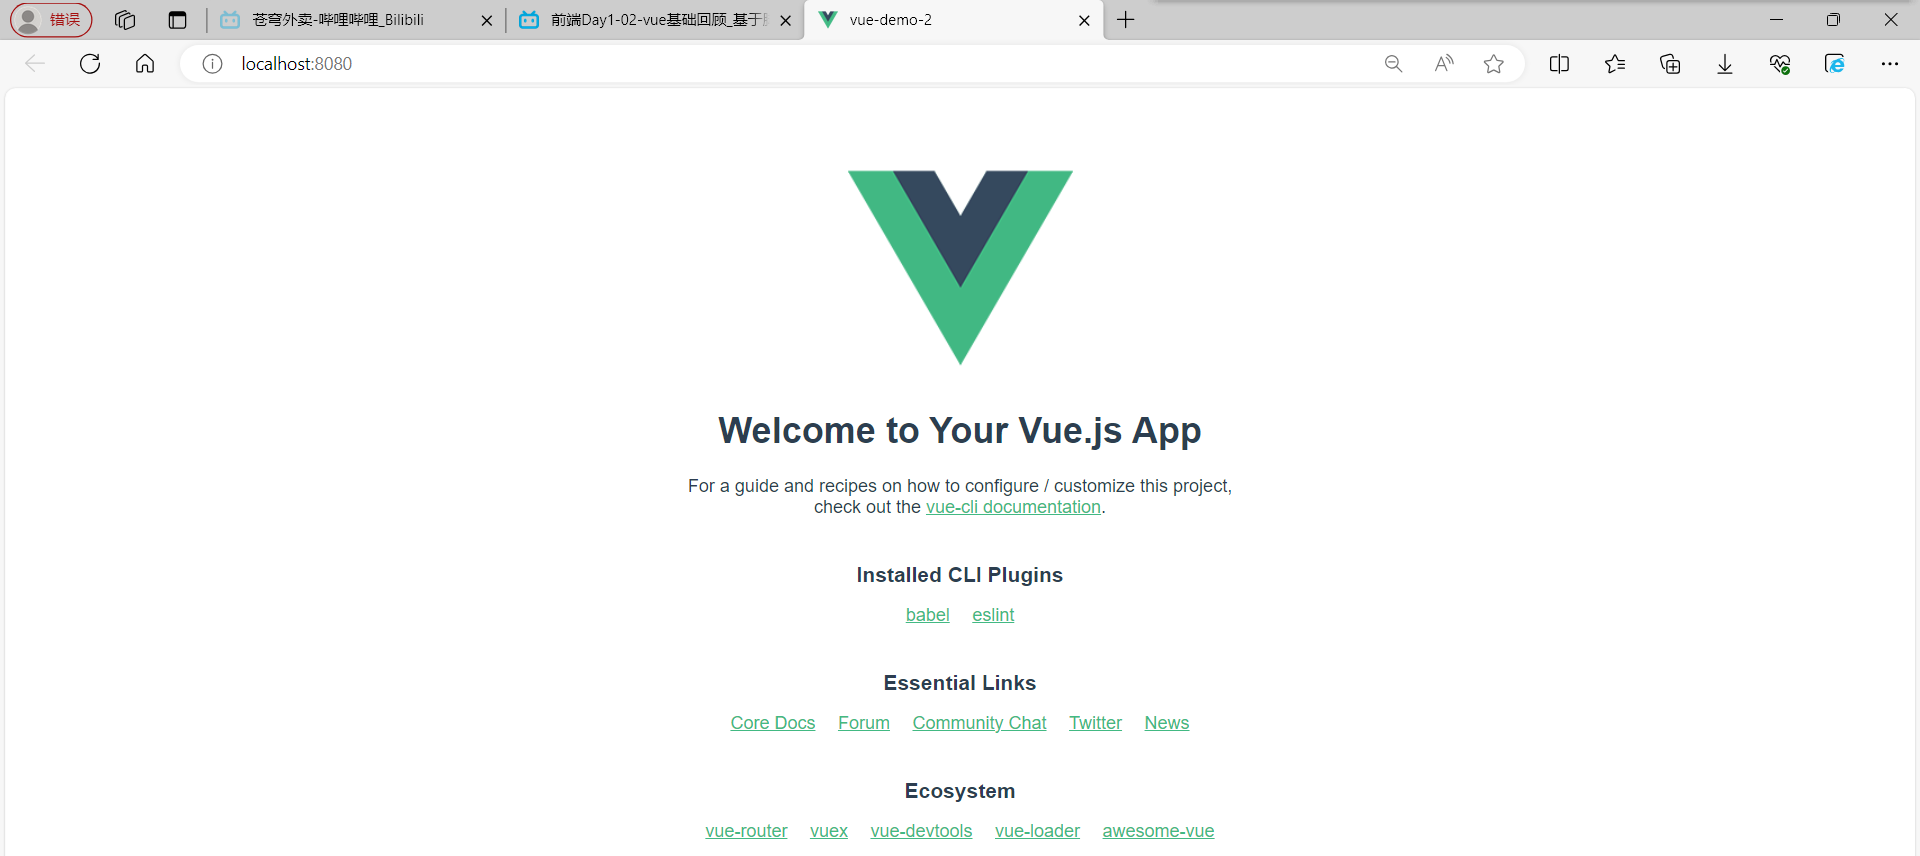
如果想退出可以按住ctrl +c
如果想更改端口号,可以在vue.config.js文件中输入如下代码(注意一定要在写完后ctrl+s保存!!!):
const { defineConfig } = require('@vue/cli-service')
module.exports = defineConfig({
  transpileDependencies: true,
  devServer:{
    port:7070
  }
})
如下图没啥问题:
4.3 Vue使用方法 P173
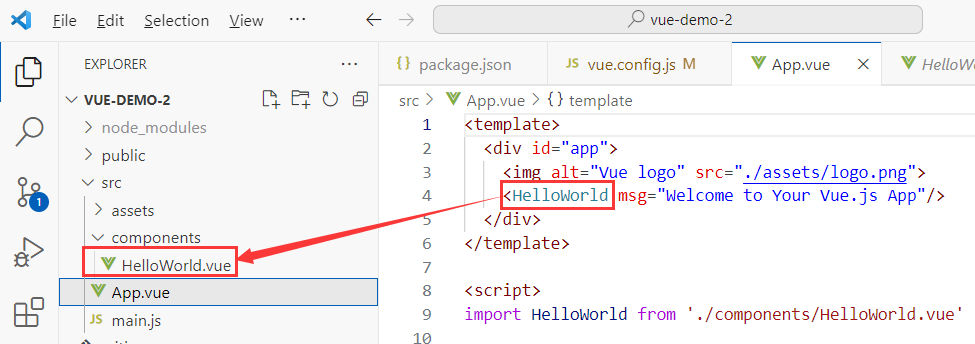
可以先在HelloWorld.vue中先把div下的内容删掉,然后再把App.vue下的图片删掉:


1.vue组件
Vue的组件文件以.vue结尾,每个组件由三部分组成。
结构<template>:只有一个根元素,由它生成HTML代码。
逻辑<script>:编写js代码,控制模板的数据来源和行为。
样式<style>:编写css,控制页面展示效果;全局样式:影响所有组件;局部样式:只作用于当前组件。
2.文本插值
作用:用来绑定data方法返回的对象属性
用法:{{ }}
案例:将HelloWorld.vue中的相应内容替换为如下:
<template>
  <div class="hello">
    {{name}}
    {{age > 60 ? '老年':'青年'}}
  </div>
</template>

<script>
export default {
 data(){
  return{
    name: '张三',
    age: 70
  }
 }
}
</script>
效果为:

3.属性绑定
作用:为标签的属性绑定data方法中返回的属性
用法:v-bind:xxx,简写为 :xxx
案例:将HelloWorld.vue中的相应内容替换为如下:
<template>
  <div class="hello">
    {{name}}
    {{age > 60 ? '老年':'青年'}}
    <input type="text" v-bind:value="name"/>
    <input type="text" :value="age"/>
    <img :src="src"/>
  </div>
</template>

<script>
export default {
 data(){
  return{
    name: '张三',
    age: 70,
    src: 'https://tse1-mm.cn.bing.net/th/id/OIP-C.00HEmqYJSK44tQgKfX9dWAHaEo?rs=1&pid=ImgDetMain'
  }
 }
}
</script>
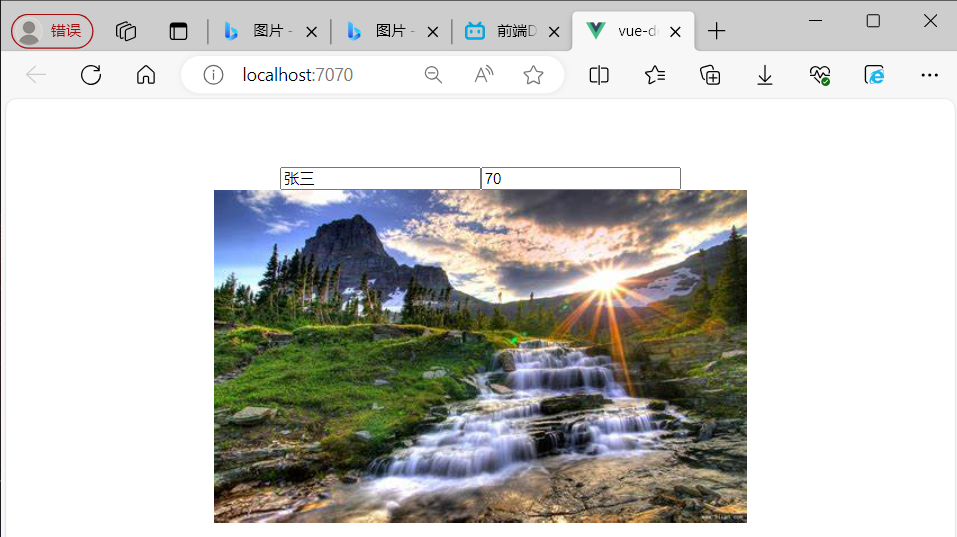
效果为:
4.事件绑定
作用:为元素绑定对应的事件。
用法:v-on:xxx,简写为@xxx
案例:将HelloWorld.vue中的相应内容替换为如下:
<template>
  <div class="hello">
    <input type="button" value="保存" v-on:click="handleSave"/>
    <input type="button" value="保存" @click="handleSave"/>
  </div>
</template>

<script>
export default {
  methods:{
    handleSave(){
      alert('你点击了保存按钮')
    }
  }
}
</script>
效果为: 点击保存后会出现弹窗
![]()
![]()
5.双向绑定
作用:表单输入项和data方法中的属性进行绑定,任意一方改变都会同步给另一方。
用法:v-model
案例:将HelloWorld.vue中的相应内容替换为如下:
<template>
  <div class="hello">
    {{name}}
    <input type="text" v-bind:value="name"/>
    <input type="text" v-model="name" />
    <input type="button" value="修改name" @click="handleChange" />
  </div>
</template>

<script>
export default {
  data(){
    return {
      name: '张三'
    }
  },
  methods:{
    handleChange(){
      this.name = '李四'
    }
  }
}
</script>
效果为: 点击修改name按钮后,三个框都会变成李四。


6.条件渲染
作用:根据表达式的值来动态渲染页面元素
用法:v-if、v-else、v-else-if
案例:将HelloWorld.vue中的相应内容替换为如下:
<template>
  <div class="hello">
    <div v-if="sex==1">男</div>
    <div v-else-if="sex==0">女</div>
    <div v-else>为止</div>
  </div>
</template>

<script>
export default {
  data(){
    return {
      sex: 1
    }
  },

}
</script>
4.4 Vue之axios使用 P174
1.下载axios
Axios是一个基于promise的网络请求库,作用于浏览器和node.js中
安装命令:
npm install axios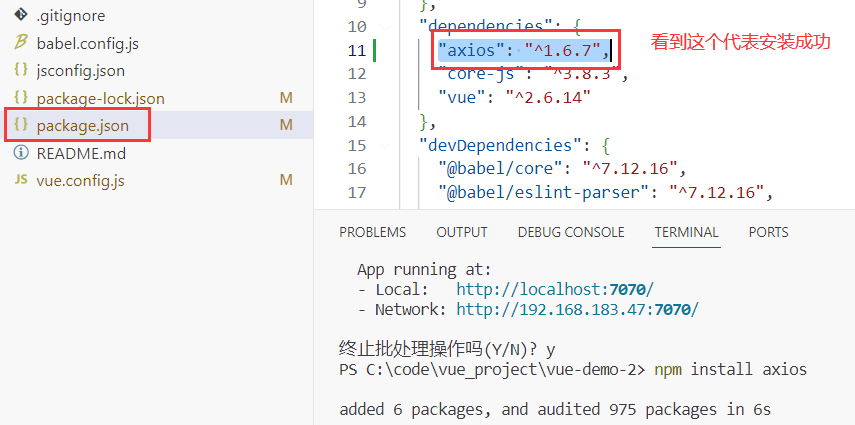
导入命令:
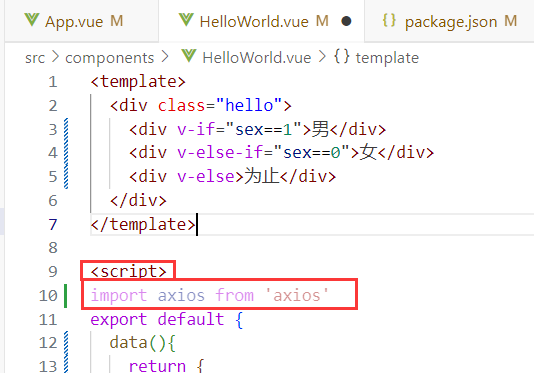
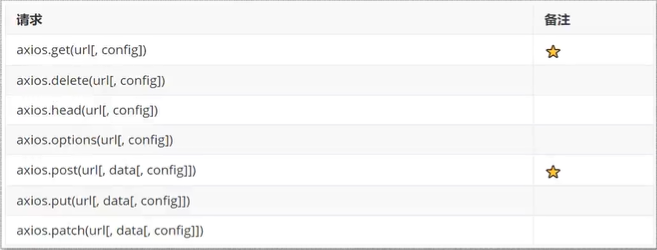
import axios from 'axios'axios的API列表 :
2.跨域问题
为了解决跨域问题,可以在vue.config.js文件中配置代理。
反向案例:设置一个按钮,点击按钮可以向后端发送请求。将HelloWorld.vue中的相应内容替换为如下:
<template>
  <div class="hello">
    <input type="button" value="发送请求" @click="handleSend"/>
  </div>
</template>

<script>
import axios from 'axios'
export default {
  methods:{
    handleSend(){
      //通过axios发送http请求
      axios.post('http://localhost:8080/admin/employee/login',{
        username: 'admin',
        password: '123456'
      }).then(res => {
        console.log(res.data)
      }).catch(error=>{
        console.log(error.response)
      })
    }
  }
}
</script>
效果:点击发送请求后,看控制台输出如下错误(发生了跨域错误):

3.跨域问题解决(Post请求)
当前端口是7070,想往8080发送请求,解决方法是配置代理。前端请求先请求到代理,然后代理转发服务请求到后端。proxy是代理的意思。/api要求前端发送的请求都以/api开始,才进行代理。会转发到指定的target的服务上。pathRewrite会将/api配置成空串。
在vue.config.js中写入如下代码:
const { defineConfig } = require('@vue/cli-service')
module.exports = defineConfig({
  transpileDependencies: true,
  devServer:{
    port:7070,
    proxy:{
      '/api' : {
        target:'http://localhost:8080',
        pathRewrite:{
          '^/api':''
        }
      }
    }
  }
})
把HelloWorld.vue中的script里的代码替换为如下:
<script>
import axios from 'axios'
export default {
  methods:{
    handleSend(){
      //通过axios发送http请求
      axios.post('/api/admin/employee/login',{
        username: 'admin',
        password: '123456'
      }).then(res => {
        console.log(res.data)
      }).catch(error=>{
        console.log(error.response)
      })
    }
  }
}
</script>
案例:将HelloWorld.vue中的相应内容替换为如下:
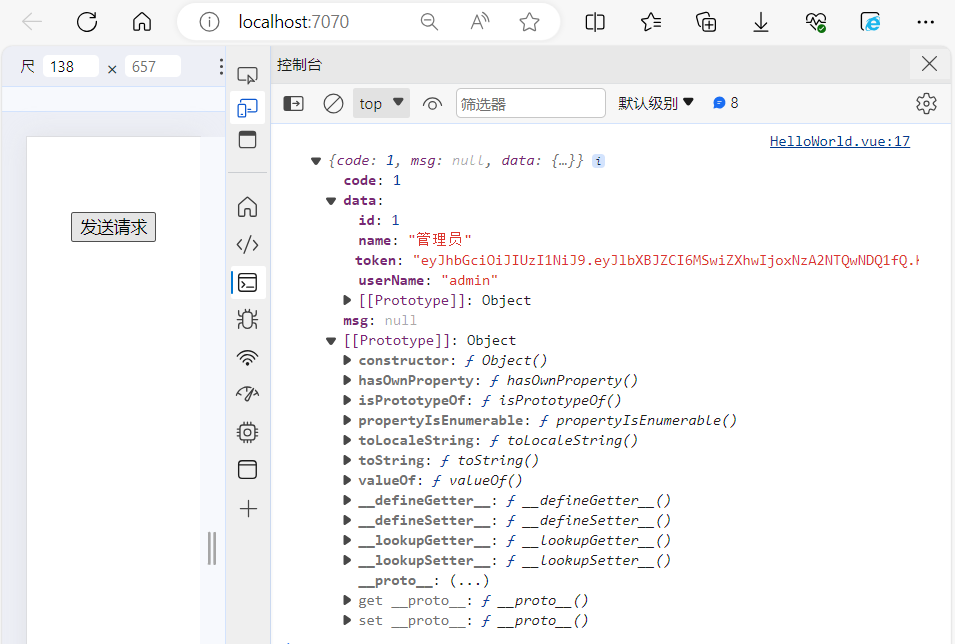
效果为: 成功请求到后端,获得token
4.Get请求
记得要传入jwt令牌,才能通过后端拦截器的校验。将HelloWorld.vue中的相应内容替换为如下:
<template>
  <div class="hello">
    <input type="button" value="发送Post请求" @click="handleSendPost"/>
    <input type="button" value="发送Get请求" @click="handleSendGet"/>
  </div>
</template>

<script>
import axios from 'axios'
export default {
  methods:{
    handleSendPost(){
      //通过axios发送http请求
      axios.post('/api/admin/employee/login',{
        username: 'admin',
        password: '123456'
      }).then(res => {
        console.log(res.data)
      }).catch(error=>{
        console.log(error.response)
      })
    },
    handleSendGet(){
      axios.get('/api/admin/shop/status',{
        headers:{
          token:'eyJhbGciOiJIUzI1NiJ9.eyJlbXBJZCI6MSwiZXhwIjoxNzA2NTQwOTkyfQ.BMXCB7aDwRE8ab9yJP9JefiB3xBYMPWXejTJXkNHQUQ'
        }
      }).then(res=>{
      console.log(res.data)
     })
    }
  }
}
</script>
首先点击发送Post请求按钮,要获得到token,然后把token作为参数填入到headers里面。此时再点击Get请求,就能成功请求的status(店铺的状态)。

5.通用方式请求
先请求登录,获得token,然后把token作为下一次请求的参数,继续请求店铺状态。将HelloWorld.vue中的相应内容替换为如下:
<template>
  <div class="hello">
    <input type="button" value="统一请求方式" @click="handleSend"/>
  </div>
</template>

<script>
import axios from 'axios'
export default {
  methods:{
    handleSend(){
      //使用axios提供的统一调用方式发送请求
      axios({
        url:'/api/admin/employee/login',
        method: 'post',
        data:{
          username:'admin',
          password:'123456'
        }
      }).then(res=>{
        console.log(res.data.data.token) //res.data是返回的数据,第2个data是返回的数据里的data,然后获取token
        axios({
          url: '/api/admin/shop/status',
          method: 'get',
          headers:{
            token: res.data.data.token
          }
        })
      })
    }
  }
}
</script>
效果是发送出2个请求,在请求状态的请求头中会带有token。在浏览器的控制台会输出token,然后在IDEA中会显示请求状态。
4.5 路由介绍和配置 P175
vue属于单页面应用,所谓的路由,就是根据浏览器路径不同,用不同的视图组件替换这个页面内容
1.创建带有路由功能的前端项目

进入vue项目管理器
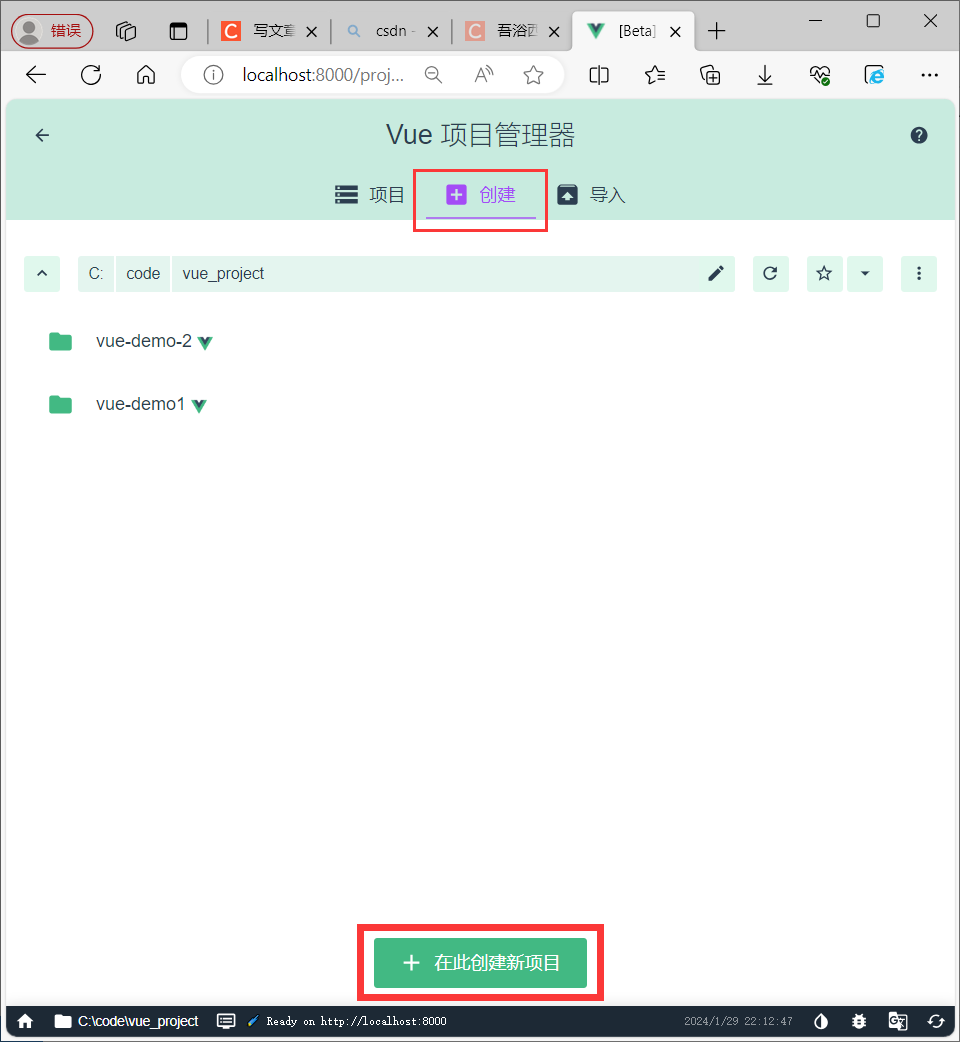
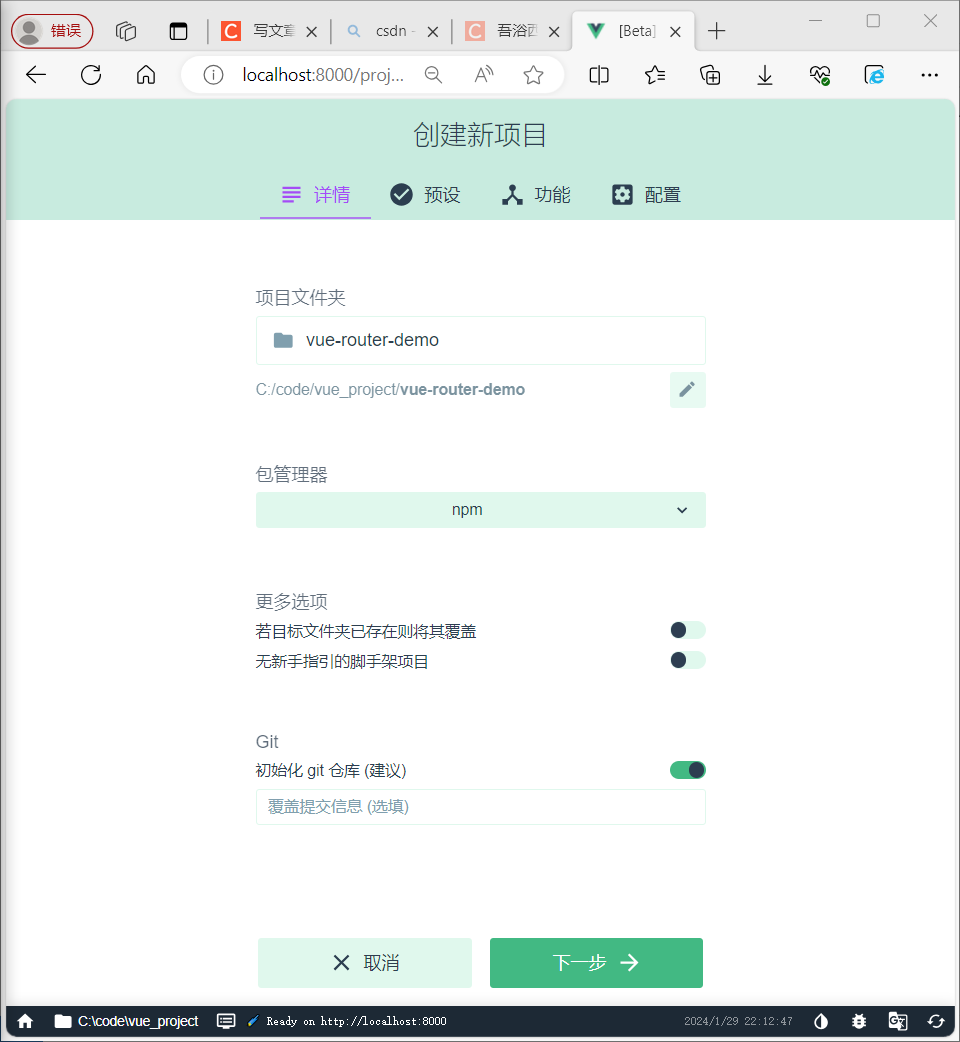
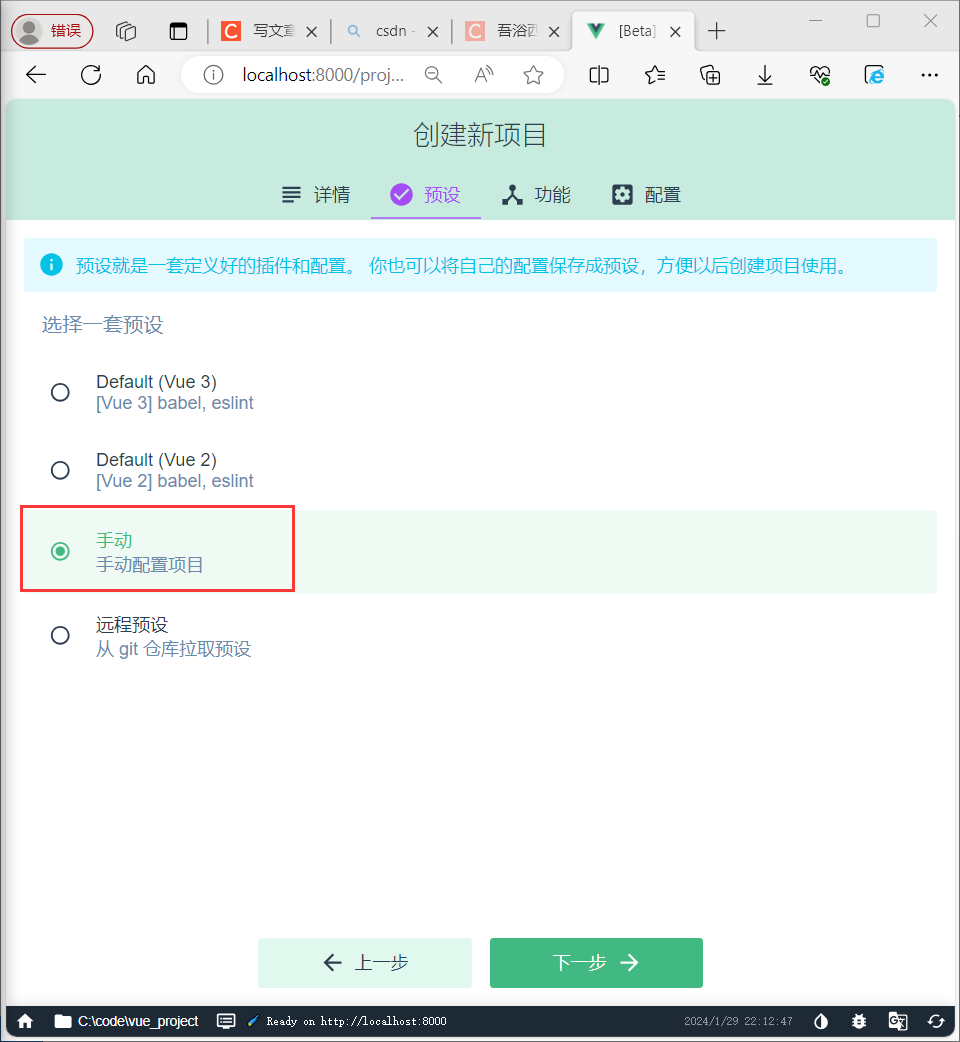
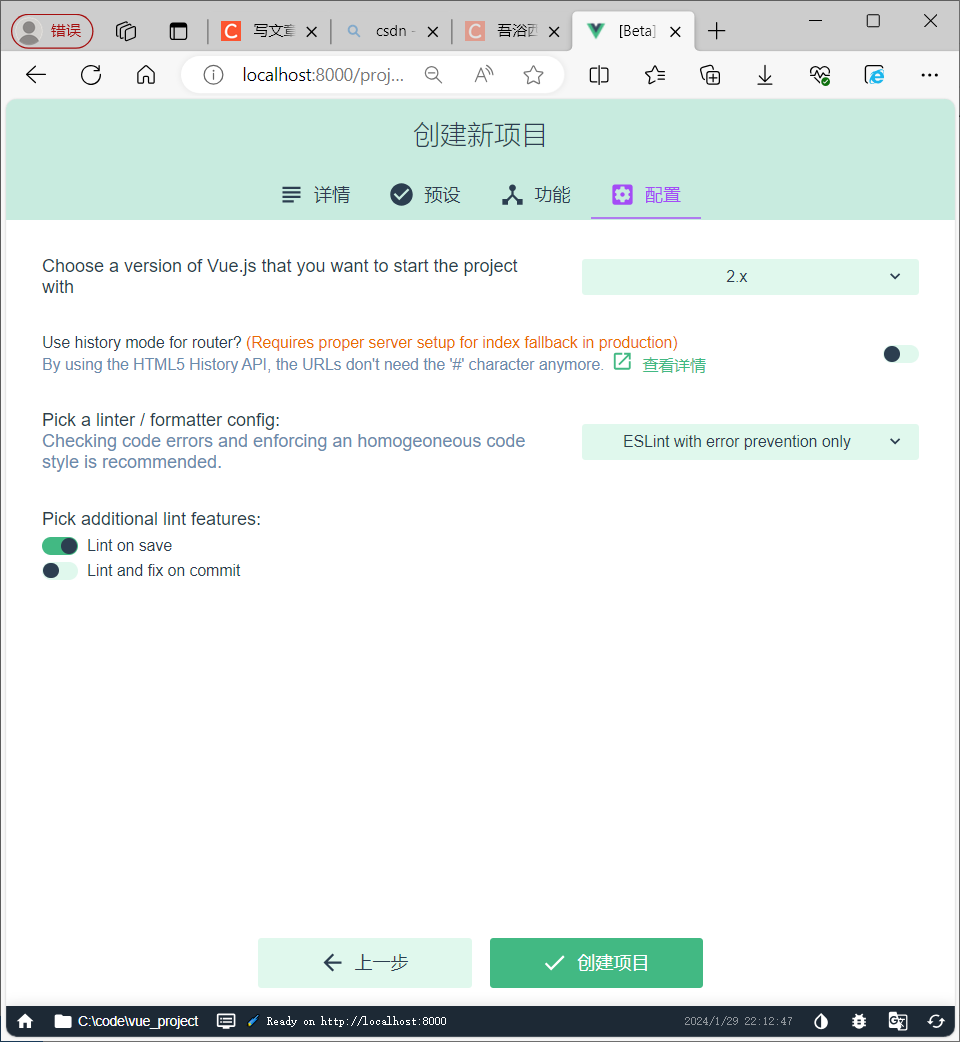
选中Router,使其具有路由功能。

在vscode中用Open Folder把文件夹打开,在命令栏中输入npm run serve,进入到连接中展示了如下页面:
![]()

2.路由逻辑分析
路由组成:
VueRouter:路由器,根据路由请求在路由视图中动态渲染对应的视图组件。
<router-link>:路由链接组件,浏览器会解析成<a>
<router-view>:路由视图组件,用来展示与路由路径匹配的视图组件。

首先在package.json里面加入“vue-router”,然后在main.js中引入router,找到router下面有一个index.js,然后在这个文件里引入VueRouter(在vue-router里)。
下面是维护路由表,某个路由路径对应哪个视图组件。
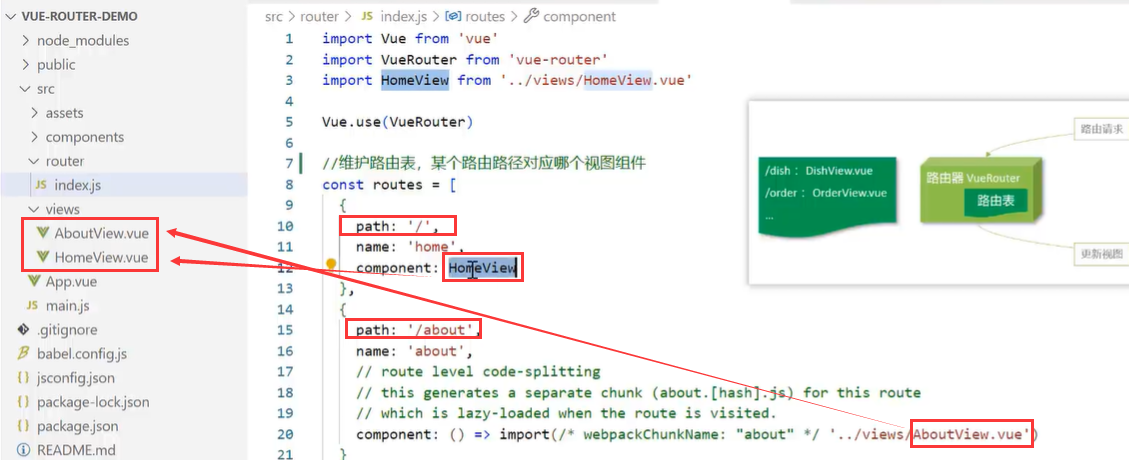
动态导入,只有调用的时候才会加载。
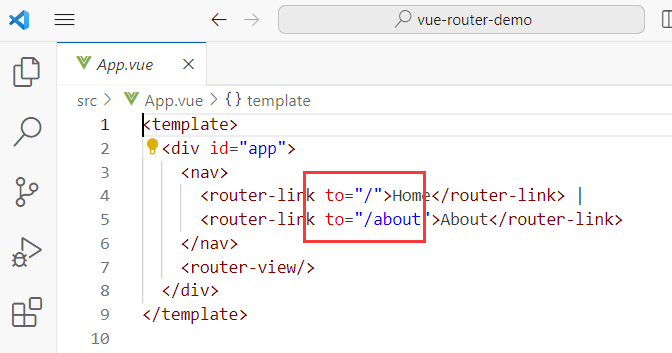
下面是首页那两个跳转连接的代码(<router-view/>很重要,视图展示组件,控制视图在哪里展示;如果没有写这个,效果会如右图):

3.编程式路由
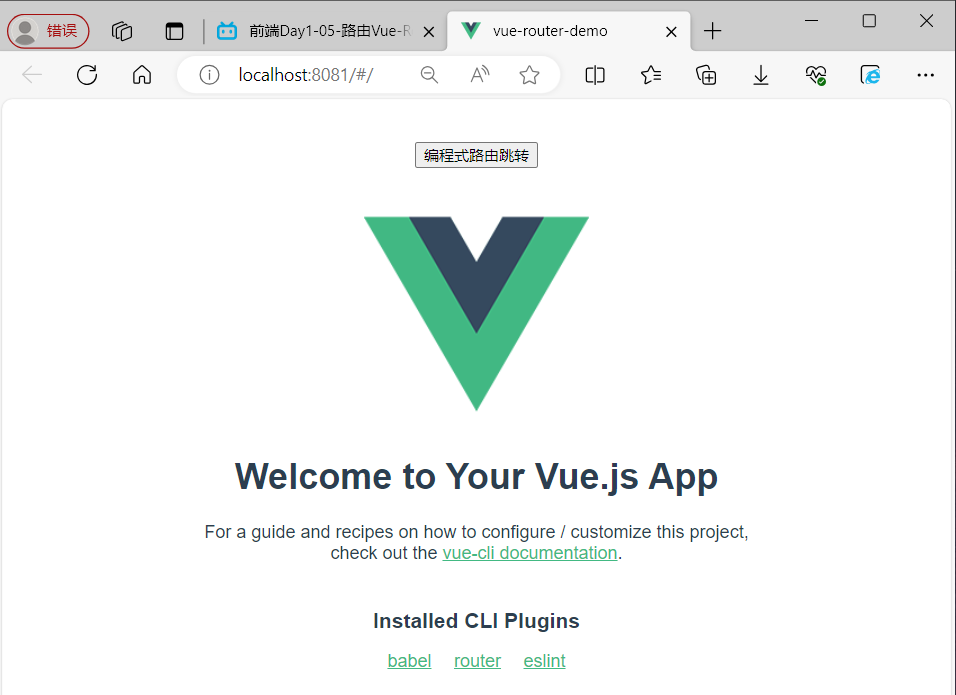
App.vue中的相应内容替换为如下:
<template>
  <div id="app">
    <nav>
      <input type="button" value="编程式路由跳转" @click="jump"/>
    </nav>
    <router-view/>
  </div>
</template>

<script>
export default{
  methods:{
    jump(){
      //使用编程式路由跳转
      this.$router.push('/about')
    }
  }
}
</script>
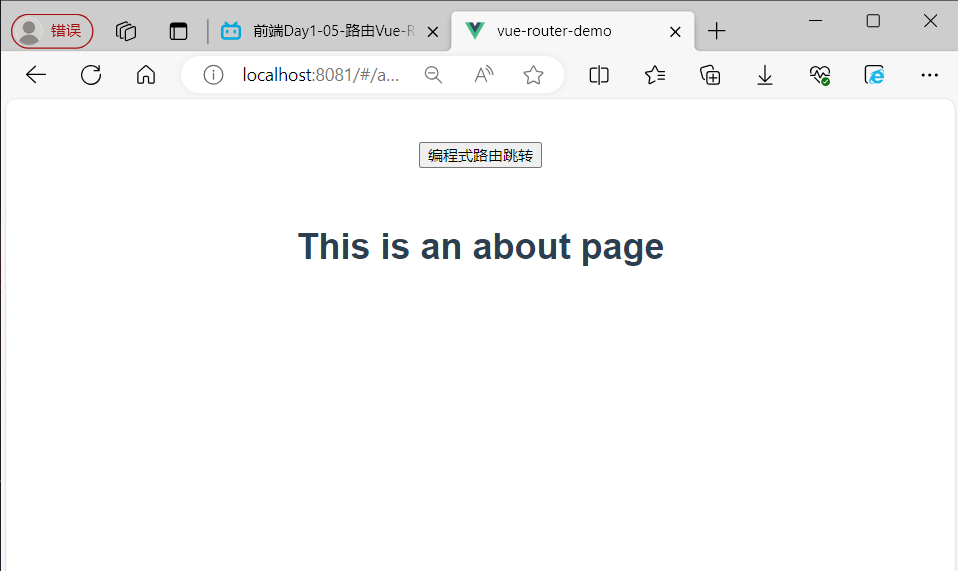
this.$router是获取到路由对象。push方法是根据url进行跳转。
4.访问的页面不存在
在index.js中将代码替换如下:
import Vue from 'vue'
import VueRouter from 'vue-router'
import HomeView from '../views/HomeView.vue'

Vue.use(VueRouter)

const routes = [
  {
    path: '/',
    name: 'home',
    component: HomeView
  },
  {
    path: '/about',
    name: 'about',
    component: () => import('../views/AboutView.vue')
  },
  {
    path: '/404',
    component: () => import('../views/404View.vue')
  },
  {
    path: '*',
    redirect: '/404'
  }
]

const router = new VueRouter({
  routes
})

export default router
在src/views下创建一个404View.vue文件,写入如下代码:
<template>
  <div class="about">
    <h1>你访问的页面不存在</h1>
  </div>
</template>
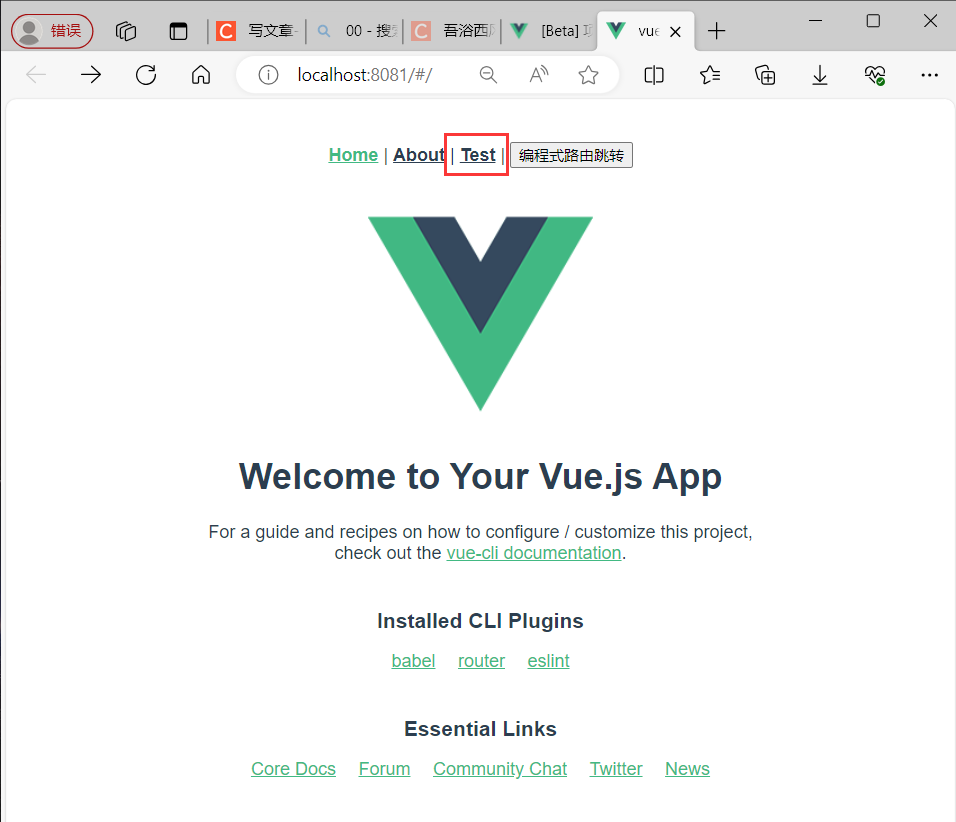
将App.vue的<template>和<script>下的代码替换为:
<template>
  <div id="app">
    <nav>
      <router-link to="/">Home</router-link> |
      <router-link to="/about">About</router-link> |
      <router-link to="/test">Test</router-link> |
      <input type="button" value="编程式路由跳转" @click="jump"/>
    </nav>
    <router-view/>
  </div>
</template>

<script>
export default{
  methods:{
    jump(){
      //使用编程式路由跳转
      this.$router.push('/about')
    }
  }
}
</script>
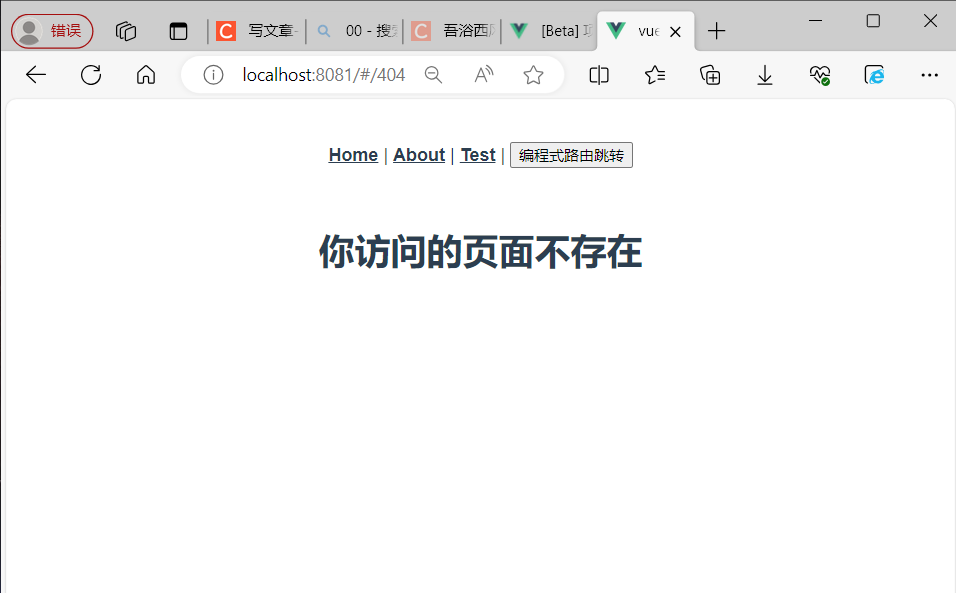
效果是点击Test之后因为匹配不到对应的组件,会跳转到404对应的页面,显示页面不存在。
4.6 嵌套路由 P176
嵌套路由:组件内要切换内容(也就是变化的时候只改变页面的一部分,另一部分不改变),需要用到嵌套路由。
1.安装并导入elementui,实现页面布局
在vscode的控制台输入如下命令:
npm i element-ui -S在main.js中写入如下代码:
import ElementUI from 'element-ui'
import 'element-ui/lib/theme-chalk/index.css'
Vue.use(ElementUI)
2.提供子视图组件,用于效果展示
3.在src/router/index.js中配置路由映射规则
4.在布局容器视图中添加<router-view>,实现子视图组件展示
5.在布局容器
4.7 vuex介绍和使用 P177
1.vuex介绍
vuex是一个专为Vue.js应用程序开发的状态管理库。
vuex可以在多个组件之间共享数据,并且共享的数据是响应式的,即数据的变更能及时渲染到模板。
vuex采用集中式存储管理所有组件的状态。
安装命令:
npm install vuex@next --savestate:状态对象,集中定义各个组件共享的数据。
mutations:类似于一个事件,用于修改共享数据,要求必须是同步函数。
actions:类似于mutation,可以包含异步操作,通过调用mutation来改变共享数据。
2.创建带有vuex的脚手架项目

进入vue项目管理器

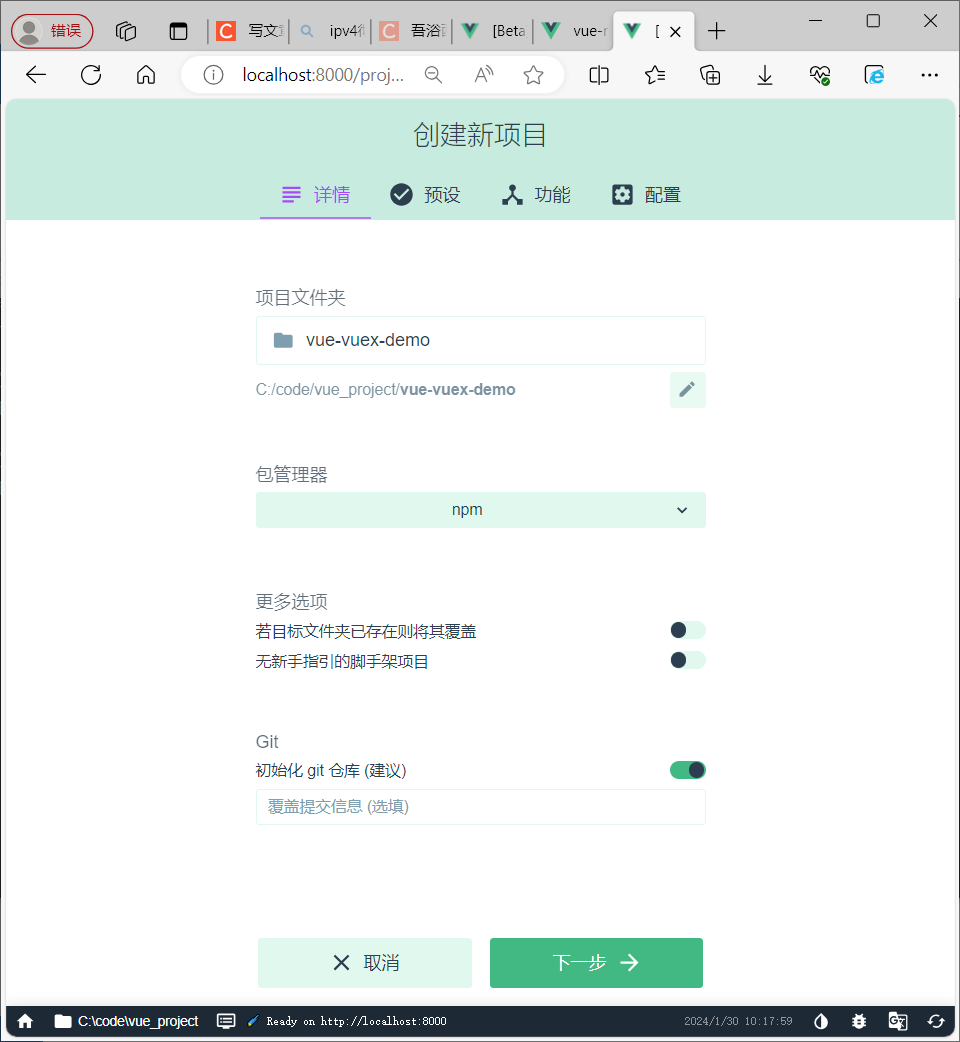

选中Vuex,使其具有Vuex功能。


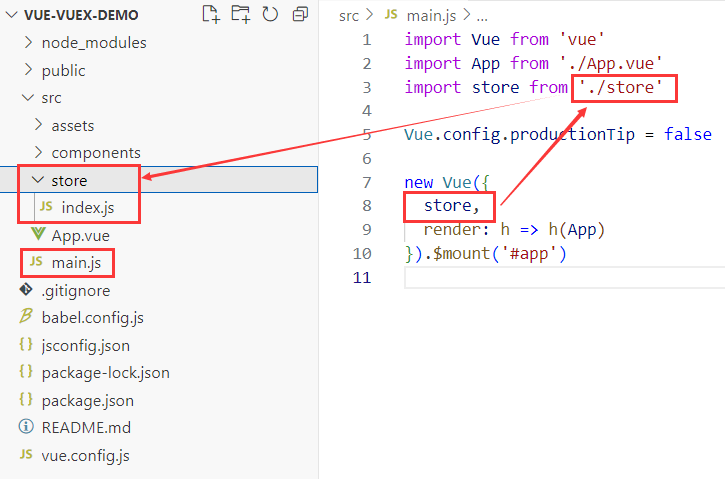

3.Vuex实例(同一变量多组件展示)
在state下定义一个name公共变量,然后在2个组件中用插值表达式展示。
在store下面将index.js的内容替换如下:
import Vue from 'vue'
import Vuex from 'vuex'

Vue.use(Vuex)

export default new Vuex.Store({
  state: {
    name: '未登录游客'
  },
  getters: {
  },
  mutations: {
  },
  actions: {
  },
  modules: {
  }
})
将App.vue中的<template>内容替换如下:
<template>
  <div id="app">
    欢迎你,{{$store.state.name}}
    <img alt="Vue logo" src="./assets/logo.png">
    <HelloWorld msg="Welcome to Your Vue.js App"/>
  </div>
</template>
将HelloWorld.vue中的<template>内容替换如下:
<template>
  <div class="hello">
    <h1>欢迎你,{{$store.state.name}}</h1>
  </div>
</template>
4.Vuex实例(mutations修改变量)
修改store/index.js下面的代码内容:
import Vue from 'vue'
import Vuex from 'vuex'

Vue.use(Vuex)

export default new Vuex.Store({
  state: {
    name: '未登录游客'
  },
  getters: {
  },
  //通过当前属性中定义的函数修改共享数据,必须都是同步操作
  mutations: {
    setName(state,newName){
      state.name = newName
    }
  },
  actions: {
  },
  modules: {
  }
})
修改App.vue下面的<template>和<script>下的代码内容:
<template>
  <div id="app">
    欢迎你,{{$store.state.name}}
    <input type="button" value="通过mutations修改共享数据" @click="handleUpdate"/>
    <img alt="Vue logo" src="./assets/logo.png">
    <HelloWorld msg="Welcome to Your Vue.js App"/>
  </div>
</template>

<script>
import HelloWorld from './components/HelloWorld.vue'
export default {
  name: 'App',
  components: {
    HelloWorld
  },
  methods:{
    handleUpdate(){
      //mutation中定义的函数不能直接调用,必须通过下面这种方式调用
      this.$store.commit('setName','lisi')
      //setName为mutation中定义的函数名称,list为传递的参数
    }
  }
}
</script>
第1个参数指定的是调用的函数名,然后第2个参数代表的是newName,注意state是自动传入的。
4.8 vuex使用 P178
1.Vuex实例(actions修改变量含有异步操作)
所谓异步感觉就是有先后顺序的操作,前一步的结果可能作为下一步的参数使用。
首先安装axios:
npm install axioscontext是上下文,有了上下文就可以调用到mutations里面的方法。
在异步请求后,需要修改共享数据,只能通过mutations中的方法。
在App.vue中将<template>和<script>代码替换为如下:
<template>
  <div id="app">
    欢迎你,{{$store.state.name}}
    <input type="button" value="通过mutations修改共享数据" @click="handleUpdate"/>
    <input type="button" value="通过actions中定义的函数" @click="handleCallAction"/>
    <img alt="Vue logo" src="./assets/logo.png">
    <HelloWorld msg="Welcome to Your Vue.js App"/>
  </div>
</template>

<script>
import HelloWorld from './components/HelloWorld.vue'
export default {
  name: 'App',
  components: {
    HelloWorld
  },
  methods:{
    handleUpdate(){
      //mutation中定义的函数不能直接调用,必须通过下面这种方式调用
      this.$store.commit('setName','lisi')
      //setName为mutation中定义的函数名称,list为传递的参数
    },
    handleCallAction(){
      //调用actions中定义的函数,setNameByAxios为函数名称
      this.$store.dispatch('setNameByAxios')
    }
  }
}
</script>
在store/index.js中将代码替换为如下:
import Vue from 'vue'
import Vuex from 'vuex'
import axios from 'axios'

Vue.use(Vuex)

export default new Vuex.Store({
  state: {
    name: '未登录游客'
  },
  getters: {
  },
  //通过当前属性中定义的函数修改共享数据,必须都是同步操作
  mutations: {
    setName(state,newName){
      state.name = newName
    }
  },
  //通过actions调用mutation,在actions中可以进行异步操作
  actions: {
    setNameByAxios(context){
      axios({
        url:'/api/admin/employee/login',
        method: 'post',
        data:{
          username:'admin',
          password:'123456'
        }
      }).then(res=>{
        if(res.data.code==1){
          //异步请求后,需要修改共享数据
          //在actions中调用mutation中定义的setName函数
          context.commit('setName',res.data.data.name)
        }
      })
    }
  },
  modules: {
  }
})
在vue.config.js中配置跨域:
const { defineConfig } = require('@vue/cli-service')
module.exports = defineConfig({
  transpileDependencies: true,
  devServer:{
    port:7777,
    proxy:{
      '/api':{
        target:'http://localhost:8080',
        pathRewrite:{
          '^/api':''
        }
      }
    }
  }
})
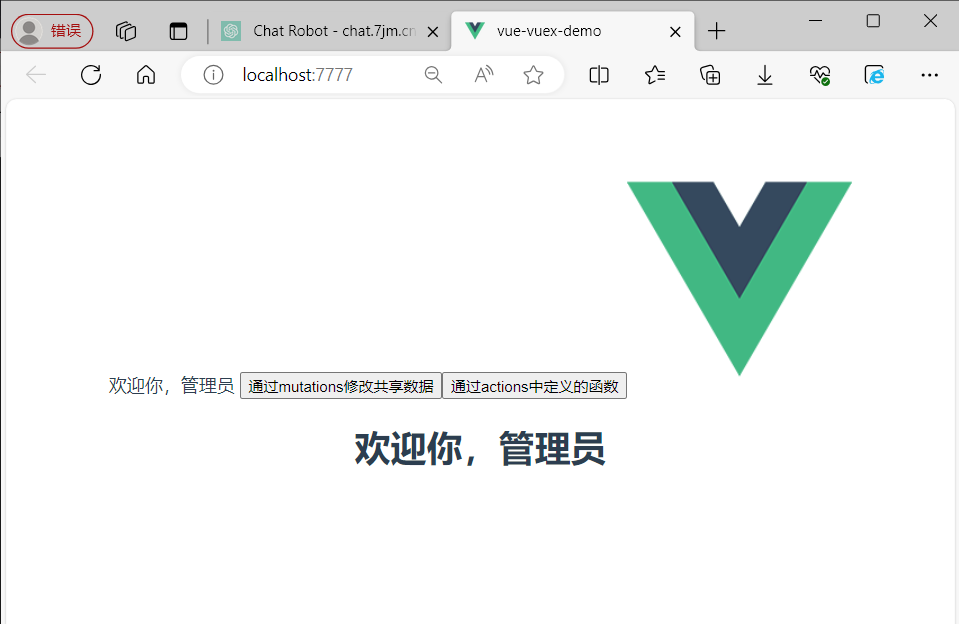
效果如下(初始为左图,点击通过actions中定义的函数后效果为右图):

4.9 TypeScript介绍 P179 P180
1.环境配置
TypeScript简称TS,是微软推出的开源语言。TypeScript是JavaScript的超集(JS有的TS都有)。TypeScript=Type+JavaScript(在JS基础上增加了类型支持)。TypeScript文件扩展名为ts。TypeScript可编译成标准的JavaScript,并且在编译时进行类型检查。
安装typescript的方法:
npm install -g typescript查看TS版本:
tsc -v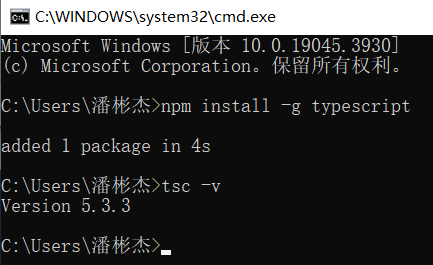
2.简单使用
在vue_project下面创建一个hello.ts:

写入如下代码:
//通过ts代码,制定函数的参数类型为string
function hello(msg:string){
    console.log(msg)
}
//传入参数类型为number
hello(123)
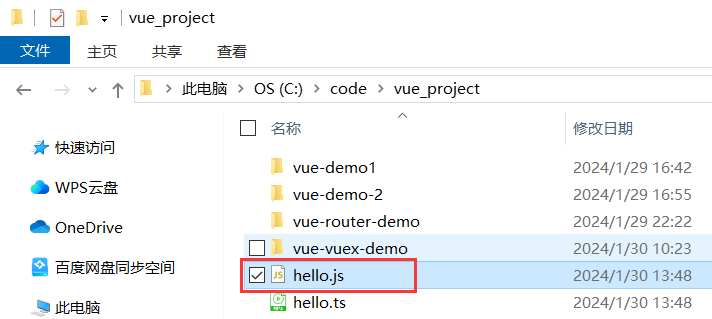
编译使用< tsc 文件名.ts >。上面代码会报错:

修改为如下:
//通过ts代码,制定函数的参数类型为string
function hello(msg:string){
    console.log(msg)
}
//传入参数类型为number
hello('123')
重新用tsc编译,输入node hello.js,会输出123

TS属于静态类型编程语言,JS属于动态类型编程语言。静态类型在编译期做类型检查,动态类型在执行期做类型检查。TS可以更早发现问题。
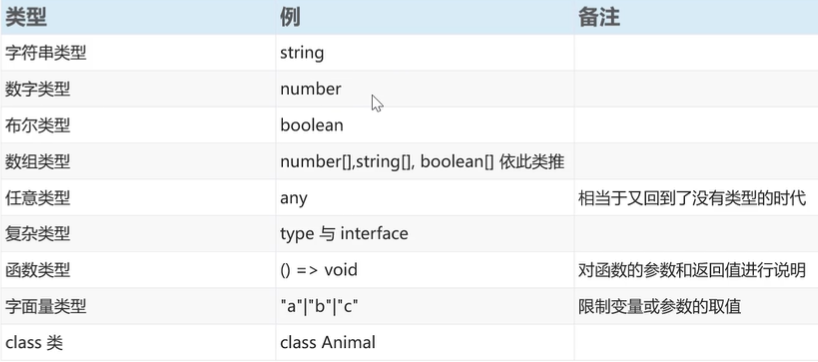
TypeScript常用类型:
3.Ts项目

进入vue项目管理器


选中TypeScrpt,使其支持Ts语言:


用vscode打开项目,然后在src下面创建ts_test。
然后写入如下代码:
//字符串类型
let username:string = 'itcast'
//数字类型
let age:number=20
//布尔类型
let isTrue:boolean=true

console.log(username)
console.log(age)
console.log(isTrue)
console.log('------------')

//字面量类型
function printText(s:string,alignment:'left'|'right'|'center'){
    console.log(s,alignment)
}
printText('hello','left')
//printText('hello','aaa')这是不行的
console.log('------------')

//interface接口
interface Cat{
    name:string,
    age?:number
}
const c1:Cat={name:'小白',age:1}
const c2:Cat={name:'小花'}
//加?代表当前属性可选,可以有也可没有,如果没加?缺少一个参数,多一个参数都会有问题

//定义一个类
class User{
    name:string; //指定类中的属性
    constructor(name:string){ //构造方法
        this.name =name;
    }
    //方法
    study(){
        console.log(this.name+"正在学习")
    }
}
const user = new User('张三')
//输出类中的属性
console.log(user.name)
//调用类中的方法
user.study()
console.log('------------')

//类实现接口
interface Animal{
    name:string
    eat():void
}
//定义一个类,实现上面的接口
class Bird implements Animal{
    name:string
    constructor(name:string){
        this.name = name
    }
    eat():void{
        console.log(this.name+' eat')
    }
}
//创建类型为Bird的对象
const b1 = new Bird('燕子')
console.log(b1.name)
b1.eat()
console.log('------------')

//定义一个类,继承上面的类
class Parrot extends Bird{
    say(){
        console.log(this.name+' say hello')
    }
}
const myParrot = new Parrot('Polly')
myParrot.eat();
myParrot.say();
console.log(myParrot.name)
字面量类型:是用于限定数据的取值范围的,有点像枚举类型。
interface类型:可以通过在属性名后面加上?,表示当前属性为可选。
class类:使用class关键字来定义类,类中可以包含属性、构造方法、普通方法。
在控制台输入下面代码进行编译:
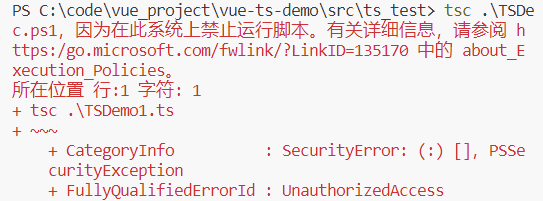
tsc .\TSDemo1.ts如果出现如下问题,解决方法如下:

编译完后出现如下:
![]()
输入下面的进行结果输出:
node .\TSDemo1.js结果如下:

4.10 前端环境搭建 P181
1.前端代码介绍
技术选型:node.js,vue,ElementUI,axios,vuex,vue-router,typescript
前端的初始文件是在苍穹外卖前端课程的day2里的资料压缩包里。

解压之后用vscode打开:
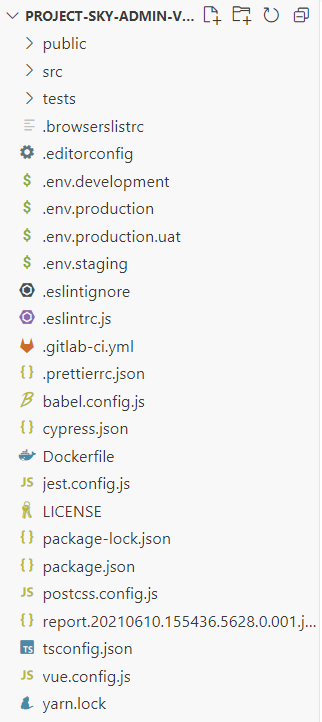
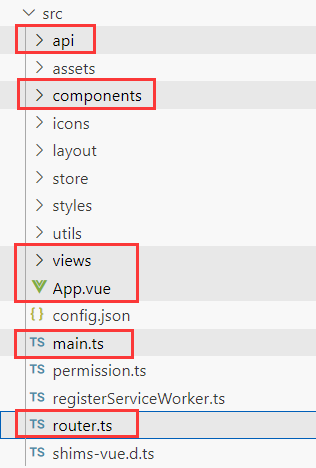
api:存放封装了Ajax请求文件的目录(请求的路径)。
components:公共组件存放目录。
views:存放视图组件的目录(页面的真正效果)。
App.vue:项目的主组间,页面的入口文件。
main.js:整个项目的入口文件
router.ts:路由文件
2.前端代码梳理
首先输入下面代码,把package.json里面的包安装一下:
npm install这里起初是报了错误,有多个包已被废弃,还有安全性的问题。
像我目前的node版本是18,推荐下降到12版本。当我换完版本之后问题都迎刃而解。
![]()
![]()
如果出现安全性问题可以打开cmd输入以下代码,
npm config set strict-ssl false可以看到大部分包被安装完毕,后续没有出现太大问题。
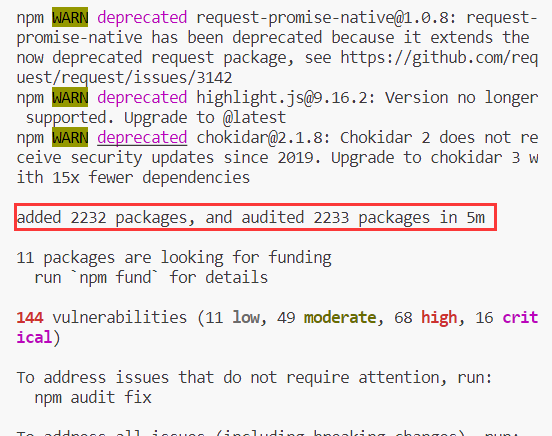
然后启动前端的代码:
npm run serve下面是运行到登录界面的效果:
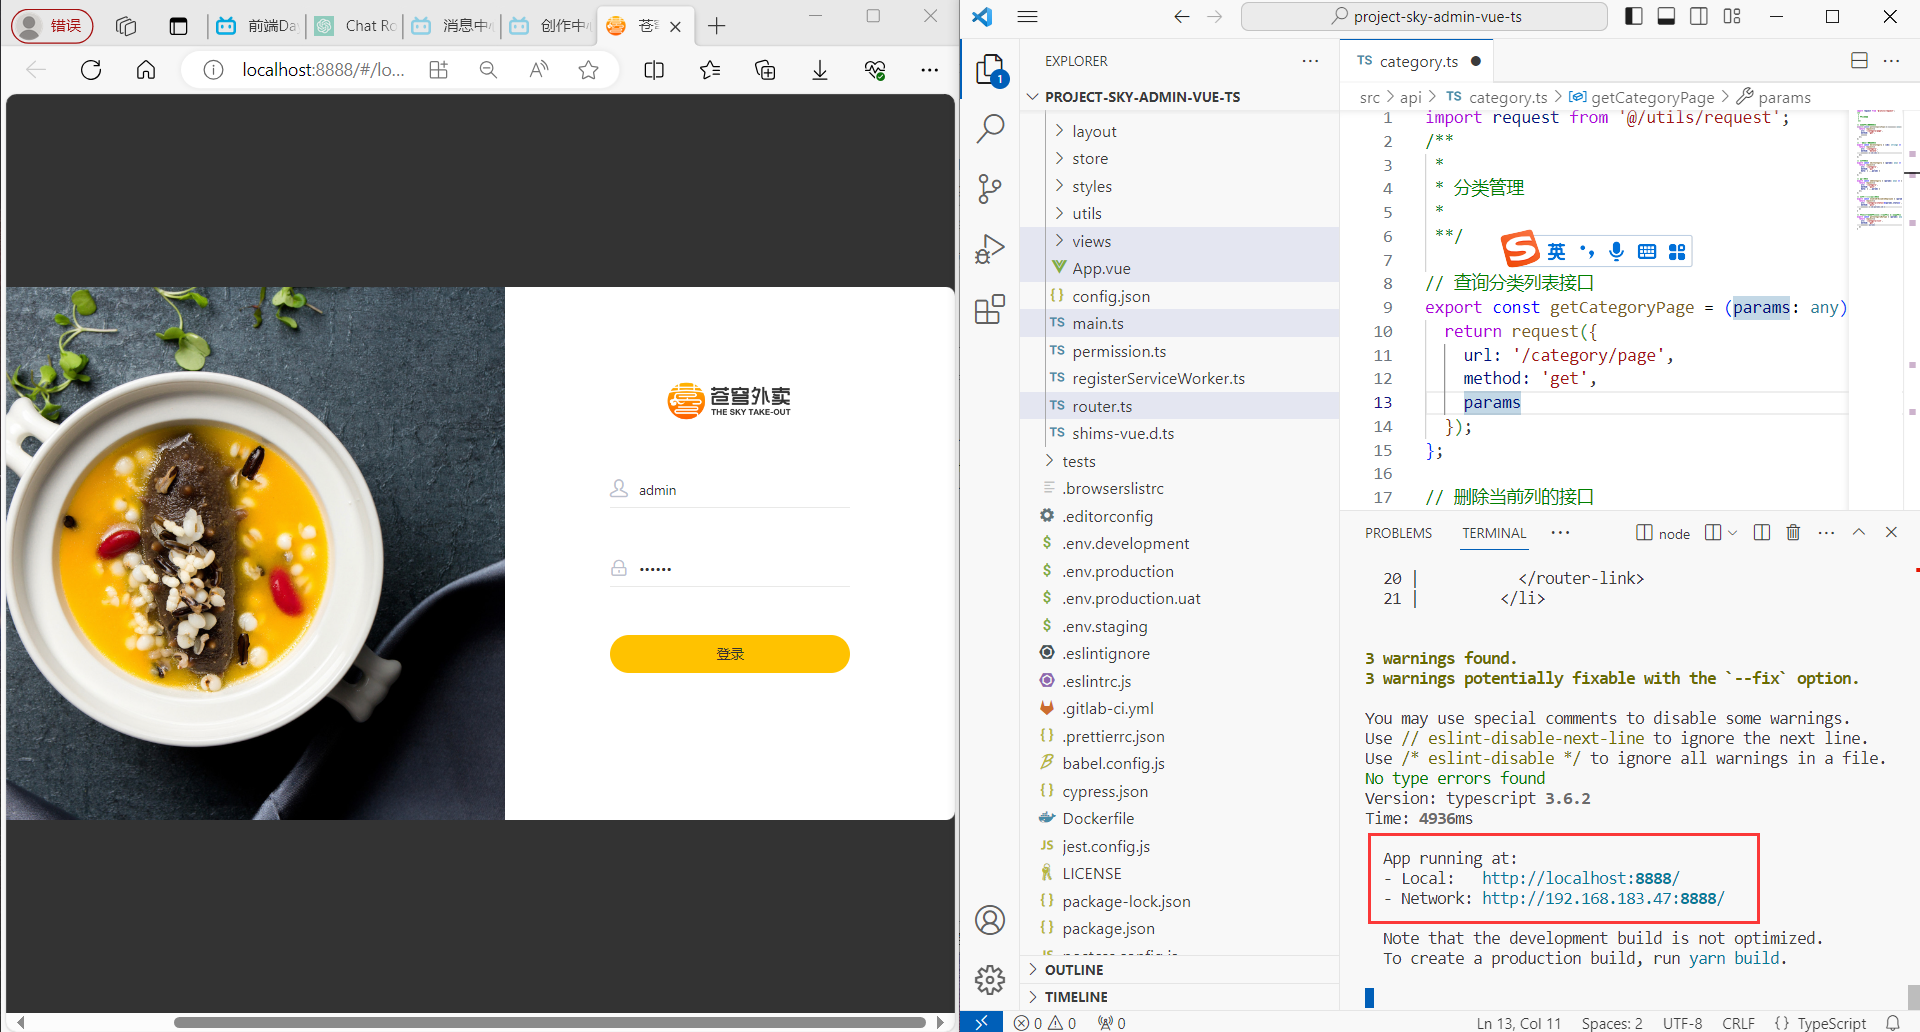
点击登录后能进来,表明成功:

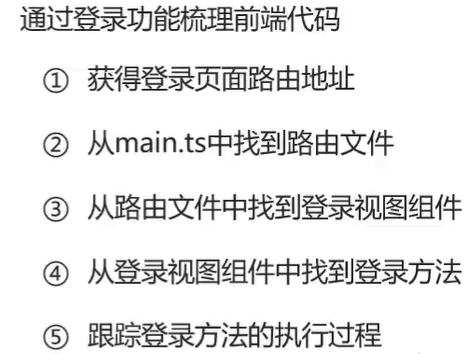
读前端源码的时候:
首先到router.ts看对应路径,看地址对应的组件
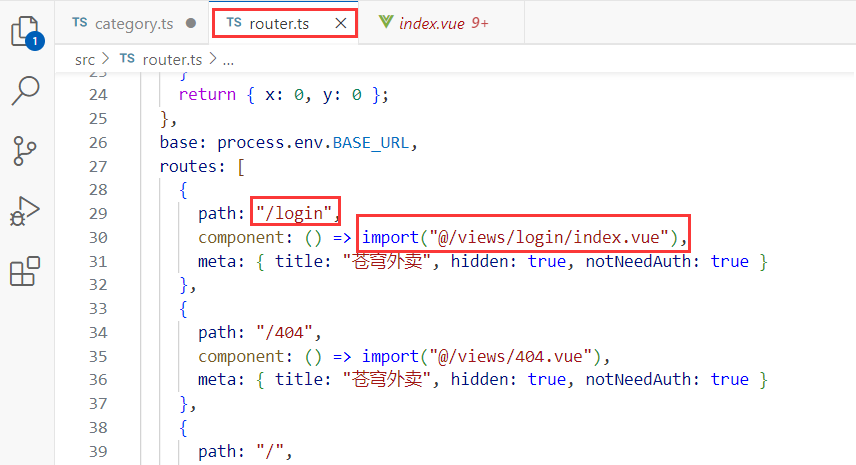
然后到视图组件里看具体的代码,比如在<template>里面可以看到页面具体的html结构,此时要重点关注调用的一些函数,追根溯源到<script>里面可以看到函数的具体实现。

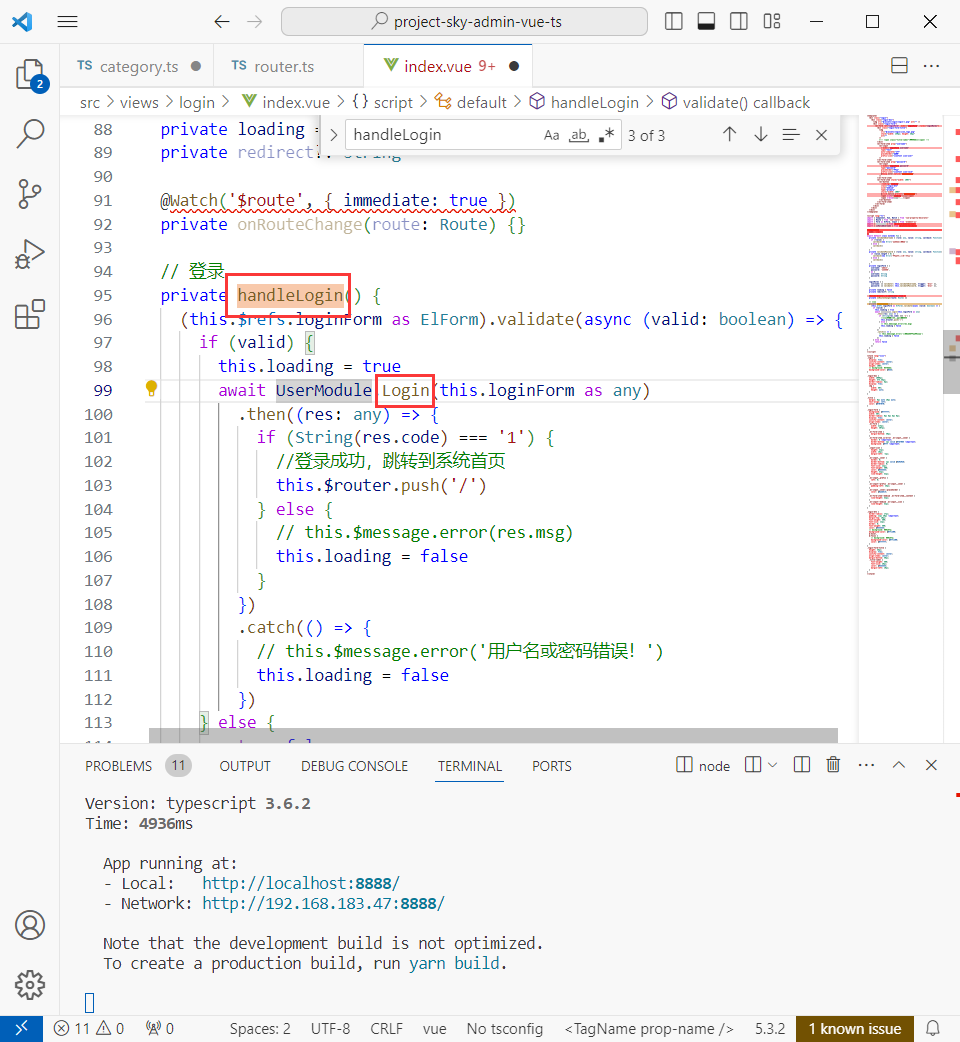
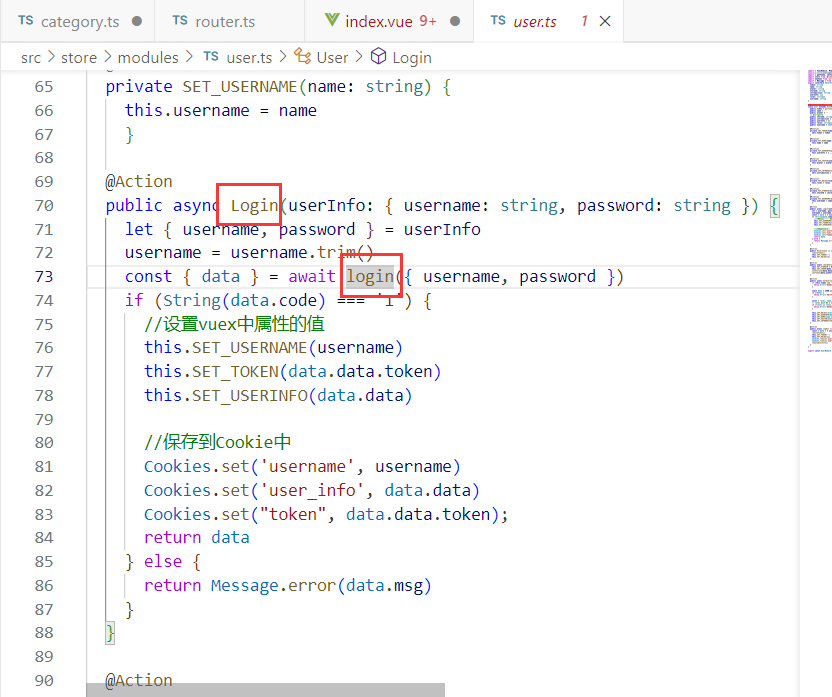
下面是最根本的地方
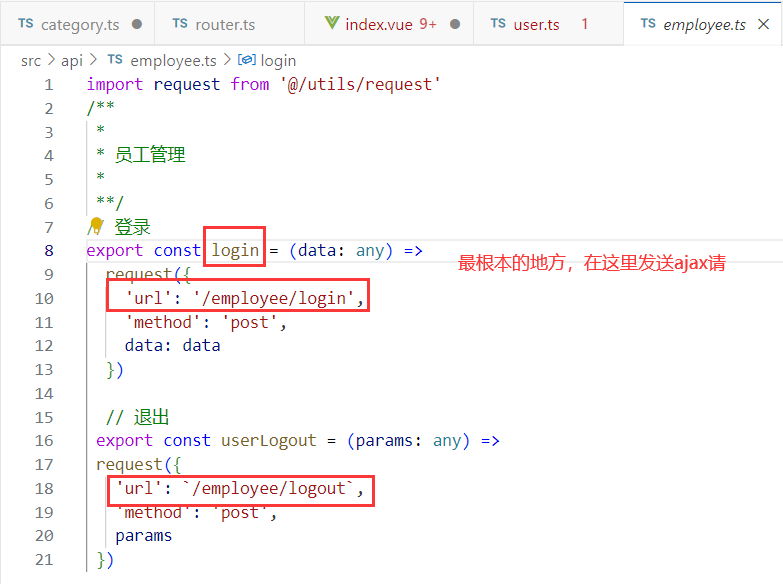
前端代码梳理:
4.11 员工分页查询代码开发 P182 P183
先看前端对应的路径:

看router.ts路径对应的组件:

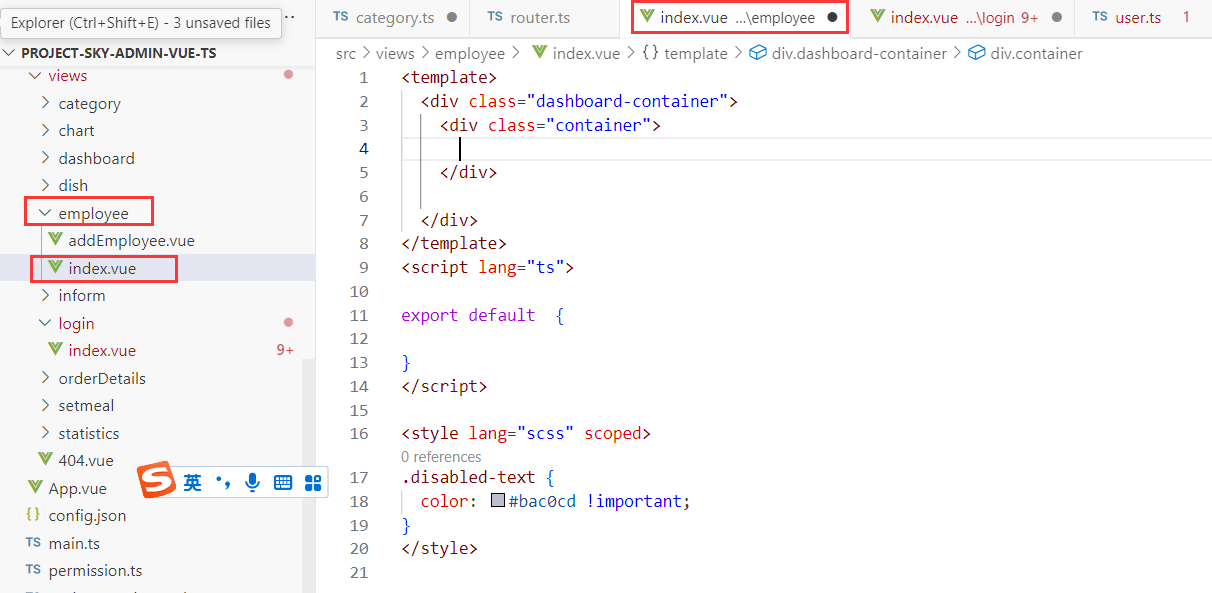
下面这段代码对应前端员工管理的页面:
1.制作头部
样例如下:
![]()
代码如下:
在src/views/employee/index.vue下面写入如下代码:
<template>
  <div class="dashboard-container">
    <div class="container">
      <div class="table">
        <label style="margin-right:5px">员工姓名:</label>
        <el-input v-model="name" placeholder="请输入员工姓名" style="width:15%"/>
        <el-button type="primary" style="margin-left: 20px" @click="pageQuery()">查询</el-button>
        <el-button type="primary" style="float:right">+添加员工</el-button>
      </div>
    </div>

  </div>
</template>
<script lang="ts">
import { dataTool } from 'echarts';
import {getEmployeeList} from '@/api/employee'
export default  {
  //模型数据
  data(){
    return {
      name:'', //员工姓名,对应上面的输入框
      page:1, //当前页码
      pageSize:10, //每页记录数
      total:0, //总记录数
      records:[] //当前页要展示的数据集合
    }
  },
  created(){
    this.pageQuery()
  },
  methods:{
    //分页查询
    pageQuery(){
      //准备请求参数
      const params = {name:this.name,page:this.page,pageSize:this.pageSize}
      //发送Ajax请求,访问后端服务,获取分页数据
      getEmployeeList(params).then(res=>{
        if(res.data.code===1){
          this.total = res.data.data.total
          this.records = res.data.data.records
        }
      }).catch(er =>{
        this.$message.error('请求出错了:'+err.message)
      })

    }
  }
}
</script>
<style lang="scss" scoped>
.disabled-text {
  color: #bac0cd !important;
}
</style>
在src/api/employee.ts下增加如下代码:
// 分页查询
export const getEmployeeList = (params: any) =>
request({
  'url': `/employee/page`,
  'method': 'get',
  params
})
效果如下:
点击查询会发出模拟请求,返回查询到的数据。
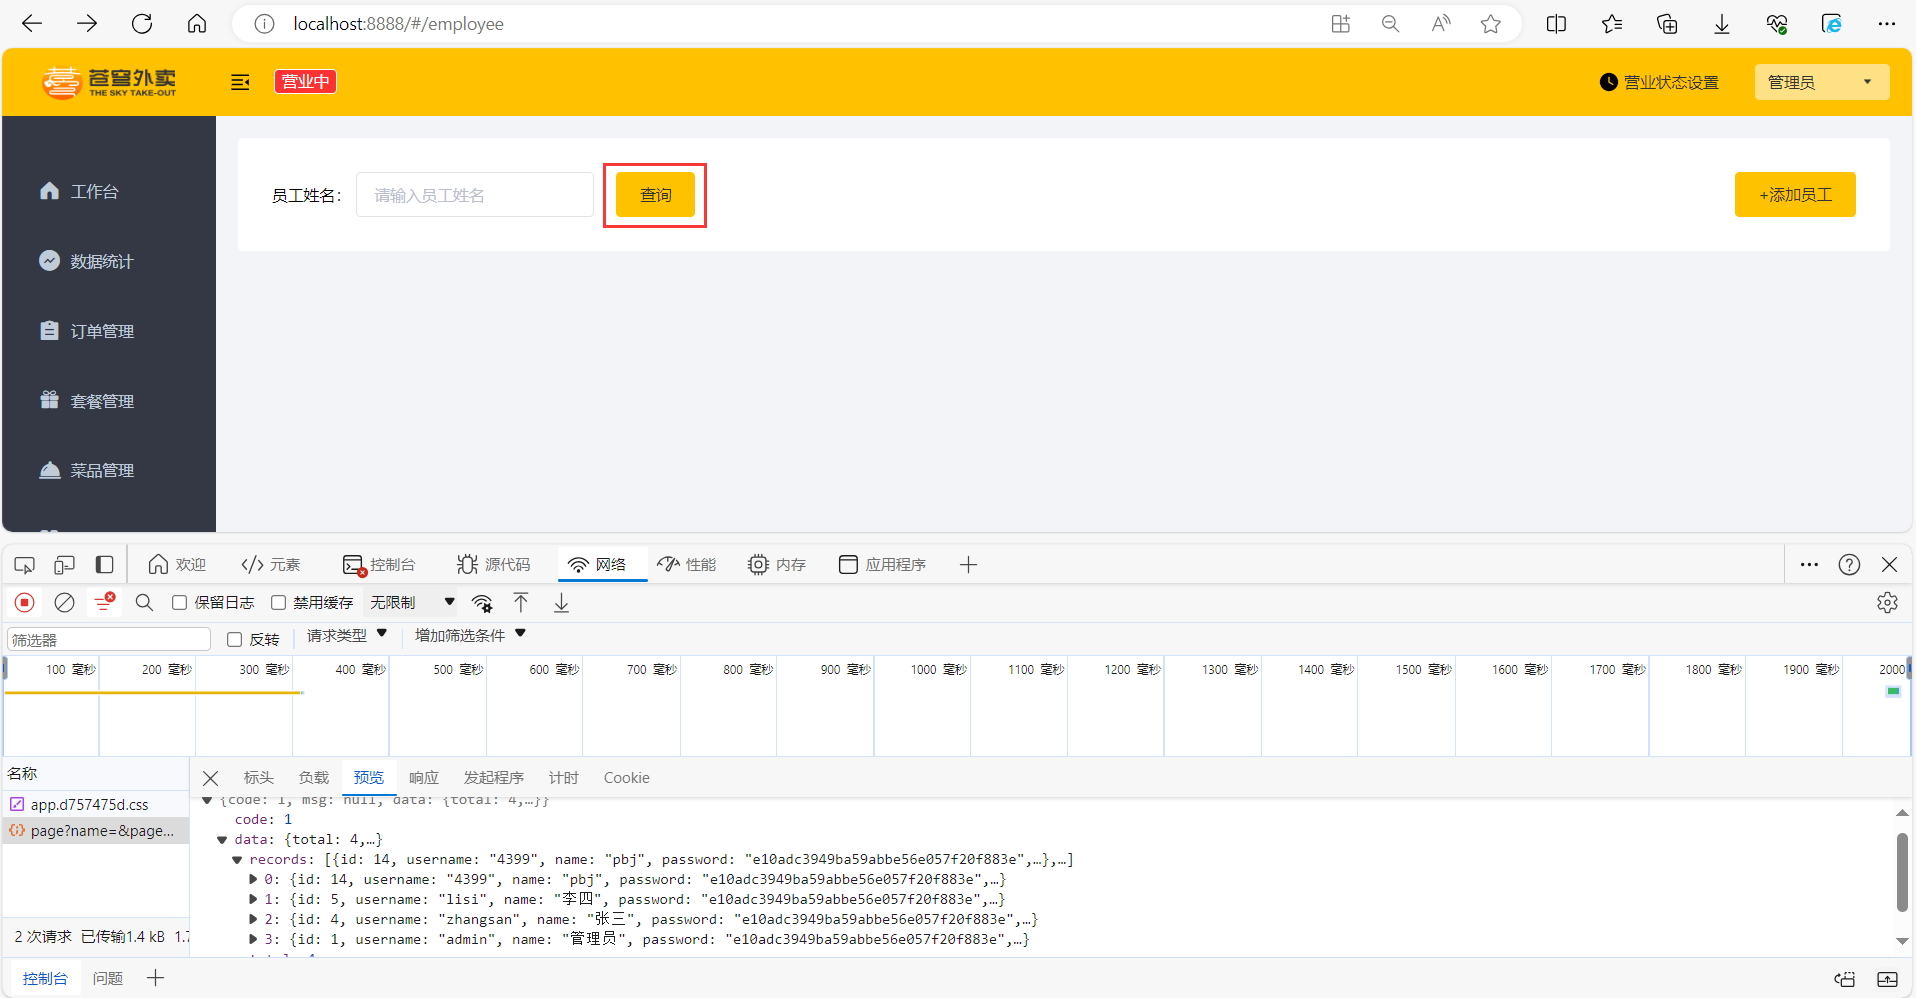
比如搜索张三,会返回带有张三的记录:

知识点如下:
1. 文字最好包在label里,方便添加css代码
2.margin-right是用来调整右边间隔的(右侧留白)
3.<el-input>是输入框,placeholder是输入框里的提示文字
4.float:right是让整个组件靠右
5.有一个问题,好像路径没有加admin,是如何请求到后端的?——其实是在转发的时候统一加上了admin
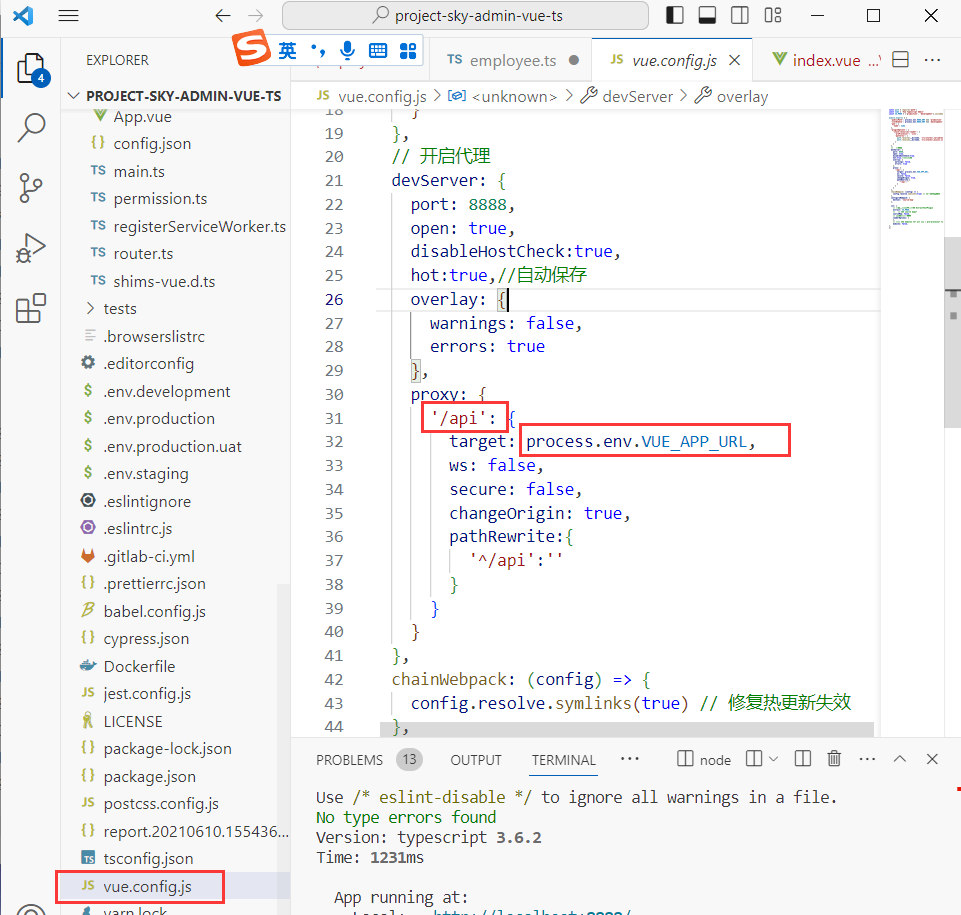

6.请求后端的代码是写在src/api/employee.ts下面,在src/views/employee下面只负责调用。
7.分页显示要求在点击查询按钮之前,只要页面一切换到,立刻进行查询,显示初始时所有的数据,所以加上下面的created方法:
created(){
  this.pageQuery()
},
4.12 员工分页查询代码开发 P184
1.分页主体
样例如下:

重点步骤如下:
到ElementUI找到Table表格,选择带斑马纹的表格:
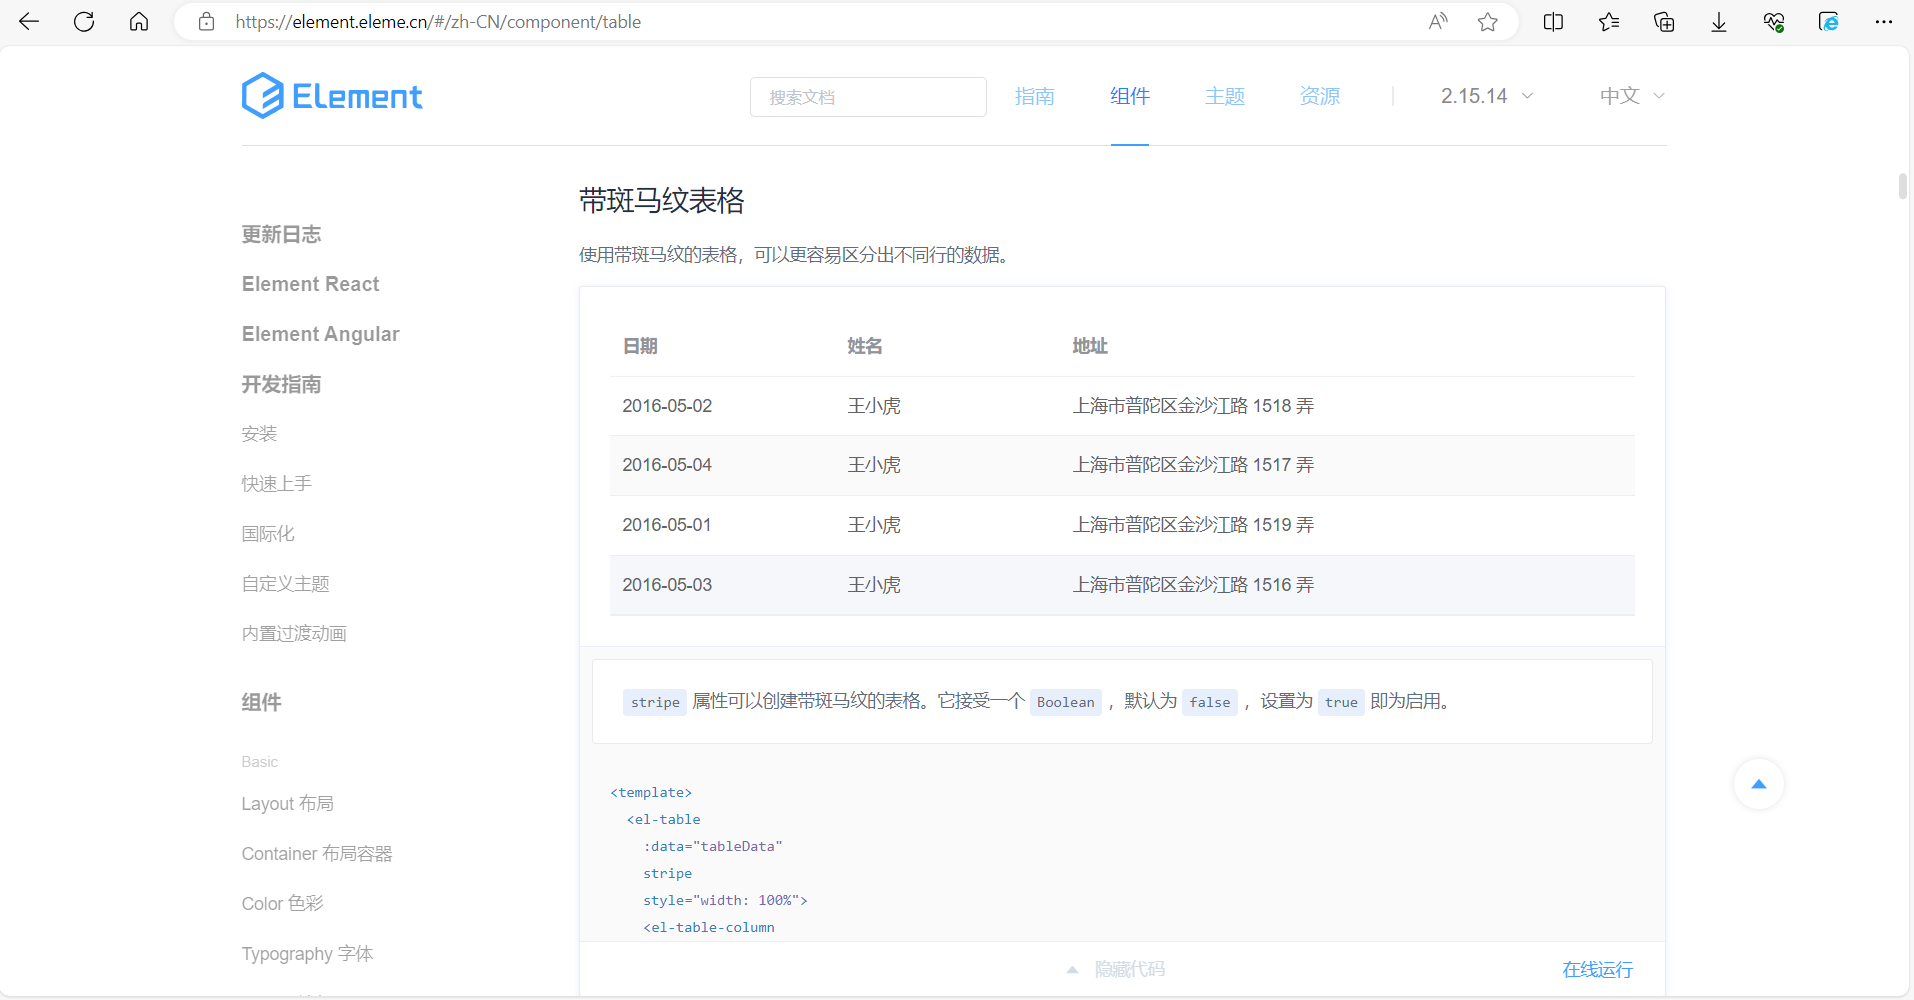
然后把<template>代码复制到src\views\employee\index.vue下面的<template>中进行修改。
代码如下:
对src\views\employee\index.vue的<template>下的内容修改如下:
<template>
  <div class="dashboard-container">
    <div class="container">
      <div class="table">
        <label style="margin-right:5px">员工姓名:</label>
        <el-input v-model="name" placeholder="请输入员工姓名" style="width:15%"/>
        <el-button type="primary" style="margin-left: 20px" @click="pageQuery()">查询</el-button>
        <el-button type="primary" style="float:right">+添加员工</el-button>
      </div>
    </div>
    <div>
      <el-table
        :data="records"
        stripe
        style="width: 100%">
        <el-table-column
          prop="name"
          label="员工姓名"
          width="180">
        </el-table-column>
        <el-table-column
          prop="username"
          label="账号"
          width="180">
        </el-table-column>
        <el-table-column
          prop="phone"
          label="手机号">
        </el-table-column>
        <el-table-column
          prop="status"
          label="账号状态">
          <template slot-scope="scope">{{scope.row.status===0?"禁用":"启用"}}</template>
        </el-table-column>
        <el-table-column
          prop="updateTime"
          label="最后操作时间">
        </el-table-column>
        <el-table-column label="操作">
          <template slot-scope="scope">
            <el-button type="text">修改</el-button>
            <el-button type="text">{{scope.row.status===0?"启用":"禁用"}}</el-button>
          </template>
        </el-table-column>
      </el-table>
    </div>
  </div>
</template>
效果如下:

知识点如下:
1.可以通过slot-scope来获得数据,通过scope.row找到每一行,然后scope.row.status可以找到每一行的数据。
<el-table-column prop="status" label="账号状态">
    <template slot-scope="scope">{{scope.row.status===0?"禁用":"启用"}}</template>
</el-table-column>
2.分页条
样例如下:
![]()
关键步骤:
在ElementUI中找到完整功能的分页条,把代码拷贝。

代码如下:
在src\views\employee\index.vue写入如下完整代码:
<template>
  <div class="dashboard-container">
    <div class="container">
      <div class="table">
        <label style="margin-right:5px">员工姓名:</label>
        <el-input v-model="name" placeholder="请输入员工姓名" style="width:15%"/>
        <el-button type="primary" style="margin-left: 20px" @click="pageQuery()">查询</el-button>
        <el-button type="primary" style="float:right">+添加员工</el-button>
      </div>
      <div>
      <el-table
        :data="records"
        stripe
        style="width: 100%">
        <el-table-column
          prop="name"
          label="员工姓名"
          width="180">
        </el-table-column>
        <el-table-column
          prop="username"
          label="账号"
          width="180">
        </el-table-column>
        <el-table-column
          prop="phone"
          label="手机号">
        </el-table-column>
        <el-table-column
          prop="status"
          label="账号状态">
          <template slot-scope="scope">{{scope.row.status===0?"禁用":"启用"}}</template>
        </el-table-column>
        <el-table-column
          prop="updateTime"
          label="最后操作时间">
        </el-table-column>
        <el-table-column label="操作">
          <template slot-scope="scope">
            <el-button type="text">修改</el-button>
            <el-button type="text">{{scope.row.status===0?"启用":"禁用"}}</el-button>
          </template>
        </el-table-column>
      </el-table>

    </div>
    <el-pagination
      class="pageList"
      @size-change="handleSizeChange"
      @current-change="handleCurrentChange"
      :current-page="page"
      :page-sizes="[10, 20, 30, 40]"
      :page-size="pageSize"
      layout="total, sizes, prev, pager, next, jumper"
      :total="total">
      </el-pagination>
    </div>
  </div>
</template>
<script lang="ts">
import { dataTool } from 'echarts';

import {getEmployeeList} from '@/api/employee'
export default  {
  //模型数据
  data(){
    return {
      name:'', //员工姓名,对应上面的输入框
      page:1, //当前页码
      pageSize:10, //每页记录数
      total:0, //总记录数
      records:[] //当前页要展示的数据集合
    }
  },
  created(){
    this.pageQuery()
  },
  methods:{
    //分页查询
    pageQuery(){
      //准备请求参数
      const params = {name:this.name,page:this.page,pageSize:this.pageSize}
      //发送Ajax请求,访问后端服务,获取分页数据
      getEmployeeList(params).then(res=>{
        if(res.data.code===1){
          this.total = res.data.data.total
          this.records = res.data.data.records
        }
      }).catch(er =>{
        this.$message.error('请求出错了:'+err.message)
      })
    },
      //每页记录数发生变化时触发
      handleSizeChange(pageSize){
        this.pageSize = pageSize
        this.pageQuery()
    },
      //page发生变化时触发
      handleCurrentChange(page){
        this.page = page
        this.pageQuery()
    }
  }

}
</script>

<style lang="scss" scoped>
.disabled-text {
  color: #bac0cd !important;
}
</style>
效果如下:
点击不同的分页类别后,会发送一个请求包。

测试的时候因为数据较少,所以设置为2条每页,能够正常每页只显示2条数据。

最终效果如下:
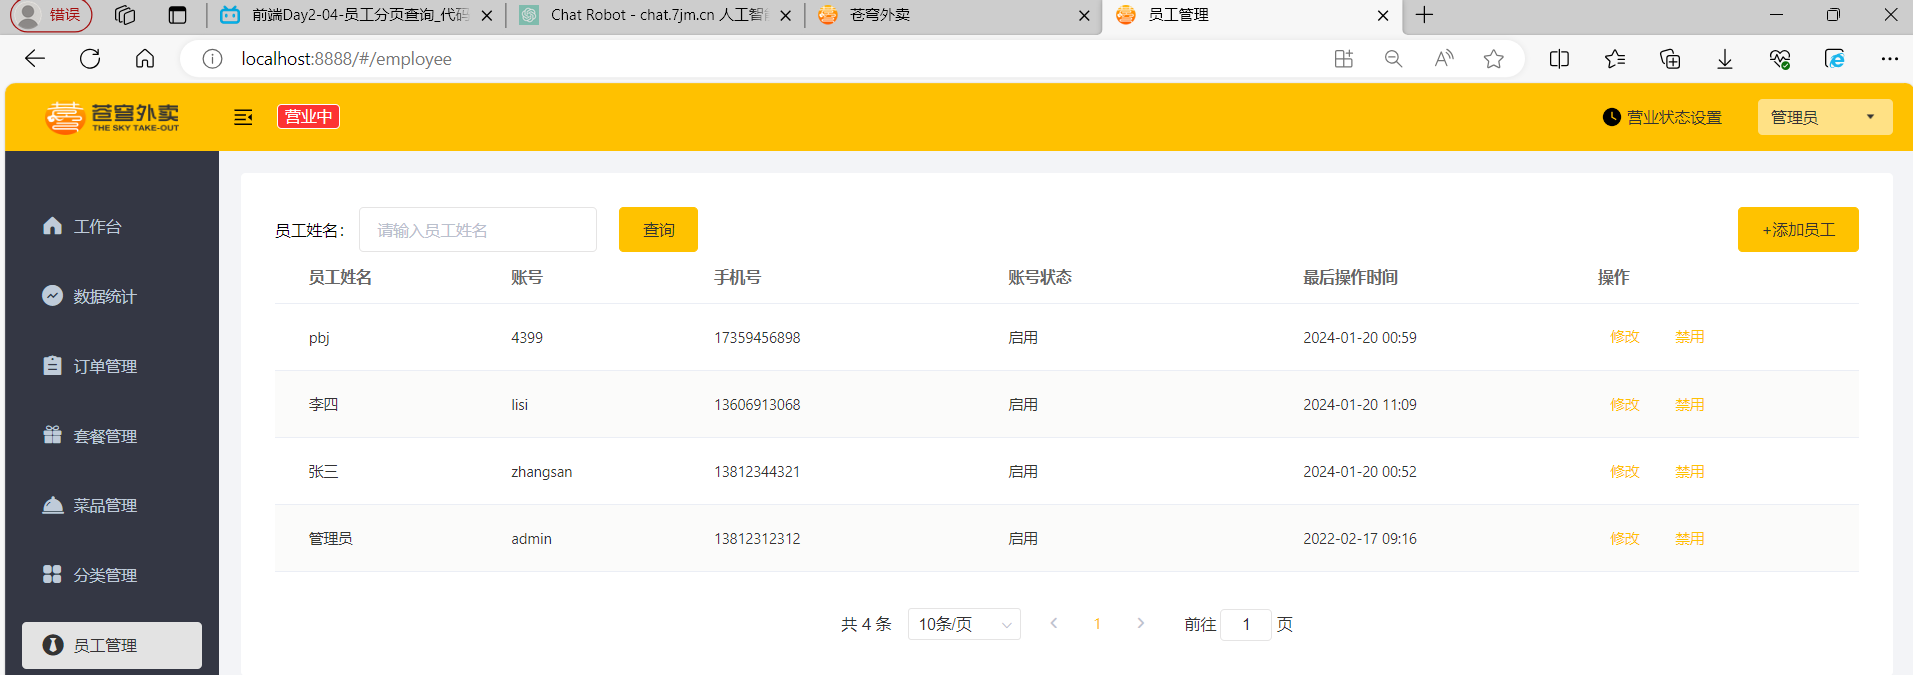
知识点如下:
1.想居中的话,前端提供有样式,可以直接用:class="pageList"
