第8章 磁盘管理
8.1 标准磁盘管理
8.1.1 两种分区格式
-
MBR(Master Boot Record,主引导分区),支持 4 个主分区或者 3 个主分区 1 个扩展分区,分区的空间最大支持 2.2 TB。
-
GPT(GUID Partition Table,全局唯一标识分区表),最多可支持 128 个分区,且大小支持 2.2 TB 到 18 EB,并向后兼容 MBR。
8.1.2 查看磁盘信息
可以通过 lsblk 命令来查看磁盘信息。
 [root@bogon ~]# lsblk
 NAME                MAJ:MIN RM  SIZE RO TYPE MOUNTPOINTS
 sr0                  11:0    1  8.9G  0 rom  /run/media/root/RHEL-9-2-0-BaseOS-x86_64
 nvme0n1             259:0    0   50G  0 disk
 ├─nvme0n1p1         259:1    0    1G  0 part /boot
 └─nvme0n1p2         259:2    0   49G  0 part
   ├─rhel_bogon-root 253:0    0   44G  0 lvm  /
   └─rhel_bogon-swap 253:1    0    5G  0 lvm  [SWAP]
接下来看为了演示后续的功能,我们添加一个 20G 的 Sata 类型的磁盘一个 30G 的 NVME 类型的磁盘。
注意:要添加磁盘,我们先关闭虚拟机。
[root@bogon ~]# systemctl poweroff
添加好上面的两个磁盘后,我们启动虚拟机,然后再查看磁盘信息:
[root@bogon ~]# lsblk
NAME                MAJ:MIN RM  SIZE RO TYPE MOUNTPOINTS
sda                   8:0    0   20G  0 disk
sr0                  11:0    1  8.9G  0 rom
nvme0n1             259:0    0   50G  0 disk
├─nvme0n1p1         259:1    0    1G  0 part /boot
└─nvme0n1p2         259:2    0   49G  0 part
  ├─rhel_bogon-root 253:0    0   44G  0 lvm  /
  └─rhel_bogon-swap 253:1    0    5G  0 lvm  [SWAP]
nvme0n2             259:3    0   30G  0 disk
上面的结果说明:
sda:表示第一块 Sata 硬盘,如果是第二块则名称为 sdb,第三块为 sdc,依次类推
sr0:表示第一块光盘,如果是 sr1 则表示第二块光盘
nvme0n1:表示第一块 nvme 类型的硬盘,nvme0n2 表示第二块 nvme 类型的硬盘,依次类推
nvme0n1p1:表示第一块 nvme 类型的硬盘的第一个分区,nvme0n1p2 表示第一块硬盘的第二个分区
8.1.3 磁盘分区
在使用磁盘之前,我们需要对磁盘进行分区并格式化后,才可以使用。而对磁盘进行分区,需要使用到 fdisk 命令工具,这个工具默认分区格式为 mbr 格式。使用的语法为:
fdisk 磁盘设备名(如/dev/sda)
8.1.3.1 MBR格式
首先我们对 Sata 磁盘进行分区,分为 3 主分区,1 个扩展分区,1 个逻辑分区。
[root@bogon ~]# fdisk /dev/sda

Welcome to fdisk (util-linux 2.37.4).
Changes will remain in memory only, until you decide to write them.
Be careful before using the write command.

Device does not contain a recognized partition table.
Created a new DOS disklabel with disk identifier 0xf0b8875a.

Command (m for help): 				# 提示按 m 键来查看帮助信息
# 输入 m 后

  Generic
   d   delete a partition					# 删除分区
   F   list free unpartitioned space		# 列出未分区的剩余空间,一般不用
   l   list known partition types			# 列出已有的分区类型
   n   add a new partition					# 添加一个新分区
   p   print the partition table			# 打印分区表
   t   change a partition type				# 修改分区类型
   v   verify the partition table			# 确认分区表,一般不用
   i   print information about a partition	# 打印分区信息,一般不用

  Misc
   m   print this menu						# 显示帮助信息
   u   change display/entry units
   x   extra functionality (experts only)

  Script
   I   load disk layout from sfdisk script file
   O   dump disk layout to sfdisk script file

  Save & Exit
   w   write table to disk and exit		# 保存分区表并退出
   q   quit without saving changes		# 退出且不保存分区

  Create a new label
   g   create a new empty GPT partition table			# 创建一个空的 GPT 分区表
   G   create a new empty SGI (IRIX) partition table	# 创建一个空的 SGI 分区表
   o   create a new empty DOS partition table			# 创建一个空的 DOS 分区表
   s   create a new empty Sun partition table			# 创建一个空的 Sun 分区表


Command (m for help):

#---------- Sata 磁盘进行分区,分为 3 主分区,1 个扩展分区,1 个逻辑分区。------------------

Command (m for help): n		# 输入 n 后回来来创建一个新的分区表
Partition type
   p   primary (0 primary, 0 extended, 4 free)		# 输入 p 来创建主分区
   e   extended (container for logical partitions)	# 输入 e 来创建扩展分区
Select (default p): p			# 输入 p 或者直接回来来创建一个主分区
Partition number (1-4, default 1): 				# 输入 1 或者直接回来表示这是第一个主分区
First sector (2048-41943039, default 2048): 	# 直接回车,表示当前第 2048 个扇区开始分区
Last sector, +/-sectors or +/-size{K,M,G,T,P} (2048-41943039, default 41943039): +2G	# 指定第一个分区大小为 2G

Created a new partition 1 of type 'Linux' and of size 2 GiB.

Command (m for help):

# 创建第二个和第三个主分区则重复上面的操作。
Command (m for help): n   # 输入 n 后回车
Partition type
   p   primary (1 primary, 0 extended, 3 free)
   e   extended (container for logical partitions)
Select (default p): 		# 直接回车来创建第二个主分区

Using default response p.
Partition number (2-4, default 2): 		# 直接回车
First sector (4196352-41943039, default 4196352): 			# 直接回车
Last sector, +/-sectors or +/-size{K,M,G,T,P} (4196352-41943039, default 41943039): +10G		# 指定大小为 10G

Created a new partition 2 of type 'Linux' and of size 10 GiB.

Command (m for help): n		# 创建第三个分区
Partition type
   p   primary (2 primary, 0 extended, 2 free)
   e   extended (container for logical partitions)
Select (default p):

Using default response p.
Partition number (3,4, default 3):
First sector (25167872-41943039, default 25167872):
Last sector, +/-sectors or +/-size{K,M,G,T,P} (25167872-41943039, default 41943039): 		# 直接回车即使用所有剩余空间

Created a new partition 3 of type 'Linux' and of size 8 GiB.

Command (m for help):


Command (m for help): w		# 分好后,输入 w 来保存分区表并退出
The partition table has been altered.
Calling ioctl() to re-read partition table.
Syncing disks.
执行完上面操作后,我们再次来查看磁盘信息:
[root@bogon ~]# lsblk
NAME                MAJ:MIN RM  SIZE RO TYPE MOUNTPOINTS
sda                   8:0    0   20G  0 disk
├─sda1                8:1    0    2G  0 part 		# 表示第一块 Sata 硬盘的第一个分区
├─sda2                8:2    0   10G  0 part 		# 表示第一块 Sata 硬盘的第二个分区
└─sda3                8:3    0    8G  0 part 		# 表示第一块 Sata 硬盘的第三个分区
sr0                  11:0    1  8.9G  0 rom
nvme0n1             259:0    0   50G  0 disk
├─nvme0n1p1         259:1    0    1G  0 part /boot
└─nvme0n1p2         259:2    0   49G  0 part
  ├─rhel_bogon-root 253:0    0   44G  0 lvm  /
  └─rhel_bogon-swap 253:1    0    5G  0 lvm  [SWAP]
nvme0n2             259:3    0   30G  0 disk
8.1.3.2 GPT格式
我们对磁盘一个 30G 的 NVME 类型的磁盘做 GPT 格式分区。
# /dev/nvme0n2 格式化为 gpt 格式,且包含 2 个分区

[root@bogon ~]# fdisk /dev/nvme0n2		# 对 nvme0n2 硬盘进行分区

Welcome to fdisk (util-linux 2.37.4).
Changes will remain in memory only, until you decide to write them.
Be careful before using the write command.

Device does not contain a recognized partition table.
Created a new DOS disklabel with disk identifier 0x79c4832e.

Command (m for help): g			# 创建一个空的 gpt 分区表
Created a new GPT disklabel (GUID: 00922DA5-3E66-F644-B5EA-A92B796BD8F2).

Command (m for help): n				# 创建第一个分区
Partition number (1-128, default 1): 			# 直接回车
First sector (2048-62914526, default 2048): 	# 直接回车
Last sector, +/-sectors or +/-size{K,M,G,T,P} (2048-62914526, default 62914526): +15G	# 指定第一个分区大小为 15G

Created a new partition 1 of type 'Linux filesystem' and of size 15 GiB.

Command (m for help): n		# 创建第二个分区
Partition number (2-128, default 2): 		# 直接回车
First sector (31459328-62914526, default 31459328): 	# 直接回车
Last sector, +/-sectors or +/-size{K,M,G,T,P} (31459328-62914526, default 62914526): 	# 直接回车

Created a new partition 2 of type 'Linux filesystem' and of size 15 GiB.

Command (m for help): w			# 保存分区表并退出
The partition table has been altered.
Calling ioctl() to re-read partition table.
Syncing disks.
执行完上面的操作后, 我们再次查看磁盘信息:
[root@bogon ~]# lsblk
NAME                MAJ:MIN RM  SIZE RO TYPE MOUNTPOINTS
sda                   8:0    0   20G  0 disk
├─sda1                8:1    0    2G  0 part
├─sda2                8:2    0   10G  0 part
└─sda3                8:3    0    8G  0 part
sr0                  11:0    1  8.9G  0 rom
nvme0n1             259:0    0   50G  0 disk
├─nvme0n1p1         259:1    0    1G  0 part /boot
└─nvme0n1p2         259:2    0   49G  0 part
  ├─rhel_bogon-root 253:0    0   44G  0 lvm  /
  └─rhel_bogon-swap 253:1    0    5G  0 lvm  [SWAP]
nvme0n2             259:3    0   30G  0 disk
├─nvme0n2p1         259:6    0   15G  0 part 		# 第一个分区
└─nvme0n2p2         259:7    0   15G  0 part		# 第二个分区
8.1.4 分区格式化
对磁盘进行格式化的目的:是为了形成文件系统,文件系统是操作系统用于明确存储设备或分区上的文件的方法和数据结构。
对于不同的操作系统,对磁盘进行格式化后所体现的文件系统类型不一样:
-
windowns:fat(这种格式不支持大于 4G 的文件)、NTFS(这是从 window7的默认格式)
-
linux:ext系统格式(ext3、ext4)、xfs
对磁盘分区格式化的命令为:
mkfs | mkfs.xfs | mkfs.ext4 [选项] 分区的设备名

选项:
	-t 文件系统类型,如果 ext4、xfs
	-c 建立文件系统前先检查坏块
	-V 输出建立的文件系统的详细信息
接下来我们对 /dev/sda1、/dev/sda2、/dev/sda3 进行格式化,我们把 /dev/sda1 格式化为 ext4,把另外两个格式化为 xfs。
[root@bogon ~]# mkfs.ext4 /dev/sda1
mke2fs 1.46.5 (30-Dec-2021)
Creating filesystem with 524288 4k blocks and 131072 inodes
Filesystem UUID: 603c056b-0097-4999-87ee-9d34c09713fb
Superblock backups stored on blocks:
	32768, 98304, 163840, 229376, 294912

Allocating group tables: done
Writing inode tables: done
Creating journal (16384 blocks): done
Writing superblocks and filesystem accounting information: done


[root@bogon ~]# mkfs -t xfs /dev/sda2
meta-data=/dev/sda2              isize=512    agcount=4, agsize=655360 blks
         =                       sectsz=512   attr=2, projid32bit=1
         =                       crc=1        finobt=1, sparse=1, rmapbt=0
         =                       reflink=1    bigtime=1 inobtcount=1
data     =                       bsize=4096   blocks=2621440, imaxpct=25
         =                       sunit=0      swidth=0 blks
naming   =version 2              bsize=4096   ascii-ci=0, ftype=1
log      =internal log           bsize=4096   blocks=2560, version=2
         =                       sectsz=512   sunit=0 blks, lazy-count=1
realtime =none                   extsz=4096   blocks=0, rtextents=0


[root@bogon ~]# mkfs.xfs /dev/sda3
meta-data=/dev/sda3              isize=512    agcount=4, agsize=524224 blks
         =                       sectsz=512   attr=2, projid32bit=1
         =                       crc=1        finobt=1, sparse=1, rmapbt=0
         =                       reflink=1    bigtime=1 inobtcount=1
data     =                       bsize=4096   blocks=2096896, imaxpct=25
         =                       sunit=0      swidth=0 blks
naming   =version 2              bsize=4096   ascii-ci=0, ftype=1
log      =internal log           bsize=4096   blocks=2560, version=2
         =                       sectsz=512   sunit=0 blks, lazy-count=1
realtime =none                   extsz=4096   blocks=0, rtextents=0
我们格式化完成后,可以使用 blkid 命令来查看分区 id 号
[root@bogon ~]# blkid
/dev/mapper/rhel_bogon-swap: UUID="c40a1d4e-8acc-4aa6-af02-773c878f5588" TYPE="swap"
/dev/nvme0n1p1: UUID="98e55bfe-116c-411f-956c-d3e925b515c5" TYPE="xfs" PARTUUID="d366e00e-01"
/dev/nvme0n1p2: UUID="gklf44-wXFJ-G8dL-qAtd-eo50-onCK-5qz24M" TYPE="LVM2_member" PARTUUID="d366e00e-02"
/dev/sr0: UUID="2023-04-13-16-58-02-00" LABEL="RHEL-9-2-0-BaseOS-x86_64" TYPE="iso9660" PTUUID="d3d1f9a5" PTTYPE="dos"
/dev/nvme0n2p1: PARTUUID="dc85fe38-0242-dc40-a40c-7b43fc204293"
/dev/nvme0n2p2: PARTUUID="496fa0c0-e85c-9045-b06e-439bf9dfc79d"
/dev/mapper/rhel_bogon-root: UUID="a673e989-57a6-4257-be10-bb807f7153d7" TYPE="xfs"
/dev/sda2: UUID="e5f2e914-2b96-4bbe-b767-7083f15bc9f8" TYPE="xfs" PARTUUID="f0b8875a-02"
/dev/sda3: UUID="94a14f34-042d-4aeb-93d0-a085ab7d066f" TYPE="xfs" PARTUUID="f0b8875a-03"
/dev/sda1: UUID="603c056b-0097-4999-87ee-9d34c09713fb" TYPE="ext4" PARTUUID="f0b8875a-01"
8.1.5 分区挂载
挂载就是将一个分区或者设备挂载到指定的挂载目录。简单来说就是使用这个分区。
挂载的命令格式:
# mount [-t 文件系统类型] 设备名  挂载目录
mount [-t vfstype] [-o options] device  dir

1、-t vfstype:用于指定文件系统的类型,通常无须指定,mount 会自动选择正确的类型,有以下几种类型:
	iso9660:光盘或光盘镜像类型(记住)
	nfs:linux中文件网络共享

2、-o options:主要用于描述设备或档案的挂载方式
	ro:采用只读的方式进行挂载
	rw:采用读写的方式进行挂载
	loop:用来把一个文件当成硬盘分区挂载上系统

3、device:要挂载的设备
4、dir:设置在系统上的挂载点(目标),必须存在
接下来我们把 /dev/sda1 挂载到 /guazai 目录。注意挂载的目录必须存在。
# 创建挂载目录
[root@bogon ~]# mkdir -pv /guazai{1..3}
mkdir: created directory '/guazai1'
mkdir: created directory '/guazai2'
mkdir: created directory '/guazai3'

# 将 /dev/sda1 设备挂载到 /guazai1 目录
[root@bogon ~]# mount /dev/sda1 /guazai1
# 将 /dev/sda2 设备挂载到 /guazai2 目录
[root@bogon ~]# mount /dev/sda2 /guazai2
# 将 /dev/sda3 设备挂载到 /guazai3 目录
[root@bogon ~]# mount /dev/sda3 /guazai3
8.1.6 查看磁盘空间
查看磁盘空间的使用情况有两个命令:du、df
-
df:列出文件系统的磁盘空间占用情况,使用格式为:
df [-ahikHTm] [目录或文件名称][root@bogon guazai2]# df -h Filesystem Size Used Avail Use% Mounted on devtmpfs 4.0M 0 4.0M 0% /dev tmpfs 3.8G 0 3.8G 0% /dev/shm tmpfs 1.5G 9.6M 1.5G 1% /run /dev/mapper/rhel_bogon-root 44G 4.6G 40G 11% / /dev/nvme0n1p1 1014M 293M 722M 29% /boot tmpfs 767M 56K 767M 1% /run/user/42 tmpfs 767M 40K 767M 1% /run/user/0 /dev/sda1 2.0G 28K 1.8G 1% /guazai1 /dev/sda2 10G 104M 9.9G 2% /guazai2 /dev/sda3 8.0G 90M 8.0G 2% /guazai3
-
du:显示磁盘空间的使用量,默认情况下是以 KB 为单位,使用格式为:
du [-ahskm] 文件或目录[root@bogon guazai2]# du -h /dev/sda1 0 /dev/sda1
8.2 逻辑卷管理
8.2.1 逻辑卷结构
在对磁盘进行分区大小规划时,往往不能合理的利用磁盘空间,这里我们可以使用逻辑卷(Logic Volume Manager)来进行管理。
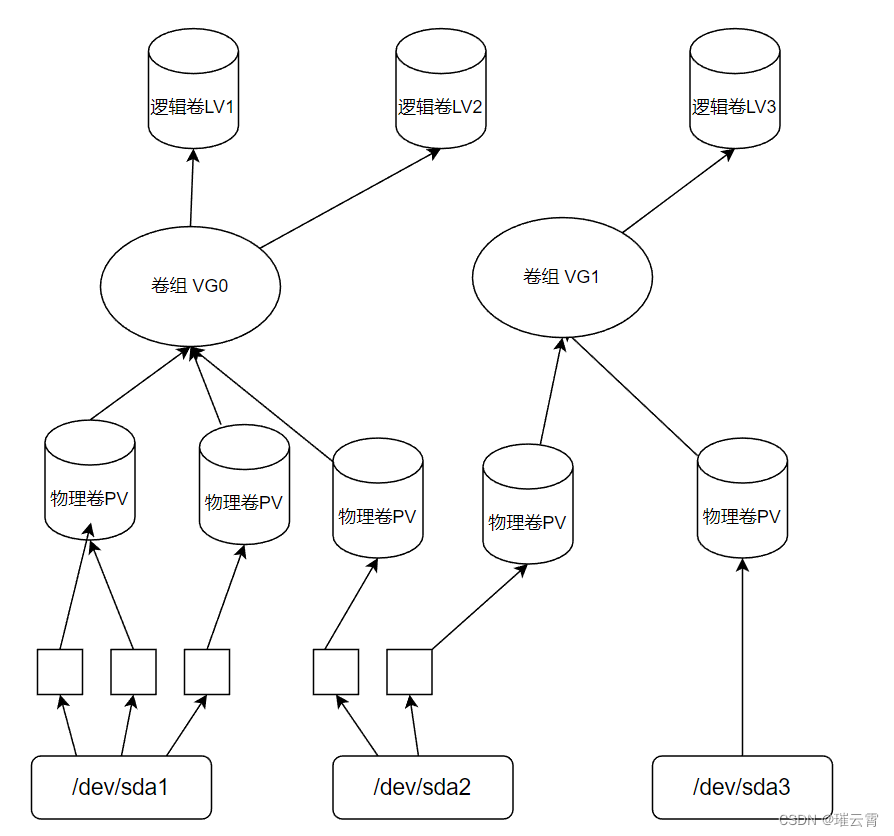
逻辑卷由以下几个部分组成:
-
物理设备,一般指的是系统存储设备,如:/dev/sda1、/dev/sda2等
-
物理卷(physical volume, PV),它是由多个分区或整个硬盘组成
-
卷组(Volume Group),简称 VG,它可以看成单独的逻辑磁盘,一个卷组中至少包括一个 PV,在卷组创建好后,可以动态添加 PV 到卷组中。
-
逻辑卷(Logical Volume),简称 LV,相当于物理分区,它是建立在卷组之上。
8.2.2 部署逻辑卷
常用的 LVM 部署命令如下:
| 功能 | 物理卷管理 | 卷组管理 | 逻辑卷管理 |
|---|---|---|---|
| 扫描 | pvscan | vgscan | lvscan |
| 建立 | pvcreate | vgcreate | lvcreate |
| 显示 | pvdisplay | vgdisplay | lvdisplay |
| 删除 | pvremove | vgremove | lvremove |
部署逻辑卷步骤:
1、首先我们先把之前挂载的信息删除(删除 /etc/fstab中挂载信息,umount卸载)
# 卸载的格式:umount 设备名称
[root@bogon /]# umount /dev/sda1
[root@bogon /]# umount /dev/sda2
[root@bogon /]# umount /dev/sda3
2、然后执行 fdisk 设备名称 来进行分区删除
# 首先删除 /dev/sda 设备的分区信息
[root@bogon /]# fdisk /dev/sda

Welcome to fdisk (util-linux 2.37.4).
Changes will remain in memory only, until you decide to write them.
Be careful before using the write command.


Command (m for help): d
Partition number (1-3, default 3):

Partition 3 has been deleted.

Command (m for help): d
Partition number (1,2, default 2):

Partition 2 has been deleted.

Command (m for help): d
Selected partition 1
Partition 1 has been deleted.

Command (m for help): w
The partition table has been altered.
Calling ioctl() to re-read partition table.
Syncing disks.

# 删除 /dev/nvme0n2设备的分区信息
[root@bogon /]# fdisk /dev/nvme0n2

Welcome to fdisk (util-linux 2.37.4).
Changes will remain in memory only, until you decide to write them.
Be careful before using the write command.


Command (m for help): d
Partition number (1,2, default 2):

Partition 2 has been deleted.

Command (m for help): d
Selected partition 1
Partition 1 has been deleted.

Command (m for help): w
The partition table has been altered.
Calling ioctl() to re-read partition table.
Syncing disks.


[root@bogon /]# lsblk
NAME                MAJ:MIN RM  SIZE RO TYPE MOUNTPOINTS
sda                   8:0    0   20G  0 disk
sr0                  11:0    1  8.9G  0 rom
nvme0n1             259:0    0   50G  0 disk
├─nvme0n1p1         259:1    0    1G  0 part /boot
└─nvme0n1p2         259:2    0   49G  0 part
  ├─rhel_bogon-root 253:0    0   44G  0 lvm  /
  └─rhel_bogon-swap 253:1    0    5G  0 lvm  [SWAP]
nvme0n2             259:3    0   30G  0 disk
3、最后用 /dev/sda 和 /dev/nvme0n2 来做逻辑卷
8.2.2.1 物理卷管理(PV)
# 创建物理卷的命令为 `pvcreate 要创建物理卷的设备或分区`

[root@bogon /]# pvcreate /dev/sda
  Physical volume "/dev/sda" successfully created.
[root@bogon /]# pvcreate /dev/nvme0n2
  Cannot use /dev/nvme0n2: device is partitioned

# 查看 pv
[root@bogon /]# pvs
  PV             VG         Fmt  Attr PSize   PFree
  /dev/nvme0n1p2 rhel_bogon lvm2 a--  <49.00g     0
  /dev/sda                  lvm2 ---   20.00g 20.00g

# 如果希望查看详细的物理卷信息,我们使用 pvdisplay
[root@bogon /]# pvdisplay
  --- Physical volume ---
  PV Name               /dev/nvme0n1p2
  VG Name               rhel_bogon
  PV Size               <49.00 GiB / not usable 3.00 MiB
  Allocatable           yes (but full)
  PE Size               4.00 MiB
  Total PE              12543
  Free PE               0
  Allocated PE          12543
  PV UUID               gklf44-wXFJ-G8dL-qAtd-eo50-onCK-5qz24M

  "/dev/sda" is a new physical volume of "20.00 GiB"
  --- NEW Physical volume ---
  PV Name               /dev/sda
  VG Name
  PV Size               20.00 GiB
  Allocatable           NO
  PE Size               0
  Total PE              0
  Free PE               0
  Allocated PE          0
  PV UUID               auPcsf-q5mU-bvuP-U6D0-FMwC-xRio-7Y7kV8
8.2.2.2 卷组管理(VG)
# 卷组创建的命令是:`vgcreage 物理卷名称`
[root@bogon /]# vgcreate vgtest /dev/sda

# 查看卷组信息
[root@bogon /]# vgs
  VG         #PV #LV #SN Attr   VSize   VFree
  rhel_bogon   1   2   0 wz--n- <49.00g      0
  vgtest       1   0   0 wz--n- <20.00g <20.00g

#如果希望查看详细信息,则需要使用 vgdisplay
[root@bogon /]# vgdisplay
  --- Volume group ---
  VG Name               rhel_bogon
  System ID
  Format                lvm2
  Metadata Areas        1
  Metadata Sequence No  3
  VG Access             read/write
  VG Status             resizable
  MAX LV                0
  Cur LV                2
  Open LV               2
  Max PV                0
  Cur PV                1
  Act PV                1
  VG Size               <49.00 GiB
  PE Size               4.00 MiB
  Total PE              12543
  Alloc PE / Size       12543 / <49.00 GiB
  Free  PE / Size       0 / 0
  VG UUID               WaQIKz-ye0E-MaPw-jtra-a7rH-CyIK-FGZfHp

  --- Volume group ---
  VG Name               vgtest
  System ID
  Format                lvm2
  Metadata Areas        1
  Metadata Sequence No  1
  VG Access             read/write
  VG Status             resizable
  MAX LV                0
  Cur LV                0
  Open LV               0
  Max PV                0
  Cur PV                1
  Act PV                1
  VG Size               <20.00 GiB
  PE Size               4.00 MiB
  Total PE              5119
  Alloc PE / Size       0 / 0
  Free  PE / Size       5119 / <20.00 GiB
  VG UUID               GKc8v2-FMAm-MMOY-eUQa-MwDA-z2a3-IIqKk8
8.2.2.3 逻辑卷管理(LV)
# 逻辑卷的创建命令为:lvcreate -n 逻辑卷名称 -L 逻辑卷大小 卷组名称

[root@bogon /]# lvcreate -n lvtest -L 10G vgtest
WARNING: ext4 signature detected on /dev/vgtest/lvtest at offset 1080. Wipe it? [y/n]: y
  Wiping ext4 signature on /dev/vgtest/lvtest.
  Logical volume "lvtest" created.


# 查看逻辑卷信息
[root@bogon /]# lvs
  LV     VG         Attr       LSize   Pool Origin Data%  Meta%  Move Log Cpy%Sync Convert
  root   rhel_bogon -wi-ao---- <44.00g
  swap   rhel_bogon -wi-ao----   5.00g
  lvtest vgtest     -wi-a-----  10.00g

# 如果希望查看 lvtest 的详细信息
[root@bogon /]# lvdisplay
  --- Logical volume ---
  LV Path                /dev/rhel_bogon/swap
  LV Name                swap
  VG Name                rhel_bogon
  LV UUID                6B9VPA-sOSR-LqOA-lCP2-dNOo-DpMG-SaqdDU
  LV Write Access        read/write
  LV Creation host, time bogon, 2023-10-15 19:35:54 +0800
  LV Status              available
  # open                 2
  LV Size                5.00 GiB
  Current LE             1280
  Segments               1
  Allocation             inherit
  Read ahead sectors     auto
  - currently set to     256
  Block device           253:1

  --- Logical volume ---
  LV Path                /dev/rhel_bogon/root
  LV Name                root
  VG Name                rhel_bogon
  LV UUID                aVkuFm-8Irw-PQ4a-qy07-R4Pv-LTFs-228OFd
  LV Write Access        read/write
  LV Creation host, time bogon, 2023-10-15 19:35:54 +0800
  LV Status              available
  # open                 1
  LV Size                <44.00 GiB
  Current LE             11263
  Segments               1
  Allocation             inherit
  Read ahead sectors     auto
  - currently set to     256
  Block device           253:0

  --- Logical volume ---
  LV Path                /dev/vgtest/lvtest
  LV Name                lvtest
  VG Name                vgtest
  LV UUID                XTBjin-FOC4-w6FQ-C52w-TxuT-ItzA-K78InY
  LV Write Access        read/write
  LV Creation host, time bogon, 2023-12-24 17:17:00 +0800
  LV Status              available
  # open                 0
  LV Size                10.00 GiB
  Current LE             2560
  Segments               1
  Allocation             inherit
  Read ahead sectors     auto
  - currently set to     256
  Block device           253:2
8.2.2.4 格式化逻辑卷
# 我们将 /dev/vgtest/lvtest 逻辑卷格式化为 xfs 类型的文件系统

[root@bogon /]# mkfs.xfs /dev/vgtest/lvtest
meta-data=/dev/vgtest/lvtest     isize=512    agcount=4, agsize=655360 blks
         =                       sectsz=512   attr=2, projid32bit=1
         =                       crc=1        finobt=1, sparse=1, rmapbt=0
         =                       reflink=1    bigtime=1 inobtcount=1
data     =                       bsize=4096   blocks=2621440, imaxpct=25
         =                       sunit=0      swidth=0 blks
naming   =version 2              bsize=4096   ascii-ci=0, ftype=1
log      =internal log           bsize=4096   blocks=2560, version=2
         =                       sectsz=512   sunit=0 blks, lazy-count=1
realtime =none                   extsz=4096   blocks=0, rtextents=0
8.2.2.5 挂载逻辑卷
# 我们将格式化好的 /dev/vgtest/lvtest 逻辑卷挂载到 /mnt/mount1 目录上

# 查看目录是否存在
[root@bogon /]# ls -d /mnt/mount1
ls: cannot access '/mnt/mount1': No such file or directory
# 创建挂载点(即目标目录)
[root@bogon /]# mkdir -pv /mnt/mount1
mkdir: created directory '/mnt/mount1'

# 挂载
[root@bogon /]# mount /dev/vgtest/lvtest /mnt/mount1

# 验证是否挂载成功
[root@bogon /]# cp /etc/passwd /mnt/mount1
[root@bogon /]# cat /mnt/mount1/passwd | head -3
root:x:0:0:root:/root:/bin/bash
bin:x:1:1:bin:/bin:/sbin/nologin
daemon:x:2:2:daemon:/sbin:/sbin/nologin
8.2.2.6 删除逻辑卷
# 查看
[root@bogon /]# df -h
Filesystem                   Size  Used Avail Use% Mounted on
devtmpfs                     4.0M     0  4.0M   0% /dev
tmpfs                        3.8G     0  3.8G   0% /dev/shm
tmpfs                        1.5G  9.6M  1.5G   1% /run
/dev/mapper/rhel_bogon-root   44G  4.6G   40G  11% /
/dev/nvme0n1p1              1014M  293M  722M  29% /boot
tmpfs                        767M   56K  767M   1% /run/user/42
tmpfs                        767M   40K  767M   1% /run/user/0
/dev/mapper/vgtest-lvtest     10G  104M  9.9G   2% /mnt/mount1

# 卸载
[root@bogon /]# umount /dev/mapper/vgtest-lvtest	# umount 设备  或者  umount 挂载点(目标)

# 验证是否卸载成功
[root@bogon /]# df -h
Filesystem                   Size  Used Avail Use% Mounted on
devtmpfs                     4.0M     0  4.0M   0% /dev
tmpfs                        3.8G     0  3.8G   0% /dev/shm
tmpfs                        1.5G  9.6M  1.5G   1% /run
/dev/mapper/rhel_bogon-root   44G  4.6G   40G  11% /
/dev/nvme0n1p1              1014M  293M  722M  29% /boot
tmpfs                        767M   56K  767M   1% /run/user/42
tmpfs                        767M   40K  767M   1% /run/user/0


# 删除逻辑卷,命令的格式为:lvremove 逻辑卷路径
[root@bogon /]# lvremove /dev/vgtest/lvtest
Do you really want to remove active logical volume vgtest/lvtest? [y/n]: y			# 输入 y 来确认删除
  Logical volume "lvtest" successfully removed.


# 删除卷组,命令的格式为:vgremove 卷组名称
[root@bogon /]# vgremove vgtest
  Volume group "vgtest" successfully removed


# 删除物理卷
[root@bogon /]# pvremove /dev/sda
  Labels on physical volume "/dev/sda" successfully wiped.
8.3 交换分区管理
在 Linux 执行某个程序时,会把这个程序加载到内存在中,以便于快速的执行。
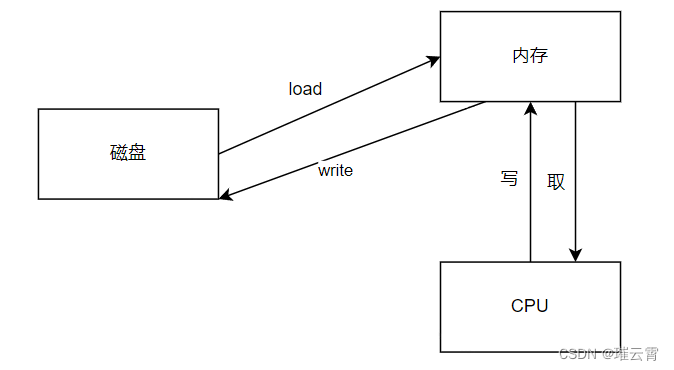
在这个过程中,并不是所有的程序都是常用的,将常用的加载到内存在,而将不常用的功能放到 swap (交换空间),而这个交换空间就是硬盘划分出来的一小块区域。这个区域的大小可以是物理内存的 2~4 倍,一般我们指定为 2G 即可。因为此部分基本不会用到。
交换分区管理也有相应的命令:
-
mkswap 分区设备名:将指定的分区格式化为 swap 交换文件系统(交换分区)
-
swapon 交换分区设备名:启用指定的交换分区
-
swapoff 交换分区设备名:禁用指定的交换分区
-
swapon -s:查看交换分区的使用情况
-
free -m:以兆字节为单位显示物理内存、交换分区的使用情况
[root@bogon /]# swapon -s
Filename				Type		Size		Used		Priority
/dev/dm-1                               partition	5242876		0		-2


[root@bogon /]# free -m
               total        used        free      shared  buff/cache   available
Mem:            7661         998        6300          15         618        6662
Swap:           5119           0        5119

