NGFW Module安装在集群交换机上,二层双机负载分担部署,交换机重定向引流
业务需求
如图1所示,两台交换机集群组网,两块NGFW Module分别安装在两台交换机的1号槽位组成双机负载分担组网。NGFW Module工作在二层,也就是透明接入网络。NGFW Module对内网用户访问外网的流量进行安全检测,不同VLAN的内网流量互访不经过NGFW Module直接由交换机转发。
本案例中以NGFW Module V100R001C30版本、交换机V200R008C00版本为例。

在NGFW Module侧,两个内部以太网接口的编号固定为GE1/0/0~GE1/0/1。在交换机侧,内部以太网接口的编号由NGFW Module安装的槽位号决定。例如,当NGFW Module安装在交换机的1号槽位时,交换机侧的两个内部以太网接口编号为XGE1/1/0/0~XGE1/1/0/1。
Eth-Trunk2和Eth-Trunk3是CSS内交换机下的接口。
部署方案
总体部署方案为在交换机上将其与两块NGFW Module相连的4个接口捆绑为一个Eth-Trunk接口,然后将流量分担到两块NGFW Module上。两块NGFW Module组成二层负载分担双机热备组网。
- 将两台交换机上的4个接口都加入Eth-Trunk 10,分别将两块NGFW Module上的4个接口加入Eth-Trunk 1。
- 交换机配置重定向将内网用户和外网之间的流量引导至NGFW Module,NGFW Module的Eth-Trunk 1组成同进同出接口对将流量会送回交换机。
当NGFW Module工作在接口对模式时,交换机不能开启loop-detection功能。交换机上开启了loop-detection功能后,会在接口上外发广播包。NGFW Module配置了接口对模式,从接口收到的所有报文又从这个接口发出去。这样就导致交换机检测到流量成环,会把接口关闭。
-
两块NGFW Module组成二层负载分担方式的双机热备组网,因此需要配置监控上下行接口所属VLAN。
-
图2 NGFW Module配置双机热备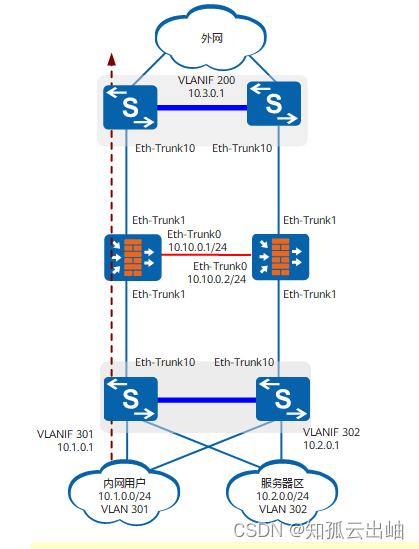
图2中仅给出交换机与NGFW Module有关的接口信息。
-
将NGFW Module面板上的GE0/0/1和GE0/0/2接口捆绑为Eth-Trunk0接口,作为心跳口和备份通道,并启用双机热备功能。
-
双机热备功能配置完成后,需要在NGFW Module_A上配置安全策略、IPS安全功能。NGFW Module_A的配置会自动备份到NGFW Module_B。
操作步骤
- 配置NGFW Module接口,完成网络基本配置。
# 在NGFW Module_A上配置设备名称。
<sysname> system-view
[sysname] sysname Module_A
# 在NGFW Module_A上创建VLAN。
[Module_A] vlan batch 200 301 to 302
[Module_A-vlan-302] quit
# 在NGFW Module_A上创建二层Eth-Trunk 1接口,允许上下行VLAN通过。
[Module_A] interface Eth-Trunk 1
[Module_A-Eth-Trunk1] description To_SwitchA_trunk10
[Module_A-Eth-Trunk1] portswitch
[Module_A-Eth-Trunk1] port link-type trunk
[Module_A-Eth-Trunk1] port trunk permit vlan 200 301 to 302
[Module_A-Eth-Trunk1] quit
# 在NGFW Module_A上将内联物理接口加入Eth-Trunk 1。
[Module_A] interface GigabitEthernet 1/0/0
[Module_A-GigabitEthernet1/0/0] portswitch
[Module_A-GigabitEthernet1/0/0] Eth-Trunk 1
[Module_A-GigabitEthernet1/0/0] quit
[Module_A] interface GigabitEthernet 1/0/1
[Module_A-GigabitEthernet1/0/1] portswitch
[Module_A-GigabitEthernet1/0/1] Eth-Trunk 1
[Module_A-GigabitEthernet1/0/1] quit
# 在NGFW Module_A上创建Eth-Trunk 1接口对。
[Module_A] pair-interface Eth-Trunk 1 Eth-Trunk 1
# 在NGFW Module_A上将面板上的两个接口加入Eth-Trunk 0。
[Module_A] interface Eth-Trunk 0
[Module_A-Eth-Trunk0] description hrp_interface
[Module_A-Eth-Trunk0] ip address 10.10.0.1 24
[Module_A-Eth-Trunk0] quit
[Module_A] interface GigabitEthernet 0/0/1
[Module_A-GigabitEthernet0/0/1] Eth-Trunk 0
[Module_A-GigabitEthernet0/0/1] quit
[Module_A] interface GigabitEthernet 0/0/2
[Module_A-GigabitEthernet0/0/2] Eth-Trunk 0
[Module_A-GigabitEthernet0/0/2] quit
# 在NGFW Module_A上配置接口加入安全区域。
[Module_A] firewall zone trust
[Module_A-zone-trust] add interface Eth-Trunk 1
[Module_A-zone-trust] quit
[Module_A] firewall zone name hrp
[Module_A-zone-hrp] set priority 75
[Module_A-zone-hrp] add interface Eth-Trunk 0
[Module_A-zone-hrp] quit
# 在NGFW Module_B上配置设备名称。
<sysname> system-view
[sysname] sysname Module_B
# 在NGFW Module_B上创建VLAN。
[Module_B] vlan batch 200 301 to 302
[Module_B-vlan-302] quit
# 在NGFW Module_B上创建二层Eth-Trunk 1接口,允许上下行VLAN通过。
[Module_B] interface Eth-Trunk 1
[Module_B-Eth-Trunk1] description To_SwitchB_trunk10
[Module_B-Eth-Trunk1] portswitch
[Module_B-Eth-Trunk1] port link-type trunk
[Module_B-Eth-Trunk1] port trunk permit vlan 200 301 to 302
[Module_B-Eth-Trunk1] quit
# 在NGFW Module_B上将内联物理接口加入Eth-Trunk 1。
[Module_B] interface GigabitEthernet 1/0/0
[Module_B-GigabitEthernet1/0/0] portswitch
[Module_B-GigabitEthernet1/0/0] Eth-Trunk 1
[Module_B-GigabitEthernet1/0/0] quit
[Module_B] interface GigabitEthernet 1/0/1
[Module_B-GigabitEthernet1/0/1] portswitch
[Module_B-GigabitEthernet1/0/1] Eth-Trunk 1
[Module_B-GigabitEthernet1/0/1] quit
# 在NGFW Module_B上创建Eth-Trunk 1接口对。
[Module_B] pair-interface Eth-Trunk 1 Eth-Trunk 1
# 在NGFW Module_B上将面板上的两个接口加入Eth-Trunk 0。
[Module_B] interface Eth-Trunk 0
[Module_B-Eth-Trunk0] description hrp_interface
[Module_B-Eth-Trunk0] ip address 10.10.0.2 24
[Module_B-Eth-Trunk0] quit
[Module_B] interface GigabitEthernet 0/0/1
[Module_B-GigabitEthernet0/0/1] Eth-Trunk 0
[Module_B-GigabitEthernet0/0/1] quit
[Module_B] interface GigabitEthernet 0/0/2
[Module_B-GigabitEthernet0/0/2] Eth-Trunk 0
[Module_B-GigabitEthernet0/0/2] quit
# 在NGFW Module_B上配置接口加入安全区域。
[Module_B] firewall zone trust
[Module_B-zone-trust] add interface Eth-Trunk 1
[Module_B-zone-trust] quit
[Module_B] firewall zone name hrp
[Module_B-zone-hrp] set priority 75
[Module_B-zone-hrp] add interface Eth-Trunk 0
[Module_B-zone-hrp] quit
- 配置NGFW Module双机热备功能。
# 在NGFW Module_A上启用会话快速备份功能。
[Module_A] hrp mirror session enable
# 在NGFW Module_A上指定心跳接口,启用双机热备。
[Module_A] hrp interface Eth-Trunk 0
[Module_A] hrp enable
[Module_A] hrp loadbalance-device //V100R001C30SPC300之前版本需要配置该命令,V100R001C30SPC300及之后版本不需要配置该命令
# 在NGFW Module_B上启用会话快速备份功能。
[Module_B] hrp mirror session enable
# 在NGFW Module_B上指定心跳接口,启用双机热备。
[Module_B] hrp interface Eth-Trunk 0
[Module_B] hrp enable
[Module_B] hrp loadbalance-device //V100R001C30SPC300之前版本需要配置该命令,V100R001C30SPC300及之后版本不需要配置该命令
配置入侵防御功能前,需要保证已经加载License、入侵防御特征库已升级至最新的版本。
配置入侵防御功能时,通常使用默认存在的入侵防御配置文件default即可。
- 配置NGFW Module安全业务。
# 在NGFW Module_A上配置安全策略,允许内网用户访问外网并进行入侵防御。
HRP_A[Module_A] security-policy
HRP_A[Module_A-policy-security] rule name policy_to_wan
HRP_A[Module_A-policy-security-rule-policy_to_wan] source-address 10.1.0.0 24
HRP_A[Module_A-policy-security-rule-policy_to_wan] source-address 10.2.0.0 24
HRP_A[Module_A-policy-security-rule-policy_to_wan] profile ips default
HRP_A[Module_A-policy-security-rule-policy_to_wan] action permit
HRP_A[Module_A-policy-security-rule-policy_to_wan] quit
HRP_A[Module_A-policy-security] quit
# 在NGFW Module_A上配置ASPF,此处以FTP协议为例。
HRP_A[Module_A] firewall zone trust
HRP_A[Module_A-zone-trust] detect ftp
HRP_A[Module_A-zone-trust] quit
#分别在NGFW Module_A和NGFW Module_B上保存配置。
HRP_A<Module_A> save
The current configurations will be written to the device.
Are you sure?[Y/N] y
Now saving the current configuration to the device......
Info:The Current Configuration was saved to the device successfully
HRP_S<Module_B> save
The current configurations will be written to the device.
Are you sure?[Y/N] y
Now saving the current configuration to the device......
Info:The Current Configuration was saved to the device successfully
- 配置核心层交换机组成CSS。
- 安装硬件,连接集群线缆,请参考“交换机集群安装指导”。
- 配置集群连接方式(此处以集群卡集群为例)、集群ID及集群优先级
# 在SwitchA上配置集群。集群连接方式为集群卡集群,集群ID为1,集群优先级为100。
<HUAWEI> system-view
[HUAWEI] sysname SwitchA
[SwitchA] set css mode css-card                //配置集群卡集群,缺省为集群卡集群
[SwitchA] set css id 1                          //配置集群ID,缺省值为1
[SwitchA] set css priority 100                 //配置集群优先级,缺省值为1
# 在SwitchB上配置集群。集群连接方式为集群卡集群,集群ID为2,集群优先级为10。
<HUAWEI> system-view
[HUAWEI] sysname SwitchB
[SwitchB] set css mode css-card
[SwitchB] set css id 2
[SwitchB] set css priority 10
- 使能集群功能
# 为使SwitchA成为主交换机,先使能SwitchA的集群功能并重新启动SwitchA。
[SwitchA] css enable
Warning: The CSS configuration will take effect only after the system is rebooted. T
he next CSS mode is CSS card. Reboot now? [Y/N]:y
# 再使能SwitchB的集群功能并重新启动SwitchB。
[SwitchB] css enable
Warning: The CSS configuration will take effect only after the system is rebooted. T
he next CSS mode is CSS card. Reboot now? [Y/N]:y
- 检查集群组建是否成功
# 通过任意主控板上的Console口本地登录集群,使用命令行查看集群系统的状态。
<SwitchA> display css status
CSS Enable switch On

Chassis Id   CSS Enable   CSS Status      CSS Mode    Priority    Master Force
------------------------------------------------------------------------------
1            On           Master          CSS card    100         Off
2            On           Standby         CSS card    10          Off
以上显示信息中,能够查看到两台成员交换机的集群ID、集群优先级、集群使能状态和集群状态,此处表明集群已建立成功。
为了防止集群系统分裂导致出现多主,建议给集群系统配置多主检测,此处略。
- 集群系统重命名为CSS
<SwitchA> system-view
[SwitchA] sysname CSS
[CSS]
- 配置交换机接口和VLAN。此处仅介绍了交换机和NGFW Module对接部分的配置。
- 创建VLAN
[CSS] vlan batch 200 301 to 302
- 配置上下行接口,并将上下行接口与Eth-Trunk10单向隔离。将物理接口加入Eth-Trunk接口的步骤略。
[CSS] interface eth-trunk 2 [CSS-Eth-Trunk2] port link-type trunk [CSS-Eth-Trunk2] undo port trunk allow-pass vlan 1 [CSS-Eth-Trunk2] port trunk allow-pass vlan 301 [CSS-Eth-Trunk2] am isolate Eth-Trunk 10 [CSS-Eth-Trunk2] quit [CSS] interface eth-trunk 3 [CSS-Eth-Trunk3] port link-type trunk [CSS-Eth-Trunk3] undo port trunk allow-pass vlan 1 [CSS-Eth-Trunk3] port trunk allow-pass vlan 302 [CSS-Eth-Trunk3] am isolate Eth-Trunk 10 [CSS-Eth-Trunk3] quit [CSS] interface eth-trunk 5 [CSS-Eth-Trunk5] port link-type access [CSS-Eth-Trunk5] port default vlan 200 [CSS-Eth-Trunk5] am isolate Eth-Trunk 10 [CSS-Eth-Trunk5] quit - 配置VLANIF接口分别作为上下行网关。
[CSS] interface vlanif301 [CSS-Vlanif301] ip address 10.1.0.1 24 [CSS-Vlanif301] quit [CSS] interface vlanif302 [CSS-Vlanif302] ip address 10.2.0.1 24 [CSS-Vlanif302] quit [CSS] interface vlanif200 [CSS-Vlanif200] ip address 10.3.0.1 24 [CSS-Vlanif200] quit - 将与NGFW Module连接的4个接口加入Eth-Trunk 10。
[CSS] interface eth-trunk 10 [CSS-Eth-Trunk10] description To_Module [CSS-Eth-Trunk10] port link-type trunk [CSS-Eth-Trunk10] trunkport xgigabitethernet 1/1/0/0 to 1/1/0/1 [CSS-Eth-Trunk10] trunkport xgigabitethernet 2/1/0/0 to 2/1/0/1 [CSS-Eth-Trunk10] undo port trunk allow-pass vlan 1 [CSS-Eth-Trunk10] port trunk allow-pass vlan 200 301 to 302 [CSS-Eth-Trunk10] mac-address learning disable [CSS-Eth-Trunk10] undo local-preference enable [CSS-Eth-Trunk10] stp disable [CSS-Eth-Trunk10] quit - 配置Eth-Trunk接口的负载分担方式。
[CSS] load-balance-profile module [CSS-load-balance-profile-module] ipv4 field sip dip [CSS-load-balance-profile-module] quit [CSS] interface Eth-Trunk 10 [CSS-Eth-Trunk10] load-balance enhanced profile module [CSS-Eth-Trunk10] quit - 配置流策略,将流量重定向到NGFW Module。
# 创建ACL。 [CSS] acl 3001 //匹配不同VLAN的内网用户互访流量 [CSS-acl-adv-3001] rule permit ip source 10.1.0.0 0.0.0.255 destination 10.2.0.0 0.0.0.255 [CSS-acl-adv-3001] rule permit ip source 10.2.0.0 0.0.0.255 destination 10.1.0.0 0.0.0.255 [CSS-acl-adv-3001] quit [CSS] acl 3002 //匹配内网用户访问外网的流量 [CSS-acl-adv-3002] rule permit ip source 10.1.0.0 0.0.0.255 [CSS-acl-adv-3002] rule permit ip source 10.2.0.0 0.0.0.255 [CSS-acl-adv-3002] quit [CSS] acl 3004 //匹配外网到内网的流量 [CSS-acl-adv-3004] rule permit ip destination 10.1.0.0 0.0.0.255 [CSS-acl-adv-3004] rule permit ip destination 10.2.0.0 0.0.0.255 [CSS-acl-adv-3004] quit # 配置内网用户互访流量不进行重定向、内网访问外网的流量重定向到NGFW Module。 [CSS] traffic classifier classifier1 precedence 5 [CSS-classifier-classifier1] if-match acl 3001 [CSS-classifier-classifier1] quit [CSS] traffic behavior behavior1 //允许内网用户互访流量通过 [CSS-behavior-behavior1] permit [CSS-behavior-behavior1] quit [CSS] traffic classifier classifier2 precedence 10 [CSS-classifier-classifier2] if-match acl 3002 [CSS-classifier-classifier2] quit [CSS] traffic behavior behavior2 //将内网访问外网的流量重定向至交换机与NGFW Module连接的接口 [CSS-behavior-behavior2] redirect interface Eth-Trunk 10 [CSS-behavior-behavior2] quit [CSS] traffic policy policy1 //配置流策略 [CSS-trafficpolicy-policy1] classifier classifier1 behavior behavior1 [CSS-trafficpolicy-policy1] classifier classifier2 behavior behavior2 [CSS-trafficpolicy-policy1] quit [CSS] interface Eth-Trunk 2 [CSS-Eth-Trunk2] traffic-policy policy1 inbound [CSS-Eth-Trunk2] quit [CSS] interface Eth-Trunk 3 [CSS-Eth-Trunk3] traffic-policy policy1 inbound [CSS-Eth-Trunk3] quit # 配置外网到内网的流量重定向到NGFW Module。 [CSS] traffic classifier classifier4 [CSS-classifier-classifier4] if-match acl 3004 [CSS-classifier-classifier4] quit [CSS] traffic behavior behavior4 //将外网访问内网的流量重定向至交换机与NGFW Module连接的接口 [CSS-behavior-behavior4] redirect interface Eth-Trunk 10 [CSS-behavior-behavior4] quit [CSS] traffic policy policy2 //配置流策略 [CSS-trafficpolicy-policy2] classifier classifier4 behavior behavior4 [CSS-trafficpolicy-policy2] quit [CSS] interface Eth-Trunk 5 [CSS-Eth-Trunk5] traffic-policy policy2 inbound [CSS-Eth-Trunk5] quit - 配置静态路由。
虽然配置了重定向策略,报文进入交换机后,依然需要查找路由表,完成三层转发的流程,只是报文的出接口由重定向策略的配置决定。
本示例中,内网发往外网的报文进入交换机后,首先查找路由表,根据缺省路由将报文的VLAN Tag由301或302改为200,再转发给NGFW Module。外网发往内网的报文进入交换机后,则根据直连路由,将报文的VLAN Tag由200改为301或302,再转发给NGFW Module。
如果未查找到路由表,则报文直接根据重定向策略转发,报文的VLAN Tag不会做修改。
# 配置到外网的缺省路由。
[CSS] ip route-static 0.0.0.0 0.0.0.0 10.3.0.5
- 创建VLAN
结果验证
-
在NGFW Module_A上执行display hrp state命令,检查当前HRP的状态,显示以下信息表示HRP建立成功。
HRP_A[Module_A] display hrp state The firewall's config state is: ACTIVE Backup channel usage: 0.01% Time elapsed after the last switchover: 0 days, 0 hours, 36 minutes Current state of interfaces tracked by active: Eth-trunk1 (VLAN 200) : up Eth-trunk1 (VLAN 301) : up Eth-trunk1 (VLAN 302) : up Current state of interfaces tracked by standby: Eth-trunk1 (VLAN 200) : up Eth-trunk1 (VLAN 301) : up Eth-trunk1 (VLAN 302) : up 检查是否可以正常从私网访问Internet,并查看NGFW Module的会话表。 HRP_A[Module_A] display firewall session table Current Total Sessions : 1 http VPN: public --> public 10.1.0.10:22048 --> 3.3.3.3:80 HRP_S[Module_B] display firewall session table Current Total Sessions : 1 http VPN: public --> public Remote 10.1.0.10:22048 --> 3.3.3.3:80 -
可以看到NGFW Module_A上已经建立了连接。NGFW Module_B存在带有Remote标记的会话,表示配置双机热备功能后,会话备份成功。
-
在trust区域的PC上长ping公网的地址,然后将NGFW Module_A的Eth-trunk1接口shutdown,观察NGFW Module状态切换及ping包丢包情况。如果切换正常,NGFW Module_B会立即切换为主机承载业务。ping包不丢包或出现若干个丢包(一般是1到3个包,实际视网络环境而定)。
再将NGFW Module_A的Eth-trunk1接口undo shutdown,观察NGFW Module状态切换及ping包丢包情况。如果切换正常,在抢占延迟时间到达(缺省是60s)后,NGFW Module_A会重新切换为主机承载业务。ping包不丢包或出现若干个丢包(一般是1到3个包,实际视网络环境而定)。
配置脚本
NGFW Module配置脚本:
| NGFW Module_A | NGFW Module_B |
|---|---|
#
 sysname Module_A
#
 hrp mirror session enable
 hrp enable
 hrp interface Eth-Trunk0
 hrp loadbalance-device //V100R001C30SPC300之前版本需要配置该命令,V100R001C30SPC300及之后版本不需要配置该命令
#
vlan batch 200 301 to 302
#
pair-interface Eth-Trunk1 Eth-Trunk1
#
vlan 200
 hrp track active
 hrp track standby
     Eth-Trunk1
#
vlan 301
 hrp track active
 hrp track standby
     Eth-Trunk1
#
vlan 302
 hrp track active
 hrp track standby
     Eth-Trunk1
#
interface Eth-Trunk0
 description hrp_interface
 ip address 10.10.0.1 255.255.255.0
#
interface Eth-Trunk1
 description To_SwitchA_trunk10
 portswitch
 port link-type trunk
 port trunk permit vlan 200 301 to 302
#
interface GigabitEthernet0/0/1
 eth-trunk 0
#
interface GigabitEthernet0/0/2
 eth-trunk 0
#
interface GigabitEthernet1/0/0
 portswitch
 eth-trunk 1
#
interface GigabitEthernet1/0/1
 portswitch
 eth-trunk 1
#
firewall zone trust
 set priority 85
 detect ftp
 add interface Eth-Trunk1
#
firewall zone name hrp
 set priority 75
 add interface Eth-Trunk0
#
security-policy
 rule name policy_to_wan
  source-address 10.1.0.0 mask 255.255.255.0
  source-address 10.2.0.0 mask 255.255.255.0
  profile ips default
  action permit
#
return
| #
sysname Module_B
#
hrp mirror session enable
hrp enable
hrp interface Eth-Trunk0
hrp loadbalance-device //V100R001C30SPC300之前版本需要配置该命令,V100R001C30SPC300及之后版本不需要配置该命令
#
vlan batch 200 301 to 302
#
pair-interface Eth-Trunk1 Eth-Trunk1
#
vlan 200
hrp track active
hrp track standby
Eth-Trunk1
#
vlan 301
hrp track active
hrp track standby
Eth-Trunk1
#
vlan 302
hrp track active
hrp track standby
Eth-Trunk1
#
interface Eth-Trunk0
description hrp_interface
ip address 10.10.0.2 255.255.255.0
#
interface Eth-Trunk1
description To_SwitchB_trunk10
portswitch
port link-type trunk
port trunk permit vlan 200 301 to 302
#
interface GigabitEthernet0/0/1
eth-trunk 0
#
interface GigabitEthernet0/0/2
eth-trunk 0
#
interface GigabitEthernet1/0/0
portswitch
eth-trunk 1
#
interface GigabitEthernet1/0/1
portswitch
eth-trunk 1
#
firewall zone trust
set priority 85
detect ftp
add interface Eth-Trunk1
#
firewall zone name hrp
set priority 75
add interface Eth-Trunk0
#
security-policy
rule name policy_to_wan
source-address 10.1.0.0 mask 255.255.255.0
source-address 10.2.0.0 mask 255.255.255.0
profile ips default
action permit
#
return
|
CSS配置脚本:

# 引流配置
load-balance-profile module
#
vlan batch 200 301 to 302
#
acl number 3001
 rule 5 permit ip source 10.1.0.0 0.0.0.255 destination 10.2.0.0 0.0.0.255
 rule 10 permit ip source 10.2.0.0 0.0.0.255 destination 10.1.0.0 0.0.0.255
acl number 3002
 rule 5 permit ip source 10.1.0.0 0.0.0.255
 rule 10 permit ip source 10.2.0.0 0.0.0.255
acl number 3004
 rule 5 permit ip destination 10.1.0.0 0.0.0.255
 rule 10 permit ip destination 10.2.0.0 0.0.0.255
#
traffic classifier classifier1 operator or precedence 5
 if-match acl 3001
traffic classifier classifier2 operator or precedence 10
 if-match acl 3002
traffic classifier classifier4 operator or precedence 15
 if-match acl 3004
#
traffic behavior behavior1
 permit
traffic behavior behavior2
 permit
 redirect interface Eth-Trunk10
traffic behavior behavior4
 permit
 redirect interface Eth-Trunk10
#
traffic policy policy1 match-order config
 classifier classifier1 behavior behavior1
 classifier classifier2 behavior behavior2
traffic policy policy2 match-order config
 classifier classifier4 behavior behavior4
#
interface Vlanif200
 ip address 10.3.0.1 255.255.255.0
#
interface Vlanif301
 ip address 10.1.0.1 255.255.255.0
#
interface Vlanif302
 ip address 10.2.0.1 255.255.255.0
#
interface Eth-Trunk2
 port link-type trunk
 undo port trunk allow-pass vlan 1
 port trunk allow-pass vlan 301
 am isolate Eth-Trunk 10
 traffic-policy policy1 inbound
#
interface Eth-Trunk3
 port link-type trunk
 undo port trunk allow-pass vlan 1
 port trunk allow-pass vlan 302
 am isolate Eth-Trunk 10
 traffic-policy policy1 inbound
#
interface Eth-Trunk5
 port default vlan 200
 am isolate Eth-Trunk 10
 traffic-policy policy2 inbound
#
interface Eth-Trunk10
 description To_Module
 port link-type trunk
 undo port trunk allow-pass vlan 1
 port trunk allow-pass vlan 200 301 to 302
 mac-address learning disable
 stp disable
 load-balance enhanced profile module
 undo local-preference enable
#
interface XGigabitEthernet1/1/0/0
 eth-trunk 10
#
interface XGigabitEthernet1/1/0/1
 eth-trunk 10
#
interface xgigabitethernet1/1/0/2
 eth-trunk 2
#
interface xgigabitethernet1/1/0/3
 eth-trunk 3
#
interface xgigabitethernet1/1/0/5
 eth-trunk 5
#
interface XGigabitEthernet2/1/0/0
 eth-trunk 10
#
interface XGigabitEthernet2/1/0/1
 eth-trunk 10
#
interface xgigabitethernet2/1/0/2
 eth-trunk 2
#
interface xgigabitethernet2/1/0/3
 eth-trunk 3
#
interface xgigabitethernet2/1/0/5
 eth-trunk 5
#
ip route-static 0.0.0.0 0.0.0.0 10.3.0.5
#
return


