文章目录
- 聊天模块
- 1. 数据库表
- 2. 后端初始化
- 2.1 controller
- 2.2 service
- 2.3 dao
- 2.4 mapper
- 3. 前端初始化
- 3.1 路由创建
- 3.2 目录创建
- 3.3 tailwindCSS安装
- 4. tailwindUI
- 5. 前端代码编写
前言:最近写项目,发现了一些很有意思的功能,想写文章,录视频把这些内容记录下。但这些功能太零碎,如果为每个功能都单独搭建一个项目,这明显不合适。于是我想,就搭建一个项目,把那些我想将的小功能全部整合到一起。实现 搭一次环境,处处使用。
本文主要实现以下功能
- 评论功能
环境搭建
文章链接
已录制视频
视频链接
仓库地址
https://github.com/xuhuafeifei/fgbg-font-and-back.git
聊天模块
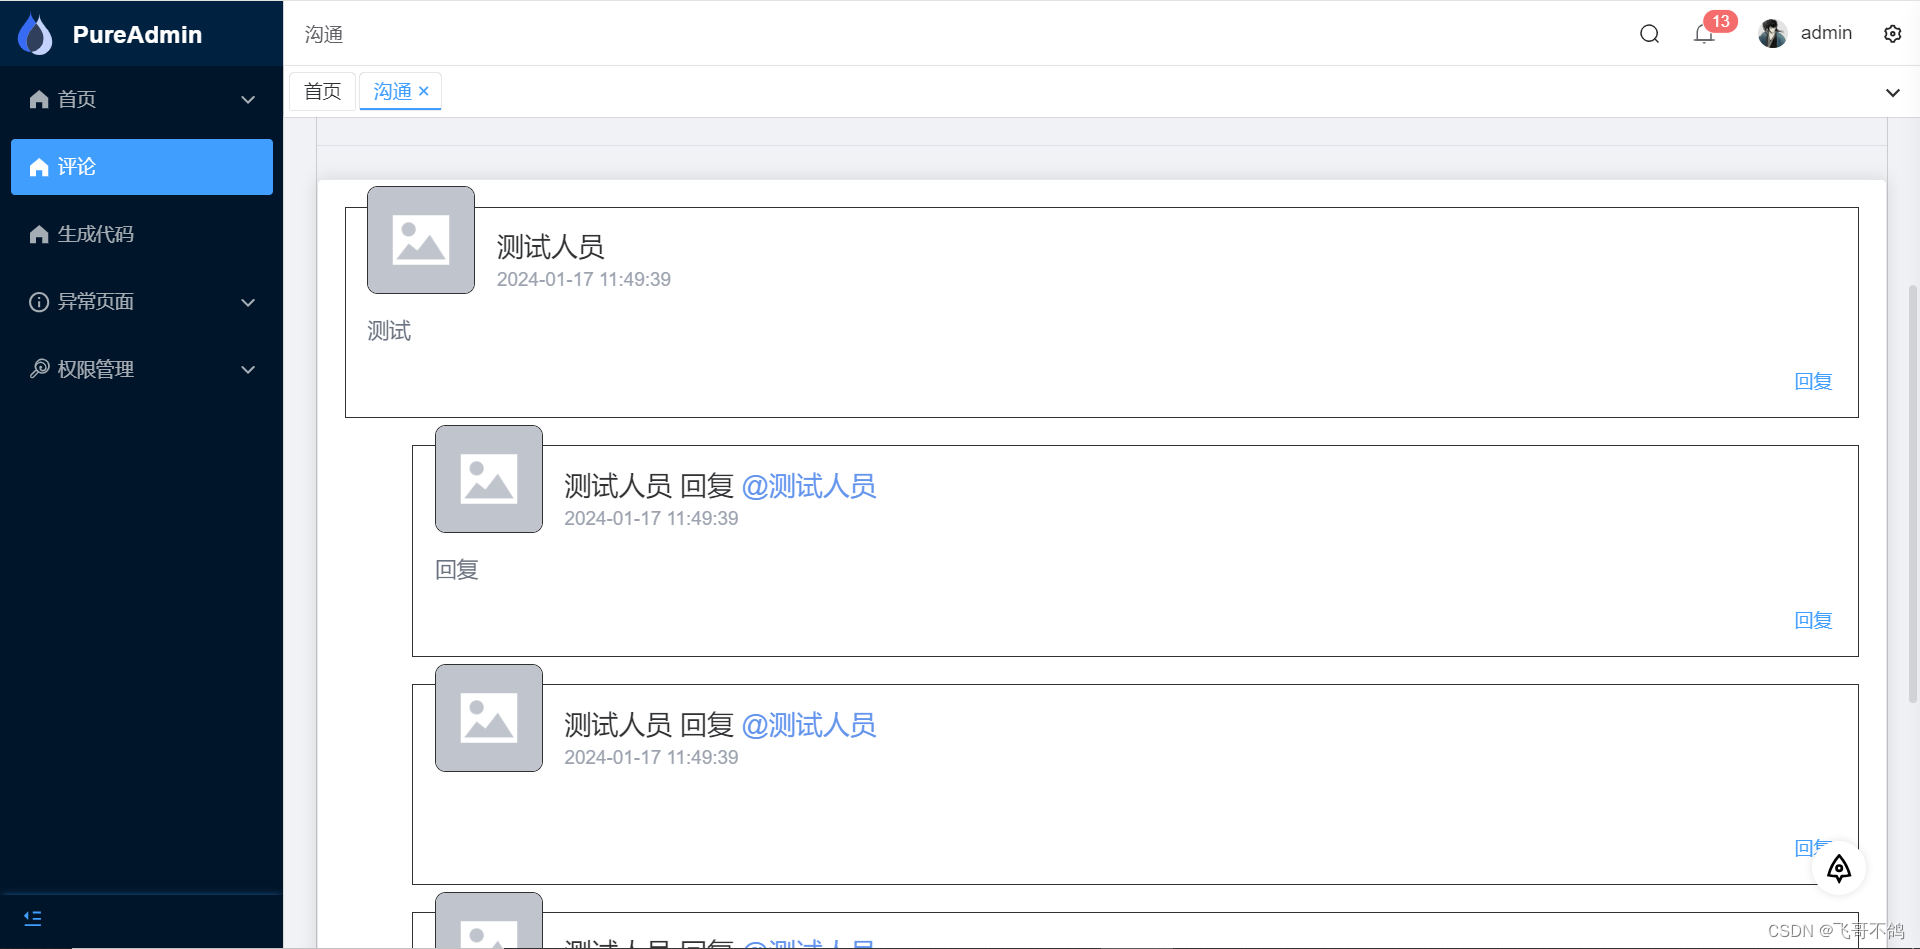
效果展示
1. 数据库表
CREATE TABLE `communicate` (
  `id` int NOT NULL AUTO_INCREMENT,
  `content` varchar(255) COLLATE utf8mb4_croatian_ci DEFAULT NULL,
  `create_time` datetime DEFAULT NULL,
  `pid` int DEFAULT NULL,
  `user_id` int DEFAULT NULL,
  `reply_user_id` int DEFAULT NULL,
  PRIMARY KEY (`id`)
) ENGINE=InnoDB AUTO_INCREMENT=3 DEFAULT CHARSET=utf8mb4 COLLATE=utf8mb4_croatian_ci;
2. 后端初始化
2.1 controller
CommunicateController
package com.fgbg.demo.controller;

import com.fgbg.common.utils.R;
import com.fgbg.demo.entity.Communicate;
import com.fgbg.demo.service.CommunicateService;
import org.springframework.beans.factory.annotation.Autowired;
import org.springframework.web.bind.annotation.RequestBody;
import org.springframework.web.bind.annotation.RequestMapping;
import org.springframework.web.bind.annotation.RestController;

import java.util.List;

@RequestMapping("comm")
@RestController
public class CommunicateController {
    @Autowired
    private CommunicateService service;

    /**
     * 返回树形结构评论数据
     */
    @RequestMapping("/list")
    public R list() {
        List<Communicate> list = service.listTree();
        return R.ok().put("data", list);
    }

    /**
     * 保存评论
     */
    @RequestMapping("/save")
    public R save(@RequestBody Communicate entity) {
        service.save(entity);
        return R.ok();
    }
}
2.2 service
CommunicateServiceImpl
package com.fgbg.demo.service.impl;

import com.baomidou.mybatisplus.extension.service.impl.ServiceImpl;
import com.fgbg.demo.dao.CommunicateDao;
import com.fgbg.demo.entity.Communicate;
import com.fgbg.demo.service.CommunicateService;
import org.springframework.stereotype.Service;

import java.util.ArrayList;
import java.util.HashMap;
import java.util.List;
import java.util.stream.Collectors;

/**
 *
 */
@Service
public class CommunicateServiceImpl extends ServiceImpl<CommunicateDao, Communicate>
    implements CommunicateService{

    /**
     * 返回树形评论数据
     *
     * @return
     */
    @Override
    public List<Communicate> listTree() {
        List<Communicate> list = this.list();
        // 映射id->index
        HashMap<Integer, Integer> map = new HashMap<>();
        for (int index = 0; index < list.size(); index++) {
            map.put(list.get(index).getId(), index);
        }
        // 遍历寻找父节点
        for (Communicate communicate : list) {
            Integer pid = communicate.getPid();
            // 有父节点
            if (pid != null) {
                // 获取父节点id
                Integer indexFather = map.get(pid);
                Communicate father = list.get(indexFather);
                if (father.getChildren() == null) {
                    father.setChildren(new ArrayList<>());
                }
                // 在父节点上添加当前节点
                father.getChildren().add(communicate);
            }
        }
        // 过滤出一级节点
        List<Communicate> ans = list.stream().filter(child -> child.getPid() == null).collect(Collectors.toList());
        return ans;
    }
}
2.3 dao
CommunicateDao
package com.fgbg.demo.dao;

import com.fgbg.demo.entity.Communicate;
import com.baomidou.mybatisplus.core.mapper.BaseMapper;
import org.apache.ibatis.annotations.Mapper;

/**
 * @Entity com.fgbg.demo.entity.Communicate
 */
@Mapper
public interface CommunicateDao extends BaseMapper<Communicate> {

}
2.4 mapper
CommunicateMapper.xml
<?xml version="1.0" encoding="UTF-8"?>
<!DOCTYPE mapper
        PUBLIC "-//mybatis.org//DTD Mapper 3.0//EN"
        "http://mybatis.org/dtd/mybatis-3-mapper.dtd">
<mapper namespace="com.fgbg.demo.dao.CommunicateDao">

    <resultMap id="BaseResultMap" type="com.fgbg.demo.entity.Communicate">
            <id property="id" column="id" jdbcType="INTEGER"/>
            <result property="content" column="content" jdbcType="VARCHAR"/>
            <result property="createTime" column="create_time" jdbcType="TIMESTAMP"/>
            <result property="pid" column="pid" jdbcType="INTEGER"/>
            <result property="userId" column="user_id" jdbcType="INTEGER"/>
            <result property="replyUserId" column="reply_user_id" jdbcType="INTEGER"/>
    </resultMap>

    <sql id="Base_Column_List">
        id,content,create_time,
        pid,user_id
    </sql>
</mapper>
3. 前端初始化
3.1 路由创建
/src/router/modules/communicate.ts
const { VITE_HIDE_HOME } = import.meta.env;
const Layout = () => import("@/layout/index.vue");

export default {
  path: "/communicate",
  name: "communicate",
  component: Layout,
  redirect: "/communicate",
  meta: {
    icon: "homeFilled",
    title: "沟通",
    rank: 0
  },
  children: [
    {
      path: "/communicate",
      name: "communicate",
      component: () => import("@/views/communicate/communicate.vue"),
      meta: {
        title: "评论",
        showLink: VITE_HIDE_HOME === "true" ? false : true
      }
    }
  ]
} as RouteConfigsTable;
3.2 目录创建
/src/views/communicate/communicate.vue
3.3 tailwindCSS安装
-
安装
pnpm install -D tailwindcss postcss autoprefixer -
输入命令初始化tailwind和postcss配置文件
npx tailwindcss init -p -
打开vue项目,在src目录下新建一个css文件:index.css,在文件中写入
@tailwind base; @tailwind components; @tailwind utilities; -
main.ts中引入
import './index.css'
检查tailwind.config.js。我的项目中,文件代码为
/** @type {import('tailwindcss').Config} */
module.exports = {
  darkMode: "class",
  corePlugins: {
    preflight: false
  },
  content: ["./index.html", "./src/**/*.{vue,js,ts,jsx,tsx}"],
  theme: {
    extend: {
      colors: {
        bg_color: "var(--el-bg-color)",
        primary: "var(--el-color-primary)",
        text_color_primary: "var(--el-text-color-primary)",
        text_color_regular: "var(--el-text-color-regular)"
      }
    }
  }
};
stylelint.config.js
module.exports = {
  root: true,
  extends: [
    "stylelint-config-standard",
    "stylelint-config-html/vue",
    "stylelint-config-recess-order"
  ],
  plugins: ["stylelint-order", "stylelint-prettier", "stylelint-scss"],
  overrides: [
    {
      files: ["**/*.(css|html|vue)"],
      customSyntax: "postcss-html"
    },
    {
      files: ["*.scss", "**/*.scss"],
      customSyntax: "postcss-scss",
      extends: [
        "stylelint-config-standard-scss",
        "stylelint-config-recommended-vue/scss"
      ]
    }
  ],
  rules: {
    "selector-class-pattern": null,
    "no-descending-specificity": null,
    "scss/dollar-variable-pattern": null,
    "selector-pseudo-class-no-unknown": [
      true,
      {
        ignorePseudoClasses: ["deep", "global"]
      }
    ],
    "selector-pseudo-element-no-unknown": [
      true,
      {
        ignorePseudoElements: ["v-deep", "v-global", "v-slotted"]
      }
    ],
    "at-rule-no-unknown": [
      true,
      {
        ignoreAtRules: [
          "tailwind",
          "apply",
          "variants",
          "responsive",
          "screen",
          "function",
          "if",
          "each",
          "include",
          "mixin",
          "use"
        ]
      }
    ],
    "rule-empty-line-before": [
      "always",
      {
        ignore: ["after-comment", "first-nested"]
      }
    ],
    "unit-no-unknown": [true, { ignoreUnits: ["rpx"] }],
    "order/order": [
      [
        "dollar-variables",
        "custom-properties",
        "at-rules",
        "declarations",
        {
          type: "at-rule",
          name: "supports"
        },
        {
          type: "at-rule",
          name: "media"
        },
        "rules"
      ],
      { severity: "warning" }
    ]
  },
  ignoreFiles: ["**/*.js", "**/*.ts", "**/*.jsx", "**/*.tsx"]
};
-
测试是否引入成功
<p class=" text-2xl font-bold">Hello Tailwind!</p>如果出现css样式,则表明引入成功
4. tailwindUI
聊天框样式涉及参考了这个大神的UI设计
网址:[comment聊天](comment | Cards (tailwindcomponents.com))
源代码
<div class="flex justify-center relative top-1/3">


<!-- This is an example component -->
<div class="relative grid grid-cols-1 gap-4 p-4 mb-8 border rounded-lg bg-white shadow-lg">
    <div class="relative flex gap-4">
        <img src="https://icons.iconarchive.com/icons/diversity-avatars/avatars/256/charlie-chaplin-icon.png" class="relative rounded-lg -top-8 -mb-4 bg-white border h-20 w-20" alt="" loading="lazy">
        <div class="flex flex-col w-full">
            <div class="flex flex-row justify-between">
                <p class="relative text-xl whitespace-nowrap truncate overflow-hidden">COMMENTOR</p>
                <a class="text-gray-500 text-xl" href="#"><i class="fa-solid fa-trash"></i></a>
            </div>
            <p class="text-gray-400 text-sm">20 April 2022, at 14:88 PM</p>
        </div>
    </div>
    <p class="-mt-4 text-gray-500">Lorem ipsum dolor sit amet consectetur adipisicing elit. <br>Maxime quisquam vero adipisci beatae voluptas dolor ame.</p>
</div>


</div>
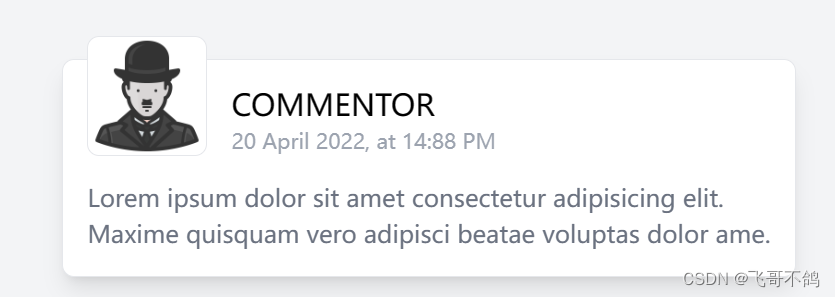
tip: 本项目编写时,对其代码进行一定程度的调整
5. 前端代码编写
笔者考虑篇幅问题,没有封装组件。读者可以尝试着将聊天代码封装为组件,一级评论一个样式,回复评论一个样式。通过这样的方式实现代码复用。
<script setup lang="ts">
import { CommunicateEntity, list, save } from "/src/api/communicate.ts";
import { ElMessage } from "element-plus";
import { ref, onMounted } from "vue";

const input = ref("");

const replyInput = ref("");

const chatList = ref<Array<CommunicateEntity>>();

const submit = (replyUserId?: Number, pid?: Number) => {
  const entity = new CommunicateEntity();
  entity.replyUserId = replyUserId;
  entity.content = input.value;
  entity.pid = pid;
  console.log(entity);

  save(entity).then(res => {
    if (res.code === 0) {
      ElMessage.success("提交成功");
      getData();
    } else {
      ElMessage.error("提交失败: " + res.msg);
    }
  });
};

onMounted(() => {
  getData();
});

const getData = () => {
  list().then(res => {
    console.log(res);
    chatList.value = res.data;
  });
};

// 模拟获取用户信息(一般用户信息会在登陆时, 存储在浏览器本地)
const getUser = (userId: Number) => {
  return "测试人员";
};
</script>

<template>
  <div style="border: 1px solid #ccc; margin-top: 10px">
    <el-input v-model="input" textarea style="height: 200px" />
    <el-button @click="submit()">提交</el-button>
    <el-divider />
    <div v-for="item in chatList" :key="item.id">
      <!-- This is an example component -->
      <div class="relative gap-4 p-6 rounded-lg mb-8 bg-white border">
        <div class="relative flex gap-4">
          <img
            src="https://cube.elemecdn.com/e/fd/0fc7d20532fdaf769a25683617711png.png"
            class="relative rounded-lg -top-8 -mb-4 bg-white border h-20 w-20"
            alt=""
            loading="lazy"
          />
          <div class="flex flex-col w-full">
            <div class="flex flex-row justify-between">
              <p
                class="relative text-xl whitespace-nowrap truncate overflow-hidden"
              >
                {{ getUser(item.id) }}
              </p>
              <a class="text-gray-500 text-xl" href="#"
                ><i class="fa-solid fa-trash"
              /></a>
            </div>
            <p class="text-gray-400 text-sm">{{ item.createTime }}</p>
          </div>
        </div>
        <p class="-mt-4 text-gray-500">
          {{ item.content }}
        </p>
        <!-- 回复按钮 -->
        <div>
          <el-popover placement="bottom-start" trigger="click" :width="200">
            <template #reference>
              <el-button style="float: right" link type="primary"
                >回复</el-button
              >
            </template>
            <el-input v-model="input" />
            <el-button @click="submit(item.userId, item.id)" style="width: 100%"
              >确定</el-button
            >
          </el-popover>
        </div>
      </div>
      <!-- 回复 -->
      <div v-for="subItem in item.children" :key="subItem.id">
        <div
          class="relative gap-4 p-6 rounded-lg mb-8 bg-white border"
          style="margin-left: 50px"
        >
          <div class="relative flex gap-4">
            <img
              src="https://cube.elemecdn.com/e/fd/0fc7d20532fdaf769a25683617711png.png"
              class="relative rounded-lg -top-8 -mb-4 bg-white border h-20 w-20"
              alt=""
              loading="lazy"
            />

            <div class="flex flex-col w-full">
              <div class="flex flex-row justify-between">
                <p
                  class="relative text-xl whitespace-nowrap truncate overflow-hidden"
                >
                  {{ getUser(subItem.userId) }} 回复
                  <span style="color: cornflowerblue"
                    >@{{ getUser(subItem.replyUserId) }}</span
                  >
                </p>
                <a class="text-gray-500 text-xl" href="#"
                  ><i class="fa-solid fa-trash"
                /></a>
              </div>
              <p class="text-gray-400 text-sm">{{ item.createTime }}</p>
            </div>
          </div>
          <p class="-mt-4 text-gray-500">
            {{ subItem.content }}
          </p>
          <!-- 回复按钮 -->
          <div>
            <el-popover placement="bottom-start" trigger="click" :width="200">
              <template #reference>
                <el-button style="float: right" link type="primary"
                  >回复</el-button
                >
              </template>
              <el-input v-model="input" />
              <el-button
                @click="submit(item.userId, item.id)"
                style="width: 100%"
                >确定</el-button
              >
            </el-popover>
          </div>
        </div>
      </div>
    </div>
  </div>
</template>

<style lang="scss" scoped></style>


![[足式机器人]Part2 Dr. CAN学习笔记-Ch04 Advanced控制理论](https://img-blog.csdnimg.cn/direct/d133933db11248f5a59dae0d309219fa.png#pic_center)
