不经过实战,看再多理论,都是只放在笔记里,活学活用才是硬道理。同时开发应用需要循序渐进,一口气规划300个功能,400张表,会严重打击自己的自信。这里根据所学的,开发一个答题App。

题库需求分析
- 首页显示试卷列表;
- 点击试卷,开启计时,逐个显示该试卷的题目;
- 点击下一题,检测是否作答,未作答提示,已作答显示下一个,更新进度条显示;
- 最后一题,按钮显示“交卷”,作答完成,点击交卷,弹出成绩。
功能分析
- 首页试卷列表使用 recyclerview;
- 答题页面涉及进度条、卡片视图(cardview)、倒计时(CountDownTimer)
- 数据模型:Paper、Question。
开发
开发环境
Android Studio Giraffe | 2022.3.1 Patch 3
Android Gradle Plugin Version 8.1.3
Gradle Version 8.0
JDK 17
compileSdk: 33
targetSdk: 33
minSdk:26
- 步骤1. 新建项目,这里选择的语言为kotlin。
解决 gradle 卡顿问题:将 gradle/gradle-wrapper.properties 中的distributionUrl 替换为国内的:
distributionUrl=https\://mirrors.cloud.tencent.com/gradle/gradle-8.0-bin.zip
settings.gradle 国内镜像设置:
pluginManagement {
    repositories {
        maven { url 'https://mirrors.cloud.tencent.com/gradle/'}
        maven {
            url 'https://maven.aliyun.com/repository/google'
        }
        maven {
            url 'https://maven.aliyun.com/repository/jcenter'
        }
        maven {
            url "https://maven.aliyun.com/repository/public"
        }
        maven {
            url 'https://developer.huawei.com/repo/'
        }
        maven {
            url "https://jitpack.io"
        }
        google()
        mavenCentral()
        gradlePluginPortal()
    }
}
dependencyResolutionManagement {
    repositoriesMode.set(RepositoriesMode.FAIL_ON_PROJECT_REPOS)
    repositories {
        maven {
            url 'https://maven.aliyun.com/repository/google'
        }
        maven {
            url 'https://maven.aliyun.com/repository/jcenter'
        }
        maven {
            url "https://maven.aliyun.com/repository/public"
        }
        maven {
            url 'https://developer.huawei.com/repo/'
        }
        maven {
            url "https://jitpack.io"
        }
        google()
        mavenCentral()
    }
}

rootProject.name = "Exam"
include ':app'
开启 viewBinding 在 build.gradle 中添加
buildFeatures {
        viewBinding = true
    }
- 步骤2:建模型:ExamModel,里面建数据类,PaperModel 和 QuestionModel;
package com.alex.exam

/**
 * @Author      : alex
 * @Date        : on 2024/1/6 16:59.
 * @Description :试卷模型
 */
data class PaperModel(
    val id : String,
    val title : String,
    val subtitle : String,
    val time : String,
    val questionList : List<QuestionModel>
){
    constructor() : this("","","","", emptyList())
}

data class QuestionModel(
    val question : String,
    val options : List<String>,
    val correct : String,
){
    constructor() : this ("", emptyList(),"")
}
- 步骤3. 主题设置
配色精美的主题是影响App评价的一个指标,这方面还是专业的人来干。这里只是参考别的,最简设置。
配置主题色,有利于界面统一,减少在代码中写颜色。在 colors.xml 中先定义主题色、背景配色、操作成功提示配色、操作失败提示配色
<?xml version="1.0" encoding="utf-8"?>
<resources>
    <color name="black">#FF000000</color>
    <color name="white">#FFFFFFFF</color>
    <color name="blue">#1890ff</color>
    <color name="gray">#F4F4F4</color>
    <color name="green">#52C41A</color>
    <color name="red">#FF4D4F</color>
</resources>
再设置主题:
<resources xmlns:tools="http://schemas.android.com/tools">
    <!-- Base application theme. -->
    <style name="Base.Theme.Exam" parent="Theme.Material3.DayNight.NoActionBar">
        <!-- Customize your light theme here. -->
        <item name="colorPrimary">@color/blue</item>
    </style>

    <style name="Theme.Exam" parent="Base.Theme.Exam" />
</resources>
- 步骤4. 首页
在首页,主要通过RecyclerView展示试卷列表。需要自定义Adapter, 列表项布局,并在 Adapter 中将模型映射到布局
<?xml version="1.0" encoding="utf-8"?>
<androidx.cardview.widget.CardView
    xmlns:android="http://schemas.android.com/apk/res/android"
    android:layout_width="match_parent"
    android:layout_height="wrap_content"
    xmlns:app="http://schemas.android.com/apk/res-auto"
    xmlns:tools="http://schemas.android.com/tools"
    android:layout_margin="4dp"
    android:elevation="10dp"
    app:cardCornerRadius="24dp">

    <RelativeLayout
        android:layout_width="match_parent"
        android:layout_height="wrap_content"
        android:padding="16dp">

        <LinearLayout
            android:layout_width="match_parent"
            android:layout_height="wrap_content"
            android:layout_centerVertical="true"
            android:orientation="vertical">
            <TextView
                android:layout_width="wrap_content"
                android:layout_height="wrap_content"
                android:id="@+id/tvPaperTitle"
                tools:text="HTML 测验"
                android:textSize="18sp"
                android:textStyle="bold"/>
            <TextView
                android:layout_width="wrap_content"
                android:layout_height="wrap_content"
                android:id="@+id/tvPaperSubTitle"
                android:layout_marginTop="4dp"
                tools:text="HTML理论模拟考试"/>
        </LinearLayout>

        <LinearLayout
            android:layout_width="wrap_content"
            android:layout_height="wrap_content"
            android:layout_alignParentEnd="true"
            android:layout_centerVertical="true"
            android:gravity="center"
            android:orientation="vertical">

            <ImageView
                android:layout_width="32dp"
                android:layout_height="32dp"
                android:src="@drawable/icon_timer"/>
            <TextView
                android:layout_width="wrap_content"
                android:layout_height="wrap_content"
                android:id="@+id/tvPaperTime"
                tools:text="20 min"/>

        </LinearLayout>

    </RelativeLayout>

</androidx.cardview.widget.CardView>
自定义 PaperListAdapter,给每个试卷项添加点击跳转到答题页面的click事件:
package com.alex.exam

import android.content.Intent
import android.view.LayoutInflater
import android.view.ViewGroup
import androidx.recyclerview.widget.RecyclerView
import com.alex.exam.databinding.PaperRecyclerRowBinding

/**
 * @Author      : alex
 * @Date        : on 2024/1/6 17:13.
 * @Description :描述
 */
class PaperListAdapter(private val paperModelList : List<PaperModel>) :
    RecyclerView.Adapter<PaperListAdapter.MyViewHolder>() {
    class MyViewHolder(private val binding: PaperRecyclerRowBinding) : RecyclerView.ViewHolder(binding.root) {
        fun bind(paperModel: PaperModel) {
            binding.apply {
                tvPaperTitle.text = paperModel.title
                tvPaperSubTitle.text = paperModel.subtitle
                tvPaperTime.text = paperModel.time+" min"
                root.setOnClickListener {
                    val intent  = Intent(root.context,ExamActivity::class.java)
                    ExamActivity.questionModelList = paperModel.questionList
                    ExamActivity.time = paperModel.time
                    root.context.startActivity(intent)
                }
            }
        }
    }

    override fun onCreateViewHolder(parent: ViewGroup, viewType: Int): MyViewHolder {
        val binding = PaperRecyclerRowBinding.inflate(LayoutInflater.from(parent.context),parent,false)
        return MyViewHolder(binding)
    }

    override fun getItemCount(): Int {
        return paperModelList.size
    }

    override fun onBindViewHolder(holder: MyViewHolder, position: Int) {
        holder.bind(paperModelList[position])
    }
}
首页布局中加入RecyclerView控件:
<?xml version="1.0" encoding="utf-8"?>
<LinearLayout xmlns:android="http://schemas.android.com/apk/res/android"
    xmlns:app="http://schemas.android.com/apk/res-auto"
    xmlns:tools="http://schemas.android.com/tools"
    android:orientation="vertical"
    android:padding="16dp"
    android:layout_width="match_parent"
    android:layout_height="match_parent"
    tools:context=".MainActivity">

    <ImageView
        android:layout_width="match_parent"
        android:layout_height="160dp"
        android:src="@drawable/ab" />

    <LinearLayout
        android:layout_width="match_parent"
        android:layout_height="wrap_content"
        android:layout_marginTop="16dp"
        android:background="@drawable/rounded_corner"
        android:backgroundTint="@color/blue"
        android:padding="8dp"
        android:orientation="vertical">

        <TextView
            android:layout_width="match_parent"
            android:layout_height="wrap_content"
            android:text="学考帮"
            android:gravity="center"
            android:textSize="34sp"
            android:letterSpacing="0.1"
            android:textColor="@color/white"
            android:textStyle="bold"/>

        <TextView
            android:layout_width="match_parent"
            android:layout_height="wrap_content"
            android:text="知识改变命运,学习成就未来。"
            android:gravity="center"
            android:textSize="18sp"
            android:layout_margin="16dp"
            android:textColor="@color/white"
            android:textStyle="bold"/>

    </LinearLayout>

    <TextView
        android:layout_width="wrap_content"
        android:layout_height="wrap_content"
        android:text="试卷列表"
        android:layout_marginTop="16dp"
        android:layout_marginStart="4dp"
        android:textSize="20sp"
        android:textStyle="bold"/>

    <RelativeLayout
        android:layout_width="match_parent"
        android:layout_height="match_parent">

        <ProgressBar
            android:layout_width="20dp"
            android:layout_height="20dp"
            android:layout_centerInParent="true"
            android:visibility="gone"
            android:id="@+id/progress_bar"/>

        <androidx.recyclerview.widget.RecyclerView
            android:layout_width="match_parent"
            android:layout_height="wrap_content"
            android:layout_marginTop="16dp"
            android:id="@+id/recycler_view"/>

    </RelativeLayout>

</LinearLayout>
在 MainActivity 中模拟加载数据,加载数据成功前,显示 progressBar,加载后填充到RecyclerView:
package com.alex.exam
import androidx.appcompat.app.AppCompatActivity
import android.os.Bundle
import android.view.View
import androidx.recyclerview.widget.LinearLayoutManager
import com.alex.exam.databinding.ActivityMainBinding
class MainActivity : AppCompatActivity() {
private lateinit var binding: ActivityMainBinding
private lateinit var paperModelList : MutableList<PaperModel>
private lateinit var adapter: PaperListAdapter
override fun onCreate(savedInstanceState: Bundle?) {
super.onCreate(savedInstanceState)
binding = ActivityMainBinding.inflate(layoutInflater)
setContentView(binding.root)
paperModelList = mutableListOf()
getPapers()
}
private fun setupRecyclerView(){
binding.progressBar.visibility = View.GONE
adapter = PaperListAdapter(paperModelList)
binding.recyclerView.layoutManager = LinearLayoutManager(this)
binding.recyclerView.adapter = adapter
}
private fun getPapers(){
val listQuestionModel = mutableListOf<QuestionModel>()
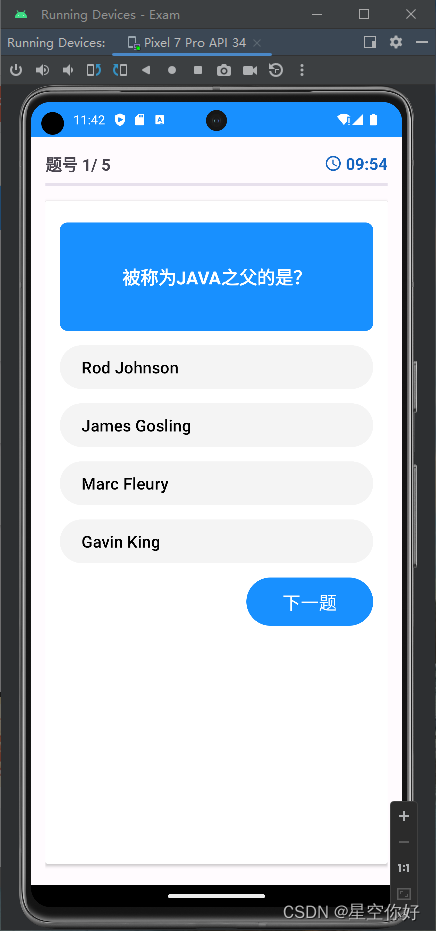
listQuestionModel.add(QuestionModel("被称为JAVA之父的是?",
listOf("Rod Johnson","James Gosling","Marc Fleury","Gavin King"),"James Gosling"))
listQuestionModel.add(QuestionModel("cmd下编译Java程序使用的命令是( )",
listOf("java","javav","java -version","javac"),"java"))
listQuestionModel.add(QuestionModel("byte变量的取值范围是( )",
listOf("0~65535","-128~127","-256~255","0~32767"),"-128~127"))
listQuestionModel.add(QuestionModel("Java的前身名字叫( )",
listOf("Oracle","mysql","spring","OAK"),"OAK"))
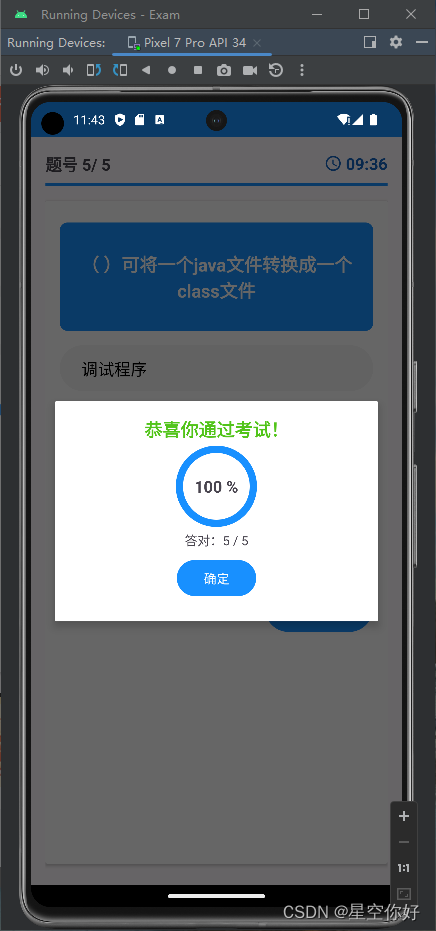
listQuestionModel.add(QuestionModel("( )可将一个java文件转换成一个class文件",
listOf("调试程序","编译程序","转换器程序","JRE"),"编译程序"))
val listQuestionModel2 = mutableListOf<QuestionModel>()
listQuestionModel2.add(QuestionModel("C#语言中,值类型包括:基本值类型、结构类型和( )",
listOf("小数类型","整数类型","类类型","枚举类型"),"类类型"))
listQuestionModel2.add(QuestionModel("C#语言中,引用类型包括:类类型、接口类型、数组类型和( )",
listOf("枚举类型","委托类型","结构类型","小数类型"),"委托类型"))
listQuestionModel2.add(QuestionModel("C#语言中,( )是一种特殊的类,它只包含数据成员,不包含方法成员",
listOf("结构类型","枚举类型","接口类型","委托类型"),"结构类型"))
listQuestionModel2.add(QuestionModel("下列关于抽象类的说法错误的是( )。",
listOf("抽象类可以实例化","抽象类可以包含抽象方法","抽象类可以包含抽象属性","抽象类可以引用派生类的实例"),"抽象类可以实例化"))
listQuestionModel2.add(QuestionModel("下列关于接口的说法错误的是( )。",
listOf("接口可以包含方法","接口可以包含属性","接口可以包含事件","接口可以包含索引器"),"接口可以包含方法"))
paperModelList.add(PaperModel("1","Java","Java语言基础测试题","10",listQuestionModel))
paperModelList.add(PaperModel("2","C#","C#理论测试题","20",listQuestionModel2))
paperModelList.add(PaperModel("3","JavaScript","JavaScript自测试题","15",listQuestionModel))
setupRecyclerView()
}
}
- 步骤5. 答题页
答题页面布局,显示题号进度条、倒计时、题目、下一题按钮;同时在交卷时,需要弹出对话框,这里要自定义。
自定义对话框:
<?xml version="1.0" encoding="utf-8"?>
<LinearLayout xmlns:android="http://schemas.android.com/apk/res/android"
    xmlns:tools="http://schemas.android.com/tools"
    xmlns:app="http://schemas.android.com/apk/res-auto"
    android:orientation="vertical"
    android:layout_width="match_parent"
    android:gravity="center"
    android:padding="16dp"
    android:layout_height="wrap_content">

    <TextView
        android:layout_width="match_parent"
        android:layout_height="wrap_content"
        tools:text="恭喜你通过考试!"
        android:gravity="center"
        android:textSize="20sp"
        android:textStyle="bold"
        android:id="@+id/tvScoreTitle"/>

    <RelativeLayout
        android:layout_width="wrap_content"
        android:layout_height="wrap_content">
        <com.google.android.material.progressindicator.CircularProgressIndicator
            android:layout_width="wrap_content"
            android:layout_height="wrap_content"
            android:id="@+id/circlePgrScoreProgress"
            android:layout_centerVertical="true"
            app:trackColor="@color/gray"
            tools:progress="60"
            app:trackCornerRadius="20dp"
            app:trackThickness="8dp"
            app:indicatorSize="90dp"/>

        <TextView
            android:id="@+id/tvProgress"
            android:layout_width="wrap_content"
            android:layout_height="wrap_content"
            android:layout_centerInParent="true"
            android:textSize="18sp"
            android:textStyle="bold"
            tools:text="50%" />
    </RelativeLayout>

    <TextView
        android:layout_width="match_parent"
        android:layout_height="wrap_content"
        tools:text="答题情况:6 / 10"
        android:gravity="center"
        android:id="@+id/tvScoreSubTitle"/>
    <Button
        android:layout_width="wrap_content"
        android:layout_height="wrap_content"
        android:text="确定"
        android:layout_margin="8dp"
        android:id="@+id/btnFinish"/>

</LinearLayout>
答题页面布局:
<?xml version="1.0" encoding="utf-8"?>
<LinearLayout xmlns:android="http://schemas.android.com/apk/res/android"
    xmlns:app="http://schemas.android.com/apk/res-auto"
    xmlns:tools="http://schemas.android.com/tools"
    android:layout_width="match_parent"
    android:layout_height="match_parent"
    android:orientation="vertical"
    android:padding="16dp"
    tools:context=".ExamActivity">

    <RelativeLayout
        android:layout_width="match_parent"
        android:layout_height="wrap_content">
        <TextView
            android:layout_width="match_parent"
            android:layout_height="wrap_content"
            tools:text="题号 7/20"
            android:textSize="18sp"
            android:textStyle="bold"
            android:layout_centerVertical="true"
            android:id="@+id/question_indicator_textview"/>

        <ImageView
            android:layout_width="20dp"
            android:layout_height="20dp"
            android:src="@drawable/icon_timer"
            app:tint="@color/blue"
            android:layout_marginEnd="4dp"
            android:layout_toStartOf="@id/timer_indicator_textview"
            android:layout_centerVertical="true"/>

        <TextView
            android:layout_width="wrap_content"
            android:layout_height="wrap_content"
            tools:text="5:46"
            android:textSize="18sp"
            android:textStyle="bold"
            android:textColor="@color/blue"
            android:layout_alignParentEnd="true"
            android:layout_centerVertical="true"
            android:id="@+id/timer_indicator_textview"/>
    </RelativeLayout>

    <com.google.android.material.progressindicator.LinearProgressIndicator
        android:layout_width="match_parent"
        android:layout_height="wrap_content"
        android:layout_marginVertical="8dp"
        tools:progress="40"
        android:id="@+id/question_progress_indicator"/>

    <androidx.cardview.widget.CardView
        android:layout_width="match_parent"
        android:layout_height="match_parent"
        android:layout_marginVertical="8dp"
        android:elevation="4dp">
        <LinearLayout
            android:layout_width="match_parent"
            android:layout_height="wrap_content"
            android:orientation="vertical"
            android:padding="16dp">

            <TextView
                android:layout_width="match_parent"
                android:layout_height="120dp"
                tools:text="这里是题目"
                android:textSize="20sp"
                android:textStyle="bold"
                android:padding="8dp"
                android:background="@drawable/rounded_corner"
                android:backgroundTint="@color/blue"
                android:textColor="@color/white"
                android:gravity="center"
                android:layout_marginVertical="8dp"
                android:id="@+id/question_textview"/>
            <Button
                android:layout_width="match_parent"
                android:layout_height="wrap_content"
                android:layout_marginVertical="4dp"
                android:backgroundTint="@color/gray"
                tools:text="答案 A"
                android:textColor="@color/black"
                android:paddingVertical="12dp"
                android:gravity="center_vertical"
                android:textSize="18sp"
                android:id="@+id/btnA" />
            <Button
                android:layout_width="match_parent"
                android:layout_height="wrap_content"
                android:layout_marginVertical="4dp"
                android:backgroundTint="@color/gray"
                tools:text="答案 B"
                android:textColor="@color/black"
                android:paddingVertical="12dp"
                android:gravity="center_vertical"
                android:textSize="18sp"
                android:id="@+id/btnB" />
            <Button
                android:layout_width="match_parent"
                android:layout_height="wrap_content"
                android:layout_marginVertical="4dp"
                android:backgroundTint="@color/gray"
                tools:text="答案 C"
                android:textColor="@color/black"
                android:paddingVertical="12dp"
                android:gravity="center_vertical"
                android:textSize="18sp"
                android:id="@+id/btnC" />
            <Button
                android:layout_width="match_parent"
                android:layout_height="wrap_content"
                android:layout_marginVertical="4dp"
                android:backgroundTint="@color/gray"
                tools:text="答案 D"
                android:textColor="@color/black"
                android:paddingVertical="12dp"
                android:gravity="center_vertical"
                android:textSize="18sp"
                android:id="@+id/btnD" />

            <Button
                android:layout_width="wrap_content"
                android:layout_height="wrap_content"
                android:layout_marginVertical="4dp"
                android:text="下一题"
                android:paddingVertical="12dp"
                android:gravity="center_vertical"
                android:layout_gravity="end"
                android:textSize="20sp"
                android:paddingHorizontal="40dp"
                android:id="@+id/btnNext" />

        </LinearLayout>

    </androidx.cardview.widget.CardView>

</LinearLayout>
ExamActity 定义了试题列表,是从上个界面传过来的数据;首先初始化数据,包括加载第一个题目内容,设置进度条、题号、开始计时;再点击下一题时,切换题目,如果是到最后一题,则显示交卷按钮,如果最后一题作答完成,并点击交卷,则停止计时,显示成绩弹窗,确认弹窗后 ,停止计时,并销毁,退出答题页。
package com.alex.exam

import android.graphics.Color
import androidx.appcompat.app.AppCompatActivity
import android.os.Bundle
import android.os.CountDownTimer
import android.util.Log
import android.view.View
import android.widget.Button
import android.widget.Toast
import androidx.appcompat.app.AlertDialog
import com.alex.exam.databinding.ActivityExamBinding
import com.alex.exam.databinding.ScoreDialogBinding

class ExamActivity : AppCompatActivity(), View.OnClickListener {

    private var timer : CountDownTimer? = null
    companion object {
        var questionModelList : List<QuestionModel> = listOf()
        var time : String = ""
    }

    lateinit var binding: ActivityExamBinding

    private var currentQuestionIndex = 0;
    private var selectedAnswer = ""
    private var score = 0
    override fun onCreate(savedInstanceState: Bundle?) {
        super.onCreate(savedInstanceState)
        binding = ActivityExamBinding.inflate(layoutInflater)
        setContentView(binding.root)

        binding.apply {
            btnA.setOnClickListener(this@ExamActivity)
            btnB.setOnClickListener(this@ExamActivity)
            btnC.setOnClickListener(this@ExamActivity)
            btnD.setOnClickListener(this@ExamActivity)
            btnNext.setOnClickListener(this@ExamActivity)
        }

        loadQuestions()
        startTimer()
    }

    private fun startTimer() {
        val totalTimeInMillis = time.toInt() * 60 * 1000L
        timer = object : CountDownTimer(totalTimeInMillis,1000L){
            override fun onTick(millisUntilFinished: Long) {
                val seconds = millisUntilFinished /1000
                val minutes = seconds/60
                val remainingSeconds = seconds % 60
                binding.timerIndicatorTextview.text = String.format("%02d:%02d", minutes,remainingSeconds)
            }

            override fun onFinish() {
                // 结束考试
                finishQuiz()
            }

        }.start()
    }

    // 加载试卷中的题目
    private fun loadQuestions(){
        selectedAnswer = ""
        // 判断是否是最后一题,如果是最后一题,点击下一题按钮,直接交卷,设置进度条为100%
        if(currentQuestionIndex == questionModelList.size){
            binding.questionProgressIndicator.progress = 100
            timer?.cancel()
            finishQuiz()
            return
        }
        // 加载题目内容到界面
        binding.apply {
            questionIndicatorTextview.text = "题号 ${currentQuestionIndex+1}/ ${questionModelList.size} "
            questionProgressIndicator.progress =
                ( currentQuestionIndex.toFloat() / questionModelList.size.toFloat() * 100 ).toInt()
            questionTextview.text = questionModelList[currentQuestionIndex].question
            btnA.text = questionModelList[currentQuestionIndex].options[0]
            btnB.text = questionModelList[currentQuestionIndex].options[1]
            btnC.text = questionModelList[currentQuestionIndex].options[2]
            btnD.text = questionModelList[currentQuestionIndex].options[3]
        }

    }

    // 结束考试
    private fun finishQuiz() {
        val totalQuestions = questionModelList.size
        val percentage = ((score.toFloat() / totalQuestions.toFloat() ) *100 ).toInt()

        // 弹出对话框,显示考试结果
        val dialogBinding  = ScoreDialogBinding.inflate(layoutInflater)
        dialogBinding.apply {
            circlePgrScoreProgress.progress = percentage
            tvProgress.text = "$percentage %"
            if(percentage>60){
                tvScoreTitle.text = "恭喜你通过考试!"
                tvScoreTitle.setTextColor(getColor(R.color.green))
            }else{
                tvScoreTitle.text = "未及格,加油哦!"
                tvScoreTitle.setTextColor(getColor(R.color.red))
            }
            tvScoreSubTitle.text = "答对:$score / $totalQuestions"
            btnFinish.setOnClickListener {
                finish()
            }
        }

        AlertDialog.Builder(this)
            .setView(dialogBinding.root)
            .setCancelable(false)
            .show()
    }

    override fun onClick(view: View?) {
        binding.apply {
            //初始化选项按钮,背景颜色位灰色,文字颜色未黑色
            btnA.setBackgroundColor(getColor(R.color.gray))
            btnB.setBackgroundColor(getColor(R.color.gray))
            btnC.setBackgroundColor(getColor(R.color.gray))
            btnD.setBackgroundColor(getColor(R.color.gray))

            btnA.setTextColor(getColor(R.color.black))
            btnB.setTextColor(getColor(R.color.black))
            btnC.setTextColor(getColor(R.color.black))
            btnD.setTextColor(getColor(R.color.black))

        }

        val clickedBtn = view as Button
        if(clickedBtn.id==R.id.btnNext){
            // 点击下一题
            if(selectedAnswer.isEmpty()){
                Toast.makeText(applicationContext,"请选择答案",Toast.LENGTH_SHORT).show()
                return;
            }
            // 判断答案是否正确
            if(selectedAnswer == questionModelList[currentQuestionIndex].correct){
                score++
                Log.i("考试分数",score.toString())
            }
            currentQuestionIndex++

            // 判断是否是最后一题
            if(currentQuestionIndex == questionModelList.size-1){
             binding.btnNext.text = "交卷"
            }

            loadQuestions()
        }else{
            // 选中答案,改变背景颜色和文字颜色
            selectedAnswer = clickedBtn.text.toString()
            clickedBtn.setBackgroundColor(getColor(R.color.blue))
            clickedBtn.setTextColor(Color.WHITE)
        }
    }

    override fun onDestroy() {
        super.onDestroy()
        //取消计时器
        timer?.cancel()
        timer = null
    }
}
打包
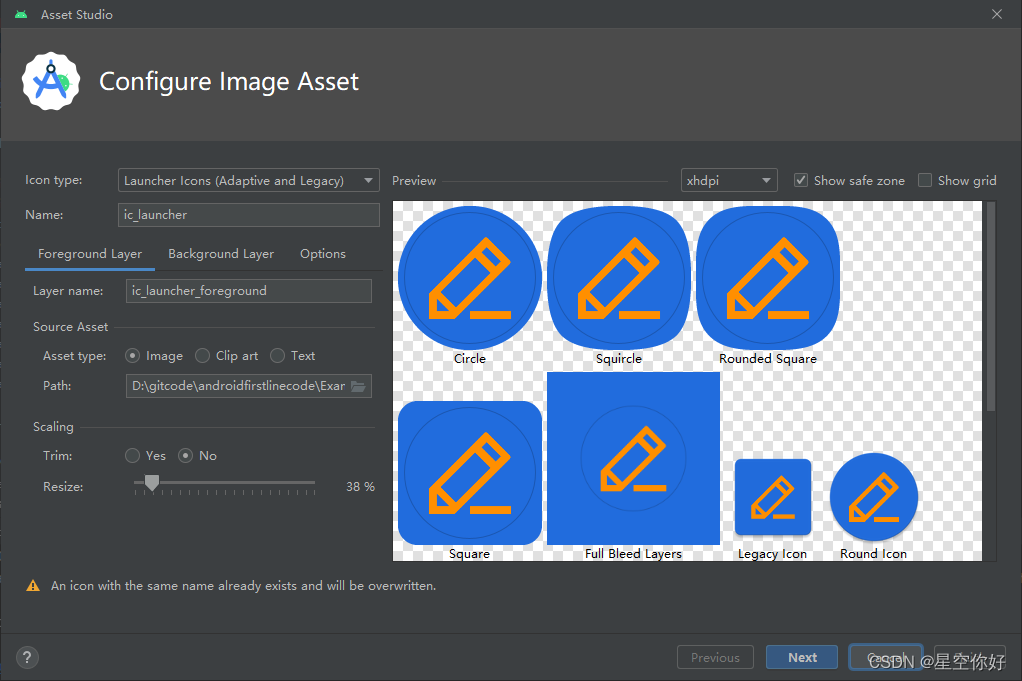
打包前,先定义个logo, 在 new->Image Asset,设置个图片:
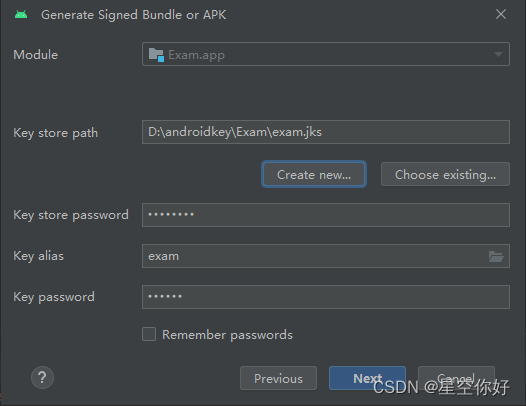
最后点击 build -> Generate Signed Bundle or APK, 加载 jks 打包密钥,进行apk 打包
夜神模拟器图标无效问题
打包后在模拟器上运行,发现图标还是小机器人,最后排查时 minSdk 对应的android 版本大于 模拟器的版本,将 minSdk降低到 25,再重新打包,就可以啦。


![[NISACTF 2022]midlevel](https://img-blog.csdnimg.cn/direct/63273fa4352646dba8fa0aaf2d551ab8.png#pic_center)