概述
Android 的显示过程可以简单概括为:Android 应用程序把经过测量、布局、绘制后的surface 缓存数据,通过 SurfaceFlinger 把数据渲染到显示屏幕上,通过 Android 的刷新机制 来刷新数据。也就是说应用层负责绘制,系统层负责渲染,通过进程间通信把应用层需要 绘制的数据传递到系统层服务,系统层服务通过刷新机制把数据更新到屏幕。 通过阅读 Android 系统的源码可以了解显示的流程,Android 的图形显示系统采用的是 Client/Server 架构。SurfaceFlinger(Server)由 C++代码编写。Client 端代码分为两部分,一 部分是由 Java 提供给应用使用的 API,另一部分则是由 C++写成的底层具体实现。
Android的绘图原理浅析
Android屏幕绘制
关于绘制,就要从performDraw()说起,我们来看一下这个流程到底是怎么绘制的.
//ViewRootImpl
//1
private void performDraw() {
try {
draw(fullRedrawNeeded);
} finally {
mIsDrawing = false;
Trace.traceEnd(Trace.TRACE_TAG_VIEW);
}
}
//2
private void draw(boolean fullRedrawNeeded) {
Surface surface = mSurface;
if (!surface.isValid()) {
return;
}
if (!drawSoftware(surface, mAttachInfo, xOffset, yOffset, scalingRequired, dirty)) {
return;
}
}
//3
private boolean drawSoftware(Surface surface, AttachInfo attachInfo, int xoff, int yoff,
boolean scalingRequired, Rect dirty) {
Canvas canvas = mSurface.lockCanvas(dirty);
}
看代码执行流程,1—>2->3, 最终拿到了Java层的canvas,然后进行一系列绘制操作.而canvas是通过Suface.lockCanvas()得到的.
那么Surface又是一个什么呢?在这里Surface只是一个抽象,在APP创建窗口时,会调用WindowManager向WMS服务发起一个请求,携带上surface对象,只有他被分配完一段屏幕缓冲区才能真正对应屏幕上的一个窗口.
来看一下Framework中的绘图架构.更好的理解Surface
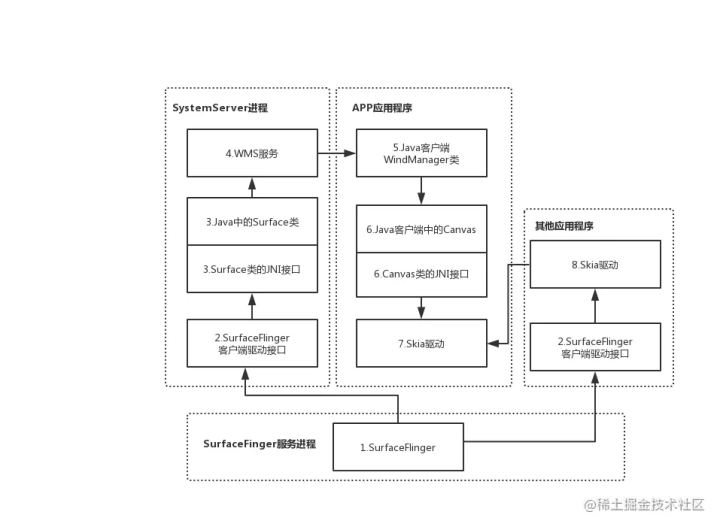
Surface本质上仅仅代表了一个平面,绘制不同图案显然是一种操作,而不是一段数据,Android使用了Skia绘图驱动库来进行平面上的绘制,在程序中使用canvas来表示这个功能.
双缓冲技术的介绍
在ViewRootImpl中,我们看到接收到绘制消息后,不是立刻绘制而是调用scheduleTraversals,在scheduleTraversals调用Choreographer.postCallback(),这又是因为什么呢?这其实涉及到屏幕绘制原理(除了Android其他平台也是类似的).
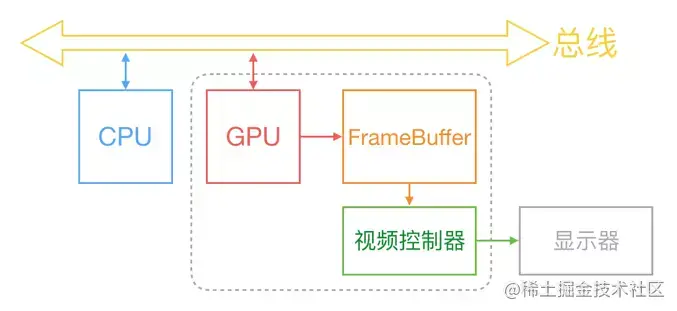
我们都知道显示器以固定的频率刷新,比如 iPhone的 60Hz、iPad Pro的 120Hz。当一帧图像绘制完毕后准备绘制下一帧时,显示器会发出一个垂直同步信号(VSync),所以 60Hz的屏幕就会一秒内发出 60次这样的信号。
并且一般地来说,计算机系统中,CPU、GPU和显示器以一种特定的方式协作:CPU将计算好的显示内容提交给 GPU,GPU渲染后放入帧缓冲区,然后视频控制器按照 VSync信号从帧缓冲区取帧数据传递给显示器显示.
但是如果屏幕的缓冲区只有一块,那么这个VSync同步信号发出时, 开始刷新屏幕,那么你看到的屏幕就是一条一条的数据在变化.为了让屏幕看上去是一帧一帧的数据,一般都有两块缓冲区(也被成为双缓冲区).当数据要刷新时,直接替换另一个缓冲区的数据.
双缓冲技术里面,如果不能特定时间刷新完的话(如果60HZ的话,就是16ms内)把这个缓冲区数据刷新完成,屏幕发出VSync同步信号,无法完成两个缓冲区的切换,那么就会造成卡顿现象.
回到scheduleTraversals()上,这个地方就是使用了双缓冲技术(或者三缓冲技术),Choreographer接收VSync的同步信号,当屏幕刷新来时,开始屏幕的刷新操作.
Android的Activity界面从何处开始绘制
- Activity启动之后,灰溜溜的会去跑onCreate,onStart,onResume等生命周期方法,那么从framework里面,让我们看看Activity在onResume之前都在干些啥? 在ActivityThread中的handleResumeActivity方法中先调用了performResumeActivity方法,而performResumeActivity中就会去回调Activity中的onResume方法,在performResumeActivity后,又做了很多事,所以如果在onResume中去做一些耗时操作是无法加速页面启动的,因为这时候页面还没展示出来呢,这里额外提一句,接着唠,performResumeActivity执行完了之后
if (r.window == null && !a.mFinished && willBeVisible) {
r.window = r.activity.getWindow();
View decor = r.window.getDecorView();
decor.setVisibility(View.INVISIBLE);
ViewManager wm = a.getWindowManager();
WindowManager.LayoutParams l = r.window.getAttributes();
a.mDecor = decor;
l.type = WindowManager.LayoutParams.TYPE_BASE_APPLICATION;
l.softInputMode |= forwardBit;
if (r.mPreserveWindow) {
a.mWindowAdded = true;
r.mPreserveWindow = false;
// Normally the ViewRoot sets up callbacks with the Activity
// in addView->ViewRootImpl#setView. If we are instead reusing
// the decor view we have to notify the view root that the
// callbacks may have changed.
ViewRootImpl impl = decor.getViewRootImpl();
if (impl != null) {
impl.notifyChildRebuilt();
}
}
if (a.mVisibleFromClient) {
                    if (!a.mWindowAdded) {
                        a.mWindowAdded = true;
                        wm.addView(decor, l);
                    } else {
                        // The activity will get a callback for this {@link LayoutParams} change
                        // earlier. However, at that time the decor will not be set (this is set
                        // in this method), so no action will be taken. This call ensures the
                        // callback occurs with the decor set.
                        a.onWindowAttributesChanged(l);
                    }
                }
// If the window has already been added, but during resume
// we started another activity, then don't yet make the
// window visible.
}
从普遍的意义上来讲,以上这段代码就是设置WindowManager和DecorView的关系,继续看:
if (a.mVisibleFromClient) {
if (!a.mWindowAdded) {
a.mWindowAdded = true;
wm.addView(decor, l);
} else {
// The activity will get a callback for this {@link LayoutParams} change
// earlier. However, at that time the decor will not be set (this is set
// in this method), so no action will be taken. This call ensures the
// callback occurs with the decor set.
a.onWindowAttributesChanged(l);
}
}
wm.addView(decor, l)这句就是把DecorView加入到WindowManager当中,那么WindowManager是什么东西呢?在这句代码打了一个断点,然后层层跟进来,WindowManagerImpl:
public void addView(@NonNull View view, @NonNull ViewGroup.LayoutParams params) {
        applyDefaultToken(params);
        mGlobal.addView(view, params, mContext.getDisplay(), mParentWindow);
    }
再继续执行了WindowManagerGlobal的addView,此时addView中第一个参数View就是DecorView,由于代码太长,只贴关键部分:
root = new ViewRootImpl(view.getContext(), display);
view.setLayoutParams(wparams);
mViews.add(view);
mRoots.add(root);
mParams.add(wparams);
// do this last because it fires off messages to start doing things
try {
root.setView(view, wparams, panelParentView);
} catch (RuntimeException e) {
// BadTokenException or InvalidDisplayException, clean up.
if (index >= 0) {
removeViewLocked(index, true);
}
throw e;
}
这里创建了一个ViewRootImpl对象root,然后调用root的setView方法,这个方法也太长,但是我可以负责任的告诉你,setView方法中调用了requestLayout()方法:
@Override
    public void requestLayout() {
        if (!mHandlingLayoutInLayoutRequest) {
            checkThread();
            mLayoutRequested = true;
            scheduleTraversals();
        }
    }
到这里,好了,界面绘制从这里开始:
void checkThread() {
        if (mThread != Thread.currentThread()) {
            throw new CalledFromWrongThreadException(
                    "Only the original thread that created a view hierarchy can touch its views.");
        }
    }
这个异常是不是经常碰到?这里就是要求界面绘制必须在主线程中进行更新mThread就是主线程,所以如果当前运行的线程不是主线程,那么就直接报这个异常,接下去是mLayoutRequested设置成true,避免在界面又layout请求的时候又重复收到一次layout请求,然后再进行界面的layout,那不就乱套了,然后就是真正的界面绘制了:
void scheduleTraversals() {
        if (!mTraversalScheduled) {
            mTraversalScheduled = true;
            mTraversalBarrier = mHandler.getLooper().getQueue().postSyncBarrier();
            mChoreographer.postCallback(
                    Choreographer.CALLBACK_TRAVERSAL, mTraversalRunnable, null);
            if (!mUnbufferedInputDispatch) {
                scheduleConsumeBatchedInput();
            }
            notifyRendererOfFramePending();
            pokeDrawLockIfNeeded();
        }
    }
核心在这里:
mChoreographer.postCallback(
                    Choreographer.CALLBACK_TRAVERSAL, mTraversalRunnable, null);
调用了Choreographer中的方法,方法中的mTraversalRunnable如下:
final class TraversalRunnable implements Runnable {
@Override
public void run() {
doTraversal();
}
}
void doTraversal() {
if (mTraversalScheduled) {
mTraversalScheduled = false;
mHandler.getLooper().getQueue().removeSyncBarrier(mTraversalBarrier);
if (mProfile) {
Debug.startMethodTracing("ViewAncestor");
}
performTraversals();
if (mProfile) {
Debug.stopMethodTracing();
mProfile = false;
}
}
}
最终会调用performTraversals方法,然后,同学们,然后就开始View的measure了,在ViewRootImpl中是去measure前面提到的DecordeView
// Ask host how big it wants to be
            windowSizeMayChange |= measureHierarchy(host, lp, res,
                    desiredWindowWidth, desiredWindowHeight);
measure阶段
measureHierarchy中的第一个参数host就是DecordeView对象,后面两个参数是屏幕的宽和高,然后根据lp,也就是LayoutParams的属性,例如lp.width,lp.height来求出View的宽和高,调用performMeasure方法:
private boolean measureHierarchy(final View host, final WindowManager.LayoutParams lp,
final Resources res, final int desiredWindowWidth, final int desiredWindowHeight) {
int childWidthMeasureSpec;
int childHeightMeasureSpec;
boolean windowSizeMayChange = false;
if (DEBUG_ORIENTATION || DEBUG_LAYOUT) Log.v(mTag,
"Measuring " + host + " in display " + desiredWindowWidth
+ "x" + desiredWindowHeight + "...");
boolean goodMeasure = false;
if (lp.width == ViewGroup.LayoutParams.WRAP_CONTENT) {
// On large screens, we don't want to allow dialogs to just
// stretch to fill the entire width of the screen to display
// one line of text. First try doing the layout at a smaller
// size to see if it will fit.
final DisplayMetrics packageMetrics = res.getDisplayMetrics();
res.getValue(com.android.internal.R.dimen.config_prefDialogWidth, mTmpValue, true);
int baseSize = 0;
if (mTmpValue.type == TypedValue.TYPE_DIMENSION) {
baseSize = (int)mTmpValue.getDimension(packageMetrics);
}
if (DEBUG_DIALOG) Log.v(mTag, "Window " + mView + ": baseSize=" + baseSize
+ ", desiredWindowWidth=" + desiredWindowWidth);
if (baseSize != 0 && desiredWindowWidth > baseSize) {
childWidthMeasureSpec = getRootMeasureSpec(baseSize, lp.width);
childHeightMeasureSpec = getRootMeasureSpec(desiredWindowHeight, lp.height);
performMeasure(childWidthMeasureSpec, childHeightMeasureSpec);
if (DEBUG_DIALOG) Log.v(mTag, "Window " + mView + ": measured ("
+ host.getMeasuredWidth() + "," + host.getMeasuredHeight()
+ ") from width spec: " + MeasureSpec.toString(childWidthMeasureSpec)
+ " and height spec: " + MeasureSpec.toString(childHeightMeasureSpec));
if ((host.getMeasuredWidthAndState()&View.MEASURED_STATE_TOO_SMALL) == 0) {
goodMeasure = true;
} else {
// Didn't fit in that size... try expanding a bit.
baseSize = (baseSize+desiredWindowWidth)/2;
if (DEBUG_DIALOG) Log.v(mTag, "Window " + mView + ": next baseSize="
+ baseSize);
childWidthMeasureSpec = getRootMeasureSpec(baseSize, lp.width);
performMeasure(childWidthMeasureSpec, childHeightMeasureSpec);
if (DEBUG_DIALOG) Log.v(mTag, "Window " + mView + ": measured ("
+ host.getMeasuredWidth() + "," + host.getMeasuredHeight() + ")");
if ((host.getMeasuredWidthAndState()&View.MEASURED_STATE_TOO_SMALL) == 0) {
if (DEBUG_DIALOG) Log.v(mTag, "Good!");
goodMeasure = true;
}
}
}
}
if (!goodMeasure) {
childWidthMeasureSpec = getRootMeasureSpec(desiredWindowWidth, lp.width);
childHeightMeasureSpec = getRootMeasureSpec(desiredWindowHeight, lp.height);
performMeasure(childWidthMeasureSpec, childHeightMeasureSpec);
if (mWidth != host.getMeasuredWidth() || mHeight != host.getMeasuredHeight()) {
windowSizeMayChange = true;
}
}
if (DBG) {
System.out.println("======================================");
System.out.println("performTraversals -- after measure");
host.debug();
}
return windowSizeMayChange;
}
private void performMeasure(int childWidthMeasureSpec, int childHeightMeasureSpec) {
if (mView == null) {
return;
}
Trace.traceBegin(Trace.TRACE_TAG_VIEW, "measure");
try {
mView.measure(childWidthMeasureSpec, childHeightMeasureSpec);
} finally {
Trace.traceEnd(Trace.TRACE_TAG_VIEW);
}
}
上面的代码中调用getRootMeasureSpec()方法来获取根MeasureSpec,这个根MeasureSpec代表了对decorView的宽高的约束信息。继续分析之前,我们先来简单地介绍下MeasureSpec的概念。 MeasureSpec是一个32位整数,由SpecMode和SpecSize两部分组成,其中,高2位为SpecMode,低30位为SpecSize。SpecMode为测量模式,SpecSize为相应测量模式下的测量尺寸。View(包括普通View和ViewGroup)的SpecMode由本View的LayoutParams结合父View的MeasureSpec生成。 SpecMode的取值可为以下三种:
- MeasureSpec.EXACTLY,对应LayoutParams.MATCH_PARENT,表示后View需要一个确切的尺寸
- MeasureSpec.AT_MOST,对应LayoutParams.WRAP_CONTENT,View的尺寸是自适应的,但是不能超过给定的SpecSize
- MeasureSpec.UNSPECIFIED这个在View的measure过程中没有用到,看注解的意思是这种模式是对View没有限定,尺寸可以任意
/**
* Measure specification mode: The parent has not imposed any constraint
* on the child. It can be whatever size it wants.
*/
public static final int UNSPECIFIED = 0 << MODE_SHIFT;
/**
* Measure specification mode: The parent has determined an exact size
* for the child. The child is going to be given those bounds regardless
* of how big it wants to be.
*/
public static final int EXACTLY = 1 << MODE_SHIFT;
/**
* Measure specification mode: The child can be as large as it wants up
* to the specified size.
*/
public static final int AT_MOST = 2 << MODE_SHIFT;
private static int getRootMeasureSpec(int windowSize, int rootDimension) {
int measureSpec;
switch (rootDimension) {
case ViewGroup.LayoutParams.MATCH_PARENT:
// Window can't resize. Force root view to be windowSize.
measureSpec = MeasureSpec.makeMeasureSpec(windowSize, MeasureSpec.EXACTLY);
break;
case ViewGroup.LayoutParams.WRAP_CONTENT:
// Window can resize. Set max size for root view.
measureSpec = MeasureSpec.makeMeasureSpec(windowSize, MeasureSpec.AT_MOST);
break;
default:
// Window wants to be an exact size. Force root view to be that size.
measureSpec = MeasureSpec.makeMeasureSpec(rootDimension, MeasureSpec.EXACTLY);
break;
}
return measureSpec;
}
在performMeasure方法中调用了View的measure方法,到这也就比较熟悉了,measure会根据条件判断是否需要layout:
- forceLayout为true:这表示强制重新布局,可以通过View.requestLayout()来实现;
- needsLayout为true,这需要specChanged为true(表示本次传入的MeasureSpec与上次传入的不同),而且需要以下三个条件满足一个:
- sAlwaysRemeasureExactly为true,该系统变量默认为false
- isSpecExactly为false,这个变量表示此次测量需要精确测量MeasureSpec.EXACTLY,也就是View的属性设置为LayoutParams.MATCH_PARENT
- matchesSpecSize为false,该变量表示此次测量出来的宽高信息和上一次的不一样,也就是说View的尺寸发生了改变 如果满足测量条件,那就会调用onMeasure方法,而对于DecorView来说,是调用了FrameLayout的onMeasure:
@Override
protected void onMeasure(int widthMeasureSpec, int heightMeasureSpec) {
int count = getChildCount();
final boolean measureMatchParentChildren =
MeasureSpec.getMode(widthMeasureSpec) != MeasureSpec.EXACTLY ||
MeasureSpec.getMode(heightMeasureSpec) != MeasureSpec.EXACTLY;
mMatchParentChildren.clear();
int maxHeight = 0;
int maxWidth = 0;
int childState = 0;
for (int i = 0; i < count; i++) {
final View child = getChildAt(i);
if (mMeasureAllChildren || child.getVisibility() != GONE) {
measureChildWithMargins(child, widthMeasureSpec, 0, heightMeasureSpec, 0);
final LayoutParams lp = (LayoutParams) child.getLayoutParams();
maxWidth = Math.max(maxWidth,
child.getMeasuredWidth() + lp.leftMargin + lp.rightMargin);
maxHeight = Math.max(maxHeight,
child.getMeasuredHeight() + lp.topMargin + lp.bottomMargin);
childState = combineMeasuredStates(childState, child.getMeasuredState());
if (measureMatchParentChildren) {
if (lp.width == LayoutParams.MATCH_PARENT ||
lp.height == LayoutParams.MATCH_PARENT) {
mMatchParentChildren.add(child);
}
}
}
}
// Account for padding too
maxWidth += getPaddingLeftWithForeground() + getPaddingRightWithForeground();
maxHeight += getPaddingTopWithForeground() + getPaddingBottomWithForeground();
// Check against our minimum height and width
maxHeight = Math.max(maxHeight, getSuggestedMinimumHeight());
maxWidth = Math.max(maxWidth, getSuggestedMinimumWidth());
// Check against our foreground's minimum height and width
final Drawable drawable = getForeground();
if (drawable != null) {
maxHeight = Math.max(maxHeight, drawable.getMinimumHeight());
maxWidth = Math.max(maxWidth, drawable.getMinimumWidth());
}
setMeasuredDimension(resolveSizeAndState(maxWidth, widthMeasureSpec, childState),
resolveSizeAndState(maxHeight, heightMeasureSpec,
childState << MEASURED_HEIGHT_STATE_SHIFT));
count = mMatchParentChildren.size();
if (count > 1) {
for (int i = 0; i < count; i++) {
final View child = mMatchParentChildren.get(i);
final MarginLayoutParams lp = (MarginLayoutParams) child.getLayoutParams();
final int childWidthMeasureSpec;
if (lp.width == LayoutParams.MATCH_PARENT) {
final int width = Math.max(0, getMeasuredWidth()
- getPaddingLeftWithForeground() - getPaddingRightWithForeground()
- lp.leftMargin - lp.rightMargin);
childWidthMeasureSpec = MeasureSpec.makeMeasureSpec(
width, MeasureSpec.EXACTLY);
} else {
childWidthMeasureSpec = getChildMeasureSpec(widthMeasureSpec,
getPaddingLeftWithForeground() + getPaddingRightWithForeground() +
lp.leftMargin + lp.rightMargin,
lp.width);
}
final int childHeightMeasureSpec;
if (lp.height == LayoutParams.MATCH_PARENT) {
final int height = Math.max(0, getMeasuredHeight()
- getPaddingTopWithForeground() - getPaddingBottomWithForeground()
- lp.topMargin - lp.bottomMargin);
childHeightMeasureSpec = MeasureSpec.makeMeasureSpec(
height, MeasureSpec.EXACTLY);
} else {
childHeightMeasureSpec = getChildMeasureSpec(heightMeasureSpec,
getPaddingTopWithForeground() + getPaddingBottomWithForeground() +
lp.topMargin + lp.bottomMargin,
lp.height);
}
child.measure(childWidthMeasureSpec, childHeightMeasureSpec);
}
}
}
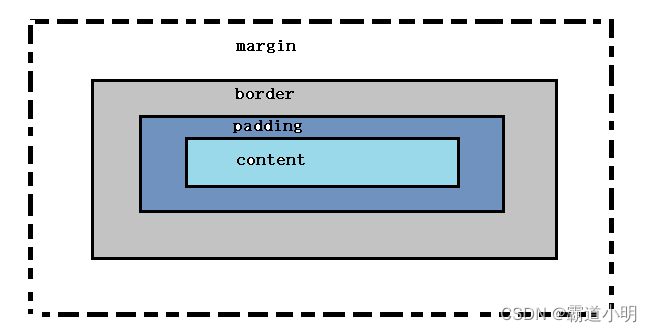
对于FrameLayout的onMeasure而言,会遍历所有子View,如果是可见的那么就调用measureChildWithMargins方法测量子View,然后会考虑margin和padding属性,考虑FrameLayout的背景图,计算出maxWidth和maxHeight,这个尺寸就是FrameLayout的能完全摆放所有子View的最大尺寸,所以一个ViewGroup需要把所有的子View都测量完成之后才能得出自身的尺寸,再来看下measureChildWithMargins都做了什么:
int parentWidthMeasureSpec, int widthUsed,
int parentHeightMeasureSpec, int heightUsed) {
final MarginLayoutParams lp = (MarginLayoutParams) child.getLayoutParams();
final int childWidthMeasureSpec = getChildMeasureSpec(parentWidthMeasureSpec,
mPaddingLeft + mPaddingRight + lp.leftMargin + lp.rightMargin
+ widthUsed, lp.width);
final int childHeightMeasureSpec = getChildMeasureSpec(parentHeightMeasureSpec,
mPaddingTop + mPaddingBottom + lp.topMargin + lp.bottomMargin
+ heightUsed, lp.height);
child.measure(childWidthMeasureSpec, childHeightMeasureSpec);
}
对于ViewGroup来说调用此方法就是测量它的子View,传进去的参数就是对子View的尺寸的限制 对于普通的View来说,普通的View的measure过程最终也会调用到onMeasure方法:
protected void onMeasure(int widthMeasureSpec, int heightMeasureSpec) {
        setMeasuredDimension(getDefaultSize(getSuggestedMinimumWidth(), widthMeasureSpec),
                getDefaultSize(getSuggestedMinimumHeight(), heightMeasureSpec));
    }
仅仅是把测量的宽高信息设置以下,所以ViewGroup的measure操作最终会是的子View都完成measure操作,包括ViewGroup本身在所有子View完成measure操作之后,也会最终确定自身的尺寸并设置
public static int getDefaultSize(int size, int measureSpec) {
int result = size;
int specMode = MeasureSpec.getMode(measureSpec);
int specSize = MeasureSpec.getSize(measureSpec);
switch (specMode) {
case MeasureSpec.UNSPECIFIED:
result = size;
break;
case MeasureSpec.AT_MOST:
case MeasureSpec.EXACTLY:
result = specSize;
break;
}
return result;
}
对于MeasureSpec.AT_MOST和MeasureSpec.EXACTL模式,都是返回specSize作为结果,所以在View中我们可以控制View的width和height属性,对应wrap_content和match_parant 到这,View的measure过程就结束了,接下去是View的layouut过程,还是在performTraversals方法中
layout阶段
对View进行measure完成之后(measureHierarchy方法)会再执行performLayout(lp, mWidth, mHeight):
private void performLayout(WindowManager.LayoutParams lp, int desiredWindowWidth,
            int desiredWindowHeight) {
        mLayoutRequested = false;
        mScrollMayChange = true;
        mInLayout = true;

        final View host = mView;
        if (host == null) {
            return;
        }
        if (DEBUG_ORIENTATION || DEBUG_LAYOUT) {
            Log.v(mTag, "Laying out " + host + " to (" +
                    host.getMeasuredWidth() + ", " + host.getMeasuredHeight() + ")");
        }

        Trace.traceBegin(Trace.TRACE_TAG_VIEW, "layout");
        try {
            host.layout(0, 0, host.getMeasuredWidth(), host.getMeasuredHeight());

            mInLayout = false;
            int numViewsRequestingLayout = mLayoutRequesters.size();
            if (numViewsRequestingLayout > 0) {
                // requestLayout() was called during layout.
                // If no layout-request flags are set on the requesting views, there is no problem.
                // If some requests are still pending, then we need to clear those flags and do
                // a full request/measure/layout pass to handle this situation.
                ArrayList<View> validLayoutRequesters = getValidLayoutRequesters(mLayoutRequesters,
                        false);
                if (validLayoutRequesters != null) {
                    // Set this flag to indicate that any further requests are happening during
                    // the second pass, which may result in posting those requests to the next
                    // frame instead
                    mHandlingLayoutInLayoutRequest = true;

                    // Process fresh layout requests, then measure and layout
                    int numValidRequests = validLayoutRequesters.size();
                    for (int i = 0; i < numValidRequests; ++i) {
                        final View view = validLayoutRequesters.get(i);
                        Log.w("View", "requestLayout() improperly called by " + view +
                                " during layout: running second layout pass");
                        view.requestLayout();
                    }
                    measureHierarchy(host, lp, mView.getContext().getResources(),
                            desiredWindowWidth, desiredWindowHeight);
                    mInLayout = true;
                    host.layout(0, 0, host.getMeasuredWidth(), host.getMeasuredHeight());

                    mHandlingLayoutInLayoutRequest = false;

                    // Check the valid requests again, this time without checking/clearing the
                    // layout flags, since requests happening during the second pass get noop'd
                    validLayoutRequesters = getValidLayoutRequesters(mLayoutRequesters, true);
                    if (validLayoutRequesters != null) {
                        final ArrayList<View> finalRequesters = validLayoutRequesters;
                        // Post second-pass requests to the next frame
                        getRunQueue().post(new Runnable() {
                            @Override
                            public void run() {
                                int numValidRequests = finalRequesters.size();
                                for (int i = 0; i < numValidRequests; ++i) {
                                    final View view = finalRequesters.get(i);
                                    Log.w("View", "requestLayout() improperly called by " + view +
                                            " during second layout pass: posting in next frame");
                                    view.requestLayout();
                                }
                            }
                        });
                    }
                }

            }
        } finally {
            Trace.traceEnd(Trace.TRACE_TAG_VIEW);
        }
        mInLayout = false;
    }
自然就调用了View的host.layout(0, 0, host.getMeasuredWidth(), host.getMeasuredHeight()),host就是DecorView,layout操作是在measure完成的基础上进行的会用到刚才View进行measure后的宽和高的信息host.getMeasuredWidth(), host.getMeasuredHeight(),在layou方法中会回调到onLayout方法,此方法默认是空实现,对于父控件来说,可以在onLayout方法中去操作子View的layout操作,而对于DecorView来说,onLayout:
@Override
    protected void onLayout(boolean changed, int left, int top, int right, int bottom) {
        layoutChildren(left, top, right, bottom, false /* no force left gravity */);
    }

void layoutChildren(int left, int top, int right, int bottom, boolean forceLeftGravity) {
        final int count = getChildCount();

        final int parentLeft = getPaddingLeftWithForeground();
        final int parentRight = right - left - getPaddingRightWithForeground();

        final int parentTop = getPaddingTopWithForeground();
        final int parentBottom = bottom - top - getPaddingBottomWithForeground();

        for (int i = 0; i < count; i++) {
            final View child = getChildAt(i);
            if (child.getVisibility() != GONE) {
                final LayoutParams lp = (LayoutParams) child.getLayoutParams();

                final int width = child.getMeasuredWidth();
                final int height = child.getMeasuredHeight();

                int childLeft;
                int childTop;

                int gravity = lp.gravity;
                if (gravity == -1) {
                    gravity = DEFAULT_CHILD_GRAVITY;
                }

                final int layoutDirection = getLayoutDirection();
                final int absoluteGravity = Gravity.getAbsoluteGravity(gravity, layoutDirection);
                final int verticalGravity = gravity & Gravity.VERTICAL_GRAVITY_MASK;

                switch (absoluteGravity & Gravity.HORIZONTAL_GRAVITY_MASK) {
                    case Gravity.CENTER_HORIZONTAL:
                        childLeft = parentLeft + (parentRight - parentLeft - width) / 2 +
                        lp.leftMargin - lp.rightMargin;
                        break;
                    case Gravity.RIGHT:
                        if (!forceLeftGravity) {
                            childLeft = parentRight - width - lp.rightMargin;
                            break;
                        }
                    case Gravity.LEFT:
                    default:
                        childLeft = parentLeft + lp.leftMargin;
                }

                switch (verticalGravity) {
                    case Gravity.TOP:
                        childTop = parentTop + lp.topMargin;
                        break;
                    case Gravity.CENTER_VERTICAL:
                        childTop = parentTop + (parentBottom - parentTop - height) / 2 +
                        lp.topMargin - lp.bottomMargin;
                        break;
                    case Gravity.BOTTOM:
                        childTop = parentBottom - height - lp.bottomMargin;
                        break;
                    default:
                        childTop = parentTop + lp.topMargin;
                }

                child.layout(childLeft, childTop, childLeft + width, childTop + height);
            }
        }
    }
上面所做的事就是根据FrameLayout的布局属性来遍历所有子View的位置信息,然后调用child.layout(childLeft, childTop, childLeft + width, childTop + height)触发子View的layout操作,然后就执行View的layout方法
draw阶段
draw操作在performTraversals方法里交给performDraw去执行,然后会在调用DecorView的draw方法:
if (!verticalEdges && !horizontalEdges) {
// Step 3, draw the content
if (!dirtyOpaque) onDraw(canvas);
// Step 4, draw the children
dispatchDraw(canvas);
drawAutofilledHighlight(canvas);
// Overlay is part of the content and draws beneath Foreground
if (mOverlay != null && !mOverlay.isEmpty()) {
mOverlay.getOverlayView().dispatchDraw(canvas);
}
// Step 6, draw decorations (foreground, scrollbars)
onDrawForeground(canvas);
// Step 7, draw the default focus highlight
drawDefaultFocusHighlight(canvas);
if (debugDraw()) {
debugDrawFocus(canvas);
}
// we're done...
return;
}
对于ViewGroup来说dispatchDraw就是去绘制子 View,具体实现在drawChild方法:
protected boolean drawChild(Canvas canvas, View child, long drawingTime) {
        return child.draw(canvas, this, drawingTime);
    }
draw的过程比较复杂,又涉及到硬件加速,绘制缓存等操作。
以上是Android开发中的绘制原理解析,更多Android技术可前往《Android核心技术手册》查看了解学习。里面技术积累了30多个技术文档;上千个小技术点。
总结
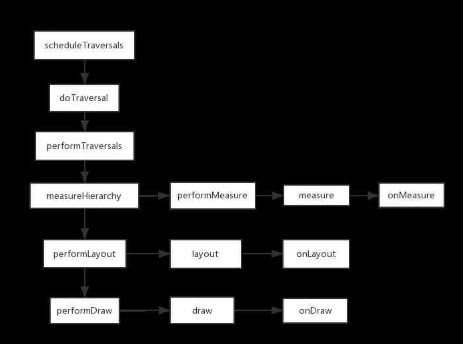
- Activity的绘制流程在onResume之后开始,切入点是ViewRootImpl类的performTraversals方法
- View的绘制流程是measure,layout,draw
- ViewGroup在绘制过程中会先遍历子View然后才会绘制自身,例如先遍历measure子View,然后再计算出自身的尺寸