USB00*端口的背景
插入USB端口的打印机,安装打印机驱动,在控制面板设备与打印机处的打印机对象上右击,可以看到打印机端口。对于不少型号,这个端口是USB001或USB002之类的。
经观察,这些USB00*端口并不是打印机驱动所创建的。即使不安装打印机驱动,插入此型号的打印机也会创建或者复用USB00*端口。从setupapi.dev.log中可知,端口是在C:\Windows\INF\usbprint.inf的指示下创建的。所谓复用,指的是,若USB001端口已存在并且没有关联上打印机,那么此时插入相关型号打印机,此打印机设备会跟USB001端口绑定起来。
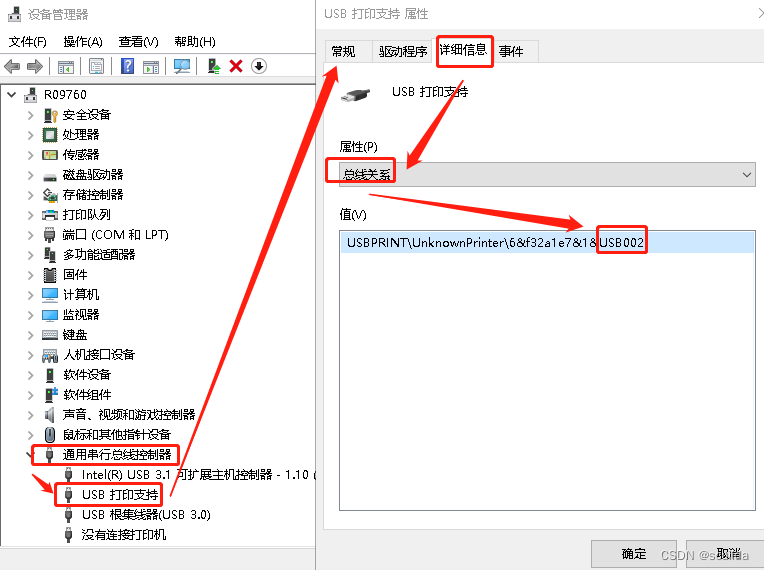
在设备管理器中可以看到USB00*端口和设备的对应关系。这里的USB打印支持的设备还具有硬件ID属性vid、pid。若vid、pid均相同,我认为它们都是同一型号的打印机。
c++代码寻找USB00*所在的设备
类似于设备管理器,本节的目标是:遍历设备管理器里的设备大类,再找每一个设备,再找设备里的各种属性。直到找到我们关注的vid、pid,然后查看其总线关系里的USB00*编号。
相关概念
-
设备安装类:
HKLM\SYSTEM\CurrentControlSet\Control\Class里的每一个key都是设备安装类。其中的{36fc9e60-c465-11cf-8056-444553540000}就是设备管理器中的通用串行总线控制器。 -
设备接口类:
HKLM\SYSTEM\CurrentControlSet\Control\DeviceClasses里的每一个key都是设备接口类。 -
获取设备属性的两类api:一类是
SetupDiGetDeviceRegistryProperty,参数一来自SetupDiGetClassDevs。一类是CM_Get_DevNode_PropertyW,参数三来自SetupDiEnumDeviceInfo。我们关注的总线关系需通过CM_Get_DevNode_PropertyW获取。
c++ demo
#define WIN32_LEAN_AND_MEAN
#include <Windows.h>
#include <Cfgmgr32.h>
#pragma comment(lib, "Cfgmgr32.lib")
#include <SetupAPI.h>
#pragma comment(lib, "SetupAPI.lib")
#include <memory>
using namespace std;

//keyseq=1        type=2012       buf=USB\VID_0471&PID_0055&REV_0100
bool jobForThePrinter1(const wchar_t* str, const wchar_t*vid, const wchar_t*pid) {
        if (_wcsnicmp(vid, str+8, 4)) return false;
        if (_wcsnicmp(pid, str+17, 4)) return false;
        return true;
}
//keyseq = 26       type = 2012       buf=USBPRINT\UnknownPrinter\6&1cc6481b&0&USB002
bool jobForThePrinterN(int &usb00n, const wchar_t* str) {
        if (_wcsnicmp(L"USBPRINT", str, 8)) return false;
        auto lenStr = wcslen(str);
        if (_wcsnicmp(L"USB", str+lenStr-6, 3)) return false;
        usb00n = wcstol(str + lenStr - 3, NULL, 10);
        return true;
}
int getPropertyFromDevinstWhereVidpid(DEVINST dnDevInst, const wchar_t*vid, const wchar_t*pid) {
#define LENBUF 8192
        ULONG lenBuf = LENBUF;
        static BYTE buf[LENBUF];
        ULONG cnt = 0;
        auto ret = CM_Get_DevNode_Property_Keys(dnDevInst, NULL, &cnt, 0);
        if (0 == cnt) return 0;
        std::unique_ptr<DEVPROPKEY[]> keys(new DEVPROPKEY[cnt]);
        ret = CM_Get_DevNode_Property_Keys(dnDevInst, keys.get()
                , &cnt, 0);
        if (ret != CR_SUCCESS) {
                fprintf(stderr, "CM_Get_DevNode_Property_Keys FAIL %d\n", ret);
                return 0;
        }
        DEVPROPTYPE type;
        DWORD i = 0;
        ret = CM_Get_DevNode_PropertyW(dnDevInst, keys.get()
                + i, &type, buf, &lenBuf, 0);
        if (ret != CR_SUCCESS) {
                fprintf(stderr, "CM_Get_DevNode_PropertyW FAIL %d\n", ret);
                return 0;
        }
        //如果不是"USB打印支持",则也跳过
        if (type != DEVPROP_TYPE_STRING) return 0;
        wprintf(L"%s\n", buf);
        if (wcscmp(PTCHAR(buf), L"USB 打印支持")) return 0;
        ++i;
        for (; i < cnt; ++i) {
                lenBuf = LENBUF;
                ret = CM_Get_DevNode_PropertyW(dnDevInst, keys.get()
                        + i, &type, buf, &lenBuf, 0);
                printf("keyseq=%d\ttype=%x\t", i, type);
                //keyseq=1        type=2012       buf=USB\VID_0471&PID_0055&REV_0100
                //keyseq = 26       type = 2012       buf = USBPRINT\UnknownPrinter\6 & 1cc6481b & 0 & USB002
                switch (type) {
                case DEVPROP_TYPE_EMPTY:
                case DEVPROP_TYPE_NULL:
                        continue;
                case DEVPROP_TYPE_STRING:
                        wprintf(L"buf=%s\n", buf);
                        break;
                case DEVPROP_TYPE_UINT32:
                case DEVPROP_TYPE_UINT64:
                        printf("buf=%uld\n", UINT32(buf));
                        break;
                case DEVPROP_TYPE_GUID: {
                        GUID guidtmp;
                        memcpy(&guidtmp, buf, sizeof(guidtmp));
                        printf("buf={%x-%x-%x-%s}\n", guidtmp.Data1, guidtmp.Data2, guidtmp.Data3, guidtmp.Data4);
                }
                break;
                case DEVPROP_TYPE_BOOLEAN:
                        if (!buf[0]) printf("buf=false\n");
                        else printf("buf=true\n");
                        break;
                case 0x2012://DEVPROP_TYPEMOD_LIST & DEVPROP_TYPE_STRING
                {
#if 1
                        LPTSTR strTmp = LPTSTR(buf);
                        unsigned lenTmp = 0;
                        do {
                                lenTmp = wcslen(strTmp);
                                if (!lenTmp) break;
                                wprintf(L"buf=%s\n", strTmp);
                                strTmp = strTmp + lenTmp + 1;
                        } while (1);
#endif
                        if (1 == i) {
                                if (!jobForThePrinter1((const wchar_t*)buf, vid, pid)) return 0;
                        }
                        int usb00n = 0;
                        if (jobForThePrinterN(usb00n, (const wchar_t*)buf)) {
                                return usb00n;
                        }
                }
                break;
                case 0x1003://DEVPROP_TYPEMOD_ARRAY& DEVPROP_TYPE_BYTE
                        //printf("type=%x\n", type);
                        break;
                default:
                        //wprintf(L"type=%x\tbuf=%s\n", type, buf);
                        break;
                }
        }
        return 0;
}

int enum36fcEachDevProperty(LPCWSTR vid, LPCWSTR pid) {
        static const GUID guid36fc = { 0x36fc9e60, 0xc465, 0x11cf,
                {0x80, 0x56, 0x44, 0x45, 0x53, 0x54, 0, 0} };
        HDEVINFO hDevInfo = SetupDiGetClassDevs(&guid36fc, 0, 0, DIGCF_PRESENT);
        if (hDevInfo == INVALID_HANDLE_VALUE) return 1;
        SP_DEVINFO_DATA deviceInfoData{ sizeof(SP_DEVINFO_DATA) };
        for (DWORD i = 0; SetupDiEnumDeviceInfo(hDevInfo, i, &deviceInfoData); ++i) {
                printf("dev=%d\n", i);
                int usb00n = getPropertyFromDevinstWhereVidpid(deviceInfoData.DevInst, vid, pid);
                if (usb00n) {
                        SetupDiDestroyDeviceInfoList(hDevInfo);
                        return usb00n;
                }
        }
        SetupDiDestroyDeviceInfoList(hDevInfo);
        return 0;
}

int WaitUsbPrinterDev(const wchar_t* vid, const wchar_t* pid, int minutes) {
        int usb00n;
        int i = 0;
        do {
                usb00n = enum36fcEachDevProperty(vid, pid);
                if (usb00n) return usb00n;
                Sleep(30000);
                ++i;
        } while (i <= 4 * minutes);
        return 0;
}
线索
USB00*端口存在时,可以从注册表中搜寻到,诸如HKLM\SYSTEM\CurrentControlSet\Enum\USBPRINT\UnknownPrinter\8&73672f4&0&USB002\Device Parameters里的数据Portname="USB002",数据ClassGUID={36fc9e60-c465-11cf-8056-444553540000}。所以我们要用设备安装类相关api来遍历设备。
添加USB00*为端口的打印机对象
原理
主要使用apiAddPrinter。参数三是个PRINTER_INFO_2结构体的指针。根据经验,info2.pPrintProcessor一般都是"winprint"。
c++ demo
#define WIN32_LEAN_AND_MEAN
#include <Windows.h>
#include <winspool.h>
#include <memory>
using namespace std;
#include <cstdio>

void addprinter(int usb00n, const wchar_t* pDrivername) {
        WCHAR proc[] = L"winprint";
        PRINTER_INFO_2W info2 = { 0 };
        info2.pPrintProcessor = proc;
        auto len = wcslen(pDrivername);
        unique_ptr<WCHAR[]> drvname(new WCHAR[len+1]);
        wcscpy_s(drvname.get(), len+1, pDrivername);
        info2.pDriverName = drvname.get();
        WCHAR portname[7];
        swprintf_s(portname, L"USB%03d", usb00n);
        info2.pPortName = portname;
        WCHAR printername[] = L"printername";
        info2.pPrinterName = printername;
        auto h = AddPrinter(NULL, 2, reinterpret_cast<LPBYTE>(&info2));
        if (!h) {
                const auto err = GetLastError();
                fwprintf(stderr, L"AddPrinter FAIL %d\n", err);
                return;
        }
        wprintf(L"打印机对象添加成功,名为%s\n", printername);
}
main.cpp和部署脚本
main.cpp
#include <clocale>
#include <cstdio>

int WaitUsbPrinterDev(const wchar_t* vid, const wchar_t* pid, int minutes = 3);
void addprinter(int usb00n, const wchar_t* pDrivername);

int wmain(int argc, wchar_t** argv) {
        setlocale(LC_CTYPE, "");
        if (4 != argc) {
                wprintf(L"请输入:vid pid \"打印机型号\"\n如:6868 0200 \"GP-58130 Series\"\n");
        }
        const wchar_t* vid = argv[1];
        const wchar_t* pid = argv[2];
        const wchar_t* model = argv[3];
        wprintf(L"正在扫描设备管理器,请确保相关打印机连入并开机……\n");
        int usb00n = WaitUsbPrinterDev(vid, pid);
        if (!usb00n) {
                wprintf(L"未见相关打印机连入。请检查vidpid是否正确,打印机是否开机\n");
                return 0;
        }
        wprintf(L"此打印机占用端口USB%03d\n正在添加打印机对象……\n", usb00n);
        addprinter(usb00n, model);
        return 0;
}
部署脚本
自动添加打印机对象.vbs
Set ws = CreateObject("Wscript.Shell")
ws.run "C:\AutoAddPrinter.exe 6868 0200 "&chr(34)&"GP-58130 Series"&chr(34)&"",vbhide
readme.txt
部署方法: 1. 编辑镜像时将“AutoAddPrinter.exe”放入C盘根目录。将“自动添加打印机对象.vbs”放入开始菜单的启动目录。
2. 编辑镜像时要删除那个型号的打印机对象
3. 镜像下发到终端上。
4. 虚机运行时,保证打印机已连入并开机。此程序会开机自启,扫描出打印机连上并添加打印机对象。打印机对象名称是newprinter

