1.Fragment —— 片段组件
-
在Vue2中: 组件必须有一个根标签。
-
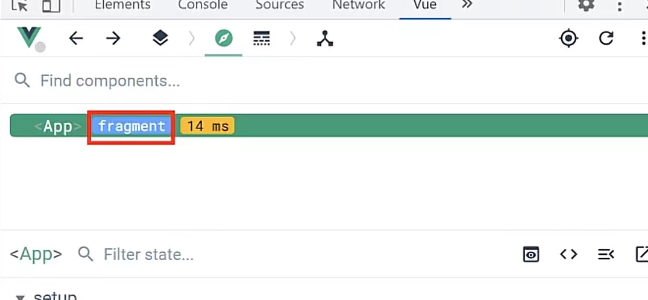
在Vue3中: 组件可以没有根标签, 内部会将多个标签包含在一个内置Fragment虚拟元素中, 最后是不参与页面渲染的!
-
好处: 减少标签层级, 减小内存占用。
<template>
    <fragment>
      .....
    </fragment>
</template>
2.Teleport——瞬间移动组件
什么是Teleport?—— Teleport 是一种能够将我们的组件html结构移动到指定位置的技术。
基础语法
<!--to属性的属性值: 是css的选择器 -->
<teleport to="移动位置">
	<div v-if="isShow" class="mask">
		<div class="dialog">
			<h3>我是一个弹窗</h3>
			<button @click="isShow = false">关闭弹窗</button>
		</div>
	</div>
</teleport>
使用场景 ?
复用 Dialog 组件时 ,html结构会很深层次! 编写Dialog 组件样式、定位等css属性就不容易控制!Teleport 瞬移组件可以把藏的深层次的组件的html结构,给它拎出来,放置到指定节点位置元素下,方便css样式的可控性!
src/components/Dialog.vue
<template>
  <div>
    <button @click="isShow = !isShow">点我谈个窗</button>

    <!-- 使用瞬移组件: 将telepor 组件包裹的html结构,瞬移到body节点下  -->
    <teleport to="body">
      <!-- 遮罩层弹窗是一体的给遮罩层上控制、遮罩层显示顺带着弹窗就出来了; 很多ui组件也是这样控制的 -->
      <!-- v-if= false: 代表直接将dom元素节点直接移除 -->
      <div v-if="isShow" class="mask">
        <div class="dialog">
          <h3>我是一个弹窗</h3>
          <h4>我是一下内容</h4>
          <button @click="isShow = !isShow">关闭弹窗</button>
        </div>
      </div>
    </teleport>
  </div>
</template>

<script>
import { ref } from "vue";
export default {
  name: "Dialog",
  // 数据驱动着页面的显示
  setup() {
    let isShow = ref(false);
    return { isShow };
  },
};
</script>

<style scoped>
.mask {
  position: relative;
  /* 将元素撑开 */
  top: 0; bottom: 0; left: 0;right: 0;
  background-color: rgba(0, 0, 0, 0.5);
}
.dialog {
  position: absolute;
  top: 50%;left: 50%;
  transform: translate(-50%, -50%);
  width: 300px;
  height: 300px;
  background-color: pink;
  opacity: 0.7;
  text-align: center;
  border-radius: 10%;
}
</style>
src/components/Son.vue
<template>
  <div class="son">
    <h3>我是Son组件!</h3>
    <!-- 使用Dialog组件, 但是Dialog组件的html 不在.son div的结构下,而是瞬移到了body节点下-->
    <Dialog/>
  </div>
</template>

<script>
import Dialog from './Dialog.vue'
export default {
  name: "Son",
  components: {Dialog}
};
</script>

<style>
.son {
  background-color: orange;
  padding: 10px;
}
</style>
3.Suspense——异步组件
Suspense——Vue3中的新组件,并且官方说这个组件目前属于实验阶段! 以后与这个组件相关的API,或者说一些写法还有可能改!
Suspense 等待异步组件时渲染一些额外内容,让应用有更好的用户体验。
使用步骤:
1.异步引入组件
import {defineAsyncComponent} from 'vue'
const Child = defineAsyncComponent(()=>import('./components/Child.vue'))2.使用Suspense包裹组件,并配置好default 与 fallback
<template>
	<div class="app">
		<h3>我是App组件</h3>
		<Suspense>
			<template v-slot:default>
				<Child/>
			</template>
			<template v-slot:fallback>
				<h3>加载中.....</h3>
			</template>
		</Suspense>
	</div>
</template>
eg:演示案例, 异步加载组件
src/App.vue
<template>
  <div class="app">
    <h1>我是App组件</h1>
    <!--
      Suspense: 异步组件
       1.底层也是用插槽实现的;
       2.内部准备好了两个插槽, default展示真实放置的内容、
    -->
    <Suspense>
      <!-- 放置真正所展示的组件、注意: 指明插槽名是 default, 因为内部是写了两个插槽  -->
      <template v-slot: default>
        <Child></Child>
      </template>
      <!-- 由于某种原因 Child 组件加载慢了! 就会展示插槽名为 fallback 中的内容信息  -->
      <template v-slot:fallback>
        <h3>加载中,稍等...</h3>
      </template>
    </Suspense>
  </div>
</template>

<script>
// app、child 组件都属于静态组件
import { defineAsyncComponent } from "vue";
/*
  静态引用
    解析过程: 只要没有引入 Child 组件成功, 整个App 组件都不进行渲染!
    缺点: 同步执行代码,会造成阻塞渲染页面白屏!
*/
// import Child from "./components/Child";

/*
  动态、异步引入
    解析过程: 组件异步加载, 不会阻塞进程!
    缺点: 异步加载成功代码,间接的渲染到页面, 会造成页面的抖动、用户体验效果不好!
*/
const Child = defineAsyncComponent(() => import("./components/Child"));

export default {
  name: "App",
  components: { Child },
  setup() {},
};
</script>

<style>
.app {
  background-color: gray;
  padding: 10px;
}
</style>
src/components/Child.vue
<template>
  <div class="child">
    <h1>我是Child组件!</h1>
    {{ sum }}
  </div>
</template>

<script>
import {ref} from 'vue'
export default {

  name: "Child",
  setup() {
    let sum = ref(0)
    // 让组件等一等
    return new Promise((resolve, reject) =>{
      setTimeout(()=>{
        resolve({sum})
      }, 1000)
    })
  }
};
</script>

<style>
.child {
  background-color: skyblue;
  padding: 10px;
}
</style>