文章目录
- 简介
- 模型
- Mosaic数据增强
- 自适应锚框计算
- 自适应图片缩放
- Focus结构
- CSP结构 Neck
- CIOU_Loss
- nms非极大值抑制
- 代码
- 最后
简介
YOLO V4没过多久YOLO V5就出来了。YOLO V5的模型架构是与V4非常相近的。
模型
Yolov5官方代码中,给出的目标检测网络中一共有4个版本,分别是Yolov5s、Yolov5m、Yolov5l、Yolov5x四个模型。
Yolov5s整体的网络结构图:
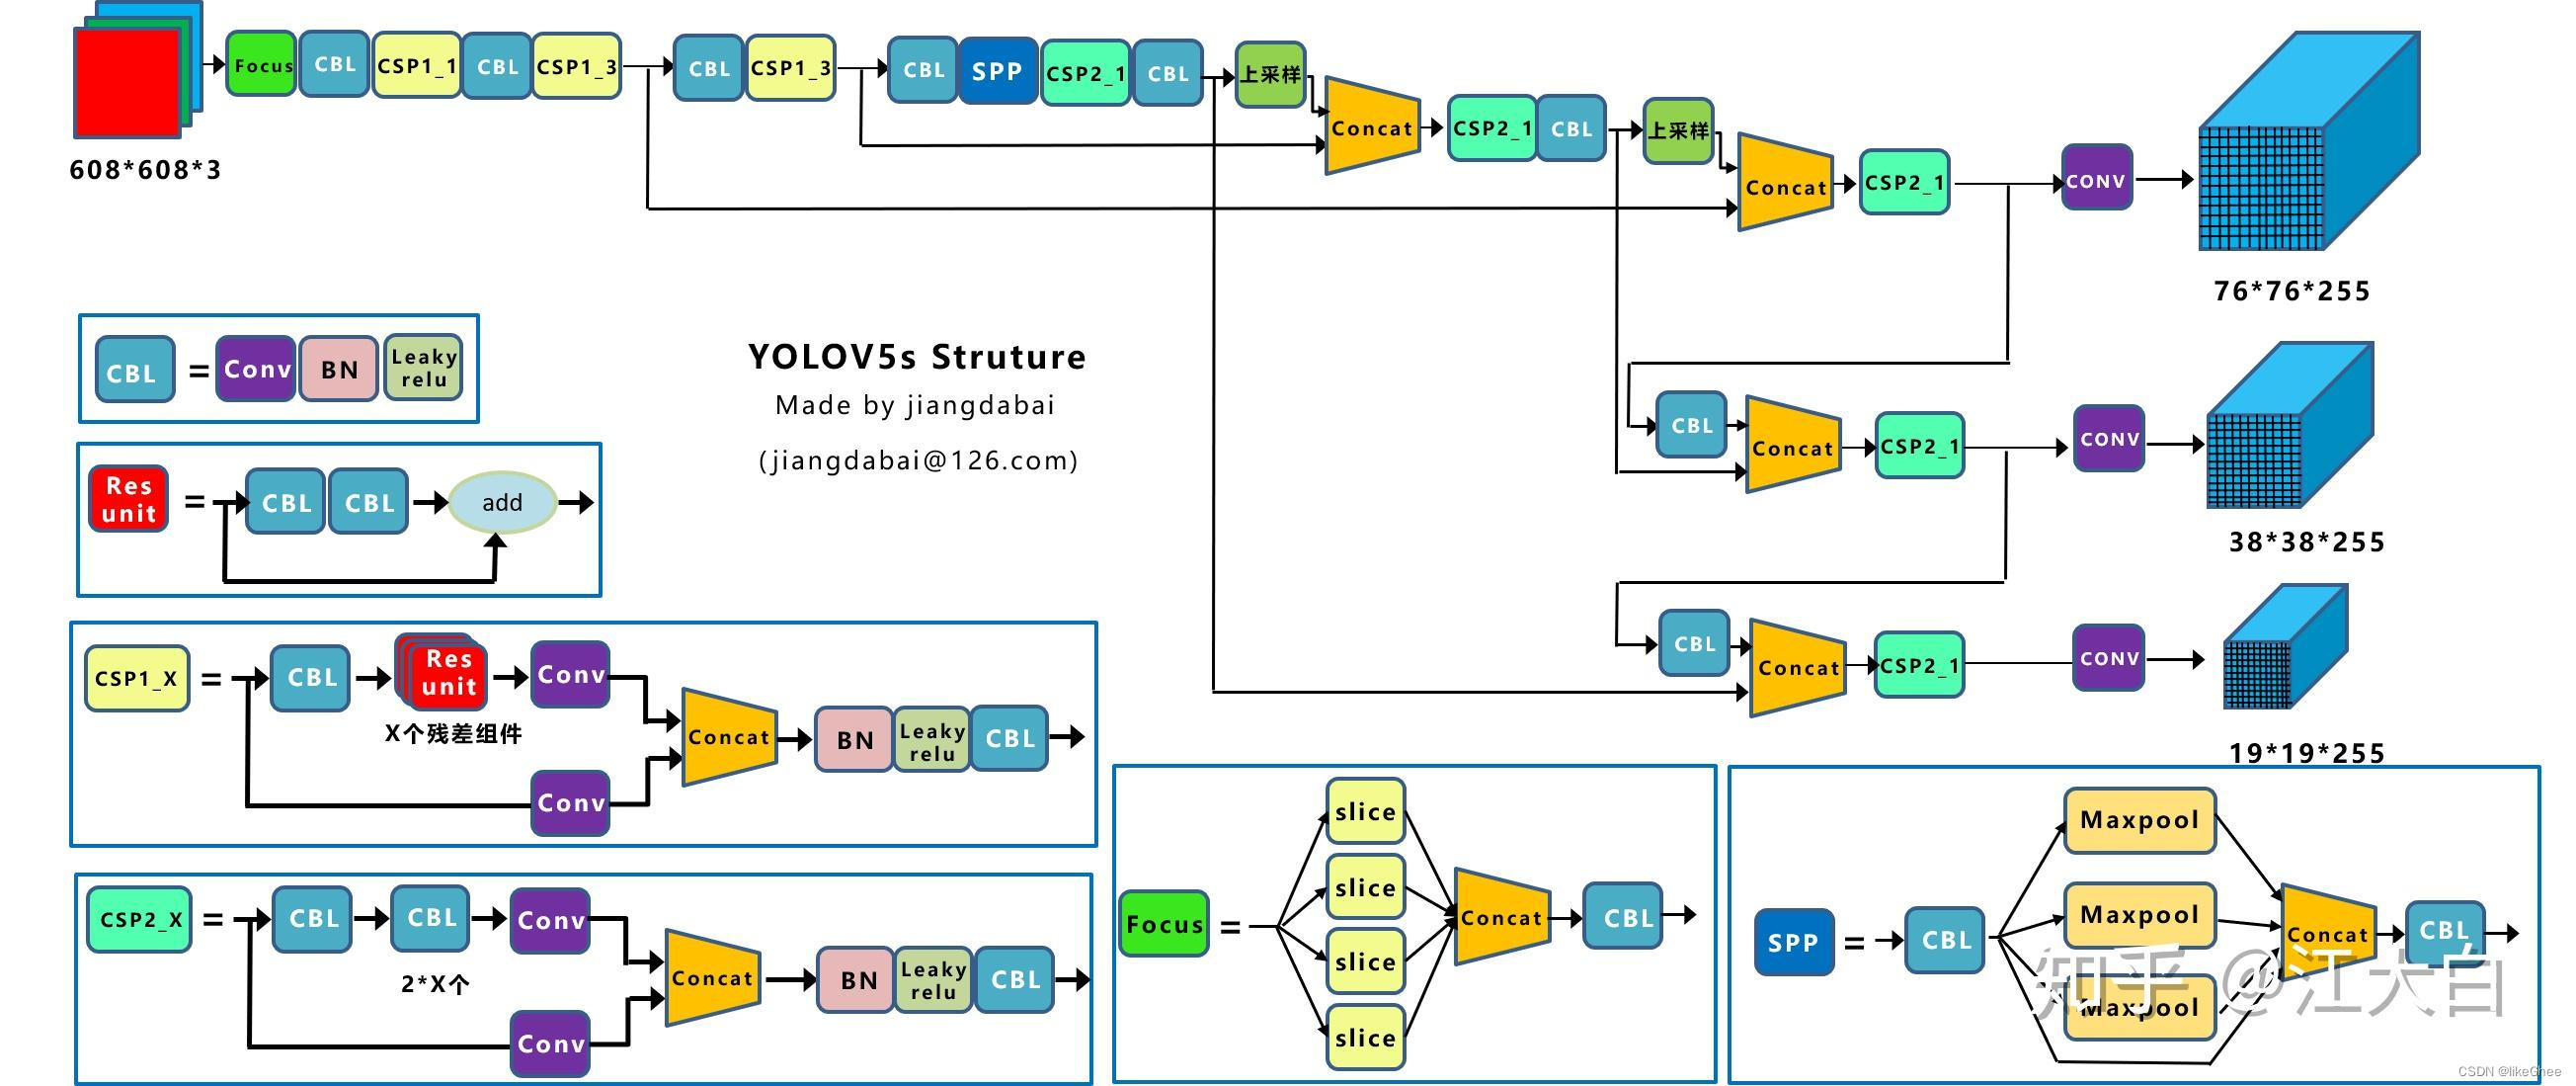
图片来自:https://zhuanlan.zhihu.com/p/172121380
(1)输入端:Mosaic数据增强、自适应锚框计算、自适应图片缩放
(2)Backbone:Focus结构,CSP结构
(3)Neck:FPN+PAN结构
(4)Prediction:GIOU_Loss
Mosaic数据增强
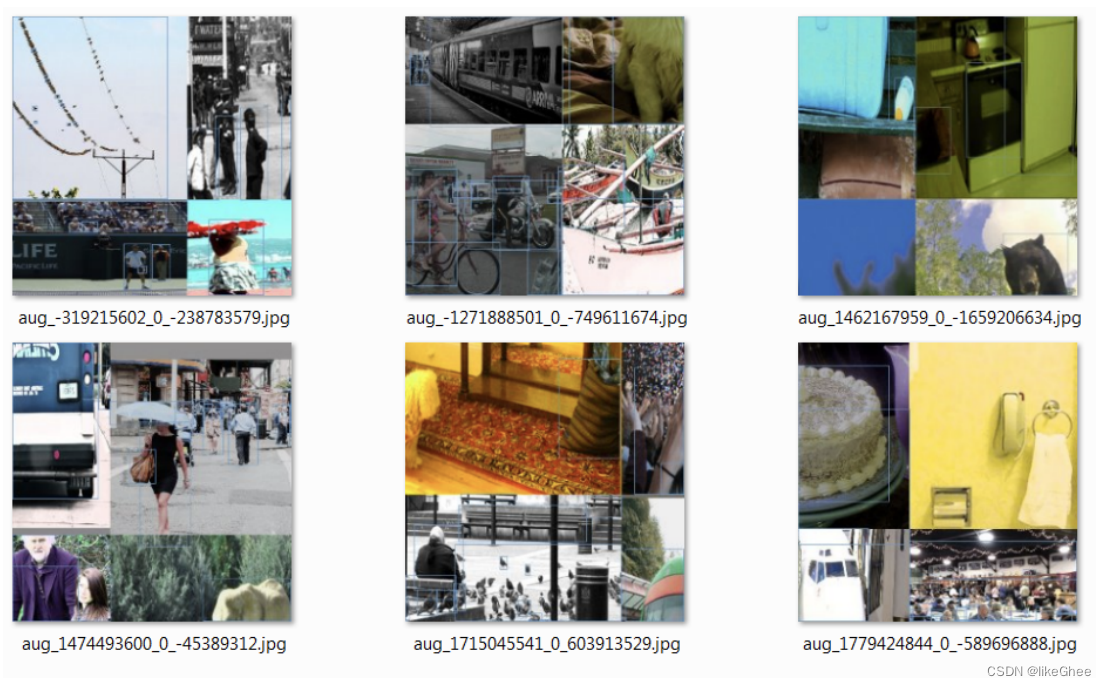
Mosaic数据增强的步骤包括:
选择四张不同的图像:从训练数据集中随机选择四张图像。
随机选取一个位置:随机选择一个位置在这四张图像中,这个位置将成为新的合成图像的中心点。
将这四张图像拼接:将选中位置的像素从四张图像中裁剪出来,然后将它们拼接在一起,形成新的合成图像。
调整目标框坐标:如果图像中包含目标框(用于目标检测的边界框),则需要相应地调整这些目标框的坐标,以反映合成图像中目标的新位置。
自适应锚框计算
在Yolo算法中,针对不同的数据集,都会有初始设定长宽的锚框。
在Yolov3、Yolov4中,训练不同的数据集时,计算初始锚框的值是通过单独的程序运行的。
但Yolov5中将此功能嵌入到代码中,每次训练时,自适应的计算不同训练集中的最佳锚框值。
传统的目标检测方法中,锚框通常是在图像中均匀分布的一组预定义框,但这种方法可能无法很好地适应不同尺度、长宽比或者特定场景下目标的变化。为了更好地适应不同的场景,自适应锚框计算采用一种动态的策略,根据数据集中的实际目标分布情况,调整生成锚框的尺度和长宽比。
自适应锚框计算可以采用以下策略:
数据统计分析: 对训练数据集进行分析,了解不同目标的尺度和长宽比分布情况。
动态调整锚框: 根据数据统计的结果,动态地调整生成锚框的尺度和长宽比,使其更符合实际场景中的目标形状和大小变化。
学习适应性参数: 有些方法还可以通过学习适应性参数的方式,让模型自动调整生成锚框的尺度和长宽比。
在yolov5x.yaml中查看锚定框的数据,如下:
# yolov5中预先设定了锚定框,这些锚框是针对coco数据集的,其他目标检测也适用。
# 这些框针对的图片大小是640x640,是默认的anchor大小。
# 需要注意的是在目标检测任务中,一般使用大特征图上去检测小目标,因为大特征图含有更多小目标信息,
# 因此大特征图上的anchor数值通常设置为小数值,小特征图检测大目标,因此小特征图上anchor数值设置较大。
anchors:
  - [10,13, 16,30, 33,23]       # P3/8    最大特征图上的锚框
  - [30,61, 62,45, 59,119]      # P4/16   中等特征图上的锚框
  - [116,90, 156,198, 373,326]  # P5/32   最小特征图上的锚框
在yolov5 中训练开始前,计算数据集标注信息针对默认锚定框的最佳召回率,当最佳召回率大于等于0.98时,则不需要更新锚定框;如果最佳召回率小于0.98,则需要重新计算数据集的锚定框,如果计算处理更好则更新原理的anchors。
def check_anchors(dataset, detect, thr=4.0, imgsz=640):
    """
    # Check anchor fit to data, recompute if necessary
    检查 anchor你和数据情况, 如果不合理重新计算anchors
    输入:
        dataset - 数据集对象
        detect - 模型的最后一层,检测头
        thr - 阈值?
        imgsz - 图片大小
    """
    m = detect
    # 例如: shape = 640 * [1280  960] / 1280
    shapes = imgsz * dataset.shapes / dataset.shapes.max(1, keepdims=True)
    # augment scale 随机缩放系数
    scale = np.random.uniform(0.9, 1.1, size=(shapes.shape[0], 1))
    # 计算框的wh
    wh = torch.tensor(np.concatenate([l[:, 3:5] * s for s, l in zip(shapes * scale, dataset.labels)])).float()

	# 计算指标 bpr,aat
    def metric(k):  # compute metric
        r = wh[:, None] / k[None]
        x = torch.min(r, 1 / r).min(2)[0]  # ratio metric
        best = x.max(1)[0]  # best_x
        aat = (x > 1 / thr).float().sum(1).mean()   # anchors above threshold
        bpr = (best > 1 / thr).float().mean()       # best possible recall
        return bpr, aat

    # 计算BPR(最好的召回率)
    stride = m.stride.to(m.anchors.device).view(-1, 1, 1)   # model strides
    anchors = m.anchors.clone() * stride                    # current anchors
    bpr, aat = metric(anchors.cpu().view(-1, 2))

    s = f'\n{PREFIX}{aat:.2f} anchors/target, {bpr:.3f} Best Possible Recall (BPR). '
    # 如果召回率>0.98,当前的anchors是正常的
    # 否则就修正anchors
    if bpr > 0.98:
        logging.info(f'{s}Current anchors are a good fit to dataset ✅')
    else:
        logging.info(f'{s}Anchors are a poor fit to dataset ⚠️, attempting to improve...')
        na = m.anchors.numel() // 2  # number of anchors
        # 基于kmean方法重新计算 anchors
        anchors = kmean_anchors(dataset, n=na, img_size=imgsz, thr=thr, gen=1000, verbose=False)
        new_bpr = metric(anchors)[0]
        # 如果新的anchors更好就替换
        if new_bpr > bpr:  # replace anchors
            anchors = torch.tensor(anchors, device=m.anchors.device).type_as(m.anchors)
            m.anchors[:] = anchors.clone().view_as(m.anchors)
            check_anchor_order(m)  # must be in pixel-space (not grid-space)
            m.anchors /= stride
            s = f'{PREFIX}Done ✅ (optional: update model *.yaml to use these anchors in the future)'
        else:
            s = f'{PREFIX}Done ⚠️ (original anchors better than new anchors, proceeding with original anchors)'
        logging.info(s)
代码的主要步骤和解释:
-
计算框的wh:
wh = torch.tensor(np.concatenate([l[:, 3:5] * s for s, l in zip(shapes * scale, dataset.labels)])).float()这一步计算了每个边界框(bounding box)的宽度(width)和高度(height),并将其保存在
wh张量中。这些边界框的尺寸是通过将数据集中的标签(labels)的宽度和高度乘以随机缩放系数(scale)得到的。 -
定义度量函数(metric):
def metric(k): # compute metric # ... (略)metric函数用于计算度量指标,包括最佳可能召回率(Best Possible Recall,BPR)和锚框与目标之间的适应度。它使用wh和输入的锚框k计算这些度量。 -
计算当前锚框的适应度:
stride = m.stride.to(m.anchors.device).view(-1, 1, 1)   # model strides
anchors = m.anchors.clone() * stride                    # current anchors
bpr, aat = metric(anchors.cpu().view(-1, 2))
这一步将当前模型的锚框进行了一些处理,然后调用
metric函数计算当前锚框的最佳可能召回率(BPR)和锚框数目相对于目标数目的比率(anchors/target)。这些度量值将用于判断当前锚框是否适合数据集。 -
判断是否需要修正锚框:
if bpr > 0.98:
    logging.info(f'{s}Current anchors are a good fit to dataset ✅')
else:
    # ... (略)
如果当前锚框的最佳可能召回率(BPR)超过了0.98,说明当前锚框适合数据集。否则,将尝试修正锚框。
-
基于K均值(k-means)重新计算锚框:
anchors = kmean_anchors(dataset, n=na, img_size=imgsz, thr=thr, gen=1000, verbose=False)如果需要修正锚框,就调用
kmean_anchors函数重新计算锚框。该函数使用K均值聚类方法来根据数据集的实际情况生成新的锚框。 -
比较新旧锚框的适应度:
new_bpr = metric(anchors)[0]
if new_bpr > bpr:  # replace anchors
    # ... (略)
计算新锚框的最佳可能召回率(BPR),如果新锚框更好,则用新锚框替换模型中的锚框。
-
更新模型中的锚框:
anchors = torch.tensor(anchors, device=m.anchors.device).type_as(m.anchors)
m.anchors[:] = anchors.clone().view_as(m.anchors)
check_anchor_order(m)  # must be in pixel-space (not grid-space)
m.anchors /= stride
s = f'{PREFIX}Done ✅ (optional: update model *.yaml to use these anchors in the future)'
将新的锚框复制到模型中,并进行一些必要的调整,确保锚框的顺序正确。更新完成后,输出一条日志消息,提示锚框已经更新。
基于kmean计算训练数据集新的anchors
def kmean_anchors(dataset='./data/coco128.yaml', n=9, img_size=640, thr=4.0, gen=1000, verbose=True):
    """ Creates kmeans-evolved anchors from training dataset

        Arguments:
            dataset: path to data.yaml, or a loaded dataset
            n: number of anchors
            img_size: image size used for training
            thr: anchor-label wh ratio threshold hyperparameter hyp['anchor_t'] used for training, default=4.0
            gen: generations to evolve anchors using genetic algorithm
            verbose: print all results

        Return:
            k: kmeans evolved anchors

        Usage:
            from utils.autoanchor import *; _ = kmean_anchors()
    """
    from scipy.cluster.vq import kmeans

    npr = np.random
    thr = 1 / thr

    def metric(k, wh):  # compute metrics
        r = wh[:, None] / k[None]
        x = torch.min(r, 1 / r).min(2)[0]  # ratio metric
        # x = wh_iou(wh, torch.tensor(k))  # iou metric
        return x, x.max(1)[0]  # x, best_x

    def anchor_fitness(k):  # mutation fitness
        _, best = metric(torch.tensor(k, dtype=torch.float32), wh)
        return (best * (best > thr).float()).mean()  # fitness

    def print_results(k, verbose=True):
        k = k[np.argsort(k.prod(1))]  # sort small to large
        x, best = metric(k, wh0)
        bpr, aat = (best > thr).float().mean(), (x > thr).float().mean() * n  # best possible recall, anch > thr
        s = f'{PREFIX}thr={thr:.2f}: {bpr:.4f} best possible recall, {aat:.2f} anchors past thr\n' \
            f'{PREFIX}n={n}, img_size={img_size}, metric_all={x.mean():.3f}/{best.mean():.3f}-mean/best, ' \
            f'past_thr={x[x > thr].mean():.3f}-mean: '
        for x in k:
            s += '%i,%i, ' % (round(x[0]), round(x[1]))
        if verbose:
            logging.info(s[:-2])
        return k

    if isinstance(dataset, str):  # *.yaml file
        with open(dataset, errors='ignore') as f:
            data_dict = yaml.safe_load(f)  # model dict
        from utils.dataloaders import LoadImagesAndLabels
        dataset = LoadImagesAndLabels(data_dict['train'], augment=True, rect=True)

    # Get label wh
    shapes = img_size * dataset.shapes / dataset.shapes.max(1, keepdims=True)
    wh0 = np.concatenate([l[:, 3:5] * s for s, l in zip(shapes, dataset.labels)])  # wh

    # Filter
    i = (wh0 < 3.0).any(1).sum()
    if i:
        logging.info(f'{PREFIX}WARNING ⚠️ Extremely small objects found: {i} of {len(wh0)} labels are <3 pixels in size')
    wh = wh0[(wh0 >= 2.0).any(1)].astype(np.float32)  # filter > 2 pixels
    # wh = wh * (npr.rand(wh.shape[0], 1) * 0.9 + 0.1)  # multiply by random scale 0-1

    # Kmeans init
    try:
        logging.info(f'{PREFIX}Running kmeans for {n} anchors on {len(wh)} points...')
        assert n <= len(wh)  # apply overdetermined constraint
        s = wh.std(0)  # sigmas for whitening
        k = kmeans(wh / s, n, iter=30)[0] * s  # points
        assert n == len(k)  # kmeans may return fewer points than requested if wh is insufficient or too similar
    except Exception:
        logging.warning(f'{PREFIX}WARNING ⚠️ switching strategies from kmeans to random init')
        k = np.sort(npr.rand(n * 2)).reshape(n, 2) * img_size  # random init
    wh, wh0 = (torch.tensor(x, dtype=torch.float32) for x in (wh, wh0))
    k = print_results(k, verbose=False)

    # Plot
    # k, d = [None] * 20, [None] * 20
    # for i in tqdm(range(1, 21)):
    #     k[i-1], d[i-1] = kmeans(wh / s, i)  # points, mean distance
    # fig, ax = plt.subplots(1, 2, figsize=(14, 7), tight_layout=True)
    # ax = ax.ravel()
    # ax[0].plot(np.arange(1, 21), np.array(d) ** 2, marker='.')
    # fig, ax = plt.subplots(1, 2, figsize=(14, 7))  # plot wh
    # ax[0].hist(wh[wh[:, 0]<100, 0],400)
    # ax[1].hist(wh[wh[:, 1]<100, 1],400)
    # fig.savefig('wh.png', dpi=200)

    # Evolve
    f, sh, mp, s = anchor_fitness(k), k.shape, 0.9, 0.1  # fitness, generations, mutation prob, sigma
    pbar = tqdm(range(gen), bar_format=TQDM_BAR_FORMAT)  # progress bar
    for _ in pbar:
        v = np.ones(sh)
        while (v == 1).all():  # mutate until a change occurs (prevent duplicates)
            v = ((npr.random(sh) < mp) * random.random() * npr.randn(*sh) * s + 1).clip(0.3, 3.0)
        kg = (k.copy() * v).clip(min=2.0)
        fg = anchor_fitness(kg)
        if fg > f:
            f, k = fg, kg.copy()
            pbar.desc = f'{PREFIX}Evolving anchors with Genetic Algorithm: fitness = {f:.4f}'
            if verbose:
                print_results(k, verbose)

    return print_results(k).astype(np.float32)
函数kmean_anchors用于生成目标检测模型中的锚框(anchors)。主要步骤包括使用K均值(kmeans)聚类方法初始化锚框,然后通过遗传算法(genetic algorithm)进行锚框的进化。以下是代码的主要解释:
-
导入库:
from scipy.cluster.vq import kmeans导入了SciPy库中用于K均值聚类的函数。
-
定义函数
kmean_anchors:def kmean_anchors(dataset='./data/coco128.yaml', n=9, img_size=640, thr=4.0, gen=1000, verbose=True):这个函数接受多个参数,包括数据集路径(或加载的数据集对象)、锚框数量、图像大小、阈值、进化代数和是否输出详细信息等。
-
数据处理和准备:
npr = np.random
thr = 1 / thr
设置一些随机种子和计算阈值的倒数。
-
度量计算函数
metric:def metric(k, wh): # compute metrics # ... (略)该函数用于计算度量指标,包括比率指标和最佳可能召回率。
-
适应度函数
anchor_fitness:def anchor_fitness(k): # mutation fitness # ... (略)该函数计算基于变异的适应度,用于评估锚框的质量。
-
结果打印函数
print_results:def print_results(k, verbose=True): # ... (略)该函数用于打印和返回计算结果,包括最佳可能召回率、锚框数量、锚框的平均度量值等。
-
加载数据集:
if isinstance(dataset, str):  # *.yaml file
    with open(dataset, errors='ignore') as f:
        data_dict = yaml.safe_load(f)  # model dict
    from utils.dataloaders import LoadImagesAndLabels
    dataset = LoadImagesAndLabels(data_dict['train'], augment=True, rect=True)
如果输入的数据集是字符串路径,就加载数据集。
-
获取标签尺寸信息:
shapes = img_size * dataset.shapes / dataset.shapes.max(1, keepdims=True)
wh0 = np.concatenate([l[:, 3:5] * s for s, l in zip(shapes, dataset.labels)])  # wh
从数据集中获取标签的尺寸信息,并计算标签的宽度和高度。
-
过滤极小的目标:
i = (wh0 < 3.0).any(1).sum()
if i:
    logging.info(f'{PREFIX}WARNING ⚠️ Extremely small objects found: {i} of {len(wh0)} labels are <3 pixels in size')
wh = wh0[(wh0 >= 2.0).any(1)].astype(np.float32)  # filter > 2 pixels
过滤掉宽度或高度小于3像素的目标,并保留宽度或高度大于等于2像素的目标。
-
K均值初始化锚框:
try:
    logging.info(f'{PREFIX}Running kmeans for {n} anchors on {len(wh)} points...')
    assert n <= len(wh)  # apply overdetermined constraint
    s = wh.std(0)  # sigmas for whitening
    k = kmeans(wh / s, n, iter=30)[0] * s  # points
    assert n == len(k)  # kmeans may return fewer points than requested if wh is insufficient or too similar
except Exception:
    logging.warning(f'{PREFIX}WARNING ⚠️ switching strategies from kmeans to random init')
    k = np.sort(npr.rand(n * 2)).reshape(n, 2) * img_size  # random init
尝试使用K均值方法初始化锚框,如果出现异常(例如,聚类数目少于要求或标签信息不足),则切换到随机初始化锚框。
-
锚框数据准备:
wh, wh0 = (torch.tensor(x, dtype=torch.float32) for x in (wh, wh0))
k = print_results(k, verbose=False)
将计算得到的锚框和相关数据准备成PyTorch张量,并进行一次结果打印。
-
锚框进化(遗传算法):
f, sh, mp, s = anchor_fitness(k), k.shape, 0.9, 0.1  # fitness, generations, mutation prob, sigma
pbar = tqdm(range(gen), bar_format=TQDM_BAR_FORMAT)  # progress bar
for _ in pbar:
    v = np.ones(sh)
    while (v == 1).all():  # mutate until a change occurs (prevent duplicates)
        v = ((npr.random(sh) < mp) * random.random() * npr.randn(*sh) * s + 1).clip(0.3, 3.0)
    kg = (k.copy() * v).clip(min=2.0)
    fg = anchor_fitness(kg)
    if fg > f:
        f, k = fg, kg.copy()
        pbar.desc = f'{PREFIX}Evolving anchors with Genetic Algorithm: fitness = {f:.4f}'
        if verbose:
            print_results(k, verbose)
使用遗传算法对锚框进行进化,不断变异和评估锚框的适应度,最终得到适应度最好的锚框。
-
返回最终锚框:
return print_results(k).astype(np.float32)返回经过进化算法得到的最终锚框,并打印最终结果。
自适应图片缩放
YOLOV5中相比于之前的版本,有很多小trick,导致其性能和应用比较好。
在目标检测中,输入的图片尺寸有大有小,根据前人的实验结果,输入网络的尺寸统一缩放到同一个尺寸时,检测效果会更好。
简单的使用resize操作可能导致信息的丢失,这主要是因为在改变图像的尺寸时,像素值的重新分布和插值操作可能引入失真。
插值操作: 在resize过程中,由于目标尺寸与原始尺寸不匹配,算法需要估计新尺寸上每个像素的值。常见的插值算法包括最近邻插值、双线性插值和双立方插值。这些插值方法都引入了一定的信息损失。
失真和形变: 简单的resize可能导致图像的失真和形变,特别是在缩小尺寸的情况下。这可能导致对象的形状发生变化,从而影响后续的视觉任务。
分辨率丧失: 缩小图像尺寸会导致分辨率的降低,从而丢失一些细节信息。
这时就有个问题,如果是简单的使用resize,很有可能就造成了图片信息的丢失,所以提出了letterbox自适应图片缩放技术。
train中放入的图片并不经过letterbox,而是检测的时候使用letterbox。
Letterbox 这个词的字面意思是“信箱”或“邮箱”,通常是指门或围栏上的一个盒子,用于接收信件或其他物品。在摄影和图像处理的上下文中,letterbox 这个词经常被用来描述一种图像调整的方法,该方法通过在图像周围添加边框(类似于信箱的概念)来适应不同的尺寸或宽高比例,以确保图像在显示或处理过程中不会失真或变形。
letterbox的主要思想是尽可能的利用网络感受野的信息特征。比如在YOLOV5中最后一层的Stride=5,即最后一层的特征图中每个点,可以对应原图中32X32的区域信息,那么只要在保证整体图片变换比例一致的情况下,长宽均可以被32整除,那么就可以有效的利用感受野的信息。
具体来说,图片变换比例一致指的是,长宽的收缩比例应该采用相同的比例。有效利用感受野信息则指对于收缩后不满足条件的一边,用灰白填充至可以被感受野整除。下面举例说明。
假设图片原来尺寸为(1080, 1920),我们想要resize的尺寸为(640,640)。要想满足收缩的要求,应该选取收缩比例640/1920 = 0.33.则图片被缩放为(360,640).下一步则要填充灰白边至360可以被32整除,则应该填充至384,最终得到图片尺寸(384,640)
而其实letterbox的实现也十分简单,以下将结合代码讲解步骤。
def letterbox(im, new_shape=(640, 640), color=(114, 114, 114), auto=True, scaleFill=False, stride=32):
    # Resize and pad image while meeting stride-multiple constraints
    shape = im.shape[:2]  # current shape [height, width]
    if isinstance(new_shape, int):
        new_shape = (new_shape, new_shape)

    # Scale ratio (new / old)
    r = min(new_shape[0] / shape[0], new_shape[1] / shape[1])

    # Compute padding
    ratio = r, r  # width, height ratios
    new_unpad = int(round(shape[1] * r)), int(round(shape[0] * r))

    dw, dh = new_shape[1] - new_unpad[0], new_shape[0] - new_unpad[1]  # wh padding
    if auto:  # minimum rectangle
        dw, dh = np.mod(dw, stride), np.mod(dh, stride)  # wh padding

    dw /= 2  # divide padding into 2 sides
    dh /= 2
    print(dw, dh)
    if shape[::-1] != new_unpad:  # resize
        im = cv.resize(im, new_unpad, interpolation=cv.INTER_LINEAR)
    top, bottom = int(round(dh - 0.1)), int(round(dh + 0.1))
    left, right = int(round(dw - 0.1)), int(round(dw + 0.1))
    im = cv.copyMakeBorder(im, top, bottom, left, right, cv.BORDER_CONSTANT, value=color)  # add border
    return im, ratio, (dw, dh)
letterbox的函数,用于对输入的图像进行缩放和填充,以满足指定的尺寸要求和stride要求。
-
获取输入图像的形状:
shape = im.shape[:2] # current shape [height, width]这行代码获取输入图像的高度和宽度。
-
处理
new_shape参数:if isinstance(new_shape, int): new_shape = (new_shape, new_shape)如果
new_shape是整数,将其转换为元组。 -
计算缩放比例:
r = min(new_shape[0] / shape[0], new_shape[1] / shape[1])计算缩放比例,以确保图像适应新的尺寸,同时保持宽高比例。
-
计算填充信息:
ratio = r, r  # width, height ratios
new_unpad = int(round(shape[1] * r)), int(round(shape[0] * r))
dw, dh = new_shape[1] - new_unpad[0], new_shape[0] - new_unpad[1]  # wh padding
计算缩放后图像的尺寸,并计算需要填充的宽度和高度。
-
自适应最小矩形:
if auto:  # minimum rectangle
    dw, dh = np.mod(dw, stride), np.mod(dh, stride)  # wh padding
如果启用了
auto选项,确保填充的宽度和高度是stride的整数倍,以保持最小矩形。 -
分配填充到两侧:
dw /= 2  # divide padding into 2 sides
dh /= 2
将填充均匀分配到图像的两侧。
-
调整图像大小:
if shape[::-1] != new_unpad:  # resize
    im = cv.resize(im, new_unpad, interpolation=cv.INTER_LINEAR)
如果缩放后的图像尺寸与目标尺寸不同,使用线性插值调整图像大小。
-
边框填充:
top, bottom = int(round(dh - 0.1)), int(round(dh + 0.1))
left, right = int(round(dw - 0.1)), int(round(dw + 0.1))
im = cv.copyMakeBorder(im, top, bottom, left, right, cv.BORDER_CONSTANT, value=color)  # add border
使用OpenCV的
copyMakeBorder函数,以指定的颜色填充图像的边框。 -
返回结果:
return im, ratio, (dw, dh)返回处理后的图像、缩放比例和填充信息。
需要注意的是:
a.这里填充的是黑色,即(0,0,0),而Yolov5中填充的是灰色,即(114,114,114),都是一样的效果。
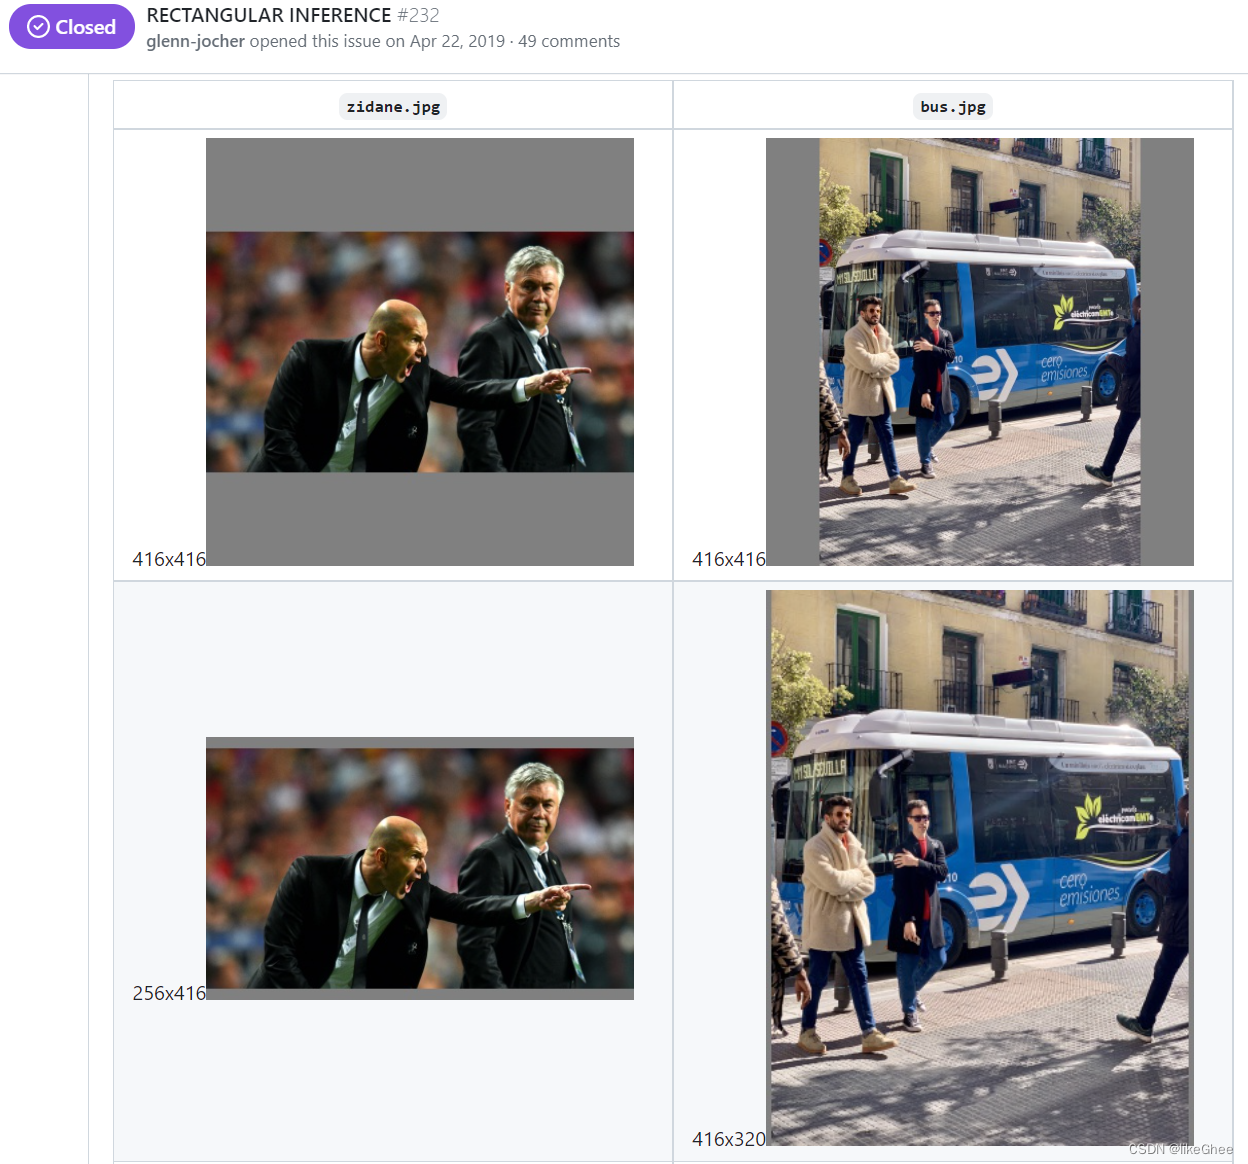
b.训练时没有采用缩减黑边的方式,还是采用传统填充的方式,即缩放到416*416大小。只是在测试,使用模型推理时,才采用缩减黑边的方式,提高目标检测,推理的速度。
c.为什么np.mod函数的后面用32?因为Yolov5的网络经过5次下采样,而2的5次方,等于32。所以至少要去掉32的倍数,再进行取余。
这种方式在之前github上Yolov3中也进行了讨论:https://github.com/ultralytics/yolov3/issues/232
在讨论中,通过这种简单的改进,推理速度得到了37%的提升,可以说效果很明显。
Focus结构
资料参考:https://blog.csdn.net/qq_39056987/article/details/112712817
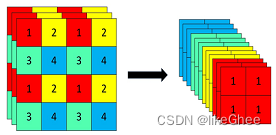
Focus模块是在V5版本中的一个图像处理模块,其主要作用是在图像输入到卷积神经网络的backbone之前进行切片操作。该模块通过在一张图片中每隔一个像素提取一个值,实现类似邻近下采样的效果,从而生成四张互补且大小相近的图片。这一操作将宽度(W)和高度(H)的信息集中到了通道空间。因此,输入通道数扩展了4倍,即将这四张图片拼接在一起,使得相对于原始的RGB三通道模式,通道数增至12。最后,经过卷积操作,得到没有信息丢失的二倍下采样特征图。
代码实现:
class Focus(nn.Module):
    # Focus wh information into c-space
    def __init__(self, c1, c2, k=1, s=1, p=None, g=1, act=True):  # ch_in, ch_out, kernel, stride, padding, groups
        super(Focus, self).__init__()
        self.conv = Conv(c1 * 4, c2, k, s, p, g, act)      # 这里输入通道变成了4倍

    def forward(self, x):  # x(b,c,w,h) -> y(b,4c,w/2,h/2)
        return self.conv(torch.cat([x[..., ::2, ::2], x[..., 1::2, ::2], x[..., ::2, 1::2], x[..., 1::2, 1::2]], 1))
YOLOv5s 6.0版本之后,然而又改回卷积了。
CSP结构 Neck
Yolov5现在的Neck和Yolov4中一样,都采用FPN+PAN的结构,但在Yolov5刚出来时,只使用了FPN结构,后面才增加了PAN结构,此外网络中其他部分也进行了调整。
Yolov4的Neck结构中,采用的都是普通的卷积操作。而Yolov5的Neck结构中,采用借鉴CSPnet设计的CSP2结构,加强网络特征融合的能力。
Yolov4网络结构中,借鉴了CSPNet的设计思路,在主干网络中设计了CSP结构。
Yolov5与Yolov4不同点在于,Yolov4中只有主干网络使用了CSP结构。
而Yolov5中设计了两种CSP结构,以Yolov5s网络为例,CSP1_X结构应用于Backbone主干网络,另一种CSP2_X结构则应用于Neck中。
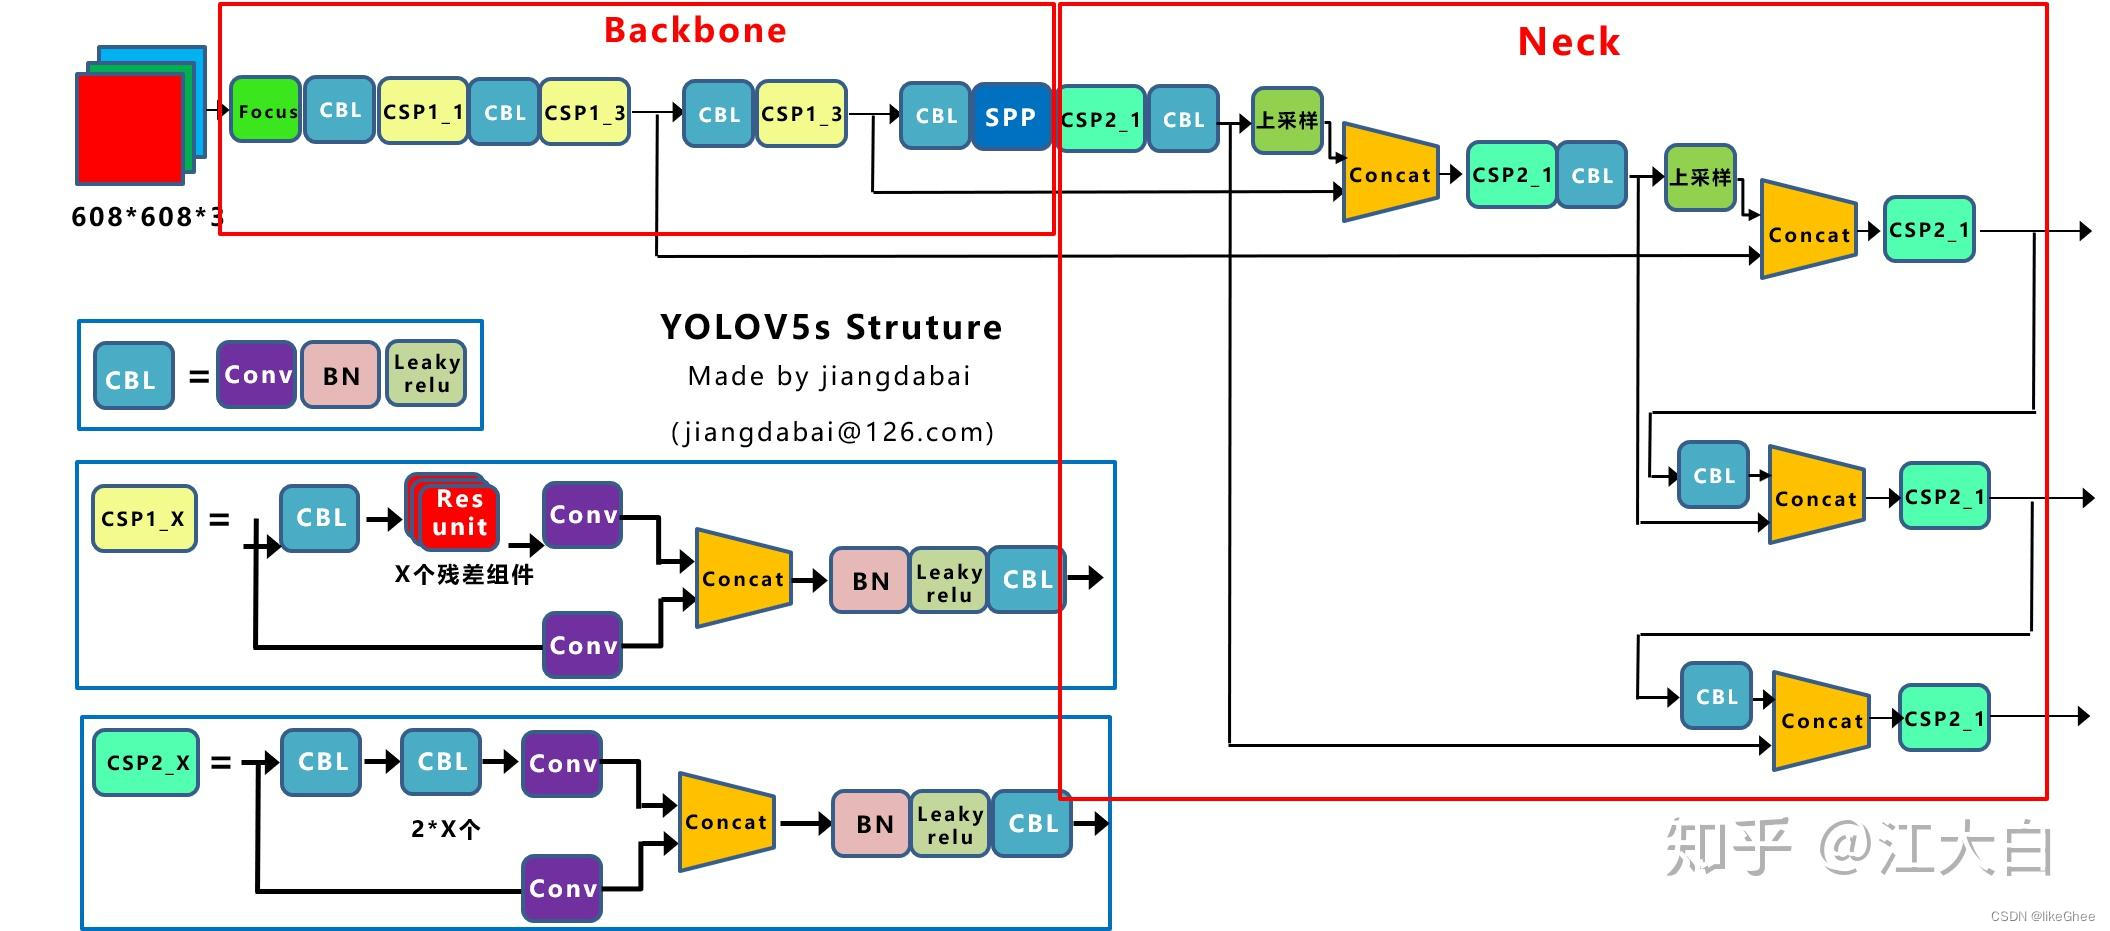
图片出处:https://zhuanlan.zhihu.com/p/172121380
CSPNet全称是Cross Stage Paritial Network,主要从网络结构设计的角度解决推理中从计算量很大的问题。
CSPNet的作者认为推理计算过高的问题是由于网络优化中的梯度信息重复导致的。
因此采用CSP模块先将基础层的特征映射划分为两部分,然后通过跨阶段层次结构将它们合并,在减少了计算量的同时可以保证准确率。
CSPNet论文地址:https://arxiv.org/pdf/1911.11929.pdf

左为原始的Dense Block,右者为Partial Dense Block。假设将输入按照part_ratio=0.5的比例分成两部分,并且假设一个Dense Block的输入为w * h * c,growth rate为 d,Dense block的layer数量为m,
CIO (Convolutional input/Output)
对于原始的DenseBlockCIO = cm + [(mm+m)d]/2
而对于使用了CSP结构的结构来说,CIO = [cm + (mm+m)d]/2
代码实现:
class DenseBlock(nn.Module):

    def __init__(self, input_channels, num_layers, growth_rate):
        super(DenseBlock, self).__init__()
        self.num_layers = num_layers
        self.k0 = input_channels
        self.k = growth_rate
        self.layers = self.__make_layers()

    def __make_layers(self):
        layer_list = []
        for i in range(self.num_layers):
            layer_list.append(nn.Sequential(
                BN_Conv2d(self.k0 + i * self.k, 4 * self.k, 1, 1, 0),
                BN_Conv2d(4 * self.k, self.k, 3, 1, 1)
            ))
        return layer_list

    def forward(self, x):
        feature = self.layers[0](x)
        out = torch.cat((x, feature), 1)
        for i in range(1, len(self.layers)):
            feature = self.layers[i](out)
            out = torch.cat((feature, out), 1)
        return out


class CSP_DenseBlock(nn.Module):

    def __init__(self, in_channels, num_layers, k, part_ratio=0.5):
        super(CSP_DenseBlock, self).__init__()
        self.part1_chnls = int(in_channels * part_ratio)
        self.part2_chnls = in_channels - self.part1_chnls
        self.dense = DenseBlock(self.part2_chnls, num_layers, k)

    def forward(self, x):
        part1 = x[:, :self.part1_chnls, :, :]
        part2 = x[:, self.part1_chnls:, :, :]
        part2 = self.dense(part2)
        out = torch.cat((part1, part2), 1)
        return out
DenseBlock 类:
-
__init__:使用指定的参数(input_channels,输入通道维度,num_layers,密集块中的层数,以及growth_rate,通道数量的增长率)初始化DenseBlock模块。 -
__make_layers:创建密集块层的私有方法。它通过指定数量的层(num_layers)迭代,并将一个由自定义BN_Conv2d模块构成的卷积层对附加到layer_list。第一卷积层的输出通道大小为4 * self.k(其中self.k是增长率),第二卷积层的输出通道大小为self.k。 -
forward:定义DenseBlock的前向传播。它通过层进行迭代,将输入张量与每个层的输出连接起来。结果作为密集块的输出返回。
CSP_DenseBlock 类:
-
__init__:使用指定的参数(in_channels,输入通道维度,num_layers,密集块中的层数,k,通道数量的增长率,以及可选的part_ratio参数,默认值为0.5,表示第一部分中通道的比例)初始化CSP_DenseBlock模块。 -
forward:定义CSP_DenseBlock的前向传播。它根据指定的通道比率将输入张量分割成两部分(part1和part2)。然后,通过DenseBlock模块处理第二部分(part2)。最后,通过连接part1和DenseBlock的输出获得输出。
CIOU_Loss
Yolov5中采用其中的CIOU_Loss做Bounding box的损失函数。
Yolov4中也采用CIOU_Loss作为目标Bounding box的损失。
下面介绍一下IOU loss的发展过程:
Intersection over Union (IoU)是用于评估目标检测模型性能的常见指标之一。IoU是通过计算预测框和真实目标框之间的交集面积与它们的并集面积的比例来衡量的。具体而言,IoU的计算公式如下:
I o U = Intersection Area Union Area IoU = \frac{\text{Intersection Area}}{\text{Union Area}} IoU=Union AreaIntersection Area
GIoU:
GIoU参考资料:
https://giou.stanford.edu/
https://sh-tsang.medium.com/review-giou-generalized-intersection-over-union-b4dd1ab89493
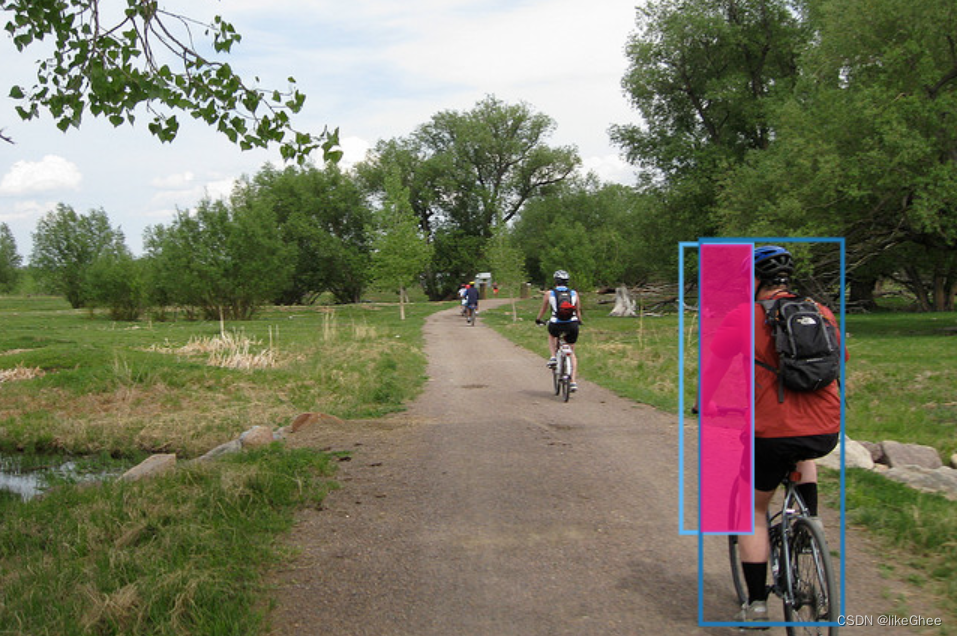
在对象检测中,IoU被用作评估预测边界框与地面实况的接近程度的度量。在上面的第一个例子中,预测和地面实况边界框重叠,因此IoU的值是非零的。让我们看一个IoU不足的例子。
当预测框和目标框不相交时,它们的交集面积为零。这意味着分母中的并集面积就是两者的面积之和。因此,IoU的计算将变为零除以非零的值,结果将始终为零。
设(A)为预测框的区域,(B)为目标框的区域。如果 ( A ∩ B = ∅ ) (A \cap B = \emptyset) (A∩B=∅)交集为空,那么 I o U = 0 A ∪ B = 0 IoU = \frac{0}{A \cup B} = 0 IoU=A∪B0=0在这种情况下,IoU的值为零,说明两个框不相交。
如果我们进行了一个糟糕的预测,其中预测的边界框与基本事实没有重叠,该怎么办。在这种情况下,以及在地面实况和预测边界框之间没有重叠的任何其他情况下,交集为0,因此IoU也将为0。如果IoU即使在没有交集的情况下,我们新的、更好的预测也比第一个预测更接近地面实况,那就太好了。
《Generalized Intersection over Union: A Metric and A Loss for Bounding Box Regression》
于是提出了一个解决方案,GIoU,其公式如下:
G
I
o
U
=
∣
A
∩
B
∣
∣
A
∪
B
∣
−
∣
C
\
(
A
∪
B
)
∣
∣
C
∣
=
I
o
U
−
∣
C
\
(
A
∪
B
)
∣
∣
C
∣
\begin{gathered}GIoU=\frac{|A\cap B|}{|A\cup B|}-\frac{|C\backslash(A\cup B)|}{|C|}=IoU\\-\frac{|C\backslash(A\cup B)|}{|C|}\end{gathered}
GIoU=∣A∪B∣∣A∩B∣−∣C∣∣C\(A∪B)∣=IoU−∣C∣∣C\(A∪B)∣
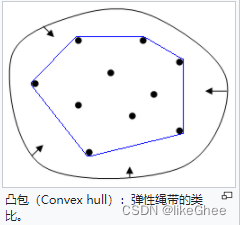
其中A和B是预测和实际边界框。C是包含A和B的最小凸包。
我们首先找到了包围A和B的最小凸包C 。然后,我们计算C(不包括A和B)所占的体积(面积)除以C所占的总体积(面积)。在更好预测的情况下,C的面积会更小,所有其他值保持不变。IoU都将为0。因此,随着预测向地面实况移动,减去较小的值,GIoU的值增加
在一个实数向量空间V中,对于给定集合X所有包含X的凸集的交集S为X的凸包。
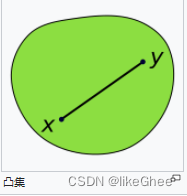
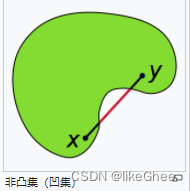
在点集拓扑学与欧几里得空间中,凸集(Convex set)是一个点集合,其中每两点之间的线段点都落在该点集合中。
随着预测向地面实况移动,减去较小的值,GIoU的值增加
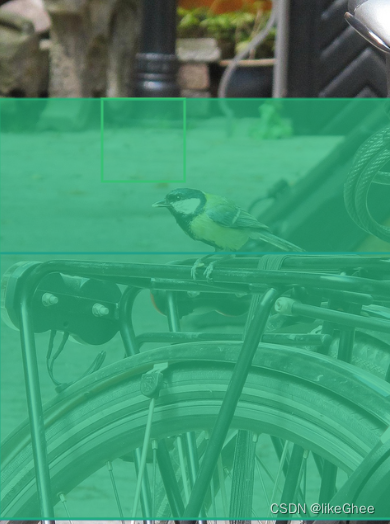
回想一下,在神经网络中,任何给定的损失函数都必须是可微分的,才能允许反向传播。我们从上面的例子中看到,在没有交集的情况下,IoU没有值,因此没有梯度。然而,GIoU总是可微的。
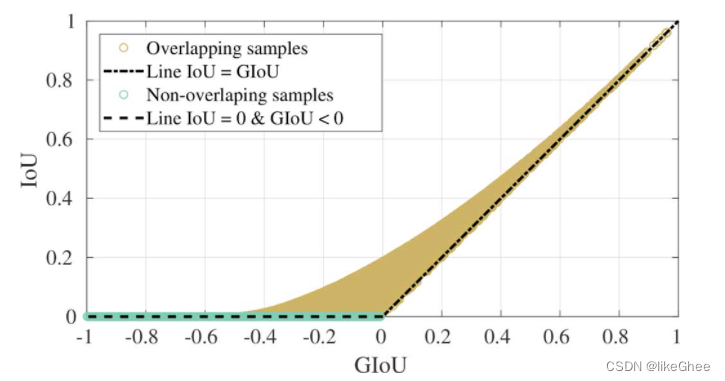
我们对预测边界框与地面实况重叠(即相交)的情况和没有相交的情况进行了采样。这些样本的IoU和GIoU之间的关系如图所示。
从图中可以看出,与上述公式一样,GIoU的范围从-1到1。当包围两个边界框的面积(例如C)大于IoU时,会出现负值。随着IoU分量的增加,GIoU的值收敛到IoU。
然而GIoU有一个问题,一旦预测框和目标框出现包含关系,或者宽和高对齐的情况,差集为0,GIoU就退化成了IoU,无法评估相对位置,收敛缓慢。
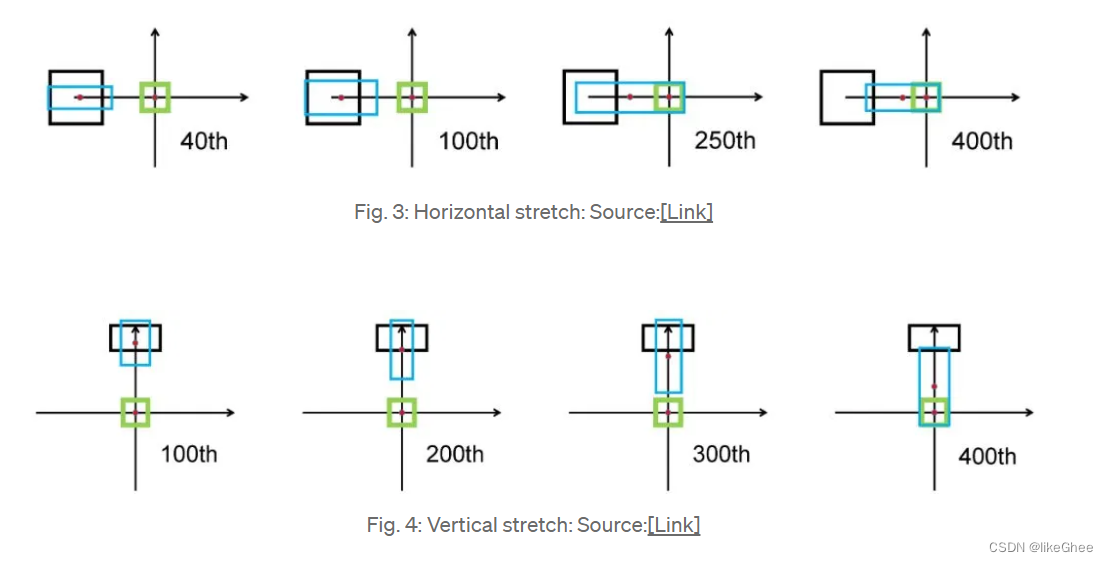
我们可以从图中观察到,图3即使在250次迭代后,预测框(蓝色)也会扩展到与目标框(绿色)重叠,并且在预测框的中心坐标中只有很小的位移。图4中的垂直拉伸也是如此。因此,尤其是对于水平和垂直方向的盒子GIoU损失收敛缓慢。
DIoU:
Distance-IoU:https://arxiv.org/abs/1911.08287
参考资料:https://medium.com/visionwizard/understanding-diou-loss-a-quick-read-a4a0fbcbf0f0
DIoU(距离-并集上的交集)损失函数包含预测框和目标框之间的归一化距离。
它不仅继承了IoU和GIoU的属性,还解决了它们都表现不佳的问题:它直接最小化了两个盒子的距离,因此收敛速度比GIoU损失快得多,尤其是在非重叠的情况下。
它还考虑了垂直和水平方向(图3和图4)DIoU可以更快地解决回归问题的情况。
令 R ( B , B g t ) \mathcal{R}(B,B^{gt}) R(B,Bgt) 是预测框 B B B 和目标框 B g t B^{gt} Bgt的惩罚项。
通常基于IoU的损失所提出的方法可以定义为
L
=
1
−
I
o
U
+
R
(
B
,
B
g
t
)
,
\mathcal{L}=1-IoU+\mathcal{R}(B,B^{gt}),
L=1−IoU+R(B,Bgt),
其中,b和b g t ^{gt} gt表示 b b b和 b g t b^{gt} bgt 的中心点, ρ ( ⋅ ) \rho(\cdot) ρ(⋅)是欧几里得距离, c c c是覆盖这两个盒子的最小封闭盒子的对角线长度。然后DIoU损失函数可以定义为:
L D I o U = 1 − I o U + ρ 2 ( b , b g t ) c 2 \mathcal{L}_{DIoU}=1-IoU+\frac{\rho^{2}(\mathbf{b},\mathbf{b}^{gt})}{c^{2}} LDIoU=1−IoU+c2ρ2(b,bgt)
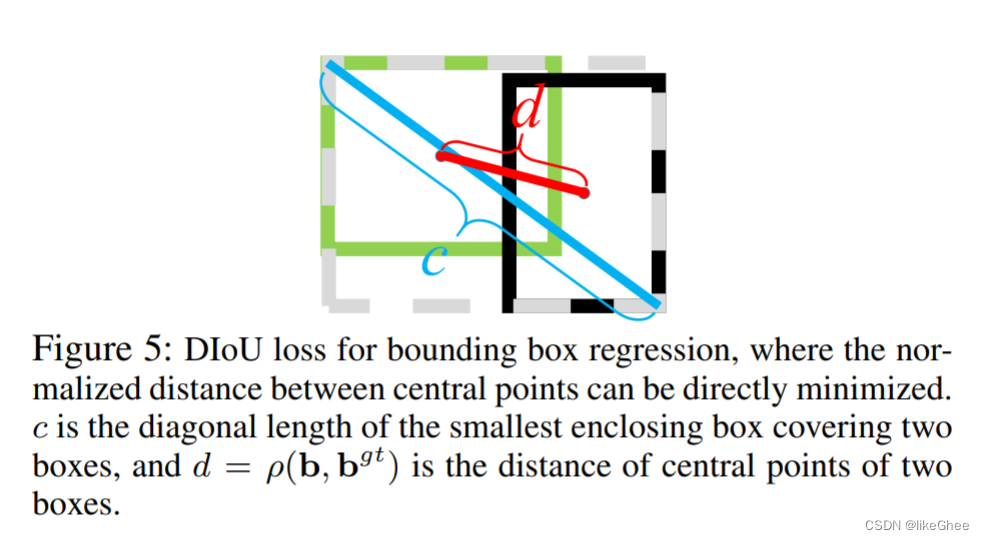
DIoU损失的惩罚项直接使两个中心点之间的距离最小化。 c 的作用是防止损失函数的值过大,有点像标准化的感觉。
参考资料:https://zhuanlan.zhihu.com/p/374907266

最终迭代T时IoU、GIoU和DIoU损失的回归误差可视化,即每个坐标n的e(T,n)。我们注意到(a)和(b)中的盆地对应于良好的回归情况。可以看出,在非重叠情况下,IoU损失有很大的误差,在水平和垂直情况下,GIoU损失有较大的误差,而DIoU损失导致到处都有非常小的回归误差。
当与目标框不重叠时,DIoU可以为边界框提供移动方向。与GIoU相比,预测框显著地向目标边界框移动。

DIoU要比GIou更加符合目标框回归的机制,将目标与anchor之间的距离,重叠率以及尺度都考虑进去,使得目标框回归变得更加稳定,不会像IoU和GIoU一样出现训练过程中发散等问题。
损失相当于在保留GIoU损失优点的基础上,增加了中心点距离度量,直接优化两个框中心距离,快速收敛,而且仅中心点完全重合的时候,才会退化成IoU。
但从式 L D I o U \mathcal{L}_{DIoU} LDIoU中我们可以看出 L D I o U \mathcal{L}_{DIoU} LDIoU 和闭包的对角线距离 c c c 成反比,当两个bounding box的中心点之间的距离不变时,闭包的对角线越长,则DIoU损失函数的值越小,这就意味着DIoU Loss可能存在DIoU Loss存在训练过程中预测框被错误放大,但是损失值变小的问题。
两个没有互相覆盖的矩形框,它们都是边长为 w w w 的矩形,它们中心点的距离为 2 w 2w 2w 。中心点不变,但是边长扩大到了 2 w 2w 2w,两种情况下DIoU的值分别是 0.4 和 0.246 ,因此DloU Loss也存在预测框被错误放大的问题。
CIoU:
上面的论文考虑到bbox回归三要素中的长宽比还没被考虑到计算中,因此,进一步在DloU的基础上提出了CloU。其惩罚项如下面公式: R C I o U = ρ 2 ( b , b g t ) c 2 + α v {\cal R}_{CIoU}=\frac{\rho^{2}(\mathbf{b},\mathbf{b}^{gt})}{c^{2}}+\alpha v RCIoU=c2ρ2(b,bgt)+αv 其中 α \alpha α 是权重函数, 而 ν \nu ν 用来度量长宽比的相似性,定义为 v = 4 π 2 ( arctan w g t h g t − arctan w h ) 2 v=\frac4{\pi^2}\left(\arctan\frac{w^{gt}}{h^{gt}}-\arctan\frac wh\right)^2 v=π24(arctanhgtwgt−arctanhw)2 完整的 CloU 损失函数定义: L C I o U = 1 − I o U + ρ 2 ( b , b g t ) c 2 + α v \mathcal{L}_{CIoU}=1-IoU+\frac{\rho^2\left(\mathbf{b},\mathbf{b}^{gt}\right)}{c^2}+\alpha v LCIoU=1−IoU+c2ρ2(b,bgt)+αv 最后,CloU loss的梯度类似于DloU Ioss, 但还要考虑 ν \nu ν 的梯度。在长宽在 [0,1] 的情况下, w 2 + h 2 w^2+h^2 w2+h2 的值通常很小,会导致梯度爆炸,因此在 1 w 2 + h 2 \frac1{w^2+h^2} w2+h21 实现时将替换成1。
def bbox_overlaps_ciou(bboxes1, bboxes2):
    rows = bboxes1.shape[0]
    cols = bboxes2.shape[0]
    cious = torch.zeros((rows, cols))
    if rows * cols == 0:
        return cious
    exchange = False
    if bboxes1.shape[0] > bboxes2.shape[0]:
        bboxes1, bboxes2 = bboxes2, bboxes1
        cious = torch.zeros((cols, rows))
        exchange = True

    w1 = bboxes1[:, 2] - bboxes1[:, 0]
    h1 = bboxes1[:, 3] - bboxes1[:, 1]
    w2 = bboxes2[:, 2] - bboxes2[:, 0]
    h2 = bboxes2[:, 3] - bboxes2[:, 1]

    area1 = w1 * h1
    area2 = w2 * h2

    center_x1 = (bboxes1[:, 2] + bboxes1[:, 0]) / 2
    center_y1 = (bboxes1[:, 3] + bboxes1[:, 1]) / 2
    center_x2 = (bboxes2[:, 2] + bboxes2[:, 0]) / 2
    center_y2 = (bboxes2[:, 3] + bboxes2[:, 1]) / 2

    inter_max_xy = torch.min(bboxes1[:, 2:],bboxes2[:, 2:])
    inter_min_xy = torch.max(bboxes1[:, :2],bboxes2[:, :2])
    out_max_xy = torch.max(bboxes1[:, 2:],bboxes2[:, 2:])
    out_min_xy = torch.min(bboxes1[:, :2],bboxes2[:, :2])

    inter = torch.clamp((inter_max_xy - inter_min_xy), min=0)
    inter_area = inter[:, 0] * inter[:, 1]
    inter_diag = (center_x2 - center_x1)**2 + (center_y2 - center_y1)**2
    outer = torch.clamp((out_max_xy - out_min_xy), min=0)
    outer_diag = (outer[:, 0] ** 2) + (outer[:, 1] ** 2)
    union = area1+area2-inter_area
    u = (inter_diag) / outer_diag
    iou = inter_area / union
    with torch.no_grad():
        arctan = torch.atan(w2 / h2) - torch.atan(w1 / h1)
        v = (4 / (math.pi ** 2)) * torch.pow((torch.atan(w2 / h2) - torch.atan(w1 / h1)), 2)
        S = 1 - iou
        alpha = v / (S + v)
        w_temp = 2 * w1
    ar = (8 / (math.pi ** 2)) * arctan * ((w1 - w_temp) * h1)
    cious = iou - (u + alpha * ar)
    cious = torch.clamp(cious,min=-1.0,max = 1.0)
    if exchange:
        cious = cious.T
    return cious
-
导入库:
import torch
from torch import math
导入 PyTorch 库,并从 torch 中导入 math 模块。
-
函数定义:
def bbox_overlaps_ciou(bboxes1, bboxes2):定义了一个名为
bbox_overlaps_ciou的函数,该函数计算两组边界框之间的 CIoU。 -
初始化变量:
rows = bboxes1.shape[0]
cols = bboxes2.shape[0]
cious = torch.zeros((rows, cols))
初始化行数、列数和 CIoU 矩阵。如果其中一组边界框为空,则直接返回全零的 CIoU 矩阵。
-
交换矩阵:
exchange = False
if bboxes1.shape[0] > bboxes2.shape[0]:
    bboxes1, bboxes2 = bboxes2, bboxes1
    cious = torch.zeros((cols, rows))
    exchange = True
如果第一组边界框的行数大于第二组,进行交换,确保第一组边界框的行数更少,同时初始化 CIoU 矩阵。
-
提取边界框参数:
w1 = bboxes1[:, 2] - bboxes1[:, 0]
h1 = bboxes1[:, 3] - bboxes1[:, 1]
w2 = bboxes2[:, 2] - bboxes2[:, 0]
h2 = bboxes2[:, 3] - bboxes2[:, 1]
提取边界框的宽度和高度。
-
计算面积和中心点:
area1 = w1 * h1
area2 = w2 * h2

center_x1 = (bboxes1[:, 2] + bboxes1[:, 0]) / 2
center_y1 = (bboxes1[:, 3] + bboxes1[:, 1]) / 2
center_x2 = (bboxes2[:, 2] + bboxes2[:, 0]) / 2
center_y2 = (bboxes2[:, 3] + bboxes2[:, 1]) / 2
计算边界框的面积和中心点坐标。
-
计算交集和并集:
inter_max_xy = torch.min(bboxes1[:, 2:], bboxes2[:, 2:])
inter_min_xy = torch.max(bboxes1[:, :2], bboxes2[:, :2])
out_max_xy = torch.max(bboxes1[:, 2:], bboxes2[:, 2:])
out_min_xy = torch.min(bboxes1[:, :2], bboxes2[:, :2])

inter = torch.clamp((inter_max_xy - inter_min_xy), min=0)
inter_area = inter[:, 0] * inter[:, 1]
计算边界框的交集和并集的坐标和面积。
-
计算对角线和 Complete IoU:
inter_diag = (center_x2 - center_x1) ** 2 + (center_y2 - center_y1) ** 2
outer = torch.clamp((out_max_xy - out_min_xy), min=0)
outer_diag = (outer[:, 0] ** 2) + (outer[:, 1] ** 2)
union = area1 + area2 - inter_area
u = (inter_diag) / outer_diag
iou = inter_area / union
计算对角线、外接框和 Complete IoU。
-
计算 CIoU 中的其他参数:
with torch.no_grad():
    arctan = torch.atan(w2 / h2) - torch.atan(w1 / h1)
    v = (4 / (math.pi ** 2)) * torch.pow((torch.atan(w2 / h2) - torch.atan(w1 / h1)), 2)
    S = 1 - iou
    alpha = v / (S + v)
    w_temp = 2 * w1
    ar = (8 / (math.pi ** 2)) * arctan * ((w1 - w_temp) * h1)
    cious = iou - (u + alpha * ar)
    cious = torch.clamp(cious, min=-1.0, max=1.0)
计算 CIoU 中的额外参数,然后使用这些参数
计算 CIoU,最后将 CIoU 的值夹在 [-1.0, 1.0] 的范围内。 -
矩阵交换:
if exchange:
    cious = cious.T
如果发生了交换,将 CIoU 矩阵转置回原始形状。
-
返回结果:
return cious返回计算得到的 CIoU 矩阵。
nms非极大值抑制
在目标检测的后处理过程中,针对很多目标框的筛选,通常需要nms操作。
因为CIOU_Loss中包含影响因子v,涉及groudtruth的信息,而测试推理时,是没有groundtruth的。
所以Yolov4在DIOU_Loss的基础上采用DIOU_nms的方式,而Yolov5中采用加权nms的方式。
可以看出,采用DIOU_nms,下方中间箭头的黄色部分,原本被遮挡的摩托车也可以检出。
将nms中IOU修改成DIOU_nms。对于一些遮挡重叠的目标,会有一些改进。
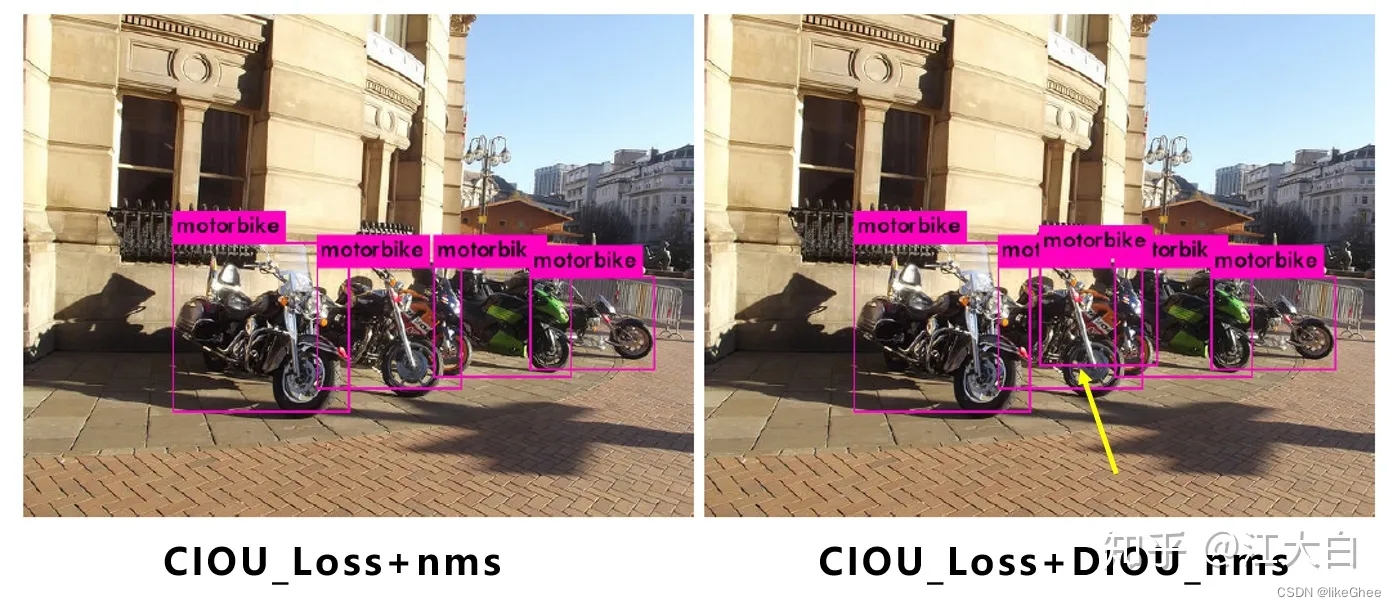
图片:https://zhuanlan.zhihu.com/p/172121380
代码
Yolov5的作者并没有发表论文,因此只能从代码角度进行分析。
Yolov5代码:https://github.com/ultralytics/yolov5
大家可以根据网页的说明,下载训练,及测试。
最后
综合而言,在实际测试中,Yolov4的准确性有不错的优势,但Yolov5的多种网络结构使用起来更加灵活,我们可以根据不同的项目需求,取长补短,发挥不同检测网络的优势。
Yolox的改进trick中,有很多值得借鉴的地方。


