playbook的组成部分
1、 tasks:任务
在目标主机上需要执行的操作。使用模块定义这些操作。每个任务都是一个模块的调用。
2、 variables:变量
用于存储和传递数据。类似于shell脚本中的变量。变量可以自定义。可以在playbook当中定义为全局变量,也可以外部传参。类似于shell脚本中的位置变量
3、 Templates:模板
用于生成配置文件。模板是包含占位符的文件。占位符由ansible在执行时转化为变量值。
4、 handlers:处理器
当需要有变更的时候,可以执行触发器。
5、 Roles:角色
类似于dockercompose。是一种组织和封装playbook的。允许把相关的任务、变量、模板和处理器组织成一个可复用的单元。
实例模板1:
vim test1.yml
#this is our first playbook
- name: first play
#相当于任务描述。一个name就是一个任务名。可以为空可以不写。
  gather_facts: false
#是否收集主机的相关信息。如果不写默认收集
#false:表示不检查。可以加快playbook的执行速度
  hosts: 20.0.0.20
#声明目标主机是谁。可以使用IP或者组名
  remote_user: root
#在目标主机执行的用户
  tasks:
#声明需要执行的任务。可以理解为大任务中的小任务
   - name: ping test
     ping:
   - name: close selinux
     command: '/sbin/setenforce 0'
     ignore_errors: True
#如果出现错误则忽略
   - name: close firewalld
     service: name=firewalld state=stopped
   - name: install httpd
     yum: name=httpd
#state=latest:声明服务的版本。可以不加
   - name: start httpd
     service: enabled=true name=httpd state=started
   - name: editon index.html
#修改httpd服务的默认的访问页面
     shell: echo "this is httpd" > /var/www/html/index.html
     notify: restart httpd
#notify:表示需要变更。交给handlers处理重启httpd服务
  handlers:
   - name: restart httpd
     service: name=httpd state=restarted
检查yml文件的语法是否正确
ansible-playbook test1.yml --syntax-check
#检查yml文件的语法是否正确
检查有多少任务
ansible-playbook test.yaml --list-task检查有多少主机生效
ansible-playbook test1.yml --list-hosts
#检查生效的目标主机
指定剧本
ansible-playbook test1.yml --start-at-task='install httpd'
#指定剧本从哪个任务开始执行
切换用户:
#this is our first playbook
- name: first play
#相当于任务描述。一个name就是一个任务名。可以为空可以不写。
  gather_facts: false
#是否收集主机的相关信息。如果不写默认收集
#false:表示不检查。可以加快playbook的执行速度
  hosts: 20.0.0.20
#声明目标主机是谁。可以使用IP或者组名
  remote_user: zyg
#在目标主机执行的用户
  become:yes
  become_user:root
  #表示需要切换用户,切换用户的名称
  tasks:
#声明需要执行的任务。可以理解为大任务中的小任务
   - name: ping test
     ping:
   - name: close selinux
     command: '/sbin/setenforce 0'
     ignore_errors: True
#如果出现错误则忽略
   - name: close firewalld
     service: name=firewalld state=stopped
   - name: install httpd
     yum: name=httpd
#state=latest:声明服务的版本。可以不加
   - name: start httpd
     service: enabled=true name=httpd state=started
   - name: editon index.html
#修改httpd服务的默认的访问页面
     shell: echo "this is httpd" > /var/www/html/index.html
     notify: restart httpd
#notify:表示需要变更。交给handlers处理重启httpd服务
  handlers:
   - name: restart httpd
     service: name=httpd state=restarted


become:yes
become_user:root
vim /etc/ansible/ansible.cfg
取消17行的注释
ansible-play test1.yml -K
#表示输入密码
#-K:内部声明更改用户,使用-K
指定用户操作
ansible-playbook test1.yml -u root -k
#如果没有声明更改用户,可以在外部指定用户
#-u:指定用户
#-k:手动输入密码
实例模板2:
声明和引用变量,以及外部传参变量
#this is second playbook!
#声明和引用变量,以及外部传参变量
- hosts: 20.0.0.20
  remote_user: root
  vars:
    groupname: zyg
    username: hmbb
  tasks:
   - name: create group
     group:
       name: "{{ groupname }}"
#引用前面设定好的groupname
       system: yes
       gid: 111
   - name: create user
     user:
       name: "{{ username }}"
       uid: 1011
       group: "{{ groupname }}"
       shell: /sbin/nologin
   - name: copy file
     copy:
       content: "{{ hostvars[inventory_hostname]['ansible_default_ipv4']['adress']}}"
       dest: /opt/bqb.txt
字典方式:
  vars:
    groupname: zyg
    username: hmbb
使用的是key-value的方式
使用符号-开头表示这是一个列表
表示包含所有主机变量的字典
 "{{ hostvars[inventory_hostname]['ansible_default_ipv4']['adress'] }}"
 #表示包含所有主机变量的字典
 #inventory_hostname:目标主机的主机名
 #['ansible_default_ipv4']['adress']:获取目标主机名
 #表示获取目标主机的IP地址复制到目标文件里
外部传参
ansible-playbook test2.yml -e 'username=yst groupname=ymr'
#外部传参
playbook的条件判断
when:比较常见的应用场景,实现满足条件即执行,不满足条件即跳过的任务
#this is when test
- hosts: all
#可以用主机的IP地址也可以使用组名
  remote_user: root
  tasks:
   - name: test when
     debug:
       msg: '位置判断'
#相当于shell脚本中的echo。满足条件就会打印。不满足则不打印
#msg:表示输出的内容
     when: ansible_default_ipv4.address == '20.0.0.30'
playbook当中的循环
ansible有多种循环格式。with_items:循环遍历
- hosts: 20.0.0.30
  remote_user: root
  gather_facts: false
  tasks:
   - debug:
       msg: "{{ item }}"
     with_items:
      - [a,b,c,d]
      - [1,2,3,4]
#声明变量是item。playbook的内置变量,with_items,会把itme的值。遍历列表当中的a,b,c,d.
#虽然声明的列表是两个,但是with_items还是把两个列表当成整体进行遍历。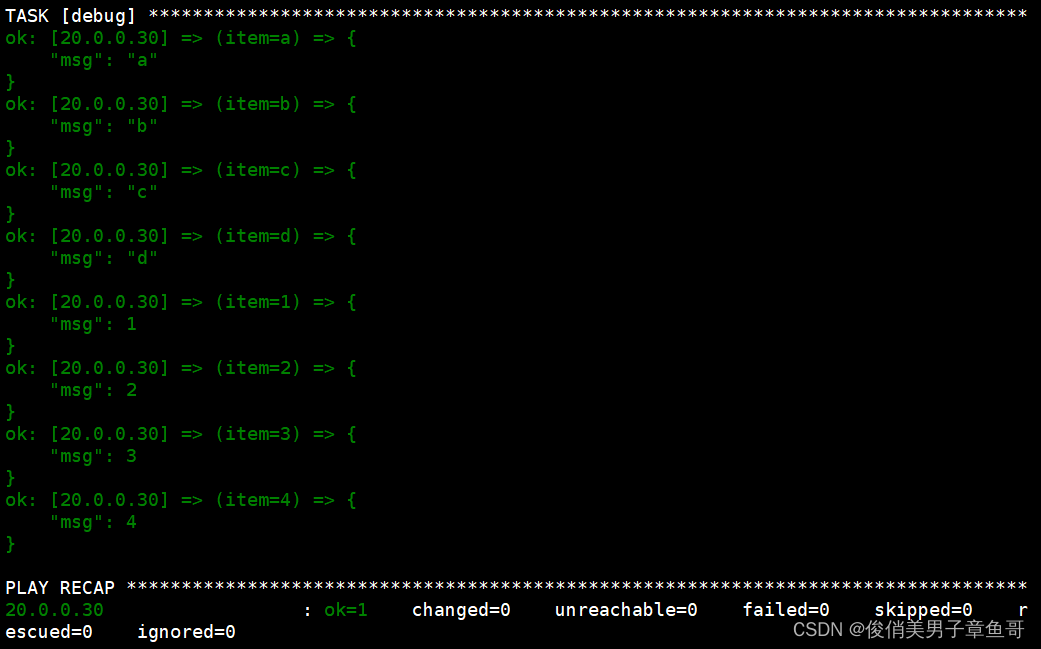
分组打印列表
- hosts: 20.0.0.30
  remote_user: root
  gather_facts: false
  tasks:
   - debug:
       msg: "{{ item }}"
     with_list:
      - [a,b,c,d]
      - [1,2,3,4]
#with_list:分组打印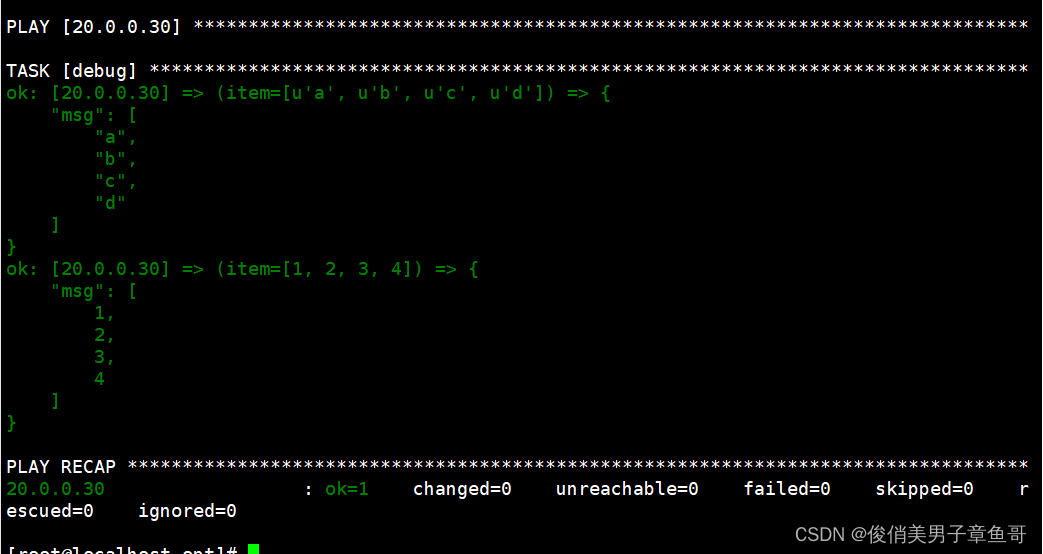
遍历循环在主机上创建目录
- hosts: 20.0.0.30
  remote_user: root
  gather_facts: false
  tasks:
   - name: create file
     file:
      path: "{{ item }}"
      state: touch
     with_items:
      - [/opt/a,/opt/b,/opt/c,/opt/d]
      - [/opt/1,/opt/2,/opt/3,/opt/4]

方法2:
- hosts: 20.0.0.30
  remote_user: root
  gather_facts: false
  tasks:
    - name: create file
      file:
        path: "{{ item }}"
        state: touch
      with_list:
        - /opt/a
        - /opt/b
        - /opt/c
        - /opt/d
        - /opt/1
        - /opt/2
        - /opt/3
        - /opt/4
同一列的数据组合输出
- hosts: 20.0.0.30
  remote_user: root
  gather_facts: false
  tasks:
   - debug:
       msg: "{{ item }}"
     with_together:
      - [a,b,c,d]
      - [1,2,3,4]
#with_together:组循环,列表当中的值一一对应,打印出来。
#适用于组合搭配
根据列表数据循环匹配
- hosts: 20.0.0.30
  remote_user: root
  gather_facts: false
  tasks:
   - debug:
       msg: "{{ item }}"
     with_nested:
      - [a,b,c,d]
      - [1,2,3,4]

#第一层:列表里面的元素定义了循环的次数
#第二层:相当于内循环
四种循环方式:
with_items
#最常用
with_list
#列表分组循环
with_together
#列表对应的列,数据结合的方式循环
with_nested
#相当于双重循环,第一层定义了循环次数,第二层表示第一层的每个元素会循环几次

#这些都是单循环
Tenplates模块
jinja模板架构,通过模板可以实现向模块文件传参(python转义),把占位符参数传到配置文件中去。
jinja的作用:生成一个目标文本文件,传递变量到需要配置文件当中。
实验架构
vim /etc/httpd/conf/httpd.conf
#配置占位符。可以理解为声明的变量
vim /etc/ansible/hosts
#配置主机的占位符名称和j2文件中的占位符一致。可以理解为定义参数:占位符的参数声明好
vim /opt/httpd.yml
#在playbook当中,使用template模块来把参数传给目标主机的配置文件。
- hosts: all
  remote_user: root
  vars:
    - package: httpd
    - service: httpd
  tasks:
    - name: install httpd
      yum: name={{package}}
    - name: install configure file
      template: src=/opt/httpd.conf.j2 dest=/etc/httpd/conf
#使用template的模板
      notify:
        - restart httpd
    - name: create root_dir
      file:
        path: /etc/httpd/htdocs
        state: directory
    - name: start httpd
      service: name={{service}} enabled=true state=started
  handlers:
    - name: restart httpd
      service: name={{service}} starte=restarted
#通过占位符,和python的转义复制到目标文件中
1、 先配置占位符。可以理解为声明的变量 2、 再配置主机的占位符名称和j2文件中的占位符一致。可以理解为定义参数:占位符的参数声明好 3、 最后在playbook当中,使用template模块来把参数传给目标主机的配置文件。
外部传参远程修改nginx的配置文件
- hosts: all
  remote_user: root
  vars:
    - package: nginx
    - service: nginx
  tasks:
    - name: install nginx
      yum: name={{package}}
    - name: install configure file
      template: src=/opt/nginx.conf.j2 dest=/etc/nginx/nginx.conf
      notify:
        - restart nginx
    - name: create root_dir
      file:
        path: /opt/nginx/html/
        state: directory
    - name: start nginx
      service: name={{service}} enabled=true state=started
  handlers:
    - name: restart nginx
      service: name={{service}} state=restarted
tags模块
标签模块:可以在playbook当中为任务设定标签。我们在运行playbook时可以通过指定任务标签,来实现只允许设定的标签任务。
-name
 tags:
   debug:
 --tags debug
 --start-at-task='wdf'
任务标签的种类
always:不管你是否制定了允许标签,任务都会执行。
never:不管是否运行了指定标签,该任务也不会执行。
debug:调试任务
setup:手机主机信息
还可以自定义标签
per_tasks:指定标签之前的任务
post_tasks:运行指定标签之后的任务
- hosts: all
  remote_user: root
  tasks:
   - name: tag debug
     debug:
       msg: "this is demo1"
     tags:
       - debug
#声明项目的名称
   - name: tag setup
     setup:
     tags:
       - setup
   - name: tag always
     debug:
       msg: "run"
     tags:
       - always
   - name: tag never
     debug:
       msg: "never run"
     tags:
       - never

ansible-playbook demo1.yml --tags="debug"
#运行指定标签debug
#如果指定标签never也可以运行
#只有always是一直在运行
Roles模块
角色模块:每个主题就是一个角色
在ansible当中,层次化,结构化的组织playbook。使用了Rolse(角色)。可以更具层次结构,自动装载变量文件,task以及handlers等等
roles:分辨把变量,文件,任务,模块以及处理器,放在单独的目录当中,使用rolse模块来一键调用这些文件。类似于Dockercompose
roles的结构图:
----web-----总目录,角色
子目录:
files:存放copy和script模块调用的文件
templates:存放j2的模板文件
tasks:包含任务的目录---子目录下---main.yml。定义角色运行的任务
handlers:包含处理器的目录--子目录下--main.yml。
vars:存放角色需要引用变量的目录--子目录下--main.yml。
defaults:包含默认变量的目录---子目录下---main.yml。
meta:包含元信息的目录---子目录下--main.yml。
site.yml:统筹调用所有的配置文件。
实验搭建:
三个服务: http mysql php
cd /etc/ansible/roles/
mkdir httpd mysql php

vim httpd/tasks/main.yml
#配置httpd
- name: install httpd
  yum: name={{pkg}}
- name: start httpd
  service: enabled=true name={{svc}} state=started

vim httpd/vars/main.yml
#配置http服务的名称进行外部传参
pkg: httpd
svc: httpd

vim mysql/tasks/main.yml
- name: install mysql
  yum: name={{pkg}}
- name: start mysql
  service: enabled=true name={{svc}} state=started

vim mysql/vars/main.yml
pkg:
  - mariadb
  - mariadb-server
svc: mariadb

vim php/tasks/main.yml
- name: install php
  yum: name={{pkg}}
- name: start php-fpm
  service: enabled=true name={{svc}} state=started

vim php/vars/main.yml
pkg:
  - php
  - php-fpm
svc: php-fpm

vim sit.yml
#定义总控制
- hosts: 20.0.0.20
  remote_user: root
  roles:
    - httpd
    - mysql
    - php


