1.Yum仓库搭建
1.1本地Yum仓库图解
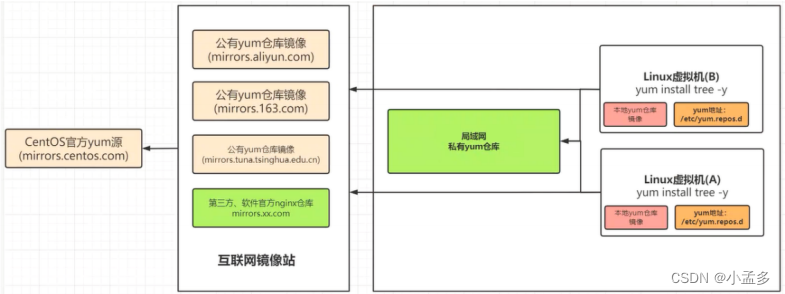 1.2Linux本地仓库搭建
配置本地光盘镜像仓库
1)挂载
[root@hadoop101 ~]# mount -t iso996 /dev/cdrom/mnt
2)查看
[rooot@hadoop101 ~] # df -h | |grep -i mnt
/dev/sr0 4.6G 4.4G
3)让现有的Yum源配置失效
[rooot@hadoop101 ~] # # gzip /etc/yum.repos.d/*
4)配置本地光盘源
[rooot@hadoop101 ~] # vim /etc/yum.d/CentOs-Cdrom.repo
[CentOs-Cdrom]
name=Local Yum
baseurl=file:///mnt
enable=1
gpgcheck=0
温馨提示:
如果把/mnt/Packages/ 里面的 rpm 包拷贝到 /var/www/html/Packages/下,需要 createrepo ./ 一下
参数解析
| [cdrom] | 仓库名称 |
| name | 仓库描述信息 |
| baseurl | Yum源url地址 |
| enabled | 是否使用该Yum源(0代表禁用,1代表激活) |
| gpgcheck | 是否验证软件签名(0代表禁用,1代表激活) |
5)清楚Yum缓存
[rooot@hadoop101 ~] # yum clean all
6) 生成元数据缓存
[rooot@hadoop101 ~] # yum makeche
7)列出可用的Yum仓库
[rooot@hadoop101 ~] # yum repolist
8)安装软件
[rooot@hadoop101 ~] # yum install -y tree
温馨提示:通过yum-config-manager 命令添加本地仓库,但是需要安装yum-utils工具
[rooot@hadoop101 ~] # yum install -y yum-utils
[rooot@hadoop101 ~] # yum-config-manager --add-repo="file:///mnt"
1.3Linux局域网私有Yum仓库
1.3.1服务端环境准备
1)关闭防火墙
[rooot@hadoop101 ~] # systemctl stop firewalld
2)禁用防火墙
[rooot@hadoop101 ~] # systemctl disable firewalld
3)查看防火墙
[rooot@hadoop101 ~] # systemctl status firewalld
4)临时关闭SELinux安全策略
[rooot@hadoop101 ~] # setenforce 0
5)永久关闭 SELinux安全策略
[rooot@hadoop101 ~] # sed -i 's#SELINUX=enforcing#SELINUX=disable#g' /etc/selinux/config
6)查看SELinux安全策略
[rooot@hadoop101 ~] # getenforce
1.3.2 使用什么传输协议提供仓库
1)http
安装
[rooot@hadoop101 ~] # yum install httpd -y
启动
[rooot@hadoop101 ~] # systemctl start httpd
查看状态
[rooot@hadoop101 ~] # systemctl status httpd
拷贝 rpm 包
[rooot@hadoop101 ~] # cd /var/www/html/
[rooot@hadoop101 html] # cp -r /mnt/Packsges ./
创建索引
[rooot@hadoop101 html] # cd Packages/
[rooot@hadoop101 Packages] # createrepo ./
查看数量
[rooot@hadoop101 Packages] # ls -l |wc -l
4072
2) python
挂载
[rooot@hadoop101 ~] # mount -t iso9660 /dev/cdrom /mnt
mount: /dev/sr0 is write-protected, mounting read-only
进入目录
[rooot@hadoop101 /] # cd /mnt/
查看python版本
[rooot@hadoop101 mnt] # python -v
Python 2.7.5
启动python服务
[rooot@hadoop101 www] # python -m SimpleHTTPServer 80 &>/dev/null &
浏览器访问
http://192.168.2.101/

3) ftp
安装
[rooot@hadoop101 ~] # yum install vsftpd -y
默认路径
[rooot@hadoop101 ~] # cd /var/ftp/
启动服务
[rooot@hadoop101 ~] # systemctl start vsftpd
查看状态
[rooot@hadoop101 ~] # systemctl status vsftpd
设置开机自启
[rooot@hadoop101 ~] # systemctl enable vsftpd
浏览器访问
ftp://192.168.2.101/

创建目录
[rooot@hadoop101 ~] # mkdir -p /var/ftp/centos7
拷贝软件包
[rooot@hadoop101 ~] # cp -rp /mnt/Packsges/*.rpm /var/ftp/centos7
yum安装repo工具
[rooot@hadoop101 ~] # yum insatll-y createrepo
创建repo索引
[rooot@hadoop101 ~] # cd /var/ftp/centos7/
[rooot@hadoop101 centos7] # createrepo ./
安装ftp客户端
[rooot@hadoop101 ~] # yum install lftp -y
ftp 客户端访问
[rooot@hadoop101 ~] # ftp 192.168.2.101
lftp 192.168.2.101:-v ls
1.4 yum安装指定自定义源
[rooot@hadoop101 ~] # yum --disablerepo="*" --enablerepo="local" install nginx
温馨提示: --enablerepo="local" 这里说的是中括号里面的内容



![读书笔记-《数据结构与算法》-摘要6[快速排序]](https://img-blog.csdnimg.cn/direct/8560c442e2da4c4ca05bbd8861aeeaeb.png)
