第1章 Hive入门
1.1 什么是Hive
Hive:由Facebook开源用于解决海量结构化日志的数据统计。
Hive是基于Hadoop的一个数据仓库工具,可以将结构化的数据文件映射为一张表,并提供类SQL查询功能。
本质是:将HQL转化成MapReduce程序
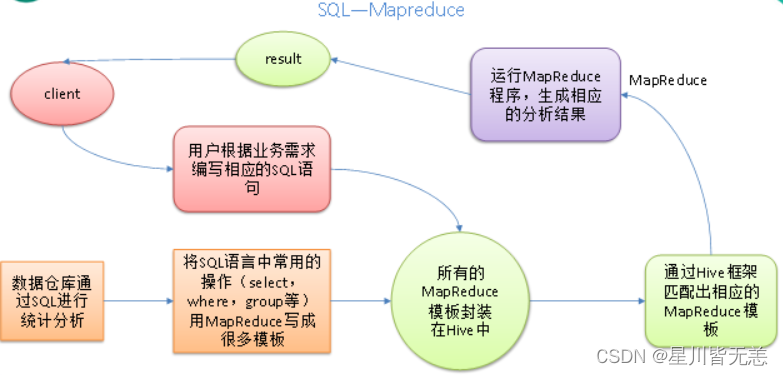
1)Hive处理的数据存储在HDFS
2)Hive分析数据底层的实现是MapReduce
3)执行程序运行在Yarn上
1.2 Hive的优缺点
1.2.1 优点
\1) 操作接口采用类SQL语法,提供快速开发的能力(简单、容易上手)。
\2) 避免了去写MapReduce,减少开发人员的学习成本。
\3) Hive的执行延迟比较高,因此Hive常用于数据分析,对实时性要求不高的场合。
\4) Hive优势在于处理大数据,对于处理小数据没有优势,因为Hive的执行延迟比较高。
\5) Hive支持用户自定义函数,用户可以根据自己的需求来实现自己的函数。
1.2.2 缺点
1.Hive的HQL表达能力有限
(1)迭代式算法无法表达
(2)数据挖掘方面不擅长
2.Hive的效率比较低
(1)Hive自动生成的MapReduce作业,通常情况下不够智能化
(2)Hive调优比较困难,粒度较粗
1.3 Hive架构原理
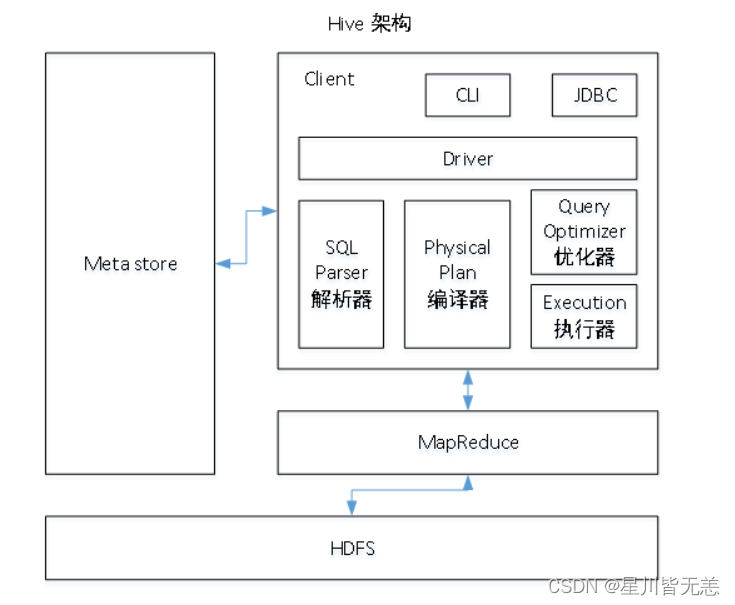
图6-1 Hive架构原理
1.用户接口:Client
CLI(hive shell)、JDBC/ODBC(java访问hive)、WEBUI(浏览器访问hive)
2.元数据:Metastore
元数据包括:表名、表所属的数据库(默认是default)、表的拥有者、列/分区字段、表的类型(是否是外部表)、表的数据所在目录等;
默认存储在自带的derby数据库中,推荐使用MySQL存储Metastore
3.Hadoop
使用HDFS进行存储,使用MapReduce进行计算。
4.驱动器:Driver
(1)解析器(SQL Parser):将SQL字符串转换成抽象语法树AST,这一步一般都用第三方工具库完成,比如antlr;对AST进行语法分析,比如表是否存在、字段是否存在、SQL语义是否有误。
(2)编译器(Physical Plan):将AST编译生成逻辑执行计划。
(3)优化器(Query Optimizer):对逻辑执行计划进行优化。
(4)执行器(Execution):把逻辑执行计划转换成可以运行的物理计划。对于Hive来说,就是MR/Spark。
Hive通过给用户提供的一系列交互接口,接收到用户的指令(SQL),使用自己的Driver,结合元数据(MetaStore),将这些指令翻译成MapReduce,提交到Hadoop中执行,最后,将执行返回的结果输出到用户交互接口。
1.4 Hive和数据库比较
由于 Hive 采用了类似SQL 的查询语言 HQL(Hive Query Language),因此很容易将 Hive 理解为数据库。其实从结构上来看,Hive 和数据库除了拥有类似的查询语言,再无类似之处。本文将从多个方面来阐述 Hive 和数据库的差异。数据库可以用在 Online 的应用中,但是Hive 是为数据仓库而设计的,清楚这一点,有助于从应用角度理解 Hive 的特性。
1.4.1 查询语言
由于SQL被广泛的应用在数据仓库中,因此,专门针对Hive的特性设计了类SQL的查询语言HQL。熟悉SQL开发的开发者可以很方便的使用Hive进行开发。
1.4.2 数据存储位置
Hive 是建立在 Hadoop 之上的,所有 Hive 的数据都是存储在 HDFS 中的。而数据库则可以将数据保存在块设备或者本地文件系统中。
1.4.3 数据更新
由于Hive是针对数据仓库应用设计的,而数据仓库的内容是读多写少的。因此,Hive中不建议对数据的改写,所有的数据都是在加载的时候确定好的。而数据库中的数据通常是需要经常进行修改的,因此可以使用 INSERT INTO … VALUES 添加数据,使用 UPDATE … SET修改数据。
1.4.4 索引
Hive在加载数据的过程中不会对数据进行任何处理,甚至不会对数据进行扫描,因此也没有对数据中的某些Key建立索引。Hive要访问数据中满足条件的特定值时,需要暴力扫描整个数据,因此访问延迟较高。由于 MapReduce 的引入, Hive 可以并行访问数据,因此即使没有索引,对于大数据量的访问,Hive 仍然可以体现出优势。数据库中,通常会针对一个或者几个列建立索引,因此对于少量的特定条件的数据的访问,数据库可以有很高的效率,较低的延迟。由于数据的访问延迟较高,决定了 Hive 不适合在线数据查询。
1.4.5 执行
Hive中大多数查询的执行是通过 Hadoop 提供的 MapReduce 来实现的。而数据库通常有自己的执行引擎。
1.4.6 执行延迟
Hive 在查询数据的时候,由于没有索引,需要扫描整个表,因此延迟较高。另外一个导致 Hive 执行延迟高的因素是 MapReduce框架。由于MapReduce 本身具有较高的延迟,因此在利用MapReduce 执行Hive查询时,也会有较高的延迟。相对的,数据库的执行延迟较低。当然,这个低是有条件的,即数据规模较小,当数据规模大到超过数据库的处理能力的时候,Hive的并行计算显然能体现出优势。
1.4.7 可扩展性
由于Hive是建立在Hadoop之上的,因此Hive的可扩展性是和Hadoop的可扩展性是一致的(世界上最大的Hadoop 集群在 Yahoo!,2009年的规模在4000 台节点左右)。而数据库由于 ACID 语义的严格限制,扩展行非常有限。目前最先进的并行数据库 Oracle 在理论上的扩展能力也只有100台左右。
1.4.8 数据规模
由于Hive建立在集群上并可以利用MapReduce进行并行计算,因此可以支持很大规模的数据;对应的,数据库可以支持的数据规模较小。
第2章 Hive安装
2.1 Hive安装地址
1.Hive官网地址
http://hive.apache.org/
2.文档查看地址
https://cwiki.apache.org/confluence/display/Hive/GettingStarted
3.下载地址
http://archive.apache.org/dist/hive/
4.github地址
https://github.com/apache/hive
2.2 Hive安装部署
1.Hive安装及配置
(1)把apache-hive-1.2.1-bin.tar.gz上传到linux的/opt/software目录下
(2)解压apache-hive-1.2.1-bin.tar.gz到/opt/module/目录下面
[atguigu@hadoop102 software]$ tar -zxvf apache-hive-1.2.1-bin.tar.gz -C /opt/module/
(3)修改apache-hive-1.2.1-bin.tar.gz的名称为hive
[atguigu@hadoop102 module]$ mv apache-hive-1.2.1-bin/ hive
(4)修改/opt/module/hive/conf目录下的hive-env.sh.template名称为hive-env.sh
[atguigu@hadoop102 conf]$ mv hive-env.sh.template hive-env.sh
(5)配置hive-env.sh文件
(a)配置HADOOP_HOME路径
export HADOOP_HOME=/opt/module/hadoop-2.7.2
(b)配置HIVE_CONF_DIR路径
export HIVE_CONF_DIR=/opt/module/hive/conf
2.Hadoop集群配置
(1)必须启动hdfs和yarn
[atguigu@hadoop102 hadoop-2.7.2]$ sbin/start-dfs.sh

[atguigu@hadoop103 hadoop-2.7.2]$ sbin/start-yarn.sh
(2)在HDFS上创建/tmp和/user/hive/warehouse两个目录并修改他们的同组权限可写
[atguigu@hadoop102 hadoop-2.7.2]$ bin/hadoop fs -mkdir /tmp

[atguigu@hadoop102 hadoop-2.7.2]$ bin/hadoop fs -mkdir -p /user/hive/warehouse


[atguigu@hadoop102 hadoop-2.7.2]$ bin/hadoop fs -chmod g+w /tmp

[atguigu@hadoop102 hadoop-2.7.2]$ bin/hadoop fs -chmod g+w /user/hive/warehouse
3.Hive基本操作
(1)启动hive
[atguigu@hadoop102 hive]$ bin/hive
(2)查看数据库
hive> show databases;
(3)打开默认数据库
hive> use default;
(4)显示default数据库中的表
hive> show tables;
(5)创建一张表
hive> create table student(id int, name string);
(6)显示数据库中有几张表
hive> show tables;
(7)查看表的结构
hive> desc student;
(8)向表中插入数据
hive> insert into student values(1000,"ss");
(9)查询表中数据
hive> select * from student;
(10)退出hive
hive> quit;
2.3 将本地文件导入Hive案例
需求
将本地/opt/module/datas/student.txt这个目录下的数据导入到hive的student(id int, name string)表中。
1.数据准备
在/opt/module/datas这个目录下准备数据
(1)在/opt/module/目录下创建datas
[atguigu@hadoop102 module]$ mkdir datas
(2)在/opt/module/datas/目录下创建student.txt文件并添加数据
[atguigu@hadoop102 datas]$ touch student.txt

[atguigu@hadoop102 datas]$ vi student.txt

1001	zhangshan

1002	lishi

1003	zhaoliu
注意以tab键间隔。
2.Hive实际操作
(1)启动hive
[atguigu@hadoop102 hive]$ bin/hive
(2)显示数据库
hive> show databases;
(3)使用default数据库
hive> use default;
(4)显示default数据库中的表
hive> show tables;
(5)删除已创建的student表
hive> drop table student;
(6)创建student表, 并声明文件分隔符’\t’
hive> create table student(id int, name string) ROW FORMAT DELIMITED FIELDS TERMINATED

 BY '\t';
(7)加载/opt/module/datas/student.txt 文件到student数据库表中。
hive> load data local inpath '/opt/module/datas/student.txt' into table student;
(8)Hive查询结果
hive> select * from student;

OK

1001	zhangshan

1002	lishi

1003	zhaoliu

Time taken: 0.266 seconds, Fetched: 3 row(s)
3.遇到的问题
再打开一个客户端窗口启动hive,会产生java.sql.SQLException异常。
Exception in thread "main" java.lang.RuntimeException: java.lang.RuntimeException:
Unable to instantiate
org.apache.hadoop.hive.ql.metadata.SessionHiveMetaStoreClient
at org.apache.hadoop.hive.ql.session.SessionState.start(SessionState.java:522)
at org.apache.hadoop.hive.cli.CliDriver.run(CliDriver.java:677)
at org.apache.hadoop.hive.cli.CliDriver.main(CliDriver.java:621)
at sun.reflect.NativeMethodAccessorImpl.invoke0(Native Method)
at sun.reflect.NativeMethodAccessorImpl.invoke(NativeMethodAccessorImpl.java:57)
at sun.reflect.DelegatingMethodAccessorImpl.invoke(DelegatingMethodAccessorImpl.java:43)
at java.lang.reflect.Method.invoke(Method.java:606)
at org.apache.hadoop.util.RunJar.run(RunJar.java:221)
at org.apache.hadoop.util.RunJar.main(RunJar.java:136)
Caused by: java.lang.RuntimeException: Unable to instantiate org.apache.hadoop.hive.ql.metadata.SessionHiveMetaStoreClient
at org.apache.hadoop.hive.metastore.MetaStoreUtils.newInstance(MetaStoreUtils.java:1523)
at org.apache.hadoop.hive.metastore.RetryingMetaStoreClient.<init>(RetryingMetaStoreClient.java:86)
at org.apache.hadoop.hive.metastore.RetryingMetaStoreClient.getProxy(RetryingMetaStoreClient.java:132)
at org.apache.hadoop.hive.metastore.RetryingMetaStoreClient.getProxy(RetryingMetaStoreClient.java:104)
at org.apache.hadoop.hive.ql.metadata.Hive.createMetaStoreClient(Hive.java:3005)
at org.apache.hadoop.hive.ql.metadata.Hive.getMSC(Hive.java:3024)
at org.apache.hadoop.hive.ql.session.SessionState.start(SessionState.java:503)
... 8 more
原因是,Metastore默认存储在自带的derby数据库中,推荐使用MySQL存储Metastore;
2.4 MySql安装
2.4.1 安装包准备
1.查看mysql是否安装,如果安装了,卸载mysql
(1)查看
[root@hadoop102 桌面]# rpm -qa|grep mysql
mysql-libs-5.1.73-7.el6.x86_64
(2)卸载
[root@hadoop102 桌面]# rpm -e --nodeps mysql-libs-5.1.73-7.el6.x86_64
2.解压mysql-libs.zip文件到当前目录
[root@hadoop102 software]# unzip mysql-libs.zip
[root@hadoop102 software]# ls
mysql-libs.zip
mysql-libs
3.进入到mysql-libs文件夹下
[root@hadoop102 mysql-libs]# ll
总用量 76048
-rw-r–r–. 1 root root 18509960 3月 26 2015 MySQL-client-5.6.24-1.el6.x86_64.rpm
-rw-r–r–. 1 root root 3575135 12月 1 2013 mysql-connector-java-5.1.27.tar.gz
-rw-r–r–. 1 root root 55782196 3月 26 2015 MySQL-server-5.6.24-1.el6.x86_64.rpm
2.4.2 安装MySql服务器
1.安装mysql服务端
[root@hadoop102 mysql-libs]# rpm -ivh MySQL-server-5.6.24-1.el6.x86_64.rpm
2.查看产生的随机密码
[root@hadoop102 mysql-libs]# cat /root/.mysql_secret
OEXaQuS8IWkG19Xs
3.查看mysql状态
[root@hadoop102 mysql-libs]# service mysql status
4.启动mysql
[root@hadoop102 mysql-libs]# service mysql start
2.4.3 安装MySql客户端
1.安装mysql客户端
[root@hadoop102 mysql-libs]# rpm -ivh MySQL-client-5.6.24-1.el6.x86_64.rpm
2.链接mysql
[root@hadoop102 mysql-libs]# mysql -uroot -pOEXaQuS8IWkG19Xs
3.修改密码
mysql>SET PASSWORD=PASSWORD(‘000000’);
4.退出mysql
mysql>exit
2.4.4 MySql中user表中主机配置
配置只要是root用户+密码,在任何主机上都能登录MySQL数据库。
1.进入mysql
[root@hadoop102 mysql-libs]# mysql -uroot -p000000
2.显示数据库
mysql>show databases;
3.使用mysql数据库
mysql>use mysql;
4.展示mysql数据库中的所有表
mysql>show tables;
5.展示user表的结构
mysql>desc user;
6.查询user表
mysql>select User, Host, Password from user;
7.修改user表,把Host表内容修改为%
mysql>update user set host=‘%’ where host=‘localhost’;
8.删除root用户的其他host
mysql>delete from user where Host=‘hadoop102’;
mysql>delete from user where Host=‘127.0.0.1’;
mysql>delete from user where Host=‘::1’;
9.刷新
mysql>flush privileges;
10.退出
mysql>quit;
2.5 Hive元数据配置到MySql
2.5.1 驱动拷贝
1.在/opt/software/mysql-libs目录下解压mysql-connector-java-5.1.27.tar.gz驱动包
[root@hadoop102 mysql-libs]# tar -zxvf mysql-connector-java-5.1.27.tar.gz
2.拷贝/opt/software/mysql-libs/mysql-connector-java-5.1.27目录下的mysql-connector-java-5.1.27-bin.jar到/opt/module/hive/lib/
[root@hadoop102 mysql-connector-java-5.1.27]# cp mysql-connector-java-5.1.27-bin.jar
/opt/module/hive/lib/
2.5.2 配置Metastore到MySql
1.在/opt/module/hive/conf目录下创建一个hive-site.xml
[atguigu@hadoop102 conf]$ touch hive-site.xml
[atguigu@hadoop102 conf]$ vi hive-site.xml
2.根据官方文档配置参数,拷贝数据到hive-site.xml文件中
https://cwiki.apache.org/confluence/display/Hive/AdminManual+MetastoreAdmin
<?xml version="1.0"?>
<?xml-stylesheet type="text/xsl" href="configuration.xsl"?>
<configuration>
<property>
<name>javax.jdo.option.ConnectionURL</name>
<value>jdbc:mysql://hadoop102:3306/metastore?createDatabaseIfNotExist=true</value>
<description>JDBC connect string for a JDBC metastore</description>
</property>
<property>
<name>javax.jdo.option.ConnectionDriverName</name>
<value>com.mysql.jdbc.Driver</value>
<description>Driver class name for a JDBC metastore</description>
</property>
<property>
<name>javax.jdo.option.ConnectionUserName</name>
<value>root</value>
<description>username to use against metastore database</description>
</property>
<property>
<name>javax.jdo.option.ConnectionPassword</name>
<value>000000</value>
<description>password to use against metastore database</description>
</property>
</configuration>
3.配置完毕后,如果启动hive异常,可以重新启动虚拟机。(重启后,别忘了启动hadoop集群)
2.5.3 多窗口启动Hive测试
1.先启动MySQL
[atguigu@hadoop102 mysql-libs]$ mysql -uroot -p000000
查看有几个数据库
mysql> show databases;
±-------------------+
| Database |
±-------------------+
| information_schema |
| mysql |
| performance_schema |
| test |
±-------------------+
2.再次打开多个窗口,分别启动hive
[atguigu@hadoop102 hive]$ bin/hive
3.启动hive后,回到MySQL窗口查看数据库,显示增加了metastore数据库
mysql> show databases;
±-------------------+
| Database |
±-------------------+
| information_schema |
| metastore |
| mysql |
| performance_schema |
| test |
±-------------------+
2**.6** HiveJDBC访问
2**.6.1** 启动hiveserver2服务
[atguigu@hadoop102 hive]$ bin/hiveserver2
2**.6.2** 启动beeline
[atguigu@hadoop102 hive]$ bin/beeline
Beeline version 1.2.1 by Apache Hive
beeline>
2**.6.3** 连接hiveserver****2
beeline> !connect jdbc:hive2://hadoop102:10000(回车)
Connecting to jdbc:hive2://hadoop102:10000
Enter username for jdbc:hive2://hadoop102:10000: atguigu(回车)
Enter password for jdbc:hive2://hadoop102:10000: (直接回车)
Connected to: Apache Hive (version 1.2.1)
Driver: Hive JDBC (version 1.2.1)
Transaction isolation: TRANSACTION_REPEATABLE_READ
0: jdbc:hive2://hadoop102:10000> show databases;
±---------------±-+
| database_name |
±---------------±-+
| default |
| hive_db2 |
±---------------±-+
2.7 Hive常用交互命令
[atguigu@hadoop102 hive]$ bin/hive -helpusage: hive -d,--define <key=value> Variable subsitution to apply to hive commands. e.g. -d A=B or --define A=B --database <databasename> Specify the database to use -e <quoted-query-string> SQL from command line -f <filename> SQL from files -H,--help Print help information --hiveconf <property=value> Use value for given property --hivevar <key=value> Variable subsitution to apply to hive commands. e.g. --hivevar A=B -i <filename> Initialization SQL file -S,--silent Silent mode in interactive shell -v,--verbose Verbose mode (echo executed SQL to the console)
1.“-e”不进入hive的交互窗口执行sql语句
[atguigu@hadoop102 hive]$ bin/hive -e “select id from student;”
2.“-f”执行脚本中sql语句
(1)在/opt/module/datas目录下创建hivef.sql文件
[atguigu@hadoop102 datas]$ touch hivef.sql
文件中写入正确的sql语句
select *from student;
(2)执行文件中的sql语句
[atguigu@hadoop102 hive]$ bin/hive -f /opt/module/datas/hivef.sql
(3)执行文件中的sql语句并将结果写入文件中
[atguigu@hadoop102 hive]$ bin/hive -f /opt/module/datas/hivef.sql > /opt/module/datas/hive_result.txt
2.8 Hive其他命令操作
1.退出hive窗口:
hive(default)>exit;
hive(default)>quit;
在新版的hive中没区别了,在以前的版本是有的:
exit:先隐性提交数据,再退出;
quit:不提交数据,退出;
2.在hive cli命令窗口中如何查看hdfs文件系统
hive(default)>dfs -ls /;
3.在hive cli命令窗口中如何查看本地文件系统
hive(default)>! ls /opt/module/datas;
4.查看在hive中输入的所有历史命令
(1)进入到当前用户的根目录/root或/home/atguigu
(2)查看. hivehistory文件
[atguigu@hadoop102 ~]$ cat .hivehistory
2.9 Hive常见属性配置
2.9.1 Hive数据仓库位置配置
1)Default数据仓库的最原始位置是在hdfs上的:/user/hive/warehouse路径下。
2)在仓库目录下,没有对默认的数据库default创建文件夹。如果某张表属于default数据库,直接在数据仓库目录下创建一个文件夹。
3)修改default数据仓库原始位置(将hive-default.xml.template如下配置信息拷贝到hive-site.xml文件中)。
hive.metastore.warehouse.dir/user/hive/warehouselocation of default database for the warehouse
配置同组用户有执行权限
bin/hdfs dfs -chmod g+w /user/hive/warehouse
2.9.2 查询后信息显示配置
1)在hive-site.xml文件中添加如下配置信息,就可以实现显示当前数据库,以及查询表的头信息配置。
hive.cli.print.header
true
hive.cli.print.current.db
true
2)重新启动hive,对比配置前后差异。
(1)配置前,如图6-2所示

图6-2 配置前
(2)配置后,如图6-3所示

图6-3 配置后
2.9.3 Hive运行日志信息配置
1.Hive的log默认存放在/tmp/atguigu/hive.log目录下(当前用户名下)
2.修改hive的log存放日志到/opt/module/hive/logs
(1)修改/opt/module/hive/conf/hive-log4j.properties.template文件名称为
hive-log4j.properties
[atguigu@hadoop102 conf]$ pwd
/opt/module/hive/conf
[atguigu@hadoop102 conf]$ mv hive-log4j.properties.template hive-log4j.properties
(2)在hive-log4j.properties文件中修改log存放位置
hive.log.dir=/opt/module/hive/logs
2.9.4 参数配置方式
1.查看当前所有的配置信息
hive>set;
2.参数的配置三种方式
(1)配置文件方式
默认配置文件:hive-default.xml
用户自定义配置文件:hive-site.xml
注意:用户自定义配置会覆盖默认配置。另外,Hive也会读入Hadoop的配置,因为Hive是作为Hadoop的客户端启动的,Hive的配置会覆盖Hadoop的配置。配置文件的设定对本机启动的所有Hive进程都有效。
(2)命令行参数方式
启动Hive时,可以在命令行添加-hiveconf param=value来设定参数。
例如:
[atguigu@hadoop103 hive]$ bin/hive -hiveconf mapred.reduce.tasks=10;
注意:仅对本次hive启动有效
查看参数设置:
hive (default)> set mapred.reduce.tasks;
(3)参数声明方式
可以在HQL中使用SET关键字设定参数
例如:
hive (default)> set mapred.reduce.tasks=100;
注意:仅对本次hive启动有效。
查看参数设置
hive (default)> set mapred.reduce.tasks;
上述三种设定方式的优先级依次递增。即配置文件<命令行参数<参数声明。注意某些系统级的参数,例如log4j相关的设定,必须用前两种方式设定,因为那些参数的读取在会话建立以前已经完成了。
第3章 Hive数据类型
3.1 基本数据类型
表6-1
| Hive数据类型 | Java数据类型 | 长度 | 例子 |
|---|---|---|---|
| TINYINT | byte | 1byte有符号整数 | 20 |
| SMALINT | short | 2byte有符号整数 | 20 |
| INT | int | 4byte有符号整数 | 20 |
| BIGINT | long | 8byte有符号整数 | 20 |
| BOOLEAN | boolean | 布尔类型,true或者false | TRUE FALSE |
| FLOAT | float | 单精度浮点数 | 3.14159 |
| DOUBLE | double | 双精度浮点数 | 3.14159 |
| STRING | string | 字符系列。可以指定字符集。可以使用单引号或者双引号。 | ‘now is the time’ “for all good men” |
| TIMESTAMP | 时间类型 | ||
| BINARY | 字节数组 |
对于Hive的String类型相当于数据库的varchar类型,该类型是一个可变的字符串,不过它不能声明其中最多能存储多少个字符,理论上它可以存储2GB的字符数。
3.2 集合数据类型
表6-2
| 数据类型 | 描述 | 语法示例 |
|---|---|---|
| STRUCT | 和c语言中的struct类似,都可以通过“点”符号访问元素内容。例如,如果某个列的数据类型是STRUCT{first STRING, last STRING},那么第1个元素可以通过字段.first来引用。 | struct() |
| MAP | MAP是一组键-值对元组集合,使用数组表示法可以访问数据。例如,如果某个列的数据类型是MAP,其中键->值对是’first’->’John’和’last’->’Doe’,那么可以通过字段名[‘last’]获取最后一个元素 | map() |
| ARRAY | 数组是一组具有相同类型和名称的变量的集合。这些变量称为数组的元素,每个数组元素都有一个编号,编号从零开始。例如,数组值为[‘John’, ‘Doe’],那么第2个元素可以通过数组名[1]进行引用。 | Array() |
Hive有三种复杂数据类型ARRAY、MAP 和 STRUCT。ARRAY和MAP与Java中的Array和Map类似,而STRUCT与C语言中的Struct类似,它封装了一个命名字段集合,复杂数据类型允许任意层次的嵌套。
案例实操
1) 假设某表有如下一行,我们用JSON格式来表示其数据结构。在Hive下访问的格式为
{ “name”: “songsong”, “friends”: [“bingbing” , “lili”] , //列表Array, “children”: { //键值Map, “xiao song”: 18 , “xiaoxiao song”: 19 } “address”: { //结构Struct, “street”: “hui long guan” , “city”: “beijing” }}
2)基于上述数据结构,我们在Hive里创建对应的表,并导入数据。
创建本地测试文件test.txt
songsong,bingbing_lili,xiao song:18_xiaoxiao song:19,hui long guan_beijingyangyang,caicai_susu,xiao yang:18_xiaoxiao yang:19,chao yang_beijing
注意:MAP,STRUCT和ARRAY里的元素间关系都可以用同一个字符表示,这里用“_”。
3)Hive上创建测试表test
create table test(name string,friends array,children map<string, int>,address struct<street:string, city:string>)row format delimited fields terminated by ','collection items terminated by '_'map keys terminated by ':'lines terminated by ‘\n’;
字段解释:
row format delimited fields terminated by ‘,’ – 列分隔符
collection items terminated by ‘_’ --MAP STRUCT 和 ARRAY 的分隔符(数据分割符号)
map keys terminated by ‘:’ – MAP中的key与value的分隔符
lines terminated by ‘\n’; – 行分隔符
4)导入文本数据到测试表
hive (default)> load data local inpath ‘/opt/module/datas/test.txt’into table test
5)访问三种集合列里的数据,以下分别是ARRAY,MAP,STRUCT的访问方式
hive (default)> select friends[1],children[‘xiao song’],address.city from testwhere name=“songsong”;OK_c0 _c1 citylili 18 beijingTime taken: 0.076 seconds, Fetched: 1 row(s)
3.3 类型转化
Hive的原子数据类型是可以进行隐式转换的,类似于Java的类型转换,例如某表达式使用INT类型,TINYINT会自动转换为INT类型,但是Hive不会进行反向转化,例如,某表达式使用TINYINT类型,INT不会自动转换为TINYINT类型,它会返回错误,除非使用CAST操作。
1.隐式类型转换规则如下
(1)任何整数类型都可以隐式地转换为一个范围更广的类型,如TINYINT可以转换成INT,INT可以转换成BIGINT。
(2)所有整数类型、FLOAT和STRING类型都可以隐式地转换成DOUBLE。
(3)TINYINT、SMALLINT、INT都可以转换为FLOAT。
(4)BOOLEAN类型不可以转换为任何其它的类型。
2.可以使用CAST操作显示进行数据类型转换
例如CAST(‘1’ AS INT)将把字符串’1’ 转换成整数1;如果强制类型转换失败,如执行CAST(‘X’ AS INT),表达式返回空值 NULL。
第4章 DDL数据定义
4.1 创建数据库
1)创建一个数据库,数据库在HDFS上的默认存储路径是/user/hive/warehouse/*.db。
hive (default)> create database db_hive;
2)避免要创建的数据库已经存在错误,增加if not exists判断。(标准写法)
hive (default)> create database db_hive;FAILED: Execution Error, return code 1 from org.apache.hadoop.hive.ql.exec.DDLTask. Database db_hive already existshive (default)> create database if not exists db_hive;
3)创建一个数据库,指定数据库在HDFS上存放的位置
hive (default)> create database db_hive2 location ‘/db_hive2.db’;

图6-4 数据库存放位置
4.2 查询数据库
4.2.1 显示数据库
1.显示数据库
hive> show databases;
2.过滤显示查询的数据库
hive> show databases like ‘db_hive*’;
OK
db_hive
db_hive_1
4.2.2 查看数据库详情
1.显示数据库信息
hive> desc database db_hive;
OK
db_hive hdfs://hadoop102:9000/user/hive/warehouse/db_hive.db atguiguUSER
2.显示数据库详细信息,extended
hive> desc database extended db_hive;
OK
db_hive hdfs://hadoop102:9000/user/hive/warehouse/db_hive.db atguiguUSER
40.3.3 切换当前数据库
hive (default)> use db_hive;
4.3.3 切换当前数据库
hive (default)> use db_hive;
4.3 修改数据库
用户可以使用ALTER DATABASE命令为某个数据库的DBPROPERTIES设置键-值对属性值,来描述这个数据库的属性信息。数据库的其他元数据信息都是不可更改的,包括数据库名和数据库所在的目录位置。
hive (default)> alter database db_hive set dbproperties(‘createtime’=‘20170830’);
在hive中查看修改结果
hive> desc database extended db_hive;
db_name comment location owner_name owner_type parameters
db_hive hdfs://hadoop102:8020/user/hive/warehouse/db_hive.db atguigu USER {createtime=20170830}
4.4 删除数据库
1.删除空数据库
hive>drop database db_hive2;
2.如果删除的数据库不存在,最好采用 if exists判断数据库是否存在
hive> drop database db_hive;
FAILED: SemanticException [Error 10072]: Database does not exist: db_hive
hive> drop database if exists db_hive2;
3.如果数据库不为空,可以采用cascade命令,强制删除
hive> drop database db_hive;
FAILED: Execution Error, return code 1 from org.apache.hadoop.hive.ql.exec.DDLTask. InvalidOperationException(message:Database db_hive is not empty. One or more tables exist.)
hive> drop database db_hive cascade;
4.5 创建表
1.建表语法
CREATE [EXTERNAL] TABLE [IF NOT EXISTS] table_name
[(col_name data_type [COMMENT col_comment], …)]
[COMMENT table_comment]
[PARTITIONED BY (col_name data_type [COMMENT col_comment], …)]
[CLUSTERED BY (col_name, col_name, …)
[SORTED BY (col_name [ASC|DESC], …)] INTO num_buckets BUCKETS]
[ROW FORMAT row_format]
[STORED AS file_format]
[LOCATION hdfs_path]
2.字段解释说明
(1)CREATE TABLE 创建一个指定名字的表。如果相同名字的表已经存在,则抛出异常;用户可以用 IF NOT EXISTS 选项来忽略这个异常。
(2)EXTERNAL关键字可以让用户创建一个外部表,在建表的同时指定一个指向实际数据的路径(LOCATION),Hive创建内部表时,会将数据移动到数据仓库指向的路径;若创建外部表,仅记录数据所在的路径,不对数据的位置做任何改变。在删除表的时候,内部表的元数据和数据会被一起删除,而外部表只删除元数据,不删除数据。
(3)COMMENT:为表和列添加注释。
(4)PARTITIONED BY创建分区表
(5)CLUSTERED BY创建分桶表
(6)SORTED BY不常用
(7)ROW FORMAT
DELIMITED [FIELDS TERMINATED BY char] [COLLECTION ITEMS TERMINATED BY char]
[MAP KEYS TERMINATED BY char] [LINES TERMINATED BY char]
| SERDE serde_name [WITH SERDEPROPERTIES (property_name=property_value, property_name=property_value, …)]
用户在建表的时候可以自定义SerDe或者使用自带的SerDe。如果没有指定ROW FORMAT 或者ROW FORMAT DELIMITED,将会使用自带的SerDe。在建表的时候,用户还需要为表指定列,用户在指定表的列的同时也会指定自定义的SerDe,Hive通过SerDe确定表的具体的列的数据。
SerDe是Serialize/Deserilize的简称,目的是用于序列化和反序列化。
(8)STORED AS指定存储文件类型
常用的存储文件类型:SEQUENCEFILE(二进制序列文件)、TEXTFILE(文本)、RCFILE(列式存储格式文件)
如果文件数据是纯文本,可以使用STORED AS TEXTFILE。如果数据需要压缩,使用 STORED AS SEQUENCEFILE。
(9)LOCATION :指定表在HDFS上的存储位置。
(10)LIKE允许用户复制现有的表结构,但是不复制数据。
4.5.1 管理表
1.理论
默认创建的表都是所谓的管理表,有时也被称为内部表。因为这种表,Hive会(或多或少地)控制着数据的生命周期。Hive默认情况下会将这些表的数据存储在由配置项hive.metastore.warehouse.dir(例如,/user/hive/warehouse)所定义的目录的子目录下。 当我们删除一个管理表时,Hive也会删除这个表中数据。管理表不适合和其他工具共享数据。
2.案例实操
(1)普通创建表
create table if not exists student2(id int, name string)row format delimited fields terminated by '\t’stored as textfilelocation ‘/user/hive/warehouse/student2’;
(2)根据查询结果创建表(查询的结果会添加到新创建的表中)
create table if not exists student3 as select id, name from student;
(3)根据已经存在的表结构创建表
create table if not exists student4 like student;
(4)查询表的类型
hive (default)> desc formatted student2;
Table Type: MANAGED_TABLE
4.5.2 外部表
1.理论
因为表是外部表,所以Hive并非认为其完全拥有这份数据。删除该表并不会删除掉这份数据,不过描述表的元数据信息会被删除掉。
2.管理表和外部表的使用场景
每天将收集到的网站日志定期流入HDFS文本文件。在外部表(原始日志表)的基础上做大量的统计分析,用到的中间表、结果表使用内部表存储,数据通过SELECT+INSERT进入内部表。
3.案例实操
分别创建部门和员工外部表,并向表中导入数据。
(1)原始数据

(2)建表语句
创建部门表
create external table if not exists default.dept(deptno int,dname string,loc int)row format delimited fields terminated by ‘\t’;
创建员工表
create external table if not exists default.emp(empno int,ename string,job string,mgr int,hiredate string, sal double, comm double,deptno int)row format delimited fields terminated by ‘\t’;
(3)查看创建的表
hive (default)> show tables;
OK
tab_name
dept
emp
(4)向外部表中导入数据
导入数据
hive (default)> load data local inpath ‘/opt/module/datas/dept.txt’ into table default.dept;
hive (default)> load data local inpath ‘/opt/module/datas/emp.txt’ into table default.emp;
查询结果
hive (default)> select * from emp;
hive (default)> select * from dept;
(5)查看表格式化数据
hive (default)> desc formatted dept;
Table Type: EXTERNAL_TABLE
4**.5.3** 管理表与外部表的互相转换
(1)查询表的类型
hive (default)> desc formatted student2;
Table Type: MANAGED_TABLE
(2)修改内部表student2为外部表
alter table student2 set tblproperties(‘EXTERNAL’=‘TRUE’);
(3)查询表的类型
hive (default)> desc formatted student2;
Table Type: EXTERNAL_TABLE
(4)修改外部表student2为内部表
alter table student2 set tblproperties(‘EXTERNAL’=‘FALSE’);
(5)查询表的类型
hive (default)> desc formatted student2;
Table Type: MANAGED_TABLE
注意:(‘EXTERNAL’=‘TRUE’)和(‘EXTERNAL’=‘FALSE’)为固定写法,区分大小写!
4.6 分区表
分区表实际上就是对应一个HDFS文件系统上的独立的文件夹,该文件夹下是该分区所有的数据文件。Hive中的分区就是分目录,把一个大的数据集根据业务需要分割成小的数据集。在查询时通过WHERE子句中的表达式选择查询所需要的指定的分区,这样的查询效率会提高很多。
4.6.1 分区表基本操作
1.引入分区表(需要根据日期对日志进行管理)
/user/hive/warehouse/log_partition/20170702/20170702.log
/user/hive/warehouse/log_partition/20170703/20170703.log
/user/hive/warehouse/log_partition/20170704/20170704.log
2.创建分区表语法
hive (default)> create table dept_partition(deptno int, dname string, loc string)partitioned by (month string)row format delimited fields terminated by ‘\t’;
3.加载数据到分区表中
hive (default)> load data local inpath ‘/opt/module/datas/dept.txt’ into table default.dept_partition partition(month=‘201709’);
hive (default)> load data local inpath ‘/opt/module/datas/dept.txt’ into table default.dept_partition partition(month=‘201708’);
hive (default)> load data local inpath ‘/opt/module/datas/dept.txt’ into table default.dept_partition partition(month='201707’);

图6-5 加载数据到分区表

图6-6 分区表
4.查询分区表中数据
单分区查询
hive (default)> select * from dept_partition where month=‘201709’;
多分区联合查询
hive (default)> select * from dept_partition where month=‘201709’
union
select * from dept_partition where month=‘201708’
union
select * from dept_partition where month=‘201707’;
_u3.deptno _u3.dname _u3.loc _u3.month
10 ACCOUNTING NEW YORK 201707
10 ACCOUNTING NEW YORK 201708
10 ACCOUNTING NEW YORK 201709
20 RESEARCH DALLAS 201707
20 RESEARCH DALLAS 201708
20 RESEARCH DALLAS 201709
30 SALES CHICAGO 201707
30 SALES CHICAGO 201708
30 SALES CHICAGO 201709
40 OPERATIONS BOSTON 201707
40 OPERATIONS BOSTON 201708
40 OPERATIONS BOSTON 201709
5.增加分区
创建单个分区
hive (default)> alter table dept_partition add partition(month=‘201706’) ;
同时创建多个分区
hive (default)> alter table dept_partition add partition(month=‘201705’) partition(month=‘201704’);
6.删除分区
删除单个分区
hive (default)> alter table dept_partition drop partition (month=‘201704’);
同时删除多个分区
hive (default)> alter table dept_partition drop partition (month=‘201705’), partition (month=‘201706’);
7.查看分区表有多少分区
hive> show partitions dept_partition;
8.查看分区表结构
hive> desc formatted dept_partition;
# Partition Information
# col_name data_type comment
month string
4.6.2 分区表注意事项
1.创建二级分区表
hive (default)> create table dept_partition2( deptno int, dname string, loc string ) partitioned by (month string, day string) row format delimited fields terminated by ‘\t’;
2.正常的加载数据
(1)加载数据到二级分区表中
hive (default)> load data local inpath ‘/opt/module/datas/dept.txt’ into table
default.dept_partition2 partition(month=‘201709’, day=‘13’);
(2)查询分区数据
hive (default)> select * from dept_partition2 where month=‘201709’ and day=‘13’;
3.把数据直接上传到分区目录上,让分区表和数据产生关联的三种方式
(1)方式一:上传数据后修复
上传数据
hive (default)> dfs -mkdir -p
/user/hive/warehouse/dept_partition2/month=201709/day=12;
hive (default)> dfs -put /opt/module/datas/dept.txt /user/hive/warehouse/dept_partition2/month=201709/day=12;
查询数据(查询不到刚上传的数据)
hive (default)> select * from dept_partition2 where month=‘201709’ and day=‘12’;
执行修复命令
hive> msck repair table dept_partition2;
再次查询数据
hive (default)> select * from dept_partition2 where month=‘201709’ and day=‘12’;
(2)方式二:上传数据后添加分区
上传数据
hive (default)> dfs -mkdir -p
/user/hive/warehouse/dept_partition2/month=201709/day=11;
hive (default)> dfs -put /opt/module/datas/dept.txt /user/hive/warehouse/dept_partition2/month=201709/day=11;
执行添加分区
hive (default)> alter table dept_partition2 add partition(month=‘201709’,
day=‘11’);
查询数据
hive (default)> select * from dept_partition2 where month=‘201709’ and day=‘11’;
(3)方式三:创建文件夹后load数据到分区
创建目录
hive (default)> dfs -mkdir -p
/user/hive/warehouse/dept_partition2/month=201709/day=10;
上传数据
hive (default)> load data local inpath ‘/opt/module/datas/dept.txt’ into table
dept_partition2 partition(month=‘201709’,day=‘10’);
查询数据
hive (default)> select * from dept_partition2 where month=‘201709’ and day=‘10’;
4.7 修改表
4.7.1 重命名表
1.语法
ALTER TABLE table_name RENAME TO new_table_name
2.实操案例
hive (default)> alter table dept_partition2 rename to dept_partition3;
4.7.2 增加、修改和删除表分区
详见4.6.1分区表基本操作。
4.7.3 增加/修改/替换列信息
1.语法
更新列
ALTER TABLE table_name CHANGE [COLUMN] col_old_name col_new_name column_type [COMMENT col_comment] [FIRST|AFTER column_name]
增加和替换列
ALTER TABLE table_name ADD|REPLACE COLUMNS (col_name data_type [COMMENT col_comment], …)
注:ADD是代表新增一字段,字段位置在所有列后面(partition列前),REPLACE则是表示替换表中所有字段。
2.实操案例
(1)查询表结构
hive> desc dept_partition;
(2)添加列
hive (default)> alter table dept_partition add columns(deptdesc string);
(3)查询表结构
hive> desc dept_partition;
(4)更新列
hive (default)> alter table dept_partition change column deptdesc desc int;
(5)查询表结构
hive> desc dept_partition;
(6)替换列
hive (default)> alter table dept_partition replace columns(deptno string, dname
string, loc string);
(7)查询表结构
hive> desc dept_partition;
4.8 删除表
hive (default)> drop table dept_partition;
第5章 DML数据操作
5.1 数据导入
5.1.1 向表中装载数据(Load)
1.语法
hive> load data [local] inpath ‘/opt/module/datas/student.txt’ overwrite | into table student [partition (partcol1=val1,…)];
(1)load data:表示加载数据
(2)local:表示从本地加载数据到hive表;否则从HDFS加载数据到hive表
(3)inpath:表示加载数据的路径
(4)overwrite:表示覆盖表中已有数据,否则表示追加
(5)into table:表示加载到哪张表
(6)student:表示具体的表
(7)partition:表示上传到指定分区
2.实操案例
(0)创建一张表
hive (default)> create table student(id string, name string) row format delimited fields terminated by ‘\t’;
(1)加载本地文件到hive
hive (default)> load data local inpath ‘/opt/module/datas/student.txt’ into table default.student;
(2)加载HDFS文件到hive中
上传文件到HDFS
hive (default)> dfs -put /opt/module/datas/student.txt /user/atguigu/hive;
加载HDFS上数据
hive (default)> load data inpath ‘/user/atguigu/hive/student.txt’ into table default.student;
(3)加载数据覆盖表中已有的数据
上传文件到HDFS
hive (default)> dfs -put /opt/module/datas/student.txt /user/atguigu/hive;
加载数据覆盖表中已有的数据
hive (default)> load data inpath ‘/user/atguigu/hive/student.txt’ overwrite into table default.student;
5.1.2 通过查询语句向表中插入数据(Insert)
1.创建一张分区表
hive (default)> create table student(id int, name string) partitioned by (month string) row format delimited fields terminated by ‘\t’;
2.基本插入数据
hive (default)> insert into table student partition(month=‘201709’) values(1,‘wangwu’);
3.基本模式插入(根据单张表查询结果)
hive (default)> insert overwrite table student partition(month=‘201708’)
select id, name from student where month=‘201709’;
4.多插入模式(根据多张表查询结果)
hive (default)> from student
insert overwrite table student partition(month=‘201707’)
select id, name where month=‘201709’
insert overwrite table student partition(month=‘201706’)
select id, name where month=‘201709’;
5.1.3 查询语句中创建表并加载数据(As Select)
详见4.5.1章创建表。
根据查询结果创建表(查询的结果会添加到新创建的表中)
create table if not exists student3
as select id, name from student;
5.1.4 创建表时通过Location指定加载数据路径
1.创建表,并指定在hdfs上的位置
hive (default)> create table if not exists student5(
id int, name string
)
row format delimited fields terminated by ‘\t’
location ‘/user/hive/warehouse/student5’;
2.上传数据到hdfs上
hive (default)> dfs -put /opt/module/datas/student.txt
/user/hive/warehouse/student5;
3.查询数据
hive (default)> select * from student5;
5.1.5 Import数据到指定Hive表中
注意:先用export导出后,再将数据导入。
hive (default)> import table student2 partition(month=‘201709’) from
‘/user/hive/warehouse/export/student’;
5.2 数据导出
5.2.1 Insert导出
1.将查询的结果导出到本地
hive (default)> insert overwrite local directory ‘/opt/module/datas/export/student’
select * from student;
2.将查询的结果格式化导出到本地
hive(default)>insert overwrite local directory ‘/opt/module/datas/export/student1’
ROW FORMAT DELIMITED FIELDS TERMINATED BY ‘\t’ select * from student;
3.将查询的结果导出到HDFS上(没有local)
hive (default)> insert overwrite directory ‘/user/atguigu/student2’
ROW FORMAT DELIMITED FIELDS TERMINATED BY ‘\t’
select * from student;
5.2.2 Hadoop命令导出到本地
hive (default)> dfs -get /user/hive/warehouse/student/month=201709/000000_0
/opt/module/datas/export/student3.txt;
5.2.3 Hive Shell 命令导出
基本语法:(hive -f/-e 执行语句或者脚本 > file)
[atguigu@hadoop102 hive]$ bin/hive -e ‘select * from default.student;’ >
/opt/module/datas/export/student4.txt;
5.2.4 Export导出到HDFS上
(defahiveult)> export table default.student to
‘/user/hive/warehouse/export/student’;
5.2.5 Sqoop导出
后续课程专门讲。
5.3 清除表中数据(Truncate)
注意:Truncate只能删除管理表,不能删除外部表中数据
hive (default)> truncate table student;
第6章 查询
https://cwiki.apache.org/confluence/display/Hive/LanguageManual+Select
查询语句语法:
[WITH CommonTableExpression (, CommonTableExpression)*] (Note: Only available starting with Hive 0.13.0)SELECT [ALL | DISTINCT] select_expr, select_expr, … FROM table_reference [WHERE where_condition] [GROUP BY col_list] [ORDER BY col_list] [CLUSTER BY col_list | [DISTRIBUTE BY col_list] [SORT BY col_list] ] [LIMIT number]
6.1 基本查询(Select…From)
6.1.1 全表和特定列查询
1.全表查询
hive (default)> select * from emp;
2.选择特定列查询
hive (default)> select empno, ename from emp;
注意:
(1)SQL 语言大小写不敏感。
(2)SQL 可以写在一行或者多行
(3)关键字不能被缩写也不能分行
(4)各子句一般要分行写。
(5)使用缩进提高语句的可读性。
6.1.2 列别名
1.重命名一个列
2.便于计算
3.紧跟列名,也可以在列名和别名之间加入关键字‘AS’
4.案例实操
查询名称和部门
hive (default)> select ename AS name, deptno dn from emp;
6.1.3 算术运算符
表6-3
| 运算符 | 描述 |
|---|---|
| A+B | A和B 相加 |
| A-B | A减去B |
| A*B | A和B 相乘 |
| A/B | A除以B |
| A%B | A对B取余 |
| A&B | A和B按位取与 |
| A|B | A和B按位取或 |
| A^B | A和B按位取异或 |
| ~A | A按位取反 |
案例实操
查询出所有员工的薪水后加1显示。
hive (default)> select sal +1 from emp;
6.1.4 常用函数
1.求总行数(count)
hive (default)> select count(*) cnt from emp;
2.求工资的最大值(max)
hive (default)> select max(sal) max_sal from emp;
3.求工资的最小值(min)
hive (default)> select min(sal) min_sal from emp;
4.求工资的总和(sum)
hive (default)> select sum(sal) sum_sal from emp;
5.求工资的平均值(avg)
hive (default)> select avg(sal) avg_sal from emp;
6.1.5 Limit语句
典型的查询会返回多行数据。LIMIT子句用于限制返回的行数。
hive (default)> select * from emp limit 5;
6.2 Where语句
1.使用WHERE子句,将不满足条件的行过滤掉
2.WHERE子句紧随FROM子句
3.案例实操
查询出薪水大于1000的所有员工
hive (default)> select * from emp where sal >1000;
6.2.1 比较运算符(Between/In/ Is Null)
1)下面表中描述了谓词操作符,这些操作符同样可以用于JOIN…ON和HAVING语句中。
表6-4
| 操作符 | 支持的数据类型 | 描述 |
|---|---|---|
| A=B | 基本数据类型 | 如果A等于B则返回TRUE,反之返回FALSE |
| A<=>B | 基本数据类型 | 如果A和B都为NULL,则返回TRUE,其他的和等号(=)操作符的结果一致,如果任一为NULL则结果为NULL |
| A<>B, A!=B | 基本数据类型 | A或者B为NULL则返回NULL;如果A不等于B,则返回TRUE,反之返回FALSE |
| A<B | 基本数据类型 | A或者B为NULL,则返回NULL;如果A小于B,则返回TRUE,反之返回FALSE |
| A<=B | 基本数据类型 | A或者B为NULL,则返回NULL;如果A小于等于B,则返回TRUE,反之返回FALSE |
| A>B | 基本数据类型 | A或者B为NULL,则返回NULL;如果A大于B,则返回TRUE,反之返回FALSE |
| A>=B | 基本数据类型 | A或者B为NULL,则返回NULL;如果A大于等于B,则返回TRUE,反之返回FALSE |
| A [NOT] BETWEEN B AND C | 基本数据类型 | 如果A,B或者C任一为NULL,则结果为NULL。如果A的值大于等于B而且小于或等于C,则结果为TRUE,反之为FALSE。如果使用NOT关键字则可达到相反的效果。 |
| A IS NULL | 所有数据类型 | 如果A等于NULL,则返回TRUE,反之返回FALSE |
| A IS NOT NULL | 所有数据类型 | 如果A不等于NULL,则返回TRUE,反之返回FALSE |
| IN(数值1, 数值2) | 所有数据类型 | 使用 IN运算显示列表中的值 |
| A [NOT] LIKE B | STRING 类型 | B是一个SQL下的简单正则表达式,如果A与其匹配的话,则返回TRUE;反之返回FALSE。B的表达式说明如下:‘x%’表示A必须以字母‘x’开头,‘%x’表示A必须以字母’x’结尾,而‘%x%’表示A包含有字母’x’,可以位于开头,结尾或者字符串中间。如果使用NOT关键字则可达到相反的效果。 |
| A RLIKE B, A REGEXP B | STRING 类型 | B是一个正则表达式,如果A与其匹配,则返回TRUE;反之返回FALSE。匹配使用的是JDK中的正则表达式接口实现的,因为正则也依据其中的规则。例如,正则表达式必须和整个字符串A相匹配,而不是只需与其字符串匹配。 |
2)案例实操
(1)查询出薪水等于5000的所有员工
hive (default)> select * from emp where sal =5000;
(2)查询工资在500到1000的员工信息
hive (default)> select * from emp where sal between 500 and 1000;
(3)查询comm为空的所有员工信息
hive (default)> select * from emp where comm is null;
(4)查询工资是1500或5000的员工信息
hive (default)> select * from emp where sal IN (1500, 5000);
6.2.2 Like和RLike
1)使用LIKE运算选择类似的值
2)选择条件可以包含字符或数字:
% 代表零个或多个字符(任意个字符)。
_ 代表一个字符。
3)RLIKE子句是Hive中这个功能的一个扩展,其可以通过Java的正则表达式这个更强大的语言来指定匹配条件。
4)案例实操
(1)查找以2开头薪水的员工信息
hive (default)> select * from emp where sal LIKE ‘2%’;
(2)查找第二个数值为2的薪水的员工信息
hive (default)> select * from emp where sal LIKE ‘_2%’;
(3)查找薪水中含有2的员工信息
hive (default)> select * from emp where sal RLIKE ‘[2]’;
6.2.3 逻辑运算符(And/Or/Not)
表6-5
| 操作符 | 含义 |
|---|---|
| AND | 逻辑并 |
| OR | 逻辑或 |
| NOT | 逻辑否 |
案例实操
(1)查询薪水大于1000,部门是30
hive (default)> select * from emp where sal>1000 and deptno=30;
(2)查询薪水大于1000,或者部门是30
hive (default)> select * from emp where sal>1000 or deptno=30;
(3)查询除了20部门和30部门以外的员工信息
hive (default)> select * from emp where deptno not IN(30, 20);
6.3 分组
6.3.1 Group By语句
GROUP BY语句通常会和聚合函数一起使用,按照一个或者多个列队结果进行分组,然后对每个组执行聚合操作。
案例实操:
(1)计算emp表每个部门的平均工资
hive (default)> select t.deptno, avg(t.sal) avg_sal from emp t group by t.deptno;
(2)计算emp每个部门中每个岗位的最高薪水
hive (default)> select t.deptno, t.job, max(t.sal) max_sal from emp t group by
t.deptno, t.job;
6.3.2 Having语句
1.having与where不同点
(1)where针对表中的列发挥作用,查询数据;having针对查询结果中的列发挥作用,筛选数据。
(2)where后面不能写分组函数,而having后面可以使用分组函数。
(3)having只用于group by分组统计语句。
2.案例实操
(1)求每个部门的平均薪水大于2000的部门
求每个部门的平均工资
hive (default)> select deptno, avg(sal) from emp group by deptno;
求每个部门的平均薪水大于2000的部门
hive (default)> select deptno, avg(sal) avg_sal from emp group by deptno having
avg_sal > 2000;
6.4 Join语句
6.4.1 等值Join
Hive支持通常的SQL JOIN语句,但是只支持等值连接,不支持非等值连接。
案例实操
(1)根据员工表和部门表中的部门编号相等,查询员工编号、员工名称和部门名称;
hive (default)> select e.empno, e.ename, d.deptno, d.dname from emp e join dept d
on e.deptno = d.deptno;
6.4.2 表的别名
1.好处
(1)使用别名可以简化查询。
(2)使用表名前缀可以提高执行效率。
2.案例实操
合并员工表和部门表
hive (default)> select e.empno, e.ename, d.deptno from emp e join dept d on e.deptno
= d.deptno;
6.4.3 内连接
内连接:只有进行连接的两个表中都存在与连接条件相匹配的数据才会被保留下来。
hive (default)> select e.empno, e.ename, d.deptno from emp e join dept d on e.deptno
= d.deptno;
6.4.4 左外连接
左外连接:JOIN操作符左边表中符合WHERE子句的所有记录将会被返回。
hive (default)> select e.empno, e.ename, d.deptno from emp e left join dept d on e.deptno
= d.deptno;
6.4.5 右外连接
右外连接:JOIN操作符右边表中符合WHERE子句的所有记录将会被返回。
hive (default)> select e.empno, e.ename, d.deptno from emp e right join dept d on e.deptno
= d.deptno;
6.4.6 满外连接
满外连接:将会返回所有表中符合WHERE语句条件的所有记录。如果任一表的指定字段没有符合条件的值的话,那么就使用NULL值替代。
hive (default)> select e.empno, e.ename, d.deptno from emp e full join dept d on e.deptno
= d.deptno;
6.4.7 多表连接
注意:连接 n个表,至少需要n-1个连接条件。例如:连接三个表,至少需要两个连接条件。
数据准备

1.创建位置表
create table if not exists default.location(loc int,loc_name string)row format delimited fields terminated by ‘\t’;
2.导入数据
hive (default)> load data local inpath ‘/opt/module/datas/location.txt’ into table default.location;
3.多表连接查询
hive (default)>SELECT e.ename, d.deptno, l. loc_name
FROM emp e
JOIN dept d
ON d.deptno = e.deptno
JOIN location l
ON d.loc = l.loc;
大多数情况下,Hive会对每对JOIN连接对象启动一个MapReduce任务。本例中会首先启动一个MapReduce job对表e和表d进行连接操作,然后会再启动一个MapReduce job将第一个MapReduce job的输出和表l;进行连接操作。
注意:为什么不是表d和表l先进行连接操作呢?这是因为Hive总是按照从左到右的顺序执行的。
6.4.8 笛卡尔积
1.笛卡尔集会在下面条件下产生
(1)省略连接条件
(2)连接条件无效
(3)所有表中的所有行互相连接
2.案例实操
hive (default)> select empno, dname from emp, dept;
6.4.9 连接谓词中不支持or
hive (default)> select e.empno, e.ename, d.deptno from emp e join dept d on e.deptno
= d.deptno or e.ename=d.ename; 错误的
6.5 排序
6.5.1 全局排序(Order By)
Order By:全局排序,一个Reducer
1.使用 ORDER BY 子句排序
ASC(ascend): 升序(默认)
DESC(descend): 降序
2.ORDER BY 子句在SELECT语句的结尾
3.案例实操
(1)查询员工信息按工资升序排列
hive (default)> select * from emp order by sal;
(2)查询员工信息按工资降序排列
hive (default)> select * from emp order by sal desc;
6.5.2 按照别名排序
按照员工薪水的2倍排序
hive (default)> select ename, sal*2 twosal from emp order by twosal;
6.5.3 多个列排序
按照部门和工资升序排序
hive (default)> select ename, deptno, sal from emp order by deptno, sal ;
6.5.4 每个MapReduce内部排序(Sort By)
Sort By:每个Reducer内部进行排序,对全局结果集来说不是排序。
1.设置reduce个数
hive (default)> set mapreduce.job.reduces=3;
2.查看设置reduce个数
hive (default)> set mapreduce.job.reduces;
3.根据部门编号降序查看员工信息
hive (default)> select * from emp sort by empno desc;
4.将查询结果导入到文件中(按照部门编号降序排序)
hive (default)> insert overwrite local directory ‘/opt/module/datas/sortby-result’
select * from emp sort by deptno desc;
6.5.5 分区排序(Distribute By)
Distribute By:类似MR中partition,进行分区,结合sort by使用。
注意,Hive要求DISTRIBUTE BY语句要写在SORT BY语句之前。
对于distribute by进行测试,一定要分配多reduce进行处理,否则无法看到distribute by的效果。
案例实操:
(1)先按照部门编号分区,再按照员工编号降序排序。
hive (default)> set mapreduce.job.reduces=3;
hive (default)> insert overwrite local directory ‘/opt/module/datas/distribute-result’ select * from emp distribute by deptno sort by empno desc;
6.5.6 Cluster By
当distribute by和sorts by字段相同时,可以使用cluster by方式。
cluster by除了具有distribute by的功能外还兼具sort by的功能。但是排序只能是升序排序,不能指定排序规则为ASC或者DESC。
1)以下两种写法等价
hive (default)> select * from emp cluster by deptno;
hive (default)> select * from emp distribute by deptno sort by deptno;
注意:按照部门编号分区,不一定就是固定死的数值,可以是20号和30号部门分到一个分区里面去。
6.6 分桶及抽样查询
6.6.1 分桶表数据存储
分区针对的是数据的存储路径;分桶针对的是数据文件。
分区提供一个隔离数据和优化查询的便利方式。不过,并非所有的数据集都可形成合理的分区,特别是之前所提到过的要确定合适的划分大小这个疑虑。
分桶是将数据集分解成更容易管理的若干部分的另一个技术。
1.先创建分桶表,通过直接导入数据文件的方式
(1)数据准备

(2)创建分桶表
create table stu_buck(id int, name string)clustered by(id) into 4 bucketsrow format delimited fields terminated by ‘\t’;
(3)查看表结构
hive (default)> desc formatted stu_buck;
Num Buckets: 4
(4)导入数据到分桶表中
hive (default)> load data local inpath ‘/opt/module/datas/student.txt’ into table
stu_buck;
(5)查看创建的分桶表中是否分成4个桶,如图6-7所示

图6-7 未分桶
发现并没有分成4个桶。是什么原因呢?
2.创建分桶表时,数据通过子查询的方式导入
(1)先建一个普通的stu表
create table stu(id int, name string)row format delimited fields terminated by ‘\t’;
(2)向普通的stu表中导入数据
load data local inpath ‘/opt/module/datas/student.txt’ into table stu;
(3)清空stu_buck表中数据
truncate table stu_buck;select * from stu_buck;
(4)导入数据到分桶表,通过子查询的方式
insert into table stu_buckselect id, name from stu;
(5)发现还是只有一个分桶,如图6-8所示

图6-8 未分桶
(6)需要设置一个属性
hive (default)> set hive.enforce.bucketing=true;hive (default)> set mapreduce.job.reduces=-1;hive (default)> insert into table stu_buckselect id, name from stu;

图6-9 分桶
(7)查询分桶的数据
hive (default)> select * from stu_buck;OKstu_buck.id stu_buck.name1004 ss41008 ss81012 ss121016 ss161001 ss11005 ss51009 ss91013 ss131002 ss21006 ss61010 ss101014 ss141003 ss31007 ss71011 ss111015 ss15
6.6.2 分桶抽样查询
对于非常大的数据集,有时用户需要使用的是一个具有代表性的查询结果而不是全部结果。Hive可以通过对表进行抽样来满足这个需求。
查询表stu_buck中的数据。
hive (default)> select * from stu_buck tablesample(bucket 1 out of 4 on id);
注:tablesample是抽样语句,语法:TABLESAMPLE(BUCKET x OUT OF y) 。
y必须是table总bucket数的倍数或者因子。hive根据y的大小,决定抽样的比例。例如,table总共分了4份,当y=2时,抽取(4/2=)2个bucket的数据,当y=8时,抽取(4/8=)1/2个bucket的数据。
x表示从哪个bucket开始抽取,如果需要取多个分区,以后的分区号为当前分区号加上y。例如,table总bucket数为4,tablesample(bucket 1 out of 2),表示总共抽取(4/2=)2个bucket的数据,抽取第1(x)个和第3(x+y)个bucket的数据。
注意:x的值必须小于等于y的值,否则
FAILED: SemanticException [Error 10061]: Numerator should not be bigger than denominator in sample clause for table stu_buck
6**.7** 其他常用查询函数
6**.7.1** 空字段赋值
\1. 函数说明
NVL:给值为NULL的数据赋值,它的格式是NVL( string1, replace_with)。它的功能是如果string1为NULL,则NVL函数返回replace_with的值,否则返回string1的值,如果两个参数都为NULL ,则返回NULL。
\2. 数据准备:采用员工表
\3. 查询:如果员工的comm为NULL,则用-1代替
hive (default)> select nvl(comm,-1) from emp;
OK
_c0
20.0
300.0
500.0
-1.0
1400.0
-1.0
-1.0
-1.0
-1.0
0.0
-1.0
-1.0
-1.0
-1.0
\4. 查询:如果员工的comm为NULL,则用领导id代替
hive (default)> select nvl(comm,mgr) from emp;
OK
_c0
20.0
300.0
500.0
7839.0
1400.0
7839.0
7839.0
7566.0
NULL
0.0
7788.0
7698.0
7566.0
6**.7.2 CASE WHEN**
\1. 数据准备
| name | dept_id | sex |
|---|---|---|
| 悟空 | A | 男 |
| 大海 | A | 男 |
| 宋宋 | B | 男 |
| 凤姐 | A | 女 |
| 婷姐 | B | 女 |
| 婷婷 | B | 女 |
2.需求
求出不同部门男女各多少人。结果如下:
A 2 1
B 1 2
3.创建本地emp_sex.txt,导入数据
[atguigu@hadoop102 datas]$ vi emp_sex.txt
悟空 A 男
大海 A 男
宋宋 B 男
凤姐 A 女
婷姐 B 女
婷婷 B 女
4.创建hive表并导入数据
create table emp_sex(
name string,
dept_id string,
sex string)
row format delimited fields terminated by “\t”;
load data local inpath ‘/opt/module/datas/emp_sex.txt’ into table emp_sex;
5.按需求查询数据
select dept_id, sum(case sex when ‘男’ then 1 else 0 end) male_count, sum(case sex when ‘女’ then 1 else 0 end) female_countfrom emp_sexgroup by dept_id;
6.7**.2** 行转列
1.相关函数说明
CONCAT(string A/col, string B/col…):返回输入字符串连接后的结果,支持任意个输入字符串;
CONCAT_WS(separator, str1, str2,…):它是一个特殊形式的 CONCAT()。第一个参数剩余参数间的分隔符。分隔符可以是与剩余参数一样的字符串。如果分隔符是 NULL,返回值也将为 NULL。这个函数会跳过分隔符参数后的任何 NULL 和空字符串。分隔符将被加到被连接的字符串之间;
COLLECT_SET(col):函数只接受基本数据类型,它的主要作用是将某字段的值进行去重汇总,产生array类型字段。
2.数据准备
表6-6 数据准备
| name | constellation | blood_type |
|---|---|---|
| 孙悟空 | 白羊座 | A |
| 大海 | 射手座 | A |
| 宋宋 | 白羊座 | B |
| 猪八戒 | 白羊座 | A |
| 凤姐 | 射手座 | A |
3.需求
把星座和血型一样的人归类到一起。结果如下:
射手座,A 大海|凤姐
白羊座,A 孙悟空|猪八戒
白羊座,B 宋宋
4.创建本地constellation.txt,导入数据
[atguigu@hadoop102 datas]$ vi constellation.txt
孙悟空 白羊座 A
大海 射手座 A
宋宋 白羊座 B
猪八戒 白羊座 A
凤姐 射手座 A
5.创建hive表并导入数据
create table person_info(
name string,
constellation string,
blood_type string)
row format delimited fields terminated by “\t”;
load data local inpath “/opt/module/datas/person_info.txt” into table person_info;
6.按需求查询数据
select t1.base, concat_ws(‘|’, collect_set(t1.name)) namefrom (select name, concat(constellation, “,”, blood_type) base from person_info) t1group by t1.base;
**6.**7.3 列转行
1.函数说明
EXPLODE(col):将hive一列中复杂的array或者map结构拆分成多行。
LATERAL VIEW
用法:LATERAL VIEW udtf(expression) tableAlias AS columnAlias
解释:用于和split, explode等UDTF一起使用,它能够将一列数据拆成多行数据,在此基础上可以对拆分后的数据进行聚合。
2.数据准备
表6-7 数据准备
| movie | category |
|---|---|
| 《疑犯追踪》 | 悬疑,动作,科幻,剧情 |
| 《Lie to me》 | 悬疑,警匪,动作,心理,剧情 |
| 《战狼2》 | 战争,动作,灾难 |
3.需求
将电影分类中的数组数据展开。结果如下:
《疑犯追踪》 悬疑
《疑犯追踪》 动作
《疑犯追踪》 科幻
《疑犯追踪》 剧情
《Lie to me》 悬疑
《Lie to me》 警匪
《Lie to me》 动作
《Lie to me》 心理
《Lie to me》 剧情
《战狼2》 战争
《战狼2》 动作
《战狼2》 灾难
4.创建本地movie.txt,导入数据
[atguigu@hadoop102 datas]$ vi movie.txt
《疑犯追踪》 悬疑,动作,科幻,剧情
《Lie to me》 悬疑,警匪,动作,心理,剧情
《战狼2》 战争,动作,灾难
5.创建hive表并导入数据
create table movie_info( movie string, category array) row format delimited fields terminated by "\t"collection items terminated by “,”; load data local inpath “/opt/module/datas/movie.txt” into table movie_info;
6.按需求查询数据
select movie, category_namefrom movie_info lateral view explode(category) table_tmp as category_name;
**6.**7.4 窗口函数
1.相关函数说明
OVER():指定分析函数工作的数据窗口大小,这个数据窗口大小可能会随着行的变而变化
CURRENT ROW:当前行
n PRECEDING:往前n行数据
n FOLLOWING:往后n行数据
UNBOUNDED:起点,UNBOUNDED PRECEDING 表示从前面的起点, UNBOUNDED FOLLOWING表示到后面的终点
LAG(col,n):往前第n行数据
LEAD(col,n):往后第n行数据
NTILE(n):把有序分区中的行分发到指定数据的组中,各个组有编号,编号从1开始,对于每一行,NTILE返回此行所属的组的编号。注意:n必须为int类型。
2.数据准备:name,orderdate,cost
jack,2017-01-01,10
tony,2017-01-02,15
jack,2017-02-03,23
tony,2017-01-04,29
jack,2017-01-05,46
jack,2017-04-06,42
tony,2017-01-07,50
jack,2017-01-08,55
mart,2017-04-08,62
mart,2017-04-09,68
neil,2017-05-10,12
mart,2017-04-11,75
neil,2017-06-12,80
mart,2017-04-13,94
3.需求
(1)查询在2017年4月份购买过的顾客及总人数
(2)查询顾客的购买明细及月购买总额
(3)上述的场景,要将cost按照日期进行累加
(4)查询顾客上次的购买时间
(5)查询前20%时间的订单信息
4.创建本地business.txt,导入数据
[atguigu@hadoop102 datas]$ vi business.txt
5.创建hive表并导入数据
create table business(name string, orderdate string,cost int) ROW FORMAT DELIMITED FIELDS TERMINATED BY ‘,’; load data local inpath “/opt/module/datas/business.txt” into table business;
6.按需求查询数据
(1)查询在2017年4月份购买过的顾客及总人数
select name,count(*) over () from business where substring(orderdate,1,7) = ‘2017-04’ group by name;
(2)查询顾客的购买明细及月购买总额
select name,orderdate,cost,sum(cost) over(partition by month(orderdate)) from business;
(3)上述的场景,要将cost按照日期进行累加
select name,orderdate,cost, sum(cost) over() as sample1,–所有行相加 sum(cost) over(partition by name) as sample2,–按name分组,组内数据相加 sum(cost) over(partition by name order by orderdate) as sample3,–按name分组,组内数据累加 sum(cost) over(partition by name order by orderdate rows between UNBOUNDED PRECEDING and current row ) as sample4 ,–和sample3一样,由起点到当前行的聚合 sum(cost) over(partition by name order by orderdate rows between 1 PRECEDING and current row) as sample5, --当前行和前面一行做聚合 sum(cost) over(partition by name order by orderdate rows between 1 PRECEDING AND 1 FOLLOWING ) as sample6,–当前行和前边一行及后面一行 sum(cost) over(partition by name order by orderdate rows between current row and UNBOUNDED FOLLOWING ) as sample7 --当前行及后面所有行 from business;
(4)查看顾客上次的购买时间
select name,orderdate,cost, lag(orderdate,1,‘1900-01-01’) over(partition by name order by orderdate ) as time1, lag(orderdate,2) over (partition by name order by orderdate) as time2 from business;
(5)查询前20%时间的订单信息
select * from ( select name,orderdate,cost, ntile(5) over(order by orderdate) sorted from business) twhere sorted = 1;
6**.7.5** Rank
1.函数说明
RANK() 排序相同时会重复,总数不会变
DENSE_RANK() 排序相同时会重复,总数会减少
ROW_NUMBER() 会根据顺序计算
2.数据准备
表6-7 数据准备
| name | subject | score |
|---|---|---|
| 孙悟空 | 语文 | 87 |
| 孙悟空 | 数学 | 95 |
| 孙悟空 | 英语 | 68 |
| 大海 | 语文 | 94 |
| 大海 | 数学 | 56 |
| 大海 | 英语 | 84 |
| 宋宋 | 语文 | 64 |
| 宋宋 | 数学 | 86 |
| 宋宋 | 英语 | 84 |
| 婷婷 | 语文 | 65 |
| 婷婷 | 数学 | 85 |
| 婷婷 | 英语 | 78 |
3.需求
计算每门学科成绩排名。
4.创建本地movie.txt,导入数据
[atguigu@hadoop102 datas]$ vi score.txt
5.创建hive表并导入数据
create table score(name string,subject string, score int) row format delimited fields terminated by “\t”;load data local inpath ‘/opt/module/datas/score.txt’ into table score;
6.按需求查询数据
select name,subject,score,rank() over(partition by subject order by score desc) rp,dense_rank() over(partition by subject order by score desc) drp,row_number() over(partition by subject order by score desc) rmpfrom score; name subject score rp drp rmp孙悟空 数学 95 1 1 1宋宋 数学 86 2 2 2婷婷 数学 85 3 3 3大海 数学 56 4 4 4宋宋 英语 84 1 1 1大海 英语 84 1 1 2婷婷 英语 78 3 2 3孙悟空 英语 68 4 3 4大海 语文 94 1 1 1孙悟空 语文 87 2 2 2婷婷 语文 65 3 3 3宋宋 语文 64 4 4 4
第7章 函数
7.1 **系统内置**函数
1.查看系统自带的函数
hive> show functions;
2.显示自带的函数的用法
hive> desc function upper;
3.详细显示自带的函数的用法
hive> desc function extended upper;
7.2 自定义函数
1)Hive 自带了一些函数,比如:max/min等,但是数量有限,自己可以通过自定义UDF来方便的扩展。
2)当Hive提供的内置函数无法满足你的业务处理需要时,此时就可以考虑使用用户自定义函数(UDF:user-defined function)。
3)根据用户自定义函数类别分为以下三种:
(1)UDF(User-Defined-Function)
一进一出
(2)UDAF(User-Defined Aggregation Function)
聚集函数,多进一出
类似于:count/max/min
(3)UDTF(User-Defined Table-Generating Functions)
一进多出
如lateral view explore()
4)官方文档地址
https://cwiki.apache.org/confluence/display/Hive/HivePlugins
5)编程步骤:
(1)继承org.apache.hadoop.hive.ql.UDF
(2)需要实现evaluate函数;evaluate函数支持重载;
(3)在hive的命令行窗口创建函数
a)添加jar
add jar linux_jar_path
b)创建function,
create [temporary] function [dbname.]function_name AS class_name;
(4)在hive的命令行窗口删除函数
Drop [temporary] function [if exists] [dbname.]function_name;
6)注意事项
(1)UDF必须要有返回类型,可以返回null,但是返回类型不能为void;
7.3 自定义UDF函数
1.创建一个Maven工程Hive
2.导入依赖
org.apache.hive hive-exec 1.2.1
3.创建一个类
package com.atguigu.hive;import org.apache.hadoop.hive.ql.exec.UDF; public class Lower extends UDF { public String evaluate (final String s) { if (s == null) { return null; } return s.toLowerCase(); }}
4.打成jar包上传到服务器/opt/module/jars/udf.jar
5.将jar包添加到hive的classpath
hive (default)> add jar /opt/module/datas/udf.jar;
6.创建临时函数与开发好的java class关联
hive (default)> create temporary function mylower as “com.atguigu.hive.Lower”;
7.即可在hql中使用自定义的函数strip
hive (default)> select ename, mylower(ename) lowername from emp;
第8章 压缩和存储
8.1 Hadoop源码编译支持Snappy压缩
8.1.1 资源准备
1.CentOS联网
配置CentOS能连接外网。Linux虚拟机ping www.baidu.com 是畅通的
注意:采用root角色编译,减少文件夹权限出现问题
2.jar包准备(hadoop源码、JDK8 、maven、protobuf)
(1)hadoop-2.7.2-src.tar.gz
(2)jdk-8u144-linux-x64.tar.gz
(3)snappy-1.1.3.tar.gz
(4)apache-maven-3.0.5-bin.tar.gz
(5)protobuf-2.5.0.tar.gz
8.1.2 jar包安装
注意:所有操作必须在root用户下完成
1.JDK解压、配置环境变量JAVA_HOME和PATH,验证java-version(如下都需要验证是否配置成功)
[root@hadoop101 software] # tar -zxf jdk-8u144-linux-x64.tar.gz -C /opt/module/
[root@hadoop101 software]# vi /etc/profile
#JAVA_HOMEexport JAVA_HOME=/opt/module/jdk1.8.0_144export PATH= P A T H : PATH: PATH:JAVA_HOME/bin
[root@hadoop101 software]#source /etc/profile
验证命令:java -version
2.Maven解压、配置 MAVEN_HOME和PATH
[root@hadoop101 software]# tar -zxvf apache-maven-3.0.5-bin.tar.gz -C /opt/module/
[root@hadoop101 apache-maven-3.0.5]# vi /etc/profile
#MAVEN_HOMEexport MAVEN_HOME=/opt/module/apache-maven-3.0.5export PATH= P A T H : PATH: PATH:MAVEN_HOME/bin
[root@hadoop101 software]#source /etc/profile
验证命令:mvn -version
8.1.3 编译源码
1.准备编译环境
[root@hadoop101 software]# yum install svn
[root@hadoop101 software]# yum install autoconf automake libtool cmake
[root@hadoop101 software]# yum install ncurses-devel
[root@hadoop101 software]# yum install openssl-devel
[root@hadoop101 software]# yum install gcc*
2.编译安装snappy
[root@hadoop101 software]# tar -zxvf snappy-1.1.3.tar.gz -C /opt/module/
[root@hadoop101 module]# cd snappy-1.1.3/
[root@hadoop101 snappy-1.1.3]# ./configure
[root@hadoop101 snappy-1.1.3]# make
[root@hadoop101 snappy-1.1.3]# make install
# 查看snappy库文件
[root@hadoop101 snappy-1.1.3]# ls -lh /usr/local/lib |grep snappy
3.编译安装protobuf
[root@hadoop101 software]# tar -zxvf protobuf-2.5.0.tar.gz -C /opt/module/
[root@hadoop101 module]# cd protobuf-2.5.0/
[root@hadoop101 protobuf-2.5.0]# ./configure
[root@hadoop101 protobuf-2.5.0]# make
[root@hadoop101 protobuf-2.5.0]# make install
# 查看protobuf版本以测试是否安装成功
[root@hadoop101 protobuf-2.5.0]# protoc --version
4.编译hadoop native
[root@hadoop101 software]# tar -zxvf hadoop-2.7.2-src.tar.gz
[root@hadoop101 software]# cd hadoop-2.7.2-src/
[root@hadoop101 software]# mvn clean package -DskipTests -Pdist,native -Dtar -Dsnappy.lib=/usr/local/lib -Dbundle.snappy
执行成功后,/opt/software/hadoop-2.7.2-src/hadoop-dist/target/hadoop-2.7.2.tar.gz即为新生成的支持snappy压缩的二进制安装包。
8.2 Hadoop压缩配置
8.2.1 MR支持的压缩编码
表6-8
| 压缩格式 | 工具 | 算法 | 文件扩展名 | 是否可切分 |
|---|---|---|---|---|
| DEFAULT | 无 | DEFAULT | .deflate | 否 |
| Gzip | gzip | DEFAULT | .gz | 否 |
| bzip2 | bzip2 | bzip2 | .bz2 | 是 |
| LZO | lzop | LZO | .lzo | 是 |
| Snappy | 无 | Snappy | .snappy | 否 |
为了支持多种压缩/解压缩算法,Hadoop引入了编码/解码器,如下表所示:
表6-9
| 压缩格式 | 对应的编码/解码器 |
|---|---|
| DEFLATE | org.apache.hadoop.io.compress.DefaultCodec |
| gzip | org.apache.hadoop.io.compress.GzipCodec |
| bzip2 | org.apache.hadoop.io.compress.BZip2Codec |
| LZO | com.hadoop.compression.lzo.LzopCodec |
| Snappy | org.apache.hadoop.io.compress.SnappyCodec |
压缩性能的比较:
表6-10
| 压缩算法 | 原始文件大小 | 压缩文件大小 | 压缩速度 | 解压速度 |
|---|---|---|---|---|
| gzip | 8.3GB | 1.8GB | 17.5MB/s | 58MB/s |
| bzip2 | 8.3GB | 1.1GB | 2.4MB/s | 9.5MB/s |
| LZO | 8.3GB | 2.9GB | 49.3MB/s | 74.6MB/s |
http://google.github.io/snappy/
On a single core of a Core i7 processor in 64-bit mode, Snappy compresses at about 250 MB/sec or more and decompresses at about 500 MB/sec or more.
8.2.2 压缩参数配置
要在Hadoop中启用压缩,可以配置如下参数(mapred-site.xml文件中):
表6-11
| 参数 | 默认值 | 阶段 | 建议 |
|---|---|---|---|
| io.compression.codecs (在core-site.xml中配置) | org.apache.hadoop.io.compress.DefaultCodec, org.apache.hadoop.io.compress.GzipCodec, org.apache.hadoop.io.compress.BZip2Codec,org.apache.hadoop.io.compress.Lz4Codec | 输入压缩 | Hadoop使用文件扩展名判断是否支持某种编解码器 |
| mapreduce.map.output.compress | false | mapper输出 | 这个参数设为true启用压缩 |
| mapreduce.map.output.compress.codec | org.apache.hadoop.io.compress.DefaultCodec | mapper输出 | 使用LZO、LZ4或snappy编解码器在此阶段压缩数据 |
| mapreduce.output.fileoutputformat.compress | false | reducer输出 | 这个参数设为true启用压缩 |
| mapreduce.output.fileoutputformat.compress.codec | org.apache.hadoop.io.compress. DefaultCodec | reducer输出 | 使用标准工具或者编解码器,如gzip和bzip2 |
| mapreduce.output.fileoutputformat.compress.type | RECORD | reducer输出 | SequenceFile输出使用的压缩类型:NONE和BLOCK |
8.3 开启Map输出阶段压缩
开启map输出阶段压缩可以减少job中map和Reduce task间数据传输量。具体配置如下:
案例实操:
1.开启hive中间传输数据压缩功能
hive (default)>set hive.exec.compress.intermediate=true;
2.开启mapreduce中map输出压缩功能
hive (default)>set mapreduce.map.output.compress=true;
3.设置mapreduce中map输出数据的压缩方式
hive (default)>set mapreduce.map.output.compress.codec=
org.apache.hadoop.io.compress.SnappyCodec;
4.执行查询语句
hive (default)> select count(ename) name from emp;
8.4 开启Reduce输出阶段压缩
当Hive将输出写入到表中时,输出内容同样可以进行压缩。属性hive.exec.compress.output控制着这个功能。用户可能需要保持默认设置文件中的默认值false,这样默认的输出就是非压缩的纯文本文件了。用户可以通过在查询语句或执行脚本中设置这个值为true,来开启输出结果压缩功能。
案例实操:
1.开启hive最终输出数据压缩功能
hive (default)>set hive.exec.compress.output=true;
2.开启mapreduce最终输出数据压缩
hive (default)>set mapreduce.output.fileoutputformat.compress=true;
3.设置mapreduce最终数据输出压缩方式
hive (default)> set mapreduce.output.fileoutputformat.compress.codec =
org.apache.hadoop.io.compress.SnappyCodec;
4.设置mapreduce最终数据输出压缩为块压缩
hive (default)> set mapreduce.output.fileoutputformat.compress.type=BLOCK;
5.测试一下输出结果是否是压缩文件
hive (default)> insert overwrite local directory
‘/opt/module/datas/distribute-result’ select * from emp distribute by deptno sort by empno desc;
8.5 文件存储格式
Hive支持的存储数的格式主要有:TEXTFILE 、SEQUENCEFILE、ORC、PARQUET。
8.5.1 列式存储和行式存储
图6-10 列式存储和行式存储

如图6-10所示左边为逻辑表,右边第一个为行式存储,第二个为列式存储。
1.行存储的特点
查询满足条件的一整行数据的时候,列存储则需要去每个聚集的字段找到对应的每个列的值,行存储只需要找到其中一个值,其余的值都在相邻地方,所以此时行存储查询的速度更快。
2.列存储的特点
因为每个字段的数据聚集存储,在查询只需要少数几个字段的时候,能大大减少读取的数据量;每个字段的数据类型一定是相同的,列式存储可以针对性的设计更好的设计压缩算法。
TEXTFILE和SEQUENCEFILE的存储格式都是基于行存储的;
ORC和PARQUET是基于列式存储的。
8.5.2 TextFile格式
默认格式,数据不做压缩,磁盘开销大,数据解析开销大。可结合Gzip、Bzip2使用,但使用Gzip这种方式,hive不会对数据进行切分,从而无法对数据进行并行操作。
8.5.3 Orc格式
Orc (Optimized Row Columnar)是Hive 0.11版里引入的新的存储格式。
如图6-11所示可以看到每个Orc文件由1个或多个stripe组成,每个stripe250MB大小,这个Stripe实际相当于RowGroup概念,不过大小由4MB->250MB,这样应该能提升顺序读的吞吐率。每个Stripe里有三部分组成,分别是Index Data,Row Data,Stripe Footer:
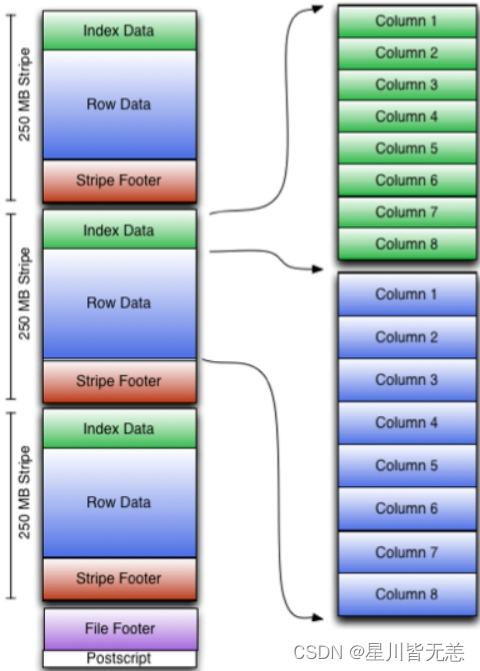
图6-11 Orc格式
1)Index Data:一个轻量级的index,默认是每隔1W行做一个索引。这里做的索引应该只是记录某行的各字段在Row Data中的offset。

2)Row Data:存的是具体的数据,先取部分行,然后对这些行按列进行存储。对每个列进行了编码,分成多个Stream来存储。
3)Stripe Footer:存的是各个Stream的类型,长度等信息。
每个文件有一个File Footer,这里面存的是每个Stripe的行数,每个Column的数据类型信息等;每个文件的尾部是一个PostScript,这里面记录了整个文件的压缩类型以及FileFooter的长度信息等。在读取文件时,会seek到文件尾部读PostScript,从里面解析到File Footer长度,再读FileFooter,从里面解析到各个Stripe信息,再读各个Stripe,即从后往前读。
8.5.4 Parquet格式
Parquet是面向分析型业务的列式存储格式,由Twitter和Cloudera合作开发,2015年5月从Apache的孵化器里毕业成为Apache顶级项目。
Parquet文件是以二进制方式存储的,所以是不可以直接读取的,文件中包括该文件的数据和元数据,因此Parquet格式文件是自解析的。
通常情况下,在存储Parquet数据的时候会按照Block大小设置行组的大小,由于一般情况下每一个Mapper任务处理数据的最小单位是一个Block,这样可以把每一个行组由一个Mapper任务处理,增大任务执行并行度。Parquet文件的格式如图6-12所示。

图6-12 Parquet格式
上图展示了一个Parquet文件的内容,一个文件中可以存储多个行组,文件的首位都是该文件的Magic Code,用于校验它是否是一个Parquet文件,Footer length记录了文件元数据的大小,通过该值和文件长度可以计算出元数据的偏移量,文件的元数据中包括每一个行组的元数据信息和该文件存储数据的Schema信息。除了文件中每一个行组的元数据,每一页的开始都会存储该页的元数据,在Parquet中,有三种类型的页:数据页、字典页和索引页。数据页用于存储当前行组中该列的值,字典页存储该列值的编码字典,每一个列块中最多包含一个字典页,索引页用来存储当前行组下该列的索引,目前Parquet中还不支持索引页。
8.5.5 主流文件存储格式对比实验
从存储文件的压缩比和查询速度两个角度对比。
存储文件的压缩比测试:
\1. 测试数据

2.TextFile
(1)创建表,存储数据格式为TEXTFILE
create table log_text (track_time string,url string,session_id string,referer string,ip string,end_user_id string,city_id string)row format delimited fields terminated by '\t’stored as textfile ;
(2)向表中加载数据
hive (default)> load data local inpath ‘/opt/module/datas/log.data’ into table log_text ;
(3)查看表中数据大小
hive (default)> dfs -du -h /user/hive/warehouse/log_text;
18.1 M /user/hive/warehouse/log_text/log.data
3.ORC
(1)创建表,存储数据格式为ORC
create table log_orc(track_time string,url string,session_id string,referer string,ip string,end_user_id string,city_id string)row format delimited fields terminated by '\t’stored as orc ;
(2)向表中加载数据
hive (default)> insert into table log_orc select * from log_text ;
(3)查看表中数据大小
hive (default)> dfs -du -h /user/hive/warehouse/log_orc/ ;
2.8 M /user/hive/warehouse/log_orc/000000_0
4.Parquet
(1)创建表,存储数据格式为parquet
create table log_parquet(track_time string,url string,session_id string,referer string,ip string,end_user_id string,city_id string)row format delimited fields terminated by '\t’stored as parquet ;
(2)向表中加载数据
hive (default)> insert into table log_parquet select * from log_text ;
(3)查看表中数据大小
hive (default)> dfs -du -h /user/hive/warehouse/log_parquet/ ;
13.1 M /user/hive/warehouse/log_parquet/000000_0
存储文件的压缩比总结:
ORC > Parquet > textFile
存储文件的查询速度测试:
1.TextFile
hive (default)> select count(*) from log_text;
_c0
100000
Time taken: 21.54 seconds, Fetched: 1 row(s)
Time taken: 21.08 seconds, Fetched: 1 row(s)
Time taken: 19.298 seconds, Fetched: 1 row(s)
2.ORC
hive (default)> select count(*) from log_orc;
_c0
100000
Time taken: 20.867 seconds, Fetched: 1 row(s)
Time taken: 22.667 seconds, Fetched: 1 row(s)
Time taken: 18.36 seconds, Fetched: 1 row(s)
3.Parquet
hive (default)> select count(*) from log_parquet;
_c0
100000
Time taken: 22.922 seconds, Fetched: 1 row(s)
Time taken: 21.074 seconds, Fetched: 1 row(s)
Time taken: 18.384 seconds, Fetched: 1 row(s)
存储文件的查询速度总结:查询速度相近。
8.6 存储和压缩结合
8.6.1 修改Hadoop集群****具有Snappy压缩方式
1.查看hadoop checknative命令使用
[atguigu@hadoop104 hadoop-2.7.2]$ hadoop
checknative [-a|-h] check native hadoop and compression libraries availability
2.查看hadoop支持的压缩方式
[atguigu@hadoop104 hadoop-2.7.2]$ hadoop checknative
17/12/24 20:32:52 WARN bzip2.Bzip2Factory: Failed to load/initialize native-bzip2 library system-native, will use pure-Java version
17/12/24 20:32:52 INFO zlib.ZlibFactory: Successfully loaded & initialized native-zlib library
Native library checking:
hadoop: true /opt/module/hadoop-2.7.2/lib/native/libhadoop.so
zlib: true /lib64/libz.so.1
snappy: false
lz4: true revision:99
bzip2: false
3.将编译好的支持Snappy压缩的hadoop-2.7.2.tar.gz包导入到hadoop102的/opt/software中
4.解压hadoop-2.7.2.tar.gz到当前路径
[atguigu@hadoop102 software]$ tar -zxvf hadoop-2.7.2.tar.gz
5.进入到/opt/software/hadoop-2.7.2/lib/native路径可以看到支持Snappy压缩的动态链接库
[atguigu@hadoop102 native]$ pwd
/opt/software/hadoop-2.7.2/lib/native
[atguigu@hadoop102 native]$ ll
-rw-r–r–. 1 atguigu atguigu 472950 9月 1 10:19 libsnappy.a
-rwxr-xr-x. 1 atguigu atguigu 955 9月 1 10:19 libsnappy.la
lrwxrwxrwx. 1 atguigu atguigu 18 12月 24 20:39 libsnappy.so -> libsnappy.so.1.3.0
lrwxrwxrwx. 1 atguigu atguigu 18 12月 24 20:39 libsnappy.so.1 -> libsnappy.so.1.3.0
-rwxr-xr-x. 1 atguigu atguigu 228177 9月 1 10:19 libsnappy.so.1.3.0
6.拷贝/opt/software/hadoop-2.7.2/lib/native里面的所有内容到开发集群的/opt/module/hadoop-2.7.2/lib/native路径上
[atguigu@hadoop102 native]$ cp …/native/* /opt/module/hadoop-2.7.2/lib/native/
7.分发集群
[atguigu@hadoop102 lib]$ xsync native/
8.再次查看hadoop支持的压缩类型
[atguigu@hadoop102 hadoop-2.7.2]$ hadoop checknative
17/12/24 20:45:02 WARN bzip2.Bzip2Factory: Failed to load/initialize native-bzip2 library system-native, will use pure-Java version
17/12/24 20:45:02 INFO zlib.ZlibFactory: Successfully loaded & initialized native-zlib library
Native library checking:
hadoop: true /opt/module/hadoop-2.7.2/lib/native/libhadoop.so
zlib: true /lib64/libz.so.1
snappy: true /opt/module/hadoop-2.7.2/lib/native/libsnappy.so.1
lz4: true revision:99
bzip2: false
9.重新启动hadoop集群和hive
8.6.2 测试****存储和压缩
官网:https://cwiki.apache.org/confluence/display/Hive/LanguageManual+ORC
ORC存储方式的压缩:
表6-12
| Key | Default | Notes |
|---|---|---|
| orc.compress | ZLIB | high level compression (one of NONE, ZLIB, SNAPPY) |
| orc.compress.size | 262,144 | number of bytes in each compression chunk |
| orc.stripe.size | 67,108,864 | number of bytes in each stripe |
| orc.row.index.stride | 10,000 | number of rows between index entries (must be >= 1000) |
| orc.create.index | true | whether to create row indexes |
| orc.bloom.filter.columns | “” | comma separated list of column names for which bloom filter should be created |
| orc.bloom.filter.fpp | 0.05 | false positive probability for bloom filter (must >0.0 and <1.0) |
1.创建一个非压缩的的ORC存储方式
(1)建表语句
create table log_orc_none(track_time string,url string,session_id string,referer string,ip string,end_user_id string,city_id string)row format delimited fields terminated by '\t’stored as orc tblproperties (“orc.compress”=“NONE”);
(2)插入数据
hive (default)> insert into table log_orc_none select * from log_text ;
(3)查看插入后数据
hive (default)> dfs -du -h /user/hive/warehouse/log_orc_none/ ;
7.7 M /user/hive/warehouse/log_orc_none/000000_0
2.创建一个SNAPPY压缩的ORC存储方式
(1)建表语句
create table log_orc_snappy(track_time string,url string,session_id string,referer string,ip string,end_user_id string,city_id string)row format delimited fields terminated by '\t’stored as orc tblproperties (“orc.compress”=“SNAPPY”);
(2)插入数据
hive (default)> insert into table log_orc_snappy select * from log_text ;
(3)查看插入后数据
hive (default)> dfs -du -h /user/hive/warehouse/log_orc_snappy/ ;
3.8 M /user/hive/warehouse/log_orc_snappy/000000_0
3.上一节中默认创建的ORC存储方式,导入数据后的大小为
2.8 M /user/hive/warehouse/log_orc/000000_0
比Snappy压缩的还小。原因是orc存储文件默认采用ZLIB压缩。比snappy压缩的小。
4.存储方式和压缩总结
在实际的项目开发当中,hive表的数据存储格式一般选择:orc或parquet。压缩方式一般选择snappy,lzo。
第9章 企业级调优
9.1 Fetch抓取
Fetch抓取是指,Hive中对某些情况的查询可以不必使用MapReduce计算。例如:SELECT * FROM employees;在这种情况下,Hive可以简单地读取employee对应的存储目录下的文件,然后输出查询结果到控制台。
在hive-default.xml.template文件中hive.fetch.task.conversion默认是more,老版本hive默认是minimal,该属性修改为more以后,在全局查找、字段查找、limit查找等都不走mapreduce。
hive.fetch.task.conversion more Expects one of [none, minimal, more]. Some select queries can be converted to single FETCH task minimizing latency. Currently the query should be single sourced not having any subquery and should not have any aggregations or distincts (which incurs RS), lateral views and joins. 0. none : disable hive.fetch.task.conversion 1. minimal : SELECT STAR, FILTER on partition columns, LIMIT only 2. more : SELECT, FILTER, LIMIT only (support TABLESAMPLE and virtual columns)
案例实操:
1)把hive.fetch.task.conversion设置成none,然后执行查询语句,都会执行mapreduce程序。
hive (default)> set hive.fetch.task.conversion=none;
hive (default)> select * from emp;
hive (default)> select ename from emp;
hive (default)> select ename from emp limit 3;
2)把hive.fetch.task.conversion设置成more,然后执行查询语句,如下查询方式都不会执行mapreduce程序。
hive (default)> set hive.fetch.task.conversion=more;
hive (default)> select * from emp;
hive (default)> select ename from emp;
hive (default)> select ename from emp limit 3;
9.2 本地模式
大多数的Hadoop Job是需要Hadoop提供的完整的可扩展性来处理大数据集的。不过,有时Hive的输入数据量是非常小的。在这种情况下,为查询触发执行任务消耗的时间可能会比实际job的执行时间要多的多。对于大多数这种情况,Hive可以通过本地模式在单台机器上处理所有的任务。对于小数据集,执行时间可以明显被缩短。
用户可以通过设置hive.exec.mode.local.auto的值为true,来让Hive在适当的时候自动启动这个优化。
set hive.exec.mode.local.auto=true; //开启本地mr//设置local mr的最大输入数据量,当输入数据量小于这个值时采用local mr的方式,默认为134217728,即128Mset hive.exec.mode.local.auto.inputbytes.max=50000000;//设置local mr的最大输入文件个数,当输入文件个数小于这个值时采用local mr的方式,默认为4set hive.exec.mode.local.auto.input.files.max=10;
案例实操:
1)开启本地模式,并执行查询语句
hive (default)> set hive.exec.mode.local.auto=true;
hive (default)> select * from emp cluster by deptno;
Time taken: 1.328 seconds, Fetched: 14 row(s)
2)关闭本地模式,并执行查询语句
hive (default)> set hive.exec.mode.local.auto=false;
hive (default)> select * from emp cluster by deptno;
Time taken: 20.09 seconds, Fetched: 14 row(s)
9.3 表的优化
9.3.1 小表、大表Join
将key相对分散,并且数据量小的表放在join的左边,这样可以有效减少内存溢出错误发生的几率;再进一步,可以使用map join让小的维度表(1000条以下的记录条数)先进内存。在map端完成reduce。
实际测试发现:新版的hive已经对小表JOIN大表和大表JOIN小表进行了优化。小表放在左边和右边已经没有明显区别。
案例实操
需求
测试大表JOIN小表和小表JOIN大表的效率
2.建大表、小表和JOIN后表的语句
// 创建大表create table bigtable(id bigint, time bigint, uid string, keyword string, url_rank int, click_num int, click_url string) row format delimited fields terminated by ‘\t’;// 创建小表create table smalltable(id bigint, time bigint, uid string, keyword string, url_rank int, click_num int, click_url string) row format delimited fields terminated by ‘\t’;// 创建join后表的语句create table jointable(id bigint, time bigint, uid string, keyword string, url_rank int, click_num int, click_url string) row format delimited fields terminated by ‘\t’;
3.分别向大表和小表中导入数据
hive (default)> load data local inpath ‘/opt/module/datas/bigtable’ into table bigtable;
hive (default)>load data local inpath ‘/opt/module/datas/smalltable’ into table smalltable;
4.关闭mapjoin功能(默认是打开的)
set hive.auto.convert.join = false;
5.执行小表JOIN大表语句
insert overwrite table jointable
select b.id, b.time, b.uid, b.keyword, b.url_rank, b.click_num, b.click_url
from smalltable s
left join bigtable b
on b.id = s.id;
Time taken: 35.921 seconds
No rows affected (44.456 seconds)
6.执行大表JOIN小表语句
insert overwrite table jointable
select b.id, b.time, b.uid, b.keyword, b.url_rank, b.click_num, b.click_url
from bigtable b
left join smalltable s
on s.id = b.id;
Time taken: 34.196 seconds
No rows affected (26.287 seconds)
9.3.2 大表Join大表
1.空KEY过滤
有时join超时是因为某些key对应的数据太多,而相同key对应的数据都会发送到相同的reducer上,从而导致内存不够。此时我们应该仔细分析这些异常的key,很多情况下,这些key对应的数据是异常数据,我们需要在SQL语句中进行过滤。例如key对应的字段为空,操作如下:
案例实操
(1)配置历史服务器
配置mapred-site.xml
mapreduce.jobhistory.addresshadoop102:10020 mapreduce.jobhistory.webapp.address hadoop102:19888
启动历史服务器
sbin/mr-jobhistory-daemon.sh start historyserver
查看jobhistory
http://hadoop102:19888/jobhistory
(2)创建原始数据表、空id表、合并后数据表
// 创建原始表create table ori(id bigint, time bigint, uid string, keyword string, url_rank int, click_num int, click_url string) row format delimited fields terminated by ‘\t’;// 创建空id表create table nullidtable(id bigint, time bigint, uid string, keyword string, url_rank int, click_num int, click_url string) row format delimited fields terminated by ‘\t’;// 创建join后表的语句create table jointable(id bigint, time bigint, uid string, keyword string, url_rank int, click_num int, click_url string) row format delimited fields terminated by ‘\t’;
(3)分别加载原始数据和空id数据到对应表中
hive (default)> load data local inpath ‘/opt/module/datas/ori’ into table ori;
hive (default)> load data local inpath ‘/opt/module/datas/nullid’ into table nullidtable;
(4)测试不过滤空id
hive (default)> insert overwrite table jointable
select n.* from nullidtable n left join ori o on n.id = o.id;
Time taken: 42.038 seconds
Time taken: 37.284 seconds
(5)测试过滤空id
hive (default)> insert overwrite table jointable
select n.* from (select * from nullidtable where id is not null ) n left join ori o on n.id = o.id;
Time taken: 31.725 seconds
Time taken: 28.876 seconds
2.空key转换
有时虽然某个key为空对应的数据很多,但是相应的数据不是异常数据,必须要包含在join的结果中,此时我们可以表a中key为空的字段赋一个随机的值,使得数据随机均匀地分不到不同的reducer上。例如:
案例实操:
不随机分布空null值:
(1)设置5个reduce个数
set mapreduce.job.reduces = 5;
(2)JOIN两张表
insert overwrite table jointable
select n.* from nullidtable n left join ori b on n.id = b.id;
**结果:****如图6-13所示,**可以看出来,出现了数据倾斜,某些reducer的资源消耗远大于其他reducer。
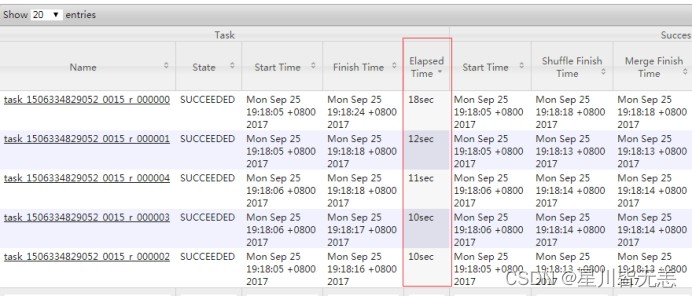
图6-13 空key转换
随机分布空null值
(1)设置5个reduce个数
set mapreduce.job.reduces = 5;
(2)JOIN两张表
insert overwrite table jointable
select n.* from nullidtable n full join ori o on
case when n.id is null then concat(‘hive’, rand()) else n.id end = o.id;
**结果:****如图6-14所示,**可以看出来,消除了数据倾斜,负载均衡reducer的资源消耗

图6-14 随机分布空值
9.3.3 MapJoin
如果不指定MapJoin或者不符合MapJoin的条件,那么Hive解析器会将Join操作转换成Common Join,即:在Reduce阶段完成join。容易发生数据倾斜。可以用MapJoin把小表全部加载到内存在map端进行join,避免reducer处理。
1.开启MapJoin参数设置
(1)设置自动选择Mapjoin
set hive.auto.convert.join = true; 默认为true
(2)大表小表的阈值设置(默认25M一下认为是小表):
set hive.mapjoin.smalltable.filesize=25000000;
2.MapJoin工作机制,如图6-15所示
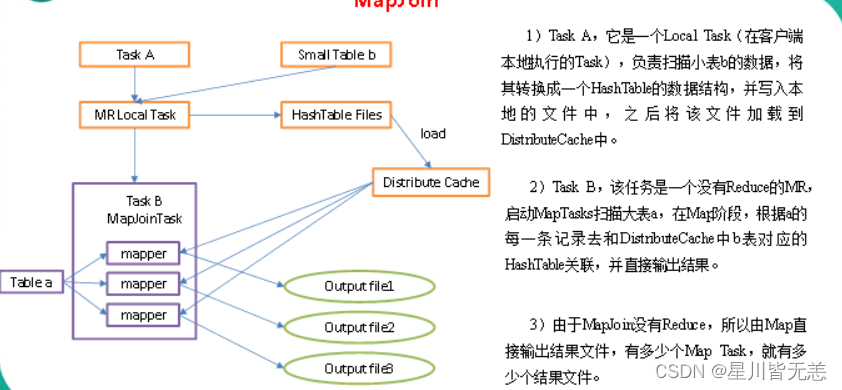
图6-15 MapJoin工作机制
案例实操:
(1)开启Mapjoin功能
set hive.auto.convert.join = true; 默认为true
(2)执行小表JOIN大表语句
insert overwrite table jointableselect b.id, b.time, b.uid, b.keyword, b.url_rank, b.click_num, b.click_urlfrom smalltable sjoin bigtable bon s.id = b.id;
Time taken: 24.594 seconds
(3)执行大表JOIN小表语句
insert overwrite table jointableselect b.id, b.time, b.uid, b.keyword, b.url_rank, b.click_num, b.click_urlfrom bigtable bjoin smalltable son s.id = b.id;
Time taken: 24.315 seconds
9.3.4 Group By
默认情况下,Map阶段同一Key数据分发给一个reduce,当一个key数据过大时就倾斜了。
并不是所有的聚合操作都需要在Reduce端完成,很多聚合操作都可以先在Map端进行部分聚合,最后在Reduce端得出最终结果。
1.开启Map端聚合参数设置
(1)是否在Map端进行聚合,默认为True
hive.map.aggr = true
(2)在Map端进行聚合操作的条目数目
hive.groupby.mapaggr.checkinterval = 100000
(3)有数据倾斜的时候进行负载均衡(默认是false)
hive.groupby.skewindata = true
当选项设定为 true,生成的查询计划会有两个MR Job。第一个MR Job中,Map的输出结果会随机分布到Reduce中,每个Reduce做部分聚合操作,并输出结果,这样处理的结果是相同的Group By Key有可能被分发到不同的Reduce中,从而达到负载均衡的目的;第二个MR Job再根据预处理的数据结果按照Group By Key分布到Reduce中(这个过程可以保证相同的Group By Key被分布到同一个Reduce中),最后完成最终的聚合操作。
9.3.5 Count(Distinct) 去重统计
数据量小的时候无所谓,数据量大的情况下,由于COUNT DISTINCT操作需要用一个Reduce Task来完成,这一个Reduce需要处理的数据量太大,就会导致整个Job很难完成,一般COUNT DISTINCT使用先GROUP BY再COUNT的方式替换:
案例实操
1. 创建一张大表
hive (default)> create table bigtable(id bigint, time bigint, uid string, keyword
string, url_rank int, click_num int, click_url string) row format delimited
fields terminated by ‘\t’;
2.加载数据
hive (default)> load data local inpath ‘/opt/module/datas/bigtable’ into table
bigtable;
3.设置5个reduce个数
set mapreduce.job.reduces = 5;
4.执行去重id查询
hive (default)> select count(distinct id) from bigtable;
Stage-Stage-1: Map: 1 Reduce: 1 Cumulative CPU: 7.12 sec HDFS Read: 120741990 HDFS Write: 7 SUCCESS
Total MapReduce CPU Time Spent: 7 seconds 120 msec
OK
c0
100001
Time taken: 23.607 seconds, Fetched: 1 row(s)
5.采用GROUP by去重id
hive (default)> select count(id) from (select id from bigtable group by id) a;

Stage-Stage-1: Map: 1  Reduce: 5  Cumulative CPU: 17.53 sec  HDFS Read: 120752703 HDFS Write: 580 SUCCESS

Stage-Stage-2: Map: 1  Reduce: 1  Cumulative CPU: 4.29 sec  HDFS Read: 9409 HDFS Write: 7 SUCCESS

Total MapReduce CPU Time Spent: 21 seconds 820 msec

OK

_c0

100001

Time taken: 50.795 seconds, Fetched: 1 row(s)
虽然会多用一个Job来完成,但在数据量大的情况下,这个绝对是值得的。
9.3.6 笛卡尔积
尽量避免笛卡尔积,join的时候不加on条件,或者无效的on条件,Hive只能使用1个reducer来完成笛卡尔积。
9.3.7 行列过滤
列处理:在SELECT中,只拿需要的列,如果有,尽量使用分区过滤,少用SELECT *。
行处理:在分区剪裁中,当使用外关联时,如果将副表的过滤条件写在Where后面,那么就会先全表关联,之后再过滤,比如:
案例实操:
1.测试先关联两张表,再用where条件过滤
hive (default)> select o.id from bigtable b

join ori o on o.id = b.id

where o.id <= 10;

Time taken: 34.406 seconds, Fetched: 100 row(s)
2.通过子查询后,再关联表
hive (default)> select b.id from bigtable b

join (select id from ori where id <= 10 ) o on b.id = o.id;

Time taken: 30.058 seconds, Fetched: 100 row(s)
9.3.8 动态分区调整
关系型数据库中,对分区表Insert数据时候,数据库自动会根据分区字段的值,将数据插入到相应的分区中,Hive中也提供了类似的机制,即动态分区(Dynamic Partition),只不过,使用Hive的动态分区,需要进行相应的配置。
1.开启动态分区参数设置
(1)开启动态分区功能(默认true,开启)
hive.exec.dynamic.partition=true
(2)设置为非严格模式(动态分区的模式,默认strict,表示必须指定至少一个分区为静态分区,nonstrict模式表示允许所有的分区字段都可以使用动态分区。)
hive.exec.dynamic.partition.mode=nonstrict
(3)在所有执行MR的节点上,最大一共可以创建多少个动态分区。
hive.exec.max.dynamic.partitions=1000
(4)在每个执行MR的节点上,最大可以创建多少个动态分区。该参数需要根据实际的数据来设定。比如:源数据中包含了一年的数据,即day字段有365个值,那么该参数就需要设置成大于365,如果使用默认值100,则会报错。
hive.exec.max.dynamic.partitions.pernode=100
(5)整个MR Job中,最大可以创建多少个HDFS文件。
hive.exec.max.created.files=100000
(6)当有空分区生成时,是否抛出异常。一般不需要设置。
hive.error.on.empty.partition=false
2.案例实操
需求:将ori中的数据按照时间(如:20111230000008),插入到目标表ori_partitioned_target的相应分区中。
(1)创建分区表
create table ori_partitioned(id bigint, time bigint, uid string, keyword string, url_rank int, click_num int, click_url string) partitioned by (p_time bigint) row format delimited fields terminated by '\t';
(2)加载数据到分区表中
hive (default)> load data local inpath '/home/atguigu/ds1' into table ori_partitioned partition(p_time='20111230000010') ;hive (default)> load data local inpath '/home/atguigu/ds2' into table ori_partitioned partition(p_time='20111230000011') ;
(3)创建目标分区表
create table ori_partitioned_target(id bigint, time bigint, uid string, keyword string, url_rank int, click_num int, click_url string) PARTITIONED BY (p_time STRING) row format delimited fields terminated by '\t';
(4)设置动态分区
set hive.exec.dynamic.partition = true;set hive.exec.dynamic.partition.mode = nonstrict;set hive.exec.max.dynamic.partitions = 1000;set hive.exec.max.dynamic.partitions.pernode = 100;set hive.exec.max.created.files = 100000;set hive.error.on.empty.partition = false; hive (default)> insert overwrite table ori_partitioned_target partition (p_time) select id, time, uid, keyword, url_rank, click_num, click_url, p_time from ori_partitioned;
(5)查看目标分区表的分区情况
hive (default)> show partitions ori_partitioned_target;
9.3.9 分桶
详见6.6章。
9.3.10 分区
详见4.6章。
9.4 数据倾斜
9.4.1 合理设置Map数
1)通常情况下,作业会通过input的目录产生一个或者多个map任务。
主要的决定因素有:input的文件总个数,input的文件大小,集群设置的文件块大小。
2)是不是map数越多越好?
答案是否定的。如果一个任务有很多小文件(远远小于块大小128m),则每个小文件也会被当做一个块,用一个map任务来完成,而一个map任务启动和初始化的时间远远大于逻辑处理的时间,就会造成很大的资源浪费。而且,同时可执行的map数是受限的。
3)是不是保证每个map处理接近128m的文件块,就高枕无忧了?
答案也是不一定。比如有一个127m的文件,正常会用一个map去完成,但这个文件只有一个或者两个小字段,却有几千万的记录,如果map处理的逻辑比较复杂,用一个map任务去做,肯定也比较耗时。
针对上面的问题2和3,我们需要采取两种方式来解决:即减少map数和增加map数;
9.4.2 小文件进行合并
在map执行前合并小文件,减少map数:CombineHiveInputFormat具有对小文件进行合并的功能(系统默认的格式)。HiveInputFormat没有对小文件合并功能。
set hive.input.format= org.apache.hadoop.hive.ql.io.CombineHiveInputFormat;
9.4.3 复杂文件增加Map数
当input的文件都很大,任务逻辑复杂,map执行非常慢的时候,可以考虑增加Map数,来使得每个map处理的数据量减少,从而提高任务的执行效率。
增加map的方法为:根据computeSliteSize(Math.max(minSize,Math.min(maxSize,blocksize)))=blocksize=128M公式,调整maxSize最大值。让maxSize最大值低于blocksize就可以增加map的个数。
案例实操:
1.执行查询
hive (default)> select count(*) from emp;

Hadoop job information for Stage-1: number of mappers: 1; number of reducers: 1
2.设置最大切片值为100个字节
hive (default)> set mapreduce.input.fileinputformat.split.maxsize=100;

hive (default)> select count(*) from emp;

Hadoop job information for Stage-1: number of mappers: 6; number of reducers: 1
9.4.4 合理设置Reduce数
1.调整reduce个数方法一
(1)每个Reduce处理的数据量默认是256MB
hive.exec.reducers.bytes.per.reducer=256000000
(2)每个任务最大的reduce数,默认为1009
hive.exec.reducers.max=1009
(3)计算reducer数的公式
N=min(参数2,总输入数据量/参数1)
2.调整reduce个数方法二
在hadoop的mapred-default.xml文件中修改
设置每个job的Reduce个数
set mapreduce.job.reduces = 15;
3.reduce个数并不是越多越好
1)过多的启动和初始化reduce也会消耗时间和资源;
2)另外,有多少个reduce,就会有多少个输出文件,如果生成了很多个小文件,那么如果这些小文件作为下一个任务的输入,则也会出现小文件过多的问题;
在设置reduce个数的时候也需要考虑这两个原则:处理大数据量利用合适的reduce数;使单个reduce任务处理数据量大小要合适;
9.5 并行执行
Hive会将一个查询转化成一个或者多个阶段。这样的阶段可以是MapReduce阶段、抽样阶段、合并阶段、limit阶段。或者Hive执行过程中可能需要的其他阶段。默认情况下,Hive一次只会执行一个阶段。不过,某个特定的job可能包含众多的阶段,而这些阶段可能并非完全互相依赖的,也就是说有些阶段是可以并行执行的,这样可能使得整个job的执行时间缩短。不过,如果有更多的阶段可以并行执行,那么job可能就越快完成。
通过设置参数hive.exec.parallel值为true,就可以开启并发执行。不过,在共享集群中,需要注意下,如果job中并行阶段增多,那么集群利用率就会增加。
set hive.exec.parallel=true;        //打开任务并行执行

set hive.exec.parallel.thread.number=16;  //同一个sql允许最大并行度,默认为8。
当然,得是在系统资源比较空闲的时候才有优势,否则,没资源,并行也起不来。
9.6 严格模式
Hive提供了一个严格模式,可以防止用户执行那些可能意想不到的不好的影响的查询。
通过设置属性hive.mapred.mode值为默认是非严格模式nonstrict 。开启严格模式需要修改hive.mapred.mode值为strict,开启严格模式可以禁止3种类型的查询。
<property>
<name>hive.mapred.mode</name>
<value>strict</value>
<description>
The mode in which the Hive operations are being performed.
In strict mode, some risky queries are not allowed to run. They include:
Cartesian Product.
No partition being picked up for a query.
Comparing bigints and strings.
Comparing bigints and doubles.
Orderby without limit.
</description>
</property>
\1) 对于分区表,除非where语句中含有分区字段过滤条件来限制范围,否则不允许执行。换句话说,就是用户不允许扫描所有分区。进行这个限制的原因是,通常分区表都拥有非常大的数据集,而且数据增加迅速。没有进行分区限制的查询可能会消耗令人不可接受的巨大资源来处理这个表。
\2) 对于使用了order by语句的查询,要求必须使用limit语句。因为order by为了执行排序过程会将所有的结果数据分发到同一个Reducer中进行处理,强制要求用户增加这个LIMIT语句可以防止Reducer额外执行很长一段时间。
\3) 限制笛卡尔积的查询。对关系型数据库非常了解的用户可能期望在执行JOIN查询的时候不使用ON语句而是使用where语句,这样关系数据库的执行优化器就可以高效地将WHERE语句转化成那个ON语句。不幸的是,Hive并不会执行这种优化,因此,如果表足够大,那么这个查询就会出现不可控的情况。
9.7 JVM重用
JVM重用是Hadoop调优参数的内容,其对Hive的性能具有非常大的影响,特别是对于很难避免小文件的场景或task特别多的场景,这类场景大多数执行时间都很短。
Hadoop的默认配置通常是使用派生JVM来执行map和Reduce任务的。这时JVM的启动过程可能会造成相当大的开销,尤其是执行的job包含有成百上千task任务的情况。JVM重用可以使得JVM实例在同一个job中重新使用N次。N的值可以在Hadoop的mapred-site.xml文件中进行配置。通常在10-20之间,具体多少需要根据具体业务场景测试得出。
<property>

 <name>mapreduce.job.jvm.numtasks</name>

 <value>10</value>

 <description>How many tasks to run per jvm. If set to -1, there is

 no limit.

 </description>

</property>
这个功能的缺点是,开启JVM重用将一直占用使用到的task插槽,以便进行重用,直到任务完成后才能释放。如果某个“不平衡的”job中有某几个reduce task执行的时间要比其他Reduce task消耗的时间多的多的话,那么保留的插槽就会一直空闲着却无法被其他的job使用,直到所有的task都结束了才会释放。
9.8 推测执行
在分布式集群环境下,因为程序Bug(包括Hadoop本身的bug),负载不均衡或者资源分布不均等原因,会造成同一个作业的多个任务之间运行速度不一致,有些任务的运行速度可能明显慢于其他任务(比如一个作业的某个任务进度只有50%,而其他所有任务已经运行完毕),则这些任务会拖慢作业的整体执行进度。为了避免这种情况发生,Hadoop采用了推测执行(Speculative Execution)机制,它根据一定的法则推测出“拖后腿”的任务,并为这样的任务启动一个备份任务,让该任务与原始任务同时处理同一份数据,并最终选用最先成功运行完成任务的计算结果作为最终结果。
设置开启推测执行参数:Hadoop的mapred-site.xml文件中进行配置
<property> <name>mapreduce.map.speculative</name> <value>true</value> <description>If true, then multiple instances of some map tasks may be executed in parallel.</description></property> <property> <name>mapreduce.reduce.speculative</name> <value>true</value> <description>If true, then multiple instances of some reduce tasks may be executed in parallel.</description></property>
不过hive本身也提供了配置项来控制reduce-side的推测执行:
<property> <name>hive.mapred.reduce.tasks.speculative.execution</name> <value>true</value> <description>Whether speculative execution for reducers should be turned on. </description> </property>
关于调优这些推测执行变量,还很难给一个具体的建议。如果用户对于运行时的偏差非常敏感的话,那么可以将这些功能关闭掉。如果用户因为输入数据量很大而需要执行长时间的map或者Reduce task的话,那么启动推测执行造成的浪费是非常巨大大。
9.9 压缩
详见第8章。
9.10 执行计划(Explain)
1.基本语法
EXPLAIN [EXTENDED | DEPENDENCY | AUTHORIZATION] query
2.案例实操
(1)查看下面这条语句的执行计划
hive (default)> explain select * from emp;

hive (default)> explain select deptno, avg(sal) avg_sal from emp group by deptno;
(2)查看详细执行计划
hive (default)> explain extended select * from emp;

hive (default)> explain extended select deptno, avg(sal) avg_sal from emp group by deptno;
第10章 Hive实战****之谷粒影音
10.1 需求描述
统计硅谷影音视频网站的常规指标,各种TopN指标:
–统计视频观看数Top10
–统计视频类别热度Top10
–统计视频观看数Top20所属类别
–统计视频观看数Top50所关联视频的所属类别Rank
–统计每个类别中的视频热度Top10
–统计每个类别中视频流量Top10
–统计上传视频最多的用户Top10以及他们上传的视频
–统计每个类别视频观看数Top10
10.2 项目
10.2.1 数据结构
1.视频表
表6-13 视频表
| 字段 | 备注 | 详细描述 |
|---|---|---|
| video id | 视频唯一id | 11位字符串 |
| uploader | 视频上传者 | 上传视频的用户名String |
| age | 视频年龄 | 视频在平台上的整数天 |
| category | 视频类别 | 上传视频指定的视频分类 |
| length | 视频长度 | 整形数字标识的视频长度 |
| views | 观看次数 | 视频被浏览的次数 |
| rate | 视频评分 | 满分5分 |
| ratings | 流量 | 视频的流量,整型数字 |
| conments | 评论数 | 一个视频的整数评论数 |
| related ids | 相关视频id | 相关视频的id,最多20个 |
2.用户表
表6-14 用户表
| 字段 | 备注 | 字段类型 |
|---|---|---|
| uploader | 上传者用户名 | string |
| videos | 上传视频数 | int |
| friends | 朋友数量 | int |
10.2.2 ETL原始数据
通过观察原始数据形式,可以发现,视频可以有多个所属分类,每个所属分类用&符号分割,且分割的两边有空格字符,同时相关视频也是可以有多个元素,多个相关视频又用“\t”进行分割。为了分析数据时方便对存在多个子元素的数据进行操作,我们首先进行数据重组清洗操作。即:将所有的类别用“&”分割,同时去掉两边空格,多个相关视频id也使用“&”进行分割。
1.ETL之ETLUtil
public class ETLUtil { public static String oriString2ETLString(String ori){ StringBuilder etlString = new StringBuilder(); String[] splits = ori.split("\t"); if(splits.length < 9) return null; splits[3] = splits[3].replace(" ", ""); for(int i = 0; i < splits.length; i++){ if(i < 9){ if(i == splits.length - 1){ etlString.append(splits[i]); }else{ etlString.append(splits[i] + "\t"); } }else{ if(i == splits.length - 1){ etlString.append(splits[i]); }else{ etlString.append(splits[i] + "&"); } } } return etlString.toString(); }}
2.ETL之Mapper
import java.io.IOException; import org.apache.commons.lang.StringUtils;import org.apache.hadoop.io.NullWritable;import org.apache.hadoop.io.Text;import org.apache.hadoop.mapreduce.Mapper; import com.atguigu.util.ETLUtil; public class VideoETLMapper extends Mapper<Object, Text, NullWritable, Text>{ Text text = new Text(); @Override protected void map(Object key, Text value, Context context) throws IOException, InterruptedException { String etlString = ETLUtil.oriString2ETLString(value.toString()); if(StringUtils.isBlank(etlString)) return; text.set(etlString); context.write(NullWritable.get(), text); }}
3.ETL之Runner
import java.io.IOException; import org.apache.hadoop.conf.Configuration;import org.apache.hadoop.fs.FileSystem;import org.apache.hadoop.fs.Path;import org.apache.hadoop.io.NullWritable;import org.apache.hadoop.io.Text;import org.apache.hadoop.mapreduce.Job;import org.apache.hadoop.mapreduce.lib.input.FileInputFormat;import org.apache.hadoop.mapreduce.lib.output.FileOutputFormat;import org.apache.hadoop.util.Tool;import org.apache.hadoop.util.ToolRunner; public class VideoETLRunner implements Tool { private Configuration conf = null; @Override public void setConf(Configuration conf) { this.conf = conf; } @Override public Configuration getConf() { return this.conf; } @Override public int run(String[] args) throws Exception { conf = this.getConf(); conf.set("inpath", args[0]); conf.set("outpath", args[1]); Job job = Job.getInstance(conf); job.setJarByClass(VideoETLRunner.class); job.setMapperClass(VideoETLMapper.class); job.setMapOutputKeyClass(NullWritable.class); job.setMapOutputValueClass(Text.class); job.setNumReduceTasks(0); this.initJobInputPath(job); this.initJobOutputPath(job); return job.waitForCompletion(true) ? 0 : 1; } private void initJobOutputPath(Job job) throws IOException { Configuration conf = job.getConfiguration(); String outPathString = conf.get("outpath"); FileSystem fs = FileSystem.get(conf); Path outPath = new Path(outPathString); if(fs.exists(outPath)){ fs.delete(outPath, true); } FileOutputFormat.setOutputPath(job, outPath); } private void initJobInputPath(Job job) throws IOException { Configuration conf = job.getConfiguration(); String inPathString = conf.get("inpath"); FileSystem fs = FileSystem.get(conf); Path inPath = new Path(inPathString); if(fs.exists(inPath)){ FileInputFormat.addInputPath(job, inPath); }else{ throw new RuntimeException("HDFS中该文件目录不存在:" + inPathString); } } public static void main(String[] args) { try { int resultCode = ToolRunner.run(new VideoETLRunner(), args); if(resultCode == 0){ System.out.println("Success!"); }else{ System.out.println("Fail!"); } System.exit(resultCode); } catch (Exception e) { e.printStackTrace(); System.exit(1); } }}
4.执行ETL
$ bin/yarn jar ~/softwares/jars/gulivideo-0.0.1-SNAPSHOT.jar \com.atguigu.etl.ETLVideosRunner \/gulivideo/video/2008/0222 \/gulivideo/output/video/2008/0222
10.3 准备工作
10.3.1 创建表
创建表:gulivideo_ori,gulivideo_user_ori,
创建表:gulivideo_orc,gulivideo_user_orc
gulivideo_ori:
create table gulivideo_ori( videoId string, uploader string, age int, category array, length int, views int, rate float, ratings int, comments int, relatedId array)row format delimited fields terminated by "\t"collection items terminated by "&"stored as textfile;
gulivideo_user_ori:
create table gulivideo_user_ori( uploader string, videos int, friends int)row format delimited fields terminated by “\t” stored as textfile;
然后把原始数据插入到orc表中
gulivideo_orc:
create table gulivideo_orc( videoId string, uploader string, age int, category array, length int, views int, rate float, ratings int, comments int, relatedId array)clustered by (uploader) into 8 buckets row format delimited fields terminated by “\t” collection items terminated by “&” stored as orc;
gulivideo_user_orc:
create table gulivideo_user_orc( uploader string, videos int, friends int)row format delimited fields terminated by “\t” stored as orc;
10.3.2 导入ETL后的数据
gulivideo_ori:
load data inpath “/gulivideo/output/video/2008/0222” into table gulivideo_ori;
gulivideo_user_ori:
load data inpath “/gulivideo/user/2008/0903” into table gulivideo_user_ori;
10.3.3 向ORC表插入数据
gulivideo_orc:
insert into table gulivideo_orc select * from gulivideo_ori;
gulivideo_user_orc:
insert into table gulivideo_user_orc select * from gulivideo_user_ori;
10.4 业务分析
10.4.1 统计视频观看数Top10
思路:使用order by按照views字段做一个全局排序即可,同时我们设置只显示前10条。
最终代码:
select videoId, uploader, age, category, length, views, rate, ratings, comments from gulivideo_orc order by views desc limit 10;
10.4.2 统计视频类别热度Top10
思路:
\1) 即统计每个类别有多少个视频,显示出包含视频最多的前10个类别。
\2) 我们需要按照类别group by聚合,然后count组内的videoId个数即可。
\3) 因为当前表结构为:一个视频对应一个或多个类别。所以如果要group by类别,需要先将类别进行列转行(展开),然后再进行count即可。
\4) 最后按照热度排序,显示前10条。
最终代码:
select category_name as category, count(t1.videoId) as hot from ( select videoId, category_name from gulivideo_orc lateral view explode(category) t_catetory as category_name) t1 group by t1.category_name order by hot desc limit 10;
10.4.3 统计出视频观看数最高的20个视频的所属类别以及类别包含Top20视频的个数
思路:
\1) 先找到观看数最高的20个视频所属条目的所有信息,降序排列
\2) 把这20条信息中的category分裂出来(列转行)
\3) 最后查询视频分类名称和该分类下有多少个Top20的视频
最终代码:
select category_name as category, count(t2.videoId) as hot_with_views from ( select videoId, category_name from ( select * from gulivideo_orc order by views desc limit 20) t1 lateral view explode(category) t_catetory as category_name) t2 group by category_name order by hot_with_views desc;
10.4.4 统计视频观看数Top50所关联视频的所属类别Rank
思路:
\1) 查询出观看数最多的前50个视频的所有信息(当然包含了每个视频对应的关联视频),记为临时表t1
t1:观看数前50的视频
select * from gulivideo_orc order by views desc limit 50;
\2) 将找到的50条视频信息的相关视频relatedId列转行,记为临时表t2
t2:将相关视频的id进行列转行操作
select explode(relatedId) as videoId from t1;
\3) 将相关视频的id和gulivideo_orc表进行inner join操作
t5:得到两列数据,一列是category,一列是之前查询出来的相关视频id
(select distinct(t2.videoId), t3.category from t2inner join gulivideo_orc t3 on t2.videoId = t3.videoId) t4 lateral view explode(category) t_catetory as category_name;
\4) 按照视频类别进行分组,统计每组视频个数,然后排行
最终代码:
select category_name as category, count(t5.videoId) as hot from ( select videoId, category_name from ( select distinct(t2.videoId), t3.category from ( select explode(relatedId) as videoId from ( select * from gulivideo_orc order by views desc limit 50) t1) t2 inner join gulivideo_orc t3 on t2.videoId = t3.videoId) t4 lateral view explode(category) t_catetory as category_name) t5group by category_name order by hot desc;
10.4.5 统计每个类别中的视频热度Top10,以Music为例
思路:
\1) 要想统计Music类别中的视频热度Top10,需要先找到Music类别,那么就需要将category展开,所以可以创建一张表用于存放categoryId展开的数据。
\2) 向category展开的表中插入数据。
\3) 统计对应类别(Music)中的视频热度。
最终代码:
创建表类别表:
create table gulivideo_category( videoId string, uploader string, age int, categoryId string, length int, views int, rate float, ratings int, comments int, relatedId array<string>)row format delimited fields terminated by "\t" collection items terminated by "&" stored as orc;
向类别表中插入数据:
insert into table gulivideo_category select videoId, uploader, age, categoryId, length, views, rate, ratings, comments, relatedId from gulivideo_orc lateral view explode(category) catetory as categoryId;
统计Music类别的Top10(也可以统计其他)
select videoId, viewsfrom gulivideo_category where categoryId = "Music" order by views desc limit 10;
10.4.6 统计每个类别中视频流量Top10,以Music为例
思路:
\1) 创建视频类别展开表(categoryId列转行后的表)
\2) 按照ratings排序即可
最终代码:
select videoId, views, ratings from gulivideo_category where categoryId = "Music" order by ratings desc limit 10;
10.4.7 统计上传视频最多的用户Top10以及他们上传的观看次数在前20的视频
思路:
\1) 先找到上传视频最多的10个用户的用户信息
select * from gulivideo_user_orc order by videos desc limit 10;
\2) 通过uploader字段与gulivideo_orc表进行join,得到的信息按照views观看次数进行排序即可。
最终代码:
select t2.videoId, t2.views, t2.ratings, t1.videos, t1.friends from ( select * from gulivideo_user_orc order by videos desc limit 10) t1 join gulivideo_orc t2on t1.uploader = t2.uploader order by views desc limit 20;
10.4.8 统计每个类别视频观看数Top10
思路:
\1) 先得到categoryId展开的表数据
\2) 子查询按照categoryId进行分区,然后分区内排序,并生成递增数字,该递增数字这一列起名为rank列
\3) 通过子查询产生的临时表,查询rank值小于等于10的数据行即可。
最终代码:
select t1.* from ( select videoId, categoryId, views, row_number() over(partition by categoryId order by views desc) rank from gulivideo_category) t1 where rank <= 10;
第11章 常见错误及解决方案
1)SecureCRT 7.3出现乱码或者删除不掉数据,免安装版的SecureCRT 卸载或者用虚拟机直接操作或者换安装版的SecureCRT
2)连接不上mysql数据库
(1)导错驱动包,应该把mysql-connector-java-5.1.27-bin.jar导入/opt/module/hive/lib的不是这个包。错把mysql-connector-java-5.1.27.tar.gz导入hive/lib包下。
(2)修改user表中的主机名称没有都修改为%,而是修改为localhost
3)hive默认的输入格式处理是CombineHiveInputFormat,会对小文件进行合并。
hive (default)> set hive.input.format;

hive.input.format=org.apache.hadoop.hive.ql.io.CombineHiveInputFormat
可以采用HiveInputFormat就会根据分区数输出相应的文件。
hive (default)> set hive.input.format=org.apache.hadoop.hive.ql.io.HiveInputFormat;
4)不能执行mapreduce程序
可能是hadoop的yarn没开启。
5)启动mysql服务时,报MySQL server PID file could not be found! 异常。
在/var/lock/subsys/mysql路径下创建hadoop102.pid,并在文件中添加内容:
4396
6)报service mysql status MySQL is not running, but lock file (/var/lock/subsys/mysql[失败])异常。
解决方案:在/var/lib/mysql 目录下创建: -rw-rw----. 1 mysql mysql 5 12月 22 16:41 hadoop102.pid 文件,并修改权限为 777。
7)JVM堆内存溢出
描述:java.lang.OutOfMemoryError: Java heap space
解决:在yarn-site.xml中加入如下代码
<property>
<name>yarn.scheduler.maximum-allocation-mb</name>
<value>2048</value>
</property>
<property>
<name>yarn.scheduler.minimum-allocation-mb</name>
<value>2048</value>
</property>
<property>
<name>yarn.nodemanager.vmem-pmem-ratio</name>
<value>2.1</value>
</property>
<property>
<name>mapred.child.java.opts</name>
<value>-Xmx1024m</value>
</property>
, count(t5.videoId) as hot from ( select videoId, category_name from ( select distinct(t2.videoId), t3.category from ( select explode(relatedId) as videoId from ( select * from gulivideo_orc order by views desc limit 50) t1) t2 inner join gulivideo_orc t3 on t2.videoId = t3.videoId) t4 lateral view explode(category) t_catetory as category_name) t5group by category_name order by hot desc;
10.4.5 统计每个类别中的视频热度Top10,以Music为例
思路:
\1) 要想统计Music类别中的视频热度Top10,需要先找到Music类别,那么就需要将category展开,所以可以创建一张表用于存放categoryId展开的数据。
\2) 向category展开的表中插入数据。
\3) 统计对应类别(Music)中的视频热度。
最终代码:
创建表类别表:
create table gulivideo_category( videoId string, uploader string, age int, categoryId string, length int, views int, rate float, ratings int, comments int, relatedId array<string>)row format delimited fields terminated by "\t" collection items terminated by "&" stored as orc;
向类别表中插入数据:
insert into table gulivideo_category select videoId, uploader, age, categoryId, length, views, rate, ratings, comments, relatedId from gulivideo_orc lateral view explode(category) catetory as categoryId;
统计Music类别的Top10(也可以统计其他)
select videoId, viewsfrom gulivideo_category where categoryId = "Music" order by views desc limit 10;
10.4.6 统计每个类别中视频流量Top10,以Music为例
思路:
\1) 创建视频类别展开表(categoryId列转行后的表)
\2) 按照ratings排序即可
最终代码:
select videoId, views, ratings from gulivideo_category where categoryId = "Music" order by ratings desc limit 10;
10.4.7 统计上传视频最多的用户Top10以及他们上传的观看次数在前20的视频
思路:
\1) 先找到上传视频最多的10个用户的用户信息
select * from gulivideo_user_orc order by videos desc limit 10;
\2) 通过uploader字段与gulivideo_orc表进行join,得到的信息按照views观看次数进行排序即可。
最终代码:
select t2.videoId, t2.views, t2.ratings, t1.videos, t1.friends from ( select * from gulivideo_user_orc order by videos desc limit 10) t1 join gulivideo_orc t2on t1.uploader = t2.uploader order by views desc limit 20;
10.4.8 统计每个类别视频观看数Top10
思路:
\1) 先得到categoryId展开的表数据
\2) 子查询按照categoryId进行分区,然后分区内排序,并生成递增数字,该递增数字这一列起名为rank列
\3) 通过子查询产生的临时表,查询rank值小于等于10的数据行即可。
最终代码:
select t1.* from ( select videoId, categoryId, views, row_number() over(partition by categoryId order by views desc) rank from gulivideo_category) t1 where rank <= 10;
第11章 常见错误及解决方案
1)SecureCRT 7.3出现乱码或者删除不掉数据,免安装版的SecureCRT 卸载或者用虚拟机直接操作或者换安装版的SecureCRT
2)连接不上mysql数据库
(1)导错驱动包,应该把mysql-connector-java-5.1.27-bin.jar导入/opt/module/hive/lib的不是这个包。错把mysql-connector-java-5.1.27.tar.gz导入hive/lib包下。
(2)修改user表中的主机名称没有都修改为%,而是修改为localhost
3)hive默认的输入格式处理是CombineHiveInputFormat,会对小文件进行合并。
hive (default)> set hive.input.format;

hive.input.format=org.apache.hadoop.hive.ql.io.CombineHiveInputFormat
可以采用HiveInputFormat就会根据分区数输出相应的文件。
hive (default)> set hive.input.format=org.apache.hadoop.hive.ql.io.HiveInputFormat;
4)不能执行mapreduce程序
可能是hadoop的yarn没开启。
5)启动mysql服务时,报MySQL server PID file could not be found! 异常。
在/var/lock/subsys/mysql路径下创建hadoop102.pid,并在文件中添加内容:
4396
6)报service mysql status MySQL is not running, but lock file (/var/lock/subsys/mysql[失败])异常。
解决方案:在/var/lib/mysql 目录下创建: -rw-rw----. 1 mysql mysql 5 12月 22 16:41 hadoop102.pid 文件,并修改权限为 777。
7)JVM堆内存溢出
描述:java.lang.OutOfMemoryError: Java heap space
解决:在yarn-site.xml中加入如下代码
<property>
<name>yarn.scheduler.maximum-allocation-mb</name>
<value>2048</value>
</property>
<property>
<name>yarn.scheduler.minimum-allocation-mb</name>
<value>2048</value>
</property>
<property>
<name>yarn.nodemanager.vmem-pmem-ratio</name>
<value>2.1</value>
</property>
<property>
<name>mapred.child.java.opts</name>
<value>-Xmx1024m</value>
</property>


