参考 Cloudman 老师的《每天5分钟玩转Kubernetes》,记录如何使用 Kubernetes ,由于版本变化,一些命令也有相应的变化,本文对应 Kubernetes 1.25.3
5. 运行应用
010.123 用 Deployment 运行应用
原文使用kubectl run命令,在新版本的 Kubernetes 中 run 命令只能运行一个 pod ,要运行 Deployment ,需要使用 create deployment 命令
kubectl create deployment nginx-deployment --image=nginx:1.7.9 --replicas=2
其他命令可以正常使用
kubectl get deployment
kubectl describe deployment nginx-deployment
kubectl get replicaset
kubectl describe replicaset nginx-deployment-646f57b9cb
kubectl get pod
kubectl describe pod nginx-deployment-646f57b9cb-ckkgq
011.124 k8s 创建资源的两种方式
nginx.yml
apiVersion: apps/v1
kind: Deployment
metadata:
  name: nginx-deployment
spec:
  replicas: 2
  selector:
    matchLabels:
      app: web_server
  template:
    metadata:
      labels:
        app: web_server
    spec:
      containers:
      - name: nginx
        image: nginx:1.7.9
注意这里的版本变化:apiVersion: apps/v1
另外,在新的版本里必须指定“spec.selector”,这里用 matchLabels ,下面的 app: web_server 要与template.labels里的label app: web_server 一致
kubectl apply -f nginx.yml
参考:https://kubernetes.io/docs/concepts/cluster-administration/manage-deployment/
配置文件怎么写参考官方文档
012.125 读懂 Deployment YAML
013.126 如何 Scale Up/Down?
修改配置文件中的replicas值,重新应用配置即可
修改控制面节点是否可以部署应用
修改为可以部署
kubectl taint node k8s-master node-role.kubernetes.io/master-
官方文档中的方法
kubectl taint nodes --all node-role.kubernetes.io/control-plane-
差异待研究
禁止部署
kubectl taint node k8s-master node-role.kubernetes.io/master="":NoSchedule
014.127 k8s 如何 Failover?
在node2上执行halt命令之后,查看node状态
NAME         STATUS     ROLES           AGE   VERSION   INTERNAL-IP      EXTERNAL-IP   OS-IMAGE             KERNEL-VERSION      CONTAINER-RUNTIME
k8s-master   Ready      control-plane   22h   v1.25.3   192.168.232.20   <none>        Ubuntu 18.04.6 LTS   5.4.0-126-generic   docker://20.10.19
k8s-node1    Ready      <none>          20h   v1.25.3   192.168.232.21   <none>        Ubuntu 18.04.6 LTS   5.4.0-126-generic   docker://20.10.19
k8s-node2    NotReady   <none>          20h   v1.25.3   192.168.232.22   <none>        Ubuntu 18.04.6 LTS   5.4.0-128-generic   docker://20.10.19
node2进入NotReady状态
查看pod的状态
NAME                                READY   STATUS    RESTARTS   AGE     IP            NODE        NOMINATED NODE   READINESS GATES
nginx-deployment-5678ff998d-4t6dd   1/1     Running   0          105m    10.244.1.15   k8s-node1   <none>           <none>
nginx-deployment-5678ff998d-7dh8m   1/1     Running   0          105m    10.244.1.13   k8s-node1   <none>           <none>
nginx-deployment-5678ff998d-8g7ts   1/1     Running   0          105m    10.244.1.14   k8s-node1   <none>           <none>
nginx-deployment-5678ff998d-q55bc   1/1     Running   0          6m46s   10.244.1.17   k8s-node1   <none>           <none>
nginx-deployment-5678ff998d-x6sdt   1/1     Running   0          6m46s   10.244.1.16   k8s-node1   <none>           <none>
node2上的pod仍然还是Running状态,重启node2之后,node2上的pod会重启,何时才会执行failover操作待研究
015.128 用 label 控制 Pod 的位置
给节点添加label
kubectl label nodes k8s-node1 disktype=ssd
删除节点label
kubectl label nodes k8s-node1 disktype-
查看节点label
kubectl get node --show-labels
或者
kubectl describe node k8s-node1
修改配置文件,添加spec.template.spec.nodeSelector
apiVersion: apps/v1
kind: Deployment
metadata:
  name: nginx-deployment
spec:
  replicas: 6
  selector:
    matchLabels:
      app: web_server
  template:
    metadata:
      labels:
        app: web_server
    spec:
      containers:
      - name: nginx
        image: nginx:1.7.9
      nodeSelector:
        disktype: ssd
重新应用后pod会迁移到合适的node上,如果没有合适的node,pod会进入Pending状态等待资源。
pod创建修改删除label不会影响已创建的pod
如果删除配置文件中的nodeSelector部分重新应用,pod会重新部署。
016.129 DaemonSet 典型应用
查看DaemonSet
kubectl get daemonset --namespace=kube-system
NAME         DESIRED   CURRENT   READY   UP-TO-DATE   AVAILABLE   NODE SELECTOR            AGE
kube-proxy   3         3         3       3            3           kubernetes.io/os=linux   25h
当前版本 flannel 运行在 kube-flannel 命名空间中
kubectl get daemonset --namespace=kube-flannel
NAME              DESIRED   CURRENT   READY   UP-TO-DATE   AVAILABLE   NODE SELECTOR   AGE
kube-flannel-ds   3         3         3       3            3           <none>          24h
017.130 DaemonSet 案例分析
查看/修改已经运行的Daemon的yaml定义
kubectl edit daemonset kube-proxy --namespace=kube-system
018.131 运行自己的 DaemonSet
配置文件 node_exporter.yml
apiVersion: apps/v1
kind: DaemonSet
metadata:
  name: node-exporter-daemonset
spec:
  selector:
    matchLabels:
      app: prometheus
  template:
    metadata:
      labels:
        app: prometheus
    spec:
      hostNetwork: true
      containers:
      - name: node-exporter
        image: prom/node-exporter
        imagePullPolicy: IfNotPresent
        command:
        - /bin/node_exporter
        - --path.procfs
        - /host/proc
        - --path.sysfs
        - /host/sys
        - --collector.filesystem.ignored-mount-points
        - ^/(sys|proc|dev|host|etc)($|/)
        volumeMounts:
        - name: proc
          mountPath: /host/proc
        - name: sys
          mountPath: /host/sys
        - name: root
          mountPath: /rootfs
      volumes:
      - name: proc
        hostPath:
          path: /proc
      - name: sys
        hostPath:
          path: /sys
      - name: root
        hostPath:
          path: /
与原著区别也是在于apiVersion不同,增加了spec.selector
创建DaemonSet
kubectl apply -f node_exporter.yml
查看DaemonSet
kubectl get daemonsets
输出
NAME                      DESIRED   CURRENT   READY   UP-TO-DATE   AVAILABLE   NODE SELECTOR   AGE
node-exporter-daemonset   2         2         2       2            2           <none>          7m12s
查看pod
kubectl -o wide get pod
输出
NAME                            READY   STATUS    RESTARTS   AGE     IP               NODE        NOMINATED NODE   READINESS GATES
node-exporter-daemonset-2zd2m   1/1     Running   0          3m19s   192.168.232.21   k8s-node1   <none>           <none>
node-exporter-daemonset-gr4mk   1/1     Running   0          3m19s   192.168.232.22   k8s-node2   <none>           <none>
019.132 用 k8s 运行一次性任务
myjob.yml,与原文一致
apiVersion: batch/v1
kind: Job
metadata:
  name: myjob
spec:
  template:
    metadata:
      name: myjob
    spec:
      containers:
      - name: hello
        image: busybox
        command: ["echo", "hello k8s job!"]
      restartPolicy: Never
启动job
查看job
kubectl get job
输出
NAME    COMPLETIONS   DURATION   AGE
myjob   1/1           12s        84s
查看pod,不支持–show-all参数,直接查看即可
kubectl get pod
输出
NAME          READY   STATUS      RESTARTS   AGE
myjob-258sw   0/1     Completed   0          72s
020.133 Job 失败了怎么办?
引入错误
apiVersion: batch/v1
kind: Job
metadata:
  name: myjob
spec:
  template:
    metadata:
      name: myjob
    spec:
      containers:
      - name: hello
        image: busybox
        command: ["invalid_command", "hello k8s job!"]
      restartPolicy: Never
因为字段的修改,要运行新的job,需要先删除之前的job
kubectl delete -f myjob.yml
运行修改后的job
kubectl apply -f myjob.yml
查看job
kubectl get job
输出
NAME    COMPLETIONS   DURATION   AGE
myjob   0/1           15s        15s
查看pod
kubectl get pod
输出
NAME          READY   STATUS               RESTARTS   AGE
myjob-9q5z9   0/1     ContainerCannotRun   0          15s
myjob-cjp5h   0/1     ContainerCannotRun   0          9s
myjob-cjprp   0/1     ContainerCannotRun   0          21s
myjob-df8cp   0/1     ContainerCreating    0          2s
修改重启策略为OnFailure
apiVersion: batch/v1
kind: Job
metadata:
  name: myjob
spec:
  template:
    metadata:
      name: myjob
    spec:
      containers:
      - name: hello
        image: busybox
        command: ["invalid_command", "hello k8s job!"]
      restartPolicy: OnFailure
删除之前的job
kubectl delete -f myjob.yml
运行修改后的job
kubectl apply -f myjob.yml
查看job
kubectl get job
输出
NAME    COMPLETIONS   DURATION   AGE
myjob   0/1           6s         6s
查看pod
kubectl get pod
输出
NAME          READY   STATUS             RESTARTS      AGE
myjob-rj5fp   0/1     CrashLoopBackOff   2 (44s ago)   68s
查看pod详情
kubectl describe pod myjob-x9txs
输出
Name:             myjob-x9txs
Namespace:        default
Priority:         0
Service Account:  default
Node:             k8s-node1/192.168.232.21
Start Time:       Wed, 19 Oct 2022 09:53:36 +0800
Labels:           controller-uid=b925196f-9e4d-4a55-adc4-bcabc54d8755
                  job-name=myjob
Annotations:      <none>
Status:           Running
IP:               10.244.1.38
IPs:
  IP:           10.244.1.38
Controlled By:  Job/myjob
Containers:
  hello:
    Container ID:  docker://08e7f8e4131b6ea6879f53556c4c815619308aa6e3f35c72ba11a29ea3e98167
    Image:         busybox
    Image ID:      docker-pullable://busybox@sha256:9810966b5f712084ea05bf28fc8ba2c8fb110baa2531a10e2da52c1efc504698
    Port:          <none>
    Host Port:     <none>
    Command:
      invalid_command
      hello k8s job!
    State:          Waiting
      Reason:       RunContainerError
    Last State:     Terminated
      Reason:       ContainerCannotRun
      Message:      failed to create shim task: OCI runtime create failed: runc create failed: unable to start container process: exec: "invalid_command": executable file not found in $PATH: unknown
      Exit Code:    127
      Started:      Wed, 19 Oct 2022 09:53:43 +0800
      Finished:     Wed, 19 Oct 2022 09:53:43 +0800
    Ready:          False
    Restart Count:  1
    Environment:    <none>
    Mounts:
      /var/run/secrets/kubernetes.io/serviceaccount from kube-api-access-fztwk (ro)
Conditions:
  Type              Status
  Initialized       True
  Ready             False
  ContainersReady   False
  PodScheduled      True
Volumes:
  kube-api-access-fztwk:
    Type:                    Projected (a volume that contains injected data from multiple sources)
    TokenExpirationSeconds:  3607
    ConfigMapName:           kube-root-ca.crt
    ConfigMapOptional:       <nil>
    DownwardAPI:             true
QoS Class:                   BestEffort
Node-Selectors:              <none>
Tolerations:                 node.kubernetes.io/not-ready:NoExecute op=Exists for 300s
                             node.kubernetes.io/unreachable:NoExecute op=Exists for 300s
Events:
  Type     Reason     Age               From               Message
  ----     ------     ----              ----               -------
  Normal   Scheduled  27s               default-scheduler  Successfully assigned default/myjob-x9txs to k8s-node1
  Normal   Pulled     24s               kubelet            Successfully pulled image "busybox" in 2.959098699s
  Normal   Pulled     20s               kubelet            Successfully pulled image "busybox" in 2.997665355s
  Normal   Pulling    5s (x3 over 27s)  kubelet            Pulling image "busybox"
  Normal   Created    2s (x3 over 24s)  kubelet            Created container hello
  Warning  Failed     2s (x3 over 24s)  kubelet            Error: failed to start container "hello": Error response from daemon: failed to create shim task: OCI runtime create failed: runc create failed: unable to start container process: exec: "invalid_command": executable file not found in $PATH: unknown
  Normal   Pulled     2s                kubelet            Successfully pulled image "busybox" in 2.994711015s
pod 失败重启了几次(目前默认值是6次)后自动删除了
kubectl get pod
No resources found in default namespace.
kubectl get job
NAME    COMPLETIONS   DURATION   AGE
myjob   0/1           7m18s      7m18s
kubectl describe jobs.batch myjob
Name:             myjob
Namespace:        default
Selector:         controller-uid=06c7bddd-faae-4dcd-99ef-5c04f4f6e235
Labels:           controller-uid=06c7bddd-faae-4dcd-99ef-5c04f4f6e235
                  job-name=myjob
Annotations:      batch.kubernetes.io/job-tracking:
Parallelism:      1
Completions:      1
Completion Mode:  NonIndexed
Start Time:       Wed, 19 Oct 2022 10:12:46 +0800
Pods Statuses:    0 Active (0 Ready) / 0 Succeeded / 1 Failed
Pod Template:
  Labels:  controller-uid=06c7bddd-faae-4dcd-99ef-5c04f4f6e235
           job-name=myjob
  Containers:
   hello:
    Image:      busybox
    Port:       <none>
    Host Port:  <none>
    Command:
      invalid_command
      hello k8s job!
    Environment:  <none>
    Mounts:       <none>
  Volumes:        <none>
Events:
  Type     Reason                Age    From            Message
  ----     ------                ----   ----            -------
  Normal   SuccessfulCreate      7m40s  job-controller  Created pod: myjob-rj5fp
  Normal   SuccessfulDelete      83s    job-controller  Deleted pod: myjob-rj5fp
  Warning  BackoffLimitExceeded  83s    job-controller  Job has reached the specified backoff limit
可以看到“BackoffLimitExceeded”事件
021.134 并行执行 Job
parallelism 指定并发数
completions 指定总次数
apiVersion: batch/v1
kind: Job
metadata:
  name: myjob
spec:
  completions: 6
  parallelism: 2
  template:
    metadata:
      name: myjob
    spec:
      containers:
      - name: hello
        image: busybox
        command: ["echo", "hello k8s job!"]
      restartPolicy: OnFailure
查看job
kubectl get job
NAME    COMPLETIONS   DURATION   AGE
myjob   4/6           21s        21s
查看pod
zhangch@k8s-master:~$ kubectl get pod
NAME          READY   STATUS              RESTARTS   AGE
myjob-6cxz6   0/1     Completed           0          15s
myjob-82zfd   0/1     ContainerCreating   0          0s
myjob-9k86t   0/1     Completed           0          7s
myjob-bgvlq   0/1     ContainerCreating   0          0s
myjob-qzcv5   0/1     Completed           0          15s
myjob-st7hg   0/1     Completed           0          7s
** 注意:如果指定completions 为1,那么parallelism也被限制为1;如果completions 为nil(不指定),那么有一个pod成功则认为所有pod成功(job成功)**
022.135 定时执行 Job
以类似crontab的方式定时运行job,使用 spec.schedule 指定
cronjob.yml
apiVersion: batch/v1
kind: CronJob
metadata:
  name: hello
spec:
  schedule: "*/1 * * * *"
  jobTemplate:
    spec:
      template:
        metadata:
          name: hello
        spec:
          containers:
          - name: hello
            image: busybox
            command: ["echo", "hello k8s job!"]
          restartPolicy: OnFailure
创建cronjob
kubectl apply -f cronjob.yml
查看cronjob
kubectl get cronjobs.batch -o wide
NAME    SCHEDULE      SUSPEND   ACTIVE   LAST SCHEDULE   AGE   CONTAINERS   IMAGES    SELECTOR
hello   */1 * * * *   False     1        1s              89s   hello        busybox   <none>
查看pod
kubectl get pod -o wide
hello-27769511-nb7z2   0/1     Completed           0          63s   10.244.2.26   k8s-node2   <none>           <none>
hello-27769512-qsw99   0/1     ContainerCreating   0          3s    <none>        k8s-node2   <none>           <none>
查看pod日志
kubectl logs hello-27769515-v99vf
hello k8s job!
** 注意: 查看日志要及时,目前看 kubernetes 只保留最近4个pod的信息和日志 **
6. 通过 Service 访问 Pod
023.136 通过 Service 访问 Pod
httpd.yml
apiVersion: apps/v1
kind: Deployment
metadata:
  name: httpd
spec:
  replicas: 3
  selector:
    matchLabels:
      run: httpd
  template:
    metadata:
      labels:
        run: httpd
    spec:
      containers:
      - name: httpd
        image: httpd
        ports:
        - containerPort: 80
httpd-svc.yml
apiVersion: v1
kind: Service
metadata:
  name: httpd-svc
spec:
  selector:
    run: httpd
  ports:
  - protocol: TCP
    port: 8080
    targetPort: 80
启动Service后查看Service状态:
kubectl get service
NAME         TYPE        CLUSTER-IP     EXTERNAL-IP   PORT(S)    AGE
httpd-svc    ClusterIP   10.99.171.60   <none>        8080/TCP   3m14s
kubernetes   ClusterIP   10.96.0.1      <none>        443/TCP    2d2h
kubectl describe service httpd-svc
Name:              httpd-svc
Namespace:         default
Labels:            <none>
Annotations:       <none>
Selector:          run=httpd
Type:              ClusterIP
IP Family Policy:  SingleStack
IP Families:       IPv4
IP:                10.99.171.60
IPs:               10.99.171.60
Port:              <unset>  8080/TCP
TargetPort:        80/TCP
Endpoints:         10.244.1.62:80,10.244.2.38:80,10.244.2.39:80
Session Affinity:  None
Events:            <none>
注:用curl直接访问pod,应答很快,但是访问service,每次都卡一下
024.137 Service IP 原理
025.138 DNS 访问 Service
目前用的DNS组件是coredns
kubectl get deployments.apps --namespace kube-system
NAME      READY   UP-TO-DATE   AVAILABLE   AGE
coredns   2/2     2            2           2d2h
用域名httpd-svc和httpd-svc.default确实可以访问服务,但是用nslookup无法解析这两个域名
nslookup httpd-svc
Server:         10.96.0.10
Address:        10.96.0.10:53

** server can't find httpd-svc.default.svc.cluster.local: NXDOMAIN

*** Can't find httpd-svc.svc.cluster.local: No answer
*** Can't find httpd-svc.cluster.local: No answer
*** Can't find httpd-svc.default.svc.cluster.local: No answer
*** Can't find httpd-svc.svc.cluster.local: No answer
*** Can't find httpd-svc.cluster.local: No answer
httpd2.yml
apiVersion: apps/v1
kind: Deployment
metadata:
  name: httpd2
  namespace: kube-public
spec:
  replicas: 3
  selector:
    matchLabels:
      run: httpd2
  template:
    metadata:
      labels:
        run: httpd2
    spec:
      containers:
      - name: httpd2
        image: httpd
        ports:
        - containerPort: 80
---
apiVersion: v1
kind: Service
metadata:
  name: httpd2-svc
  namespace: kube-public
spec:
  selector:
    run: httpd2
  ports:
  - protocol: TCP
    port: 8080
    targetPort: 80
026.139 外网如何访问 Service?
Service的配置中有一个spec.type字段来指定如何暴露服务,默认是“ClusterIP”,就是分配一个集群内部可用的IP地址,可以指定为其他值,这样就能在kubernetes集群外部访问服务了。
可用的type有:
- ClusterIP:如前述说明
- NodePort: 可以通过各节点IP地址和指定端口访问服务
- LoadBalancer: 通过云平台的负载均衡器范围服务,需要云平台支持,需要插件
- ExternalName: 通过外部域名访问服务
使用NodePort配置
apiVersion: v1
kind: Service
metadata:
  name: httpd-svc
spec:
  type: NodePort
  selector:
    run: httpd
  ports:
  - protocol: TCP
    port: 8080
    targetPort: 80```

查看服务状态
```bash
kubectl get service
NAME         TYPE        CLUSTER-IP     EXTERNAL-IP   PORT(S)          AGE
httpd-svc    NodePort    10.99.171.60   <none>        8080:31184/TCP   59m
kubernetes   ClusterIP   10.96.0.1      <none>        443/TCP          2d3h
这里显示的EXTERNAL-IP还是而不是原文中的,netstat也看不到相应的端口,但服务端口已打开,确实可以通过节点IP和端口访问服务了。(完全使用iptables转发)
使用NodePort,通过kubernetes集群的各个节点都可以访问服务,而不仅是master节点。
一个奇怪的现象,在各节点上访问服务,如果通过本节点地址访问容易出现卡顿现象,而用其他节点地址访问就不会卡顿
可以使用spec.ports[].nodePort固定node上的服务端口而不是用随机端口:
apiVersion: v1
kind: Service
metadata:
  name: httpd-svc
spec:
  type: NodePort
  selector:
    run: httpd
  ports:
  - protocol: TCP
    nodePort: 30000
    port: 8080
    targetPort: 80
7. Rolling Update
027.140 Rolling Update
操作参考原著,配置文件参考前文
028.141 回滚
现在–record参数仍然可用但会给出警告,将来–record参数会移除;如果移除了–record参数,可以用kubectl annotate命令添加kubernetes.io/change-cause注解来指明“CHANGE-CAUSE”
kubectl apply -f httpd.v1.yml --record
kubectl apply -f httpd.v2.yml
kubectl annotate deployments.apps httpd kubernetes.io/change-cause="upgrade test"
kubectl rollout history deployment httpd
REVISION  CHANGE-CAUSE
1         kubectl apply --filename=httpd.v1.yml --record=true
2         upgrade test
回滚
kubectl rollout undo deployment httpd --to-revision=1
kubectl rollout history deployment httpd
REVISION  CHANGE-CAUSE
2         upgrade test
3         kubectl apply --filename=httpd.v3.yml --record=true
4         kubectl apply --filename=httpd.v1.yml --record=true
8. Health Check
029.142 Health Check
healthcheck.yml
apiVersion: v1
kind: Pod
metadata:
  labels:
    test: healthcheck
  name: healthcheck
spec:
  restartPolicy: OnFailure
  containers:
  - name: healthcheck
    image: busybox
    args:
    - /bin/sh
    - -c
    - sleep 10; exit 1
030.143 Liveness 探测
Liveness (存活检测)探测让用户可以自定义判断容器是否健康的条件。如果探测失败,Kubernetes 就会重启容器。
apiVersion: v1
kind: Pod
metadata:
  labels:
    test: liveness
  name: liveness
spec:
  restartPolicy: OnFailure
  containers:
  - name: liveness
    image: busybox
    args:
    - /bin/sh
    - -c
    - touch /tmp/healthy; sleep 30; rm -rf /tmp/healthy; sleep 600
    livenessProbe:
      exec:
        command:
        - cat
        - /tmp/healthy
      initialDelaySeconds: 10
      periodSeconds: 5
有哪些探测方式:
- exec
- httpGet
- tcpSocket
- grpc
参数:
- initialDelaySeconds
- periodSeconds
- timeoutSeconds
- failureThreshold:默认值是3,检测成功后,多少次连续失败才算失败
- successThreshold:默认值是1,检测失败后,多少次连续成功才算成功;对liveness 和 startup 必须是1
- terminationGracePeriodSeconds: 检测到failure之后,发送SIGTERM结束进程,在terminationGracePeriodSeconds秒后如果进程还没有退出,发送SIGKILL强制结束。
031.144 Readiness 探测
Readiness (就绪检测)探测,检测Pod中的程序何时就绪,就绪后可以将容器加入到 Service 负载均衡池中。
检测失败后,会发出警告事件,事件原因是Unhealthy,Pod的运行状态还是Running,但Ready状态已是False。
Readiness 探测的配置语法与 Liveness 探测完全一样
readiness.yml
apiVersion: v1
kind: Pod
metadata:
  labels:
    test: readiness
  name: readiness
spec:
  restartPolicy: OnFailure
  containers:
  - name: readiness
    image: busybox
    args:
    - /bin/sh
    - -c
    - touch /tmp/healthy; sleep 30; rm -rf /tmp/healthy; sleep 600
    readinessProbe:
      exec:
        command:
        - cat
        - /tmp/healthy
      initialDelaySeconds: 10
      periodSeconds: 5
kubectl describe pods readiness
Name:             readiness
Namespace:        default
Priority:         0
Service Account:  default
Node:             k8s-node1/192.168.232.21
Start Time:       Thu, 20 Oct 2022 15:08:05 +0800
Labels:           test=readiness
Annotations:      <none>
Status:           Running
IP:               10.244.1.84
IPs:
  IP:  10.244.1.84
Containers:
  readiness:
    Container ID:  docker://e9ee4d0114a7043a0bc188b269de9bab49294ba40eefa16a50a889d16b944a42
    Image:         busybox
    Image ID:      docker-pullable://busybox@sha256:9810966b5f712084ea05bf28fc8ba2c8fb110baa2531a10e2da52c1efc504698
    Port:          <none>
    Host Port:     <none>
    Args:
      /bin/sh
      -c
      touch /tmp/healthy; sleep 30; rm -rf /tmp/healthy; sleep 600
    State:          Running
      Started:      Thu, 20 Oct 2022 15:08:14 +0800
    Ready:          False
    Restart Count:  0
    Readiness:      exec [cat /tmp/healthy] delay=10s timeout=1s period=5s #success=1 #failure=3
    Environment:    <none>
    Mounts:
      /var/run/secrets/kubernetes.io/serviceaccount from kube-api-access-5pwfx (ro)
Conditions:
  Type              Status
  Initialized       True
  Ready             False
  ContainersReady   False
  PodScheduled      True
Volumes:
  kube-api-access-5pwfx:
    Type:                    Projected (a volume that contains injected data from multiple sources)
    TokenExpirationSeconds:  3607
    ConfigMapName:           kube-root-ca.crt
    ConfigMapOptional:       <nil>
    DownwardAPI:             true
QoS Class:                   BestEffort
Node-Selectors:              <none>
Tolerations:                 node.kubernetes.io/not-ready:NoExecute op=Exists for 300s
                             node.kubernetes.io/unreachable:NoExecute op=Exists for 300s
Events:
  Type     Reason     Age                   From               Message
  ----     ------     ----                  ----               -------
  Normal   Scheduled  2m58s                 default-scheduler  Successfully assigned default/readiness to k8s-node1
  Normal   Pulling    2m57s                 kubelet            Pulling image "busybox"
  Normal   Pulled     2m49s                 kubelet            Successfully pulled image "busybox" in 8.064936069s
  Normal   Created    2m49s                 kubelet            Created container readiness
  Normal   Started    2m49s                 kubelet            Started container readiness
  Warning  Unhealthy  42s (x21 over 2m17s)  kubelet            Readiness probe failed: cat: can't open '/tmp/healthy': No such file or directory
032.145 在 Scale Up 中使用 Health Check
配合Service使用,通过 Readiness 探测判断容器是否就绪,避免将请求发送到还没有 ready 的 backend。
033.146 在滚动更新中使用 Health Check
app.v1.yml
apiVersion: apps/v1
kind: Deployment
metadata:
  name: app
spec:
  replicas: 10
  selector:
    matchLabels:
      run: app
  template:
    metadata:
      labels:
        run: app
    spec:
      containers:
      - name: app
        image: busybox
        args:
        - /bin/sh
        - -c
        - sleep 10; touch /tmp/healthy; sleep 30000
        readinessProbe:
          exec:
            command:
            - cat
            - /tmp/healthy
          initialDelaySeconds: 10
          periodSeconds: 5
app.v2.yml
kind: Deployment
metadata:
  name: app
spec:
  replicas: 10
  selector:
    matchLabels:
      run: app
  template:
    metadata:
      labels:
        run: app
    spec:
      containers:
      - name: app
        image: busybox
        args:
        - /bin/sh
        - -c
        - sleep 3000
        readinessProbe:
          exec:
            command:
            - cat
            - /tmp/healthy
          initialDelaySeconds: 10
          periodSeconds: 5
应用app.v1.yml,到全部ready要等几分钟
应用app.v2.yml,查看deployment和pod的状态
get deployments.apps app -o wide
NAME   READY   UP-TO-DATE   AVAILABLE   AGE
app    8/10    5            8           3m45s
kubectl get pod -o wide
zhangch@k8s-master:~$ kubectl get pod -o wide
NAME                   READY   STATUS    RESTARTS   AGE     IP            NODE        NOMINATED NODE   READINESS GATES
app-58b9589548-2wxz4   1/1     Running   0          3m57s   10.244.1.86   k8s-node1   <none>           <none>
app-58b9589548-c2srx   1/1     Running   0          3m57s   10.244.1.89   k8s-node1   <none>           <none>
app-58b9589548-jzsfd   1/1     Running   0          3m57s   10.244.2.57   k8s-node2   <none>           <none>
app-58b9589548-klw7j   1/1     Running   0          3m57s   10.244.1.87   k8s-node1   <none>           <none>
app-58b9589548-m2pfs   1/1     Running   0          3m57s   10.244.2.58   k8s-node2   <none>           <none>
app-58b9589548-p6dtr   1/1     Running   0          3m57s   10.244.1.85   k8s-node1   <none>           <none>
app-58b9589548-s8l2b   1/1     Running   0          3m57s   10.244.2.56   k8s-node2   <none>           <none>
app-58b9589548-x2f94   1/1     Running   0          3m57s   10.244.1.88   k8s-node1   <none>           <none>
app-7c5fcfd845-6j4kd   0/1     Running   0          47s     10.244.2.61   k8s-node2   <none>           <none>
app-7c5fcfd845-96tdx   0/1     Running   0          47s     10.244.2.62   k8s-node2   <none>           <none>
app-7c5fcfd845-j8jcw   0/1     Running   0          47s     10.244.1.90   k8s-node1   <none>           <none>
app-7c5fcfd845-s7v6n   0/1     Running   0          47s     10.244.1.91   k8s-node1   <none>           <none>
app-7c5fcfd845-trd82   0/1     Running   0          47s     10.244.2.63   k8s-node2   <none>           <none>
控制更新策略:strategy
strategy.type: Recreate 或 RollingUpdate(默认值)
strategy.rollingUpdate:仅当 type = RollingUpdate 时才出现
strategy.rollingUpdate.maxSurge: 更新过程中可以超出的pod数,可以是数值或百分比
strategy.rollingUpdate.maxUnavailable:更新过程中允许的不可用(Ready=False)的pod数,可以是数值或百分比
apiVersion: apps/v1
kind: Deployment
metadata:
  name: app
spec:
  strategy:
    rollingUpdate:
      maxSurge: 35%
      maxUnavailable: 35%
  replicas: 10
  selector:
    matchLabels:
      run: app
  template:
    metadata:
      labels:
        run: app
    spec:
      containers:
      - name: app
        image: busybox
        args:
        - /bin/sh
        - -c
        - sleep 3000
        readinessProbe:
          exec:
            command:
            - cat
            - /tmp/healthy
          initialDelaySeconds: 10
          periodSeconds: 5
kubectl get deployments.apps app
NAME   READY   UP-TO-DATE   AVAILABLE   AGE
app    7/10    7            7           24m
kubectl get pod -o wide
NAME                   READY   STATUS    RESTARTS   AGE   IP            NODE        NOMINATED NODE   READINESS GATES
app-58b9589548-2wxz4   1/1     Running   0          24m   10.244.1.86   k8s-node1   <none>           <none>
app-58b9589548-c2srx   1/1     Running   0          24m   10.244.1.89   k8s-node1   <none>           <none>
app-58b9589548-jzsfd   1/1     Running   0          24m   10.244.2.57   k8s-node2   <none>           <none>
app-58b9589548-m2pfs   1/1     Running   0          24m   10.244.2.58   k8s-node2   <none>           <none>
app-58b9589548-p6dtr   1/1     Running   0          24m   10.244.1.85   k8s-node1   <none>           <none>
app-58b9589548-s8l2b   1/1     Running   0          24m   10.244.2.56   k8s-node2   <none>           <none>
app-58b9589548-x2f94   1/1     Running   0          24m   10.244.1.88   k8s-node1   <none>           <none>
app-7c5fcfd845-4l4ll   0/1     Running   0          48s   10.244.2.64   k8s-node2   <none>           <none>
app-7c5fcfd845-6j4kd   0/1     Running   0          21m   10.244.2.61   k8s-node2   <none>           <none>
app-7c5fcfd845-96tdx   0/1     Running   0          21m   10.244.2.62   k8s-node2   <none>           <none>
app-7c5fcfd845-j8jcw   0/1     Running   0          21m   10.244.1.90   k8s-node1   <none>           <none>
app-7c5fcfd845-s7v6n   0/1     Running   0          21m   10.244.1.91   k8s-node1   <none>           <none>
app-7c5fcfd845-trd82   0/1     Running   0          21m   10.244.2.63   k8s-node2   <none>           <none>
app-7c5fcfd845-xbtmc   0/1     Running   0          48s   10.244.1.92   k8s-node1   <none>           <none>
9. 数据管理
034.147 emptyDir Volume
emptyDir Volume 对于容器来说是持久的,对于 Pod 则不是。当 Pod 从节点删除时,Volume 的内容也会被删除。但如果只是容器被销毁而 Pod 还在,则 Volume 不受影响。
035.148 hostPath Volume
hostPath Volume 的作用是将 Docker Host 文件系统中已经存在的目录 mount 给 Pod 的容器。大部分应用都不会使用 hostPath Volume,因为这实际上增加了 Pod 与节点的耦合,限制了 Pod 的使用。不过那些需要访问 Kubernetes 或 Docker 内部数据(配置文件和二进制库)的应用则需要使用 hostPath。
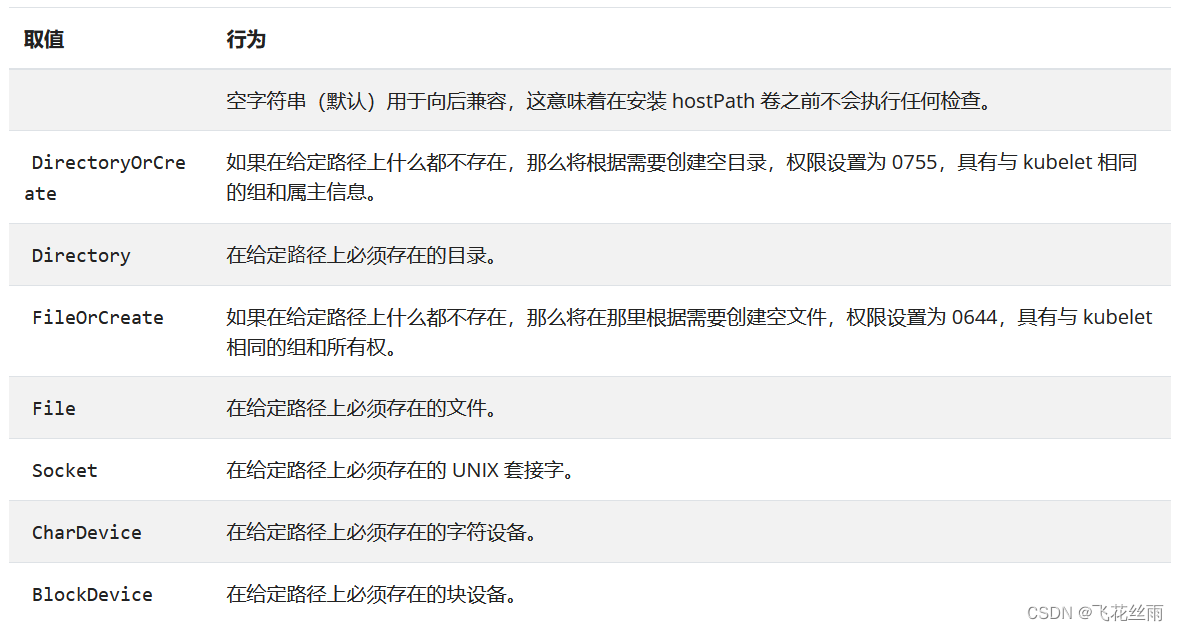
volumes[].hostPath.path: Node上的路径,可以指向目录或文件
volumes[].hostPath.type:
036.149 外部 Storage Provider
现在 awsElasticBlockStore , azureDisk , azureFile , cinder , gcePersistentDisk , glusterfs , portworxVolume , vsphereVolume , flexVolume 等都已弃用,可能需要以CSI插件的方式来支持。
截止到2021-12-10,各种卷支持的CSI迁移状态
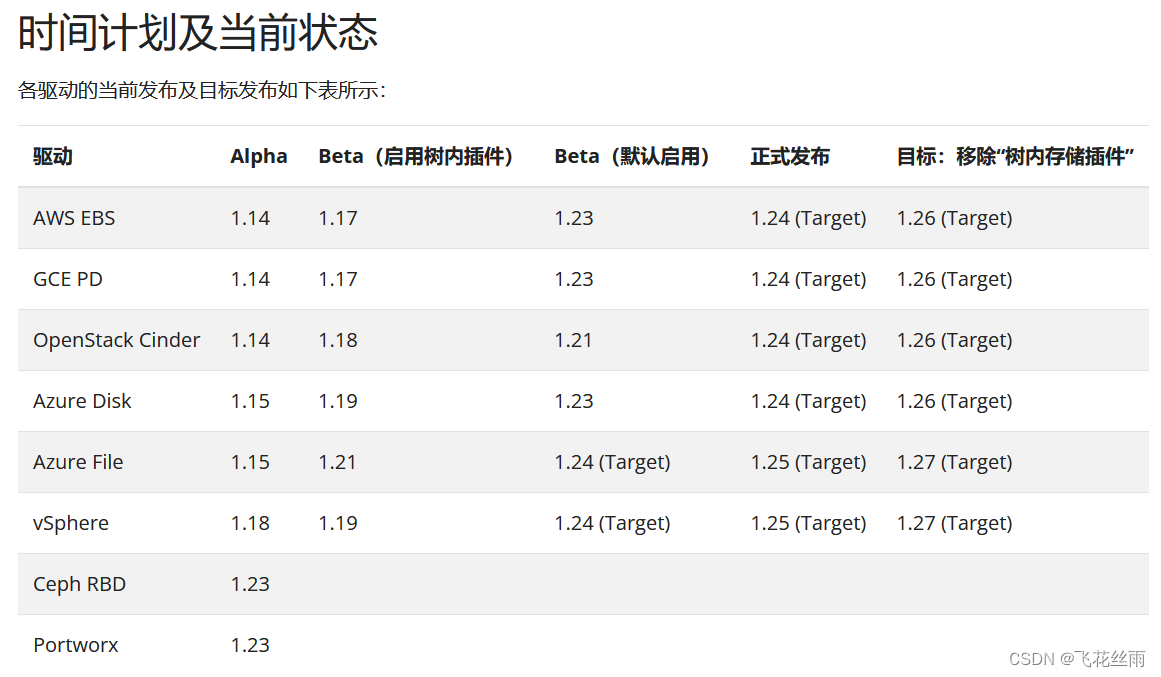 为支持对象存储还推出了COSI接口
各种存储的CSI驱动参考这里:https://kubernetes-csi.github.io/docs/drivers.html
037.150 PersistentVolume(PV) & PersistentVolumeClaim(PVC)
038.151 NFS PersistentVolume
NFS部署参考 https://blog.csdn.net/m0_59474046/article/details/123802030
nfs-pv1.yml
apiVersion: v1
kind: PersistentVolume
metadata:
  name: mypv1
spec:
  capacity:
    storage: 1Gi
  accessModes:
    - ReadWriteOnce
  persistentVolumeReclaimPolicy: Recycle
  storageClassName: nfs
  nfs:
    path: /nfsroot
    server: 192.168.232.20
nfs-pvc1.yml
apiVersion: v1
kind: PersistentVolumeClaim
metadata:
  name: mypvc1
spec:
  resources:
    requests:
      storage: 1Gi
  accessModes:
    - ReadWriteOnce
  storageClassName: nfs
kubectl get pv
NAME    CAPACITY   ACCESS MODES   RECLAIM POLICY   STATUS   CLAIM            STORAGECLASS   REASON   AGE
mypv1   1Gi        RWO            Recycle          Bound    default/mypvc1   nfs                     3m17s
kubectl get pvc
NAME     STATUS   VOLUME   CAPACITY   ACCESS MODES   STORAGECLASS   AGE
mypvc1   Bound    mypv1    1Gi        RWO            nfs            14s
pod1.yml
apiVersion: v1
kind: Pod
metadata:
  name: mypod1
spec:
  containers:
    - name: mypod1
      image: busybox
      args:
        - /bin/sh
        - -c
        - sleep 30000
      volumeMounts:
        - mountPath: "/mydata"
          name: mydata
  volumes:
    - name: mydata
      persistentVolumeClaim:
        claimName: mypvc1
应用pod1
在mypod1里运行命令访问/mydata
kubectl exec mypod1 touch /mydata/hello
在nfs服务器上查看
ls /nfsroot/
hello
039.152 回收 PV
先停掉 使用pvc的pod,否则删除pvc时会等待
kubectl delete -f pod1.yml --force
做测试时删除pod使用了–force参数,否则会等很久
删除pvc
kubectl delete pvc mypvc1
查看pv状态
kubectl get pv
NAME    CAPACITY   ACCESS MODES   RECLAIM POLICY   STATUS     CLAIM            STORAGECLASS   REASON   AGE
mypv1   1Gi        RWO            Recycle          Released   default/mypvc1   nfs                     28m
查看pod信息
kubectl get pod
清理用的pod处于ImagePullBackOff状态
NAME                 READY   STATUS             RESTARTS   AGE
recycler-for-mypv1   0/1     ImagePullBackOff   0          35s
说明下载容器镜像失败了,解决网络问题后自动恢复,再查看
kubectl get pod
数据清理已完成
NAME                 READY   STATUS      RESTARTS   AGE
recycler-for-mypv1   0/1     Completed   0          4m51s
查看nfs目录中已没有文件
ls /nfsroot/
040. 153 PV 动态供给
需要云服务,未测试
Kubernetes 支持的动态供给 PV 的 Provisioner:
https://kubernetes.io/docs/concepts/storage/storage-classes/#provisioner
041.154 MySQL 使用 PV 和 PVC
注意:NFS上的数据目录必须提前创建好,挂载卷时不会自动创建目录,目录不存在会导致Pod启动失败
docker镜像加速参考 https://blog.csdn.net/m0_64802729/article/details/124033032
mysql.yml
apiVersion: v1
kind: Service
metadata:
  name: mysql
spec:
  selector:
    app: mysql
  ports:
  - port: 3306
---
apiVersion: apps/v1
kind: Deployment
metadata:
  name: mysql
spec:
  selector:
    matchLabels:
      app: mysql
  template:
    metadata:
      labels:
        app: mysql
    spec:
      containers:
      - name: mysql
        image: mysql:5.6
        env:
        - name: MYSQL_ROOT_PASSWORD
          value: password
        ports:
        - containerPort: 3306
          name: mysql
        volumeMounts:
        - name: mysql-persistent-storage
          mountPath: /var/lib/mysql
      volumes:
      - name: mysql-persistent-storage
        persistentVolumeClaim:
          claimName: mysql-pvc
启动mysql客户端的命令
kubectl run -it --rm --image=mysql:5.6 --restart=Never mysql-client -- mysql -h mysql -ppassword
注意:因为只能有一个同名pod,每次运行时如果前一个命令异常终止导致pod没有删除需要手工删除一下
10. Secret & Configmap
042.155 用 k8s 管理机密信息
除非是二进制数据,否则base64编码不如直接来字符串明文,yml文件中可以使用stringData代替data,数据用明文方式输入。注意,如果数据是纯数字,需要加上引号,因为这里数据只能是字符串,如果解析时发现是数字会报错。
mysecret.yml
apiVersion: v1
kind: Secret
metadata:
  name: mysecret
data:
  username: YWRtaW4=
  password: MTIzNDU2
mysecret-string.yml
apiVersion: v1
kind: Secret
metadata:
  name: mysecret
stringData:
  username: amdin
  password: "123456"
043.156 查看 Secret
044.157 volume 方式使用 Secret
mypod.yml
apiVersion: v1
kind: Pod
metadata:
  name: mypod
spec:
  containers:
  - name: mypod
    image: busybox
    args:
      - /bin/sh
      - -c
      - sleep 10; touch /tmp/healthy; sleep 300000
    volumeMounts:
      - mountPath: "/etc/foo"
        name: foo
        readOnly: true
  volumes:
  - name: foo
    secret:
      secretName: mysecret
      items:
        - key: username
          path: my-group/my-username
        - key: password
          path: my-group/my-password
045.158 环境变量方式使用 Secret
mypod-env.yml
apiVersion: v1
kind: Pod
metadata:
  name: mypod
spec:
  containers:
  - name: mypod
    image: busybox
    args:
      - /bin/sh
      - -c
      - sleep 10; touch /tmp/healthy; sleep 300000
    env:
      - name: SECRET_USERNAME
        valueFrom:
          secretKeyRef:
            key: username
            name: mysecret
      - name: SECRET_PASSWORD
        valueFrom:
          secretKeyRef:
            key: password
            name: mysecret
046.159 用 ConfigMap 管理配置
myconfigmap.yml
apiVersion: v1
kind: ConfigMap
metadata:
  name: myconfigmap
data:
  config1: xxx
  config2: yyy
myconfigmap-log.yml
apiVersion: v1
kind: ConfigMap
metadata:
  name: myconfigmap
data:
  logging.conf: |
    class: logging.handlers.RatatingFileHandler
    formmater: precise
    level: INFO
    filename: %hostname-%timestamp.log
mypod-log.yml
apiVersion: v1
kind: Pod
metadata:
  name: mypod
spec:
  containers:
  - name: mypod
    image: busybox
    args:
      - /bin/sh
      - -c
      - sleep 10; touch /tmp/healthy; sleep 300000
    volumeMounts:
      - mountPath: "/etc/foo"
        name: foo
  volumes:
  - name: foo
    configMap:
      name: myconfigmap
      items:
        - key: logging.conf
          path: logging.conf
11. Helm – 包管理器
047.160 Why Helm
048.161 Helm 架构
049.162 部署 Helm
curl https://raw.githubusercontent.com/helm/helm/main/scripts/get-helm-3 | bash
helm completion bash > .helmrc
echo "source .helmrc" >> .bashrc
helm version
version.BuildInfo{Version:"v3.10.1", GitCommit:"9f88ccb6aee40b9a0535fcc7efea6055e1ef72c9", GitTreeState:"clean", GoVersion:"go1.18.7"}
helm version只打印客户端版本
helm init命令在当前版本中已不可用,需要手动注册repo
helm repo add bitnami https://charts.bitnami.com/bitnami
helm search repo bitnami
安装应用chart
helm repo update
helm install bitnami/mysql --generate-name
NAME: mysql-1666537388
LAST DEPLOYED: Sun Oct 23 23:03:10 2022
NAMESPACE: default
STATUS: deployed
REVISION: 1
TEST SUITE: None
NOTES:
CHART NAME: mysql
CHART VERSION: 9.4.1
APP VERSION: 8.0.31

** Please be patient while the chart is being deployed **

Tip:

  Watch the deployment status using the command: kubectl get pods -w --namespace default

Services:

  echo Primary: mysql-1666537388.default.svc.cluster.local:3306

Execute the following to get the administrator credentials:

  echo Username: root
  MYSQL_ROOT_PASSWORD=$(kubectl get secret --namespace default mysql-1666537388 -o jsonpath="{.data.mysql-root-password}" | base64 -d)

To connect to your database:

  1. Run a pod that you can use as a client:

      kubectl run mysql-1666537388-client --rm --tty -i --restart='Never' --image  docker.io/bitnami/mysql:8.0.31-debian-11-r0 --namespace default --env MYSQL_ROOT_PASSWORD=$MYSQL_ROOT_PASSWORD --command -- bash

  2. To connect to primary service (read/write):

      mysql -h mysql-1666537388.default.svc.cluster.local -uroot -p"$MYSQL_ROOT_PASSWORD"
helm list
NAME                    NAMESPACE       REVISION        UPDATED                                 STATUS          CHART           APP VERSION
mysql-1666537388        default         1               2022-10-23 23:03:10.963056781 +0800 CST deployed        mysql-9.4.1     8.0.31
helm uninstall mysql-1666537388
helm status mysql-1666537388
Error: release: not found
卸载之后丢失了之前安装的版本,我们再来试试在卸载时加入``参数来保留版本
helm uninstall mysql-1666538431 --keep-history
release "mysql-1666538431" uninstalled
卸载之后查看一下状态
helm status mysql-1666538431
还可以查看,但状态是 STATUS: uninstalled
NAME: mysql-1666538431
LAST DEPLOYED: Sun Oct 23 23:20:33 2022
NAMESPACE: default
STATUS: uninstalled
REVISION: 1
TEST SUITE: None
NOTES:
CHART NAME: mysql
CHART VERSION: 9.4.1
APP VERSION: 8.0.31

** Please be patient while the chart is being deployed **

Tip:

  Watch the deployment status using the command: kubectl get pods -w --namespace default

Services:

  echo Primary: mysql-1666538431.default.svc.cluster.local:3306

Execute the following to get the administrator credentials:

  echo Username: root
  MYSQL_ROOT_PASSWORD=$(kubectl get secret --namespace default mysql-1666538431 -o jsonpath="{.data.mysql-root-password}" | base64 -d)

To connect to your database:

  1. Run a pod that you can use as a client:

      kubectl run mysql-1666538431-client --rm --tty -i --restart='Never' --image  docker.io/bitnami/mysql:8.0.31-debian-11-r0 --namespace default --env MYSQL_ROOT_PASSWORD=$MYSQL_ROOT_PASSWORD --command -- bash

  2. To connect to primary service (read/write):

      mysql -h mysql-1666538431.default.svc.cluster.local -uroot -p"$MYSQL_ROOT_PASSWORD"
查看历史版本:
helm history mysql-1666538431
REVISION        UPDATED                         STATUS          CHART           APP VERSION     DESCRIPTION
1               Sun Oct 23 23:20:33 2022        uninstalled     mysql-9.4.1     8.0.31          Uninstallation complete
050.163 使用 Helm
参考:https://helm.sh/docs/intro/quickstart/
现在hub中或repo中查找想要的chart
helm search hub
helm search repo
在hub中查找时加上–list-repo-url可以看到chart所属repo的url
helm search hub mysql --list-repo-url
URL                                                     CHART VERSION   APP VERSION             DESCRIPTION                                             REPO URL
https://artifacthub.io/packages/helm/cloudnativ...      5.0.1           8.0.16                  Chart to create a Highly available MySQL cluster        https://cloudnativeapp.github.io/charts/curated/
https://artifacthub.io/packages/helm/bitnami/mysql      9.4.1           8.0.31                  MySQL is a fast, reliable, scalable, and easy t...      https://charts.bitnami.com/bitnami
https://artifacthub.io/packages/helm/mysql/mysql        2.1.3           8.0.26                  deploy mysql standalone or group-replication He...      https://haolowkey.github.io/helm-mysql
...
将repo添加到helm
helm repo add mysql https://haolowkey.github.io/helm-mysql
helm repo update
helm search repo mysql
NAME                    CHART VERSION   APP VERSION     DESCRIPTION
bitnami/mysql           9.4.1           8.0.31          MySQL is a fast, reliable, scalable, and easy t...
mysql/mysql             2.1.3           8.0.26          deploy mysql standalone or group-replication He...
bitnami/phpmyadmin      10.3.5          5.2.0           phpMyAdmin is a free software tool written in P...
bitnami/mariadb         11.3.3          10.6.10         MariaDB is an open source, community-developed ...
bitnami/mariadb-galera  7.4.7           10.6.10         MariaDB Galera is a multi-primary database clus...
安装:
helm install mysql/mysql --generate-name
NAME: mysql-1666540178
LAST DEPLOYED: Sun Oct 23 23:49:53 2022
NAMESPACE: default
STATUS: deployed
REVISION: 1
TEST SUITE: None
NOTES:
CHART NAME: mysql
CHART VERSION: 2.1.3
APP VERSION: 8.0.26

** Please be patient while the chart is being deployed **

Get the list of pods by executing:

  kubectl get pods --namespace default -l app.kubernetes.io/instance=mysql-1666540178

Access the pod you want to debug by executing:

  kubectl exec --namespace default -ti <NAME OF THE POD> -- bash

Services:
  echo ProxySQL: mysql-1666540178-proxysql.default.svc.cluster.local:6033

Execute the following to get the administrator credentials:
echo Username: root
  mysql_root_password=$(kubectl get secret --namespace default mysql-1666540178 -o jsonpath="{.data.ROOT_PASSWORD}" | base64 -d)"

echo New user:
  username=$(kubectl get secret --namespace default mysql-1666540178 -o jsonpath="{.data.MYSQL_USER}" | base64 -d)"
  password=$(kubectl get secret --namespace default mysql-1666540178 -o jsonpath="{.data.MYSQL_PASS}" | base64 -d)"
看看创建了哪些对象
kubectl get service,deployments.apps,replicasets.apps,pods,persistentvolumeclaims
NAME                                TYPE        CLUSTER-IP      EXTERNAL-IP   PORT(S)              AGE
service/kubernetes                  ClusterIP   10.96.0.1       <none>        443/TCP              6d13h
service/mysql-1666540178            ClusterIP   None            <none>        3306/TCP,33061/TCP   9h
service/mysql-1666540178-proxysql   ClusterIP   10.103.225.64   <none>        6033/TCP             9h

NAME                                        READY   UP-TO-DATE   AVAILABLE   AGE
deployment.apps/mysql-1666540178-proxysql   0/1     1            0           9h

NAME                                                   DESIRED   CURRENT   READY   AGE
replicaset.apps/mysql-1666540178-proxysql-77b8f89545   1         1         0       9h

NAME                                             READY   STATUS             RESTARTS       AGE
pod/mysql-1666540178-0                           0/1     Pending            0              9h
pod/mysql-1666540178-proxysql-77b8f89545-pxhc7   0/1     CrashLoopBackOff   41 (76s ago)   9h

NAME                                            STATUS    VOLUME   CAPACITY   ACCESS MODES   STORAGECLASS   AGE
persistentvolumeclaim/data-mysql-1666540178-0   Pending                                                     9h
051.164 chart 目录结构
当前版本,helm的配置保存在 $HOME/.config/helm目录下,缓存文件在 $HOME/.cache/helm目录下
在 $HOME/.cache/helm/repository目录下可以看到之前安装的chart打包文件 mysql-2.1.3.tgz 和 mysql-9.4.1.tgz
解压后查看目录结构:
tree mysql/
mysql/
├── Chart.lock
├── charts
│   └── common
│       ├── Chart.yaml
│       ├── README.md
│       ├── templates
│       │   ├── _affinities.tpl
│       │   ├── _capabilities.tpl
│       │   ├── _errors.tpl
│       │   ├── _images.tpl
│       │   ├── _ingress.tpl
│       │   ├── _labels.tpl
│       │   ├── _names.tpl
│       │   ├── _secrets.tpl
│       │   ├── _storage.tpl
│       │   ├── _tplvalues.tpl
│       │   ├── _utils.tpl
│       │   ├── validations
│       │   │   ├── _cassandra.tpl
│       │   │   ├── _mariadb.tpl
│       │   │   ├── _mongodb.tpl
│       │   │   ├── _mysql.tpl
│       │   │   ├── _postgresql.tpl
│       │   │   ├── _redis.tpl
│       │   │   └── _validations.tpl
│       │   └── _warnings.tpl
│       └── values.yaml
├── Chart.yaml
├── README.md
├── templates
│   ├── extra-list.yaml
│   ├── _helpers.tpl
│   ├── metrics-svc.yaml
│   ├── networkpolicy.yaml
│   ├── NOTES.txt
│   ├── primary
│   │   ├── configmap.yaml
│   │   ├── initialization-configmap.yaml
│   │   ├── pdb.yaml
│   │   ├── statefulset.yaml
│   │   ├── svc-headless.yaml
│   │   └── svc.yaml
│   ├── prometheusrule.yaml
│   ├── rolebinding.yaml
│   ├── role.yaml
│   ├── secondary
│   │   ├── configmap.yaml
│   │   ├── pdb.yaml
│   │   ├── statefulset.yaml
│   │   ├── svc-headless.yaml
│   │   └── svc.yaml
│   ├── secrets.yaml
│   ├── serviceaccount.yaml
│   └── servicemonitor.yaml
├── values.schema.json
└── values.yaml

7 directories, 49 files
Chart.yaml
annotations:
  category: Database
apiVersion: v2
appVersion: 8.0.31
dependencies:
- name: common
  repository: https://charts.bitnami.com/bitnami
  tags:
  - bitnami-common
  version: 2.x.x
description: MySQL is a fast, reliable, scalable, and easy to use open source relational
  database system. Designed to handle mission-critical, heavy-load production applications.
home: https://github.com/bitnami/charts/tree/master/bitnami/mysql
icon: https://bitnami.com/assets/stacks/mysql/img/mysql-stack-220x234.png
keywords:
- mysql
- database
- sql
- cluster
- high availability
maintainers:
- name: Bitnami
  url: https://github.com/bitnami/charts
name: mysql
sources:
- https://github.com/bitnami/containers/tree/main/bitnami/mysql
- https://mysql.com
version: 9.4.1
** 可以看到,dependencies 部分直接放到了 Chart.yaml 中 **
** chart 安装成功后会显示 templates/NOTES.txt **
这些文档都是模板,里面包含了 go template 语法和 values 替换
052.165 chart 模板
还是来看简单一点的mysql/mysql chart,这里是mysql-2.1.3.tgz
Chart 和 Release 是 Helm 预定义的对象,每个对象都有自己的属性,可以在模板中使用。参考 https://helm.sh/docs/chart_template_guide/builtin_objects/
在_xxx.tpl中定义子模板,例如:
{{- define "mysql.auth.root.password" -}}
{{ default "Root@123!" .Values.auth.rootpassword | b64enc | quote }}
{{- end -}}
在其他模板中这样引用:
ROOT_PASSWORD: {{ include "mysql.auth.root.password" . }}
** 注意:这里用include,原封不动的引用也可以用template **
而include可以处理缩进等
{{ include "mychart.app" . | indent 4 }}
在tpl中也可以引用其他tpl中的定义
{{- define "mysql.fullname" -}}
{{- include "common.names.fullname" . -}}
{{- end -}}
053.166 再次实践 MySQL chart
helm当前版本没有inspect命令,用show命令代替
helm show values mysql/mysql
global:
  imageRegistry: ""
  ## E.g.
  ## imagePullSecrets:
  ##   - myRegistryKeySecretName
  ##
  imagePullSecrets: []

## @param architecture MySQL architecture (`standalone` or `group-replication`)
architecture: "group-replication"

nameOverride: ""

fullnameOverride: ""

image:
  registry: docker.io
  repository: haolowkey/mysql
  tag: 8.0.26
  ## Specify a imagePullPolicy
  ## Defaults to 'Always' if image tag is 'latest', else set to 'IfNotPresent'
  ## ref: https://kubernetes.io/docs/user-guide/images/#pre-pulling-images
  ##
  pullPolicy: IfNotPresent
  ## Optionally specify an array of imagePullSecrets (secrets must be manually created in the namespace)
  ## ref: https://kubernetes.io/docs/tasks/configure-pod-container/pull-image-private-registry/
  ## Example:
  ## pullSecrets:
  ##   - myRegistryKeySecretName
  ##
  pullSecrets: []

## MySQL Authentication parameters
##
auth:
  username: ""
  password: ""
  rootPassword: ""
  replicationUser: ""
  replicationPassword: ""

service:
  type: ClusterIP
  ports:
    mysql: 3306
    group: 33061
  portsName:
    mysql: "mysql"
    group: "group"
  nodePorts:
    mysql: ""
    group: ""

persistence:
  storageClassName: ""
  accessModes:
    - ReadWriteOnce
  size: 10Gi

resources: {}
  # We usually recommend not to specify default resources and to leave this as a conscious
  # choice for the user. This also increases chances charts run on environments with little
  # resources, such as Minikube. If you do want to specify resources, uncomment the following
  # lines, adjust them as necessary, and remove the curly braces after 'resources:'.
  # limits:
  #   cpu: 2
  #   memory: 4G
  # requests:
  #   cpu: 2
  #   memory: 4G

## @param podAntiAffinityPreset MySQL pod anti-affinity preset. Ignored if `affinity` is set. Allowed values: `soft` or `hard`
## ref: https://kubernetes.io/docs/concepts/scheduling-eviction/assign-pod-node/#inter-pod-affinity-and-anti-affinity
## Allowed values: soft, hard
##
podAntiAffinityPreset: soft

## MySQL node affinity preset
## ref: https://kubernetes.io/docs/concepts/scheduling-eviction/assign-pod-node/#node-affinity
##
nodeAffinityPreset:
  ## @param nodeAffinityPreset.type MySQL  node affinity preset type. Ignored if `affinity` is set. Allowed values: `soft` or `hard`
  ##
  type: ""
  ## @param nodeAffinityPreset.key MySQL node label key to match Ignored if `affinity` is set.
  ## E.g.
  ## key: "kubernetes.io/e2e-az-name"
  ##
  key: ""
  ## @param nodeAffinityPreset.values MySQL node label values to match. Ignored if `affinity` is set.
  ## E.g.
  ## values:
  ##   - e2e-az1
  ##   - e2e-az2
  ##
  values: []

## @param affinity Affinity for MySQL pods assignment
## ref: https://kubernetes.io/docs/concepts/configuration/assign-pod-node/#affinity-and-anti-affinity
## Note: podAntiAffinityPreset, and  nodeAffinityPreset will be ignored when it's set
##
affinity: {}

## Configure extra options for liveness probe
## ref: https://kubernetes.io/docs/tasks/configure-pod-container/configure-liveness-readiness-probes/#configure-probes
## @param livenessProbe.enabled Enable livenessProbe
## @param livenessProbe.initialDelaySeconds Initial delay seconds for livenessProbe
## @param livenessProbe.periodSeconds Period seconds for livenessProbe
## @param livenessProbe.timeoutSeconds Timeout seconds for livenessProbe
## @param livenessProbe.failureThreshold Failure threshold for livenessProbe
## @param livenessProbe.successThreshold Success threshold for livenessProbe
##
livenessProbe:
  enabled: true
  initialDelaySeconds: 5
  periodSeconds: 10
  timeoutSeconds: 1
  failureThreshold: 3
  successThreshold: 1

## Configure extra options for readiness probe
## ref: https://kubernetes.io/docs/tasks/configure-pod-container/configure-liveness-readiness-probes/#configure-probes
## @param readinessProbe.enabled Enable readinessProbe
## @param readinessProbe.initialDelaySeconds Initial delay seconds for readinessProbe
## @param readinessProbe.periodSeconds Period seconds for readinessProbe
## @param readinessProbe.timeoutSeconds Timeout seconds for readinessProbe
## @param readinessProbe.failureThreshold Failure threshold for readinessProbe
## @param readinessProbe.successThreshold Success threshold for readinessProbe
##
readinessProbe:
  enabled: true
  initialDelaySeconds: 5
  periodSeconds: 10
  timeoutSeconds: 1
  failureThreshold: 3
  successThreshold: 1

## Configure extra options for startupProbe probe
## ref: https://kubernetes.io/docs/tasks/configure-pod-container/configure-liveness-readiness-probes/#configure-probes
## @param startupProbe.enabled Enable startupProbe
## @param startupProbe.initialDelaySeconds Initial delay seconds for startupProbe
## @param startupProbe.periodSeconds Period seconds for startupProbe## @param startupProbe.timeoutSeconds Timeout seconds for startupProbe## @param startupProbe.failureThreshold Failure threshold for startupProbe
## @param startupProbe.successThreshold Success threshold for startupProbe
##
startupProbe:
  enabled: true
  initialDelaySeconds: 15
  periodSeconds: 10
  timeoutSeconds: 1
  failureThreshold: 15
  successThreshold: 1

## @param tolerations Tolerations for MySQL pods assignment
## ref: https://kubernetes.io/docs/concepts/configuration/taint-and-toleration/
##
tolerations: []

proxysql:
  ## MySQL Authentication parameters
  ##
  auth:
    monitorUser: ""
    monitorPassword: ""
    proxysqlUser: ""
    proxysqlPassword: ""

  image:
    registry: docker.io
    repository: haolowkey/proxysql
    tag: 2.4.2
    ## Specify a imagePullPolicy
    ## Defaults to 'Always' if image tag is 'latest', else set to 'IfNotPresent'
    ## ref: https://kubernetes.io/docs/user-guide/images/#pre-pulling-images
    ##
    pullPolicy: IfNotPresent
    ## Optionally specify an array of imagePullSecrets (secrets must be manually created in the namespace)
    ## ref: https://kubernetes.io/docs/tasks/configure-pod-container/pull-image-private-registry/
    ## Example:
    ## pullSecrets:
    ##   - myRegistryKeySecretName
    ##
    pullSecrets: []

  nameOverride: ""

  fullnameOverride: ""

  replicaCount: 1

  service:
    type: ClusterIP
    ports:
      proxysql: 6033
      admin: 6032
    portsName:
      proxysql: "proxysql"
      admin: "admin"
    nodePorts:
      proxysql: ""
      admin: ""

  resources: {}
    # We usually recommend not to specify default resources and to leave this as a conscious
    # choice for the user. This also increases chances charts run on environments with little
    # resources, such as Minikube. If you do want to specify resources, uncomment the following
    # lines, adjust them as necessary, and remove the curly braces after 'resources:'.
    # limits:
    #   cpu: 2
    #   memory: 4G
    # requests:
    #   cpu: 2
    #   memory: 4G

  ## @param podAntiAffinityPreset MySQL pod anti-affinity preset. Ignored if `affinity` is set. Allowed values: `soft` or `hard`
  ## ref: https://kubernetes.io/docs/concepts/scheduling-eviction/assign-pod-node/#inter-pod-affinity-and-anti-affinity
  ## Allowed values: soft, hard
  ##
  podAntiAffinityPreset: soft

  ## MySQL node affinity preset
  ## ref: https://kubernetes.io/docs/concepts/scheduling-eviction/assign-pod-node/#node-affinity
  ##
  nodeAffinityPreset:
    ## @param nodeAffinityPreset.type MySQL  node affinity preset type. Ignored if `affinity` is set. Allowed values: `soft` or `hard`
    ##
    type: ""
    ## @param nodeAffinityPreset.key MySQL node label key to match Ignored if `affinity` is set.
    ## E.g.
    ## key: "kubernetes.io/e2e-az-name"
    ##
    key: ""
    ## @param nodeAffinityPreset.values MySQL node label values to match. Ignored if `affinity` is set.
    ## E.g.
    ## values:
    ##   - e2e-az1
    ##   - e2e-az2
    ##
    values: []

  ## @param affinity Affinity for MySQL pods assignment
  ## ref: https://kubernetes.io/docs/concepts/configuration/assign-pod-node/#affinity-and-anti-affinity
  ## Note: podAntiAffinityPreset, and  nodeAffinityPreset will be ignored when it's set
  ##
  affinity: {}

  ## Configure extra options for liveness probe
  ## ref: https://kubernetes.io/docs/tasks/configure-pod-container/configure-liveness-readiness-probes/#configure-probes
  ## @param livenessProbe.enabled Enable livenessProbe
  ## @param livenessProbe.initialDelaySeconds Initial delay seconds for livenessProbe
  ## @param livenessProbe.periodSeconds Period seconds for livenessProbe
  ## @param livenessProbe.timeoutSeconds Timeout seconds for livenessProbe
  ## @param livenessProbe.failureThreshold Failure threshold for livenessProbe
  ## @param livenessProbe.successThreshold Success threshold for livenessProbe
  ##
  livenessProbe:
    enabled: true
    initialDelaySeconds: 5
    periodSeconds: 10
    timeoutSeconds: 1
    failureThreshold: 3
    successThreshold: 1

  ## Configure extra options for readiness probe
  ## ref: https://kubernetes.io/docs/tasks/configure-pod-container/configure-liveness-readiness-probes/#configure-probes
  ## @param readinessProbe.enabled Enable readinessProbe
  ## @param readinessProbe.initialDelaySeconds Initial delay seconds for readinessProbe
  ## @param readinessProbe.periodSeconds Period seconds for readinessProbe
  ## @param readinessProbe.timeoutSeconds Timeout seconds for readinessProbe
  ## @param readinessProbe.failureThreshold Failure threshold for readinessProbe
  ## @param readinessProbe.successThreshold Success threshold for readinessProbe
  ##
  readinessProbe:
    enabled: true
    initialDelaySeconds: 5
    periodSeconds: 10
    timeoutSeconds: 1
    failureThreshold: 3
    successThreshold: 1

  ## Configure extra options for startupProbe probe
  ## ref: https://kubernetes.io/docs/tasks/configure-pod-container/configure-liveness-readiness-probes/#configure-probes
  ## @param startupProbe.enabled Enable startupProbe
  ## @param startupProbe.initialDelaySeconds Initial delay seconds for startupProbe
  ## @param startupProbe.periodSeconds Period seconds for startupProbe## @param startupProbe.timeoutSeconds Timeout seconds for startupProbe## @param startupProbe.failureThreshold Failure threshold for startupProbe
  ## @param startupProbe.successThreshold Success threshold for startupProbe
  ##
  startupProbe:
    enabled: true
    initialDelaySeconds: 15
    periodSeconds: 10
    timeoutSeconds: 1
    failureThreshold: 15
    successThreshold: 1

  ## @param tolerations Tolerations for MySQL pods assignment
  ## ref: https://kubernetes.io/docs/concepts/configuration/taint-and-toleration/
  ##
  tolerations: []
可以用helm get values查看已安装的release中的values计算值。
helm get values mysql-1666540178 -a
COMPUTED VALUES:
affinity: {}
architecture: group-replication
auth:
  password: ""
  replicationPassword: ""
  replicationUser: ""
  rootPassword: ""
  username: ""
fullnameOverride: ""
global:
  imagePullSecrets: []
  imageRegistry: ""
image:
  pullPolicy: IfNotPresent
  pullSecrets: []
  registry: docker.io
  repository: haolowkey/mysql
  tag: 8.0.26
livenessProbe:
  enabled: true
  failureThreshold: 3
  initialDelaySeconds: 5
  periodSeconds: 10
  successThreshold: 1
  timeoutSeconds: 1
nameOverride: ""
nodeAffinityPreset:
  key: ""
  type: ""
  values: []
persistence:
  accessModes:
  - ReadWriteOnce
  size: 10Gi
  storageClassName: ""
podAntiAffinityPreset: soft
proxysql:
  affinity: {}
  auth:
    monitorPassword: ""
    monitorUser: ""
    proxysqlPassword: ""
    proxysqlUser: ""
  fullnameOverride: ""
  image:
    pullPolicy: IfNotPresent
    pullSecrets: []
    registry: docker.io
    repository: haolowkey/proxysql
    tag: 2.4.2
  livenessProbe:
    enabled: true
    failureThreshold: 3
    initialDelaySeconds: 5
    periodSeconds: 10
    successThreshold: 1
    timeoutSeconds: 1
  nameOverride: ""
  nodeAffinityPreset:
    key: ""
    type: ""
    values: []
  podAntiAffinityPreset: soft
  readinessProbe:
    enabled: true
    failureThreshold: 3
    initialDelaySeconds: 5
    periodSeconds: 10
    successThreshold: 1
    timeoutSeconds: 1
  replicaCount: 1
  resources: {}
  service:
    nodePorts:
      admin: ""
      proxysql: ""
    ports:
      admin: 6032
      proxysql: 6033
    portsName:
      admin: admin
      proxysql: proxysql
    type: ClusterIP
  startupProbe:
    enabled: true
    failureThreshold: 15
    initialDelaySeconds: 15
    periodSeconds: 10
    successThreshold: 1
    timeoutSeconds: 1
  tolerations: []
readinessProbe:
  enabled: true
  failureThreshold: 3
  initialDelaySeconds: 5
  periodSeconds: 10
  successThreshold: 1
  timeoutSeconds: 1
resources: {}
service:
  nodePorts:
    group: ""
    mysql: ""
  ports:
    group: 33061
    mysql: 3306
  portsName:
    group: group
    mysql: mysql
  type: ClusterIP
startupProbe:
  enabled: true
  failureThreshold: 15
  initialDelaySeconds: 15
  periodSeconds: 10
  successThreshold: 1
  timeoutSeconds: 1
tolerations: []
安装mysql,这里指定名字为my,注意,不用-n选项,现在-n选项用于指定namespace;指定root密码为abc123,注意,value项是区分大小写的,虽然show values里显示应该是auth.rootPassword,但实际查看secret的模板文件发现应该全小写,即auth.rootpassword
helm install my mysql/mysql --set auth.rootpassword="abc123"
NAME: my
LAST DEPLOYED: Mon Oct 24 20:10:12 2022
NAMESPACE: default
STATUS: deployed
REVISION: 1
TEST SUITE: None
NOTES:
CHART NAME: mysql
CHART VERSION: 2.1.3
APP VERSION: 8.0.26

** Please be patient while the chart is being deployed **

Get the list of pods by executing:

  kubectl get pods --namespace default -l app.kubernetes.io/instance=my

Access the pod you want to debug by executing:

  kubectl exec --namespace default -ti <NAME OF THE POD> -- bash

Services:
  echo ProxySQL: my-proxysql.default.svc.cluster.local:6033

Execute the following to get the administrator credentials:
echo Username: root
  mysql_root_password=$(kubectl get secret --namespace default my-mysql -o jsonpath="{.data.ROOT_PASSWORD}" | base64 -d)"

echo New user:
  username=$(kubectl get secret --namespace default my-mysql -o jsonpath="{.data.MYSQL_USER}" | base64 -d)"
  password=$(kubectl get secret --namespace default my-mysql -o jsonpath="{.data.MYSQL_PASS}" | base64 -d)"
mysql_root_password=$(kubectl get secret --namespace default my-mysql -o jsonpath="{.data.ROOT_PASSWORD}" | base64 -d)
echo $mysql_root_password
abc123
以上由于没有pv,无法正常运行
我们先创建3个10Gi大小的nfs类型pv:mysql-pv1,mysql-pv2,mysql-pv3
kubectl get pv
NAME        CAPACITY   ACCESS MODES   RECLAIM POLICY   STATUS      CLAIM   STORAGECLASS   REASON   AGE
mysql-pv1   10Gi       RWO            Retain           Available           nfs                     6m40s
mysql-pv2   10Gi       RWO            Retain           Available           nfs                     6m38s
mysql-pv3   10Gi       RWO            Retain           Available           nfs                     6m35s
卸载之前的部署
helm uninstall my
kubectl delete pvc data-my-mysql-0
注意:这里二维删除了pvc,uninstall时不会自动删除,而不删除重新创建时又不会更新
运行时指定用nfs类型的pv
helm install my mysql/mysql --set persistence.storageClassName=nfs
kubectl get pvc
pvc已绑定到pv
NAME              STATUS   VOLUME      CAPACITY   ACCESS MODES   STORAGECLASS   AGE
data-my-mysql-0   Bound    mysql-pv1   10Gi       RWO            nfs            17s
等待一段时间后,三个mysql副本都启动了
kubectl get pods --namespace default -l app.kubernetes.io/instance=my
NAME                           READY   STATUS             RESTARTS       AGE
my-mysql-0                     1/1     Running            0              40m
my-mysql-1                     1/1     Running            2 (13m ago)    35m
my-mysql-2                     1/1     Running            0              13m
my-proxysql-5dcfcc6688-qshpf   0/1     CrashLoopBackOff   17 (76s ago)   40m
注意:如果安装应用之前数据目录下已经有数据库,要保持各用户名和密码与之前一致,否则手工修改用户名密码或者删除之前的库重建
现在 my-proxysql-5dcfcc6688-qshpf 处于 CrashLoopBackOff 状态,查看日志发现没有访问数据库的权限,需要进一步修复
054.167 开发自己的 chart
helm create mychart
tree mychart
mychart
├── charts
├── Chart.yaml
├── templates
│   ├── deployment.yaml
│   ├── _helpers.tpl
│   ├── hpa.yaml
│   ├── ingress.yaml
│   ├── NOTES.txt
│   ├── serviceaccount.yaml
│   ├── service.yaml
│   └── tests
│       └── test-connection.yaml
└── values.yaml

3 directories, 10 files
helm lint mychart
==> Linting mychart
[INFO] Chart.yaml: icon is recommended

1 chart(s) linted, 0 chart(s) failed
helm install --dry-run --debug mychart --generate-name
install.go:192: [debug] Original chart version: ""
install.go:209: [debug] CHART PATH: /home/zhangch/helm/mychart

NAME: mychart-1666667874
LAST DEPLOYED: Tue Oct 25 11:17:54 2022
NAMESPACE: default
STATUS: pending-install
REVISION: 1
USER-SUPPLIED VALUES:
{}

COMPUTED VALUES:
affinity: {}
autoscaling:
  enabled: false
  maxReplicas: 100
  minReplicas: 1
  targetCPUUtilizationPercentage: 80
fullnameOverride: ""
image:
  pullPolicy: IfNotPresent
  repository: nginx
  tag: ""
imagePullSecrets: []
ingress:
  annotations: {}
  className: ""
  enabled: false
  hosts:
  - host: chart-example.local
    paths:
    - path: /
      pathType: ImplementationSpecific
  tls: []
nameOverride: ""
nodeSelector: {}
podAnnotations: {}
podSecurityContext: {}
replicaCount: 1
resources: {}
securityContext: {}
service:
  port: 80
  type: ClusterIP
serviceAccount:
  annotations: {}
  create: true
  name: ""
tolerations: []

HOOKS:
---
# Source: mychart/templates/tests/test-connection.yaml
apiVersion: v1
kind: Pod
metadata:
  name: "mychart-1666667874-test-connection"
  labels:
    helm.sh/chart: mychart-0.1.0
    app.kubernetes.io/name: mychart
    app.kubernetes.io/instance: mychart-1666667874
    app.kubernetes.io/version: "1.16.0"
    app.kubernetes.io/managed-by: Helm
  annotations:
    "helm.sh/hook": test
spec:
  containers:
    - name: wget
      image: busybox
      command: ['wget']
      args: ['mychart-1666667874:80']
  restartPolicy: Never
MANIFEST:
---
# Source: mychart/templates/serviceaccount.yaml
apiVersion: v1
kind: ServiceAccount
metadata:
  name: mychart-1666667874
  labels:
    helm.sh/chart: mychart-0.1.0
    app.kubernetes.io/name: mychart
    app.kubernetes.io/instance: mychart-1666667874
    app.kubernetes.io/version: "1.16.0"
    app.kubernetes.io/managed-by: Helm
---
# Source: mychart/templates/service.yaml
apiVersion: v1
kind: Service
metadata:
  name: mychart-1666667874
  labels:
    helm.sh/chart: mychart-0.1.0
    app.kubernetes.io/name: mychart
    app.kubernetes.io/instance: mychart-1666667874
    app.kubernetes.io/version: "1.16.0"
    app.kubernetes.io/managed-by: Helm
spec:
  type: ClusterIP
  ports:
    - port: 80
      targetPort: http
      protocol: TCP
      name: http
  selector:
    app.kubernetes.io/name: mychart
    app.kubernetes.io/instance: mychart-1666667874
---
# Source: mychart/templates/deployment.yaml
apiVersion: apps/v1
kind: Deployment
metadata:
  name: mychart-1666667874
  labels:
    helm.sh/chart: mychart-0.1.0
    app.kubernetes.io/name: mychart
    app.kubernetes.io/instance: mychart-1666667874
    app.kubernetes.io/version: "1.16.0"
    app.kubernetes.io/managed-by: Helm
spec:
  replicas: 1
  selector:
    matchLabels:
      app.kubernetes.io/name: mychart
      app.kubernetes.io/instance: mychart-1666667874
  template:
    metadata:
      labels:
        app.kubernetes.io/name: mychart
        app.kubernetes.io/instance: mychart-1666667874
    spec:
      serviceAccountName: mychart-1666667874
      securityContext:
        {}
      containers:
        - name: mychart
          securityContext:
            {}
          image: "nginx:1.16.0"
          imagePullPolicy: IfNotPresent
          ports:
            - name: http
              containerPort: 80
              protocol: TCP
          livenessProbe:
            httpGet:
              path: /
              port: http
          readinessProbe:
            httpGet:
              path: /
              port: http
          resources:
            {}

NOTES:
1. Get the application URL by running these commands:
  export POD_NAME=$(kubectl get pods --namespace default -l "app.kubernetes.io/name=mychart,app.kubernetes.io/instance=mychart-1666667874" -o jsonpath="{.items[0].metadata.name}")
  export CONTAINER_PORT=$(kubectl get pod --namespace default $POD_NAME -o jsonpath="{.spec.containers[0].ports[0].containerPort}")
  echo "Visit http://127.0.0.1:8080 to use your application"
  kubectl --namespace default port-forward $POD_NAME 8080:$CONTAINER_PORT
055.168 管理和安装 chart
安装
helm install [NAME] [CHART] [flags]
CHART可以是库里的chart,例如:mysql/mysql;可以是本地chart包,例如:nginx-1.2.3.tgz;也可以使本地目录,例如:mychart
打包
helm package mychart
构建chart库
mkdir myrepo
mv mychart-0.1.0.tgz myrepo/
helm repo index myrepo/ --url http://192.168.232.21:8080/charts
helm repo add newrepo http://192.168.232.21:8080/charts
helm search repo mychart
NAME            CHART VERSION   APP VERSION     DESCRIPTION
newrepo/mychart 0.1.0           1.16.0          A Helm chart for Kubernetes
问题:如何让你的chart能够从hub上搜索到?
现在可以使用 artifacthub 让自己的 repo 和 chart 可以在 helm search hub 时搜索到:
- 创建自己的repo
- 登录 artifacthub
- 进入 Control Panel
- Add repository, 选择 Helm charts, 填写信息即可
12. Kubernetes 网络
056.169 网络模型
057.170 k8s 各种网络方案
k8s支持哪些网络方案参考https://kubernetes.io/zh-cn/docs/concepts/cluster-administration/addons/
058.171 Network Policy
Canal安装文档:https://projectcalico.docs.tigera.io/getting-started/kubernetes/flannel/flannel
之前安装的是Flannel网络方案,直接安装Canal,无需重新初始化集群
curl https://raw.githubusercontent.com/projectcalico/calico/v3.24.3/manifests/canal.yaml -O
kubectl apply -f canal.yaml
poddisruptionbudget.policy/calico-kube-controllers created
serviceaccount/calico-kube-controllers created
serviceaccount/canal created
configmap/canal-config created
customresourcedefinition.apiextensions.k8s.io/bgpconfigurations.crd.projectcalico.org created
customresourcedefinition.apiextensions.k8s.io/bgppeers.crd.projectcalico.org created
customresourcedefinition.apiextensions.k8s.io/blockaffinities.crd.projectcalico.org created
customresourcedefinition.apiextensions.k8s.io/caliconodestatuses.crd.projectcalico.org created
customresourcedefinition.apiextensions.k8s.io/clusterinformations.crd.projectcalico.org created
customresourcedefinition.apiextensions.k8s.io/felixconfigurations.crd.projectcalico.org created
customresourcedefinition.apiextensions.k8s.io/globalnetworkpolicies.crd.projectcalico.org created
customresourcedefinition.apiextensions.k8s.io/globalnetworksets.crd.projectcalico.org created
customresourcedefinition.apiextensions.k8s.io/hostendpoints.crd.projectcalico.org created
customresourcedefinition.apiextensions.k8s.io/ipamblocks.crd.projectcalico.org created
customresourcedefinition.apiextensions.k8s.io/ipamconfigs.crd.projectcalico.org created
customresourcedefinition.apiextensions.k8s.io/ipamhandles.crd.projectcalico.org created
customresourcedefinition.apiextensions.k8s.io/ippools.crd.projectcalico.org created
customresourcedefinition.apiextensions.k8s.io/ipreservations.crd.projectcalico.org created
customresourcedefinition.apiextensions.k8s.io/kubecontrollersconfigurations.crd.projectcalico.org created
customresourcedefinition.apiextensions.k8s.io/networkpolicies.crd.projectcalico.org created
customresourcedefinition.apiextensions.k8s.io/networksets.crd.projectcalico.org created
clusterrole.rbac.authorization.k8s.io/calico-kube-controllers created
clusterrole.rbac.authorization.k8s.io/calico-node created
clusterrole.rbac.authorization.k8s.io/flannel unchanged
clusterrolebinding.rbac.authorization.k8s.io/calico-kube-controllers created
clusterrolebinding.rbac.authorization.k8s.io/canal-flannel created
clusterrolebinding.rbac.authorization.k8s.io/canal-calico created
daemonset.apps/canal created
deployment.apps/calico-kube-controllers created
059.172 实践 Network Policy
部署httpd:
httpd2.yml
apiVersion: apps/v1
kind: Deployment
metadata:
  name: httpd
spec:
  replicas: 3
  selector:
    matchLabels:
      run: httpd
  template:
    metadata:
      labels:
        run: httpd
    spec:
      containers:
      - name: httpd2
        image: httpd:latest
        imagePullPolicy: IfNotPresent
        ports:
        - containerPort: 80
---
apiVersion: v1
kind: Service
metadata:
  name: httpd-svc
spec:
  type: NodePort
  selector:
    run: httpd
  ports:
  - protocol: TCP
    nodePort: 30000
    port: 8080
    targetPort: 80
kubectl apply -f httpd2.yml
kubectl get pods -o wide
NAME                     READY   STATUS    RESTARTS   AGE   IP           NODE        NOMINATED NODE   READINESS GATES
httpd-85764f4979-bxbxk   1/1     Running   0          17s   10.244.2.2   k8s-node2   <none>           <none>
httpd-85764f4979-ln7r7   1/1     Running   0          17s   10.244.1.2   k8s-node1   <none>           <none>
httpd-85764f4979-v9tb7   1/1     Running   0          17s   10.244.1.3   k8s-node1   <none>           <none>
验证
kubectl run busybox --rm -it --image=busybox -- /bin/sh
添加网络策略
policy.yaml
apiVersion: networking.k8s.io/v1
kind: NetworkPolicy
metadata:
  name: access-httpd
spec:
  podSelector:
    matchLabels:
      run: httpd
  ingress:
  - from:
    - podSelector:
        matchLabels:
          access: "true"
    ports:
    - protocol: TCP
      port: 80
应用策略
kubectl apply -f policy.yaml
networkpolicy.networking.k8s.io/access-httpd created
现在在之前的busybox pod中已经无法访问httpd的各pod和服务
从其他主机也无法访问node的30000端口服务
退出之前的busybox,加上label重新启动
kubectl run busybox --rm -it --image=busybox --labels="access=true" -- /bin/sh
现在可以访问httpd pod的80端口了,但是不能ping,也不能访问Service的8080端口
修改策略,添加IP段
apiVersion: networking.k8s.io/v1
kind: NetworkPolicy
metadata:
  name: access-httpd
spec:
  podSelector:
    matchLabels:
      run: httpd
  ingress:
  - from:
    - podSelector:
        matchLabels:
          access: "true"
    - ipBlock:
        cidr: 192.168.232.0/24
    ports:
    - protocol: TCP
      port: 80
重新应用配置后,过一会从192.168.232.1访问服务
用node ip 192.168.232.21和192.168.232.22访问时通时断,但master ip 192.168.232.20
前面带label的busybox中,可以用pod地址和80端口访问服务,也可以用Service地址和8080端口访问,但用node地址和30000端口访问时有跟上面相同的通信问题。
13. K8s Dashboard
060.173 Kubernetes Dashboard
官方文档:https://kubernetes.io/docs/tasks/access-application-cluster/web-ui-dashboard/
安装:
kubectl apply -f https://raw.githubusercontent.com/kubernetes/dashboard/v2.6.1/aio/deploy/recommended.yaml
参考文档创建amdin-user,获取token
dashboard-adminuser.yaml
apiVersion: v1
kind: ServiceAccount
metadata:
  name: admin-user
  namespace: kubernetes-dashboard
---
apiVersion: rbac.authorization.k8s.io/v1
kind: ClusterRoleBinding
metadata:
  name: admin-user
roleRef:
  apiGroup: rbac.authorization.k8s.io
  kind: ClusterRole
  name: cluster-admin
subjects:
- kind: ServiceAccount
  name: admin-user
  namespace: kubernetes-dashboard
kubectl apply -f dashboard-adminuser.yaml
kubectl -n kubernetes-dashboard create token admin-user
eyJhbGciOiJSUzI1NiIsImtpZCI6ImN3TGZmOXEtVUVoTjg1WmFoLW9Tb05HN2E2cV80YXhIMVJhbEQ4NUlqZGMifQ.eyJhdWQiOlsiaHR0cHM6Ly9rdWJlcm5ldGVzLmRlZmF1bHQuc3ZjLmNsdXN0ZXIubG9jYWwiXSwiZXhwIjoxNjY2Nzk0NjYwLCJpYXQiOjE2NjY3OTEwNjAsImlzcyI6Imh0dHBzOi8va3ViZXJuZXRlcy5kZWZhdWx0LnN2Yy5jbHVzdGVyLmxvY2FsIiwia3ViZXJuZXRlcy5pbyI6eyJuYW1lc3BhY2UiOiJrdWJlcm5ldGVzLWRhc2hib2FyZCIsInNlcnZpY2VhY2NvdW50Ijp7Im5hbWUiOiJhZG1pbi11c2VyIiwidWlkIjoiNTA4OTJjOTUtMTYxMy00NmM2LTlkMDAtMzY4NjJjZjI1MzQwIn19LCJuYmYiOjE2NjY3OTEwNjAsInN1YiI6InN5c3RlbTpzZXJ2aWNlYWNjb3VudDprdWJlcm5ldGVzLWRhc2hib2FyZDphZG1pbi11c2VyIn0.qNl0MjgkFQQgyeOBOmWuD31Fkf97niTWbTn2tbuMxTdrsw1IaIqVtwOE743aNueo828HA7UaNkDiPZ6hJKkJZTKE53PTtMQHtZrMEfIQ6UEXaFkXZu-IEwEl4O-OXet-5TGyZUH93x-Rcqb6bgNTan7Ov5Qf6Pt0p4UO3Q2hpuZOsD1MZjPEHWer4t8UIDCxeR4oqARwiWm5Ik3RFcvE-RVMf3VP1uje0OvZGhnFEPT175Y0nf822UszfNWWj5zW6JJz0q1o3mOsOBEIqAhGTMfsTC_BwzBtnoi1APKwV3Mua0U_SppoIDcLwaMegsC-UHftoSAOnSgpELRe6AIO3Q
运行proxy
kubectl proxy
打开运行proxy节点的图形界面,可以通过浏览器访问:http://localhost:8001/api/v1/namespaces/kubernetes-dashboard/services/https:kubernetes-dashboard:/proxy/
选择Token方式登录,输入前面获取的token,即可登录
也可以将kubernetes-dashboard服务的类型修改为NodePort,这样就可以从其他主机访问dashboard了。
061.174 使用 Dashboard
14. Kubernetes 集群监控
062.175 用 Weave Scope 监控集群
参考https://www.weave.works/docs/scope/latest/installing/
kubectl apply -f https://github.com/weaveworks/scope/releases/download/v1.13.2/k8s-scope.yaml
namespace/weave created
clusterrole.rbac.authorization.k8s.io/weave-scope created
clusterrolebinding.rbac.authorization.k8s.io/weave-scope created
deployment.apps/weave-scope-app created
daemonset.apps/weave-scope-agent created
deployment.apps/weave-scope-cluster-agent created
serviceaccount/weave-scope created
service/weave-scope-app created
打开web看拓扑结构,我这里只能看到k8s-master,没有k8s-node1和k8s-node2,不知道为什么。
063.176 用 Heapster 监控集群
Heapster目前已经不再维护,经过简单的修改依然可以部署,但
访问web ui后并没有预先配置Dashboard,不知道是不是因为跟当前的kubernetes版本不兼容导致的。
当前commit: e1e83412787b60d8a70088f09a2cb12339b305c3
修改文件如下:
git diff
diff --git a/deploy/kube-config/influxdb/grafana.yaml b/deploy/kube-config/influxdb/grafana.yaml
index 216bd9a5..eae405f9 100644
--- a/deploy/kube-config/influxdb/grafana.yaml
+++ b/deploy/kube-config/influxdb/grafana.yaml
@@ -1,10 +1,13 @@
-apiVersion: extensions/v1beta1
+apiVersion: apps/v1
 kind: Deployment
 metadata:
   name: monitoring-grafana
   namespace: kube-system
 spec:
   replicas: 1
+  selector:
+    matchLabels:
+      k8s-app: grafana
   template:
     metadata:
       labels:
diff --git a/deploy/kube-config/influxdb/heapster.yaml b/deploy/kube-config/influxdb/heapster.yaml
index e820ca56..674596fe 100644
--- a/deploy/kube-config/influxdb/heapster.yaml
+++ b/deploy/kube-config/influxdb/heapster.yaml
@@ -4,13 +4,16 @@ metadata:
   name: heapster
   namespace: kube-system
 ---
-apiVersion: extensions/v1beta1
+apiVersion: apps/v1
 kind: Deployment
 metadata:
   name: heapster
   namespace: kube-system
 spec:
   replicas: 1
+  selector:
+    matchLabels:
+      k8s-app: heapster
   template:
     metadata:
       labels:
diff --git a/deploy/kube-config/influxdb/influxdb.yaml b/deploy/kube-config/influxdb/influxdb.yaml
index cdd2440d..30838177 100644
--- a/deploy/kube-config/influxdb/influxdb.yaml
+++ b/deploy/kube-config/influxdb/influxdb.yaml
@@ -1,10 +1,13 @@
-apiVersion: extensions/v1beta1
+apiVersion: apps/v1
 kind: Deployment
 metadata:
   name: monitoring-influxdb
   namespace: kube-system
 spec:
   replicas: 1
+  selector:
+    matchLabels:
+      k8s-app: influxdb
   template:
     metadata:
       labels:
diff --git a/deploy/kube-config/rbac/heapster-rbac.yaml b/deploy/kube-config/rbac/heapster-rbac.yaml
index 6e638038..7885e31d 100644
--- a/deploy/kube-config/rbac/heapster-rbac.yaml
+++ b/deploy/kube-config/rbac/heapster-rbac.yaml
@@ -1,5 +1,5 @@
 kind: ClusterRoleBinding
-apiVersion: rbac.authorization.k8s.io/v1beta1
+apiVersion: rbac.authorization.k8s.io/v1
 metadata:
   name: heapster
 roleRef:
部署
kubectl apply -f heapster/deploy/kube-config/influxdb/
kubectl apply -f heapster/deploy/kube-config/rbac/heapster-rbac.yaml
064.177 Prometheus Operator概述
065.178 Prometheus Operator架构
066.179 部署Prometheus Operator
官方:https://github.com/prometheus-operator/prometheus-operator
部署 prometheus-operator 的 helm chart 已经迁移到 https://github.com/prometheus-community/helm-charts/tree/main/charts/kube-prometheus-stack
部署 kube-prometheus-stack,这是all-in-one的部署
helm repo add prometheus https://prometheus-community.github.io/helm-charts
helm install prometheus prometheus/kube-prometheus-stack
当前的chart版本:41.6.1
安装后可以通过prometheus-grafana服务的端口访问web界面,如果需要远程登录,可以将type改为NodePort
打开界面后,输入用户名密码进入系统
安装时默认管理员用户名/密码:admin/prom-operator
15. Kubernetes 日志管理
067.180 Kubernetes 集群日志管理
k8s的日志架构参考:https://kubernetes.io/zh-cn/docs/concepts/cluster-administration/system-logs/
从1.24版本开始移除了fluentd-elasticsearch,添加了fluentd-gcp,参考:https://github.com/kubernetes/kubernetes/tree/master/cluster/addons/fluentd-gcp
fluentd-elasticsearch现在可以参考:https://github.com/kubernetes-sigs/instrumentation-addons/tree/master/fluentd-elasticsearch
commit: 193692c92eb4667b8f4fb7d4cdf0462e229b5f13
git clone https://github.com/kubernetes-sigs/instrumentation-addons.git
cd instrumentation-addons/fluentd-elasticsearch/
# 这里先修改一下kibana-deployment.yaml和kibana-service.yaml
# kibana-deployment.yaml 注释环境变量 SERVER_BASEPATH
# kibana-service.yaml 指定type为NodePort
kubectl apply -f .
namespace/logging created
service/elasticsearch-logging created
serviceaccount/elasticsearch-logging created
clusterrole.rbac.authorization.k8s.io/elasticsearch-logging created
clusterrolebinding.rbac.authorization.k8s.io/elasticsearch-logging created
statefulset.apps/elasticsearch-logging created
configmap/fluentd-es-config-v0.2.1 created
serviceaccount/fluentd-es created
clusterrole.rbac.authorization.k8s.io/fluentd-es created
clusterrolebinding.rbac.authorization.k8s.io/fluentd-es created
daemonset.apps/fluentd-es-v3.1.1 created
deployment.apps/kibana-logging created
service/kibana-logging created
所有的资源都部署在 logging Namespace 里。
现在就可以打开Kibana页面,创建索引,分析日志了。
所有修改如下:
git diff
diff --git a/fluentd-elasticsearch/es-service.yaml b/fluentd-elasticsearch/es-service.yaml
index 81bdfa5..dc1f6c3 100644
--- a/fluentd-elasticsearch/es-service.yaml
+++ b/fluentd-elasticsearch/es-service.yaml
@@ -9,7 +9,6 @@ metadata:
     addonmanager.kubernetes.io/mode: Reconcile
     kubernetes.io/name: "Elasticsearch"
 spec:
-  clusterIP: None
   ports:
     - name: db
       port: 9200
@@ -23,4 +22,4 @@ spec:
   selector:
     k8s-app: elasticsearch-logging
   sessionAffinity: None
-  type: ClusterIP
+  type: NodePort
diff --git a/fluentd-elasticsearch/kibana-deployment.yaml b/fluentd-elasticsearch/kibana-deployment.yaml
index 2442673..a781a75 100644
--- a/fluentd-elasticsearch/kibana-deployment.yaml
+++ b/fluentd-elasticsearch/kibana-deployment.yaml
@@ -33,8 +33,8 @@ spec:
               value: http://elasticsearch-logging:9200
             - name: SERVER_NAME
               value: kibana-logging
-            - name: SERVER_BASEPATH
-              value: /api/v1/namespaces/logging/services/kibana-logging/proxy
+              #            - name: SERVER_BASEPATH
+              #              value: /api/v1/namespaces/logging/services/kibana-logging/proxy
             - name: SERVER_REWRITEBASEPATH
               value: "false"
           ports:
diff --git a/fluentd-elasticsearch/kibana-service.yaml b/fluentd-elasticsearch/kibana-service.yaml
index 25cc9b0..71e80c0 100644
--- a/fluentd-elasticsearch/kibana-service.yaml
+++ b/fluentd-elasticsearch/kibana-service.yaml
@@ -9,6 +9,7 @@ metadata:
     addonmanager.kubernetes.io/mode: Reconcile
     kubernetes.io/name: "Kibana"
 spec:
+  type: NodePort
   ports:
   - port: 5601
     protocol: TCP


![[深度学习] 名词解释--正则化](https://img-blog.csdnimg.cn/f46550436a4a48049d6926878fbbb316.png)
