一 : 引言
经过前面的学习,我们已经可以实现基本的 Spring 读取和存储对象的操作了,但在操作的过程中我们发现读取和存储对象并没有想象中的那么“简单”,所以接下来我们要学习更加简单的操作 Bean 对象的方法 .
二 : 存储Bean对象
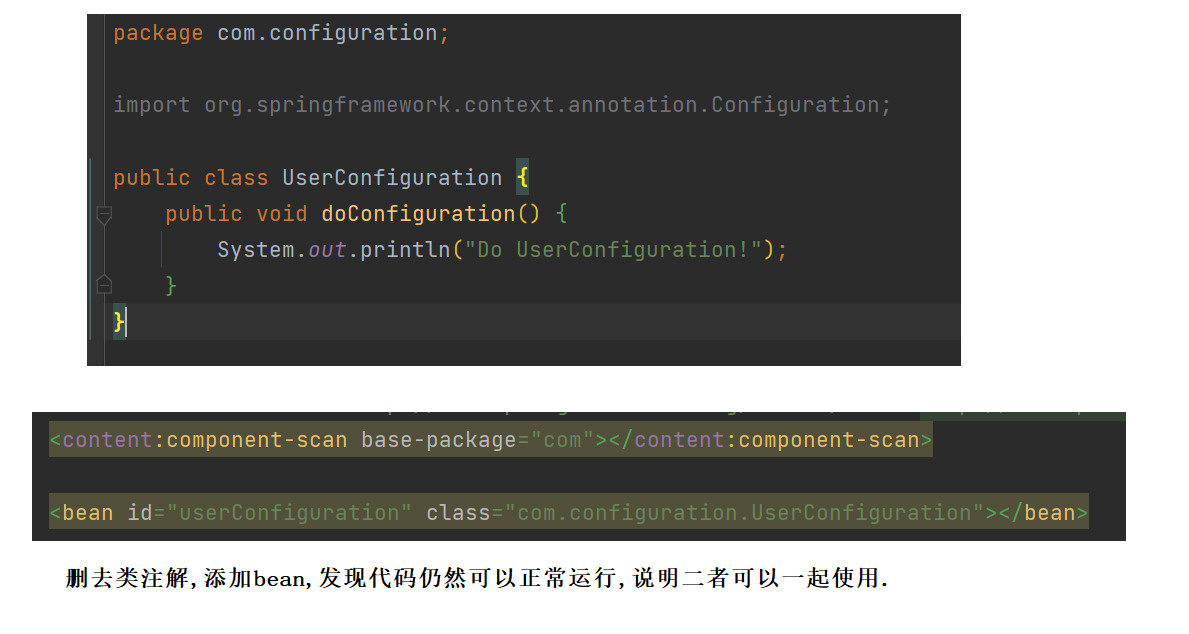
2.1 使用类注解


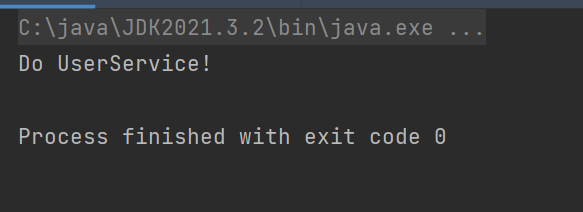
示例代码 :
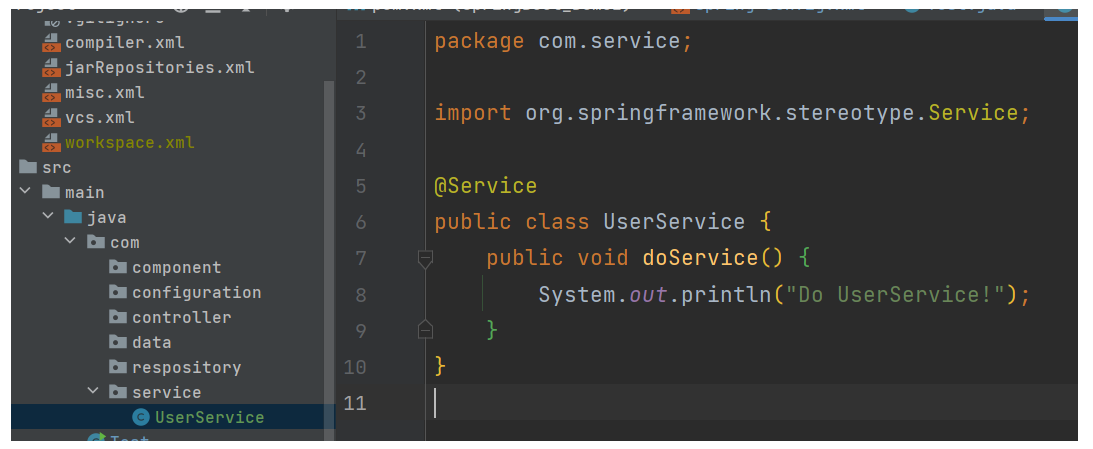
运行结果 :
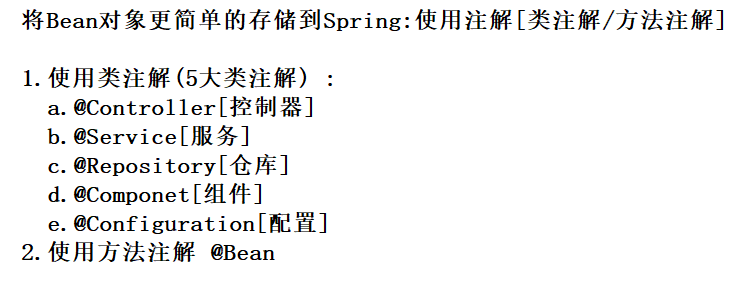
接下来我们对类注解进行一一验证 :
import com.component.UserComponent;
import com.configuration.UserConfiguration;
import com.controller.UserController;
import com.respository.UserRepository;
import com.service.UserService;
import org.springframework.context.ApplicationContext;
import org.springframework.context.support.ClassPathXmlApplicationContext;
import org.springframework.stereotype.Controller;
//启动类
public class Test {
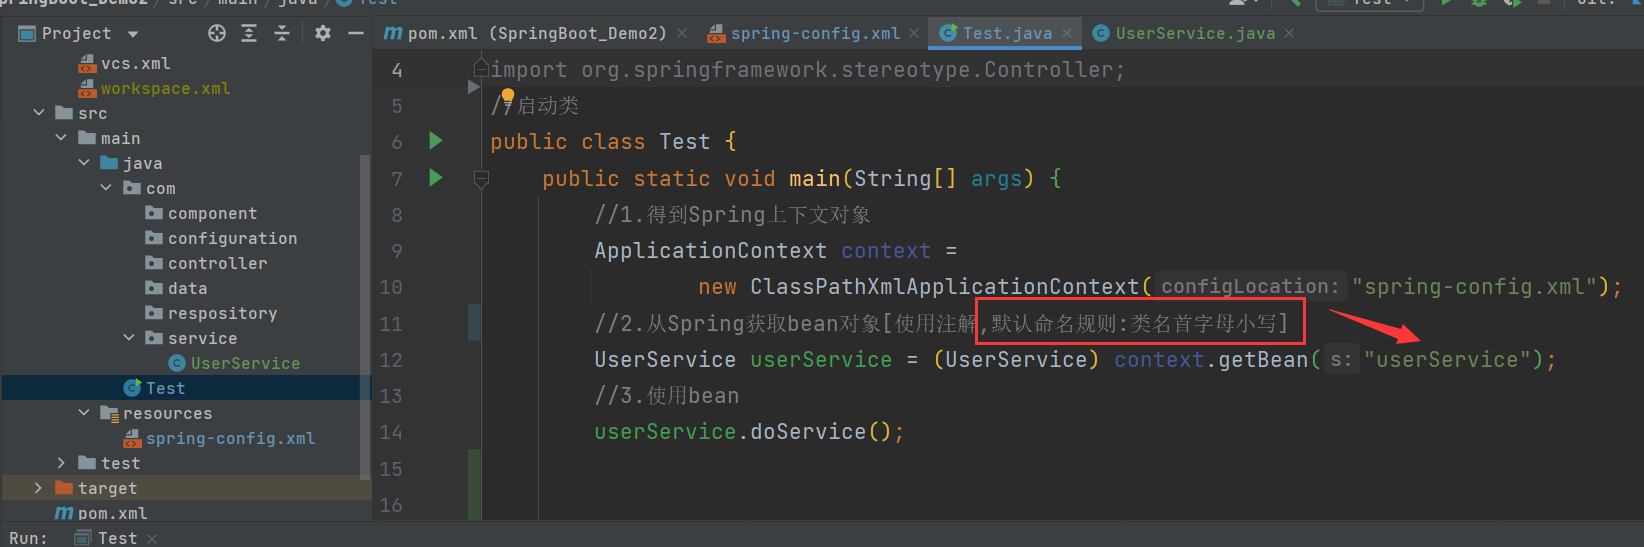
public static void main(String[] args) {
//1.得到Spring上下文对象
ApplicationContext context =
new ClassPathXmlApplicationContext("spring-config.xml");
//2.从Spring获取bean对象[使用注解,默认命名规则:类名首字母小写]
UserService userService = (UserService) context.getBean("userService");
//3.使用bean
userService.doService();
UserRepository userRepository = (UserRepository) context.getBean("userRepository");
userRepository.doRepository();
UserComponent userComponent = (UserComponent) context.getBean("userComponent");
userComponent.doComponent();
UserConfiguration userConfiguration = (UserConfiguration) context.getBean("userConfiguration");
userConfiguration.doConfiguration();
UserController userController = (UserController) context.getBean("userController");
userController.doUserController();
}
}
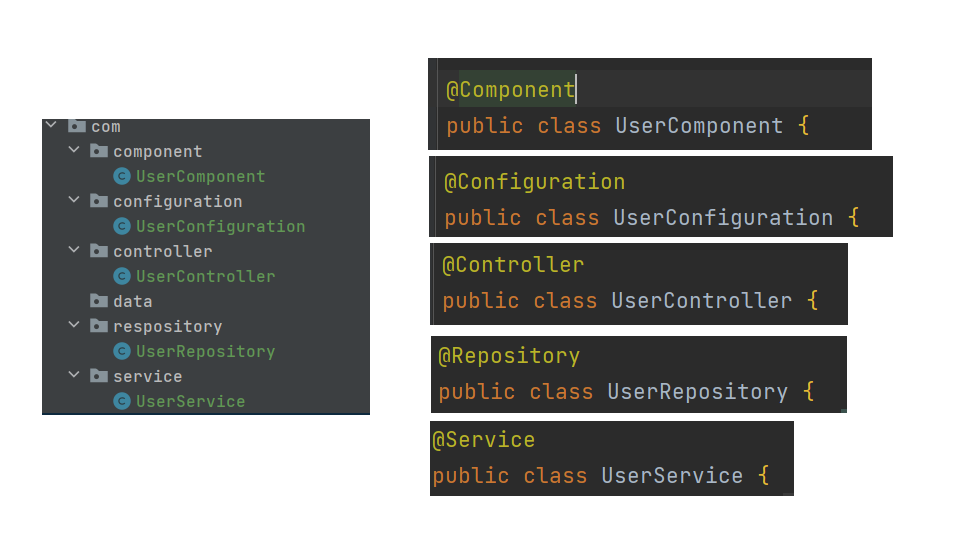
代码结构基本一致 :
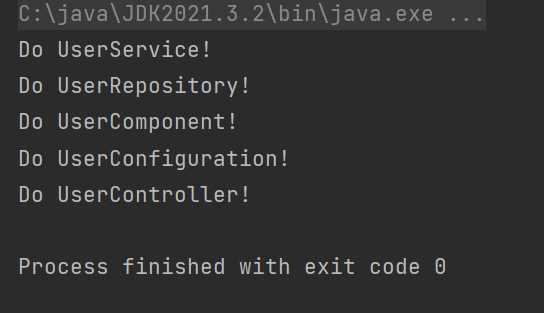
运行结果 :
Q1 : 5大类注解的关系 ?
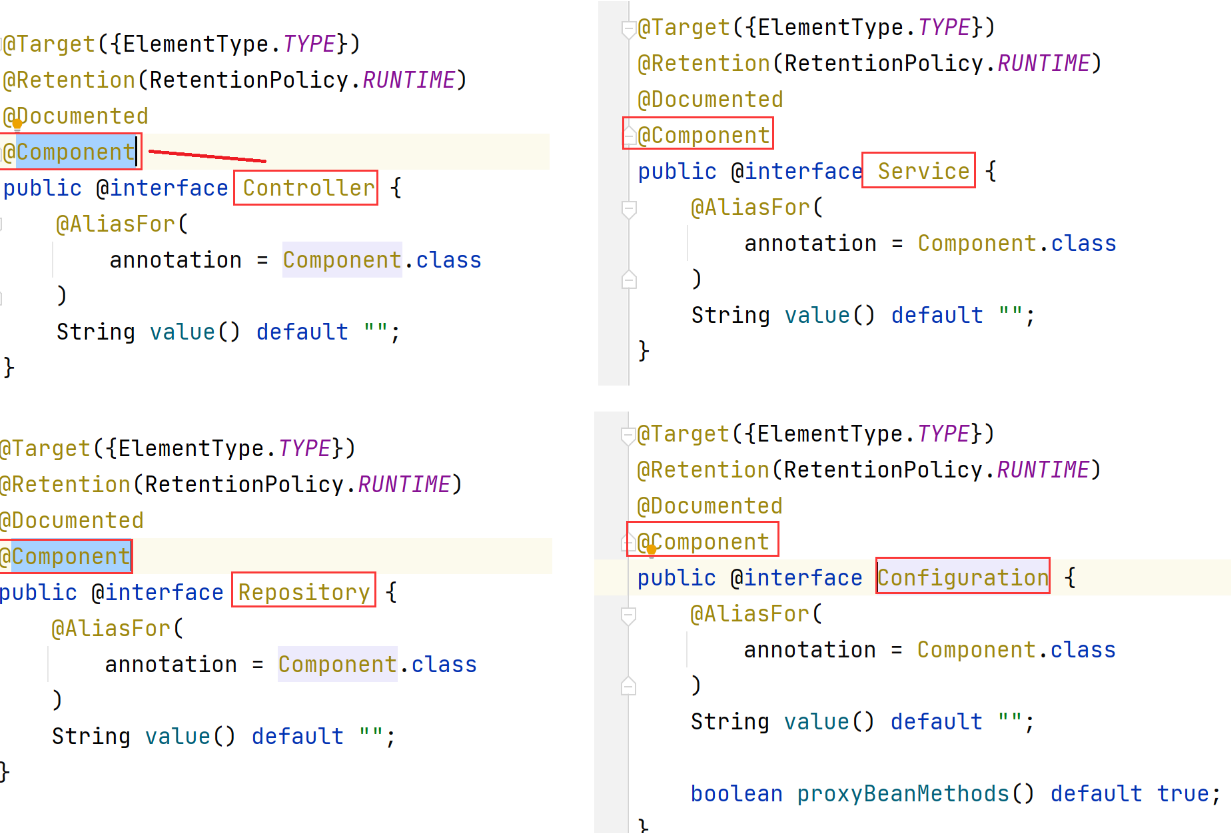
@Controller、@Service、@Repository、@Configuration 都是基于@Component,它们的作用都是将Bean存储到Spring 中 .
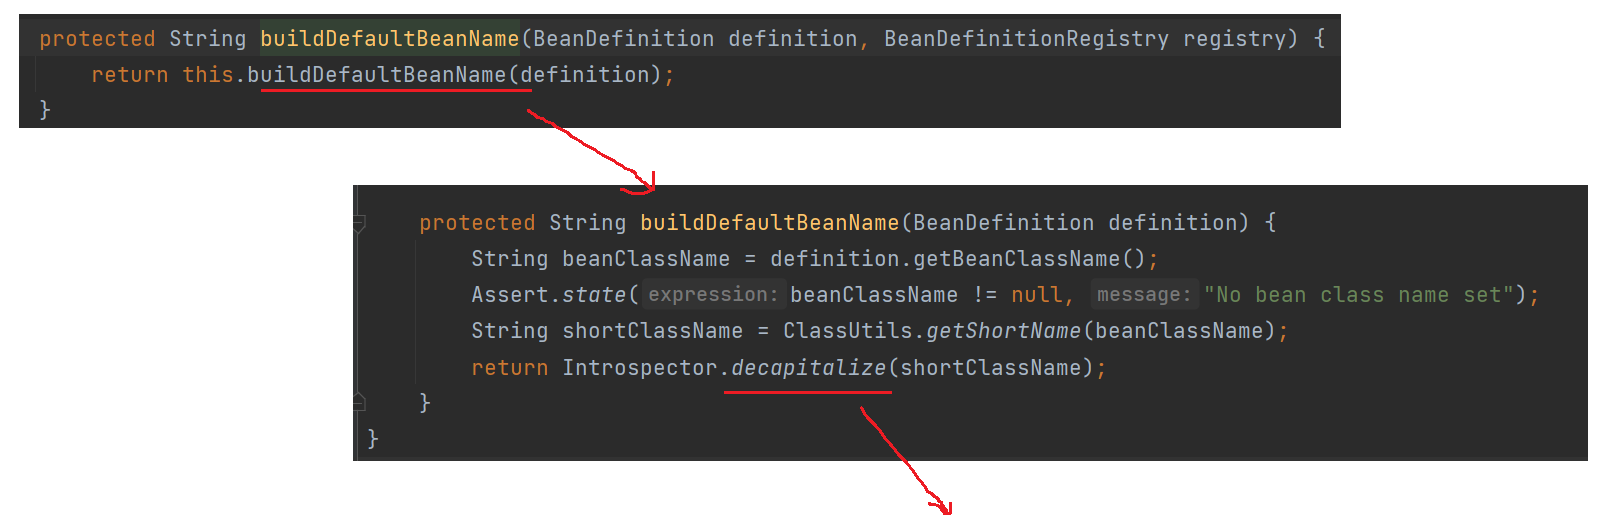
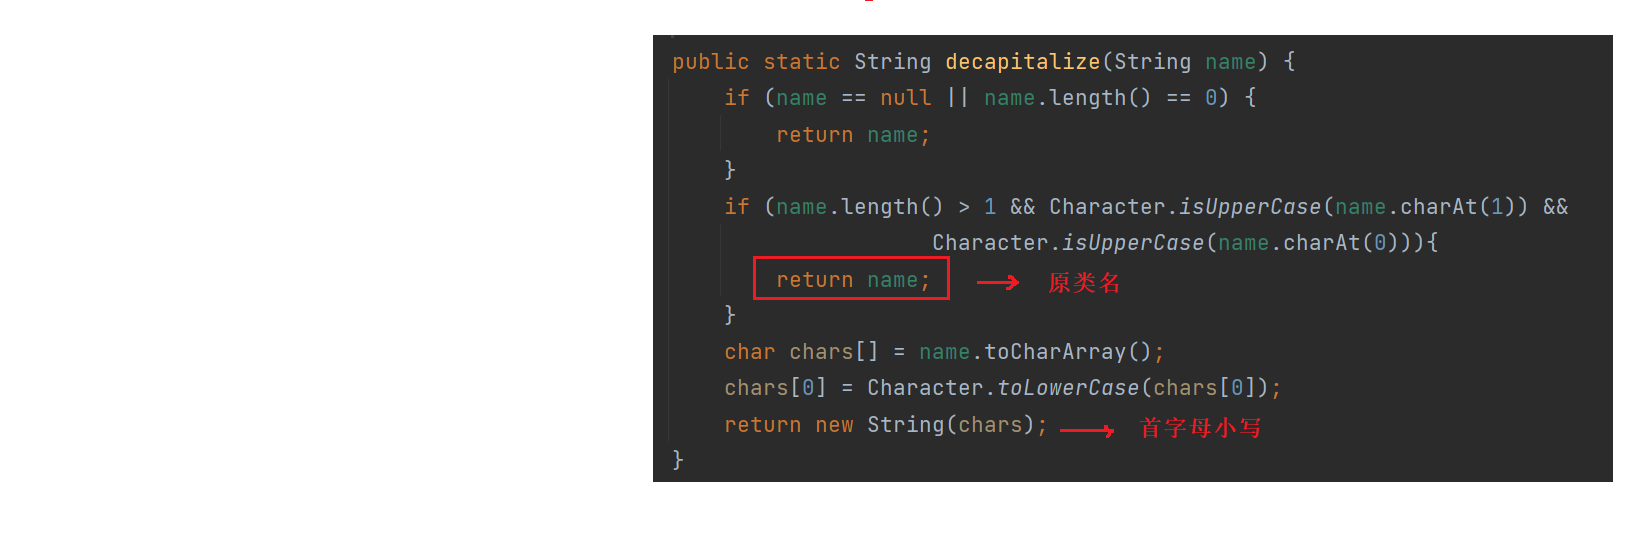
Q2 : Bean的命名规则 ?
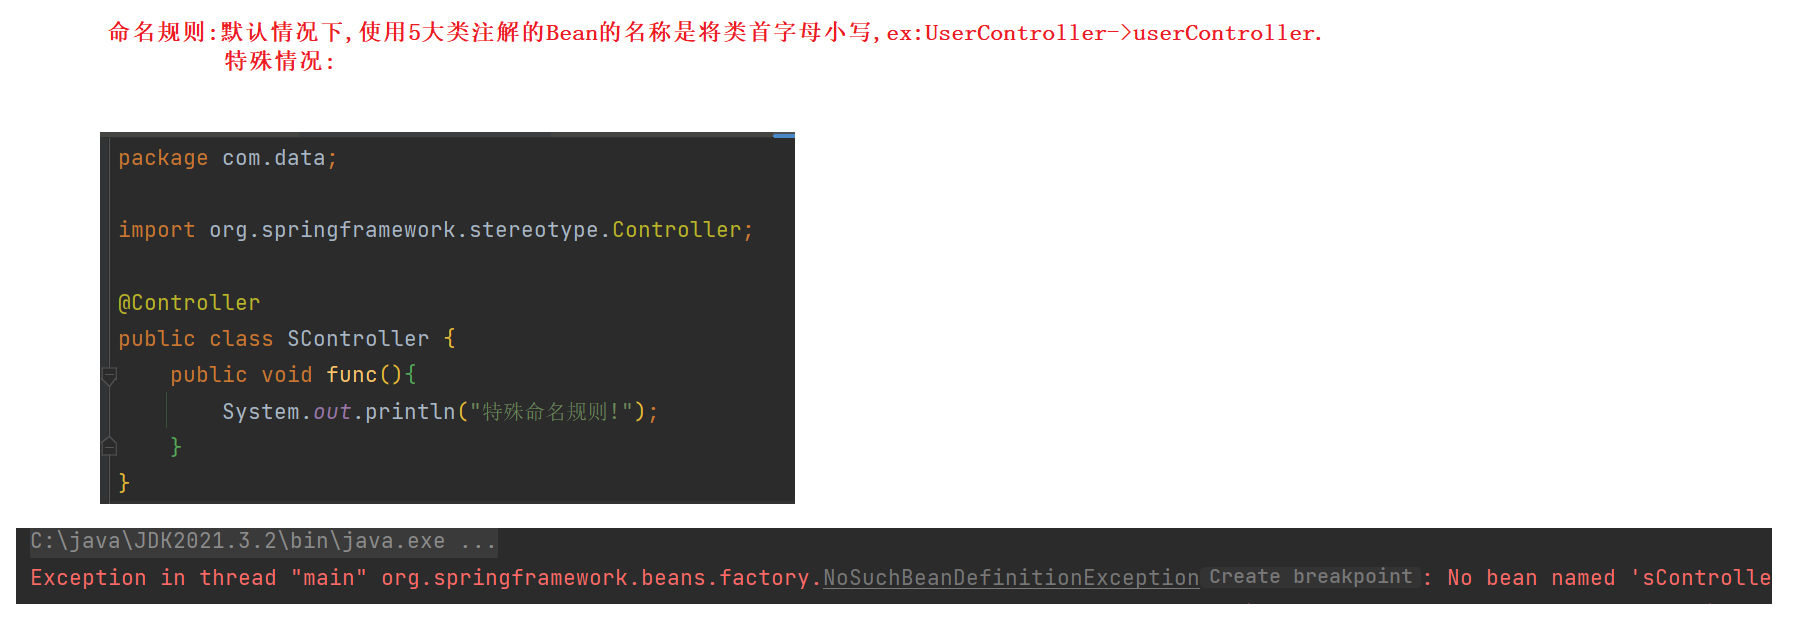
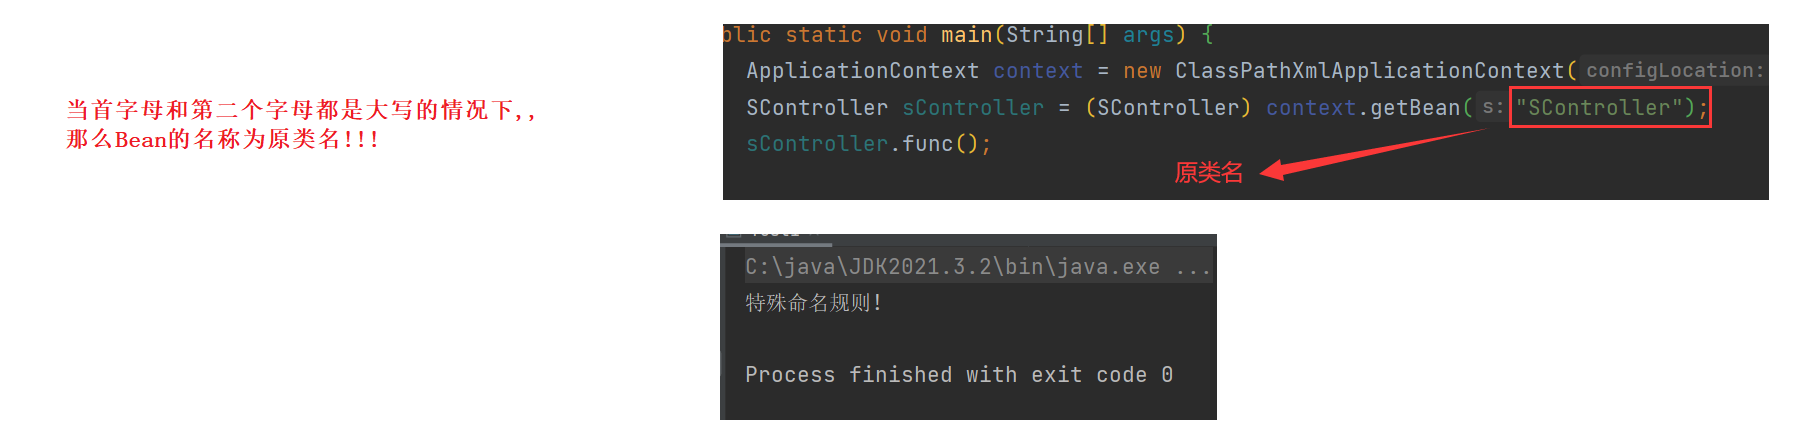
查看Bean命名的源码 :
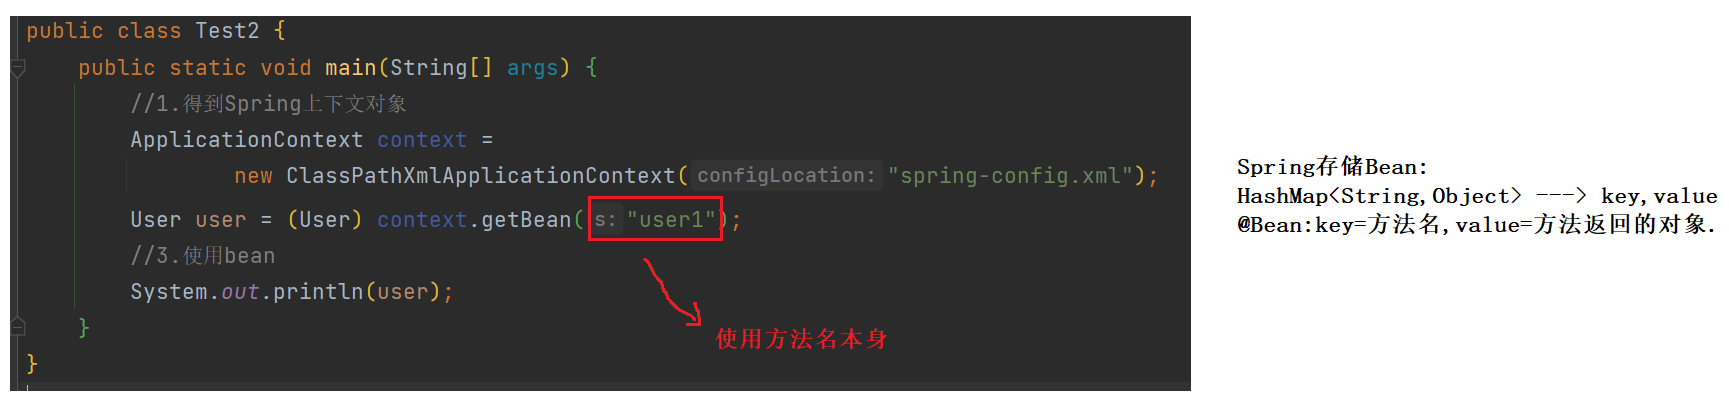
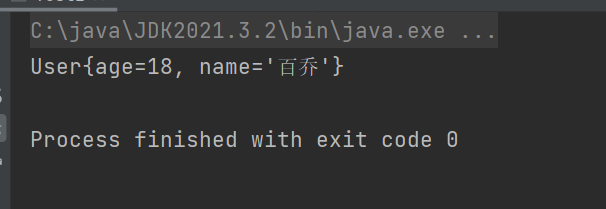
2.2 使用方法注解
2.2.1 演示
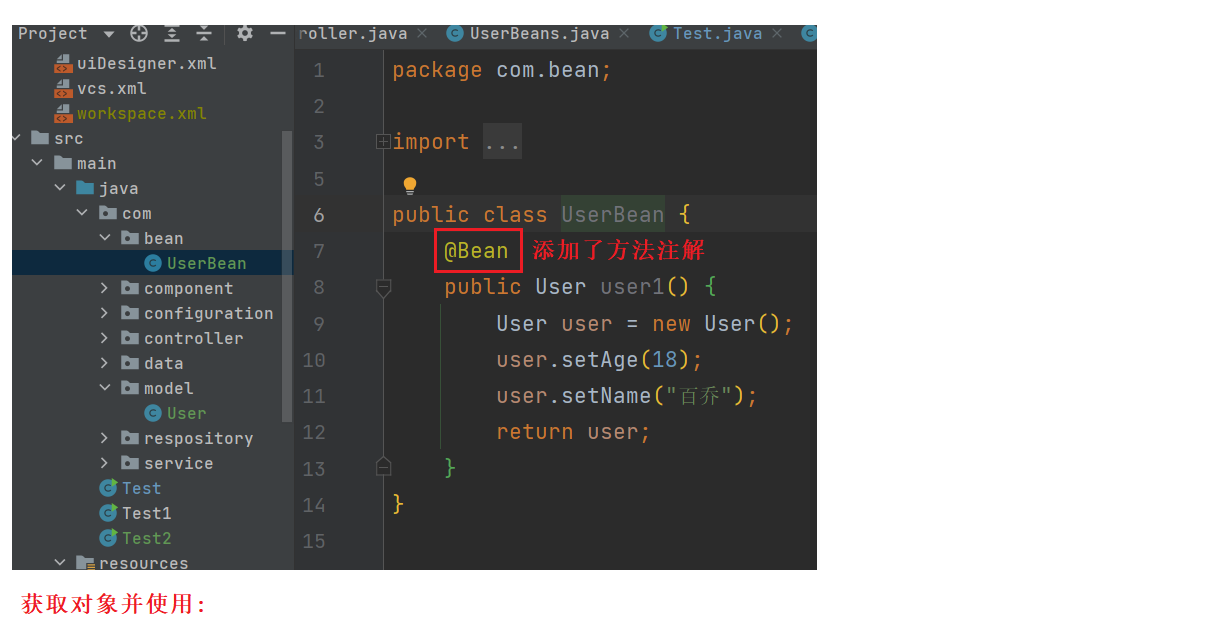
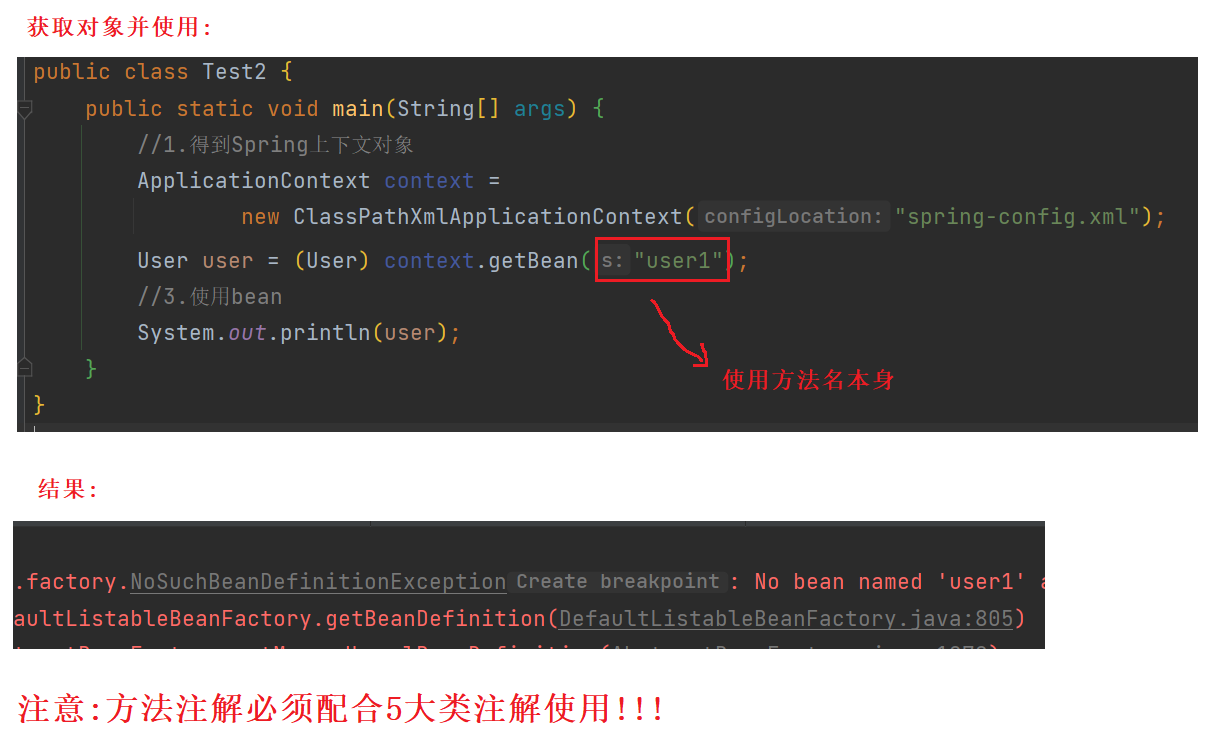
方法注解Bean命名规则 :
2.2.2注意事项

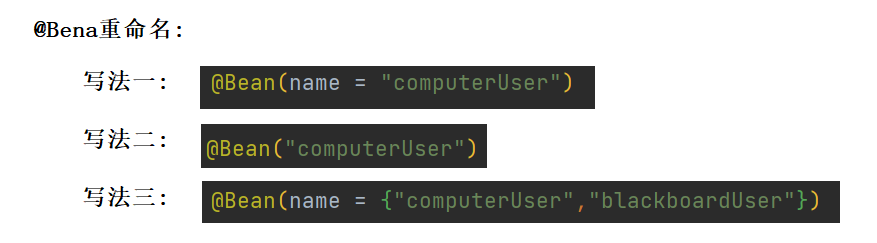
2.2.3 @Bean重命名
方法一:@Bean(name="xxxxx")
package com.bean;

import com.model.User;
import org.springframework.context.annotation.Bean;
import org.springframework.stereotype.Controller;

@Controller
public class UserBean {
    @Bean(name = "computerUser")
    public User user1() {
        User user = new User();
        user.setAge(18);
        user.setName("百乔");
        return user;
    }
}
import com.model.User;
import org.springframework.context.ApplicationContext;
import org.springframework.context.support.ClassPathXmlApplicationContext;

public class Test2 {
    public static void main(String[] args) {
        //1.得到Spring上下文对象
        ApplicationContext context =
                new ClassPathXmlApplicationContext("spring-config.xml");
        //2.从Spring获取bean对象[使用注解,默认命名规则:类名首字母小写]
        User user = (User) context.getBean("computerUser");
        //3.使用bean
        System.out.println(user);
    }
}

方法二:@Bean("xxxxx")
package com.bean;

import com.model.User;
import org.springframework.context.annotation.Bean;
import org.springframework.stereotype.Controller;

@Controller
public class UserBean {
    @Bean("computerUser")
    public User user1() {
        User user = new User();
        user.setAge(18);
        user.setName("百乔");
        return user;
    }
}
import com.model.User;
import org.springframework.context.ApplicationContext;
import org.springframework.context.support.ClassPathXmlApplicationContext;

public class Test2 {
    public static void main(String[] args) {
        //1.得到Spring上下文对象
        ApplicationContext context =
                new ClassPathXmlApplicationContext("spring-config.xml");
        //2.从Spring获取bean对象[使用注解,默认命名规则:类名首字母小写]
        User user = (User) context.getBean("computerUser");
        //3.使用bean
        System.out.println(user);
    }
}
方法三 : @Bean("xxxx","xxxxxx")
package com.bean;

import com.model.User;
import org.springframework.context.annotation.Bean;
import org.springframework.stereotype.Controller;

@Controller
public class UserBean {
    @Bean(name = {"computerUser","blackboardUser"})
    public User user1() {
        User user = new User();
        user.setAge(18);
        user.setName("百乔");
        return user;
    }
}
import com.model.User;
import org.springframework.context.ApplicationContext;
import org.springframework.context.support.ClassPathXmlApplicationContext;

public class Test2 {
    public static void main(String[] args) {
        //1.得到Spring上下文对象
        ApplicationContext context =
                new ClassPathXmlApplicationContext("spring-config.xml");
        //2.从Spring获取bean对象[使用注解,默认命名规则:类名首字母小写]
        User user = (User) context.getBean("blackboardUser");
        //3.使用bean
        System.out.println(user);
    }
}

三 : 获取Bean对象(依赖注入/对象装配)
在 Spring 中实现依赖注入的常见方式有以下 3 种:
- 属性注入(Field Injection);
- Setter 注入(Setter Injection);
- 构造方法注入(Constructor Injection).
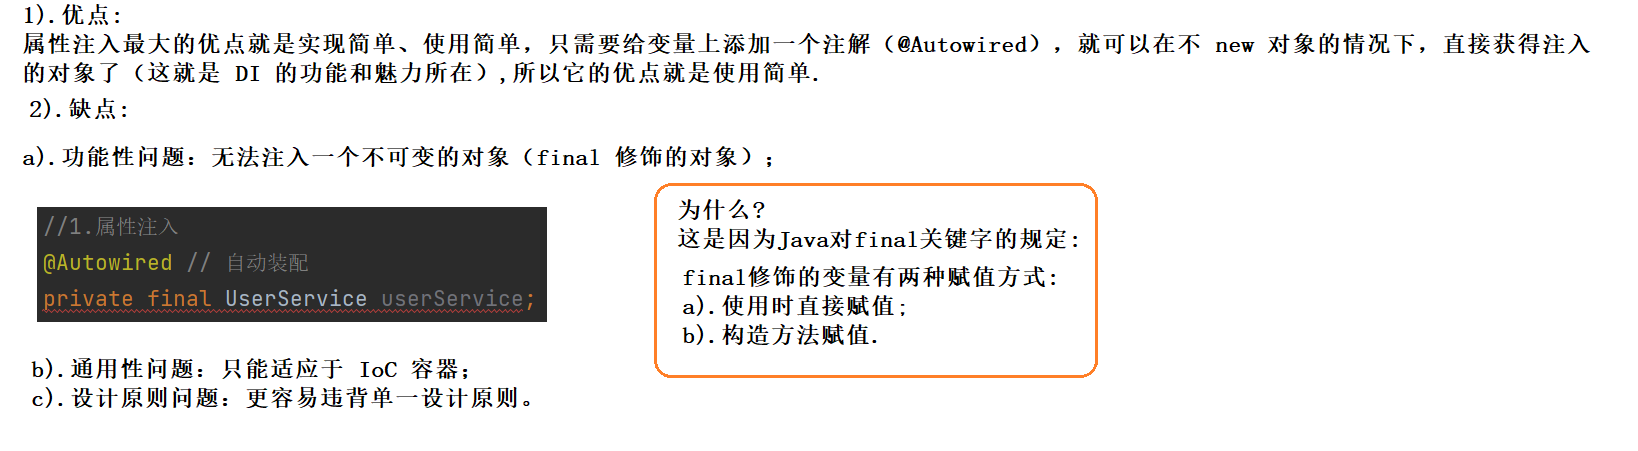
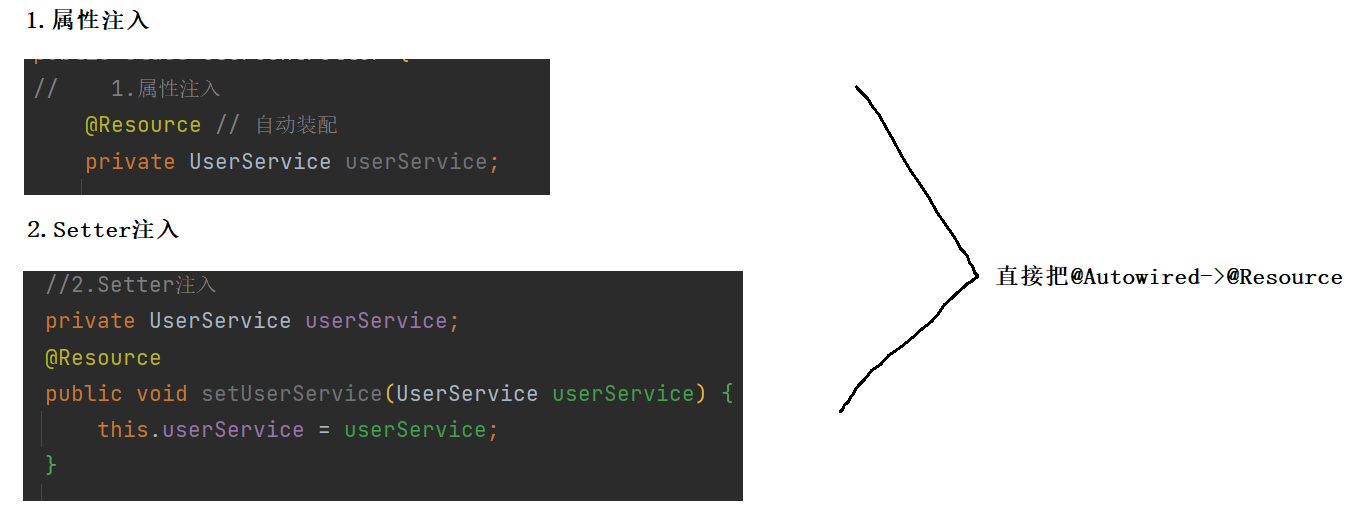
3.1 属性注入
属性注入是我们最熟悉,也是日常开发中使用最多的一种注入方式.
package com.controller;
import com.service.UserService;
import org.springframework.beans.factory.annotation.Autowired;
import org.springframework.stereotype.Controller;
@Controller
public class UserController {
//1.属性注入
@Autowired // 自动装配
private UserService userService;
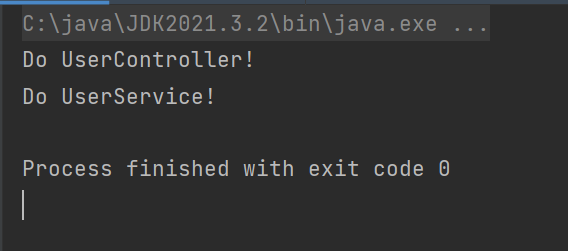
public void doUserController() {
System.out.println("Do UserController!");
userService.doService();
}
}
import com.controller.UserController;
import org.springframework.context.ApplicationContext;
import org.springframework.context.support.ClassPathXmlApplicationContext;

public class Test3 {
    public static void main(String[] args) {
        ApplicationContext context =
                new ClassPathXmlApplicationContext("spring-config.xml");
        UserController userController = (UserController) context.getBean("userController");
        userController.doUserController();
    }
}
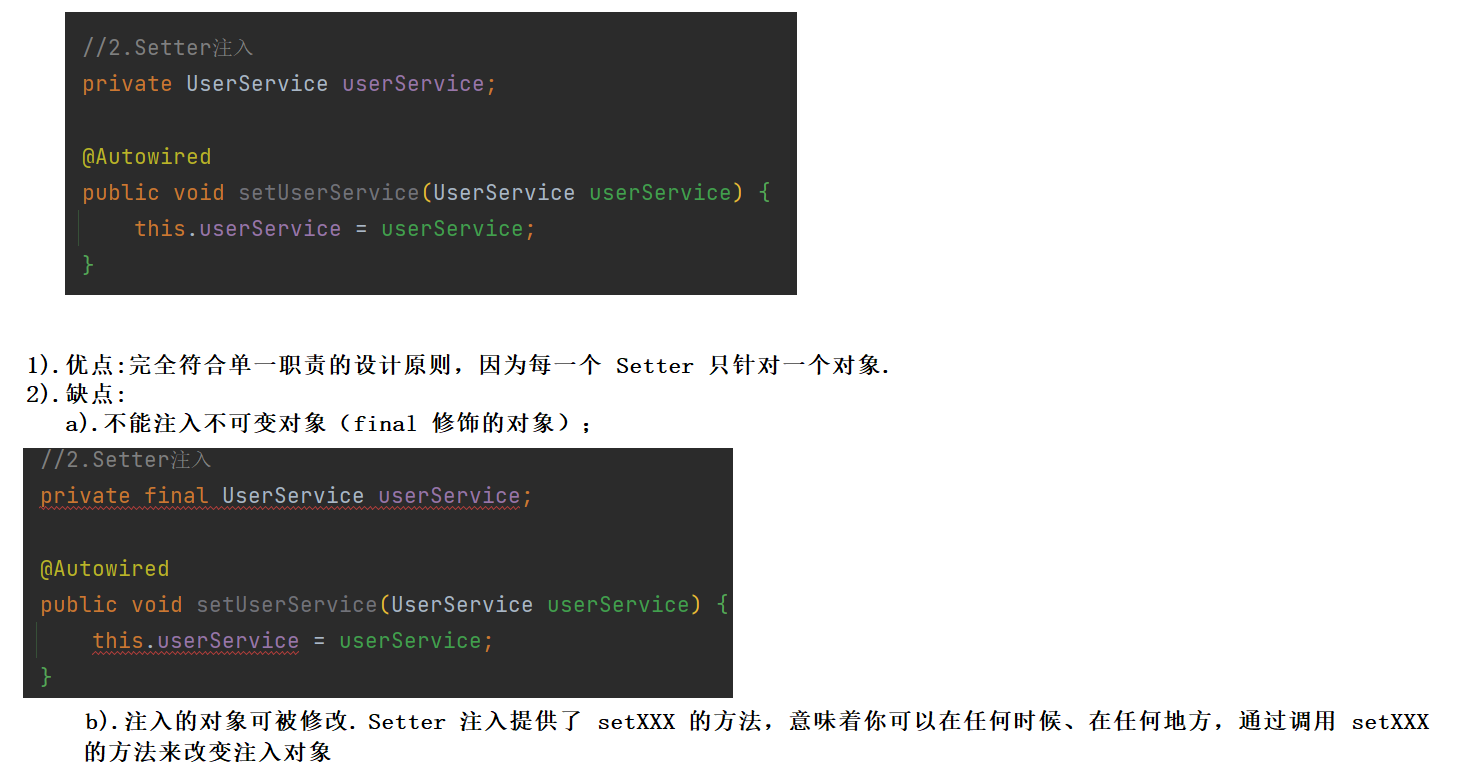
3.2 Setter注入
package com.controller;

import com.service.UserService;
import org.springframework.beans.factory.annotation.Autowired;
import org.springframework.stereotype.Controller;

@Controller
public class UserController {
    //2.Setter注入
    private UserService userService;

    @Autowired
    public void setUserService(UserService userService) {
        this.userService = userService;
    }

    public void doUserController() {
        System.out.println("Do UserController!");
        userService.doService();
    }
}
import com.controller.UserController;
import org.springframework.context.ApplicationContext;
import org.springframework.context.support.ClassPathXmlApplicationContext;

public class Test3 {
    public static void main(String[] args) {
        ApplicationContext context =
                new ClassPathXmlApplicationContext("spring-config.xml");
        UserController userController = (UserController) context.getBean("userController");
        userController.doUserController();
    }
}
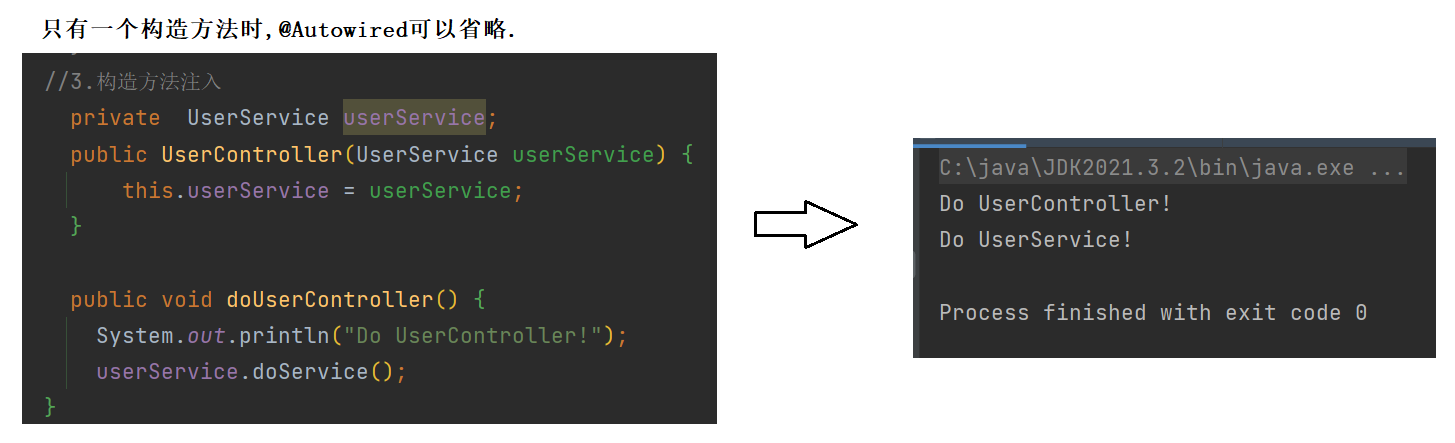
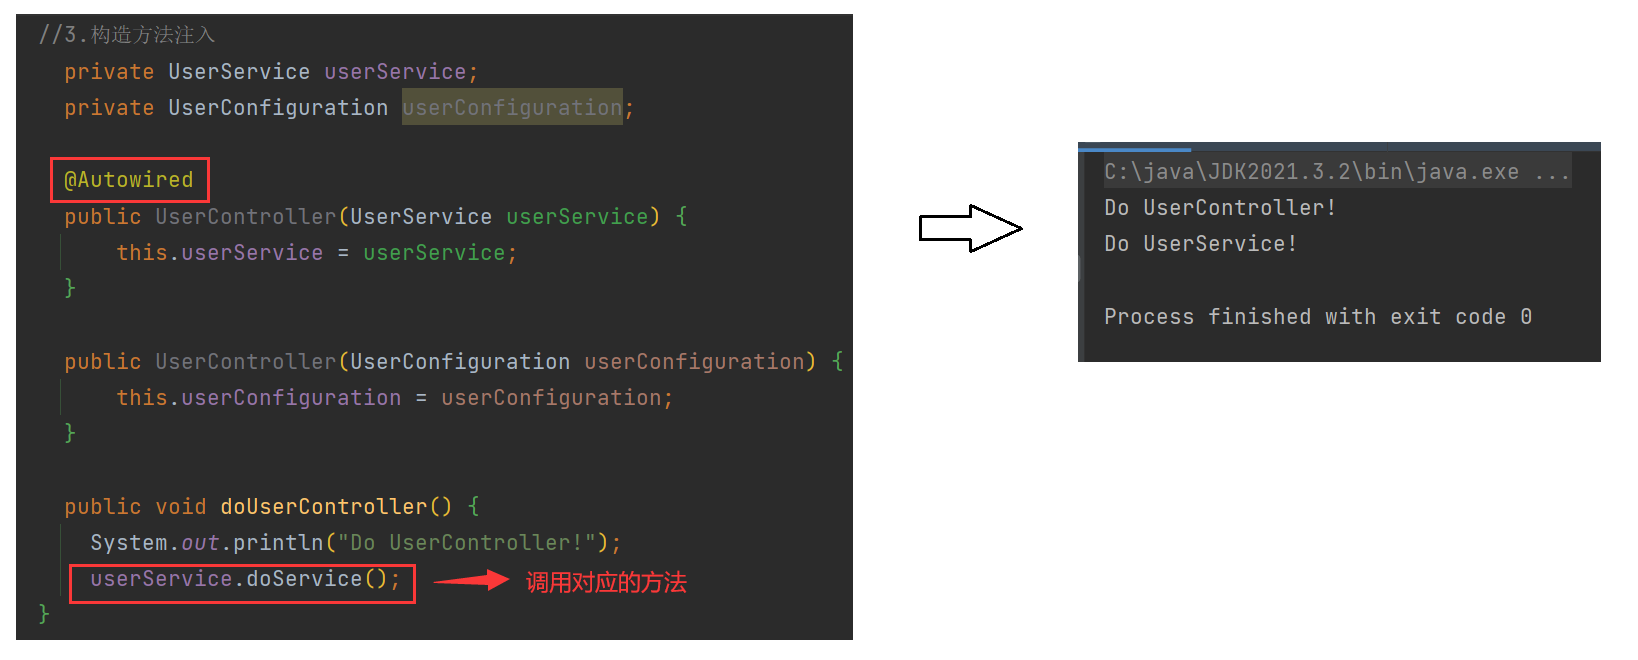
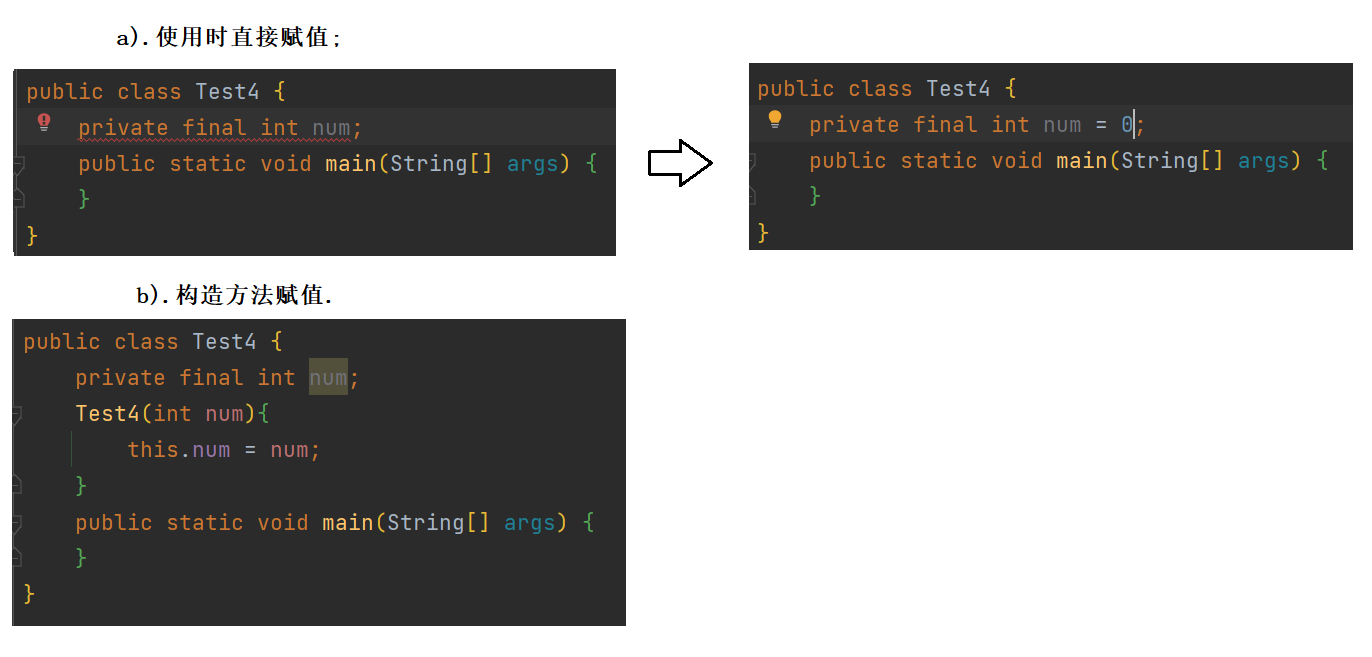
3.3 构造方法注入
package com.controller;

import com.model.User;
import com.service.UserService;
import org.springframework.beans.factory.annotation.Autowired;
import org.springframework.stereotype.Controller;

@Controller
public class UserController {
    //3.构造方法注入
      private  UserService userService;

	  @Autowired
      public UserController(UserService userService) {
          this.userService = userService;
      }

    public void doUserController() {
        System.out.println("Do UserController!");
        userService.doService();
    }
}
import com.controller.UserController;
import org.springframework.context.ApplicationContext;
import org.springframework.context.support.ClassPathXmlApplicationContext;

public class Test3 {
    public static void main(String[] args) {
        ApplicationContext context =
                new ClassPathXmlApplicationContext("spring-config.xml");
        UserController userController = (UserController) context.getBean("userController");
        userController.doUserController();
    }
}
以下是关于构造方法注入的一些注意事项 :
1.当当前类只有一个构造方法时,@Autowired可以省略;当存在多个构造方法时,@Autowired注解不能省略.
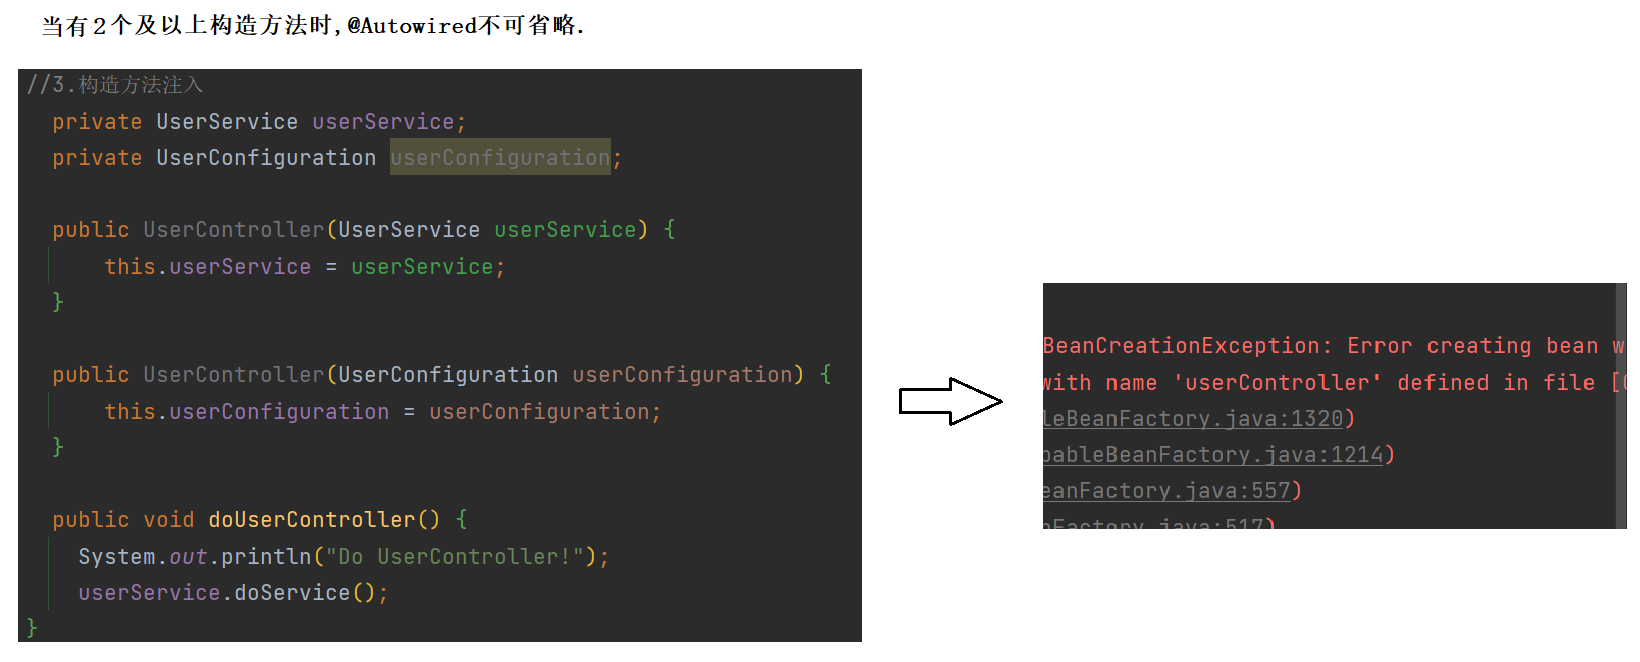
2.可以在一个构造方法里注入多个Autowired对象,且当仅有1个构造方法时,@Autowired可以省略.
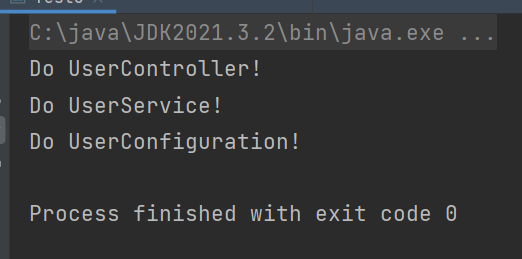
package com.controller;

import com.configuration.UserConfiguration;
import com.model.User;
import com.service.UserService;
import org.springframework.beans.factory.annotation.Autowired;
import org.springframework.stereotype.Controller;

@Controller
public class UserController {
    //3.构造方法注入
      private UserService userService;
      private UserConfiguration userConfiguration;

      @Autowired
      public UserController(UserService userService,UserConfiguration userConfiguration) {
          this.userService = userService;
          this.userConfiguration = userConfiguration;
      }

      public void doUserController() {
        System.out.println("Do UserController!");
        userService.doService();
        userConfiguration.doConfiguration();
    }
}
import com.controller.UserController;
import org.springframework.context.ApplicationContext;
import org.springframework.context.support.ClassPathXmlApplicationContext;

public class Test3 {
    public static void main(String[] args) {
        ApplicationContext context =
                new ClassPathXmlApplicationContext("spring-config.xml");
        UserController userController = (UserController) context.getBean("userController");
        userController.doUserController();
    }
}
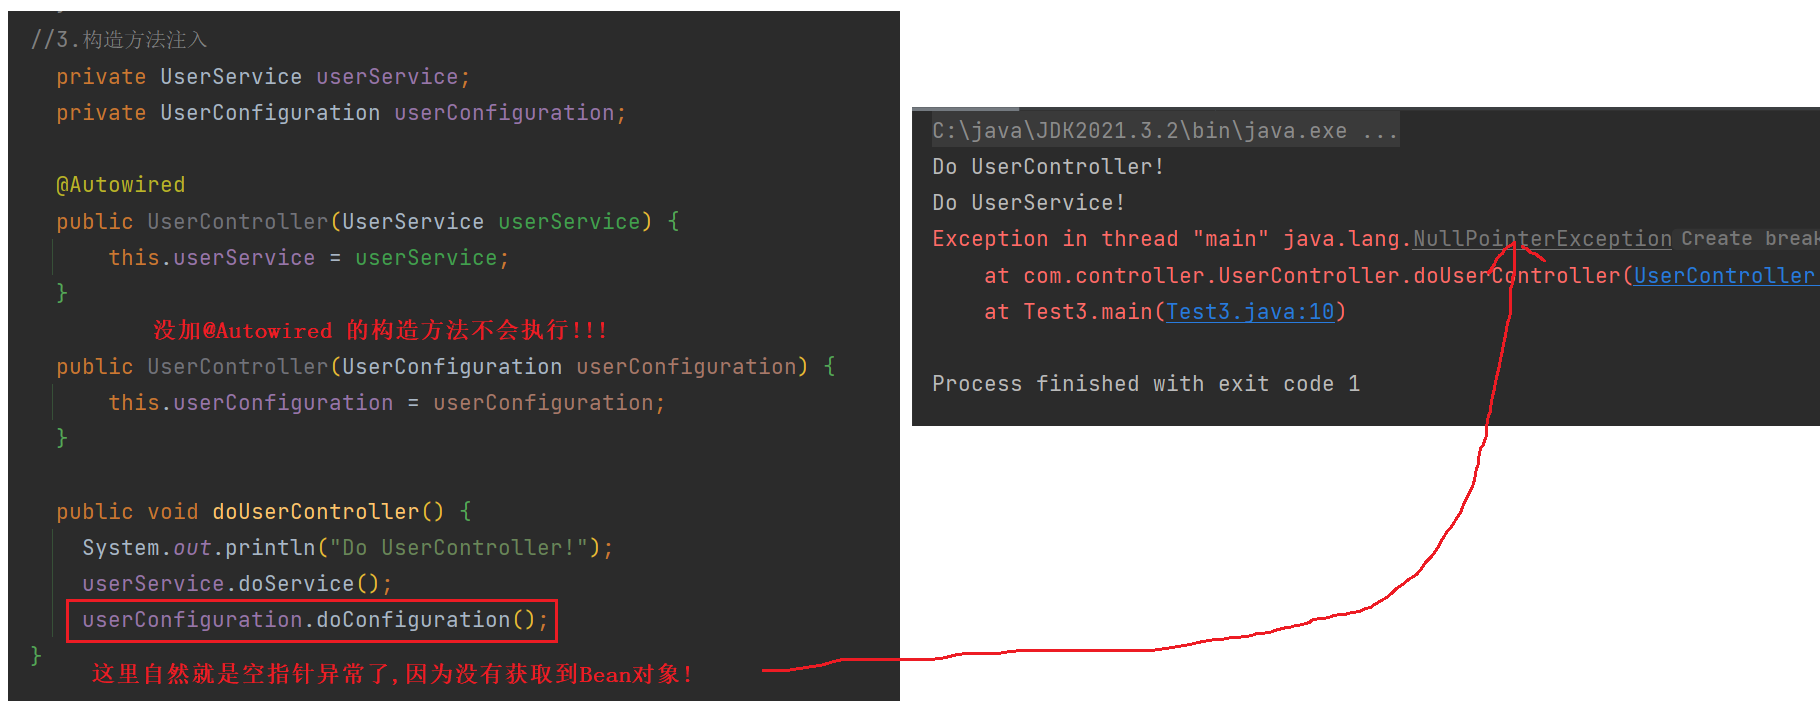
3.答:当有多个构造方法的时候,加了@Autowired 的构造方法才会执行,并且构造方法中的参数(对象)必须要存在于Spring容器中,否则就会报错.
典型错误 :
构造方法注入的优点 :
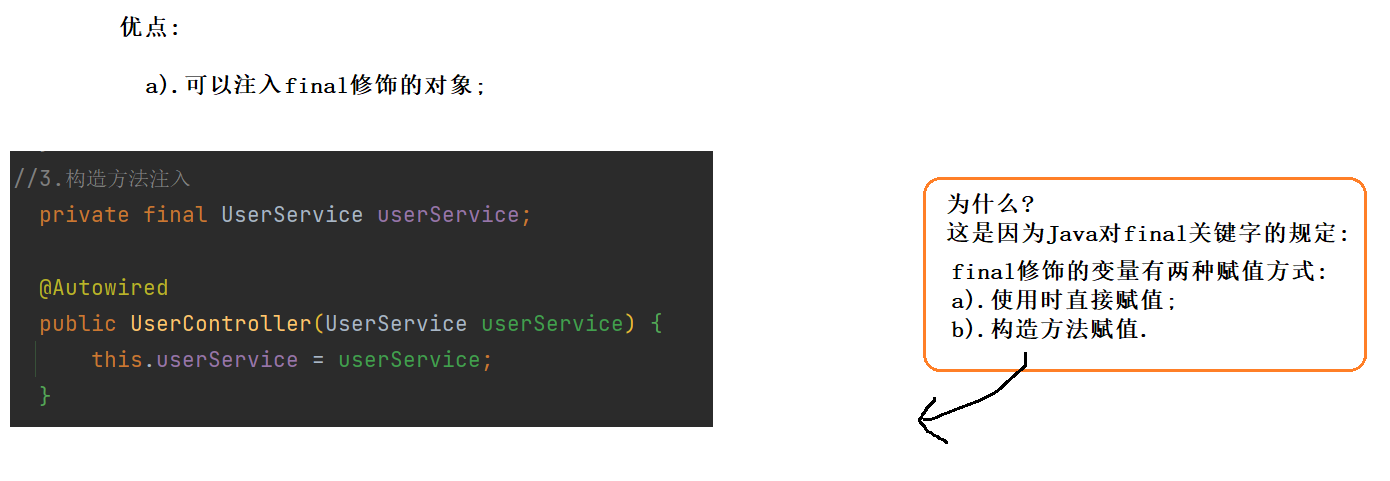


Spring4.2之前推荐使用Setter注入方式 , 原因是其符合单一性原则 ; Spring4.2之后则推荐使用构造方法注入 . 有意思的是Spring官方在源代码中更多使用的 , 却是属性注入的方式 , 因为这种方法确实非常简单 .
3.2 @Resource
在进行类注入时,除了可以使用 @Autowired 关键字之外,我们还可以使用 @Resource 进行注入 , 示例如下 :
@Resource注解不能使用在构造方法实现上 .
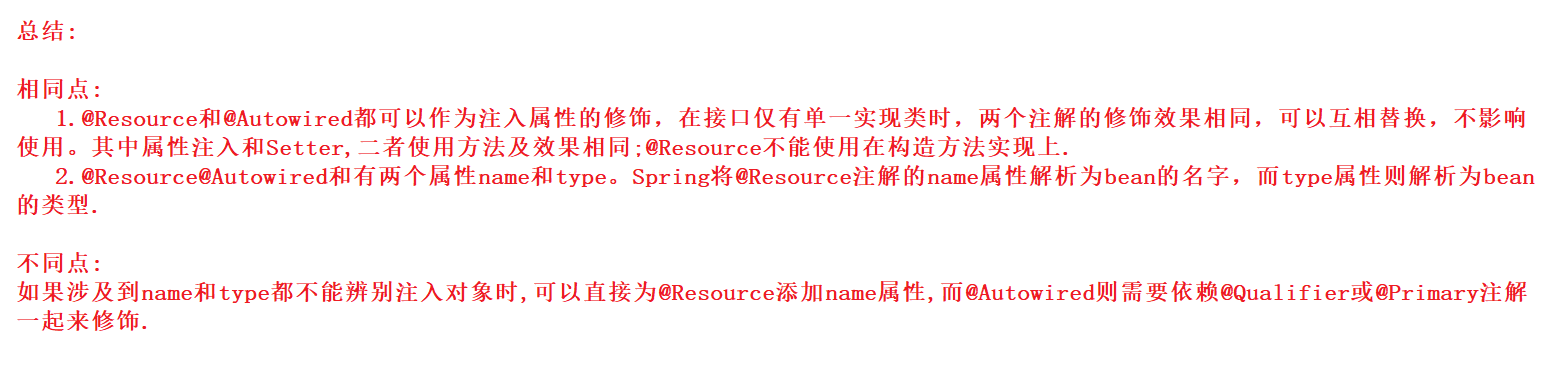
@Resource和@Autowired的区别
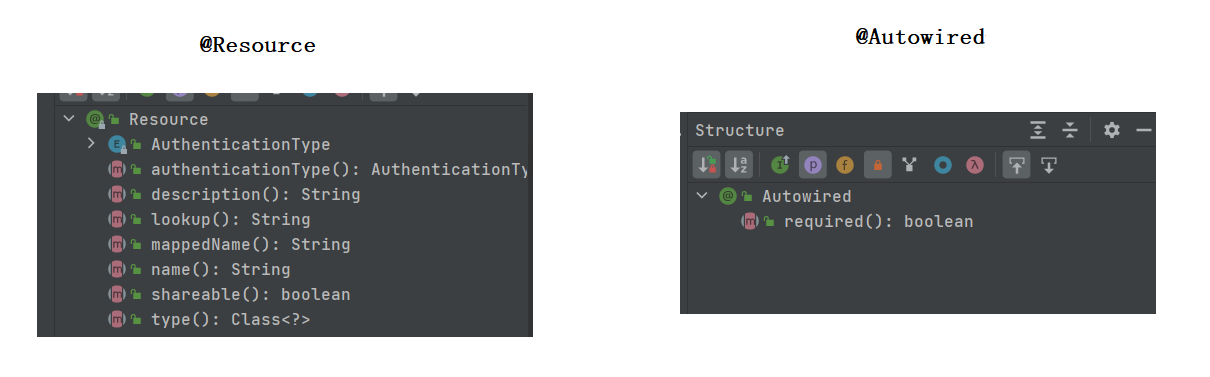
先看@Resource :
package com.controller;
import com.model.User;
import org.springframework.stereotype.Controller;

import javax.annotation.Resource;

@Controller
public class SheepController {
    @Resource(name = "user1")
    private User user;

    public void doSheepController() {
        System.out.println("别看我只是一只羊");
        System.out.println(user);
    }
}
import com.controller.SheepController;
import org.springframework.context.ApplicationContext;
import org.springframework.context.support.ClassPathXmlApplicationContext;

public class Test3 {
    public static void main(String[] args) {
        ApplicationContext context =
                new ClassPathXmlApplicationContext("spring-config.xml");
        SheepController sheepController =
                (SheepController) context.getBean("sheepController");
        sheepController.doSheepController();
    }
}
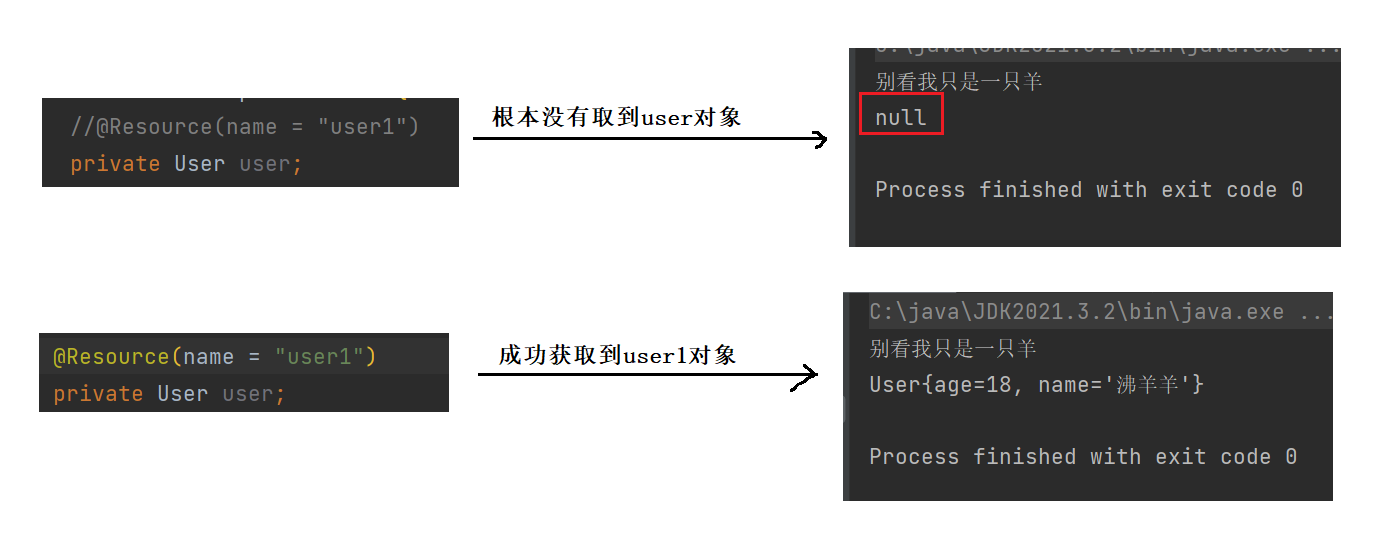
解释 :
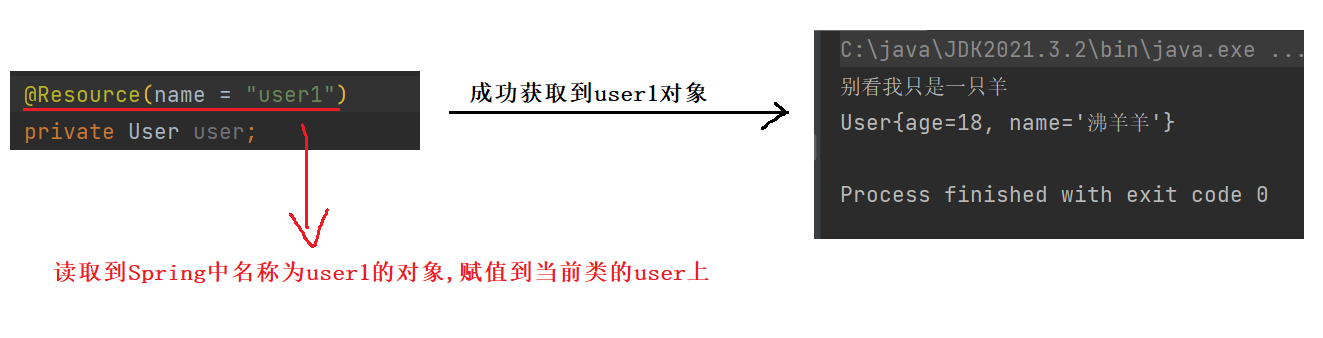
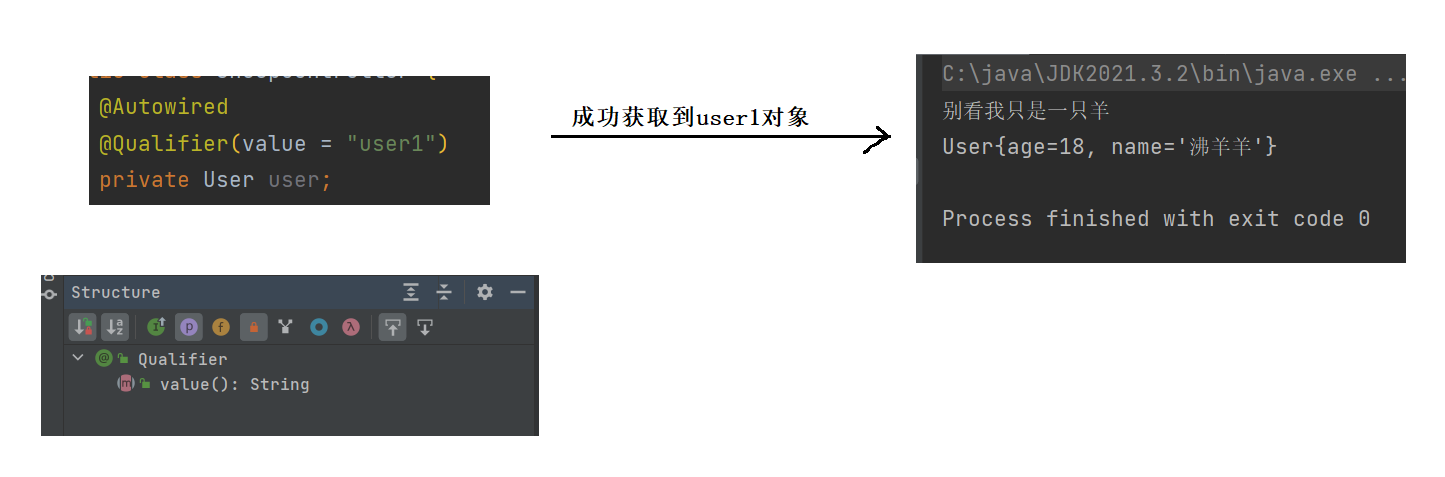
如果使用@Autowired , 需要配合另一个Spring的注解@qualifier .
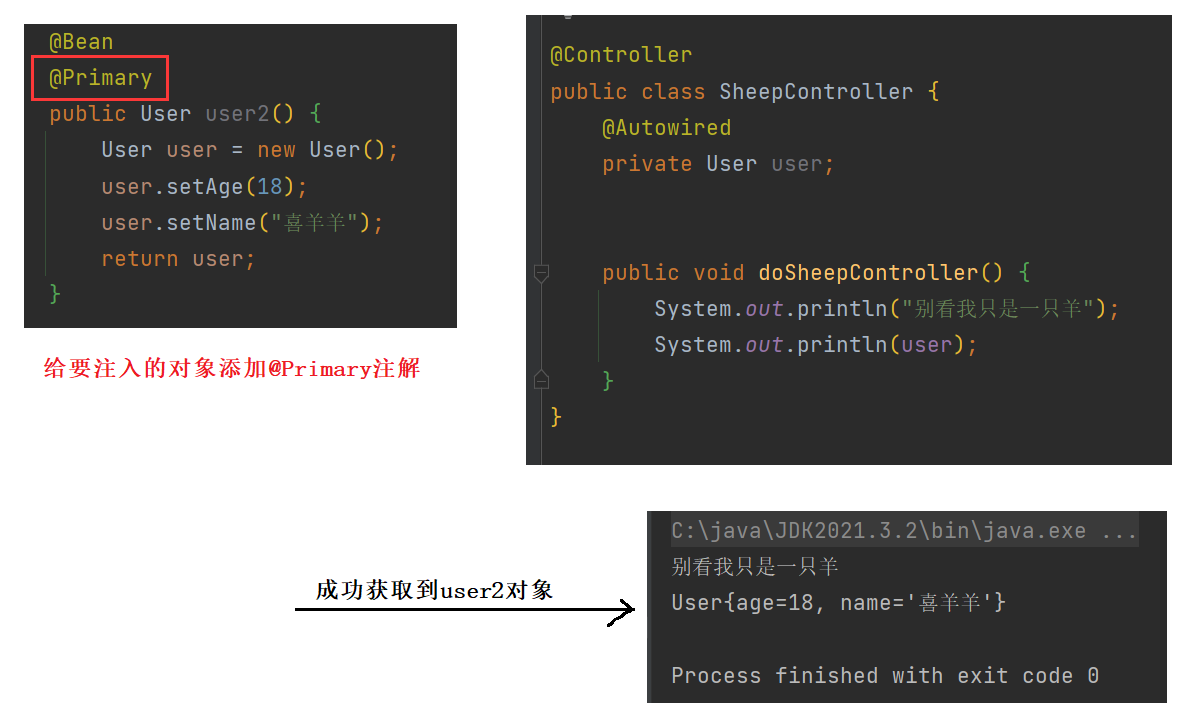
还可以配合@Primary注解 :
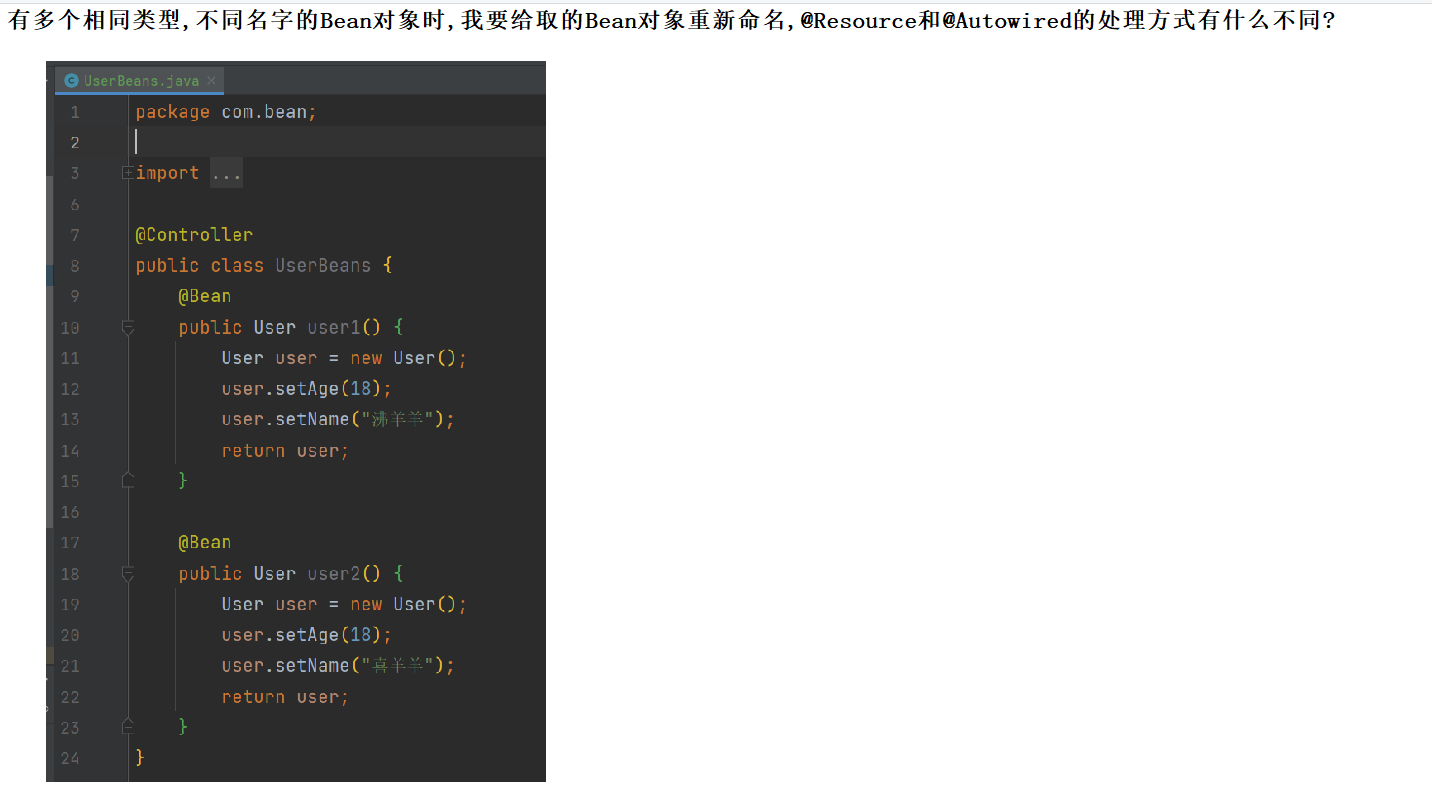
以下是一道综合练习题 , 大家可以到我的码云(SpringBoot_Demo3)查看答案 :


本节内容结束 !
![[数据结构] 图---图的邻接矩阵存储方式模拟实现,包括BFS广度优先遍历和DFS深度优先遍历(上)](https://img-blog.csdnimg.cn/1344d61068954c6595b532dca9bf00eb.png#pic_center)