1.进程间通信介绍
1.1进程间通信目的
-
数据传输:一个进程需要将它的数据发送给另一个进程。
-
资源共享:多个进程之间共享同样的资源。
-
通知事件:一个进程需要向另一个或一组进程发送消息,通知它(它们)发生了某种事件(如进程终止时要通知父进程)。
-
进程控制:有些进程希望完全控制另一个进程的执行(如 Debug 进程),此时控制进程希望能够拦截另一个进程的所有陷入和异常,并能够及时知道它的状态改变。
1.2进程间通信发展
-
管道
-
System V 进程间通信
-
POSIX 进程间通信
1.3 进程间通信分类
1.3.1管道
-
匿名管道 pipe
-
命名管道
1.3.2 System V IPC
-
System V 消息队列
-
System V 共享内存
-
System V 信号量
1.3.3 POSIX IPC
- 消息队列
-
共享内存
- 信号量
- 互斥量
- 条件变量
- 读写锁
2.管道
2.1什么是管道
-
管道是 Unix 中最古老的进程间通信的形式。
-
我们把从一个进程连接到另一个进程的一个数据流称为一个 “ 管道”。

2.2匿名管道
#include <unistd.h>
功能:创建一无名管道
原型
int pipe(int fd[2]);
参数
fd:文件描述符数组,其中fd[0]表示读端, fd[1]表示写端
返回值:成功返回0,失败返回错误代码
2.3实例代码
例子:从键盘读取数据,写入管道,读取管道,写到屏幕

#include <stdio.h>
#include <stdlib.h>
#include <string.h>
#include <unistd.h>

int main(void)
{
	int fds[2];
	char buf[100];
	int len;

	if (pipe(fds) == -1)
		perror("make pipe"), exit(1);

	// read from stdin
	while (fgets(buf, 100, stdin))
	{
		len = strlen(buf);
		// write into pipe
		if (write(fds[1], buf, len) != len)
		{
			perror("write to pipe");
			break;
		}
		memset(buf, 0x00, sizeof(buf));

		// read from pipe
		if ((len = read(fds[0], buf, 100)) == -1)
		{
			perror("read from pipe");
			break;
		}

		// write to stdout
		if (write(1, buf, len) != len)
		{
			perror("write to stdout");
			break;
		}
	}
}
2.4用fork来共享管道原理

2.5站在文件描述符角度-深度理解管道

2.6站在内核角度-管道本质

所以,看待管道,就如同看待文件一样!管道的使用和文件一致,迎合了“Linux一切皆文件思想”。
#include <unistd.h>
#include <stdlib.h>
#include <stdio.h>
#include <errno.h>
#include <string.h>
#defifine ERR_EXIT(m) \ do \ { \ perror(m); \ exit(EXIT_FAILURE); \ } while(0)
int main(int argc, char *argv[]) { int pipefd[2]; if (pipe(pipefd) == -1) ERR_EXIT("pipe error");
pid_t pid;
pid = fork();
if (pid == -1)
ERR_EXIT("fork error");

if (pid == 0)
{
	close(pipefd[0]);
	write(pipefd[1], "hello", 5);
	close(pipefd[1]);
	exit(EXIT_SUCCESS);
}

close(pipefd[1]);
char buf[10] = { 0 };
read(pipefd[0], buf, 10);
printf("buf=%s\n", buf);

return 0;
例子
1.
在
minishell
中添加管道的实现:
# include <stdio.h>
# include <stdlib.h>
# include <unistd.h>
# include <string.h>
# include <fcntl.h>

# define MAX_CMD 1024
char command[MAX_CMD];
int do_face()
{
	memset(command, 0x00, MAX_CMD);
	printf("minishell$ ");
	fflush(stdout);
	if (scanf("%[^\n]%*c", command) == 0)
	{
		getchar();
		return -1;
	}
	return 0;
}
char** do_parse(char* buff)
{
	int argc = 0;
	static char* argv[32];
	char* ptr = buff;

	while (*ptr != '\0')
	{
		if (!isspace(*ptr))
		{
			argv[argc++] = ptr;
			while ((!isspace(*ptr)) && (*ptr) != '\0')
			{
				ptr++;
			}
		}
		else
		{
			while (isspace(*ptr))
			{
				*ptr = '\0';
				ptr++;
			}
		}
	}
	argv[argc] = NULL;
	return argv;
}
int do_redirect(char* buff)
{
	char* ptr = buff, * file = NULL;
	int type = 0, fd, redirect_type = -1;
	while (*ptr != '\0')
	{
		if (*ptr == '>')
		{
			*ptr++ = '\0';

			redirect_type++;
			if (*ptr == '>')
			{
				*ptr++ = '\0';
				redirect_type++;
			}
			while (isspace(*ptr))
			{
				ptr++;
			}
			file = ptr;
			while ((!isspace(*ptr)) && *ptr != '\0')
			{
				ptr++;
			}
			*ptr = '\0';
			if (redirect_type == 0)
			{
				fd = open(file, O_CREAT | O_TRUNC | O_WRONLY, 0664);
			}
			else
			{
				fd = open(file, O_CREAT | O_APPEND | O_WRONLY, 0664);
			}
			dup2(fd, 1);
		}
		ptr++;
	}
	return 0;
}
int do_command(char* buff)
{
	int pipe_num = 0, i;
	char* ptr = buff;
	int pipefd[32][2] = { {-1} };
	int pid = -1;

	pipe_command[pipe_num] = ptr;
	while (*ptr != '\0')
	{
		if (*ptr == '|')
		{
			pipe_num++;
			*ptr++ = '\0';
			pipe_command[pipe_num] = ptr;
			continue;
		}
		ptr++;
	}
	pipe_command[pipe_num + 1] = NULL;
	return pipe_num;
}

int do_pipe(int pipe_num)
{
	int pid = 0, i;
	int pipefd[10][2] = { {0} };
	char** argv = { NULL };

	for (i = 0; i <= pipe_num; i++)
	{
		pipe(pipefd[i]);
	}

	for (i = 0; i <= pipe_num; i++)
	{
		pid = fork();
		if (pid == 0)
		{
			do_redirect(pipe_command[i]);
			argv = do_parse(pipe_command[i]);
			if (i != 0)
			{
				close(pipefd[i][1]);
				dup2(pipefd[i][0], 0);
			}
			if (i != pipe_num)
			{
				close(pipefd[i + 1][0]);
				dup2(pipefd[i + 1][1], 1);
			}
			execvp(argv[0], argv);
		}
		else
		{
			close(pipefd[i][0]);
			close(pipefd[i][1]);
			waitpid(pid, NULL, 0);
		}
	}
	return 0;
}

int main(int argc, char* argv[])
{
	int num = 0;
	while (1)
	{
		if (do_face() < 0)
			continue;
		num = do_command(command);
		do_pipe(num);
	}
	return 0;
}
2.7管道读写规则
-
当没有数据可读时1. O_NONBLOCK disable : read 调用阻塞,即进程暂停执行,一直等到有数据来到为止。2. O_NONBLOCK enable : read 调用返回 -1 , errno 值为 EAGAIN 。
- 当管道满的时候
1. O_NONBLOCK disable: write调用阻塞,直到有进程读走数据
2.
O_NONBLOCK enable
:调用返回
-1
,
errno
值为
EAGAIN
- 如果所有管道写端对应的文件描述符被关闭,则read返回0
-
如果所有管道读端对应的文件描述符被关闭,则 write 操作会产生信号 SIGPIPE, 进而可能导致 write 进程退出
-
当要写入的数据量不大于 PIPE_BUF 时, linux 将保证写入的原子性。
-
当要写入的数据量大于 PIPE_BUF 时, linux 将不再保证写入的原子性。
2.8 管道特点
-
只能用于具有共同祖先的进程(具有亲缘关系的进程)之间进行通信;通常,一个管道由一个进程创建,然后该进程调用fork ,此后父、子进程之间就可应用该管道。
-
管道提供流式服务。
-
一般而言,进程退出,管道释放,所以管道的生命周期随进程。
-
一般而言,内核会对管道操作进行同步与互斥。
-
管道是半双工的,数据只能向一个方向流动;需要双方通信时,需要建立起两个管道。

2.9命名管道
- 管道应用的一个限制就是只能在具有共同祖先(具有亲缘关系)的进程间通信。
-
如果我们想在不相关的进程之间交换数据,可以使用 FIFO 文件来做这项工作,它经常被称为命名管道。
- 命名管道是一种特殊类型的文件。
2.9.1创建一个命名管道
- 命名管道可以从命令行上创建,命令行方法是使用下面这个命令:
$ mkfifo filename- 命名管道也可以从程序里创建,相关函数有:
int mkfifo(const char *filename,mode_t mode);- 创建命名管道:
int main(int argc, char* argv[])
{
	mkfifo("p2", 0644);
	return 0;
}
2.9.2匿名管道与命名管道的区别
-
匿名管道由 pipe 函数创建并打开。
-
命名管道由 mkfififo 函数创建,打开用 open 。
-
FIFO (命名管道)与 pipe (匿名管道)之间唯一的区别在它们创建与打开的方式不同,一但这些工作完成之后,它们具有相同的语义。
2.9.3命名管道的打开规则
-
如果当前打开操作是为读而打开 FIFO 时
-
O_NONBLOCK disable :阻塞直到有相应进程为写而打开该 FIFO
-
O_NONBLOCK enable :立刻返回成功
- 如果当前打开操作是为写而打开FIFO时
-
O_NONBLOCK disable :阻塞直到有相应进程为读而打开该 FIFO
-
O_NONBLOCK enable :立刻返回失败,错误码为 ENXIO
例子1-用命名管道实现文件拷贝
读取文件,写入命名管道:
#include <unistd.h>
#include <stdlib.h>
#include <stdio.h>
#include <errno.h>
#include <string.h>

#define ERR_EXIT(m) \
 do \
 { \
 perror(m); \
 exit(EXIT_FAILURE); \
 } while(0)
int main(int argc, char *argv[]) { mkfififo("tp", 0644); int infd; infd = open("abc", O_RDONLY); if (infd == -1)
ERR_EXIT("open");
int outfd;
outfd = open("tp", O_WRONLY);
if (outfd == -1) ERR_EXIT("open");

char buf[1024];
int n;
while ((n = read(infd, buf, 1024)) > 0)
{
	write(outfd, buf, n);
}

close(infd);
close(outfd);
return 0;
读取管道,写入目标文件
:
#include <unistd.h>
#include <stdlib.h>
#include <stdio.h>
#include <errno.h>
#include <string.h>

#define ERR_EXIT(m) \
 do \
 { \
 perror(m); \
 exit(EXIT_FAILURE); \
 } while(0)
int main(int argc, char *argv[]) { int outfd; outfd = open("abc.bak", O_WRONLY | O_CREAT | O_TRUNC,
0644); if (outfd == -1) ERR_EXIT("open");
int infd;
infd = open("tp", O_RDONLY);
if (outfd == -1)
ERR_EXIT("open");

char buf[1024];
int n;
while ((n = read(infd, buf, 1024)) > 0)
{
	write(outfd, buf, n);
}

close(infd);
close(outfd);
unlink("tp");
return 0;
例子
2-
用命名管道实现
server&client
通信
# ll
total 12
-rw-r--r--. 1 root root 46 Sep 18 22:37 clientPipe.c
-rw-r--r--. 1 root root 164 Sep 18 22:37 Makefile
-rw-r--r--. 1 root root 46 Sep 18 22:38 serverPipe.c

# cat Makefile
.PHONY:all
all:clientPipe serverPipe
clientPipe:clientPipe.c
 gcc -o $@ $^
serverPipe:serverPipe.c
 gcc -o $@ $^

.PHONY:clean
clean:
 rm -f clientPipe serverPipe
serverPipe.c
#include <stdio.h>
#include <sys/types.h>
#include <sys/stat.h>
#include <fcntl.h>
#include <unistd.h>
#include <stdlib.h>

#define ERR_EXIT(m) \
do
{\
 perror(m);\
 exit(EXIT_FAILURE);\
}while(0)

int main()
{
	umask(0);
	if (mkfifo("mypipe", 0644) < 0)
	{
		ERR_EXIT("mkfifo");
	}
	int rfd = open("mypipe", O_RDONLY);
	if (rfd < 0)
	{
		ERR_EXIT("open");
	}

	char buf[1024];
	while (1)
	{
		buf[0] = 0;
		printf("Please wait...\n");
		ssize_t s = read(rfd, buf, sizeof(buf) - 1);
		if (s > 0)
		{
			buf[s - 1] = 0;
			printf("client say# %s\n", buf);
		}
		else if (s == 0)
		{
			printf("client quit, exit now!\n");
			exit(EXIT_SUCCESS);
		}
		else
		{
			ERR_EXIT("read");
		}
	}
	close(rfd);
	return 0;
}
clientPipe.c
#include <stdio.h>
#include <sys/types.h>
#include <sys/stat.h>
#include <fcntl.h>
#include <unistd.h>
#include <stdlib.h>
#include <string.h>

#define ERR_EXIT(m) \
do
{\
 perror(m);\
 exit(EXIT_FAILURE);\
}while(0)

int main()
{
	int wfd = open("mypipe", O_WRONLY);
	if (wfd < 0)
	{
		ERR_EXIT("open");
	}

	char buf[1024];
	while (1)
	{
		buf[0] = 0;
		printf("Please Enter# ");
		fflush(stdout);
		ssize_t s = read(0, buf, sizeof(buf) - 1);
		if (s > 0)
		{
			buf[s] = 0;
			write(wfd, buf, strlen(buf));
		}
		else if (s <= 0)
		{
			ERR_EXIT("read");
		}
	}

	close(wfd);
	return 0;
}
结果
:

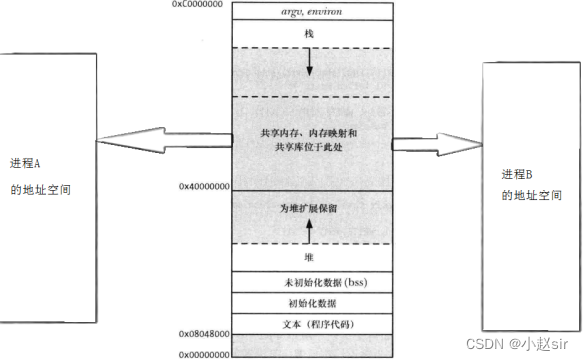
3. system V共享内存
共享内存区是最快的
IPC
形式。一旦这样的内存映射到共享它的进程的地址空间,这些进程间数据传递不再涉及到内核,换句话说是进程不再通过执行进入内核的系统调用来传递彼此的数据.
3.1 共享内存示意图
3.2 共享内存数据结构
struct shmid_ds
{
	struct ipc_perm shm_perm; /* operation perms */
	int shm_segsz; /* size of segment (bytes) */
	__kernel_time_t shm_atime; /* last attach time */
	__kernel_time_t shm_dtime; /* last detach time */
	__kernel_time_t shm_ctime; /* last change time */
	__kernel_ipc_pid_t shm_cpid; /* pid of creator */
	__kernel_ipc_pid_t shm_lpid; /* pid of last operator */
	unsigned short shm_nattch; /* no. of current attaches */
	unsigned short shm_unused; /* compatibility */
	void* shm_unused2; /* ditto - used by DIPC */
	void* shm_unused3; /* unused */
};
3.3共享内存函数
shmget
函数
功能:用来创建共享内存
原型
 int shmget(key_t key, size_t size, int shmflg);
参数
 key:这个共享内存段名字
 size:共享内存大小
 shmflg:由九个权限标志构成,它们的用法和创建文件时使用的mode模式标志是一样的
返回值:成功返回一个非负整数,即该共享内存段的标识码;失败返回-1
shmat
函数
功能:将共享内存段连接到进程地址空间
原型
 void *shmat(int shmid, const void *shmaddr, int shmflg);
参数
 shmid: 共享内存标识
 shmaddr:指定连接的地址
 shmflg:它的两个可能取值是SHM_RND和SHM_RDONLY
返回值:成功返回一个指针,指向共享内存第一个节;失败返回-1
说明:
shmaddr为NULL,核心自动选择一个地址
shmaddr不为NULL且shmflg无SHM_RND标记,则以shmaddr为连接地址。
shmaddr不为NULL且shmflg设置了SHM_RND标记,则连接的地址会自动向下调整为SHMLBA的整数倍。公式:shmaddr -
(shmaddr % SHMLBA)
shmflg=SHM_RDONLY,表示连接操作用来只读共享内存
shmdt
函数
功能:将共享内存段与当前进程脱离
原型
 int shmdt(const void *shmaddr);
参数
 shmaddr: 由shmat所返回的指针
返回值:成功返回0;失败返回-1
注意:将共享内存段与当前进程脱离不等于删除共享内存段
shmctl
函数
功能:用于控制共享内存
原型
 int shmctl(int shmid, int cmd, struct shmid_ds *buf);
参数
 shmid:由shmget返回的共享内存标识码
 cmd:将要采取的动作(有三个可取值)
 buf:指向一个保存着共享内存的模式状态和访问权限的数据结构
返回值:成功返回0;失败返回-1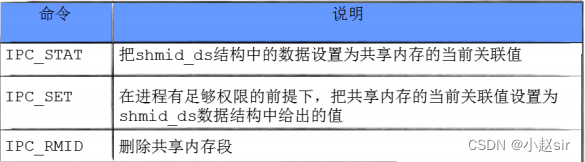
3.4 实例代码
3.4.1测试代码结构
# ls
client.c comm.c comm.h Makefile server.c
# cat Makefile

.PHONY:all
all:server client

client:client.c comm.c
 gcc -o $@ $^
server:server.c comm.c
 gcc -o $@ $^
.PHONY:clean
clean:
 rm -f client server
comm.h #ifndef
COMM_H
#defifine
COMM_H
#include <stdio.h>
#include <sys/types.h>
#include <sys/ipc.h>
#include <sys/shm.h>

#define PATHNAME "."
#define PROJ_ID 0x6666

int createShm(int size);
int destroyShm(int shmid);
int getShm(int size);

#endif
comm.c #include "comm.h"
static int commShm(int size, int flags)
{
	key_t _key = ftok(PATHNAME, PROJ_ID);
	if (_key < 0)
	{
		perror("ftok");
		return -1;
	}
	int shmid = 0;
	if ((shmid = shmget(_key, size, flags)) < 0)
	{
		perror("shmget");
		return -2;
	}
	return shmid;
}

int destroyShm(int shmid)
{
	if (shmctl(shmid, IPC_RMID, NULL) < 0)
	{
		perror("shmctl");
		return -1;
	}
	return 0;
}

int createShm(int size)
{
	return commShm(size, IPC_CREAT | IPC_EXCL | 0666);
}

int getShm(int size)
{
	return commShm(size, IPC_CREAT);
}
server.c
#include "comm.h"

int main()
{
	int shmid = createShm(4096);

	char* addr = shmat(shmid, NULL, 0);
	sleep(2);
	int i = 0;
	while (i++ < 26)
	{
		printf("client# %s\n", addr);
		sleep(1);
	}

	shmdt(addr);
	sleep(2);
	destroyShm(shmid);
	return 0;
}
client.c
#include "comm.h"

int main()
{
	int shmid = getShm(4096);
	sleep(1);
	char* addr = shmat(shmid, NULL, 0);
	sleep(2);
	int i = 0;
	while (i < 26)
	{
		addr[i] = 'A' + i;
		i++;
		addr[i] = 0;
		sleep(1);
	}

	shmdt(addr);
	sleep(2);
	return 0;
}
3.4.2结果演示
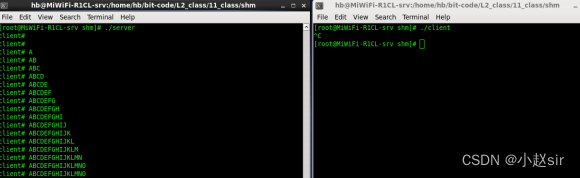
ctrl+c终止进程,再次重启
# ./server
shmget: File exists
# ipcs -m
------ Shared Memory Segments --------
key shmid owner perms bytes nattch status
0x66026a25 688145 root 666 4096 0

# ipcrm -m 688145 #删除shm ipc资源,注意,不是必须通过手动来删除,这里只为演示相关指令,删除IPC资源是进
程该做的事情


![Spring Boot[概述、功能、快速入门]](https://img-blog.csdnimg.cn/1885a6124f474035adaa8084cd91839e.png)