前言
随着Java Web应用程序的快速发展,开发人员需要越来越多地关注如何高效地构建可靠的应用程序。Spring Boot作为一种快速开发框架,旨在简化基于Spring的应用程序的初始搭建和开发过程。而MyBatis作为一种优秀的持久层框架,提供了对数据库操作的便捷支持。本系列博客将带领大家深入了解如何将这两者结合起来,以构建强大的企业级应用程序。
在本篇博客中,我们将首先介绍Spring Boot和MyBatis的基本概念,然后重点讨论它们的整合方式及实际应用场景。通过本系列博客的学习,读者将能够掌握Spring Boot整合MyBatis的最佳实践,并能够将其应用于自己的项目中。
希望本系列博客能够帮助读者更加深入地理解Spring Boot和MyBatis,并为实际项目开发提供有力支持。让我们一起开始这段充满挑战和乐趣的学习之旅吧!
本次案例通过实现城市列表的查询和分页来介绍整合 Mybatis!
一、前期准备
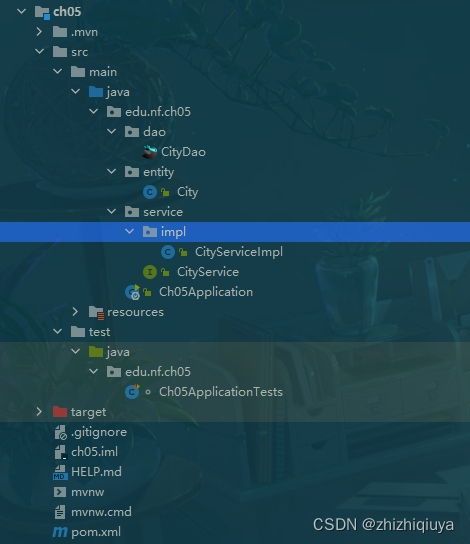
1、新建项目,结构如下
2、导入依赖
 <dependency>
            <groupId>org.springframework.boot</groupId>
            <artifactId>spring-boot-starter-jdbc</artifactId>
        </dependency>
        <!-- mybatis 整合 springboot 的 starter -->
        <dependency>
            <groupId>org.mybatis.spring.boot</groupId>
            <artifactId>mybatis-spring-boot-starter</artifactId>
            <version>2.3.1</version>
        </dependency>

        <!-- pagehelper 分页插件的 starter -->
        <!-- https://mvnrepository.com/artifact/com.github.pagehelper/pagehelper-spring-boot-starter -->
        <dependency>
            <groupId>com.github.pagehelper</groupId>
            <artifactId>pagehelper-spring-boot-starter</artifactId>
            <version>1.4.6</version>
        </dependency>


        <dependency>
            <groupId>com.mysql</groupId>
            <artifactId>mysql-connector-j</artifactId>
            <scope>runtime</scope>
        </dependency>
        <dependency>
            <groupId>org.projectlombok</groupId>
            <artifactId>lombok</artifactId>
            <optional>true</optional>
        </dependency>
        <dependency>
            <groupId>org.springframework.boot</groupId>
            <artifactId>spring-boot-starter-test</artifactId>
            <scope>test</scope>
        </dependency>
        <dependency>
            <groupId>org.mybatis.spring.boot</groupId>
            <artifactId>mybatis-spring-boot-starter-test</artifactId>
            <version>2.3.1</version>
            <scope>test</scope>
        </dependency>
这段代码是关于Spring Boot整合MyBatis所需要的依赖项。通过这些依赖项,我们可以轻松地将Spring Boot和MyBatis集成在一起,实现数据库操作的快速开发。以下是每个依赖项的作用简介:
spring-boot-starter-jdbc:Spring Boot提供的JDBC Starter,用于配置和管理数据库连接。
mybatis-spring-boot-starter:MyBatis与Spring Boot整合的Starter,提供了MyBatis的核心功能和配置。
pagehelper-spring-boot-starter:PageHelper分页插件的Starter,用于在MyBatis中实现分页查询。
mysql-connector-j:MySQL数据库驱动程序。
lombok:Java库,简化代码的编写,提供各种注解和工具。
spring-boot-starter-test:Spring Boot的测试模块,用于编写单元测试。
mybatis-spring-boot-starter-test:MyBatis与Spring Boot整合的测试模块,用于编写对MyBatis功能进行测试的单元测试。
这些依赖项可以通过Maven或Gradle等构建工具进行引入,并在项目中配置相关的属性和文件,以实现Spring Boot与MyBatis的整合。通过使用这些依赖项,我们可以简化开发过程,提高开发效率,同时保持良好的代码结构和可维护性
3、建一个 city_info 表
create table city_info(
    city_id int primary key ,
    city_name varchar(100),
    city_code varchar(100),
    province varchar(50)
)
4、新建一个 City 实体类
@Data
public class City {

    private Integer cityId;
    private String cityName;
    private String cityCode;
    private String province;

}
二、配置 application.yml
# 配置数据源
spring:
  datasource:
    driver-class-name: com.mysql.cj.jdbc.Driver
    url: jdbc:mysql://localhost:3306/psm
    username: root
    password: 123456
    hikari:
      maximum-pool-size: 200
      minimum-idle: 10
      connection-timeout: 3000
      idle-timeout: 600000
      connection-test-query: select 1
# mybatis 配置
mybatis:
  # 实体的别名
  type-aliases-package: edu.nf.ch05.entity
  # mapper 映射配置文件的路径
  mapper-locations: classpath:/mappers/*.xml
  # 输出 sql 语句
  configuration:
    log-impl: org.apache.ibatis.logging.stdout.StdOutImpl
# 分页插件配置
pagehelper:
  # 设置数据库的方言
  helper-dialect: mysql
  # 启用注解分页参数
  support-methods-arguments: true
  # 启用分页合理化
  reasonable: true
当配置Spring Boot中的数据源时,针对每个属性进行详细介绍:
spring.datasource.driver-class-name:
- 用于指定数据库驱动程序的类名。
- 在示例中,使用的是MySQL数据库,因此指定了
com.mysql.cj.jdbc.Driver。
spring.datasource.url:
- 指定数据库的连接地址。
- 在示例中,使用的是本地的MySQL数据库,连接地址为
jdbc:mysql://localhost:3306/psm,其中localhost代表数据库所在的主机名,3306代表数据库的端口号,psm是数据库的名称。
spring.datasource.username和spring.datasource.password:
- 分别指定数据库的用户名和密码。
- 在示例中,用户名为
root,密码为123456。
spring.datasource.hikari.maximum-pool-size:
- 指定Hikari连接池的最大连接数。
- 在示例中,最大连接数被设置为200。
spring.datasource.hikari.minimum-idle:
- 指定Hikari连接池的最小空闲连接数。
- 在示例中,最小空闲连接数被设置为10。
spring.datasource.hikari.connection-timeout:
- 指定连接超时时间,单位为毫秒。
- 在示例中,连接超时时间被设置为3000毫秒。
spring.datasource.hikari.idle-timeout:
- 指定连接在连接池中空闲的最长时间,单位为毫秒。
- 在示例中,空闲连接的最长时间被设置为600000毫秒(10分钟)。
spring.datasource.hikari.connection-test-query:
- 指定用于测试连接是否可用的查询语句。
- 在示例中,使用了
select 1作为测试查询语句。
mybatis.type-aliases-package:
- 指定实体类的别名包路径。
- 在示例中,实体类别名被设置为
edu.nf.ch05.entity,即该包下的实体类可以直接使用类名作为别名。
mybatis.mapper-locations:
- 指定Mapper映射文件的位置。
- 在示例中,Mapper映射文件被设置在
classpath:/mappers/*.xml路径下,表示在类路径下的mappers目录中寻找XML格式的Mapper文件。
mybatis.configuration.log-impl:
- 指定MyBatis的日志输出方式。
- 在示例中,日志输出方式被设置为
org.apache.ibatis.logging.stdout.StdOutImpl,即将日志输出到控制台。
pagehelper.helper-dialect:
- 指定PageHelper分页插件支持的数据库方言。
- 在示例中,使用的是MySQL数据库,因此数据库方言被设置为
mysql。
pagehelper.support-methods-arguments:
- 启用或禁用PageHelper分页插件的注解分页参数功能。
- 在示例中,该属性被设置为
true,表示启用注解分页参数。
pagehelper.reasonable:
- 启用或禁用PageHelper分页插件的分页合理化功能。
- 在示例中,该属性被设置为
true,表示启用分页合理化。以上是示例配置中各个属性的详细介绍。根据实际需求,可以根据数据库类型、连接池配置以及MyBatis和PageHelper的功能需求进行相应的调整和配置。
配置完数据源和mybatis以及分页插件后,我们就可以去完成dao的编写以及serviced的代码了。
三、编写 dao
public interface CityDao {


    List<City> listCity(@Param("pageNum") Integer pageNum,@Param("pageSize") Integer pageSize);

}
编写 Mybatis 配置类,映射sql语句:
<?xml version="1.0" encoding="utf-8"?>
<!DOCTYPE mapper PUBLIC "-//mybatis.org//DTD Mapper 3.0//EN"
        "http://mybatis.org/dtd/mybatis-3-mapper.dtd">
<mapper namespace="edu.nf.ch05.dao.CityDao">

    <resultMap id="cityMap" type="city">
        <id property="cityId" column="city_id"/>
        <result property="cityName" column="city_name"/>
        <result property="cityCode" column="city_code"/>
        <result property="province" column="province"/>
    </resultMap>

    <select id="listCity" resultMap="cityMap">
        select city_id, city_name, city_code, province from psm.city_info
    </select>

</mapper>
四、编写 service
public interface CityService {

    /**
     * 查询城市列表
     * @param pageNum
     * @param pageSize
     * @return
     */
    PageInfo<City> listCity(Integer pageNum,Integer pageSize);

}
实现类
@Service
@Transactional(rollbackFor = RuntimeException.class)
@RequiredArgsConstructor
public class CityServiceImpl implements CityService {

    private final CityDao dao;

    @Override
    public PageInfo<City> listCity(Integer pageNum, Integer pageSize) {
        List<City> cities = dao.listCity(pageNum, pageSize);
        return new PageInfo<>(cities);
    }
}
让我解释一下其中的一些关键点:
@Service注解:
- 用于将该类标识为Spring的Service组件,通常用于业务逻辑的处理。
@Transactional(rollbackFor = RuntimeException.class)注解:
- 用于声明事务行为,指定在发生RuntimeException时进行事务回滚。
- 这意味着当方法中抛出RuntimeException异常时,事务会回滚到方法执行前的状态。
@RequiredArgsConstructor注解:
- Lombok提供的注解,用于生成一个包含必需参数的构造函数。
- 在这里,它会为
CityServiceImpl类生成一个包含final字段dao的构造函数。
private final CityDao dao;:
- 使用
@RequiredArgsConstructor注解后,Lombok会自动生成带有CityDao类型参数的构造函数,并且会将CityDao对象注入到dao字段中。- 这也意味着
CityDao是CityServiceImpl的一个依赖项,在构造函数中通过依赖注入的方式进行初始化。
@Override注解:
- 用于标识该方法是对接口中的方法的重写实现。
public PageInfo<City> listCity(Integer pageNum, Integer pageSize)方法:
- 该方法是
CityService接口中定义的方法的实现。- 通过调用
CityDao的listCity方法获取城市列表数据,然后通过PageInfo类对其进行封装并返回。
五、在 Ch05Application 添加扫描注解
@SpringBootApplication
@MapperScan("edu.nf.ch05.dao")
public class Ch05Application {

    public static void main(String[] args) {
        SpringApplication.run(Ch05Application.class, args);
    }

}
注意:这是重点,就算写完了之前的所有代码,没有使用这个注解去扫描,前面的都是白写,如果不使用扫描,会报错。
@MapperScan("edu.nf.ch05.dao")是一个注解,用于扫描指定包下的Mapper接口,并将其注册为Spring的Bean。在整合Spring Boot和MyBatis时,我们需要告诉Spring Boot去扫描哪些包下的Mapper接口,并将其注入到容器中。在这个例子中,注解
@MapperScan("edu.nf.ch05.dao")表示对包edu.nf.ch05.dao进行扫描,该包下的所有Mapper接口将被注册为Spring的Bean,以便在其他地方可以通过自动注入的方式使用它们。这是个类就相当于我们之前所写的配置类一样。
六、测试
@Slf4j
@SpringBootTest
class Ch05ApplicationTests {

    @Autowired
    private CityService cityService;

    @Test
    void contextLoads() {

        PageInfo<City> cityPageInfo = cityService.listCity(0, 10);
        cityPageInfo.getList().forEach(list -> log.info(list.toString()));
    }

}
把 cityService 通过字段注入进来,就可以从容器中获取我们的listCity方法。
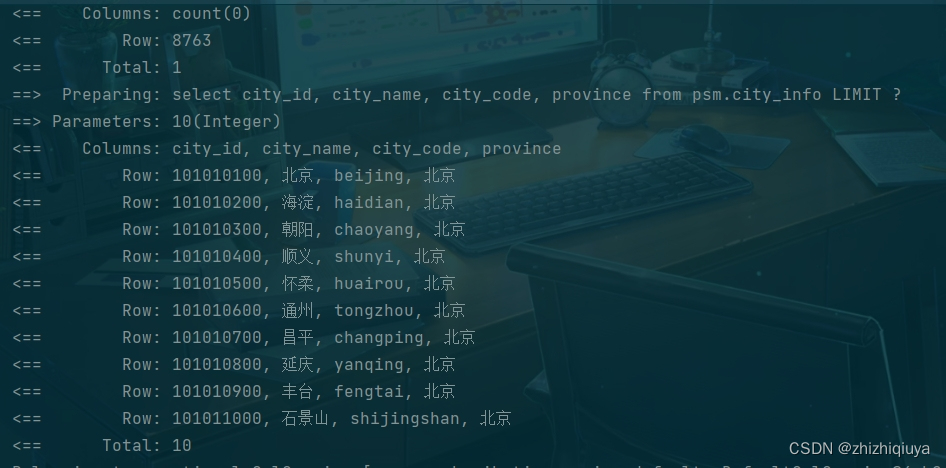
运行结果:
七、总结
大家对比一下和之前使用 springMvc 整合 Mybatis 是不是有很大的区别,区别是什么,就是不用再配置类中编写大量的配置代码了,springboot帮我们简化了这个配置过程,我们只需要在properties或者yml中使用简单的配置即可以配置好Mybatis来使用。


