一、实现效果
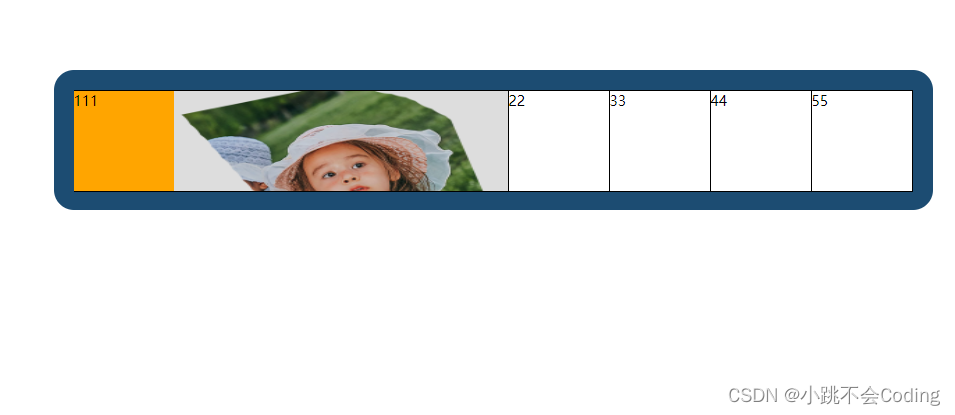
当鼠标滑过方块的时候,方块的状态就会发生如下图所示的变化,同理当鼠标滑到其他的方块也会发生同样的效果,不仅大小会改变同时方块的颜色也会跟着发生变化:

二、代码实现
<!DOCTYPE html>
<html>
	<head>
		<meta charset="utf-8">
		<title></title>
		<style>
			* {
				padding: 0;
				margin: 0;
			}

			img {
				border: none;
				display: block;
			}

			#box {
				width: 839px;
				height: 100px;
				margin: 100px auto;
				padding: 20px;
				border-radius: 20px;
				background-color: #1C4C72;
			}

			#box ul {
				position: relative;
				height: 100px;
			}

			#box ul li {
				width: 100px;
				height: 100px;
				border: 1px solid #000;
				float: left;
				list-style: none;
				border-left: 0;
				overflow: hidden;
				position: relative;
			}

			#box ul li.ac {
				width: 434px;
			}

			#box ul li .left {
				font-size: 14px;
				width: 100px;
				height: 100px;
				background-color: #fff;
				cursor: pointer;
			}

			#box ul li div.ac {
				background: orange;
			}

			#box ul li div:last-child {
				border-left: 1px solid #ddd;
				position: absolute;
				width: 334px;
				height: 100px;
				background: blue;
				top: 0;
				left: 100px;
				z-index: 0;
				box-sizing: border-box;
			}

			#box ul li img {
				width: 334px;
				height: 138px;
			}

			#box ul li.last {
				position: absolute;
				top: 0;
				right: 0;
			}
		</style>
		<script src="static/js/jquery-1.11.3.js"></script>
	</head>
	<body>
		<div id="box">
			<ul>
				<li class="ac">
					<div class="left ac">111</div>
					<div><img src="static/imgs/image01_pd@2x.png" alt=""></div>
				</li>
				<li>
					<div class="left">22</div>
					<div><img src="static/imgs/image02_con@2x.png" alt=""></div>
				</li>
				<li>
					<div class="left">33</div>
					<div><img src="static/imgs/image_about@2x.png" alt=""></div>
				</li>
				<li>
					<div class="left">44</div>
					<div><img src="static/imgs/image2_about@2x.png" alt=""></div>
				</li>
				<li class="last">
					<div class="left">55</div>
					<div><img src="static/imgs/image03_con@2x.png" alt=""></div>
				</li>

			</ul>
		</div>
		<script>
			$(function() {
				$("#box").find("li").mouseover(function() {
					$(this).stop()
						.animate({
							width: "434px"
						}, 800)
						.children("div")
						.addClass("ac")
						.end()
						.siblings()
						.stop()
						.animate({
							width: "100px"
						}, 800)
						.children("div")
						.removeClass("ac");
				});
			});
		</script>

	</body>
</html>
ps:注意一定要引入jq文件哦~
