IoC容器
IoC ,Spring全家桶各个功能模块的基础,是创建对象的容器。
IoC概念
控制反转,将对象的创建进行反转,常规情况下对象由开发者手动创建,而使用IoC不再需要创建对象,由IoC容器根据需求自动创建项目所需要的对象。
IoC环境依赖
添加spring-context,即根据spring上下文,自动引入需要的包
<dependency>
  	<groupId>org.springframework</groupId>
  	<artifactId>spring-context</artifactId>
  	<version>6.0.10</version>
</dependency>
配置元数据
在resource中创建spring配置文件,application.xml
<?xml version="1.0" encoding="UTF-8"?>
<beans xmlns="http://www.springframework.org/schema/beans"
    xmlns:xsi="http://www.w3.org/2001/XMLSchema-instance"
    xsi:schemaLocation="http://www.springframework.org/schema/beans
        https://www.springframework.org/schema/beans/spring-beans.xsd">
</beans>
实例化一个ioc容器
ApplicationContext context = new ClassPathXmlApplicationContext("application.xml");
使用容器
比如像通过容器获取一个student对象,在application.xml中配置元数据
<bean class="com.test.bean.Student"/>
通过getBean()检索到bean的实例
Student student = context.getBean(Student.class);
也可以通过对象名来获取,下面这行代码表示创建了一个Student对象,名字为student
<bean class="com.test.bean.Student" id="student"/>
Student student = context.getBean("student");
Bean
是什么?
怎么注册和配置?
bean中scope设置的prototype(原型)和singleton(单例)有什么区别?默认是什么模式?
单例模式中对象在什么时候创建的?
lazy-init是什么?作用是什么
depends-on作用?
Scope
Singleton Scope
单例模式,当定义了一个singleton的bean,Spring IoC容器就会给该bean定义的对象创建一个确切的实例,并且这个单一的实例被存储在这种单体bean的缓存中,所有后续的请求和对该bean的引用都将返回缓存中的对象。这意味通过该bean定义的类创建出来的实例只有一个。
在不写scope的情况下默认为 singleton
<bean class="com.test.entity.Student"/>
Student student1 = context.getBean(Student.class);
Student student2 = context.getBean(Student.class);
System.out.println(student1 == student2); // 单例模式下 这两个对象其实是同一个 返回true
Prototype Scope
原型模式,每次对该特定bean的请求都会创建一个新的bean实例。
<bean class="com.test.entity.Student" scope="prototype"/>
依照这样,上述代码应返回false
依赖注入
IoC容器在创建对象时将我们预先给定的属性注入给对象
基于Setter的依赖注入
public class Student {
    String name;
    private Teacher teacher;

    public void setTeacher(Teacher teacher) {
        this.teacher = teacher;
    }

    public void setName(String name) {
        this.name = name;
    }
}
在指定 bean 中使用 property标签
<bean name="teacher" class="com.test.entity.ProgramTeacher"/>
<bean class="com.test.entity.Student">
	<property name="teacher" ref="teacher"/>
    <property name="name" value="小明"/>
</bean>
基于构造器的依赖注入
public class Student {
    String name;
    private final Teacher teacher;

    public Student(String name, Teacher teacher) {
        this.name = name;
        this.teacher = teacher;
    }
}
使用 constructor-arg 标签,构造器中有几个参数,就需要几个constructor-arg
<bean name="teacher" class="com.test.entity.ProgramTeacher"/>
<bean class="com.test.entity.Student">
   	<constructor-arg name="teacher" ref="teacher"/>
    <constructor-arg name="name" value="小明"/>
</bean>
警告: Using deprecated '-debug' fallback for parameter name resolution. Compile the affected code with '-parameters' instead or avoid its introspection: com.test.entity.Student
请记住,要使这一方法开箱即用,你的代码在编译时必须启用debug标志,以便Spring能够从构造函数中查找参数名称。如果你不能或不想用debug标志编译你的代码,你可以使用 @ConstructorProperties注解来明确命名你的构造函数参数。
    @ConstructorProperties({"name", "teacher"})
    public Student(String name, Teacher teacher) {
        this.name = name;
        this.teacher = teacher;
    }
或在pom.xml中添加-parameters参数
<build>
    <pluginManagement>
        <plugins>
            <plugin>
                <artifactId>maven-compiler-plugin</artifactId>
                <version>3.10.1</version>
                <configuration>
                    <compilerArgs>
                        <arg>-parameters</arg>
                    </compilerArgs>
                </configuration>
            </plugin>
        </plugins>
    </pluginManagement>
</build>
集合类型的特殊支持
如,Map类型
public class Student {
    private Map<String, Integer> map;

    public void setMap(Map<String, Integer> map) {
        this.map = map;
    }
}
    <bean class="com.test.entity.Student">
        <property name="map">
            <map>
                <entry key="语文" value="100"/>
                <entry key="数学" value="100"/>
                <entry key="英语" value="100"/>
            </map>
        </property>
    </bean>
或者List类型
public class Student {
    private List<String> list;

    public void setList(List<String> list) {
        this.list = list;
    }
}
<bean name="student" class="com.test.Student">
    <property name="list">
        <list>
            <value>AAA</value>
            <value>BBB</value>
            <value>hello</value>
        </list>
    </property>
</bean>
自动装配
自动装配就是让IoC容器自己去寻找需要填入的值,我们只需要将set方法提供好就可以了,这里需要添加autowire属性:
byType 通过类型自动装配
<bean name="programTeacher" class="com.test.entity.ProgramTeacher"/>
<bean class="com.test.entity.Student" autowire="byType"/>
byName 通过名称自动装配,by的name是按照Setter中set后面的名称
public class Student {
    private Teacher teacher;

    public void setProgramTeacher(Teacher teacher) {
        this.teacher = teacher;
    }
}
<bean name="programTeacher" class="com.test.entity.ProgramTeacher"/>
<bean class="com.test.entity.Student" autowire="byName"/>
constructor 通过构造方法自动装配
生命周期
为bean指定初始化或者销毁方法,便于bean在初始化和销毁时做一些其他事情。
为bean配置初始化,在<bean>元素中添加 init-method
<bean class="com.test.entity.Student" autowire="byName" init-method="init"/>
public class Student {
    public void init() {
        System.out.println("i am init");
    }
}
你可以给 <bean> 元素的 destroy-method 属性分配一个特殊的 (inferred) 值,它指示Spring自动检测特定bean类上的public close 或 shutdown 方法。(任何实现了 java.lang.AutoCloseable 或 java.io.Closeable 的类都可以匹配)。你也可以在 <beans> 元素的 default-destroy-method 属性上设置这个特殊的 (inferred) 值,将这个行为应用于整个Bean集合。请注意,这是用Java配置的默认行为。
使用实现了AutoCloseable或Closeable的类
public class Main {
    public static void main(String[] args) {
        ClassPathXmlApplicationContext context = new ClassPathXmlApplicationContext("application.xml");
        context.close();
    }
}
<bean class="com.test.entity.Student" autowire="byName" destroy-method="destroy"/>
或者在顶层<beans>中添加默认的 default-init-method 和default-destroy-method,这意味着可以编写你的应用类并使用名为 init() 的初始化回调,而不必为每个Bean定义配置 init-method="init" 属性。当Bean被创建时,Spring IoC容器会调用该方法
<beans default-init-method="init"
       default-destroy-method="destroy"
       ........

</beans>
注意的是,Spring并不管理 prototype Bean的完整生命周期,所以配置的destroy不会被调用.
注解实现IoC
比起内容庞大的xml配置,进行注解开发更加高效。
@Configuration
@Configuration等价于spring的xml配置文件
@Configuration
public class MainConfiguration {
}
与xml方式不同,注解开发通过如下方式实例化一个IoC容器:
AnnotationConfigApplicationContext context = new AnnotationConfigApplicationContext(MainConfiguration.class);
当配置类有很多时,直接扫描包名,例如我将配置类都放在 com.test.config包下
AnnotationConfigApplicationContext context = new AnnotationConfigApplicationContext("com.test.config");
@Bean
是XML的<bean/>元素的等价。可以在 @Configuration 或 @Component 注解的类中使用 @Bean 注解,注册为bean的对象默认名为方法名(如下面的student),也可以用 @Bean(value = )或者name来自定义名称。
@Configuration
public class MainConfiguration {
    @Bean
    public Student student() {
        return new Student();
    }
}
@Bean 注解支持指定任意的初始化和销毁回调方法,就像Spring XML在 bean 元素上的 init-method 和 destroy-method 属性一样,如下例所示。
public class Student {
    public void init() {}

    public void destroy(){}
}
@Configuration
public class MainConfiguration {
    @Bean(name = "test", initMethod = "init", destroyMethod = "destroy")
    public Student student() {
        return new Student();
    }
}
Bean别名
@Bean 注解的 name 属性接受一个 String 数组来实现这一目的。
@Bean({"dataSource", "subsystemA-dataSource", "subsystemB-dataSource"})
@Scope
默认的scope是 singleton,但你可以用 @Scope 注解来覆盖它.
@Configuration
public class MainConfiguration {
    @Bean
    @Scope("prototype")
    public Student student() {
        return new Student();
    }
}
@Import
就像 <import/> 元素在Spring XML文件中被用来帮助模块化配置一样,@Import 注解允许从另一个配置类中加载 @Bean 定义,如下例所示。
@Configuration
public class MainConfiguration {
    @Bean
    public Student student() {
        return new Student();
    }
}
@Configuration
@Import(MainConfiguration.class)
public class ChildConfig {
    @Bean
    public ArtStudent artStudent() {
        return new ArtStudent();
    }
}
现在,在实例化上下文时不需要同时指定 MainConfiguration.class 和 ChildConfig.class,而只需要明确提供 ChildConfig,正如下面的例子所示。
    public static void main(String[] args) {
        AnnotationConfigApplicationContext context = new														AnnotationConfigApplicationContext(ChildConfig.class);
        ArtStudent artStudent = context.getBean(ArtStudent.class);
        Student student = context.getBean(Student.class);
    }
@Component
在需要注册为Bean的类上添加@Component注解来将一个类进行注册
@Component
public class SportStudent extends Student{
    private String name;
    public void setName(String name) {
        this.name = name;
    }
}
@Componentscan
同时需要添加@ComponentScan自动扫描来告诉Spring,它需要在哪些包中查找我们提供的@Component声明的Bean。
@Configuration
@ComponentScan("com.test.entity")
public class MainConfiguration {
    @Bean
    public Student student() {
        return new Student();
    }

    public SportStudent sportStudent() {
        return new SportStudent();
    }
}
@Autowired
自动装载
AOP
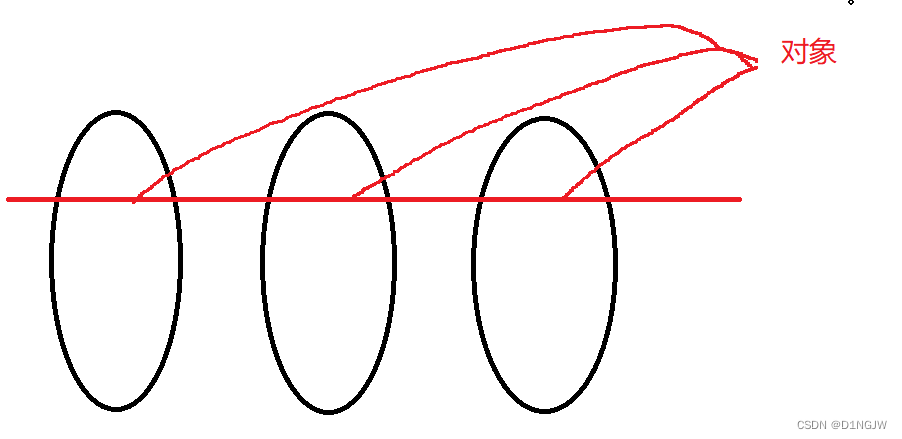
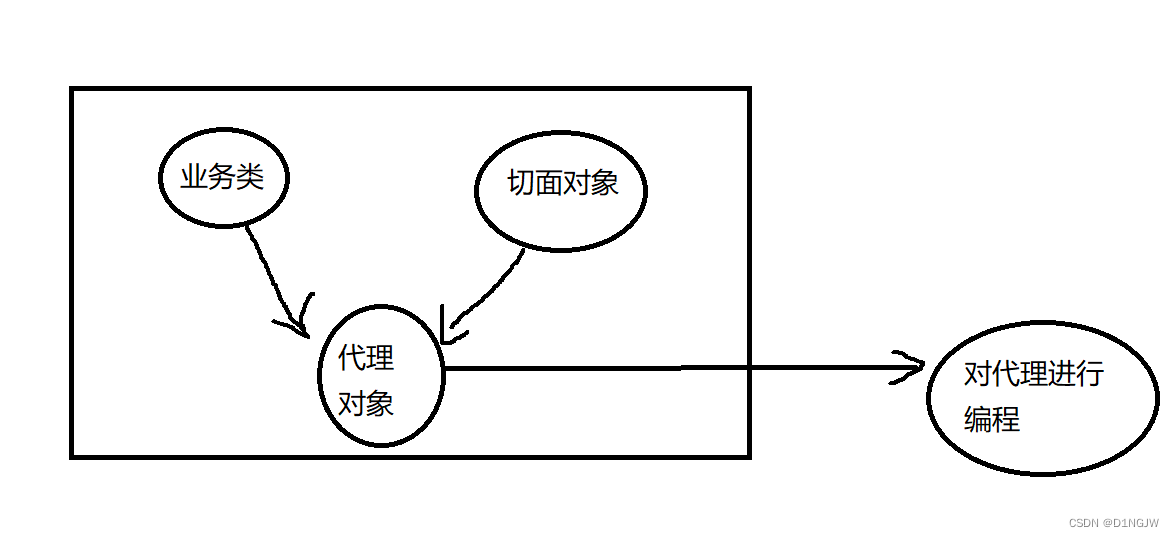
Aspect Oriented Programming,即面向切面编程。本质就是一个动态代理,让我们把一些常用功能如权限检查、日志、事务等,从每个业务方法中剥离出来。
什么是面向切面呢?就好比将三个西瓜横切一刀,将三个切面抽象为一个对象,对这个对象进行编程(比如输出一个日志),这样输出日志就会在三个切面都执行。
相关概念
- Join point(切入点):目标方法和切面的连接点。切面通常通过切入点来获取目标方法的参数,返回值等。
- Adive(通知):描述切面何时执行以及如何执行增强处理。advice类型包括:before,after,afterReturing,around等。
- Aspect(切面):通知和切点的结合
引入AOP标签
<?xml version="1.0" encoding="UTF-8"?>
<beans xmlns="http://www.springframework.org/schema/beans"
       xmlns:xsi="http://www.w3.org/2001/XMLSchema-instance"
       xmlns:aop="http://www.springframework.org/schema/aop"
       xsi:schemaLocation="http://www.springframework.org/schema/beans http://www.springframework.org/schema/beans/spring-beans.xsd
       http://www.springframework.org/schema/aop http://www.springframework.org/schema/aop/spring-aop.xsd">
XML配置AOP
public class Student {
    public void study() {
        System.out.println("好好学习");
    }
}
StudentAOP
public class StudentAOP {
    public void afterStudy() {
        System.out.println("我是后置方法");
    }
}
application.xml,在<aop:config/>声明一个<aop:pointcut/>,即切入点,切入点由
<?xml version="1.0" encoding="UTF-8"?>
<beans xmlns="http://www.springframework.org/schema/beans"
       xmlns:xsi="http://www.w3.org/2001/XMLSchema-instance"
       xmlns:aop="http://www.springframework.org/schema/aop"
       xsi:schemaLocation="http://www.springframework.org/schema/beans http://www.springframework.org/schema/beans/spring-beans.xsd
       http://www.springframework.org/schema/aop http://www.springframework.org/schema/aop/spring-aop.xsd">
    <bean class="com.test.entity.Student"/>
    <bean id="studentAOP" class="com.test.entity.StudentAOP"/>

    <aop:config>
        <aop:pointcut id="test" expression="execution(public void com.test.entity.Student.study())"/>
        <aop:aspect ref="studentAOP">
            <aop:after method="afterStudy" pointcut-ref="test"/>
        </aop:aspect>
    </aop:config>
</beans>
使用接口实现AOP
在方法执行之前或之后去调用我们实现的接口,首先讲类实现Advice接口,比如方法执行之前的MethodBeforeAdvice,方法执行之后的AfterReturningAdvice。例如
public class AopTest implements MethodBeforeAdvice, AfterReturningAdvice {

    @Override
    public void before(Method method, Object[] args, Object target) throws Throwable {
        System.out.println("我是方法执行之前");
    }

    @Override
    public void afterReturning(Object returnValue, Method method, Object[] args, Object target) throws Throwable {
        System.out.println("我是方法执行之后");
    }
}
接着在Spring的xml配置文件中,在<aop:config/>标签下使用<aop:advisor/>
<bean name="test" class="com.test.aop.AopTest"/>

<aop:config>
        <aop:pointcut id="stu" expression="execution(* com.test.bean.Student.say(String))"/>
        <aop:advisor advice-ref="test" pointcut-ref="stu"/>
    </aop:config>
注解实现AOP
@EnableAspectJAutoProxy
在添加了@Configuration的spring配置类下使用@EnableAspectJAutoProxy,即开启自动生成代理,这个操作由Spring自己完成
@EnableAspectJAutoProxy
@ComponentScans({
        @ComponentScan("com.test.bean"),
        @ComponentScan("com.test.aop")
})
@Configuration
public class MainConfiguration {

    @Bean
    public Card card() {
        return new Card();
    }

    @Bean
    public Student student() {
        return new Student();
    }
}
@Aspect
要使用AOP,还需要在AOP切面类上使用@Aspect,告诉Spring这是一个切面
@Aspect
@Component
public class AopTest {
   @Before("execution(* com.test.bean.Student.say(String))")
   public void before() {
       System.out.println("我是方法执行之前");
   }
}
从上述代码也能看到,要使用advice的几种操作,只需要使用相应的注解,如@Before,@After,@Around
Advice类型
Before
在切点匹配方法之前执行,可以通过@Before注解在一个切面中声明advice,execution中的字符串是告诉切面应该在何处执行该方法。
execution的使用:首先表示目标方法的访问范围和返回类型,然后是目标方法的包路径,括号中表示参数类型,例如
execution(public int com.test.bean.CalImpl.*(int, int))
也可以通配
execution(* com.test.bean.CalImpl.*(..))
AfterReturning
当一个匹配的方法执行正常返回带参数时,After returning advice 运行。你可以通过使用 @AfterReturning 注解来声明它,通过参数returning来绑定目标方法的返回结果
@AfterReturning(value = "execution(public int com.test.bean.CalImpl.*(..))", returning = "result")
public void afterReturning(JoinPoint joinPoint, Object result) {
        System.out.println(joinPoint.getSignature().getName() + "方法的结果" + result);
    }
After
当一个匹配的方法执行退出时,After (finally) advice 会运行。它是通过使用 @After 注解来声明的。After advice必须准备好处理正常和异常的返回条件。它通常被用于释放资源和类似的目的。
Around
@Around可以决定是否执行目标方法
AOP实现流程
SpringEL表达式
简单使用
创建一个SpEL
ExpressionParser parser = new SpelExpressionParser();
Expression exp = parser.parseExpression("'Hello World'"); // ''表示字符串
String message = (String) exp.getValue();
SpEL支持广泛的功能,如调用方法、访问属性和调用构造函数。
Expression expression = parser.parseExpression("'hello world'.toUpperCase()");
访问对象的属性,前提需要实现get方法
AnnotationConfigApplicationContext context = new                                                          	               AnnotationConfigApplicationContext(MainConfiguration.class);
Student student = context.getBean(Student.class);

ExpressionParser parser = new SpelExpressionParser();
Expression expression = parser.parseExpression("name");
String message =(String) expression.getValue(student);
调用表达式的setValues()方法来设定属性的值
Expression expression = parser.parseExpression("name");
expression.setValue(student, "小明");
使用构造函数,如调用String的构造函数
Expression expression = parser.parseExpression("new String('hello world')");
集合类的使用
@Component
public class Student {
    public Map<String, String> map = Map.of("test", "this is test");
    public List<Integer> list = List.of(1,2,3,4);
}
Map映射,通过Map[key]来取出value
Expression expression = parser.parseExpression("map['test']");
String message = (String) expression.getValue(student);
对于List,数组等,可以直接使用[index]
Expression expression = parser.parseExpression("list[2]");
Integer number = (Integer) expression.getValue(student);
.?运算符
.? 运算符通过条件来获取集合元素,例如
@Component
public class Student {
    public List<Exam> list = List.of(new Clazz("操作系统", 80));

    public record Exam(String name, int score) {

   	}
}
获取name为操作系统的集合元素:
Expression expression = parser.parseExpression("list.?[name == '操作系统']");
.!运算符
.! 运算符将需要的集合元素属性拿出来单独组成一个集合,例如
@Component
public class Student {
    public List<Exam> list = List.of(new Exam("操作系统", 100), new Exam("计算机组成原理", 75), new Exam("数据结构", 100));
    public record Exam(String name, int score) {

   }
}
我希望把所有的Exam的name取出来:
Expression expression = parser.parseExpression("list.![name]");
Spring高级特性
任务调度
定时任务
定时任务就是指定某个时间去执行任务,在Spring中,定时任务是全局性的,需要在配置类上添加@EnableScheduling
@EnableScheduling
@Configuration
public class MainConfiguration {
    @Bean
    public Student student() {
        return new Student();
    }
}
@Scheduled
方法级注解,设定任务执行的时间,参数如下:
- fixedDelay:在上一次定时任务执行完之后,间隔多久继续执行。单位毫秒
- fixedRate:无论上一次定时任务有没有执行完成,两次任务之间的时间间隔。单位毫秒
- cron:如果嫌上面两个不够灵活,你还可以使用cron表达式来指定任务计划。
如例子:每隔两秒执行一次
@EnableScheduling
@Configuration
public class MainConfiguration {
    @Scheduled(fixedRate = 2000)
//    @Scheduled(fixedDelay = 2000)
//    @Scheduled(cron = "*/2 * * * * *")
    public void task() {
        System.out.println("hello world " + new Date());
    }
}
cron表达式
格式 * * * * * * ,分别代表 秒 分 时 天 月 星期
如每秒,则为 */2 * * * * *
一看就懂:cron 表达式_cron表达式-CSDN博客