数据准备
DATA_URL = 'http://download.tensorflow.org/example_images/flower_photos.tgz'

一、训练集和验证集的划分
#spile_data.py
import os
from shutil import copy
import random
def mkfile(file):
if not os.path.exists(file):
os.makedirs(file)
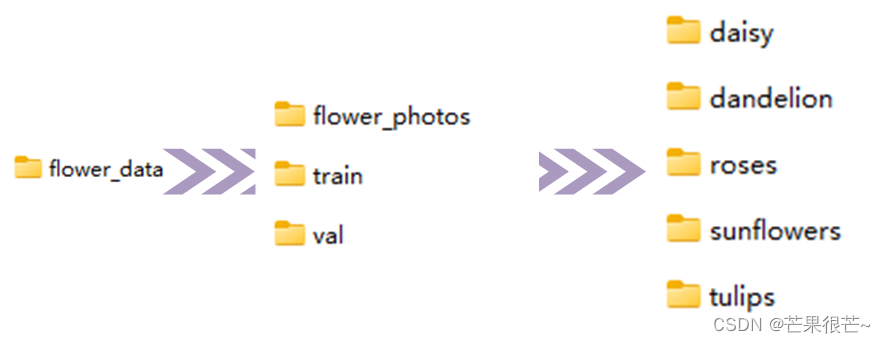
file = 'flower_data/flower_photos'
flower_class = [cla for cla in os.listdir(file) if ".txt" not in cla] #['daisy', 'dandelion', 'roses', 'sunflowers', 'tulips']
mkfile('flower_data/train') #生成train文件夹
for cla in flower_class:
mkfile('flower_data/train/'+cla) #在train文件夹下生成各个类别的文件夹
mkfile('flower_data/val')
for cla in flower_class:
mkfile('flower_data/val/'+cla)
split_rate = 0.1
for cla in flower_class:
cla_path = file + '/' + cla + '/'
images = os.listdir(cla_path)
num = len(images)
eval_index = random.sample(images, k=int(num*split_rate)) #在images中随机获取0.1的图片
for index, image in enumerate(images):
if image in eval_index:
image_path = cla_path + image
new_path = 'flower_data/val/' + cla
copy(image_path, new_path)
else:
image_path = cla_path + image
new_path = 'flower_data/train/' + cla
copy(image_path, new_path)
print("\r[{}] processing [{}/{}]".format(cla, index+1, num), end="") # processing bar
print()
print("processing done!")
二、ResNet网络
import torch.nn as nn
import math
import torch.utils.model_zoo as model_zoo
import mmd
from attention import ChannelAttention
from attention import SpatialAttention
import torch


__all__ = ['ResNet', 'resnet50']


model_urls = {
    'resnet50': 'https://download.pytorch.org/models/resnet50-19c8e357.pth',
}

def conv3x3(in_planes, out_planes, stride=1,groups=1):
    """3x3 convolution with padding"""
    return nn.Conv2d(in_planes, out_planes, kernel_size=3, stride=stride,
                     padding=1, bias=False)

def conv1x1(in_planes, out_planes, stride=1):
    """1x1 convolution"""
    return nn.Conv2d(in_planes, out_planes, kernel_size=1, stride=stride, bias=False)


'''
Resnet中BasicBlock结构,ResNet中使用的网络结构。分2步走:3x3; 3x3
'''
class BasicBlock(nn.Module):
    expansion = 1  # 最后输出的通道数扩充的比例

    # BN层来加快网络模型的收敛速度/训练速度/解决梯度消失或者梯度爆炸的问题
    # 对batch中所有的同一个channel的数据元素进行标准化处理。一个batch共享一套参数
    # 即如果有C个通道,对N*H*W进行标准化处理,一共进行C次。

    def __init__(self, inplanes, planes, stride=1, downsample=None):
        super(BasicBlock, self).__init__()
        self.conv1 = conv3x3(inplanes, planes, stride)
        self.bn1 = nn.BatchNorm2d(planes)
        self.relu = nn.ReLU(inplace=True)
        self.conv2 = conv3x3(planes, planes)
        self.bn2 = nn.BatchNorm2d(planes)
        self.downsample = downsample
        self.stride = stride

    def forward(self, x):
        residual = x

        out = self.conv1(x)
        out = self.bn1(out)
        out = self.relu(out)

        out = self.conv2(out)
        out = self.bn2(out)

        # downsample是用一个1x1的卷积核处理,改变通道数,如果H/W尺度也不一样就设计stride
        if self.downsample is not None:
            residual = self.downsample(x)

        out += residual
        out = self.relu(out)

        return out


'''
Resnet中Bottleneck结构,ResNet中使用的网络结构。目的是为了降低参数量,分三步走:
1数据降维(1x1),2常规卷积核的卷积(3x3),3数据升维(1x1)
结果图片长宽不变,通道数扩大4倍
'''
class Bottleneck(nn.Module):
    expansion = 4  # 最后输出的通道数扩充的比例

    def __init__(self, inplanes, planes, stride=1, downsample=None, groups=1,
                 base_width=64, norm_layer=None):
        super(Bottleneck, self).__init__()
        self.conv1 = nn.Conv2d(inplanes, planes, kernel_size=1, bias=False)
        # BN层来加快网络模型的收敛速度/训练速度/解决梯度消失或者梯度爆炸的问题
        # 对batch中所有的同一个channel的数据元素进行标准化处理。一个batch共享一套参数
        # 即如果有C个通道,对N*H*W进行标准化处理,一共进行C次。
        self.bn1 = nn.BatchNorm2d(planes)  # 卷积层后加BatchNorm2d,按照channel进行归一化
        self.conv2 = nn.Conv2d(planes, planes, kernel_size=3, stride=stride,
                               padding=1, bias=False)
        self.bn2 = nn.BatchNorm2d(planes)
        self.conv3 = nn.Conv2d(planes, planes * 4, kernel_size=1, bias=False)
        self.bn3 = nn.BatchNorm2d(planes * 4)
        self.relu = nn.ReLU(inplace=True)
        self.downsample = downsample
        self.dropout=nn.Dropout()
        self.stride = stride

    def forward(self, x):
        residual = x

        out = self.conv1(x)
        out = self.bn1(out)
        out = self.relu(out)

        out = self.conv2(out)
        out = self.bn2(out)
        out = self.relu(out)

        out = self.conv3(out)
        out = self.bn3(out)

        # downsample是用一个1x1的卷积核处理,改变通道数,如果H/W尺度也不一样就设计stride
        if self.downsample is not None:
            residual = self.downsample(x)

        out += residual
        out = self.relu(out)

        return out


'''
ResNet由以下组成:
1.conv1、norm1、relu(当指定了deep_stem,这三个将被stem代替)
2.maxpool
3.layer1~layer4(定义为ResLayer类,分别由多个BasicBlock或Bottleneck组成)
'''
class ResNet(nn.Module):
    # 参数block指明残差块是两层或三层,参数layers指明每个卷积层需要的残差块数量,num_classes指明分类数,zero_init_residual是否初始化为0
    def __init__(self, block, layers, num_classes=1000, zero_init_residual=False,
                 groups=1, width_per_group=64, norm_layer=None):
        super(ResNet, self).__init__()
        if norm_layer is None:
            norm_layer = nn.BatchNorm2d

        self.inplanes = 64
        self.groups = groups
        self.base_width = width_per_group
        self.conv1 = nn.Conv2d(12, self.inplanes, kernel_size=7, stride=2, padding=3,
                               bias=False)
        self.bn1 = norm_layer(self.inplanes)
        self.relu = nn.ReLU(inplace=True)

        # 网络的第一层加入注意力机制
        # self.ca = ChannelAttention(self.inplanes)
        # self.sa = SpatialAttention()

        self.maxpool = nn.MaxPool2d(kernel_size=3, stride=2, padding=1)
        self.layer1 = self._make_layer(block, 64, layers[0], norm_layer=norm_layer)
        self.layer2 = self._make_layer(block, 128, layers[1], stride=2, norm_layer=norm_layer)
        self.layer3 = self._make_layer(block, 256, layers[2], stride=2, norm_layer=norm_layer)
        self.layer4 = self._make_layer(block, 512, layers[3], stride=2, norm_layer=norm_layer)

        # 网络的卷积层的最后一层加入注意力机制
        # self.ca1 = ChannelAttention(self.inplanes)
        # self.sa1 = SpatialAttention()

        self.avgpool = nn.AdaptiveAvgPool2d((1, 1))  # 自适应平均池化,指定输出(H,W)
        self.fc = nn.Linear(512 * block.expansion, num_classes)

        for m in self.modules():
            if isinstance(m, nn.Conv2d):
                nn.init.kaiming_normal_(m.weight, mode='fan_out', nonlinearity='relu')
            elif isinstance(m, (nn.BatchNorm2d, nn.GroupNorm)):
                nn.init.constant_(m.weight, 1)
                nn.init.constant_(m.bias, 0)

        if zero_init_residual:
            for m in self.modules():
                if isinstance(m, Bottleneck):
                    nn.init.constant_(m.bn3.weight, 0)
                elif isinstance(m, BasicBlock):
                    nn.init.constant_(m.bn2.weight, 0)

    # 构造ResLayer类,layer1~layer4
    # block:BasicBlock/Bottleneck; planes:块的输入通道数; blocks:块的数目
    def _make_layer(self, block, planes, blocks, stride=1, norm_layer=None):
        if norm_layer is None:
            norm_layer = nn.BatchNorm2d
        downsample = None  # downSample的作用于在残差连接时 将输入的图像的通道数变成和卷积操作的尺寸一致
        if stride != 1 or self.inplanes != planes * block.expansion:
            # 通道数恢复成一致/长宽恢复一致
            downsample = nn.Sequential(
                conv1x1(self.inplanes, planes * block.expansion, stride),
                norm_layer(planes * block.expansion),
            )

        layers = []
        layers.append(block(self.inplanes, planes, stride, downsample, self.groups,
                            self.base_width, norm_layer))
        self.inplanes = planes * block.expansion
        for _ in range(1, blocks):
            layers.append(block(self.inplanes, planes, groups=self.groups,
                                base_width=self.base_width, norm_layer=norm_layer))

        return nn.Sequential(*layers)

    '''
    卷积/池化后的tensor维度为(batchsize,channels,x,y),其中x.size(0)指batchsize的值,
    通过x.view(x.size(0), -1)将tensor的结构转换为了(batchsize, channels*x*y)
    即将(channels,x,y)拉直,然后就可以和fc层连接

    因为最后avgpool(1,1)指定输出长*宽为1*1,通道为512*4,所以channels*x*y=2048
    '''
    def forward(self, x):
        x = self.conv1(x)
        x = self.bn1(x)
        x = self.relu(x)

        # x = self.ca(x) * x
        # x = self.sa(x) * x

        x = self.maxpool(x)

        x = self.layer1(x)
        x = self.layer2(x)
        x = self.layer3(x)
        x = self.layer4(x)

        # x = self.ca1(x) * x
        # x = self.sa1(x) * x

        x = self.avgpool(x)
        x = x.view(x.size(0), -1)
        #x=self.fc(x)

        return x

class DANNet(nn.Module):

    def __init__(self, num_classes=2):
        super(DANNet, self).__init__()
        self.sharedNet = resnet50(False)
        self.cls_fc = nn.Linear(2048, num_classes)  # channels*x*y=2048*1*1,见上面的备注

    def forward(self, source, target):
        loss = 0
        source = self.sharedNet(source)
        if self.training == True:
            target = self.sharedNet(target)
            # loss += mmd.mmd_rbf_accelerate(source, target)
            loss += mmd.mmd_rbf_noaccelerate(source, target)

        source = self.cls_fc(source)
        #target = self.cls_fc(target)

        return source, loss

def resnet50(pretrained=False, **kwargs):
    """Constructs a ResNet-50 model.
    Args:
        pretrained (bool): If True, returns a model pre-trained on ImageNet
    """
    model = ResNet(Bottleneck, [3, 4, 6, 3], **kwargs)
    if pretrained:
        model.load_state_dict(model_zoo.load_url(model_urls['resnet50']))
    return model
三、训练模型
#train.py
import torch
import torch.nn as nn
from torchvision import transforms, datasets
import json
import matplotlib.pyplot as plt
import os
import torch.optim as optim
from model import resnet34, resnet101
import torchvision.models.resnet
device = torch.device("cuda:0" if torch.cuda.is_available() else "cpu")
print(device)
#数据增强操作,训练集:随机裁剪(RandomResizedCrop)、随机水平翻转(RandomHorizontalFlip)、转换为张量(ToTensor)以及归一化(Normalize)
#验证集:大小调整(Resize)、中心裁剪(CenterCrop)、转换为张量(ToTensor)以及归一化(Normalize)
data_transform = {
"train": transforms.Compose([transforms.RandomResizedCrop(224),
transforms.RandomHorizontalFlip(),
transforms.ToTensor(),
transforms.Normalize([0.485, 0.456, 0.406], [0.229, 0.224, 0.225])]),#来自官网参数
"val": transforms.Compose([transforms.Resize(256),#将最小边长缩放到256
transforms.CenterCrop(224),
transforms.ToTensor(),
transforms.Normalize([0.485, 0.456, 0.406], [0.229, 0.224, 0.225])])}
data_root = os.getcwd()
image_path = data_root + "/flower_data/" # flower data set path
train_dataset = datasets.ImageFolder(root=image_path + "train",
transform=data_transform["train"])
train_num = len(train_dataset) #3306
flower_list = train_dataset.class_to_idx #{'daisy': 0, 'dandelion': 1, 'roses': 2, 'sunflowers': 3, 'tulips': 4}
cla_dict = dict((val, key) for key, val in flower_list.items()) #{0: 'daisy', 1: 'dandelion', 2: 'roses', 3: 'sunflowers', 4: 'tulips'}
# write dict into json file
json_str = json.dumps(cla_dict, indent=4) #将cla_dict字典对象转换为JSON格式的字符串,并通过indent=4参数指定缩进为4个空格
with open('class_indices.json', 'w') as json_file:
json_file.write(json_str)
batch_size = 16
train_loader = torch.utils.data.DataLoader(train_dataset,
batch_size=batch_size, shuffle=True,
num_workers=0)
validate_dataset = datasets.ImageFolder(root=image_path + "/val",
transform=data_transform["val"])
val_num = len(validate_dataset) #364
validate_loader = torch.utils.data.DataLoader(validate_dataset,
batch_size=batch_size, shuffle=False,
num_workers=0)
#net = resnet34()
net = resnet34(num_classes=5)
# load pretrain weights
# model_weight_path = "./resnet34-pre.pth"
# missing_keys, unexpected_keys = net.load_state_dict(torch.load(model_weight_path), strict=False)#载入模型参数
# for param in net.parameters():
# param.requires_grad = False
# change fc layer structure
# inchannel = net.fc.in_features
# net.fc = nn.Linear(inchannel, 5)
net.to(device) #将神经网络模型net移动到指定的设备上,这样模型就可以在GPU/CPU上计算
loss_function = nn.CrossEntropyLoss() #损失函数
optimizer = optim.Adam(net.parameters(), lr=0.0001) #优化器
best_acc = 0.0
save_path = './resNet34.pth'
#一个epoch表示对整个训练数据集进行一次完整的迭代训练
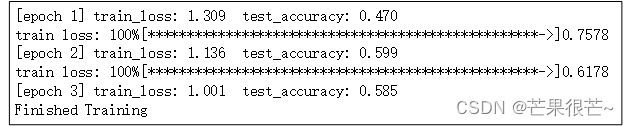
for epoch in range(3):
# train
net.train()
running_loss = 0.0
#step表示当前的步数(或者称为批次数),data则表示从train_loader中加载的数据对象
for step, data in enumerate(train_loader, start=0):
images, labels = data #images:(16,3,224,224) labels:(16,)
optimizer.zero_grad()
logits = net(images.to(device)) #logits:(16,5)将输入的图像数据images传入神经网络net
loss = loss_function(logits, labels.to(device)) #1.6871 计算模型输出logits进行标准化(softmax),再计算每个样本预测标签和真实标签的交叉熵,对于整个批次的样本,计算平均交叉熵损失
loss.backward()
optimizer.step()
# print statistics
running_loss += loss.item() #累加每个批次的损失值
# print train process
rate = (step+1)/len(train_loader)
a = "*" * int(rate * 50)
b = "." * int((1 - rate) * 50)
print("\rtrain loss: {:^3.0f}%[{}->{}]{:.4f}".format(int(rate*100), a, b, loss), end="")
print()
# validate
net.eval()
acc = 0.0 # accumulate accurate number / epoch
with torch.no_grad():
for val_data in validate_loader:
val_images, val_labels = val_data
outputs = net(val_images.to(device)) # eval model only have last output layer
# loss = loss_function(outputs, test_labels)
predict_y = torch.max(outputs, dim=1)[1] #torch.max包含两个维度信息,第一个维度是最大值,第二个维度是最大值对应的索引
acc += (predict_y == val_labels.to(device)).sum().item() #每一次的validate_loader中预测正确的个数,.item() 方法转换为标量
val_accurate = acc / val_num
if val_accurate > best_acc:
best_acc = val_accurate
torch.save(net.state_dict(), save_path) #state_dict()方法返回模型的参数字典,save_path保存模型参数的文件路径
print('[epoch %d] train_loss: %.3f test_accuracy: %.3f' %
(epoch + 1, running_loss / step, val_accurate))
print('Finished Training')
四、预测
#predict.py

import torch
from model import resnet34
from PIL import Image
from torchvision import transforms
import matplotlib.pyplot as plt
import json

data_transform = transforms.Compose(
    [transforms.Resize(256),
     transforms.CenterCrop(224),
     transforms.ToTensor(),
     transforms.Normalize([0.485, 0.456, 0.406], [0.229, 0.224, 0.225])])

# load image
img = Image.open("./roses.jpg")
plt.imshow(img)
# [N, C, H, W]
img = data_transform(img)
# expand batch dimension
img = torch.unsqueeze(img, dim=0)

# read class_indict
try:
    json_file = open('./class_indices.json', 'r')
    class_indict = json.load(json_file)
except Exception as e:
    print(e)
    exit(-1)

# create model
model = resnet34(num_classes=5)
# load model weights
model_weight_path = "./resNet34.pth"
model.load_state_dict(torch.load(model_weight_path))
model.eval()
with torch.no_grad():
    # predict class
    output = torch.squeeze(model(img))
    predict = torch.softmax(output, dim=0)
    predict_cla = torch.argmax(predict).numpy()
print(class_indict[str(predict_cla)], predict[predict_cla].numpy())
plt.show()