文章目录
- 主要完成任务
- 代码结构
- 1.action space
- 2.default_config
- 3.reward
- _agent_rewards
- _agent_reward
- _reward
- _rewards
- 小结
- 4.terminated & truncated
- 5.reset
- _make_road
- _make_vehicles
- _spawn_vehicle
- 6.step
主要完成任务
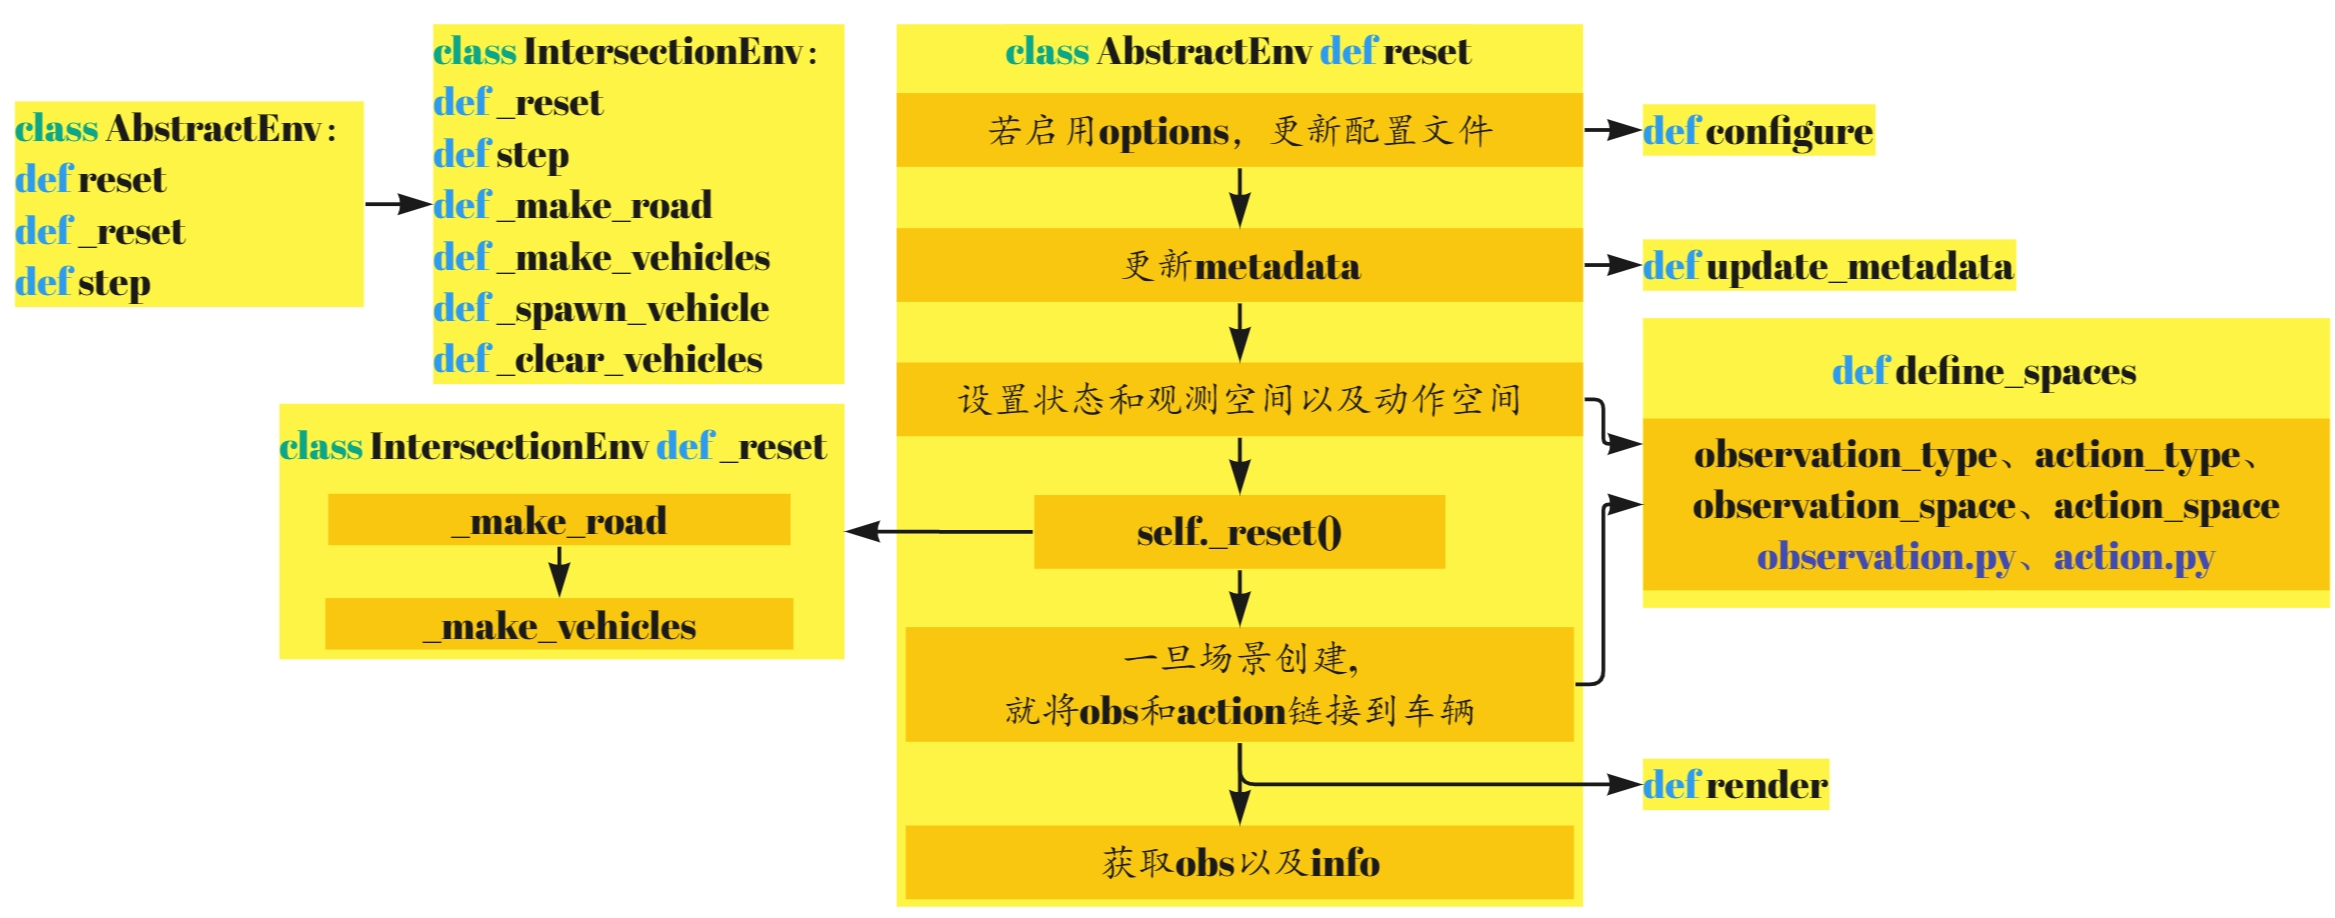
IntersectionEnv继承自AbstractEnv,主要完成以下4个任务
default_config环境默认的配置define_spaces设置相应的动作空间和观测空间step以一定的频率(policy frequency)执行策略并以一定的频率(simulation frequency)模拟环境render用于显示
代码结构
这部分的代码大致可以分为以下几个部分,我也将从以下几个方面进行分析。

另附上AbstractEnv部分的代码结构。

1.action space
在IntersectionEnv类中首先定义了action space,如下所示:分为SLOWER、IDLE和FASTER。默认设置期望速度设置为[0, 4.5, 9]

2.default_config
default_config设置了环境的默认配置,如下所示:
    @classmethod
    def default_config(cls) -> dict:
        config = super().default_config()
        config.update({
            "observation": {
                "type": "Kinematics",
                "vehicles_count": 15,
                "features": ["presence", "x", "y", "vx", "vy", "cos_h", "sin_h"],
                "features_range": {
                    "x": [-100, 100],
                    "y": [-100, 100],
                    "vx": [-20, 20],
                    "vy": [-20, 20],
                },
                "absolute": True,
                "flatten": False,
                "observe_intentions": False
            },
            "action": {
                "type": "DiscreteMetaAction",
                "longitudinal": True,
                "lateral": False,
                "target_speeds": [0, 4.5, 9]
            },
            "duration": 13,  # [s]
            "destination": "o1",
            "controlled_vehicles": 1,
            "initial_vehicle_count": 10,
            "spawn_probability": 0.6,
            "screen_width": 600,
            "screen_height": 600,
            "centering_position": [0.5, 0.6],
            "scaling": 5.5 * 1.3,
            "collision_reward": -5,
            "high_speed_reward": 1,
            "arrived_reward": 1,
            "reward_speed_range": [7.0, 9.0],
            "normalize_reward": False,
            "offroad_terminal": False
        })
        return config
默认配置文件还有AbstractEnv中所定义的部分。
    @classmethod
    def default_config(cls) -> dict:
        """
        Default environment configuration.

        Can be overloaded in environment implementations, or by calling configure().
        :return: a configuration dict
        """
        return {
            "observation": {
                "type": "Kinematics"
            },
            "action": {
                "type": "DiscreteMetaAction"
            },
            "simulation_frequency": 15,  # [Hz]
            "policy_frequency": 1,  # [Hz]
            "other_vehicles_type": "highway_env.vehicle.behavior.IDMVehicle",
            "screen_width": 600,  # [px]
            "screen_height": 150,  # [px]
            "centering_position": [0.3, 0.5],
            "scaling": 5.5,
            "show_trajectories": False,
            "render_agent": True,
            "offscreen_rendering": os.environ.get("OFFSCREEN_RENDERING", "0") == "1",
            "manual_control": False,
            "real_time_rendering": False
        }
3.reward
接着来介绍奖励函数部分,在AbstractEnv中定义了_reward和_rewards函数,其中_rewards只在info中进行使用。
    def _reward(self, action: Action) -> float:
        """
        Return the reward associated with performing a given action and ending up in the current state.

        :param action: the last action performed
        :return: the reward
        """
        raise NotImplementedError

    def _rewards(self, action: Action) -> Dict[Text, float]:
        """
        Returns a multi-objective vector of rewards.

        If implemented, this reward vector should be aggregated into a scalar in _reward().
        This vector value should only be returned inside the info dict.

        :param action: the last action performed
        :return: a dict of {'reward_name': reward_value}
        """
        raise NotImplementedError
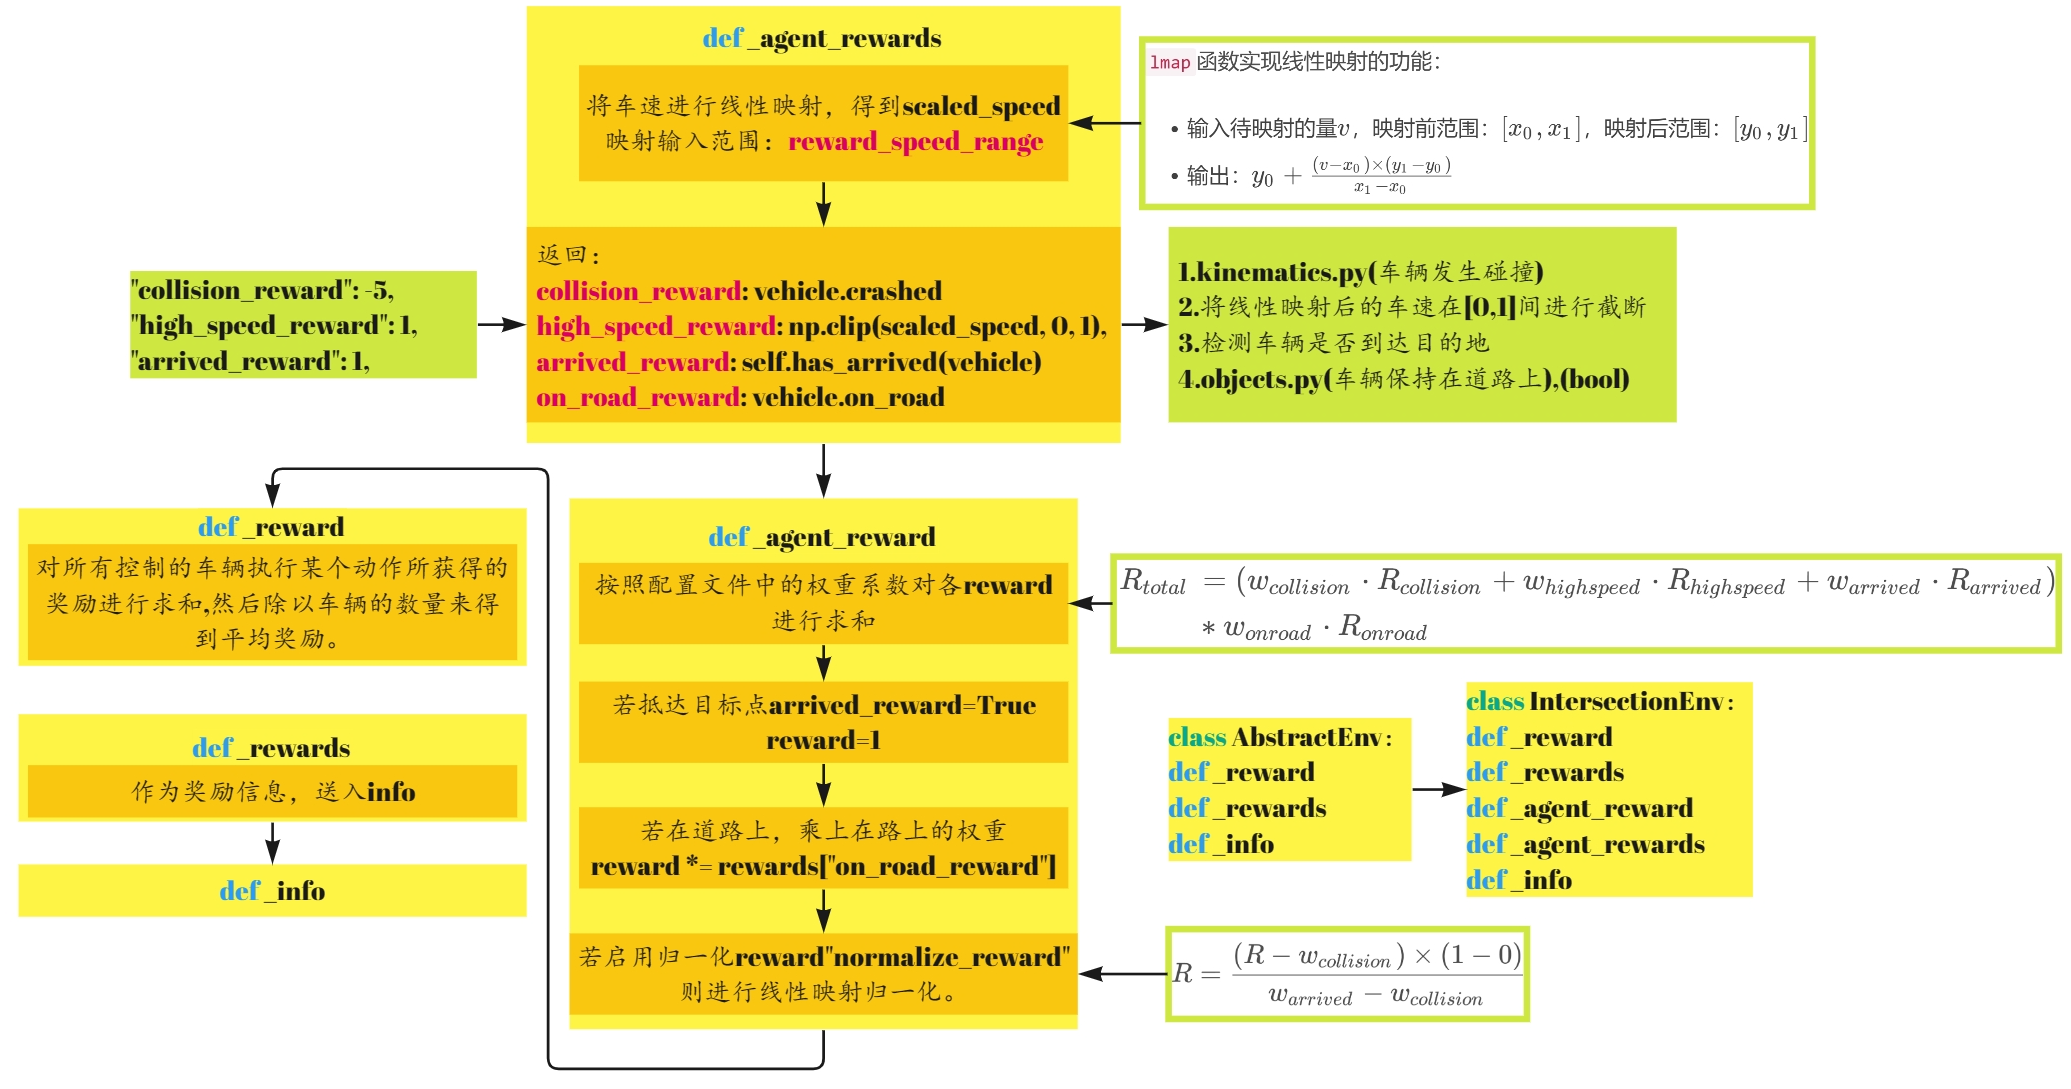
在IntersectionEnv类中,实现了_reward、_rewards、_agent_reward以及_agent_rewards四个函数,我们首先从第四个函数开始看起:
_agent_rewards
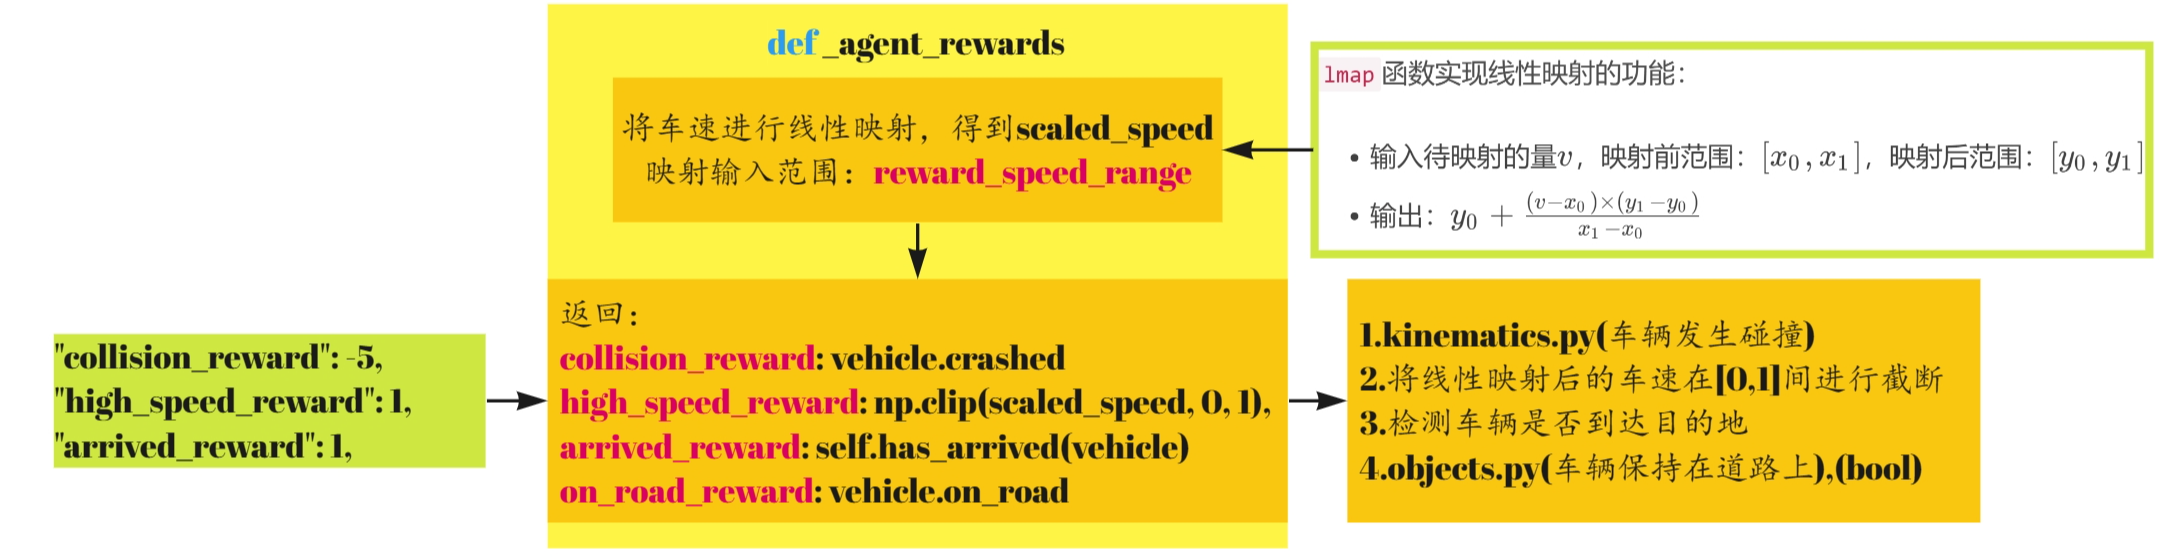
    def _agent_rewards(self, action: int, vehicle: Vehicle) -> Dict[Text, float]:
        """Per-agent per-objective reward signal."""
        scaled_speed = utils.lmap(vehicle.speed, self.config["reward_speed_range"], [0, 1])
        return {
            "collision_reward": vehicle.crashed,
            "high_speed_reward": np.clip(scaled_speed, 0, 1),
            "arrived_reward": self.has_arrived(vehicle),
            "on_road_reward": vehicle.on_road
        }
首先将车速进行线性映射,得到scaled_speed。
lmap函数实现线性映射的功能:
- 输入待映射的量 v v v,映射前范围: [ x 0 , x 1 ] [x_0,x_1] [x0,x1],映射后范围: [ y 0 , y 1 ] [y_0,y_1] [y0,y1]
- 输出: y 0 + ( v − x 0 ) × ( y 1 − y 0 ) x 1 − x 0 y_0 + \frac{{(v-x_0)}\times{(y_1-y_0)}}{x_1-x_0} y0+x1−x0(v−x0)×(y1−y0)
如:scaled_speed = utils.lmap(5, [7, 9], [0, 1])输出为-1.
utils.py
def lmap(v: float, x: Interval, y: Interval) -> float:
    """Linear map of value v with range x to desired range y."""
    return y[0] + (v - x[0]) * (y[1] - y[0]) / (x[1] - x[0])
has_arrived根据如下条件进行判断,lane_index是一个三元组(例,(‘il1’,‘o1’,0)),判断车辆是否在车道上,是否抵达目的地,且是否在车道坐标系中的纵向坐标大于exit_distance。
    def has_arrived(self, vehicle: Vehicle, exit_distance: float = 25) -> bool:
        return "il" in vehicle.lane_index[0] \
               and "o" in vehicle.lane_index[1] \
               and vehicle.lane.local_coordinates(vehicle.position)[0] >= exit_distance
_agent_reward
_agent_reward接受来自_agent_rewards的字典,进行reward求和并判断是否启用奖励归一化。
R
t
o
t
a
l
=
(
w
c
o
l
l
i
s
i
o
n
⋅
R
c
o
l
l
i
s
i
o
n
+
w
h
i
g
h
s
p
e
e
d
⋅
R
h
i
g
h
s
p
e
e
d
+
w
a
r
r
i
v
e
d
⋅
R
a
r
r
i
v
e
d
)
∗
w
o
n
r
o
a
d
⋅
R
o
n
r
o
a
d
\begin{aligned}R_{total}&=(w_{collision}\cdot R_{collision}+w_{highspeed}\cdot R_{highspeed}+w_{arrived}\cdot R_{arrived})\\ &*w_{onroad}\cdot R_{onroad}\end{aligned}
Rtotal=(wcollision⋅Rcollision+whighspeed⋅Rhighspeed+warrived⋅Rarrived)∗wonroad⋅Ronroad
启用归一化:
R
=
(
R
−
w
c
o
l
l
i
s
i
o
n
)
×
(
1
−
0
)
w
a
r
r
i
v
e
d
−
w
c
o
l
l
i
s
i
o
n
R= \frac{{(R-w_{collision})}\times{(1-0)}}{w_{arrived}-w_{collision}}
R=warrived−wcollision(R−wcollision)×(1−0)
    def _agent_reward(self, action: int, vehicle: Vehicle) -> float:
        """Per-agent reward signal."""
        rewards = self._agent_rewards(action, vehicle)
        reward = sum(self.config.get(name, 0) * reward for name, reward in rewards.items())
        reward = self.config["arrived_reward"] if rewards["arrived_reward"] else reward
        reward *= rewards["on_road_reward"]
        if self.config["normalize_reward"]:
            reward = utils.lmap(reward, [self.config["collision_reward"], self.config["arrived_reward"]], [0, 1])
        return reward
_reward
_reward通过对所有控制的车辆执行某个动作所获得的奖励进行求和,然后除以车辆的数量来得到平均奖励。
    def _reward(self, action: int) -> float:
        """Aggregated reward, for cooperative agents."""
        return sum(self._agent_reward(action, vehicle) for vehicle in self.controlled_vehicles
                   ) / len(self.controlled_vehicles)
_rewards
_rewards 方法计算的是合作智能体的多目标奖励。对于每个动作,它计算所有控制车辆的奖励,并将这些奖励按名称聚合起来,然后除以车辆的数量得到平均奖励。这个方法返回的是一个字典,其中每个键都是一个奖励的名称,每个值都是对应的平均奖励。最后将信息送人info.
    def _rewards(self, action: int) -> Dict[Text, float]:
        """Multi-objective rewards, for cooperative agents."""
        agents_rewards = [self._agent_rewards(action, vehicle) for vehicle in self.controlled_vehicles]
        return {
            name: sum(agent_rewards[name] for agent_rewards in agents_rewards) / len(agents_rewards)
            for name in agents_rewards[0].keys()
        }
AbstractEnv
    def _info(self, obs: Observation, action: Optional[Action] = None) -> dict:
        """
        Return a dictionary of additional information

        :param obs: current observation
        :param action: current action
        :return: info dict
        """
        info = {
            "speed": self.vehicle.speed,
            "crashed": self.vehicle.crashed,
            "action": action,
        }
        try:
            info["rewards"] = self._rewards(action)
        except NotImplementedError:
            pass
        return info
IntersectionEnv
    def _info(self, obs: np.ndarray, action: int) -> dict:
        info = super()._info(obs, action)
        info["agents_rewards"] = tuple(self._agent_reward(action, vehicle) for vehicle in self.controlled_vehicles)
        info["agents_dones"] = tuple(self._agent_is_terminal(vehicle) for vehicle in self.controlled_vehicles)
        return info
小结
4.terminated & truncated
- 当车辆发生碰撞或者抵达终点或者偏离道路,则视为
_is_terminated - 当车辆所经历的时间大于预定的时间
duration,则truncated _agent_is_terminal方法在info中使用。
    def _is_terminated(self) -> bool:
        return any(vehicle.crashed for vehicle in self.controlled_vehicles) \
               or all(self.has_arrived(vehicle) for vehicle in self.controlled_vehicles) \
               or (self.config["offroad_terminal"] and not self.vehicle.on_road)

    def _agent_is_terminal(self, vehicle: Vehicle) -> bool:
        """The episode is over when a collision occurs or when the access ramp has been passed."""
        return (vehicle.crashed or
                self.has_arrived(vehicle))

    def _is_truncated(self) -> bool:
        """The episode is truncated if the time limit is reached."""
        return self.time >= self.config["duration"]
5.reset
_make_road
_make_road实现了一个4-way的路口场景,共有以下四种优先级:
| 驾驶行为 | 优先级 | 图示 |
|---|---|---|
| 3 | horizontal straight lanes and right-turns |  |
| 2 | horizontal left-turns | 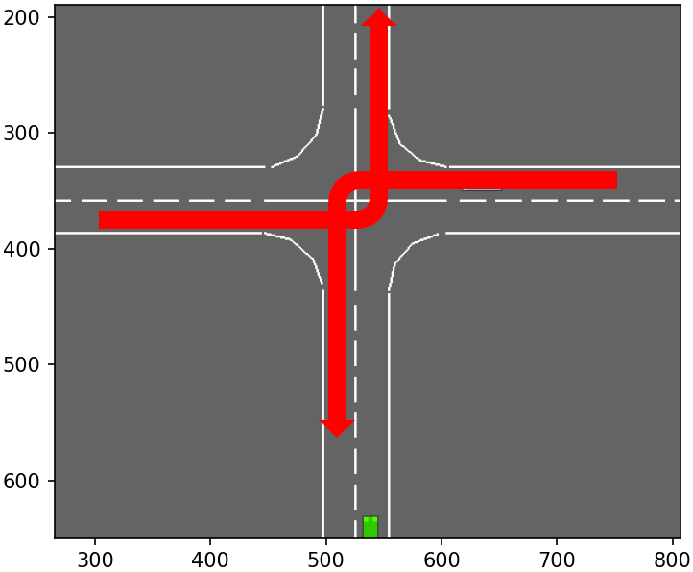 |
| 1 | vertical straight lanes and right-turns | 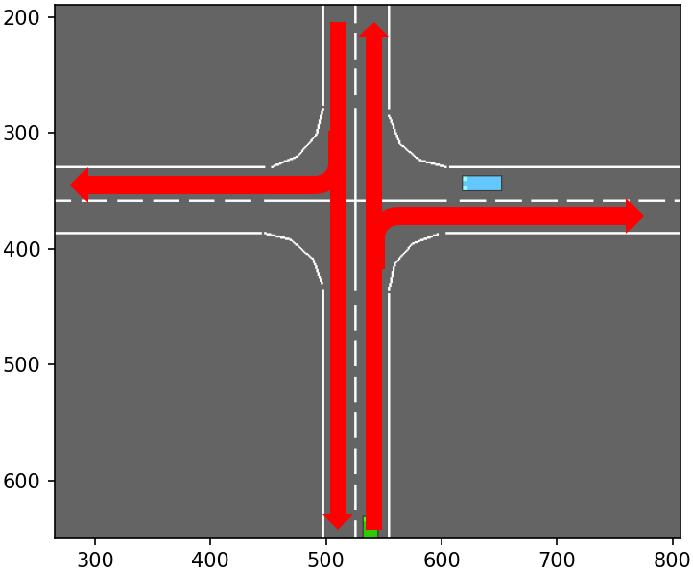 |
| 0 | vertical left-turns | 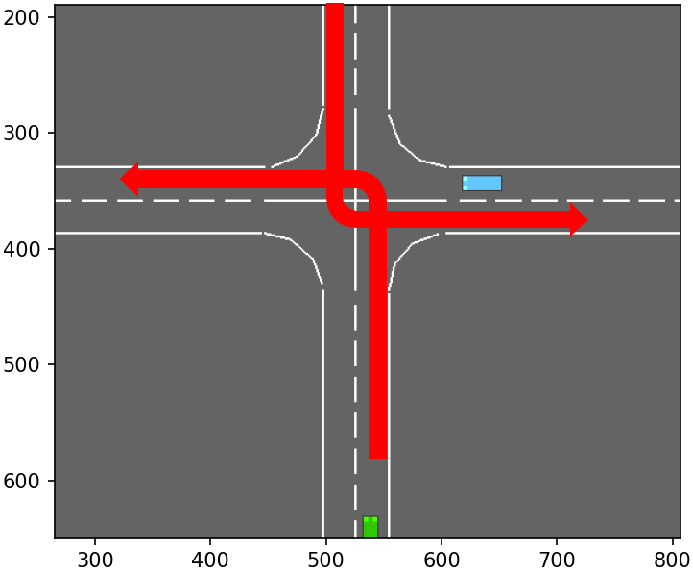 |
路网中的节点按如下规则进行标识:
(o:outer | i:inner + [r:right, l:left]) + (0:south | 1:west | 2:north | 3:east)
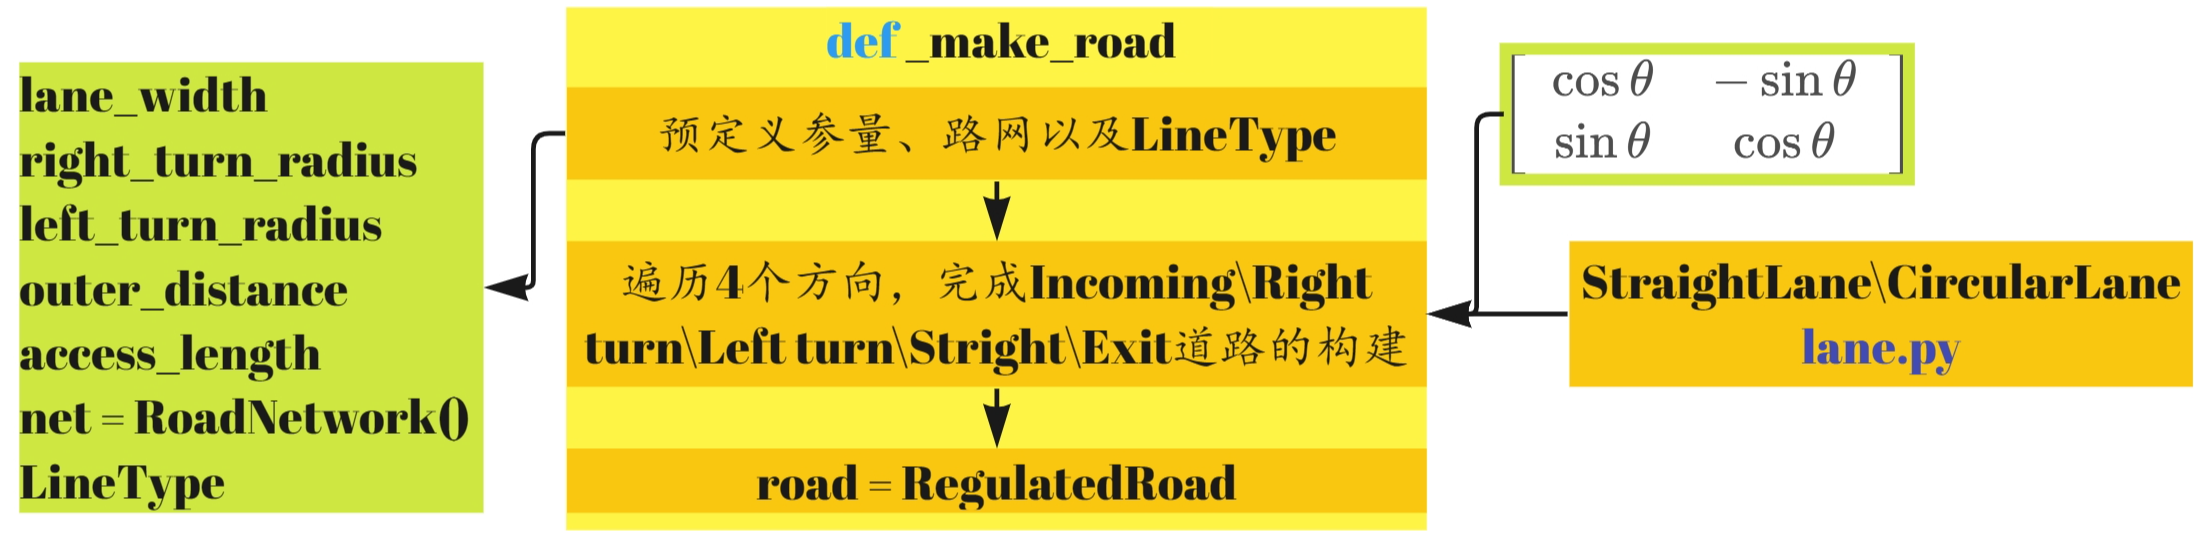
    def _make_road(self) -> None:
        """
        Make an 4-way intersection.

        The horizontal road has the right of way. More precisely, the levels of priority are:
            - 3 for horizontal straight lanes and right-turns
            - 1 for vertical straight lanes and right-turns
            - 2 for horizontal left-turns
            - 0 for vertical left-turns

        The code for nodes in the road network is:
        (o:outer | i:inner + [r:right, l:left]) + (0:south | 1:west | 2:north | 3:east)

        :return: the intersection road
        """
        lane_width = AbstractLane.DEFAULT_WIDTH
        right_turn_radius = lane_width + 5  # [m}
        left_turn_radius = right_turn_radius + lane_width  # [m}
        outer_distance = right_turn_radius + lane_width / 2
        access_length = 50 + 50  # [m]

        net = RoadNetwork()
        n, c, s = LineType.NONE, LineType.CONTINUOUS, LineType.STRIPED
        for corner in range(4):
            angle = np.radians(90 * corner)
            is_horizontal = corner % 2
            priority = 3 if is_horizontal else 1
            rotation = np.array([[np.cos(angle), -np.sin(angle)], [np.sin(angle), np.cos(angle)]])
            # Incoming
            start = rotation @ np.array([lane_width / 2, access_length + outer_distance])
            end = rotation @ np.array([lane_width / 2, outer_distance])
            net.add_lane("o" + str(corner), "ir" + str(corner),
                         StraightLane(start, end, line_types=[s, c], priority=priority, speed_limit=10))
            # Right turn
            r_center = rotation @ (np.array([outer_distance, outer_distance]))
            net.add_lane("ir" + str(corner), "il" + str((corner - 1) % 4),
                         CircularLane(r_center, right_turn_radius, angle + np.radians(180), angle + np.radians(270),
                                      line_types=[n, c], priority=priority, speed_limit=10))
            # Left turn
            l_center = rotation @ (np.array([-left_turn_radius + lane_width / 2, left_turn_radius - lane_width / 2]))
            net.add_lane("ir" + str(corner), "il" + str((corner + 1) % 4),
                         CircularLane(l_center, left_turn_radius, angle + np.radians(0), angle + np.radians(-90),
                                      clockwise=False, line_types=[n, n], priority=priority - 1, speed_limit=10))
            # Straight
            start = rotation @ np.array([lane_width / 2, outer_distance])
            end = rotation @ np.array([lane_width / 2, -outer_distance])
            net.add_lane("ir" + str(corner), "il" + str((corner + 2) % 4),
                         StraightLane(start, end, line_types=[s, n], priority=priority, speed_limit=10))
            # Exit
            start = rotation @ np.flip([lane_width / 2, access_length + outer_distance], axis=0)
            end = rotation @ np.flip([lane_width / 2, outer_distance], axis=0)
            net.add_lane("il" + str((corner - 1) % 4), "o" + str((corner - 1) % 4),
                         StraightLane(end, start, line_types=[n, c], priority=priority, speed_limit=10))

        road = RegulatedRoad(network=net, np_random=self.np_random, record_history=self.config["show_trajectories"])
        self.road = road
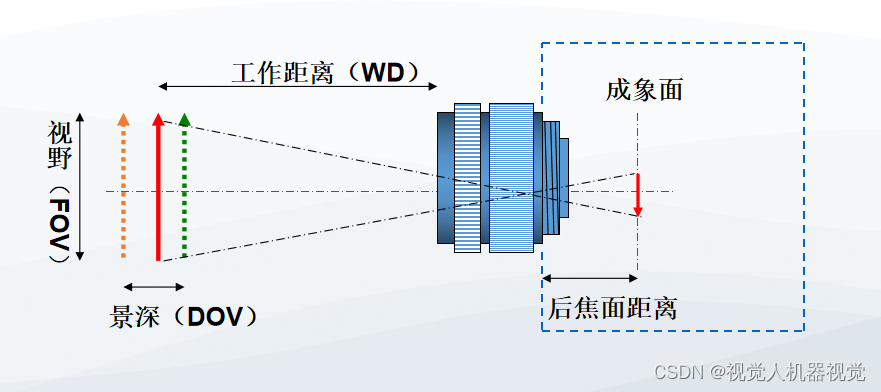
首先是lane_width、right_turn_radius、left_turn_radius、outer_distance、access_length等参数的设置,图示如下:


旋转矩阵: [ cos θ − sin θ sin θ cos θ ] \left[ {\begin{array}{ccccccccccccccc}{\cos \theta }&{ - \sin \theta }\\{\sin \theta }&{\cos \theta }\end{array}} \right] [cosθsinθ−sinθcosθ]
代码遍历4个方向,构建相应的路网,图示如下:


_make_vehicles
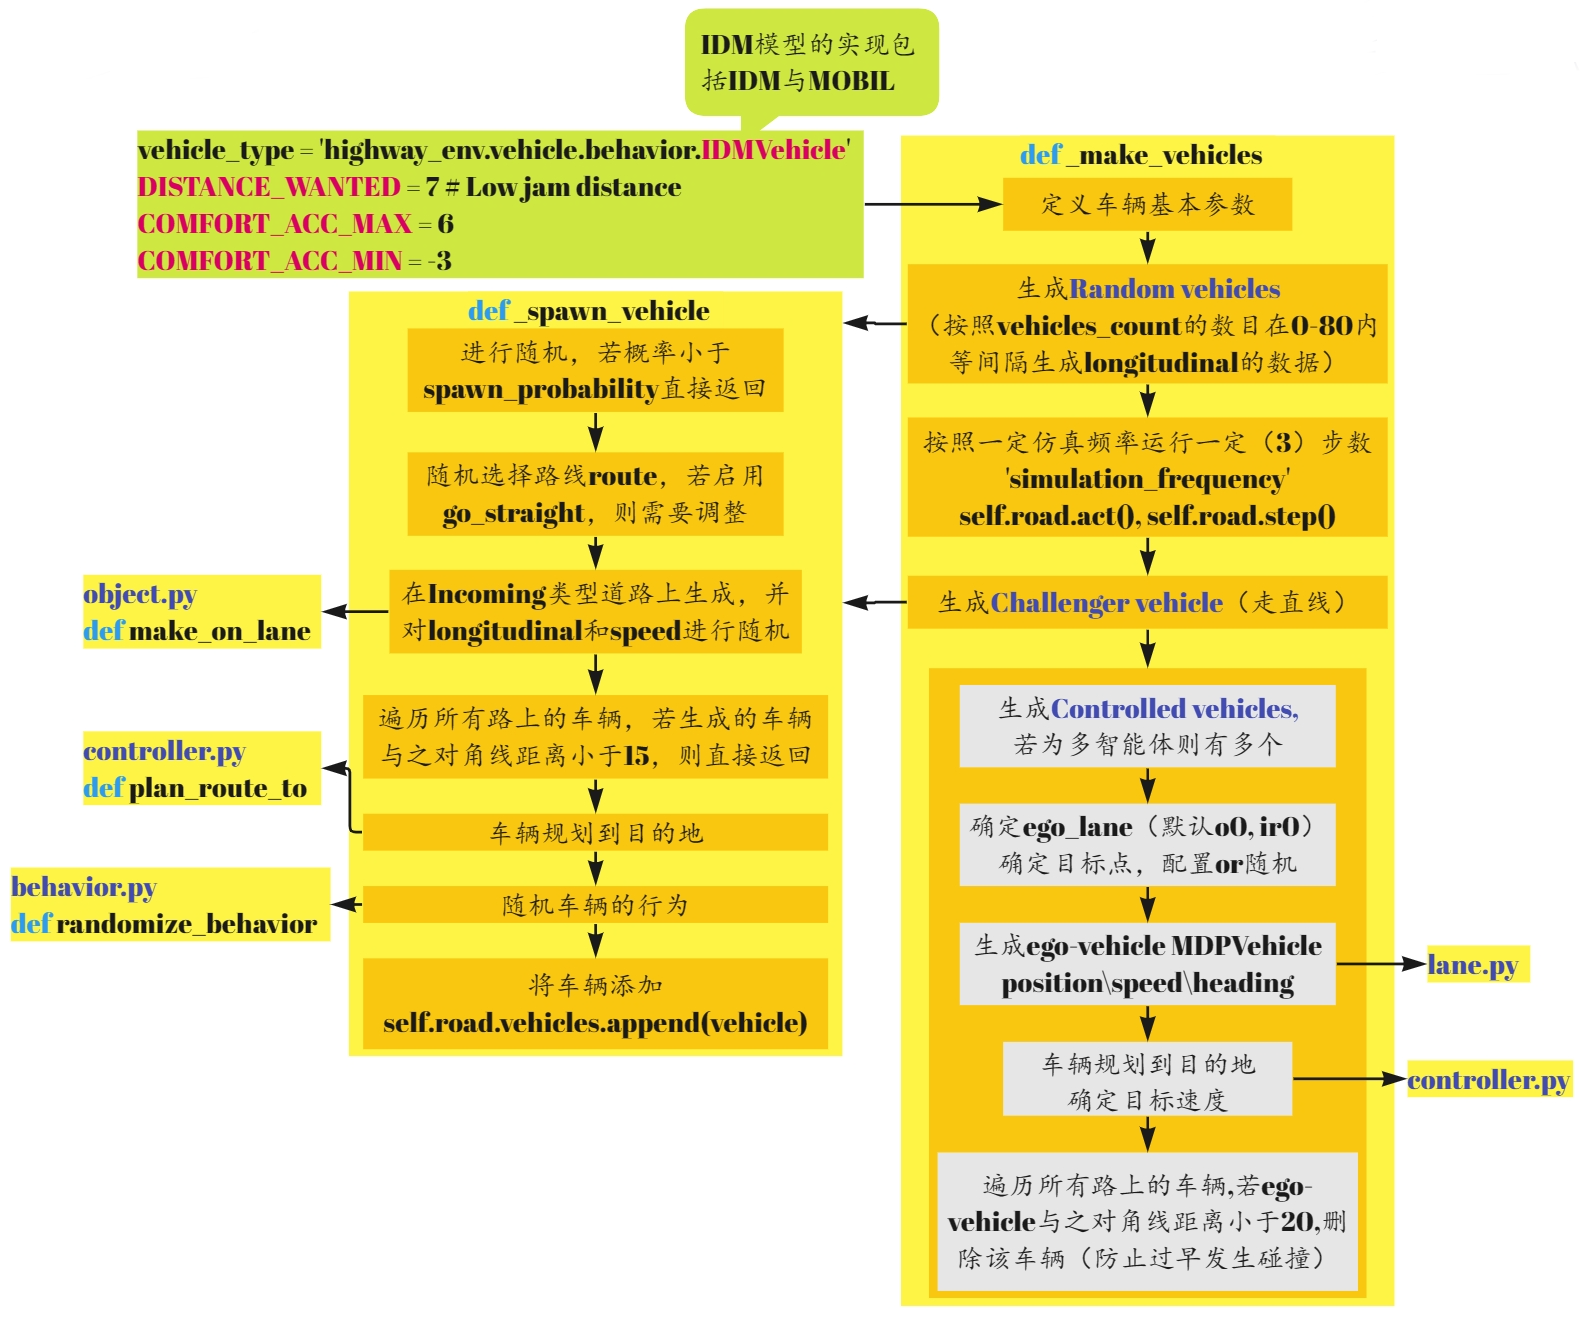
    def _make_vehicles(self, n_vehicles: int = 10) -> None:
        """
        Populate a road with several vehicles on the highway and on the merging lane

        :return: the ego-vehicle
        """
        # Configure vehicles
        vehicle_type = utils.class_from_path(self.config["other_vehicles_type"])
        vehicle_type.DISTANCE_WANTED = 7  # Low jam distance
        vehicle_type.COMFORT_ACC_MAX = 6
        vehicle_type.COMFORT_ACC_MIN = -3

        # Random vehicles
        simulation_steps = 3
        for t in range(n_vehicles - 1):
            self._spawn_vehicle(np.linspace(0, 80, n_vehicles)[t])
        for _ in range(simulation_steps):
            [(self.road.act(), self.road.step(1 / self.config["simulation_frequency"])) for _ in range(self.config["simulation_frequency"])]

        # Challenger vehicle
        self._spawn_vehicle(60, spawn_probability=1, go_straight=True, position_deviation=0.1, speed_deviation=0)

        # Controlled vehicles
        self.controlled_vehicles = []
        for ego_id in range(0, self.config["controlled_vehicles"]):
            ego_lane = self.road.network.get_lane(("o{}".format(ego_id % 4), "ir{}".format(ego_id % 4), 0))
            destination = self.config["destination"] or "o" + str(self.np_random.randint(1, 4))
            ego_vehicle = self.action_type.vehicle_class(
                             self.road,
                             ego_lane.position(60 + 5*self.np_random.normal(1), 0),
                             speed=ego_lane.speed_limit,
                             heading=ego_lane.heading_at(60))
            try:
                ego_vehicle.plan_route_to(destination)
                ego_vehicle.speed_index = ego_vehicle.speed_to_index(ego_lane.speed_limit)
                ego_vehicle.target_speed = ego_vehicle.index_to_speed(ego_vehicle.speed_index)
            except AttributeError:
                pass

            self.road.vehicles.append(ego_vehicle)
            self.controlled_vehicles.append(ego_vehicle)
            for v in self.road.vehicles:  # Prevent early collisions
                if v is not ego_vehicle and np.linalg.norm(v.position - ego_vehicle.position) < 20:
                    self.road.vehicles.remove(v)
_spawn_vehicle
    def _spawn_vehicle(self,
                       longitudinal: float = 0,
                       position_deviation: float = 1.,
                       speed_deviation: float = 1.,
                       spawn_probability: float = 0.6,
                       go_straight: bool = False) -> None:
        if self.np_random.uniform() > spawn_probability:
            return

        route = self.np_random.choice(range(4), size=2, replace=False)
        route[1] = (route[0] + 2) % 4 if go_straight else route[1]
        vehicle_type = utils.class_from_path(self.config["other_vehicles_type"])
        vehicle = vehicle_type.make_on_lane(self.road, ("o" + str(route[0]), "ir" + str(route[0]), 0),
                                            longitudinal=(longitudinal + 5
                                                          + self.np_random.normal() * position_deviation),
                                            speed=8 + self.np_random.normal() * speed_deviation)
        for v in self.road.vehicles:
            if np.linalg.norm(v.position - vehicle.position) < 15:
                return
        vehicle.plan_route_to("o" + str(route[1]))
        vehicle.randomize_behavior()
        self.road.vehicles.append(vehicle)
        return vehicle
6.step
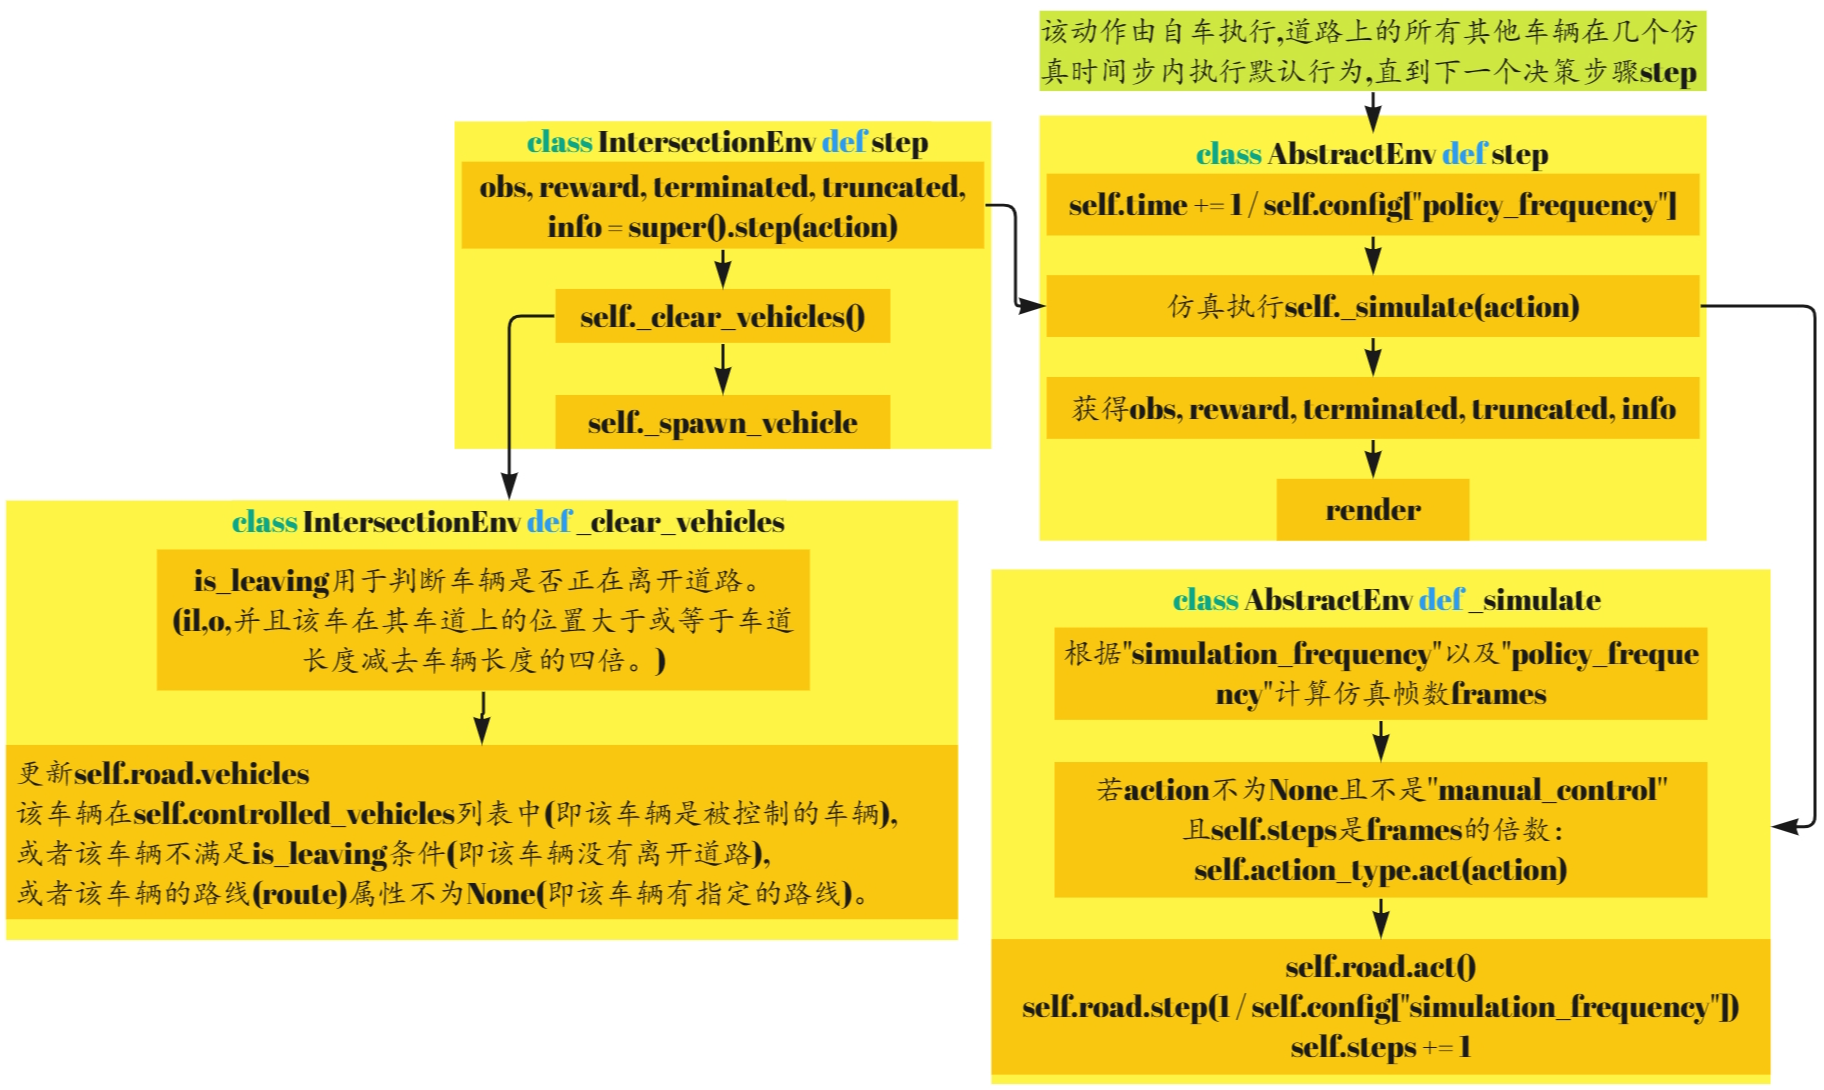
abstract.py
    def step(self, action: Action) -> Tuple[Observation, float, bool, bool, dict]:
        """
        Perform an action and step the environment dynamics.

        The action is executed by the ego-vehicle, and all other vehicles on the road performs their default behaviour
        for several simulation timesteps until the next decision making step.

        :param action: the action performed by the ego-vehicle
        :return: a tuple (observation, reward, terminated, truncated, info)
        """
        if self.road is None or self.vehicle is None:
            raise NotImplementedError("The road and vehicle must be initialized in the environment implementation")

        self.time += 1 / self.config["policy_frequency"]
        self._simulate(action)

        obs = self.observation_type.observe()
        reward = self._reward(action)
        terminated = self._is_terminated()
        truncated = self._is_truncated()
        info = self._info(obs, action)
        if self.render_mode == 'human':
            self.render()

        return obs, reward, terminated, truncated, info
intersection_env.py
    def step(self, action: int) -> Tuple[np.ndarray, float, bool, bool, dict]:
        obs, reward, terminated, truncated, info = super().step(action)
        self._clear_vehicles()
        self._spawn_vehicle(spawn_probability=self.config["spawn_probability"])
        return obs, reward, terminated, truncated, info
    def _simulate(self, action: Optional[Action] = None) -> None:
        """Perform several steps of simulation with constant action."""
        frames = int(self.config["simulation_frequency"] // self.config["policy_frequency"])
        for frame in range(frames):
            # Forward action to the vehicle
            if action is not None \
                    and not self.config["manual_control"] \
                    and self.steps % int(self.config["simulation_frequency"] // self.config["policy_frequency"]) == 0:
                self.action_type.act(action)

            self.road.act()
            self.road.step(1 / self.config["simulation_frequency"])
            self.steps += 1

            # Automatically render intermediate simulation steps if a viewer has been launched
            # Ignored if the rendering is done offscreen
            if frame < frames - 1:  # Last frame will be rendered through env.render() as usual
                self._automatic_rendering()

        self.enable_auto_render = False