SpringMVC框架
- 1. 搭建springmvc测试项目
- 1.1 创建maven项目
- 1.2 导入依赖pom.xml
- 1.3 将springmvc容器加载到tomcat中
- 1.4 启动tomcat插件
- 1.5 访问路径:
- 2. 剖析启动过程
- 2.1 启动服务器初始化过程
- 2.2 访问路径执行过程
- 3.spring-springmvc bean的管理
- 3.1 因为功能不同,如何避免spring错误的加载到?
- 3.2 spring加载与spring相关的bean
- 3.3 springmvc加载springmvc相关的bean
- 3.4 将springmvc与spring的bean加载到服务tomcat容器中
- 3.5 启动tomcat插件
- 3.6 查看打印日志
- 3.7 当我们自己编写一个容器的时候,并且注册进去
- 4. 请求与响应
- 4.1 请求映射路径
- 4.2 请求参数
- 4.3 日期类型参数传递
- 4.4 响应json数据
1. 搭建springmvc测试项目
1.1 创建maven项目
1.2 导入依赖pom.xml
<?xml version="1.0" encoding="UTF-8"?>
<project xmlns="http://maven.apache.org/POM/4.0.0"
         xmlns:xsi="http://www.w3.org/2001/XMLSchema-instance"
         xsi:schemaLocation="http://maven.apache.org/POM/4.0.0 http://maven.apache.org/xsd/maven-4.0.0.xsd">
    <modelVersion>4.0.0</modelVersion>

    <groupId>com.ypy</groupId>
    <artifactId>springmvc_01_quickstart</artifactId>
    <version>1.0-SNAPSHOT</version>
    <packaging>war</packaging> <!--修改为war包否者tomcat插件启动后就停止了,没有可以运行的代码-->

    <properties>
        <maven.compiler.source>8</maven.compiler.source>
        <maven.compiler.target>8</maven.compiler.target>
        <project.build.sourceEncoding>UTF-8</project.build.sourceEncoding>
    </properties>
    <dependencies>
        <dependency>
            <groupId>javax.servlet</groupId>
            <artifactId>javax.servlet-api</artifactId>
            <version>3.1.0</version>
            <scope>provided</scope>
        </dependency>
        <dependency>
            <groupId>org.springframework</groupId>
            <artifactId>spring-webmvc</artifactId>
            <version>5.2.12.RELEASE</version>
        </dependency>
    </dependencies>
        <!--tomcat插件 启动项目的容器插件-->
    <build>
        <plugins>
            <plugin>
                <groupId>org.apache.tomcat.maven</groupId>
                <artifactId>tomcat7-maven-plugin</artifactId>
                <version>2.2</version>
                <configuration>
                    <port>80</port>
                    <path>/</path>
                </configuration>
            </plugin>
        </plugins>
    </build>
</project>
1.3 将springmvc容器加载到tomcat中
public class ServletContainerInitConfig extends AbstractDispatcherServletInitializer {
    @Override
    protected WebApplicationContext createServletApplicationContext() {
    	// 项目使用注解配置Web应用上下文
        AnnotationConfigWebApplicationContext ctx = new AnnotationConfigWebApplicationContext();
        // 将配置类注册到上下文
        ctx.register(SpringMvcConfig.class);
        return ctx;
    }

    @Override
    // 配置拦截路径,哪些访问路径需要springmvc管理
    protected String[] getServletMappings() {
        return new String[]{"/"};
    }

    @Override
    // 配置其他容器上下文
    protected WebApplicationContext createRootApplicationContext() {
        return null;
    }
}
扫描controller进入容器
@ComponentScan("com.ypy.controller")
public class SpringMvcConfig {
}
控制器类
@Controller
public class UserController {

    @RequestMapping("/save")
    @ResponseBody
    public String save(){
        System.out.println("user save ...");
        return "{'info':'Springmvc'}";
    }
}
1.4 启动tomcat插件
edit configurations -> 搜maven -> run: tomcat7:run --> apply. --> run (绿色三角)启动
1.5 访问路径:
http://localhost/save
返回:

2. 剖析启动过程
2.1 启动服务器初始化过程
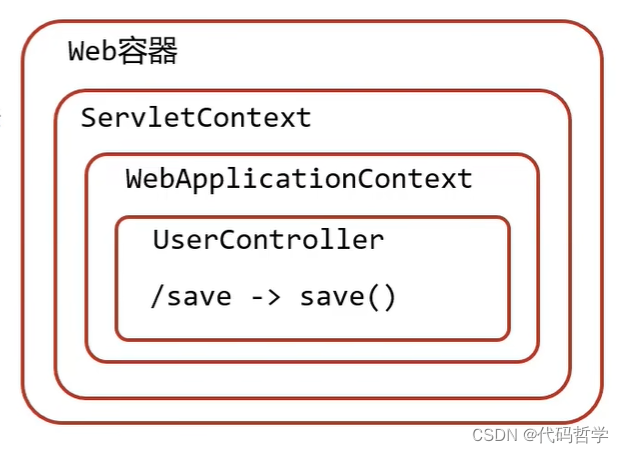
- 服务器启动,执行ServletContainerInitConfig类,初始化web容器
- 执行createServletApplicationContext方法,创建了WebApplicationContext对象
- 加载SpringMvcConfig
- 执行@ComponentScan加载对应的bean
- 加载UserController,每个@RequestMapping的名称对应一个具体的方法
- 执行getServletMappings方法,定义所有的请求都通过SpringMVC
2.2 访问路径执行过程
- 发送请求localhost/save
- web容器发现所有请求多经过springmvc,将请求交给springmvc处理
- 解析请求路径/save
- 有/save匹配执行对应的方法save()
- 执行save()
- 检测有@RequestBody直接将save()方法的返回值作为响应体返回给请求方。
3.spring-springmvc bean的管理
1.springmvc会加载controller相关的bean
2. spring会加载service、dao、config等包下的bean,那么就会扫描根包下的所有子包,这样就会重复
3.1 因为功能不同,如何避免spring错误的加载到?
SpringMVC的bean–加载Spring控制的bean的时候排除掉springmvc控制的bean
方法:
- Spring加载的bean设定扫描范围为com.itheima,排除掉controllert包内的bean
- Spring加载的bean设定扫描范围为精准范围,例如service包、dao包等
- 不区分Spring与SpringMVC的环境,加载到同一个环境中
3.2 spring加载与spring相关的bean
@Configuration
//@ComponentScan({"com.ypy.service","com.ypy.dao"})
@ComponentScan(value = "com.ypy",
        excludeFilters = @ComponentScan.Filter(
                type = FilterType.ANNOTATION,
                classes = {Controller.class,RestController.class}
        )
)
public class SpringConfig {
}
3.3 springmvc加载springmvc相关的bean
@ComponentScan("com.ypy.controller")
public class SpringMvcConfig {
}
3.4 将springmvc与spring的bean加载到服务tomcat容器中
public class ServletContainerInitConfig extends AbstractAnnotationConfigDispatcherServletInitializer {

    @Override
    protected Class<?>[] getRootConfigClasses() {
        System.out.println("1被调用了);
        return new Class[]{SpringConfig.class};
    }

    @Override
    protected Class<?>[] getServletConfigClasses() {
    	System.out.println("2被调用了);
        return new Class[]{SpringMvcConfig.class};
    }

    @Override
    protected String[] getServletMappings() {
       	System.out.println("3被调用了);
        return new String[]{"/"};
    }
}
或者
public class ServletContainerInitConfig extends AbstractDispatcherServletInitializer {
   // 注册springmvc容器bean
   @Override
   protected WebApplicationContext createServletApplicationContext() {
       AnnotationConfigWebApplicationContext ctx = new AnnotationConfigWebApplicationContext();
       ctx.register(SpringMvcConfig.class);
       return ctx;
   }

   @Override
   protected String[] getServletMappings() {
       return new String[]{"/"};
   }

   // 注册spring的容器bean
   @Override
   protected WebApplicationContext createRootApplicationContext() {
       AnnotationConfigWebApplicationContext ctx = new AnnotationConfigWebApplicationContext();
       ctx.register(SpringConfig.class);
       return ctx;
   }
}
3.5 启动tomcat插件
同上,启动方式
edit configurations -> 搜maven -> run: tomcat7:run --> apply. --> run (绿色三角)启动
3.6 查看打印日志
[INFO] Scanning for projects...
[INFO]
[INFO] ------------------< com.ypy:springmvc_01_quickstart >-------------------
[INFO] Building springmvc_01_quickstart 1.0-SNAPSHOT
[INFO] --------------------------------[ war ]---------------------------------
[INFO]
[INFO] >>> tomcat7-maven-plugin:2.2:run (default-cli) > process-classes @ springmvc_01_quickstart >>>
[INFO]
[INFO] --- maven-resources-plugin:2.6:resources (default-resources) @ springmvc_01_quickstart ---
[INFO] Using 'UTF-8' encoding to copy filtered resources.
[INFO] Copying 0 resource
[INFO]
[INFO] --- maven-compiler-plugin:3.1:compile (default-compile) @ springmvc_01_quickstart ---
[INFO] Changes detected - recompiling the module!
[INFO] Compiling 5 source files to D:\Application\WorkSpace\self-learn\base-learn\springmvc_01_quickstart\target\classes
[INFO]
[INFO] <<< tomcat7-maven-plugin:2.2:run (default-cli) < process-classes @ springmvc_01_quickstart <<<
[INFO]
[INFO]
[INFO] --- tomcat7-maven-plugin:2.2:run (default-cli) @ springmvc_01_quickstart ---
[INFO] Running war on http://localhost:80/
[INFO] Using existing Tomcat server configuration at D:\Application\WorkSpace\self-learn\base-learn\springmvc_01_quickstart\target\tomcat
[INFO] create webapp with contextPath:
十一月 13, 2023 9:47:44 下午 org.apache.coyote.AbstractProtocol init
信息: Initializing ProtocolHandler ["http-bio-80"]
十一月 13, 2023 9:47:44 下午 org.apache.catalina.core.StandardService startInternal
信息: Starting service Tomcat
十一月 13, 2023 9:47:44 下午 org.apache.catalina.core.StandardEngine startInternal
信息: Starting Servlet Engine: Apache Tomcat/7.0.47
十一月 13, 2023 9:47:45 下午 org.apache.catalina.core.ApplicationContext log
信息: 1 Spring WebApplicationInitializers detected on classpath
1被调用了
2被调用了
3被调用了
十一月 13, 2023 9:47:45 下午 org.apache.catalina.core.ApplicationContext log
信息: Initializing Spring root WebApplicationContext
[INFO] Root WebApplicationContext: initialization started
[INFO] Root WebApplicationContext initialized in 261 ms
[INFO] Initializing Servlet 'dispatcher'
十一月 13, 2023 9:47:45 下午 org.apache.catalina.core.ApplicationContext log
信息: Initializing Spring DispatcherServlet 'dispatcher'
[INFO] Completed initialization in 119 ms
十一月 13, 2023 9:47:45 下午 org.apache.coyote.AbstractProtocol start
信息: Starting ProtocolHandler ["http-bio-80"]
// 发送请求,打印的输出结果
user save ...
3.7 当我们自己编写一个容器的时候,并且注册进去
import com.ypy.config.SpringConfig;
import com.ypy.config.SpringMvcConfig;
import com.ypy.controller.UserController;
import org.springframework.context.annotation.AnnotationConfigApplicationContext;

public class App {
    public static void main(String[] args) {
    	// 创建一个internal container
        AnnotationConfigApplicationContext ctx = new AnnotationConfigApplicationContext();
        // 注册配置类
        ctx.register(SpringConfig.class, SpringMvcConfig.class);
        // 刷新容器
        ctx.refresh();
        //容器获取bean
        UserController bean = ctx.getBean(UserController.class);
        System.out.println(bean);
    }
}

// 输出结果:
com.ypy.controller.UserController@64c87930
