CLIP代码解析
- CLIP演示代码(以cifar100举例)
- 补充1
- 1. 为什么选用100*image_feature?
- 2. 为什么使用L2规范点积,而不直接使用点积?
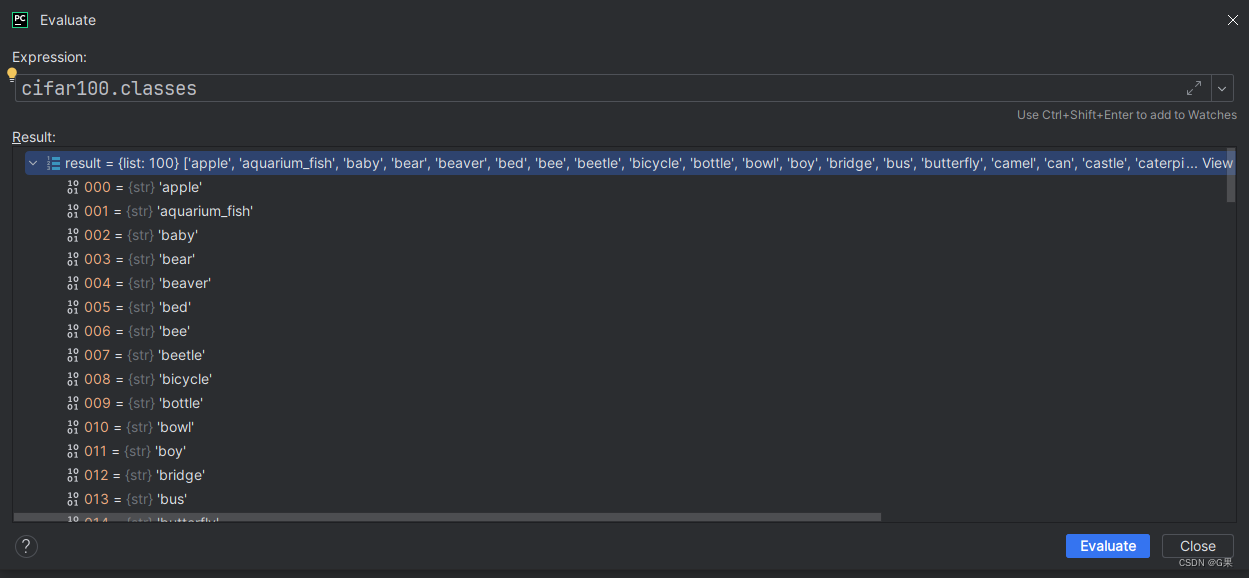
- cifar100的所有类别
- model.encode_image >> VisionTransformer
- 补充2
- 1. 为什么加入class_embedding?
- 2. self.transformer >> ResidualAttentionBlock * 12
- 3. 图像特征编码代码中self.proj,还有下面的文本特征编码代码中的self.text_projection
- model.encode_text >> CLIP/encode_text
- 补充3
- 1. 为什么使用text.aramax(-1),也就是文本的结束位作为文本特征的输出?
- 2. self.text_embedding的作用
- 字符编码代码(CLIP:一句话 = 1*77 tensor)
- self.encoder 词典(通过字符查找索引进行编码)
- CLIP调用完整代码
- 可视化图像
- 代码运行打印结果
CLIP演示代码(以cifar100举例)
-
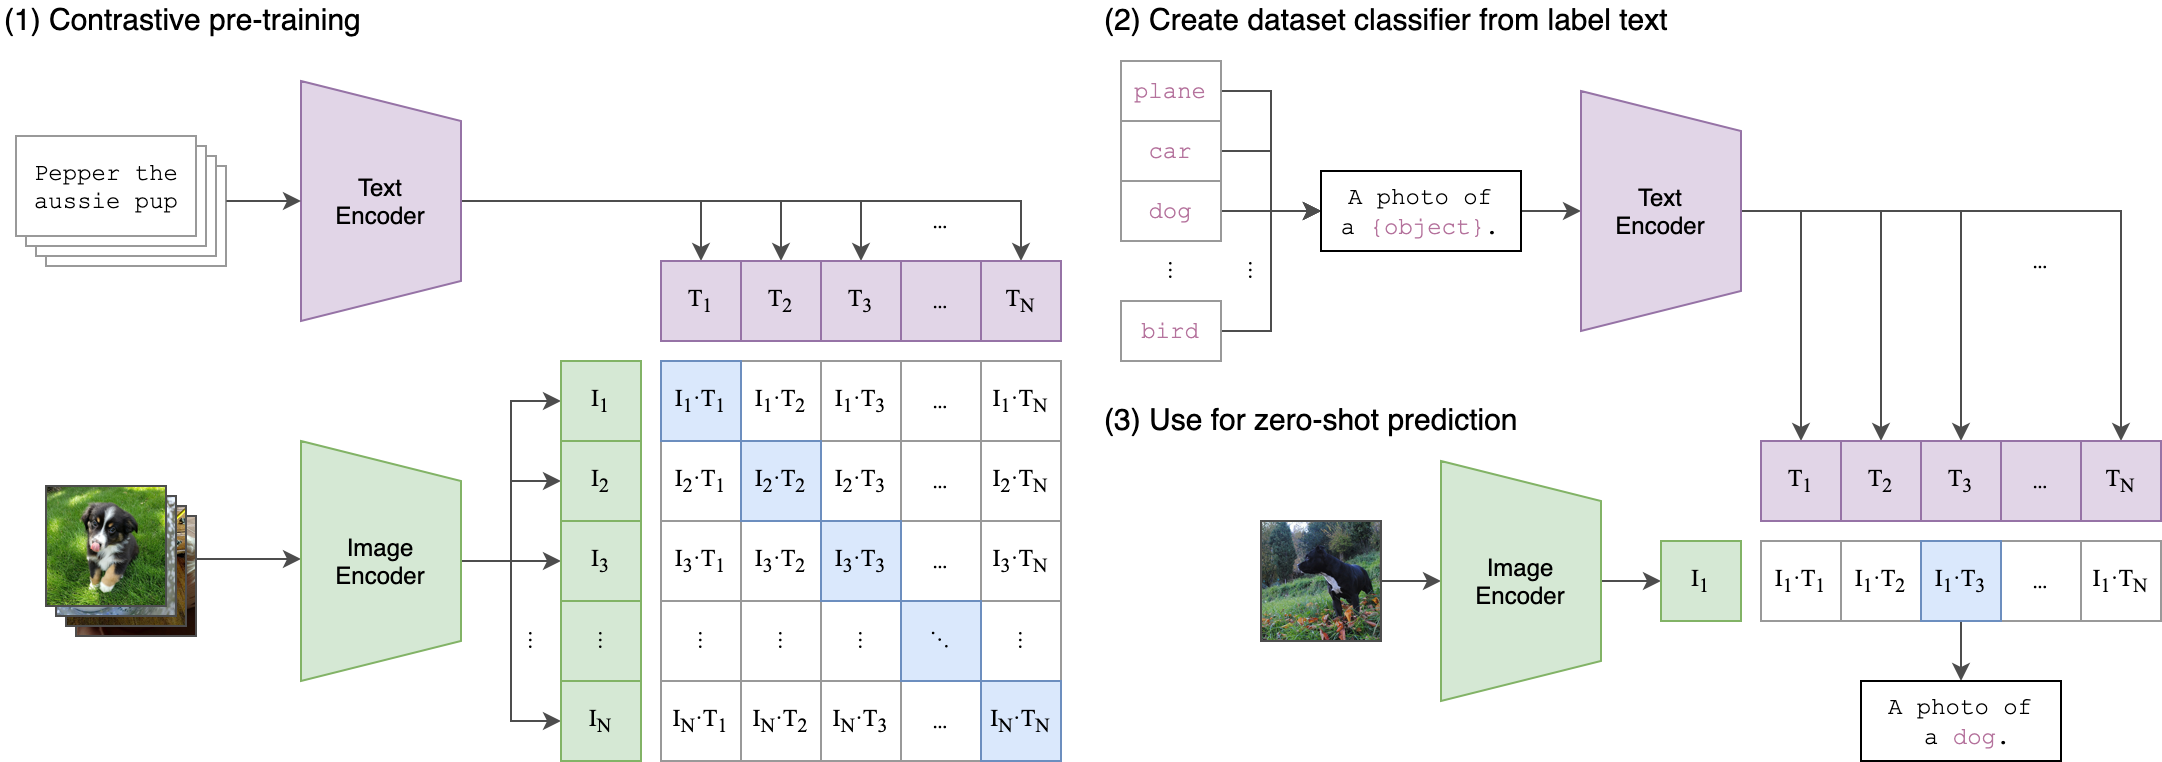
把类别cls嵌入句子‘a photo of a {cls}’,并进行字符编码,默认编码长度为77,不足的填充为0,这里通常是5个单词,例如 [a, photo, of, a, apple],但是要加上起始位[sot]和结束位[eot],就是长度为7的Tensor,例如[a, photo, of, a, ‘aquarium_fish’]>>[a, photo, of, a, ‘aquarium’, ‘_’, ‘fish’],这种类别是两个单词和下划线组成的,编码为长度为9的Tensor。
-
image_input是
(1,3,224,224)经过Vision Transformer编码为(1,512)的image_feature -
text_input是
(100,77)经过Vision Transformer编码为(100,512)的text_feature -
分别对imag_feature和text_feature进行归一化(L2范数),维度不变
-
计算image_feature和text_feature的相似度,得到
(1,100)的结果(cifar100个类的分数)
text_inputs = torch.cat([clip.tokenize(f"a photo of a {c}") for c in cifar100.classes]).to(device)#(77,100)

image_features = model.encode_image(image_input)#(1,512)
text_features = model.encode_text(text_inputs)#(100,512)

image_features /= image_features.norm(dim=-1, keepdim=True)
text_features /= text_features.norm(dim=-1, keepdim=True)
#image_features @ text_features.T == (1,512)(152,100) = (1,100)
similarity = (100.0 * image_features @ text_features.T).softmax(dim=-1)
补充1
1. 为什么选用100*image_feature?
作者回复:在对比学习过程中,我们将点乘解释为对数,并将其输入到每个文本和图像示例的交叉熵损失中。由于我们对特征向量进行了归一化处理,所以点积的上限在 [-1, 1] 之间,这可能没有足够的动态范围,并限制了对数所能表达的分类概率分布。因此,我们对对数进行了缩放,使其具有更大的差异。为了避免数值上的不稳定性,我们将刻度值限制在 100,对于我们训练的所有模型,刻度值都达到了 100。
https://github.com/openai/CLIP/issues/48
2. 为什么使用L2规范点积,而不直接使用点积?
作者回复:主要目的是通过限制对数的动态范围来稳定训练。由于余弦相似度在 [-1, 1] 以内且温度参数为上限,因此这是防止模型预测爆炸的简单方法。Radovanovi 等人发现,尽管使用了合成数据,但余弦相似度的“中心性现象”不那么严重。
https://github.com/openai/CLIP/issues/68
cifar100的所有类别
model.encode_image >> VisionTransformer
class VisionTransformer(nn.Module):
    def __init__(self, input_resolution: int, patch_size: int, width: int, layers: int, heads: int, output_dim: int):
        super().__init__()
        self.input_resolution = input_resolution
        self.output_dim = output_dim
        #patch_size=16 width=768
        self.conv1 = nn.Conv2d(in_channels=3, out_channels=width, kernel_size=patch_size, stride=patch_size, bias=False)
        scale = width ** -0.5
        self.class_embedding = nn.Parameter(scale * torch.randn(width))#(768)
        self.positional_embedding = nn.Parameter(scale * torch.randn((input_resolution // patch_size) ** 2 + 1, width))
        self.ln_pre = LayerNorm(width)#768
		#12个ResidualAttentionBlock堆叠
        self.transformer = Transformer(width, layers, heads)#(width=768,12,12)
        self.ln_post = LayerNorm(width)
        #图像投影矩阵(768,512)
        self.proj = nn.Parameter(scale * torch.randn(width, output_dim))

    def forward(self, x: torch.Tensor):
        x = self.conv1(x)  # shape = [*, width, grid, grid] x=(1,3,224,224)>>(1,768,16,16)
        x = x.reshape(x.shape[0], x.shape[1], -1)  # shape = [*, width, grid ** 2] (1,768,196)
        x = x.permute(0, 2, 1)  # shape = [*, grid ** 2, width]
        #(1,1+196,768)
        x = torch.cat([self.class_embedding.to(x.dtype) + torch.zeros(x.shape[0], 1, x.shape[-1], dtype=x.dtype, device=x.device), x], dim=1)  # shape = [*, grid ** 2 + 1, width]
        x = x + self.positional_embedding.to(x.dtype)
        x = self.ln_pre(x)
        x = x.permute(1, 0, 2)  # NLD -> LND (1,197,768)->(197,1,768)
        x = self.transformer(x)
        x = x.permute(1, 0, 2)  # LND -> NLD
        x = self.ln_post(x[:, 0, :])###(1,178) the class embedding 作为输出
        if self.proj is not None:
            x = x @ self.proj#(1,768)@(768,512)->(1,512)

        return x#(1,512)
补充2
1. 为什么加入class_embedding?
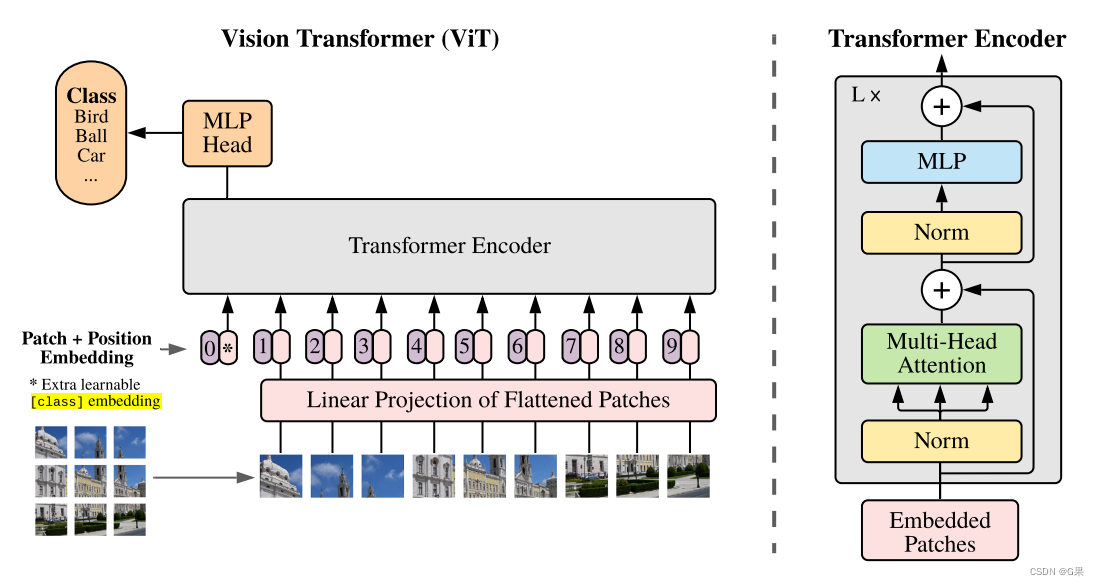
CLIP代码在图像特征的函数中加入了一个类别嵌入参数,并与原图像的token进行拼接,在经过self.transformer多层的多头注意力操作后,只取了类别嵌入(x[:,0,:])的输出。
作者回复:参考了VIT论文的设置,如下图中的 [class] embedding
x = torch.cat([self.class_embedding.to(x.dtype) + torch.zeros(x.shape[0], 1, x.shape[-1], dtype=x.dtype, device=x.device), x], dim=1)
x = self.ln_post(x[:, 0, :])
https://github.com/openai/CLIP/issues/48
https://github.com/openai/CLIP/issues/162
2. self.transformer >> ResidualAttentionBlock * 12
图像编码的多层多头注意力操作(self.transformer)是由12个ResidualAttentionBlock堆叠而成
class ResidualAttentionBlock(nn.Module):
    def __init__(self, d_model: int, n_head: int, attn_mask: torch.Tensor = None):
        super().__init__()

        self.attn = nn.MultiheadAttention(d_model, n_head)
        self.ln_1 = LayerNorm(d_model)
        self.mlp = nn.Sequential(OrderedDict([
            ("c_fc", nn.Linear(d_model, d_model * 4)),
            ("gelu", QuickGELU()),
            ("c_proj", nn.Linear(d_model * 4, d_model))
        ]))
        self.ln_2 = LayerNorm(d_model)
        self.attn_mask = attn_mask

    def attention(self, x: torch.Tensor):
        self.attn_mask = self.attn_mask.to(dtype=x.dtype, device=x.device) if self.attn_mask is not None else None
        return self.attn(x, x, x, need_weights=False, attn_mask=self.attn_mask)[0]

    def forward(self, x: torch.Tensor):
        x = x + self.attention(self.ln_1(x))
        x = x + self.mlp(self.ln_2(x))
        return x
3. 图像特征编码代码中self.proj,还有下面的文本特征编码代码中的self.text_projection
self.proj 图像特征投影矩阵维度为(768,512)
self.text_projection 文本特征投影矩阵维度为(512,512)
两者把图像特征和文本特征映射到相同的空间维度,从而计算相似度
model.encode_text >> CLIP/encode_text
这里由于文章篇幅影响只截取关键代码部分
    self.vocab_size = vocab_size#49408
    #把单词索引映射到词嵌入向量
    self.token_embedding = nn.Embedding(vocab_size, transformer_width)#Embedding(49408, 512)
    self.positional_embedding = nn.Parameter(torch.empty(self.context_length, transformer_width))#(77,512)
    self.ln_final = LayerNorm(transformer_width)
    self.text_projection = nn.Parameter(torch.empty(transformer_width, embed_dim))#(512,512)

def encode_text(self, text):#(100,77)
    x = self.token_embedding(text).type(self.dtype)  # [batch_size, n_ctx, d_model] =[100,77,512]

    x = x + self.positional_embedding.type(self.dtype)
    x = x.permute(1, 0, 2)  # NLD -> LND [77,100,512]
    x = self.transformer(x)#
    x = x.permute(1, 0, 2)  # LND -> NLD
    x = self.ln_final(x).type(self.dtype)#(100,77,512)

    # x.shape = [batch_size, n_ctx, transformer.width]
    # take features from the eot embedding (eot_token is the highest number in each sequence)
    x = x[torch.arange(x.shape[0]), text.argmax(dim=-1)] @ self.text_projection # 计算文本中每个词的结束位置

    return x#(100,512)
补充3
1. 为什么使用text.aramax(-1),也就是文本的结束位作为文本特征的输出?
作者回复:argmax 操作采用 EOT 位置的表示是正确的。沿序列维度取平均值本身并没有错,但根据经验,在特殊标记的位置(例如ViT和BERT中的CLS令牌)取表示效果更好。
https://github.com/openai/CLIP/issues/217
2. self.text_embedding的作用
把单词索引映射到连续词嵌入向量(自然语言处理的常用操作)
字符编码代码(CLIP:一句话 = 1*77 tensor)
def tokenize(texts: Union[str, List[str]], context_length: int = 77, truncate: bool = False) -> Union[torch.IntTensor, torch.LongTensor]:
    """
    Returns the tokenized representation of given input string(s)

    Parameters
    ----------
    texts : Union[str, List[str]]
        An input string or a list of input strings to tokenize
    context_length : int 默认=77
        The context length to use; all CLIP models use 77 as the context length
    truncate: bool 是否截断句子编码(超过77)
        Whether to truncate the text in case its encoding is longer than the context length
    Returns
    -------
    A two-dimensional tensor containing the resulting tokens, shape = [number of input strings, context_length].
    """
    if isinstance(texts, str):
        texts = [texts]

    sot_token = _tokenizer.encoder["<|startoftext|>"]#49406
    eot_token = _tokenizer.encoder["<|endoftext|>"]#49407
    all_tokens = [[sot_token] + _tokenizer.encode(text) + [eot_token] for text in texts]
    if packaging.version.parse(torch.__version__) < packaging.version.parse("1.8.0"):
        result = torch.zeros(len(all_tokens), context_length, dtype=torch.long)
    else:
        result = torch.zeros(len(all_tokens), context_length, dtype=torch.int)
    for i, tokens in enumerate(all_tokens):
        if len(tokens) > context_length:
            if truncate:
                tokens = tokens[:context_length]
                tokens[-1] = eot_token
            else:
                raise RuntimeError(f"Input {texts[i]} is too long for context length {context_length}")
        result[i, :len(tokens)] = torch.tensor(tokens)

    return result


class SimpleTokenizer(object):
	'''
	SimpleTokenizer 类
	#它用于将文本进行分词和编码, bps_path='./bpe_simple_vocab_16e6.txt.gz'
	1. `byte_encoder` 和 `byte_decoder`: 这两个属性是用于将字节编码与 Unicode 字符之间进行转换的字典。`byte_encoder` 将字节编码映射到 Unicode 字符,而 `byte_decoder` 则执行相反的操作。
	2. `merges`: 这是一个包含 BPE 合并操作的列表,用于构建 BPE 编码器。BPE 是一种流行的子词分割方法,它通过迭代地将文本拆分成更小的子词,并构建一个词汇表来表示这些子词。这个列表包含了 BPE 合并的操作。
	3. `vocab`: 这是一个词汇表,其中包含了字节编码和 BPE 合并操作后的词汇。它包括原始字节编码和添加 `'</w>'` 标记的词汇。
	4. `encoder` 和 `decoder`: 这两个属性是用于将文本转换为整数索引和从整数索引恢复文本的字典。`encoder` 将文本或子词映射到整数索引,而 `decoder` 则执行相反的操作。
	5. `bpe_ranks`: 这是一个字典,将 BPE 合并操作映射到它们的排名(索引)。
	6. `cache`: 这是一个缓存字典,用于存储已处理的文本片段。这有助于提高分词和编码的效率。
	7. `pat`: 这是一个正则表达式模式,用于在文本中识别和分割子词。模式包括 `<\|startoftext\|>`、`<\|endoftext\|>` 以及一些其他规则,用于分割文本成子词或词汇。
	'''
    def __init__(self, bpe_path: str = default_bpe()):
        self.byte_encoder = bytes_to_unicode()
        self.byte_decoder = {v: k for k, v in self.byte_encoder.items()}
        merges = gzip.open(bpe_path).read().decode("utf-8").split('\n')#list=(262146)
        merges = merges[1:49152-256-2+1]#l=48894
        merges = [tuple(merge.split()) for merge in merges]#l=48894
        vocab = list(bytes_to_unicode().values())#l=256
        vocab = vocab + [v+'</w>' for v in vocab]#512
        for merge in merges:
            vocab.append(''.join(merge))#512+48894=49406
        vocab.extend(['<|startoftext|>', '<|endoftext|>'])#49408
        self.encoder = dict(zip(vocab, range(len(vocab))))#{49408}
        self.decoder = {v: k for k, v in self.encoder.items()}
        self.bpe_ranks = dict(zip(merges, range(len(merges))))
        self.cache = {'<|startoftext|>': '<|startoftext|>', '<|endoftext|>': '<|endoftext|>'}
        self.pat = re.compile(r"""<\|startoftext\|>|<\|endoftext\|>|'s|'t|'re|'ve|'m|'ll|'d|[\p{L}]+|[\p{N}]|[^\s\p{L}\p{N}]+""", re.IGNORECASE)

    def encode(self, text):
    '''
    ##编码_tokenizer.encode(text) (tokenize函数计算all_tokens)
	_tokenizer.encode(text) (tokenize函数计算all_tokens)
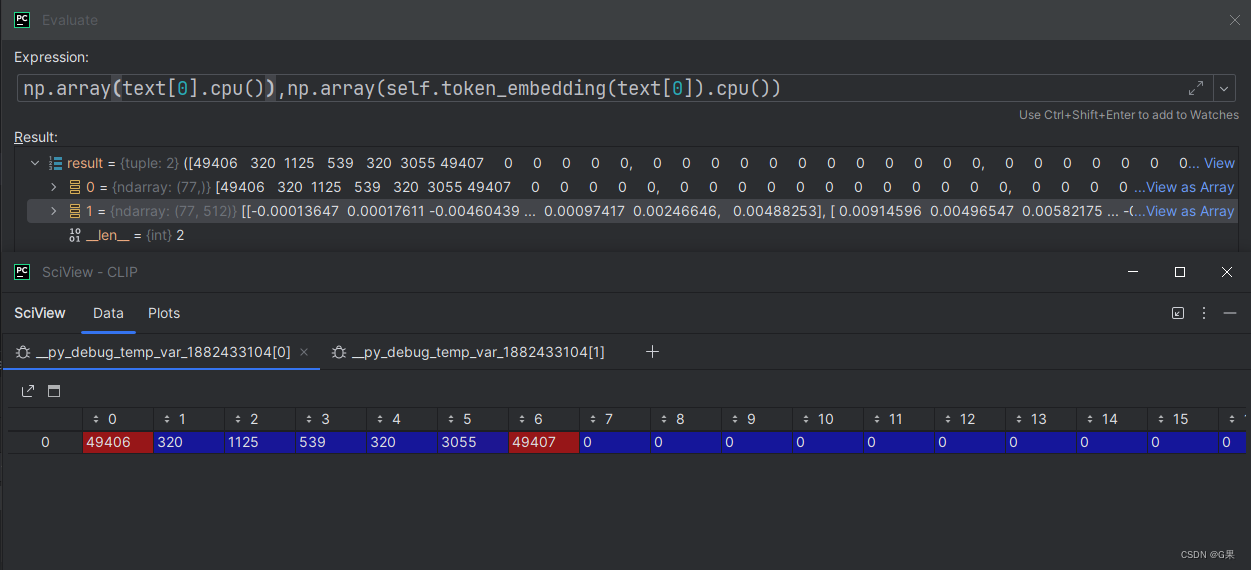
	[字符输入] ['a photo of a apple'] >> [320, 1125, 539, 320, 3055]
	re.findall(self.pat, text)通过正则化把句子拆分为单词
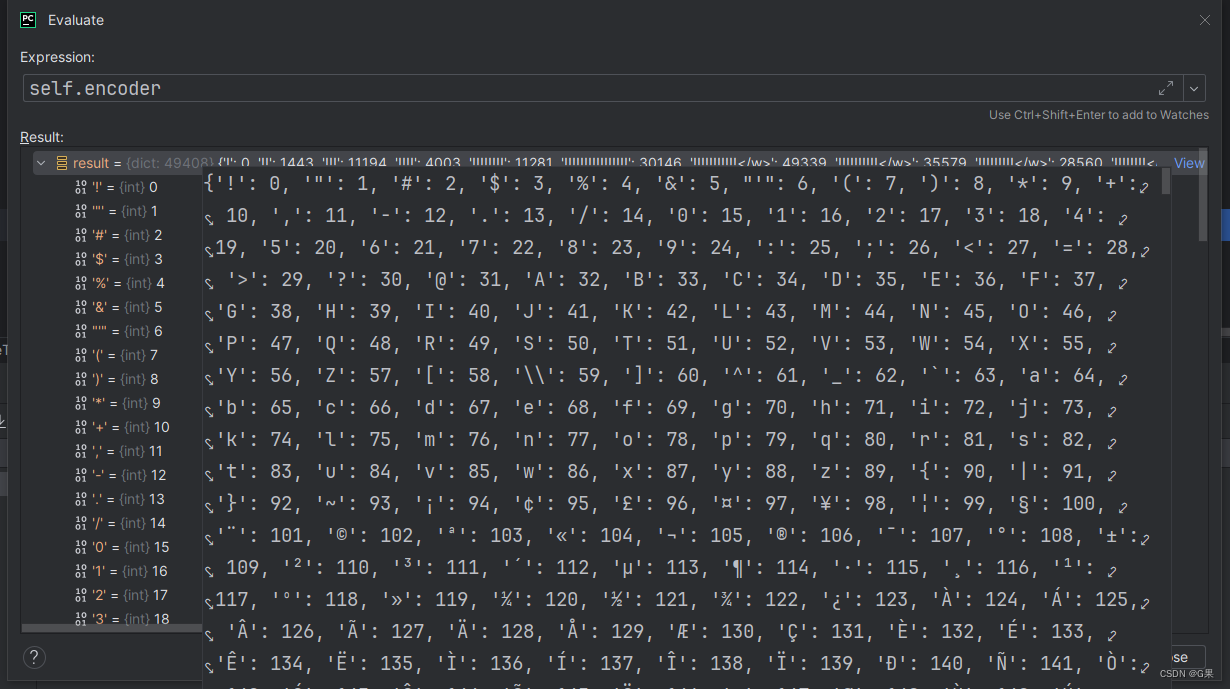
	self.encoder是一个包含49408个键值对的字典,有的是单个标点,有的是一个单词
	注意 `self.encoder['a']=64,self.encoder['a</w>']=320`
	self.bpe在每个单词后面添加</w>,表示词尾,这中编码方式可以帮助模型更好地理解'a'作为一个完整词汇单位和作为一个子词的区别,这对于处理词汇中的多义性和词缀变化非常有用,也可以处理模型未见过的词(把未知词分解为已知的子词)
	'''
        bpe_tokens = []
        text = whitespace_clean(basic_clean(text)).lower()
        for token in re.findall(self.pat, text):
            token = ''.join(self.byte_encoder[b] for b in token.encode('utf-8'))
            bpe_tokens.extend(self.encoder[bpe_token] for bpe_token in self.bpe(token).split(' '))
        return bpe_tokens

    def decode(self, tokens):
        text = ''.join([self.decoder[token] for token in tokens])
        text = bytearray([self.byte_decoder[c] for c in text]).decode('utf-8', errors="replace").replace('</w>', ' ')
        return text
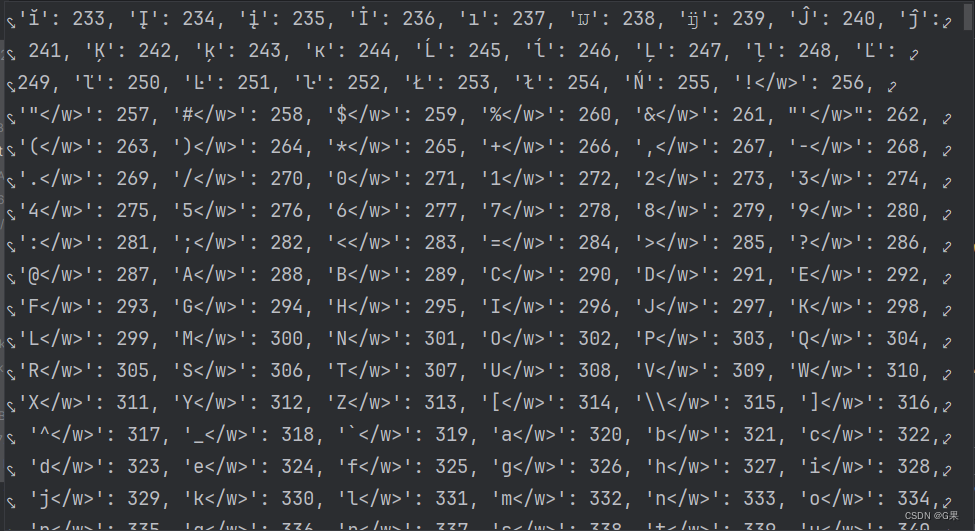
self.encoder 词典(通过字符查找索引进行编码)
该词典中前256个词是常见的标点符号和单词,256-512是前256个词增加</w>后的
CLIP调用完整代码
import os
import clip
import torch
from torchvision.datasets import CIFAR100
import matplotlib.pyplot as plt
import numpy as np
# Load the model
device = "cuda" if torch.cuda.is_available() else "cpu"
# model, preprocess = clip.load('ViT-B/32', device)
model, preprocess = clip.load('/data2/xucg/DL/CLIP/ViT-B-16.pt', device)

# Download the dataset
cifar100 = CIFAR100(root=os.path.expanduser("~/.cache"), download=True, train=False)

# Prepare the inputs
index = 2000
# image, class_id = cifar100[3637]
image, class_id = cifar100[index]
'''Compose(
    Resize(size=224, interpolation=bicubic)
    CenterCrop(size=(224, 224))
    <function _convert_image_to_rgb at 0x7fe786a46790>
    ToTensor()
    Normalize(mean=(0.48145466, 0.4578275, 0.40821073), std=(0.26862954, 0.26130258, 0.27577711))
)'''
image_input = preprocess(image).unsqueeze(0).to(device)
'''画图'''
plt.figure()
plt.subplot(121)
plt.title(f"{cifar100.classes[class_id]}")
plt.imshow(np.array(image))
plt.subplot(122)
plt.imshow(image_input[0][1].cpu())
plt.show()
'''文本编码保留最后一位'''
text_inputs = torch.cat([clip.tokenize(f"a photo of a {c}") for c in cifar100.classes]).to(device)#100
print("gt label: ", cifar100.classes[class_id])

# Calculate features
with torch.no_grad():
    image_features = model.encode_image(image_input)
    text_features = model.encode_text(text_inputs)

# Pick the top 5 most similar labels for the image
image_features /= image_features.norm(dim=-1, keepdim=True)
text_features /= text_features.norm(dim=-1, keepdim=True)
#image_features=(1,512) text_features=(100,512)
similarity = (100.0 * image_features @ text_features.T).softmax(dim=-1)
values, indices = similarity[0].topk(5)

# Print the result
print("\nTop predictions:\n")
for value, index in zip(values, indices):
    print(f"{cifar100.classes[index]:>16s}: {100 * value.item():.2f}%")
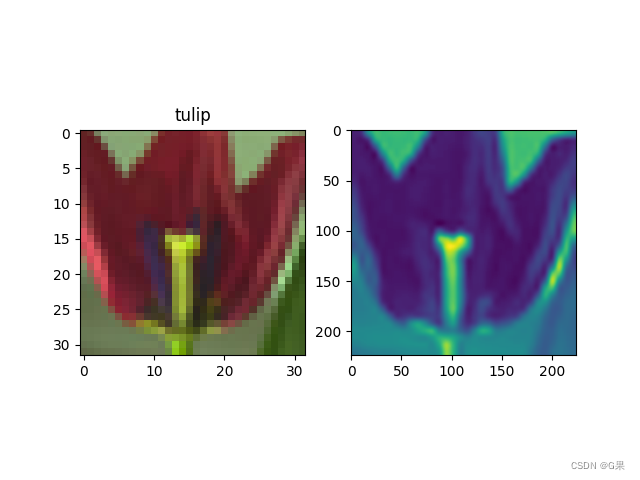
可视化图像
代码运行打印结果
Files already downloaded and verified
gt label:  tulip

Top predictions:

           tulip: 75.34%
           poppy: 8.86%
            rose: 6.38%
          orchid: 0.99%
       sunflower: 0.90%

Process finished with exit code 0
