一、简介:
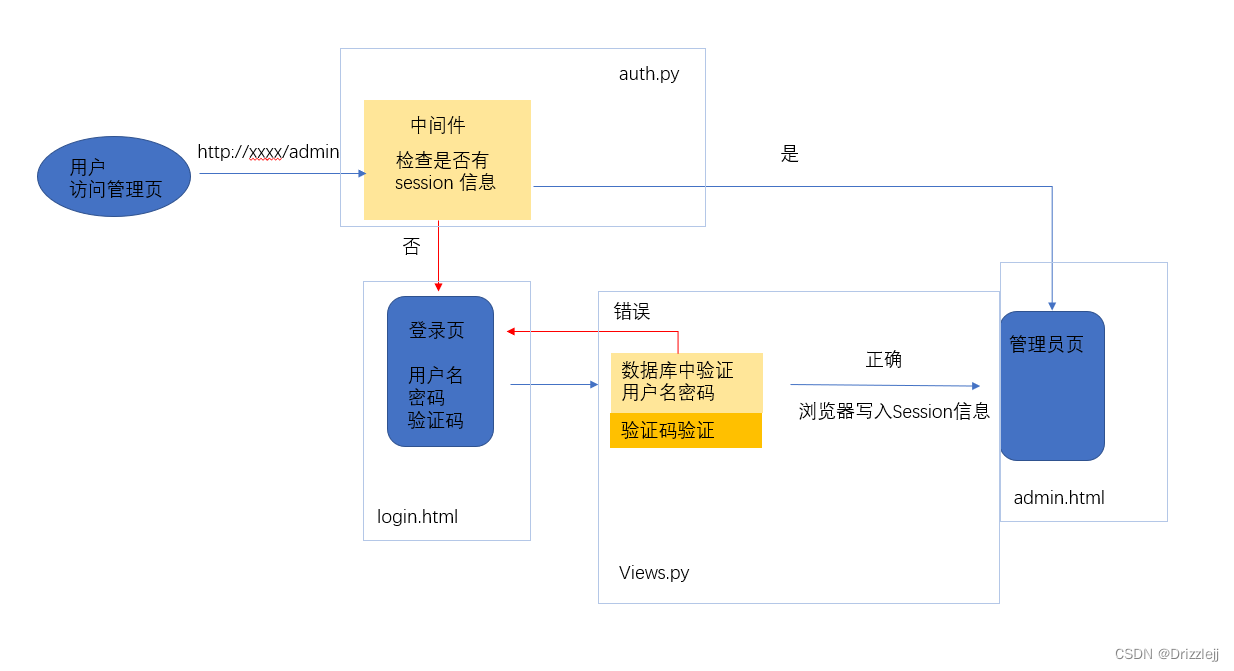
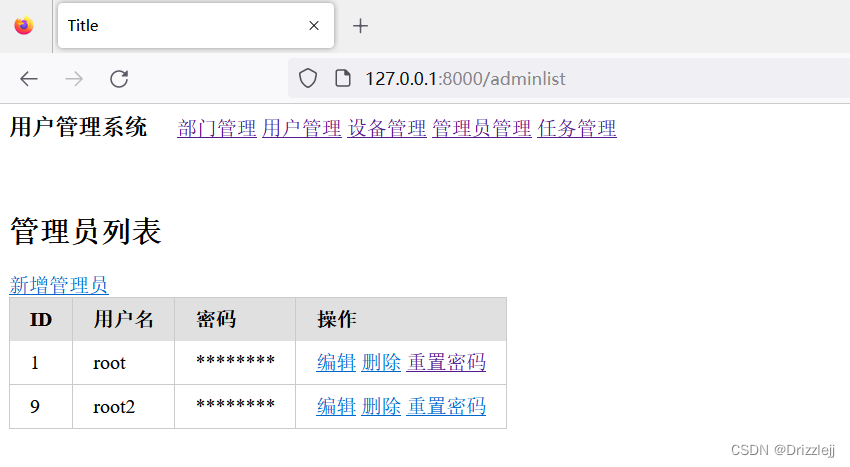
1、用户输入正确的用户名、密码、验证码点击登录即可跳转到管理员页面。
2、用户输入错误的用户名或者密码或者验证码需要错误信息提示(数据校验)
二、实现步骤
1、新建一个项目(创建项目过程和数据库略,可参考我的往期文章)
2、新建 templates 文件夹下新建登录页 login.html 和管理员页面 admin.html
3、model.py 新建一个管理员类,然后命令行运行 这两条命令,创建一张表
python manage.py makemigrations python manage.py migrateclass Admin(models.Model):
username = models.CharField(verbose_name="用户名",max_length=32)
password = models.CharField(verbose_name="密码",max_length=64)
def __str__(self):
return self.username表建立好之后,向数据库表中添加一条数据
sql:
insert into appback_admin(username,password)values(root",123456);

4、views.py
视图函数中所做的事情有点多
1、登录页面其实就是提交表单数据,这里使用了 django 的 modelform
class LoginForm(forms.Form):
username = forms.CharField(
label="用户名",
widget=forms.TextInput,
required=True
)
password = forms.CharField(
label="密码",
widget=forms.PasswordInput(render_value=True),
required=True
)
code = forms.CharField(
label="验证码",
widget=forms.TextInput,
required=True
)2、表单提交的密码需要加密存入数据库,使用了 md5 加密
from appback.util.encrypt import md5
def clean_password(self):
pwd = self.cleaned_data.get("password")
return md5(pwd)3、表单提交的用户名与密码需要与数据库中管理员表中的数据进行对比校验
admin_object = Admin.objects.filter(**form.cleaned_data).first() # 数据库校验
if not admin_object:
form.add_error("password","用户名或密码错误")
return render(request,'login.html',{"form":form})4、此处登录使用了验证码验证,验证码利用 python 的第三方库 pillow 生成的一个简单的字母验证。
from appback.util.Verification_Code import Verification_Code
from io import BytesIO
def image_code(request):
img,code_str = Verification_Code()
print(code_str)
request.session["image_code"] = code_str # 讲图片验证码写入到 session 中
request.session.set_expiry(60) # 设置 60s 超时
stream = BytesIO()
img.save(stream,'png') # 把图片内容写入到内存中
return HttpResponse(stream.getvalue())5、为了避免一张验证码被多次不停的使用,需要设置一个过期时间。
request.session.set_expiry(60)6、用户提交了错误的用户名或者密码或者验证码,需要返回错误信息,此次利用了
form.add_error()
7、用户登录成功向用户的浏览器 session 中写入用户的 ID等其他信息,根据是否有 session 信息检查用户是否登录。
# 用户名密码正确,生成随机字符串写入到浏览器cookie 和session中
request.session["info"] = {"id":admin_object.id,"username":admin_object.username} # 例如当前用户名
request.session.set_expiry(60*60*24*7) # 七天免登录查看用户的 sesion
 8、创建一个新文件夹 middleware 下新建一个auth.py 新建一个类,这是一个中间件,获取用户当前的 url 判断有无 session 信息,有就继续,没有就返回到登录,同时需要将登录页面设置为不需要验证 session 信息就可以访问,这样才能重定向成功到登录页面,否则会出错。
class AuthMiddleware(MiddlewareMixin):
def process_request(self,request):
# 排除不需要登录就能访问的页面
if request.path_info in ["/login","/image/code"]: # 获取当前用户请求的 url
return
# 读取当前访问用户的 session 信息
info_dict = request.session.get("info")
if info_dict:
return
# 没有登录回到登录页面
return redirect('/login')
def process_response(self,request,response):
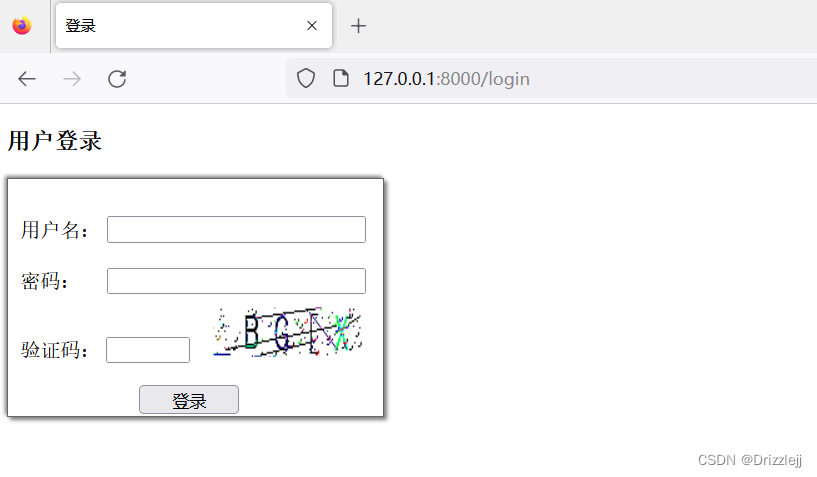
return response三、效果如下所示
登陆:
四、全部代码:
login.html
<!DOCTYPE html>
<html lang="en">
<head>
<meta charset="UTF-8">
<title>登录</title>
</head>
<body>
<div>
<div>
<h3>用户登录</h3>
<form class="form" method="post" novalidate>
{% csrf_token %}
<div class="username">
<label>用户名:</label>
{{ form.username }}
<span style="color:red;font-size:12px;">{{form.username.errors.0}}</span>
</div>
<div class="pwd">
<label>密码:</label>
{{ form.password }}
<span style="color:red;font-size:12px;">{{form.password.errors.0}}</span>
</div>
<div class="code">
<label>验证码:</label>
{{ form.code }}
<img src="/image/code" style="width:120px;height:40px;">
<span style="color:red;font-size:12px;">{{form.code.errors.0}}</span>
</div>
<div class="sub">
<input type="submit" value="登录">
</div>
</form>
</div>
</div>
</body>
<style>
.form{
width:280px;
height:150px;
border: 1px solid #666;
padding:20px 10px;
position: relative;
box-shadow:2px 2px 3px gray,
-2px -2px 3px gray;
}
.pwd>input,.username>input{
margin:10px 0px;
width:200px;
}
.pwd>label,.username>label{
display: inline-block;
width:65px;
}
.sub>input{
width:80px;
position: absolute;
bottom: 1%;
left: 35%;
}
.code>input{
width:60px;margin-right:15px;
}
</style>
</html>admin.html (模板继承此处不做介绍)
<!--该html 继承模板 layout.html-->
{% extends 'layout.html' %}
{% block content %}
<div>
<h2>管理员列表</h2>
<a href="/adminadd">新增管理员</a>
<table class="pure-table pure-table-bordered">
<thead>
<tr>
<th>ID</th>
<th>用户名</th>
<th>密码</th>
<th>操作</th>
</tr>
</thead>
<tbody>
{% for obj in queryset %}
<tr>
<td>{{obj.id}}</td>
<td>{{obj.username}}</td>
<td>********</td>
<td>
<a href="admin/{{ obj.id }}/edit">编辑</a>
<a href="admin/{{ obj.id }}/delete">删除</a>
<a href="admin/{{ obj.id }}/reset">重置密码</a>
</td>
</tr>
{% endfor %}
</tbody>
</table>
</div>
{% endblock %}models.py
# 创建管理员表
class Admin(models.Model):
    username = models.CharField(verbose_name="用户名",max_length=32)
    password = models.CharField(verbose_name="密码",max_length=64)
    def __str__(self):
        return self.username
views.py
class LoginForm(forms.Form):
    username = forms.CharField(
        label="用户名",
        widget=forms.TextInput,
        required=True
    )
    password = forms.CharField(
        label="密码",
        widget=forms.PasswordInput(render_value=True),
        required=True
    )
    code = forms.CharField(
        label="验证码",
        widget=forms.TextInput,
        required=True
    )
def clean_password(self):
pwd = self.cleaned_data.get("password")
return md5(pwd)
def login(request):
if request.method == 'GET':
form = LoginForm()
return render(request,'login.html',{"form":form})
form = LoginForm(data=request.POST)
if form.is_valid():
print(form.cleaned_data) # 打印提交的数据,结果是一个字典
user_input_code = form.cleaned_data.pop('code') # 讲验证码从提交的数据中获取并且删除它
code = request.session.get("image_code","")
if user_input_code != code:
form.add_error("code", "验证码错误")
return render(request, 'login.html', {"form": form})
admin_object = Admin.objects.filter(**form.cleaned_data).first()  # 数据库校验
        if not admin_object:
            form.add_error("password","用户名或密码错误")
            return render(request,'login.html',{"form":form})
# 用户名密码正确,生成随机字符串写入到浏览器cookie 和session中
request.session["info"] = {"id":admin_object.id,"username":admin_object.username} # 例如当前用户名
request.session.set_expiry(60*60*24*7) # 七天免登录
return redirect('/adminlist')
return render(request,'login.html',{"form":form})
# 图片验证码
from appback.util.Verification_Code import Verification_Code
from io import BytesIO
def image_code(request):
    img,code_str = Verification_Code()
    print(code_str)
    request.session["image_code"] = code_str  # 讲图片验证码写入到 session 中
    request.session.set_expiry(60)  # 设置 60s 超时
    stream = BytesIO()
    img.save(stream,'png')  # 把图片内容写入到内存中
    return HttpResponse(stream.getvalue())
图片验证码 Verification_Code.py
# 验证码 Verification Code
import random
from PIL import Image,ImageDraw,ImageFont,ImageFilter
def Verification_Code(width=120,height=30,char_length=5,font_size=28,font_file='heiti.ttf'):
code = []
img = Image.new(mode='RGB',size=(width,height),color=(255,255,255)) # 生成一张图片
draw = ImageDraw.Draw(img,mode='RGB') # 生成一支画笔
def rndChar(): # 生成随机字母
return chr(random.randint(65,98))
def rndColor(): # 生成随机颜色
return (random.randint(0,255),random.randint(10,255),random.randint(64,255))
font = ImageFont.truetype(font_file,font_size)
for i in range(char_length): # 写文字
char = rndChar()
code.append(char)
h = random.randint(0,4)
draw.text([i * width / char_length,h],char,font=font,fill=rndColor())
for i in range(40): # 写干扰点
draw.point([random.randint(0,width),random.randint(0,height)],fill=rndColor())
for i in range(40): # 写干扰圆圈
draw.point([random.randint(0,width),random.randint(0,height)],fill=rndColor())
x = random.randint(0, width)
y = random.randint(0, height)
draw.arc((x,y,x+4,y+4),0,90,fill=rndColor())
for i in range(5): # 画干扰线
x1 = random.randint(0,width)
y1 = random.randint(0,height)
x2 = random.randint(0,width)
y2 = random.randint(0,height)
draw.line((x1,y1,x2,y2),fill=rndColor())
img = img.filter(ImageFilter.EDGE_ENHANCE_MORE)
return img, "".join(code)
中间件 auth.py
from django.utils.deprecation import MiddlewareMixin
from django.shortcuts import render,redirect,HttpResponse
class AuthMiddleware(MiddlewareMixin):
    def process_request(self,request):
        # 排除不需要登录就能访问的页面
        if request.path_info in ["/login","/image/code"]: # 获取当前用户请求的 url
            return
        # 读取当前访问用户的 session 信息
        info_dict = request.session.get("info")
        if info_dict:
            return
        # 没有登录回到登录页面
        return redirect('/login')
    def process_response(self,request,response):
        return response
md5 加密 encrpty.py
# md5 加密
from django.conf import settings
import hashlib

def md5(data_string):
    obj = hashlib.md5(settings.SECRET_KEY.encode('utf-8'))
    obj.update(data_string.encode('utf-8'))
    return obj.hexdigest()