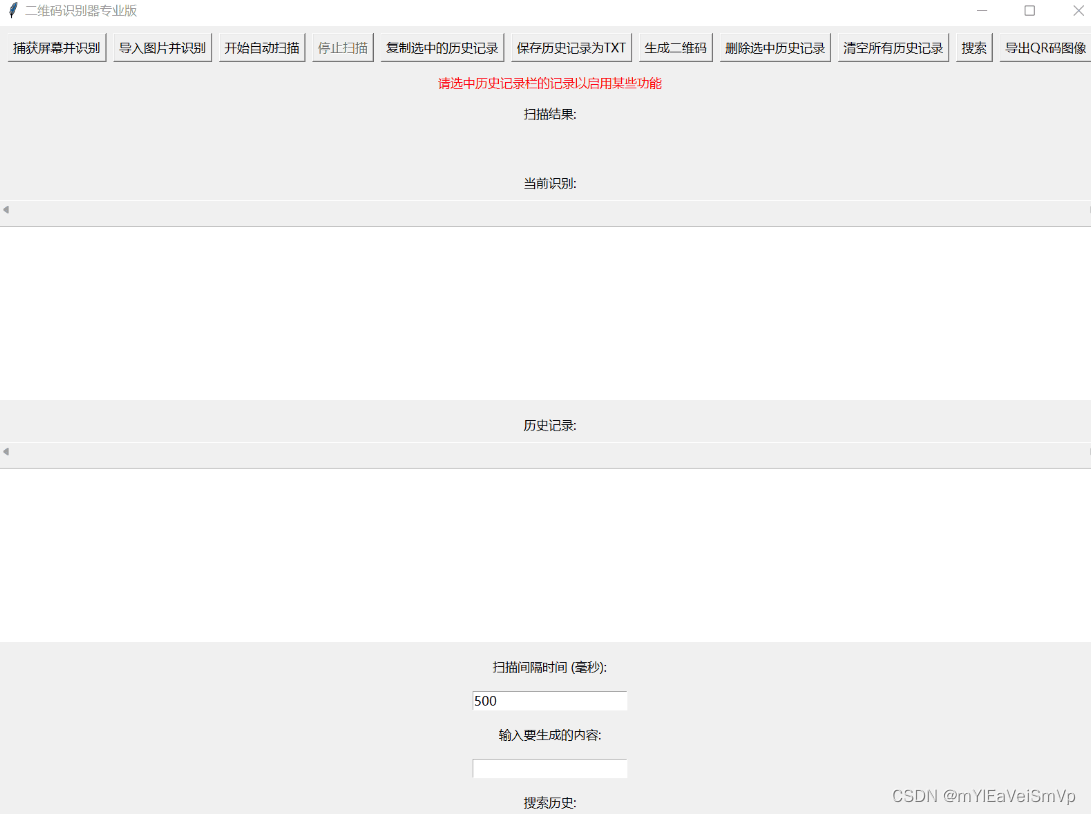
纯笔记,可以做到全屏识别二维码,自动识别,复制链接,生成简单的二维码,将识别到的内容转为txt
import pyautogui
from PIL import Image
from pyzbar.pyzbar import decode
import tkinter as tk
from tkinter import Label, Button, Listbox, Entry, END, SINGLE, filedialog
import threading
import time
import qrcode
from PIL import ImageTk
import cv2
class QRCodeScannerApp:
def init(self, root):
self.root = root
self.root.title("二维码识别器专业版")
    # 设置窗口的默认大小
    self.root.geometry("1600x1200")

    # 创建顶部功能按钮区域
    self.button_frame = tk.Frame(root)
    self.button_frame.pack(pady=10)

    self.prompt_label = Label(root, text="请选中历史记录栏的记录以启用某些功能", fg="red")
    self.prompt_label.pack(pady=5)

    # 将所有按钮移到button_frame中,并将它们设置为横向布局
    self.capture_button = Button(self.button_frame, text="捕获屏幕并识别", command=self.capture_screen_and_recognize)
    self.capture_button.grid(row=0, column=0, padx=5)

    self.batch_scan_button = Button(self.button_frame, text="导入图片并识别", command=self.batch_scan)
    self.batch_scan_button.grid(row=0, column=1, padx=5)

    self.autoscan_button = Button(self.button_frame, text="开始自动扫描", command=self.start_auto_scan)
    self.autoscan_button.grid(row=0, column=2, padx=5)

    self.stop_button = Button(self.button_frame, text="停止扫描", command=self.stop_scan, state=tk.DISABLED)
    self.stop_button.grid(row=0, column=3, padx=5)

    self.copy_button = Button(self.button_frame, text="复制选中的历史记录", command=self.copy_selected_history)
    self.copy_button.grid(row=0, column=4, padx=5)

    self.save_button = Button(self.button_frame, text="保存历史记录为TXT", command=self.save_history_to_txt)
    self.save_button.grid(row=0, column=5, padx=5)

    self.generate_button = Button(self.button_frame, text="生成二维码", command=self.generate_qrcode)
    self.generate_button.grid(row=0, column=6, padx=5)

    self.delete_history_button = Button(self.button_frame, text="删除选中历史记录", command=self.delete_selected_history)
    self.delete_history_button.grid(row=0, column=7, padx=5)

    self.clear_history_button = Button(self.button_frame, text="清空所有历史记录", command=self.clear_all_history)
    self.clear_history_button.grid(row=0, column=8, padx=5)

    self.search_button = Button(self.button_frame, text="搜索", command=self.search_history)
    self.search_button.grid(row=0, column=9, padx=5)

    self.export_button = Button(self.button_frame, text="导出QR码图像", command=self.export_qr_code)
    self.export_button.grid(row=0, column=10, padx=5)

    # 文本和输入部分
    self.label = Label(root, text="扫描结果:")
    self.label.pack(pady=10)

    self.result_label = Label(root, text="", wraplength=500)
    self.result_label.pack(pady=10)

    self.current_label = Label(root, text="当前识别:")
    self.current_label.pack(pady=10)

    # 增加宽度
    self.current_listbox_scrollbar = tk.Scrollbar(root, orient=tk.HORIZONTAL)
    self.current_listbox_scrollbar.pack(fill=tk.X)
    self.current_listbox = Listbox(root, selectmode=SINGLE, height=10, width=250,
                                   xscrollcommand=self.current_listbox_scrollbar.set)
    self.current_listbox.pack(pady=10)
    self.current_listbox_scrollbar.config(command=self.current_listbox.xview)

    self.history_label = Label(root, text="历史记录:")
    self.history_label.pack(pady=10)

    self.history_listbox_scrollbar = tk.Scrollbar(root, orient=tk.HORIZONTAL)
    self.history_listbox_scrollbar.pack(fill=tk.X)
    self.history_listbox = Listbox(root, selectmode=SINGLE, height=10, width=250,
                                   xscrollcommand=self.history_listbox_scrollbar.set)
    self.history_listbox.pack(pady=10)
    self.history_listbox_scrollbar.config(command=self.history_listbox.xview)

    self.interval_label = Label(root, text="扫描间隔时间 (毫秒):")
    self.interval_label.pack(pady=10)

    self.interval_entry = Entry(root)
    self.interval_entry.pack(pady=10)
    self.interval_entry.insert(0, "500")

    self.generate_label = Label(root, text="输入要生成的内容:")
    self.generate_label.pack(pady=10)

    self.generate_entry = Entry(root)
    self.generate_entry.pack(pady=10)

    self.search_label = Label(root, text="搜索历史:")
    self.search_label.pack(pady=10)

    self.search_entry = Entry(root)
    self.search_entry.pack(pady=10)

    # 其他属性
    self.auto_scanning = False
    self.history = []
    self.history_counter = 0
    self.seen_qrcodes = set()

def clear_all_history(self):
    self.history.clear()
    self.history_listbox.delete(0, END)

# 添加搜索历史记录的函数
def search_history(self):
    query = self.search_entry.get().lower()
    self.history_listbox.delete(0, END)
    for item in self.history:
        if query in item.lower():
            self.history_listbox.insert(END, item)

def export_qr_code(self):
    selected_index = self.history_listbox.curselection()
    if selected_index:
        selected_data = self.history[int(selected_index[0])]
        content_without_number = selected_data.split(': ', 1)[-1]

        # 使用PIL库创建QR码图像
        qr = qrcode.QRCode(version=1, error_correction=qrcode.constants.ERROR_CORRECT_L, box_size=10, border=4)
        qr.add_data(content_without_number)
        qr.make(fit=True)
        qr_image = qr.make_image(fill_color="black", back_color="white")

        # 选择保存路径
        file_path = filedialog.asksaveasfilename(defaultextension=".png", filetypes=[("PNG Files", "*.png")])

        # 如果用户选择了路径,则保存QR码图像
        if file_path:
            qr_image.save(file_path)

# 添加新的函数生成二维码并在新窗口中显示
def generate_qrcode(self):
    qr_data = self.generate_entry.get()
    if qr_data:
        qr = qrcode.QRCode(version=1, error_correction=qrcode.constants.ERROR_CORRECT_L, box_size=10, border=4)
        qr.add_data(qr_data)
        qr.make(fit=True)
        img = qr.make_image(fill_color="black", back_color="white")

        # 在新窗口中显示二维码
        new_window = tk.Toplevel(self.root)
        new_window.title("生成的二维码")

        qr_image = ImageTk.PhotoImage(img)  # 将PIL图像转换为Tkinter可使用的图像
        qr_label = Label(new_window, image=qr_image)
        qr_label.image = qr_image  # 保存图像的引用以防被垃圾收集器回收
        qr_label.pack()

def start_auto_scan(self):
    """开始自动扫描"""
    self.auto_scanning = True
    self.autoscan_button.config(state=tk.DISABLED)
    self.stop_button.config(state=tk.NORMAL)
    self.auto_scan()

def stop_scan(self):
    """停止自动扫描"""
    self.auto_scanning = False
    self.autoscan_button.config(state=tk.NORMAL)
    self.stop_button.config(state=tk.DISABLED)

def auto_scan(self):
    if self.auto_scanning:
        # 启动一个线程来异步执行屏幕捕捉和二维码识别
        threading.Thread(target=self.capture_screen_and_recognize, daemon=True).start()

        try:
            interval = int(self.interval_entry.get())
        except ValueError:
            interval = 500
        self.root.after(interval, self.auto_scan)

def capture_screen_and_recognize(self):
    start_time = time.time()
    screenshot = pyautogui.screenshot()
    image = Image.frombytes('RGB', screenshot.size, screenshot.tobytes())
    decoded_objects = decode(image)

    new_qrcodes = []

    if decoded_objects:
        for obj in decoded_objects:
            data = obj.data.decode("utf-8")
            if data not in self.seen_qrcodes:  # 如果这是一个新的二维码数据
                self.seen_qrcodes.add(data)
                new_qrcodes.append(data)

        if new_qrcodes:  # 如果有新的二维码,清除当前识别列表框
            self.current_listbox.delete(0, END)

        elapsed_time = time.time() - start_time  # 计算花费的时间
        self.result_label.config(text=f"识别到 {len(new_qrcodes)} 个新二维码,耗时 {elapsed_time:.3f} 秒")

        for i, data in enumerate(new_qrcodes):
            self.history_counter += 1
            self.current_listbox.insert(END, f"{self.history_counter}: {data}")
            self.history.append(f"{self.history_counter}: {data}")
            self.history_listbox.insert(END, f"{self.history_counter}: {data}")
    else:
        self.result_label.config(text="未找到二维码")

def copy_selected_history(self):
    selected_index = self.history_listbox.curselection()
    if selected_index:
        selected_data = self.history[int(selected_index[0])]
        # 使用字符串切片去掉标号
        content_without_number = selected_data.split(': ', 1)[-1]
        self.root.clipboard_clear()
        self.root.clipboard_append(content_without_number)
        self.root.update()

def save_history_to_txt(self):
    file_path = filedialog.asksaveasfilename(defaultextension=".txt", filetypes=[("Text Files", "*.txt")])
    if file_path:
        with open(file_path, "w") as file:
            for item in self.history:
                file.write(item + "\n")

# 添加新的函数来批量扫描图片
def batch_scan(self):
    file_paths = filedialog.askopenfilenames(title="选择图片", filetypes=[("Image Files", "*.png;*.jpg;*.jpeg")])

    for file_path in file_paths:
        image = cv2.imread(file_path)

        # 调整图片大小,以适应屏幕捕获的分辨率
        scaled_image = cv2.resize(image, (self.root.winfo_screenwidth(), self.root.winfo_screenheight()))
        screenshot = Image.fromarray(cv2.cvtColor(scaled_image, cv2.COLOR_BGR2RGB))

        # 在屏幕截图上识别二维码
        decoded_objects = decode(screenshot)

        new_qrcodes = []

        if decoded_objects:
            for obj in decoded_objects:
                data = obj.data.decode("utf-8")
                if data not in self.seen_qrcodes:  # 如果这是一个新的二维码数据
                    self.seen_qrcodes.add(data)
                    new_qrcodes.append(data)

            for i, data in enumerate(new_qrcodes):
                self.history_counter += 1
                self.current_listbox.insert(END, f"{self.history_counter}: {data}")
                self.history.append(f"{self.history_counter}: {data}")
                self.history_listbox.insert(END, f"{self.history_counter}: {data}")
        else:
            self.result_label.config(text="未找到二维码")

        self.root.update()  # 更新GUI以显示结果

# 添加删除和清空历史记录的函数
def delete_selected_history(self):
    selected_index = self.history_listbox.curselection()
    if selected_index:
        del self.history[int(selected_index[0])]
        self.history_listbox.delete(selected_index)
if name == "main":
root = tk.Tk()
app = QRCodeScannerApp(root)
root.mainloop()
