YOLOv5:通过真实结果的txt文件与预测结果的txt文件进行结果评估
- 前言
- 前提条件
- 相关介绍
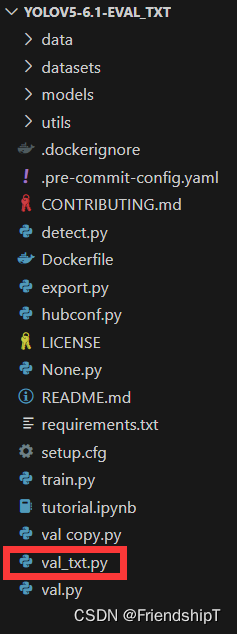
- 项目结构
- YOLOv5:通过真实结果的txt文件与预测结果的txt文件进行结果评估
- val_txt.py
- 输出结果
- 参考

前言
- 由于本人水平有限,难免出现错漏,敬请批评改正。
- 更多精彩内容,可点击进入YOLO系列专栏、自然语言处理
专栏或我的个人主页查看- 基于DETR的人脸伪装检测
- YOLOv7训练自己的数据集(口罩检测)
- YOLOv8训练自己的数据集(足球检测)
- YOLOv5:TensorRT加速YOLOv5模型推理
- YOLOv5:IoU、GIoU、DIoU、CIoU、EIoU
- 玩转Jetson Nano(五):TensorRT加速YOLOv5目标检测
- YOLOv5:添加SE、CBAM、CoordAtt、ECA注意力机制
- YOLOv5:yolov5s.yaml配置文件解读、增加小目标检测层
- Python将COCO格式实例分割数据集转换为YOLO格式实例分割数据集
- YOLOv5:使用7.0版本训练自己的实例分割模型(车辆、行人、路标、车道线等实例分割)
- 使用Kaggle GPU资源免费体验Stable Diffusion开源项目
前提条件
- 熟悉Python
相关介绍
- Python是一种跨平台的计算机程序设计语言。是一个高层次的结合了解释性、编译性、互动性和面向对象的脚本语言。最初被设计用于编写自动化脚本(shell),随着版本的不断更新和语言新功能的添加,越多被用于独立的、大型项目的开发。
- PyTorch 是一个深度学习框架,封装好了很多网络和深度学习相关的工具方便我们调用,而不用我们一个个去单独写了。它分为 CPU 和 GPU 版本,其他框架还有 TensorFlow、Caffe 等。PyTorch 是由 Facebook 人工智能研究院(FAIR)基于 Torch 推出的,它是一个基于 Python 的可续计算包,提供两个高级功能:1、具有强大的 GPU 加速的张量计算(如 NumPy);2、构建深度神经网络时的自动微分机制。
- YOLOv5是一种单阶段目标检测算法,该算法在YOLOv4的基础上添加了一些新的改进思路,使其速度与精度都得到了极大的性能提升。它是一个在COCO数据集上预训练的物体检测架构和模型系列,代表了Ultralytics对未来视觉AI方法的开源研究,其中包含了经过数千小时的研究和开发而形成的经验教训和最佳实践。
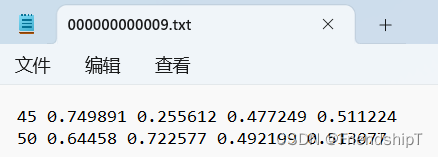
- YOLO格式标签是目标检测任务中常用的标注格式之一。YOLO格式标注文件由目标框的中心点坐标、宽度和高度组成。具体来说,YOLO格式标注文件的每一行都包含了一个目标的标注信息,其中第一个数字表示目标的类别,后面四个数字分别表示目标框的中心点坐标(x_center, y_center)和宽度w以及高度h,这些值都是相对于图像宽度和高度的比例。
- 例如,下面是一个YOLO格式标注文件的示例:
- 其中,第一行表示一个类别为45的目标,其中心点坐标为图像宽度的0.749891和0.255612,宽度和高度分别为图像宽度和高度的0.477249和0.511224;第二行表示一个类别为50的目标,其中心点坐标为图像宽度的0.64458和0.722577,宽度和高度分别为图像宽度和高度的0.492199和0.513077。
项目结构
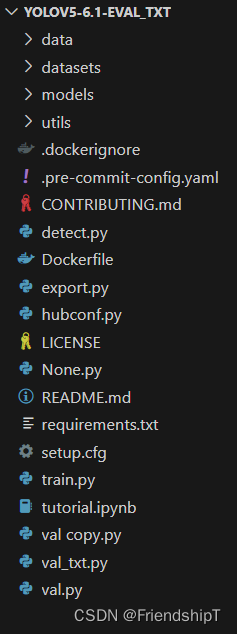
YOLOv5:通过真实结果的txt文件与预测结果的txt文件进行结果评估
- 问题描述:直接通过真实结果的YOLO格式的txt标注文件与预测结果的YOLO格式的txt标注文件进行结果评估,免去原本val.py中的模型预测。
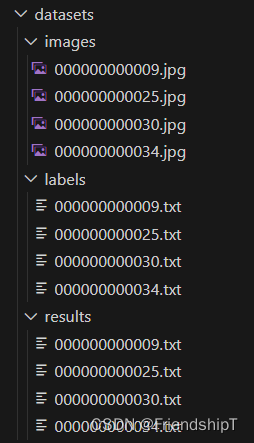
- 数据集
- images:图片数据所在的文件夹。
- labels:真实框结果txt文件所在的文件夹。
- results:预测框结果txt文件所在的文件夹。
val_txt.py
# YOLOv5 🚀 by Ultralytics, GPL-3.0 license
import argparse # 解析命令行参数模块
import json # 实现字典列表和JSON字符串之间的相互解析
import os # 与操作系统进行交互的模块 包含文件路径操作和解析
import sys # sys系统模块 包含了与Python解释器和它的环境有关的函数
from pathlib import Path # Path将str转换为Path对象 使字符串路径易于操作的模块
from threading import Thread # 线程操作模块

import numpy as np
import torch
from tqdm import tqdm

FILE = Path(__file__).resolve() # # FILE = WindowsPath './yolov5-6.1/val.py'
ROOT = FILE.parents[0]  # YOLOv5 root directory
if str(ROOT) not in sys.path:
    sys.path.append(str(ROOT))  # add ROOT to PATH
ROOT = Path(os.path.relpath(ROOT, Path.cwd()))  # relative

from models.common import DetectMultiBackend
from utils.callbacks import Callbacks
from utils.datasets import create_dataloader
from utils.general import (LOGGER, box_iou, check_dataset, check_img_size, check_requirements, check_yaml,
                           coco80_to_coco91_class, colorstr, increment_path, non_max_suppression, print_args,
                           scale_coords, xywh2xyxy, xyxy2xywh)
from utils.metrics import ConfusionMatrix, ap_per_class
from utils.plots import output_to_target, plot_images, plot_val_study
from utils.torch_utils import select_device, time_sync

import cv2

def save_one_txt(predn, save_conf, shape, file):
    # Save one txt result
    gn = torch.tensor(shape)[[1, 0, 1, 0]]  # normalization gain whwh
    for *xyxy, conf, cls in predn.tolist():
        xywh = (xyxy2xywh(torch.tensor(xyxy).view(1, 4)) / gn).view(-1).tolist()  # normalized xywh
        line = (cls, *xywh, conf) if save_conf else (cls, *xywh)  # label format
        with open(file, 'a') as f:
            f.write(('%g ' * len(line)).rstrip() % line + '\n')


def process_batch(detections, labels, iouv):
    """
    Return correct predictions matrix. Both sets of boxes are in (x1, y1, x2, y2) format.
    Arguments:
        detections (Array[N, 6]), x1, y1, x2, y2, conf, class
        labels (Array[M, 5]), class, x1, y1, x2, y2
    Returns:
        correct (Array[N, 10]), for 10 IoU levels
    """
    correct = torch.zeros(detections.shape[0], iouv.shape[0], dtype=torch.bool, device=iouv.device)
    iou = box_iou(labels[:, 1:], detections[:, :4])
    x = torch.where((iou >= iouv[0]) & (labels[:, 0:1] == detections[:, 5]))  # IoU above threshold and classes match
    if x[0].shape[0]:
        matches = torch.cat((torch.stack(x, 1), iou[x[0], x[1]][:, None]), 1).cpu().numpy()  # [label, detection, iou]
        if x[0].shape[0] > 1:
            matches = matches[matches[:, 2].argsort()[::-1]]
            matches = matches[np.unique(matches[:, 1], return_index=True)[1]]
            # matches = matches[matches[:, 2].argsort()[::-1]]
            matches = matches[np.unique(matches[:, 0], return_index=True)[1]]
        matches = torch.Tensor(matches).to(iouv.device)
        correct[matches[:, 1].long()] = matches[:, 2:3] >= iouv
    return correct


@torch.no_grad()
def run(data,
        weights=None,  # model.pt path(s)
        batch_size=32,  # batch size
        imgsz=640,  # inference size (pixels)
        conf_thres=0.001,  # confidence threshold
        iou_thres=0.6,  # NMS IoU threshold
        task='val',  # train, val, test, speed or study
        device='',  # cuda device, i.e. 0 or 0,1,2,3 or cpu
        workers=8,  # max dataloader workers (per RANK in DDP mode)
        single_cls=False,  # treat as single-class dataset
        augment=False,  # augmented inference
        verbose=False,  # verbose output
        save_txt=False,  # save results to *.txt
        save_hybrid=False,  # save label+prediction hybrid results to *.txt
        save_conf=False,  # save confidences in --save-txt labels
        save_json=False,  # save a COCO-JSON results file
        project=ROOT / 'runs/val',  # save to project/name
        name='exp',  # save to project/name
        exist_ok=False,  # existing project/name ok, do not increment
        half=True,  # use FP16 half-precision inference
        dnn=False,  # use OpenCV DNN for ONNX inference
        model=None,
        dataloader=None,
        save_dir=Path(''),
        plots=True,
        callbacks=Callbacks(),
        compute_loss=None,
        ):
    """
    :params data: 数据集配置文件地址 包含数据集的路径、类别个数、类名、下载地址等信息 train.py时传入data_dict
    :params weights: 模型的权重文件地址 运行train.py=None 运行test.py=默认weights/yolov5s.pt
    :params batch_size: 前向传播的批次大小 运行test.py传入默认32 运行train.py则传入batch_size // WORLD_SIZE * 2
    :params imgsz: 输入网络的图片分辨率 运行test.py传入默认640 运行train.py则传入imgsz_test
    :params conf_thres: object置信度阈值 默认0.25
    :params iou_thres: 进行NMS时IOU的阈值 默认0.6
    :params task: 设置测试的类型 有train, val, test, speed or study几种 默认val
    :params device: 测试的设备
    :params single_cls: 数据集是否只用一个类别 运行test.py传入默认False 运行train.py则传入single_cls
    :params augment: 测试是否使用TTA Test Time Augment 默认False
    :params verbose: 是否打印出每个类别的mAP 运行test.py传入默认Fasle 运行train.py则传入nc < 50 and final_epoch
    :params save_txt: 是否以txt文件的形式保存模型预测框的坐标 默认True
    :params save_hybrid: 是否save label+prediction hybrid results to *.txt  默认False
    :params save_conf: 是否保存预测每个目标的置信度到预测tx文件中 默认True
    :params save_json: 是否按照coco的json格式保存预测框,并且使用cocoapi做评估(需要同样coco的json格式的标签)
                       运行test.py传入默认Fasle 运行train.py则传入is_coco and final_epoch(一般也是False)
    :params project: 测试保存的源文件 默认runs/test
    :params name: 测试保存的文件地址 默认exp  保存在runs/test/exp下
    :params exist_ok: 是否存在当前文件 默认False 一般是 no exist-ok 连用  所以一般都要重新创建文件夹
    :params half: 是否使用半精度推理 FP16 half-precision inference 默认False
    :params model: 模型 如果执行test.py就为None 如果执行train.py就会传入ema.ema(ema模型)
    :params dataloader: 数据加载器 如果执行test.py就为None 如果执行train.py就会传入testloader
    :params save_dir: 文件保存路径 如果执行test.py就为‘’ 如果执行train.py就会传入save_dir(runs/train/expn)
    :params plots: 是否可视化 运行test.py传入默认True 运行train.py则传入plots and final_epoch
    :params wandb_logger: 网页可视化 类似于tensorboard 运行test.py传入默认None 运行train.py则传入wandb_logger(train)
    :params compute_loss: 损失函数 运行test.py传入默认None 运行train.py则传入compute_loss(train)
    :return (Precision, Recall, map@0.5, map@0.5:0.95, box_loss, obj_loss, cls_loss)
    """
    # Initialize/load model and set device
    # 初始化模型并选择相应的计算设备
    # 判断是否是训练时调用run函数(执行train.py脚本), 如果是就使用训练时的设备 一般都是train
    training = False
    device = select_device(device, batch_size=batch_size)

    # Directories
    # 生成save_dir文件路径  run\val\exp
    save_dir = increment_path(Path(project) / name, exist_ok=exist_ok)  # increment run
    # make dir run\val\exp\labels
    (save_dir / 'labels' if save_txt else save_dir).mkdir(parents=True, exist_ok=True)  # make dir

    nc = NUMER_OF_CLASSES  # number of classes
    # 计算mAP相关参数
    # 设置iou阈值 从0.5-0.95取10个(0.05间隔)   iou vector for mAP@0.5:0.95
    # iouv: [0.50000, 0.55000, 0.60000, 0.65000, 0.70000, 0.75000, 0.80000, 0.85000, 0.90000, 0.95000]
    iouv = torch.linspace(0.5, 0.95, 10).to(device)  # iou vector for mAP@0.5:0.95
    niou = iouv.numel() # # mAP@0.5:0.95 iou个数=10个

    # 初始化一些测试需要的参数
    seen = 0 # 初始化测试的图片的数量
    # 初始化混淆矩阵
    confusion_matrix = ConfusionMatrix(nc=nc)
    # 获取数据集所有类别的类名
    names = NAMES


    # 设置tqdm进度条的显示信息
    s = ('%20s' + '%11s' * 6) % ('Class', 'Images', 'Labels', 'P', 'R', 'mAP@.5', 'mAP@.5:.95')
    # 初始化p, r, f1, mp, mr, map50, map指标和时间t0, t1, t2
    dt, p, r, f1, mp, mr, map50, map = [0.0, 0.0, 0.0], 0.0, 0.0, 0.0, 0.0, 0.0, 0.0, 0.0
    # 初始化测试集的损失
    loss = torch.zeros(3, device=device)
    # 初始化json文件中的字典 统计信息 ap等
    jdict, stats, ap, ap_class = [], [], [], []
    # pbar = tqdm(dataloader, desc=s, bar_format='{l_bar}{bar:10}{r_bar}{bar:-10b}')  # progress bar

    target_datas = read_target_datas()
    pbar = tqdm(target_datas, desc=s, bar_format='{l_bar}{bar:10}{r_bar}{bar:-10b}')  # progress bar
    pred_datas = read_pred_datas()

    # ======开始验证 ========
    for batch_i, (im, targets, paths, shapes) in enumerate(pbar):
        # 预处理图片和target
        # im = im.to(device, non_blocking=True)
        targets = targets.to(device)
        height,width = shapes[0]
        # targets[:, 2:] *= torch.Tensor([620, 425, 620, 425]).to(device)  # to pixels
        targets[:, 2:] *= torch.Tensor([width, height, width, height]).to(device)  # to pixels

        out = [pred_datas[batch_i]]
        for si, pred in enumerate(out): # pred :[xmin,ymin,xmax,ymax,score,class_label]
            # 统计每张图片的真实框、预测框信息
            # 获取第si张图片的gt标签信息 包括class, x, y, w, h    target[:, 0]为标签属于哪张图片的编号
            labels = targets[targets[:, 0] == si, 1:] # [:, class+xywh]
            nl = len(labels) # 第si张图片的gt个数
            # 获取标签类别
            tcls = labels[:, 0].tolist() if nl else []  # target class
            path, shape = Path(paths[si]), shapes[si][0] # 第si张图片的地址
            # 统计测试图片数量 +1
            seen += 1

            # 如果预测为空,则添加空的信息到stats里
            if len(pred) == 0:
                if nl:
                    stats.append((torch.zeros(0, niou, dtype=torch.bool), torch.Tensor(), torch.Tensor(), tcls))
                continue

            predn = pred.clone()

            # Evaluate
            if nl:
                tbox = xywh2xyxy(labels[:, 1:5])  # target boxes
                labelsn = torch.cat((labels[:, 0:1], tbox), 1)  # native-space labels
                correct = process_batch(predn, labelsn, iouv)
                if plots:
                    confusion_matrix.process_batch(predn, labelsn)
            else:
                correct = torch.zeros(pred.shape[0], niou, dtype=torch.bool)
            stats.append((correct.cpu(), pred[:, 4].cpu(), pred[:, 5].cpu(), tcls))  # (correct, conf, pcls, tcls)

            # Save/log
            # 保存预测信息到txt文件  runs\test\exp7\labels\image_name.txt
            if save_txt:
                save_one_txt(predn, save_conf, shape, file=save_dir / 'labels' / (path.stem + '.txt'))

    # Compute metrics
    stats = [np.concatenate(x, 0) for x in zip(*stats)]  # to numpy
    if len(stats) and stats[0].any():
        tp, fp, p, r, f1, ap, ap_class = ap_per_class(*stats, plot=plots, save_dir=save_dir, names=names)
        ap50, ap = ap[:, 0], ap.mean(1)  # AP@0.5, AP@0.5:0.95
        mp, mr, map50, map = p.mean(), r.mean(), ap50.mean(), ap.mean()
        nt = np.bincount(stats[3].astype(np.int64), minlength=nc)  # number of targets per class
    else:
        nt = torch.zeros(1)

    # Print results
    pf = '%20s' + '%11i' * 2 + '%11.3g' * 4  # print format
    LOGGER.info(pf % ('all', seen, nt.sum(), mp, mr, map50, map))

    # Print results per class
    if (verbose or (nc < 50 and not training)) and nc > 1 and len(stats):
        for i, c in enumerate(ap_class):
            LOGGER.info(pf % (names[c], seen, nt[c], p[i], r[i], ap50[i], ap[i]))

    # Print speeds
    t = tuple(x / seen * 1E3 for x in dt)  # speeds per image
    if not training:
        # shape = (batch_size, 3, imgsz, imgsz)
        # LOGGER.info(f'Speed: %.1fms pre-process, %.1fms inference, %.1fms NMS per image at shape {shape}' % t)
        LOGGER.info(f'Speed: %.1fms pre-process, %.1fms inference, %.1fms NMS per image.' % t)

    # Plots
    if plots:
        confusion_matrix.plot(save_dir=save_dir, names=list(names.values()))
        callbacks.run('on_val_end')


def parse_opt():
    '''
    opt参数详解
    data: 数据集配置文件地址 包含数据集的路径、类别个数、类名、下载地址等信息
    weights: 模型的权重文件地址 weights/yolov5s.pt
    batch_size: 前向传播的批次大小 默认32
    imgsz: 输入网络的图片分辨率 默认640
    conf-thres: object置信度阈值 默认0.001
    iou-thres: 进行NMS时IOU的阈值 默认0.6
    task: 设置测试的类型 有train, val, test, speed or study几种 默认val
    device: 测试的设备
    single-cls: 数据集是否只用一个类别 默认False
    augment: 测试是否使用TTA Test Time Augment 默认False
    verbose: 是否打印出每个类别的mAP 默认False
    下面三个参数是auto-labelling(有点像RNN中的teaching forcing)相关参数详见:https://github.com/ultralytics/yolov5/issues/1563 下面解释是作者原话
    save-txt: traditional auto-labelling
    save-hybrid: save hybrid autolabels, combining existing labels with new predictions before NMS (existing predictions given confidence=1.0 before NMS.
    save-conf: add confidences to any of the above commands
    save-json: 是否按照coco的json格式保存预测框,并且使用cocoapi做评估(需要同样coco的json格式的标签) 默认False
    project: 测试保存的源文件 默认runs/test
    name: 测试保存的文件地址 默认exp  保存在runs/test/exp下
    exist-ok: 是否存在当前文件 默认False 一般是 no exist-ok 连用  所以一般都要重新创建文件夹
    half: 是否使用半精度推理 默认False
    '''
    parser = argparse.ArgumentParser()
    parser.add_argument('--data', type=str, default=ROOT / 'data/coco128.yaml', help='dataset.yaml path')
    parser.add_argument('--weights', nargs='+', type=str, default=ROOT / 'yolov5s.pt', help='model.pt path(s)')
    # parser.add_argument('--batch-size', type=int, default=32, help='batch size')
    parser.add_argument('--batch-size', type=int, default=1, help='batch size')
    parser.add_argument('--imgsz', '--img', '--img-size', type=int, default=640, help='inference size (pixels)')
    parser.add_argument('--conf-thres', type=float, default=0.001, help='confidence threshold')
    parser.add_argument('--iou-thres', type=float, default=0.6, help='NMS IoU threshold')
    parser.add_argument('--task', default='val', help='train, val, test, speed or study')
    parser.add_argument('--device', default='', help='cuda device, i.e. 0 or 0,1,2,3 or cpu')
    parser.add_argument('--workers', type=int, default=8, help='max dataloader workers (per RANK in DDP mode)')
    parser.add_argument('--single-cls', action='store_true', help='treat as single-class dataset')
    parser.add_argument('--augment', action='store_true', help='augmented inference')
    parser.add_argument('--verbose', action='store_true', help='report mAP by class')
    parser.add_argument('--save-txt', action='store_true', help='save results to *.txt')
    parser.add_argument('--save-hybrid', action='store_true', help='save label+prediction hybrid results to *.txt')
    parser.add_argument('--save-conf', action='store_true', help='save confidences in --save-txt labels')
    parser.add_argument('--save-json', action='store_true', help='save a COCO-JSON results file')
    parser.add_argument('--project', default=ROOT / 'runs/val', help='save to project/name')
    parser.add_argument('--name', default='exp', help='save to project/name')
    parser.add_argument('--exist-ok', action='store_true', help='existing project/name ok, do not increment')
    parser.add_argument('--half', action='store_true', help='use FP16 half-precision inference')
    parser.add_argument('--dnn', action='store_true', help='use OpenCV DNN for ONNX inference')
    opt = parser.parse_args()
    opt.data = check_yaml(opt.data)  # check YAML
    opt.save_json |= opt.data.endswith('coco.yaml')
    opt.save_txt |= opt.save_hybrid
    print_args(FILE.stem, opt)
    return opt


def main(opt):
    # 检测requirements文件中需要的包是否安装好了
    check_requirements(requirements=ROOT / 'requirements.txt', exclude=('tensorboard', 'thop'))

    # 如果task in ['train', 'val', 'test']就正常测试 训练集/验证集/测试集
    if opt.task in ('train', 'val', 'test'):  # run normally
        if opt.conf_thres > 0.001:  # https://github.com/ultralytics/yolov5/issues/1466
            LOGGER.info(f'WARNING: confidence threshold {opt.conf_thres} >> 0.001 will produce invalid mAP values.')
        run(**vars(opt))

def read_target_datas():
    '''
    datas = [
                [
                    torch.Tensor([cv2.imread('../datasets/coco128/images/train2017/000000000034.jpg')]),
                    torch.Tensor([[ 0.00000, 22.00000,  0.34621,  0.49361,  0.68942,  0.84632]]),
                    ('/data/mytest/datasets/coco128/images/train2017/000000000034.jpg',),
                    [cv2.imread('../datasets/coco128/imagesNAME/train2017/000000000034.jpg').shape],
                ]
            ] # [(im, targets, paths, shapes),...]
    '''
    img_dir = IMG_DIR
    label_dir = TARGET_LABEL_DIR
    txt_name_list = [i for i in os.listdir(label_dir) if i.endswith('.txt')]
    target_datas = []
    for txt_name in txt_name_list:
        image_path = os.path.join(img_dir,txt_name[:-4]+'.jpg')
        txt_path = os.path.join(label_dir,txt_name)
        img = cv2.imread(image_path)
        h,w = img.shape[:2]
        with open(txt_path, 'r') as t:
            lines = t.readlines()
            targets = []
            for line in lines:
                content = line.split(' ')
                label = int(content[0])
                norm_x_center = float(content[1])
                norm_y_center = float(content[2])
                norm_width = float(content[3])
                norm_height = float(content[4])
                targets.append([0.0, label, norm_x_center, norm_y_center, norm_width, norm_height])
        target_datas.append([torch.Tensor([img]),torch.Tensor(targets),(image_path,),((h,w),(h,w))])
    return target_datas


def read_pred_datas():
    '''
    datas = [
                [
                    torch.Tensor([cv2.imread('../datasets/coco128/images/train2017/000000000034.jpg')]),
                    torch.Tensor([[ 0.00000, 22.00000,  0.34621,  0.49361,  0.68942,  0.84632]]),
                    ('/data/mytest/datasets/coco128/images/train2017/000000000034.jpg',),
                    [cv2.imread('../datasets/coco128/images/train2017/000000000034.jpg').shape],
                ]
            ] # [(im, targets, paths, shapes),...]
    '''
    img_dir = IMG_DIR
    label_dir = PRED_LABEL_DIR
    txt_name_list = [i for i in os.listdir(label_dir) if i.endswith('.txt')]
    pred_datas = []
    for txt_name in txt_name_list:
        image_path = os.path.join(img_dir,txt_name[:-4]+'.jpg')
        txt_path = os.path.join(label_dir,txt_name)
        img = cv2.imread(image_path)
        h,w = img.shape[:2]
        with open(txt_path, 'r') as t:
            lines = t.readlines()
            preds = []
            for line in lines:
                content = line.split(' ')
                label = int(content[0])
                norm_x_center = float(content[1])
                norm_y_center = float(content[2])
                norm_width = float(content[3])
                norm_height = float(content[4])
                try:
                    score = float(content[5])
                except Exception as e:
                    score = float(0.99)
                xmin = (norm_x_center - norm_width / 2) * w
                ymin = (norm_y_center - norm_height / 2) * h
                xmax = (norm_x_center + norm_width / 2) * w
                ymax = (norm_y_center + norm_height / 2) * h
                preds.append([xmin, ymin, xmax, ymax, score, label])
        # pred_datas.append([torch.Tensor([img]),torch.Tensor(preds),(image_path,),((h,w),(h,w))])
        pred_datas.append(torch.Tensor(preds))
    return pred_datas

if __name__ == "__main__":
    # 全局定义数据集图片路径,真实框的txt文件夹路径,预测框的txt文件夹路径
    IMG_DIR = r'.\datasets\images'
    TARGET_LABEL_DIR = r'.\datasets\labels'
    PRED_LABEL_DIR = r'.\datasets\results'
    # class2name
    NAMES = {0: 'person', 1: 'bicycle', 2: 'car', 3: 'motorcycle', 4: 'airplane', 5: 'bus', 6: 'train',
            7: 'truck', 8: 'boat', 9: 'traffic light', 10: 'fire hydrant', 11: 'stop sign', 12: 'parking meter',
            13: 'bench', 14: 'bird', 15: 'cat', 16: 'dog', 17: 'horse', 18: 'sheep',
            19: 'cow', 20: 'elephant', 21: 'bear', 22: 'zebra', 23: 'giraffe', 24: 'backpack',
            25: 'umbrella', 26: 'handbag', 27: 'tie', 28: 'suitcase', 29: 'frisbee', 30: 'skis',
            31: 'snowboard', 32: 'sports ball', 33: 'kite', 34: 'baseball bat', 35: 'baseball glove', 36: 'skateboard',
            37: 'surfboard', 38: 'tennis racket', 39: 'bottle', 40: 'wine glass', 41: 'cup', 42: 'fork',
            43: 'knife', 44: 'spoon', 45: 'bowl', 46: 'banana', 47: 'apple', 48: 'sandwich',
            49: 'orange', 50: 'broccoli', 51: 'carrot', 52: 'hot dog', 53: 'pizza', 54: 'donut',
            55: 'cake', 56: 'chair', 57: 'couch', 58: 'potted plant', 59: 'bed', 60: 'dining table',
            61: 'toilet', 62: 'tv', 63: 'laptop', 64: 'mouse', 65: 'remote', 66: 'keyboard',
            67: 'cell phone', 68: 'microwave', 69: 'oven', 70: 'toaster', 71: 'sink', 72: 'refrigerator',
            73: 'book', 74: 'clock', 75: 'vase', 76: 'scissors', 77: 'teddy bear', 78: 'hair drier', 79: 'toothbrush'}
    # number of classes
    NUMER_OF_CLASSES = len(NAMES)

    opt = parse_opt()
    main(opt)
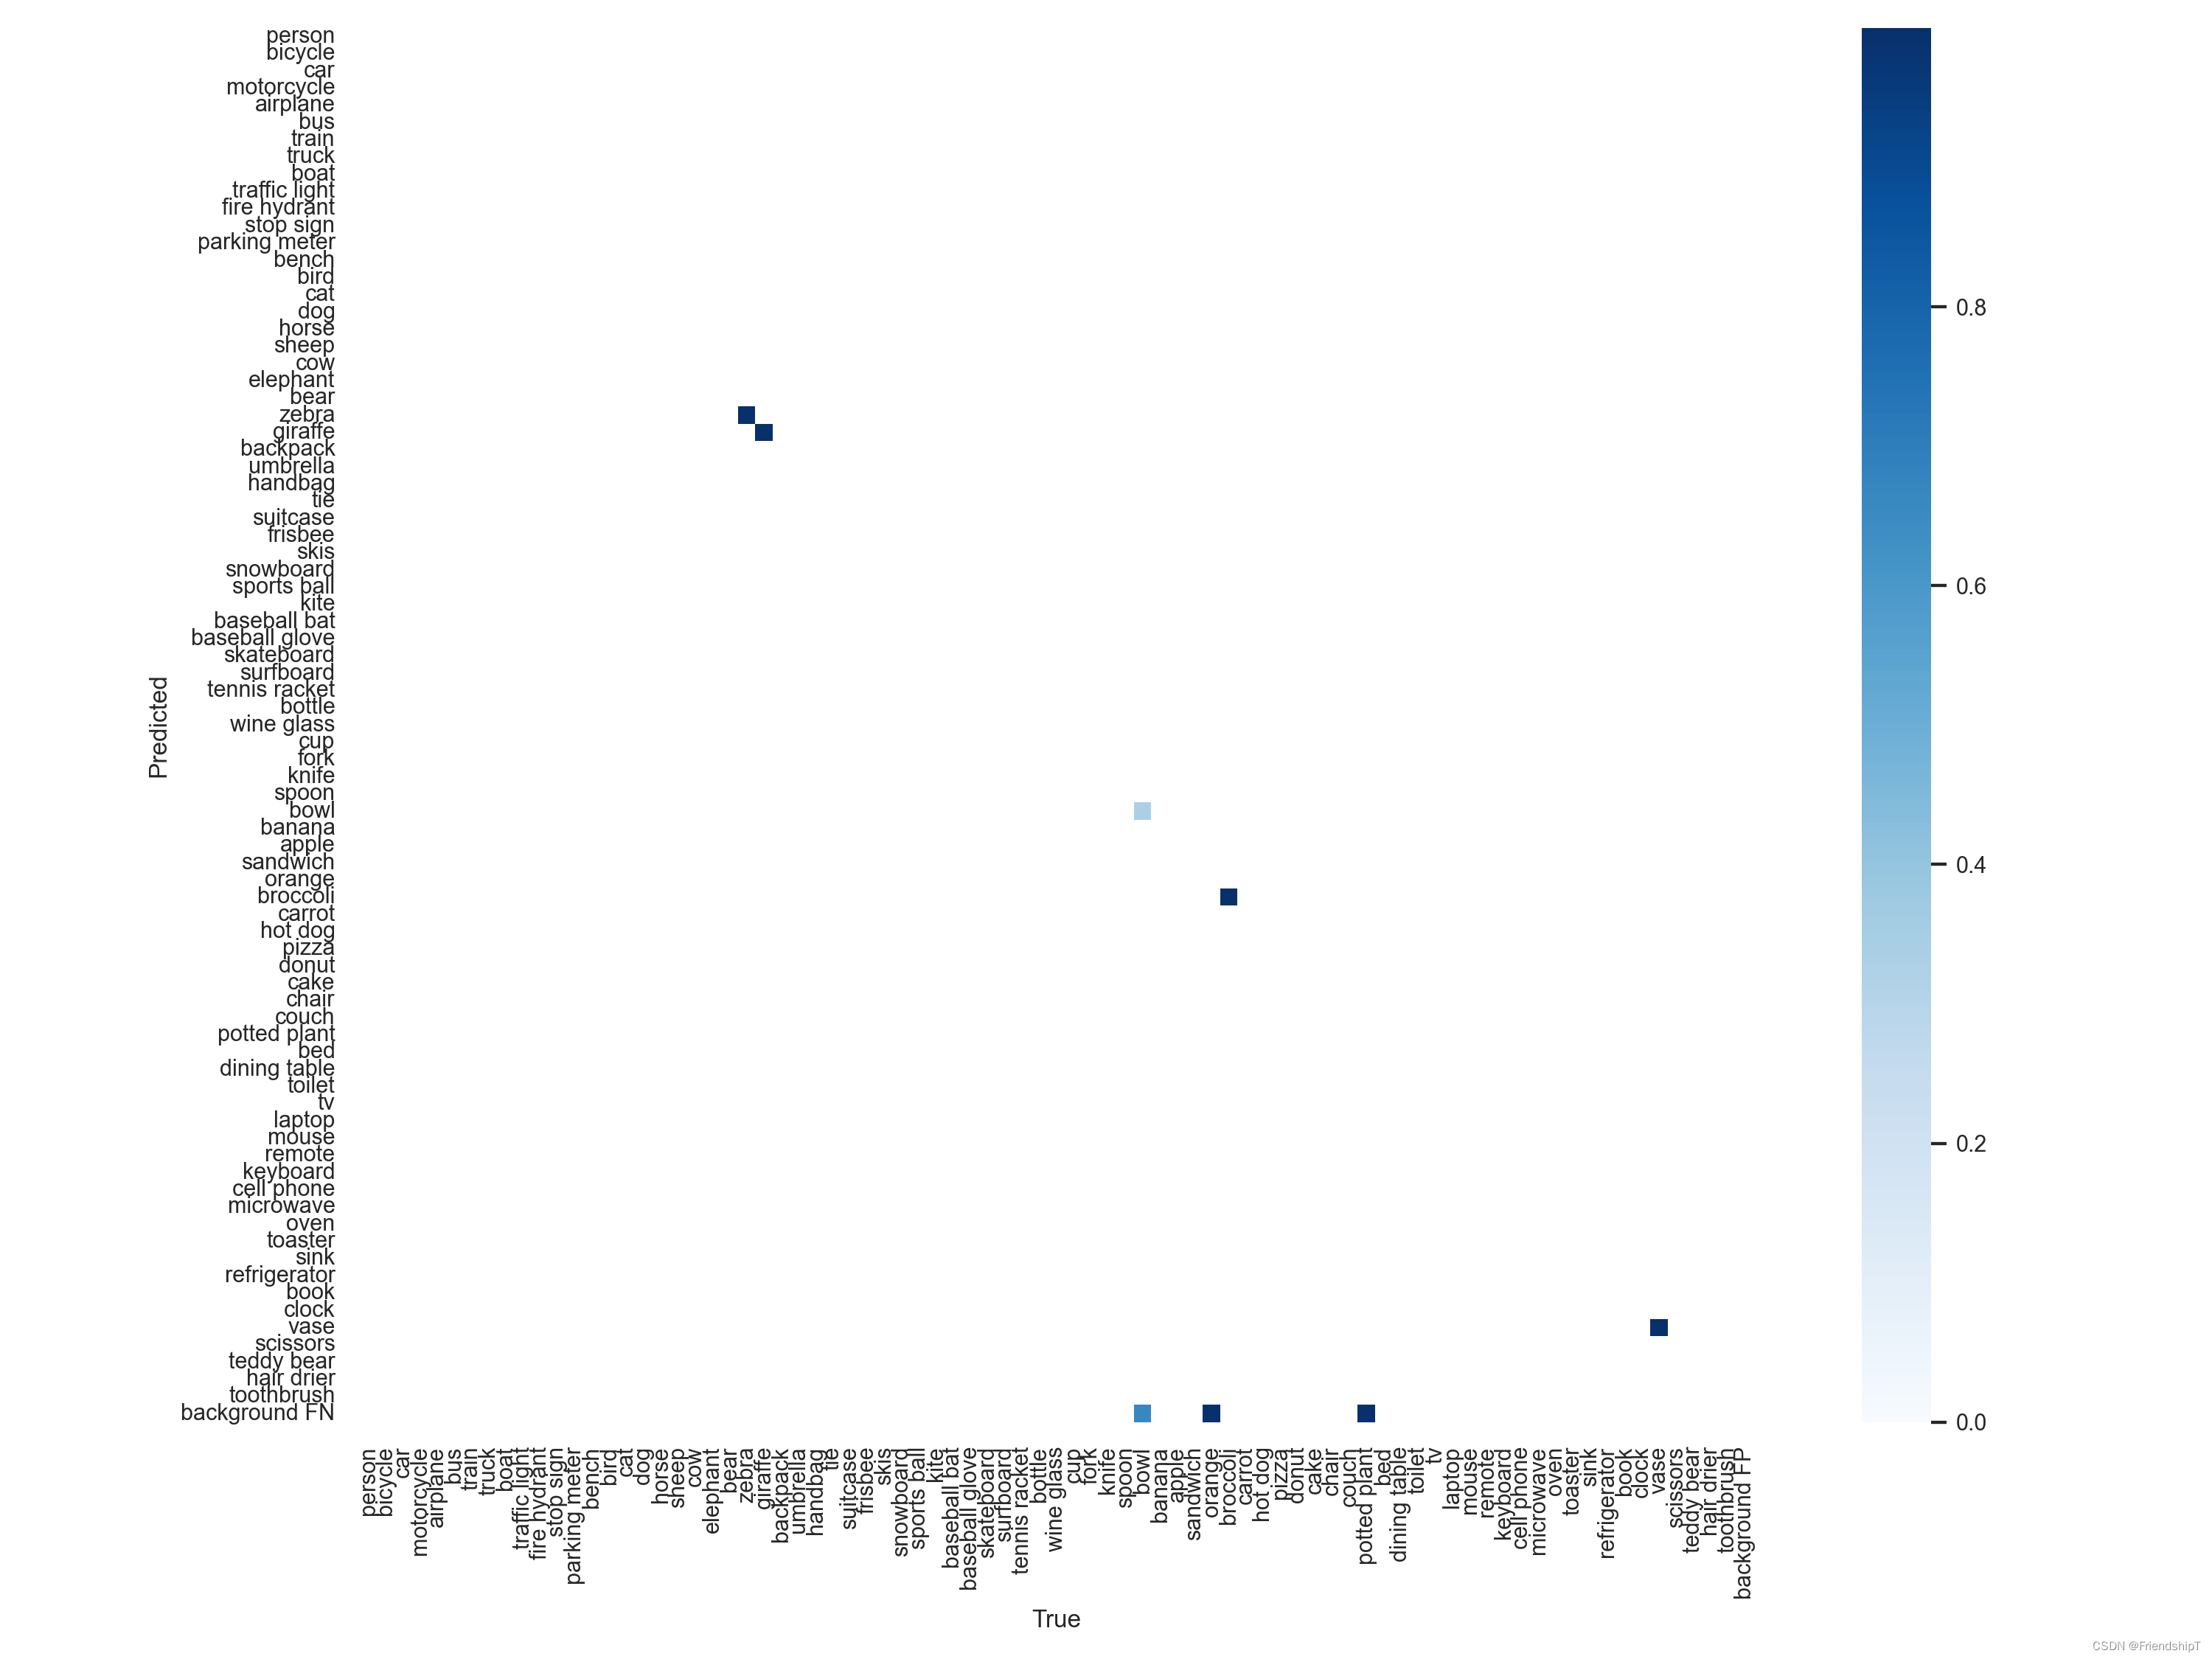
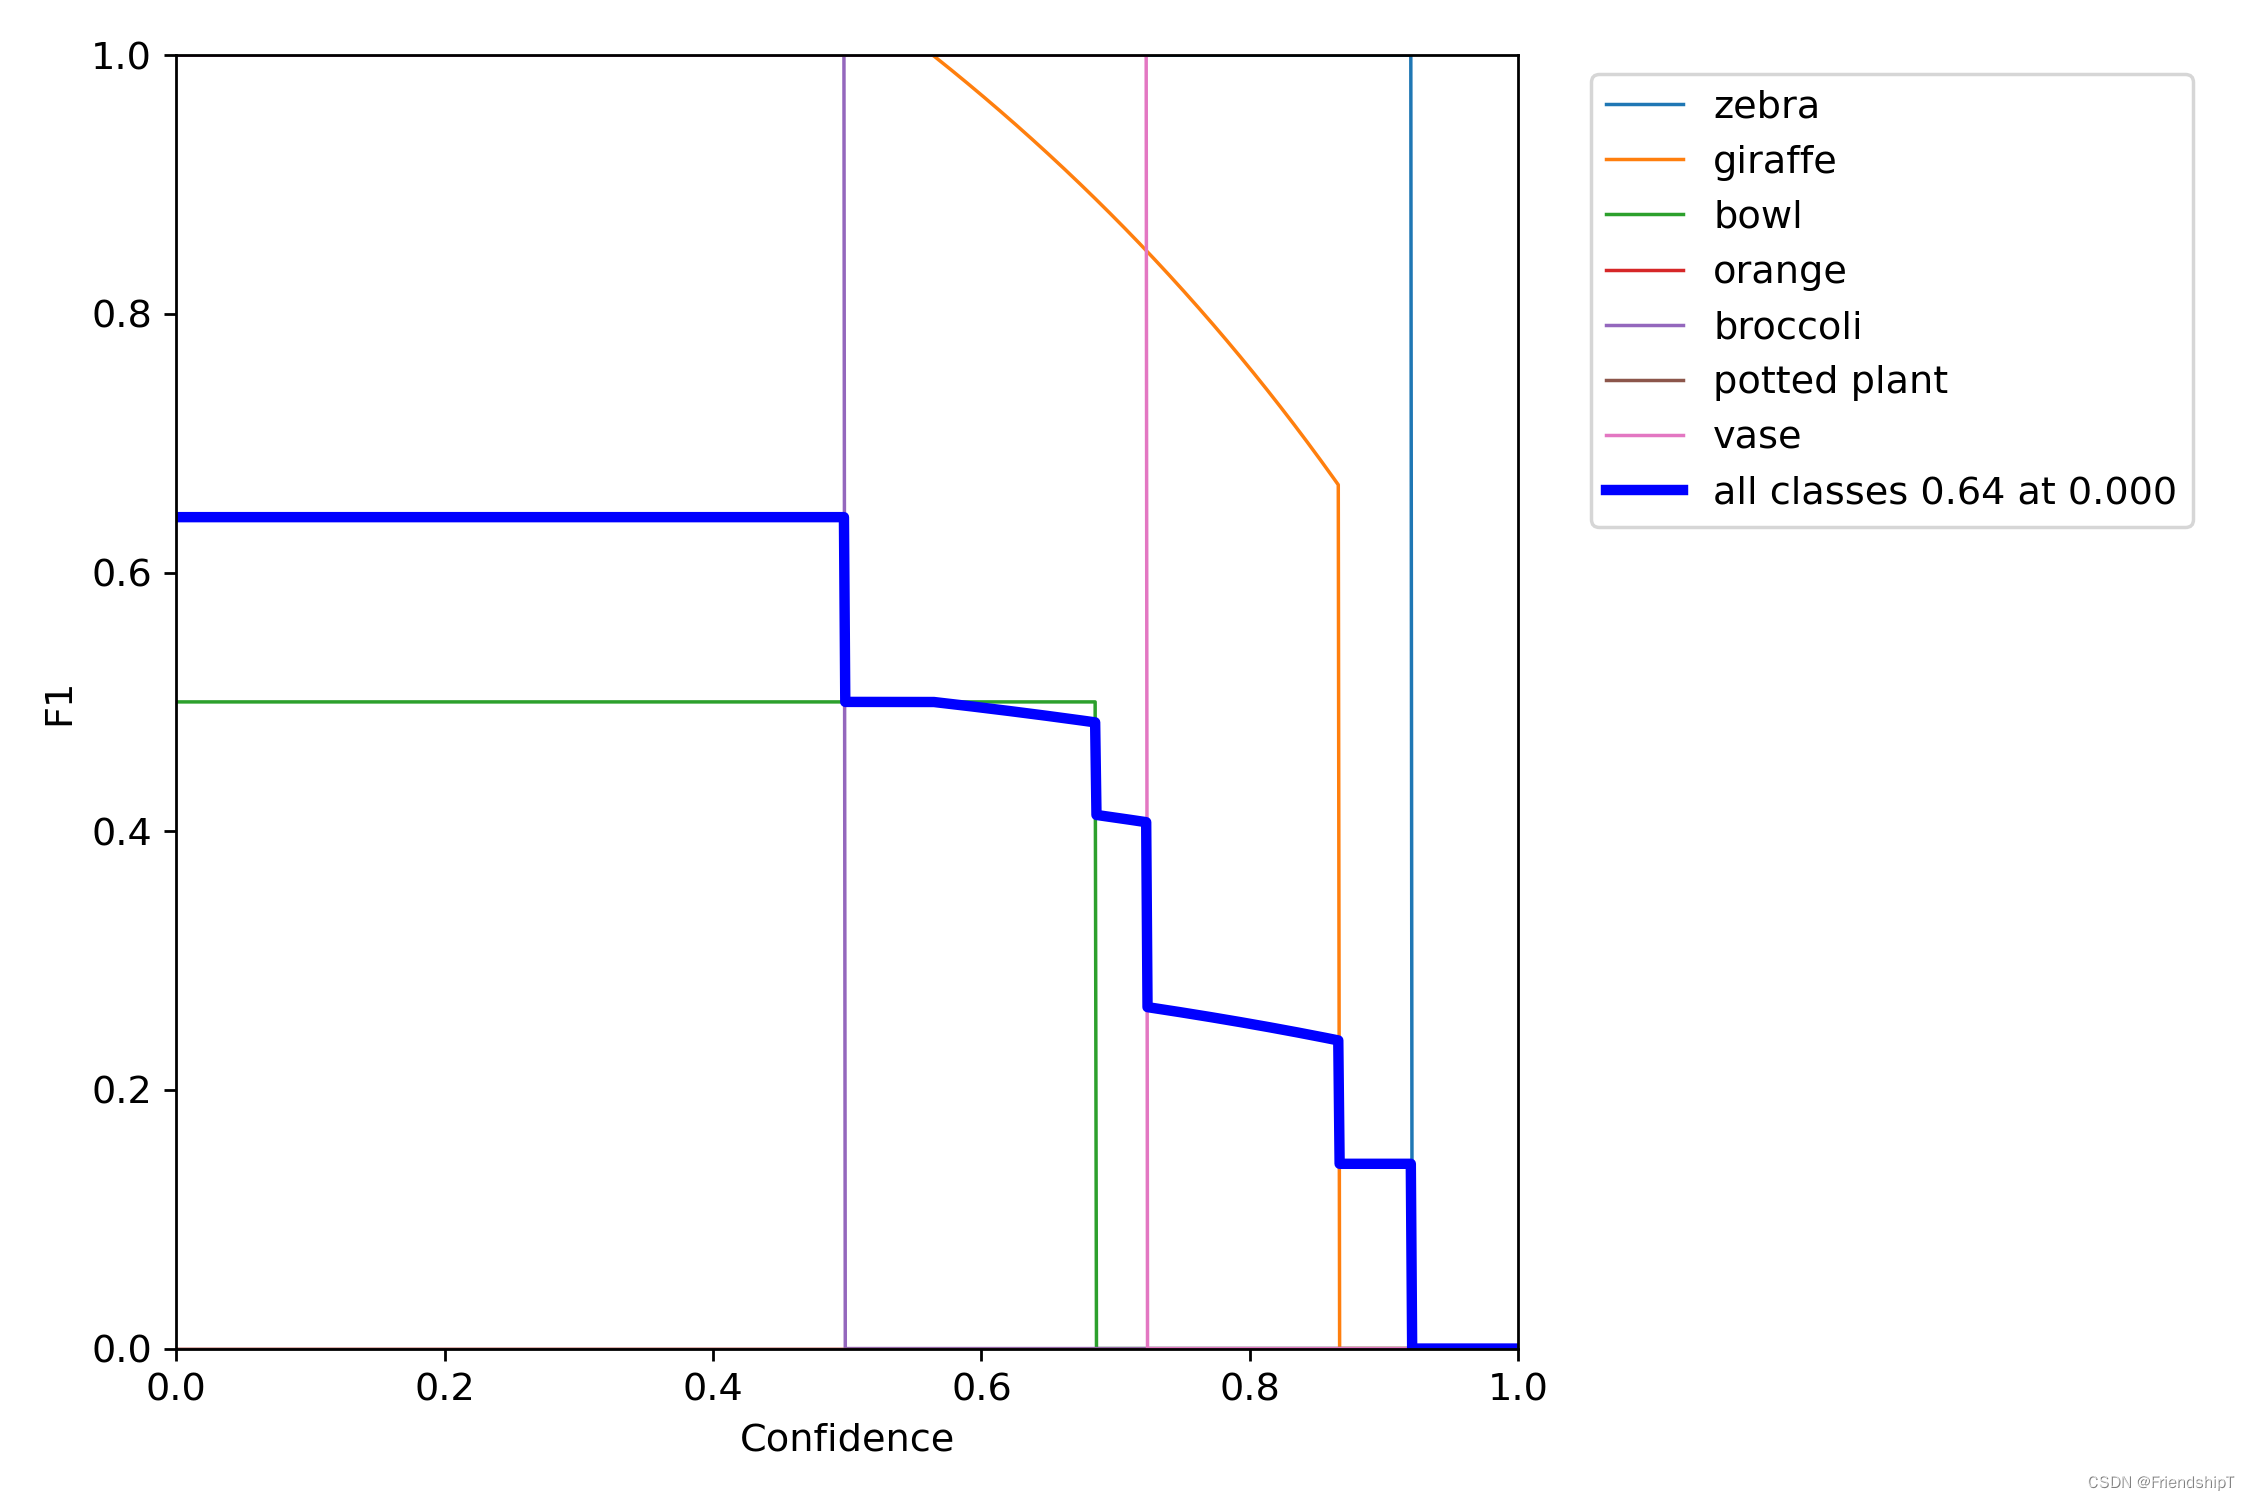
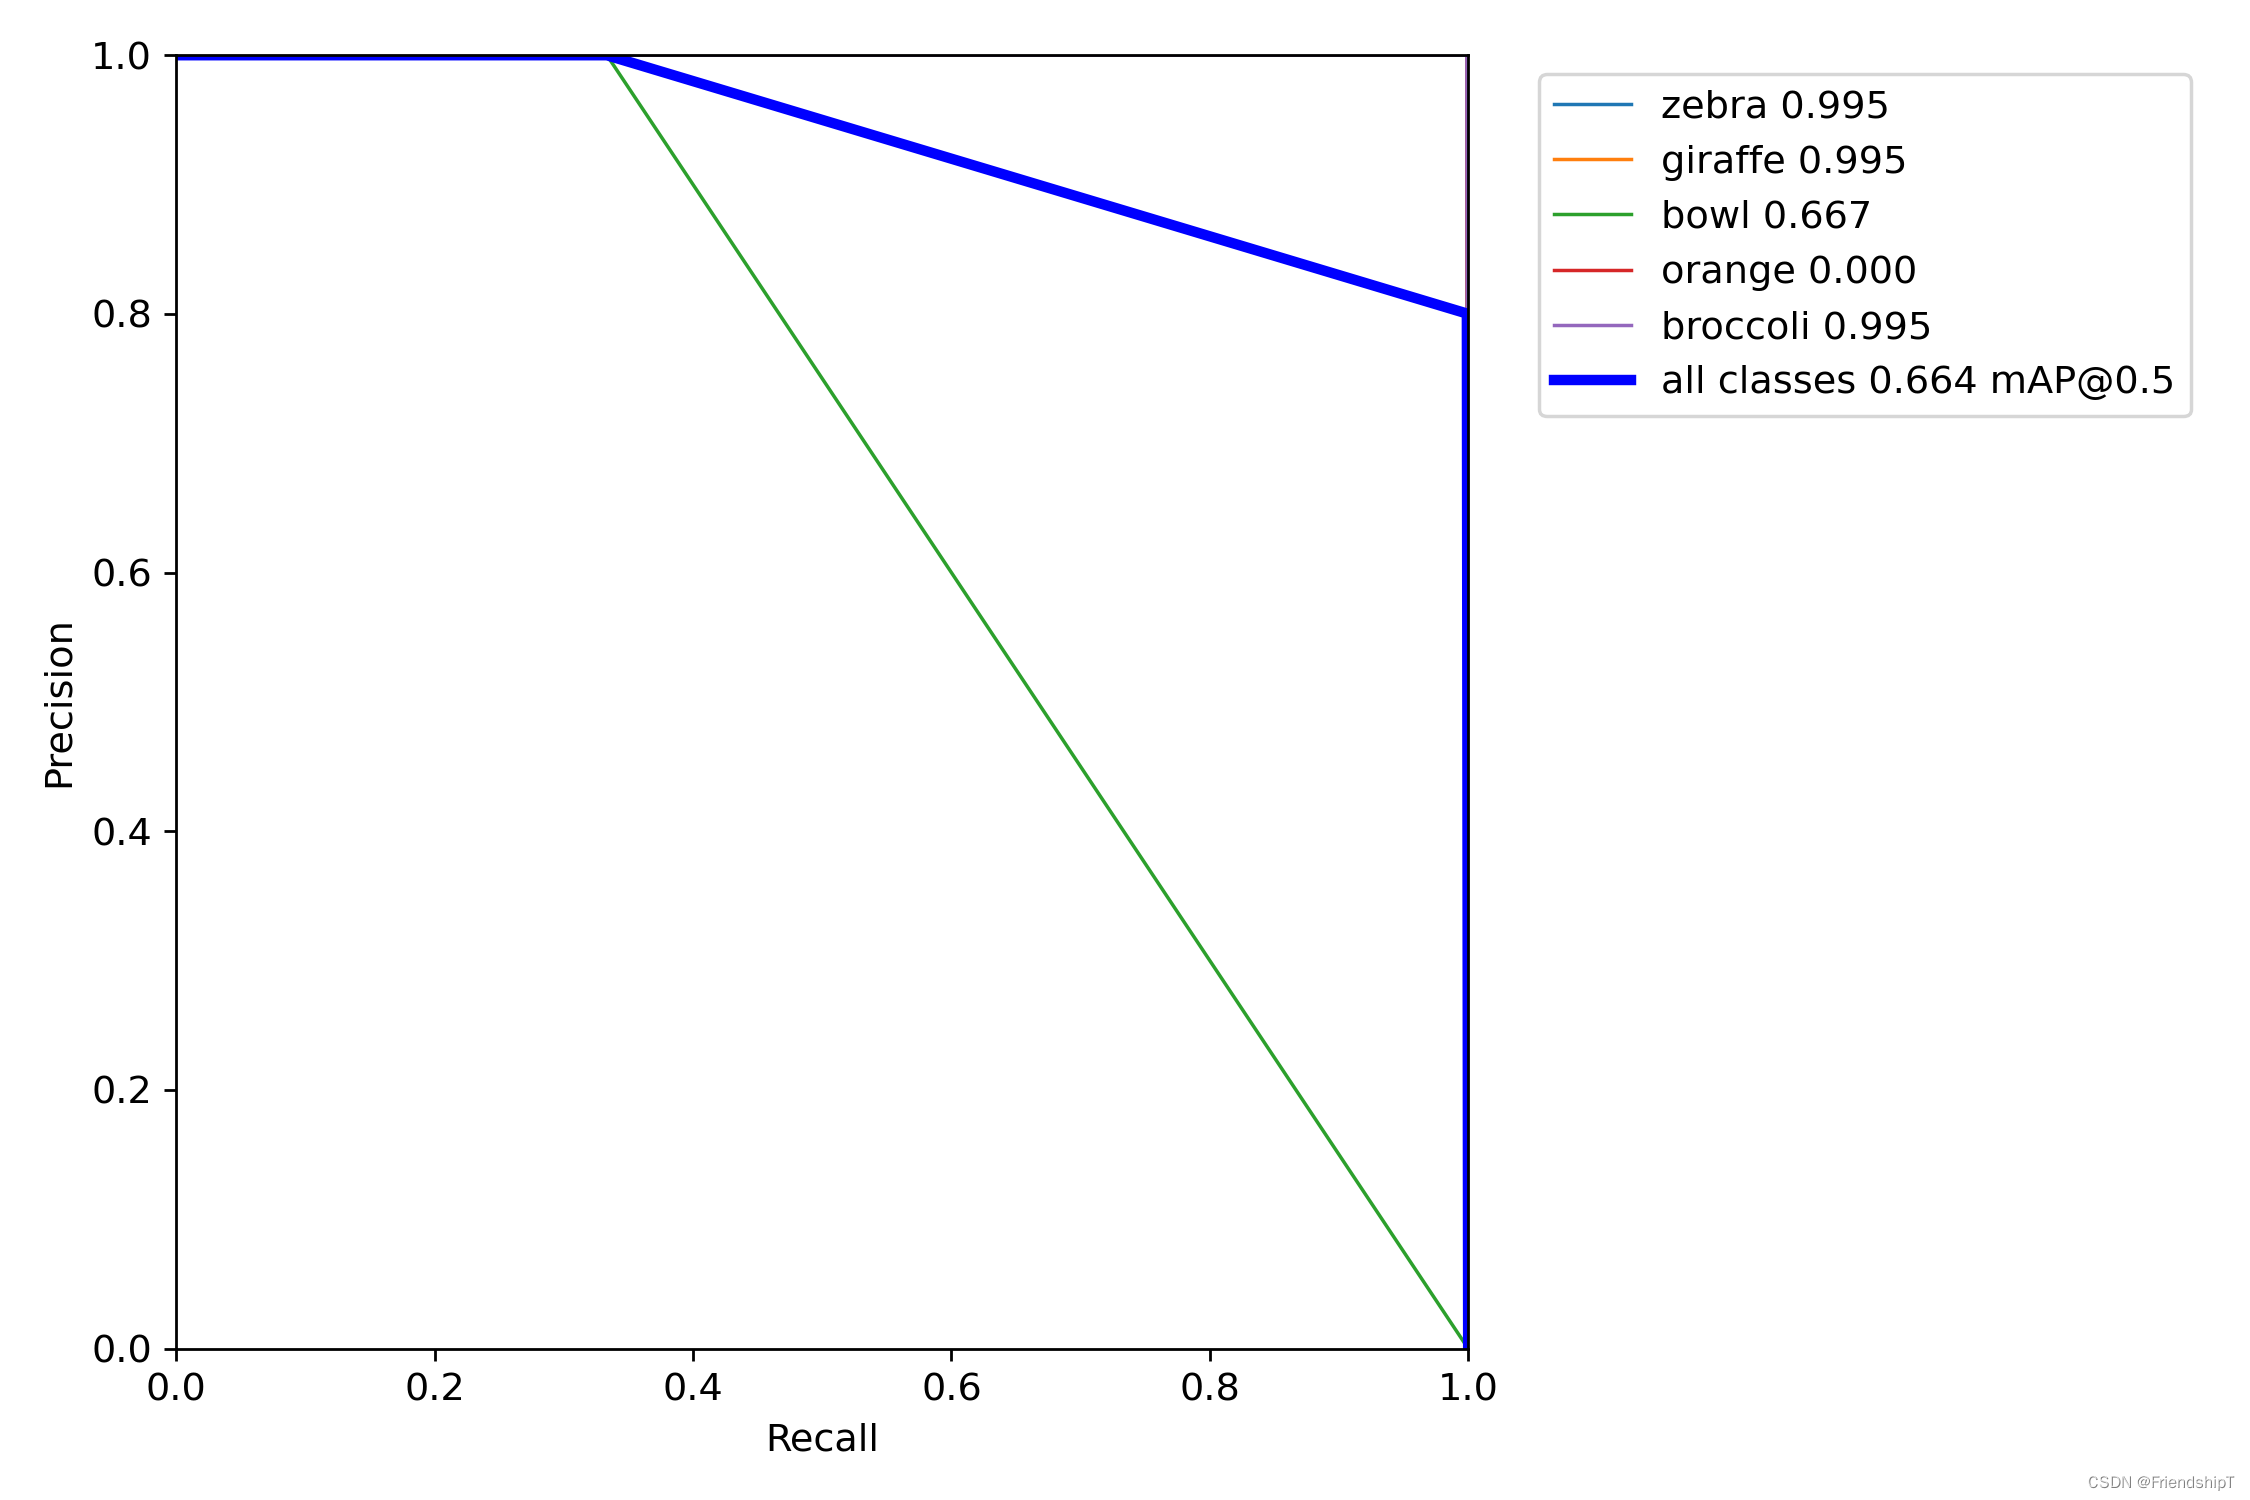
输出结果

参考
[1] https://github.com/ultralytics/yolov5.git
- 由于本人水平有限,难免出现错漏,敬请批评改正。
- 更多精彩内容,可点击进入YOLO系列专栏、自然语言处理
专栏或我的个人主页查看- 基于DETR的人脸伪装检测
- YOLOv7训练自己的数据集(口罩检测)
- YOLOv8训练自己的数据集(足球检测)
- YOLOv5:TensorRT加速YOLOv5模型推理
- YOLOv5:IoU、GIoU、DIoU、CIoU、EIoU
- 玩转Jetson Nano(五):TensorRT加速YOLOv5目标检测
- YOLOv5:添加SE、CBAM、CoordAtt、ECA注意力机制
- YOLOv5:yolov5s.yaml配置文件解读、增加小目标检测层
- Python将COCO格式实例分割数据集转换为YOLO格式实例分割数据集
- YOLOv5:使用7.0版本训练自己的实例分割模型(车辆、行人、路标、车道线等实例分割)
- 使用Kaggle GPU资源免费体验Stable Diffusion开源项目
