目录
一、inotify安装和介绍
1. 安装inotify
2. inotify-tools常用命令
3. rsync + inotify 实践
3.1 服务端配置
3.2 客户端配置
一、inotify安装和介绍
1. 安装inotify
yum install epel-release -y
yum install inotify-tools -y
2. inotify-tools常用命令
inotify-tools 包含了两个命令:inotifywait 与 inotifywatch。
(1)inotifywait:在被监控的文件或目录上等待特定文件系统事件发生,执行后处 于阻塞状态,适合在shell脚本中使用。
(2)inotifywatch:用于收集文件系统的统计数据,例如发生了多少次 inotify 事 件,某文件被访问了多少次等等。
3. rsync + inotify 实践
部署sync+inotify同步客户端/slave目录至目标服务器的/slave/下:
3.1 服务端配置
目标服务器rsync配置,也可以使用之前的
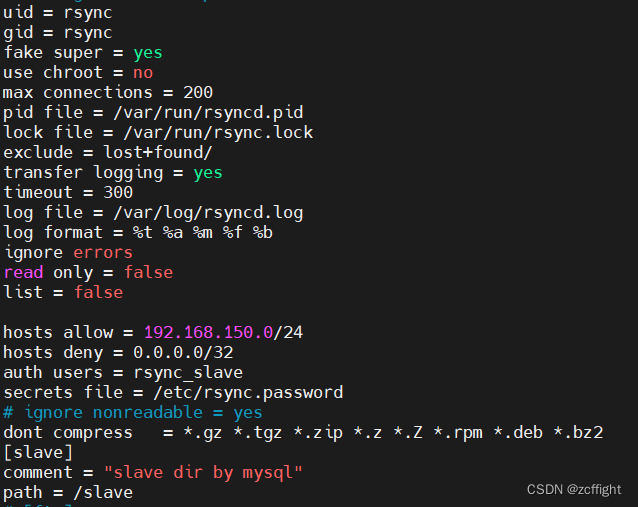
创建rsync用户
useradd -s /sbin/nologin -M rsync
创建数据备份储存目录,目录修改属主
mkdir /slave/
chown -R rsync:rsync /slave/
创建认证用户密码文件
echo "rsync_slave:nebula123" >>/etc/rsync.passwo rd
chmod 600 /etc/rsync.password
3.2 客户端配置
客户端的认证文件只需要有密码即可
echo "nebula123" >>/etc/rsync.password
chmod 600 /etc/rsync.password
vim inotify.sh
#!/bin/bash
host=192.168.150.15
src=/slave
des=slave
password=/etc/rsync.password
user=rsync_slave
inotifywait=/usr/bin/inotifywait
$inotifywait -mrq --timefmt '%Y%m%d %H:%M' --format '%T %w%f%e' -e modify,delete,create,attrib $src \
| while read files;do
        rsync -avzP --delete --timeout=100 --password-file=${password} $src $user@$host::$des
        echo "${files} was rsynced" >>/tmp/rsync.log 2>&1
done
sh inotify.sh
开另一个终端随便创建一个文件
touch awm






![[数据结构]什么是树?什么是二叉树?](https://img-blog.csdnimg.cn/71f60028d0c14282b604ae1fa49ba39c.png)


