2023.11.6-分析 Gateway 和 VirtualService
目录
本节实战
| 实战名称 |
|---|
正文
前面我们创建了一个 Gateway 和 VirtualService 对象,用来对外暴露应用,然后我们就可以通过 ingressgateway 来访问 Bookinfo 应用了。那么这两个资源对象是如何实现的呢?
Gateway 资源是用来配置允许外部流量进入 Istio 服务网格的流量入口,用于接收传入的 HTTP/TCP 连接。它会配置暴露的端口、协议等,但与 Kubernetes Ingress 资源不同,不会包括任何流量路由配置,真正的路由规则是通过 VirtualService 来配置的。
🍀
我们再查看一下前面创建的 Gateway 对象的定义:
# samples/bookinfo/networking/bookinfo-gateway.yaml
apiVersion: networking.istio.io/v1alpha3
kind: Gateway
metadata:
  name: bookinfo-gateway
spec:
  selector: # 如果使用的是 Helm 方式安装,则默认应该是 istio=ingress 标签
    istio: ingressgateway # 匹配 ingress gateway pod 的标签(kubectl get pods -l istio=ingressgateway -n istio-system)
  servers:
    - port:
        number: 8080
        name: http
        protocol: HTTP
      hosts:
        - "*"
这里定义的 Gateway 对象中有一个 selector 标签选择器,它会匹配 istio=ingressgateway 标签的 Pod,其实就是 istio-ingressgateway 这个组件。
[root@master1 ~]#kubectl get po  -nistio-system
NAME                                    READY   STATUS    RESTARTS   AGE
istio-egressgateway-8477dd44c4-jgpcg    1/1     Running   0          12h
istio-ingressgateway-5c58fcb646-df7rz   1/1     Running   0          12h
istiod-5d9595449c-8tt97                 1/1     Running   0          12h
[root@master1 ~]#kubectl get po -l istio=ingressgateway -nistio-system
NAME                                    READY   STATUS    RESTARTS   AGE
istio-ingressgateway-5c58fcb646-df7rz   1/1     Running   0          12h
# samples/bookinfo/networking/bookinfo-gateway.yaml
apiVersion: networking.istio.io/v1alpha3
kind: Gateway
metadata:
  name: bookinfo-gateway
spec:
  selector: # 如果使用的是 Helm 方式安装,则默认应该是 istio=ingress 标签
    istio: ingressgateway # 匹配 ingress gateway pod 的标签(kubectl get pods -l istio=ingressgateway -n istio-system)
  servers:
    - port:
        number: 8080
        name: http
        protocol: HTTP
      hosts:
        - "*"
---
apiVersion: networking.istio.io/v1alpha3
kind: VirtualService
metadata:
  name: bookinfo
spec:
  hosts:
    - "*"
  gateways:
    - bookinfo-gateway
  http:
    - match:
        - uri:
            exact: /productpage
        - uri:
            prefix: /static
        - uri:
            exact: /login
        - uri:
            exact: /logout
        - uri:
            prefix: /api/v1/products
      route:
        - destination:
            host: productpage
            port:
              number: 9080
🍀
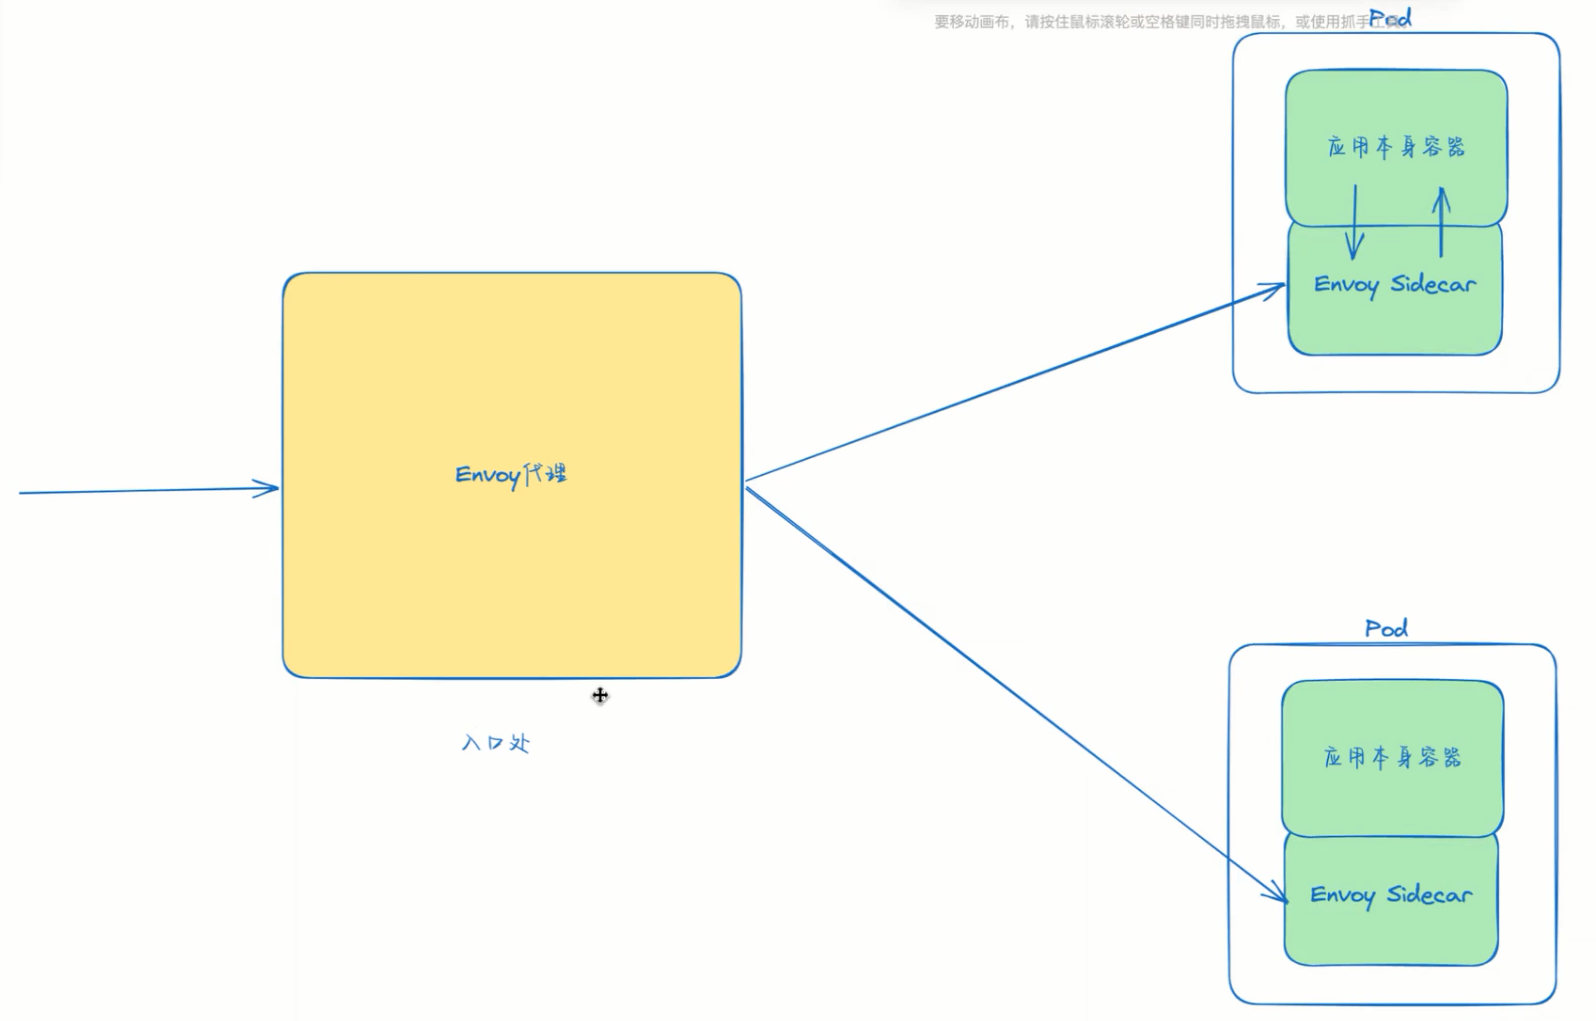
其实本质上 istio-ingressgateway 也是一个 Envoy 代理,用来作为 Istio 的统一入口网关,它会接收外部流量,然后根据 VirtualService 中定义的路由规则来进行流量的转发。
我们可以查看下 istio-ingressgateway 的 Envoy 配置来验证下:
# 进入 ingressgateway 组件所在的 Pod 中
$ kubectl exec -it istio-ingressgateway-9c8b9b586-s6s48 -n istio-system -- /bin/bash
istio-proxy@istio-ingressgateway-9c8b9b586-s6s48:/$ ll /etc/istio/proxy
total 20
drwxrwsrwx 2 root        istio-proxy    66 Nov  3 02:16 ./
drwxr-xr-x 7 root        root          103 Nov  3 02:16 ../
srw-rw-rw- 1 istio-proxy istio-proxy     0 Nov  3 02:16 XDS=
-rw-r--r-- 1 istio-proxy istio-proxy 14130 Nov  3 02:16 envoy-rev.json
-rw-r--r-- 1 istio-proxy istio-proxy  2699 Nov  3 02:16 grpc-bootstrap.json
istio-proxy@istio-ingressgateway-9c8b9b586-s6s48:/$
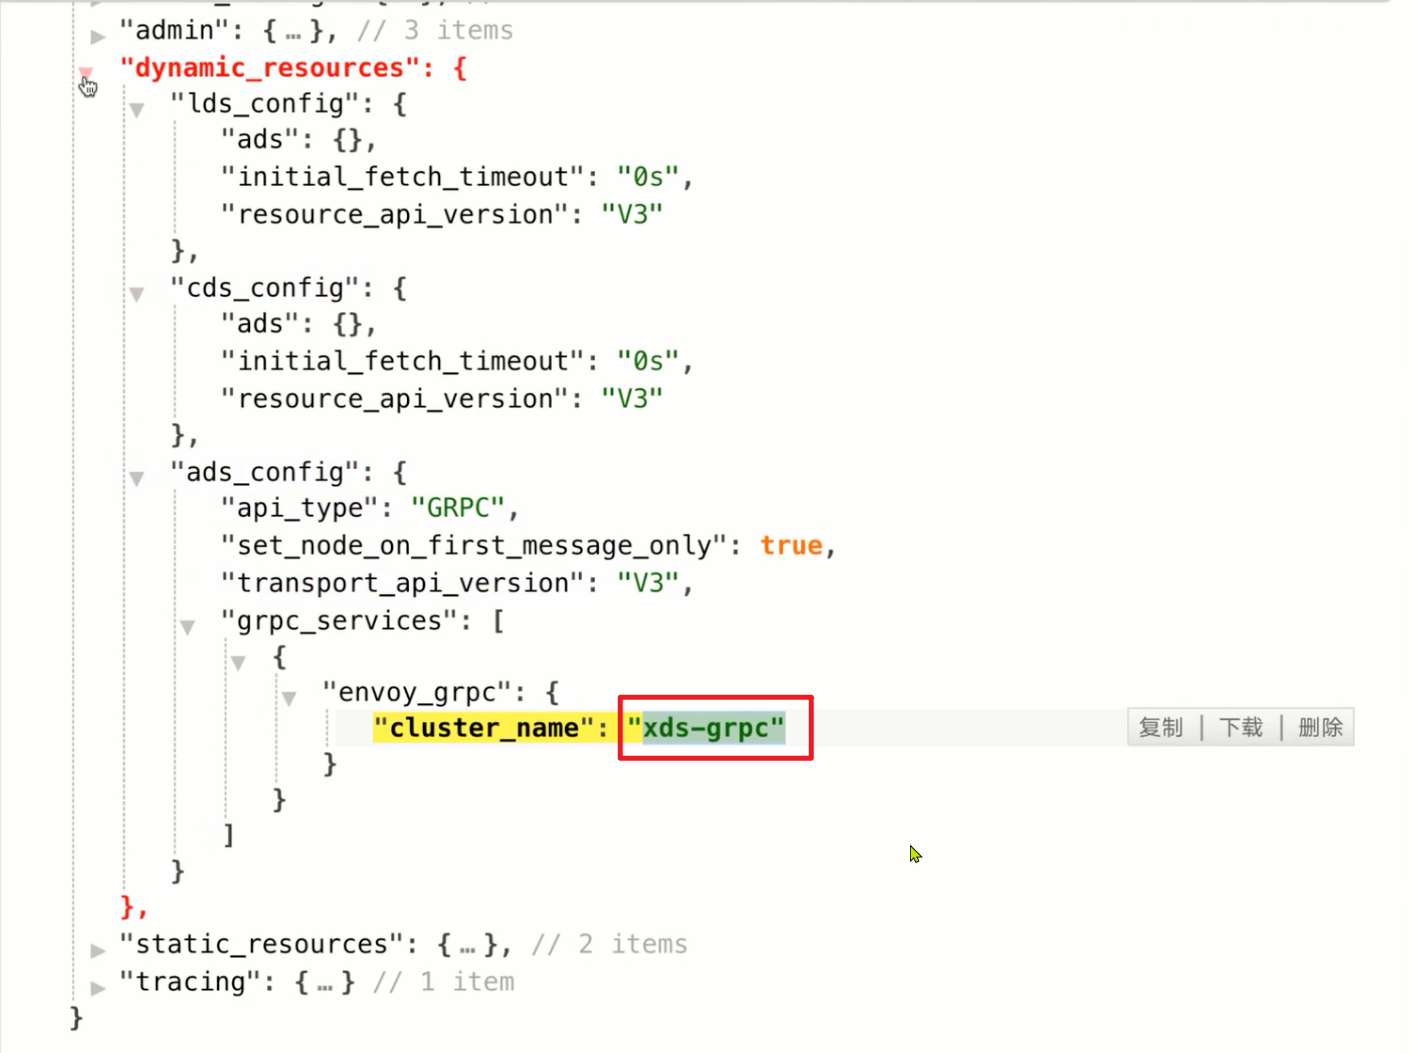
在 istio-ingressgateway 组件的 Pod 目录中有一个配置文件 envoy-rev.json,这个文件就是 Envoy 的配置文件,但是由于这里采用的是 xDS 动态配置的方式,所以直接看不到前面我们添加的 Gateway 相关信息的。
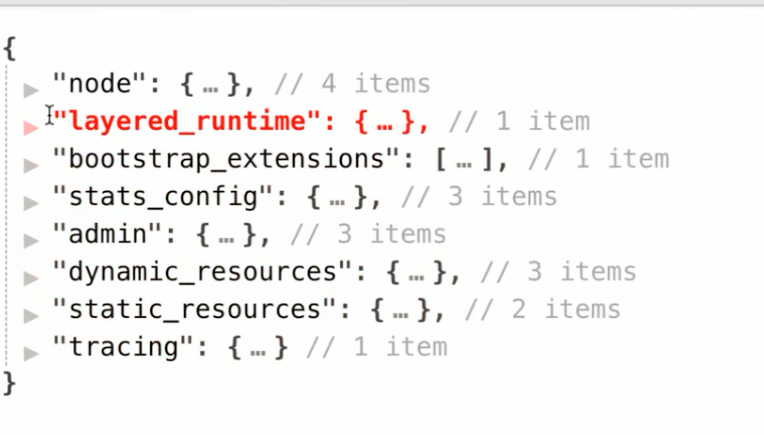
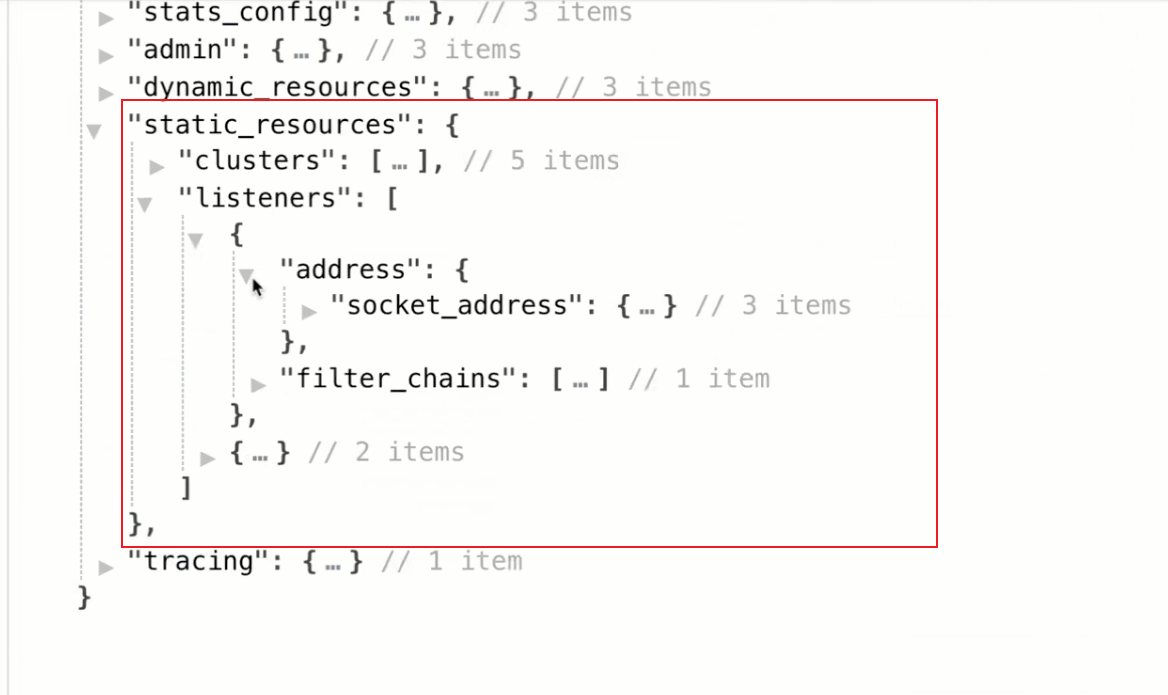
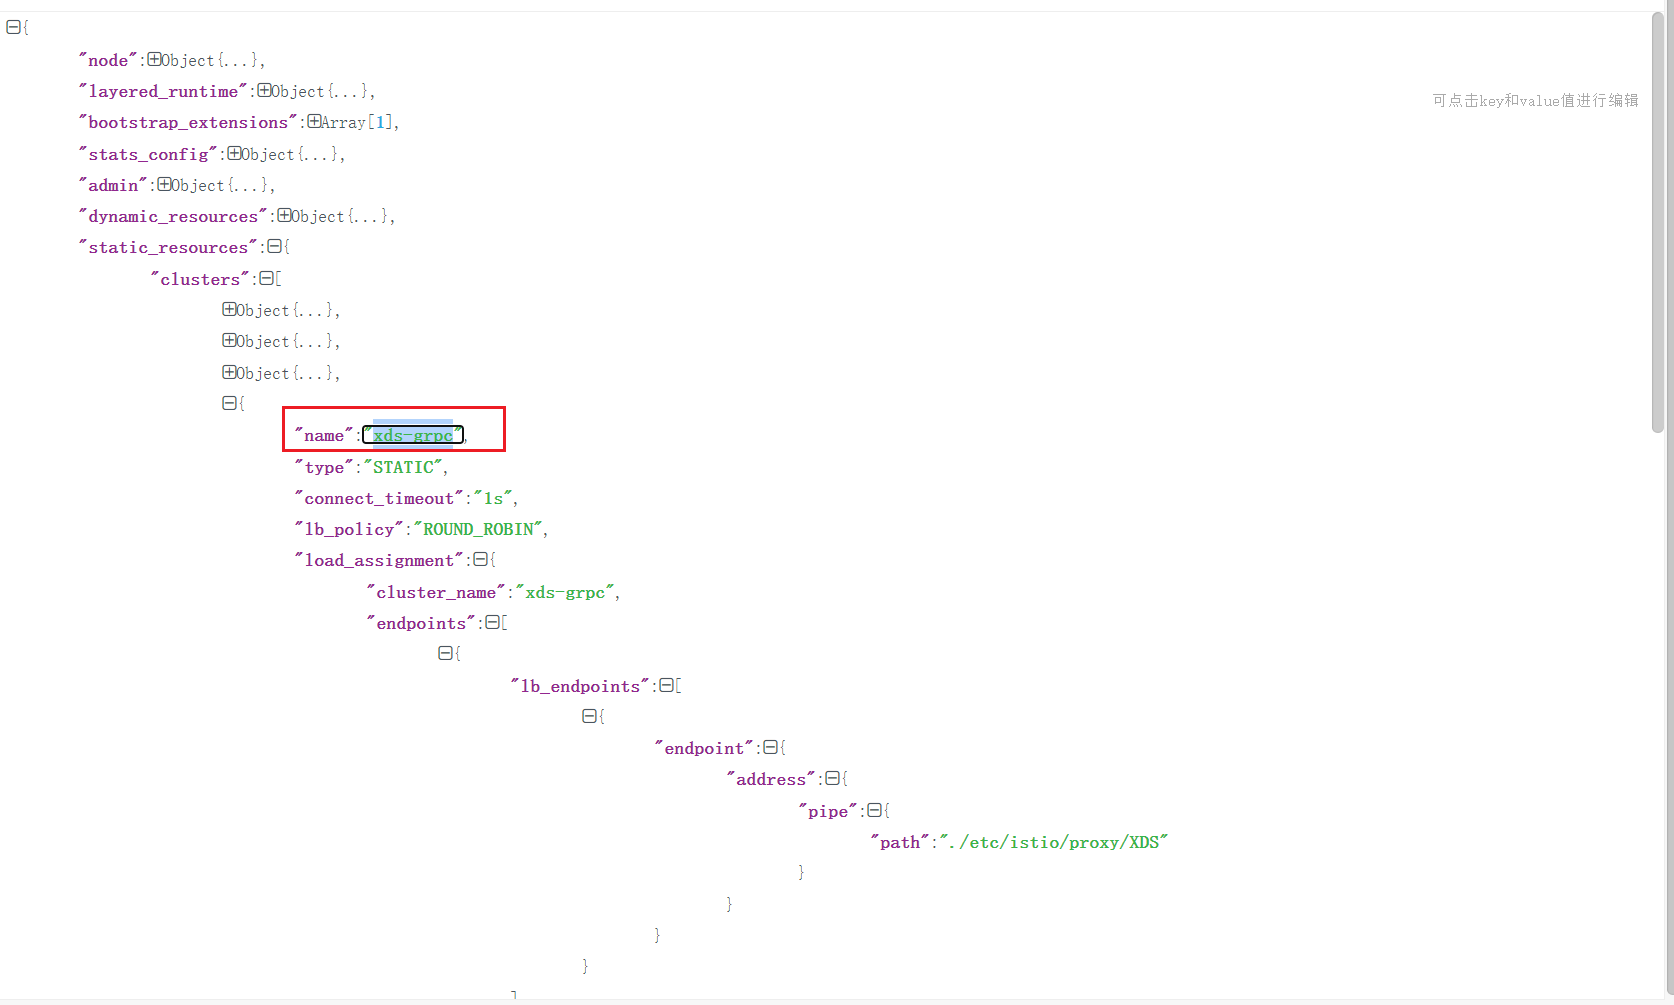
静态的2个配置:
1.数据采集
2.监控检查
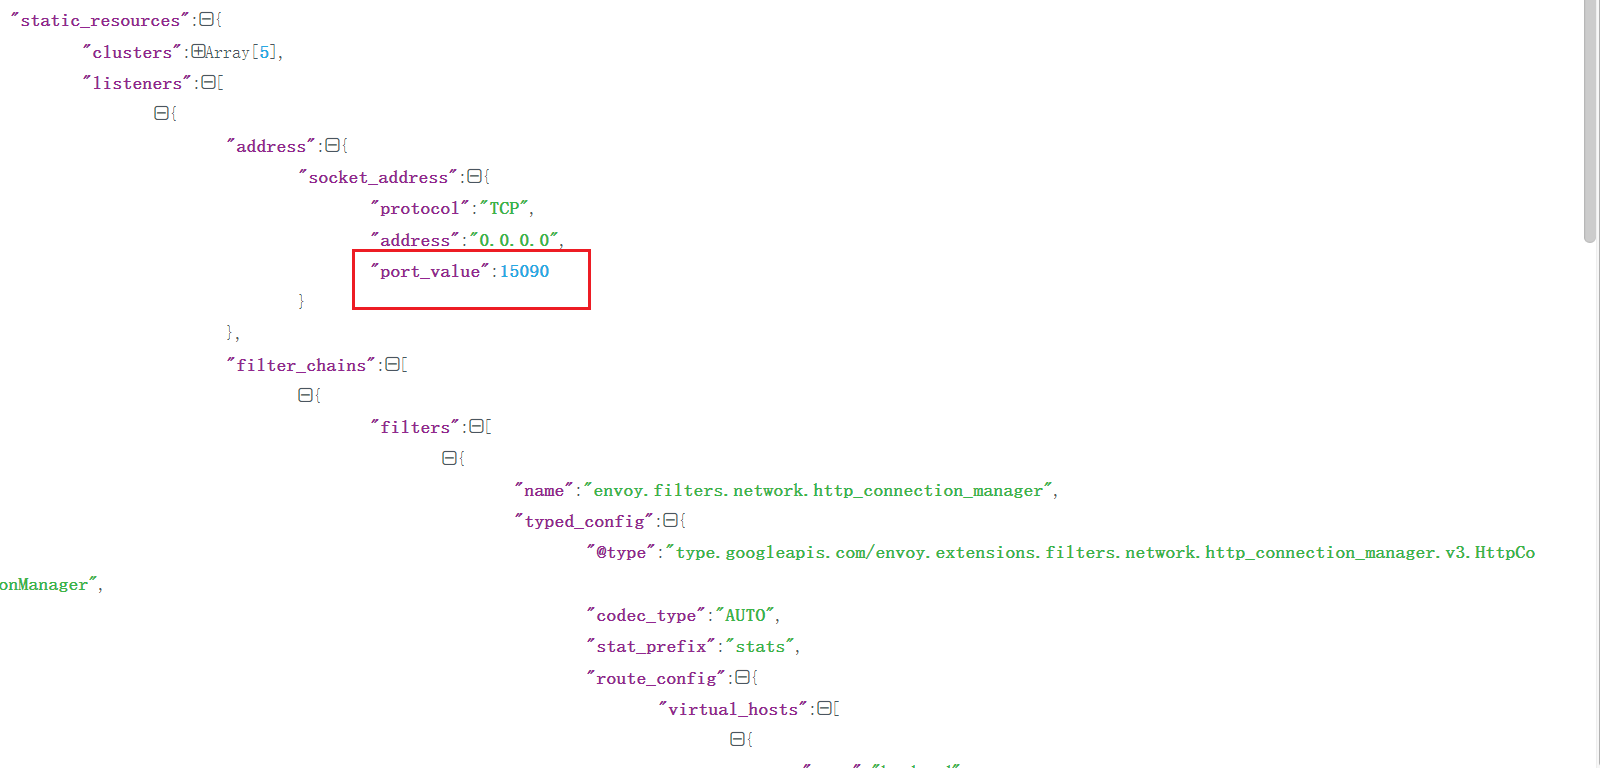
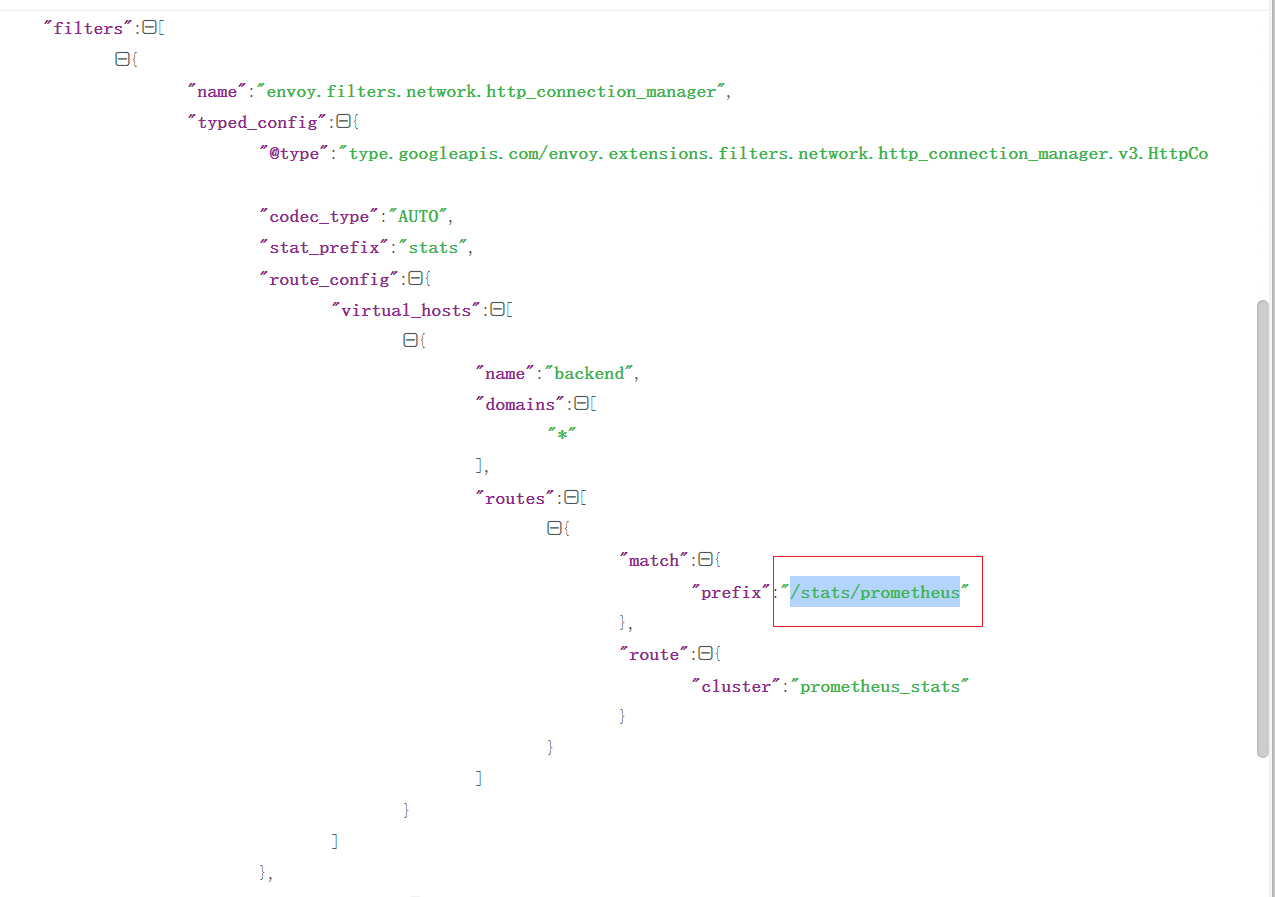
[root@master1 ~]#kubectl get po -nistio-system -owide
NAME                                    READY   STATUS    RESTARTS   AGE     IP            NODE    NOMINATED NODE   READINESS GATES
grafana-86b7d46c86-zphx2                1/1     Running   0          4h38m   10.244.2.15   node1   <none>           <none>
istio-egressgateway-8477dd44c4-jgpcg    1/1     Running   0          18h     10.244.1.18   node2   <none>           <none>
istio-ingressgateway-5c58fcb646-df7rz   1/1     Running   0          18h     10.244.1.19   node2   <none>           <none>
istiod-5d9595449c-8tt97                 1/1     Running   0          18h     10.244.1.17   node2   <none>           <none>
jaeger-594658fc5b-789s6                 1/1     Running   0          4h38m   10.244.2.16   node1   <none>           <none>
kiali-6ff88d695b-2rwtk                  1/1     Running   0          4h38m   10.244.1.25   node2   <none>           <none>
prometheus-67599c8d5c-gdhv9             2/2     Running   0          4h38m   10.244.2.17   node1   <none>           <none>
[root@master1 ~]#curl 10.244.1.19:15090/stats/prometheus
……
# TYPE envoy_server_initialization_time_ms histogram
envoy_server_initialization_time_ms_bucket{le="0.5"} 0
envoy_server_initialization_time_ms_bucket{le="1"} 0
envoy_server_initialization_time_ms_bucket{le="5"} 0
envoy_server_initialization_time_ms_bucket{le="10"} 0
envoy_server_initialization_time_ms_bucket{le="25"} 0
envoy_server_initialization_time_ms_bucket{le="50"} 0
envoy_server_initialization_time_ms_bucket{le="100"} 0
envoy_server_initialization_time_ms_bucket{le="250"} 1
envoy_server_initialization_time_ms_bucket{le="500"} 1
envoy_server_initialization_time_ms_bucket{le="1000"} 1
envoy_server_initialization_time_ms_bucket{le="2500"} 1
envoy_server_initialization_time_ms_bucket{le="5000"} 1
envoy_server_initialization_time_ms_bucket{le="10000"} 1
envoy_server_initialization_time_ms_bucket{le="30000"} 1
envoy_server_initialization_time_ms_bucket{le="60000"} 1
envoy_server_initialization_time_ms_bucket{le="300000"} 1
envoy_server_initialization_time_ms_bucket{le="600000"} 1
envoy_server_initialization_time_ms_bucket{le="1800000"} 1
envoy_server_initialization_time_ms_bucket{le="3600000"} 1
envoy_server_initialization_time_ms_bucket{le="+Inf"} 1
envoy_server_initialization_time_ms_sum{} 125
envoy_server_initialization_time_ms_count{} 1
[root@master1 ~]#
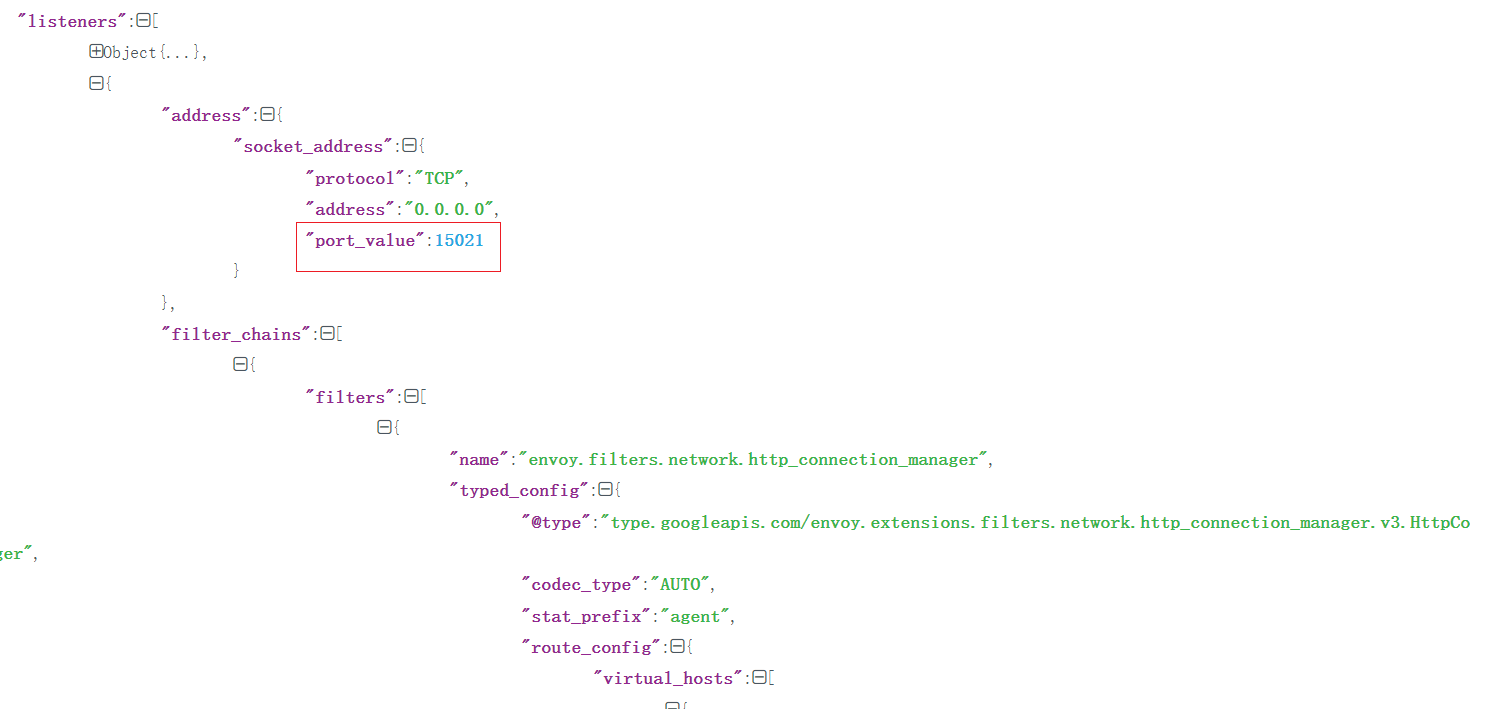
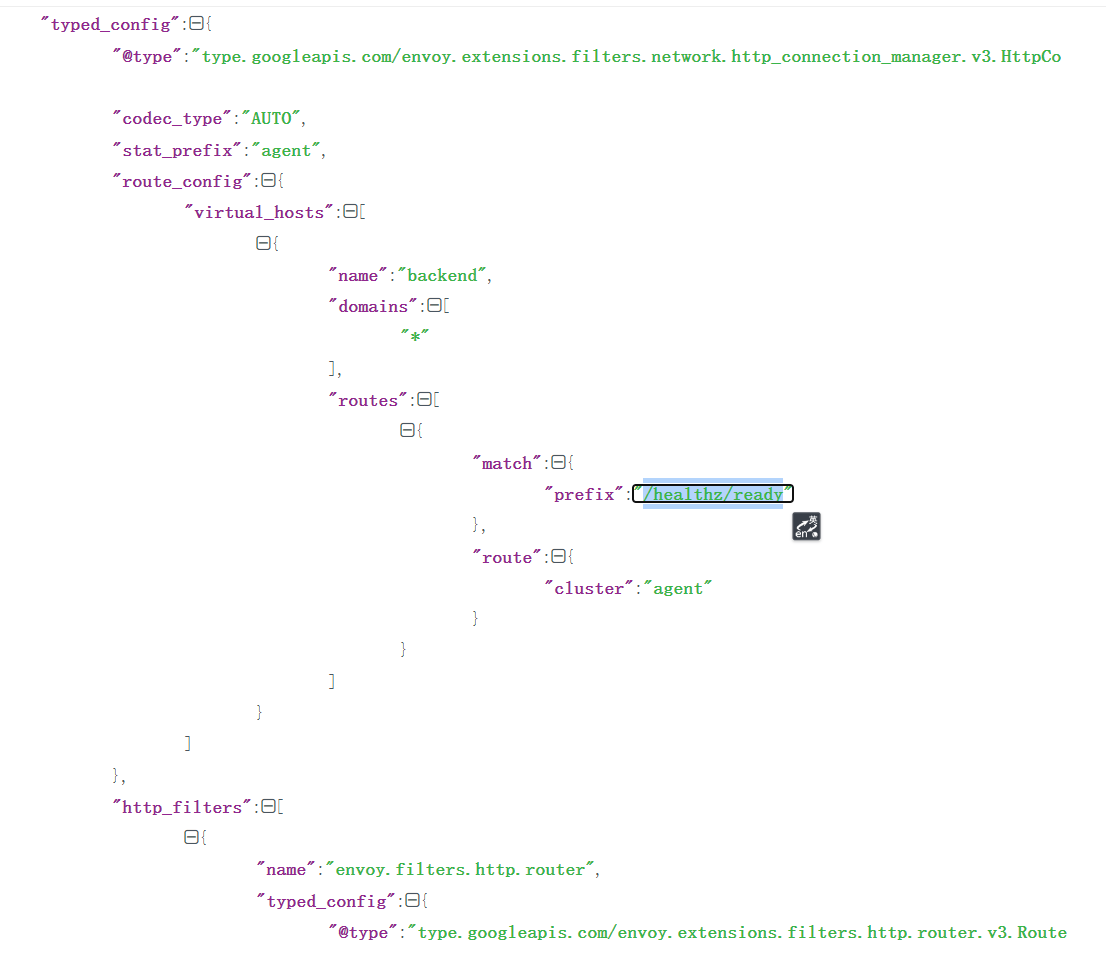
[root@master1 ~]#curl 10.244.1.19:15021/healthz/ready
[root@master1 ~]#curl 10.244.1.19:15021/healthz/ready
[root@master1 ~]#

[root@master1 ~]#kubectl get deploy istio-ingressgateway -nistio-system -oyaml
……
readinessProbe:
          failureThreshold: 30
          httpGet:
            path: /healthz/ready
            port: 15021
            scheme: HTTP
          initialDelaySeconds: 1
          periodSeconds: 2
          successThreshold: 1
          timeoutSeconds: 1
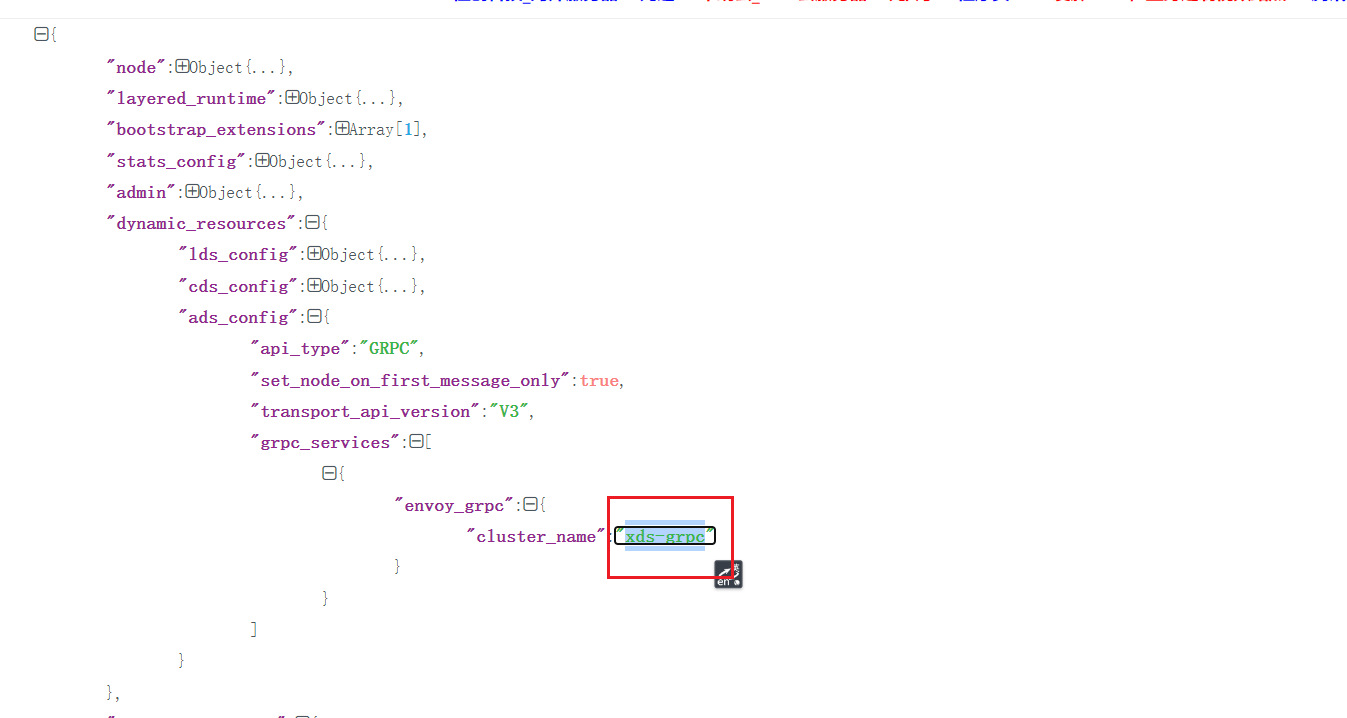
这2个就对的上了:

🍀
但是我们可以利用 Envoy 的 Admin 提供的 config_dump 来查看下配置文件:
kubectl exec istio-ingressgateway-9c8b9b586-s6s48 -c istio-proxy -n istio-system -- curl 'localhost:15000/config_dump' > ingressgateway_envoy_conf.json
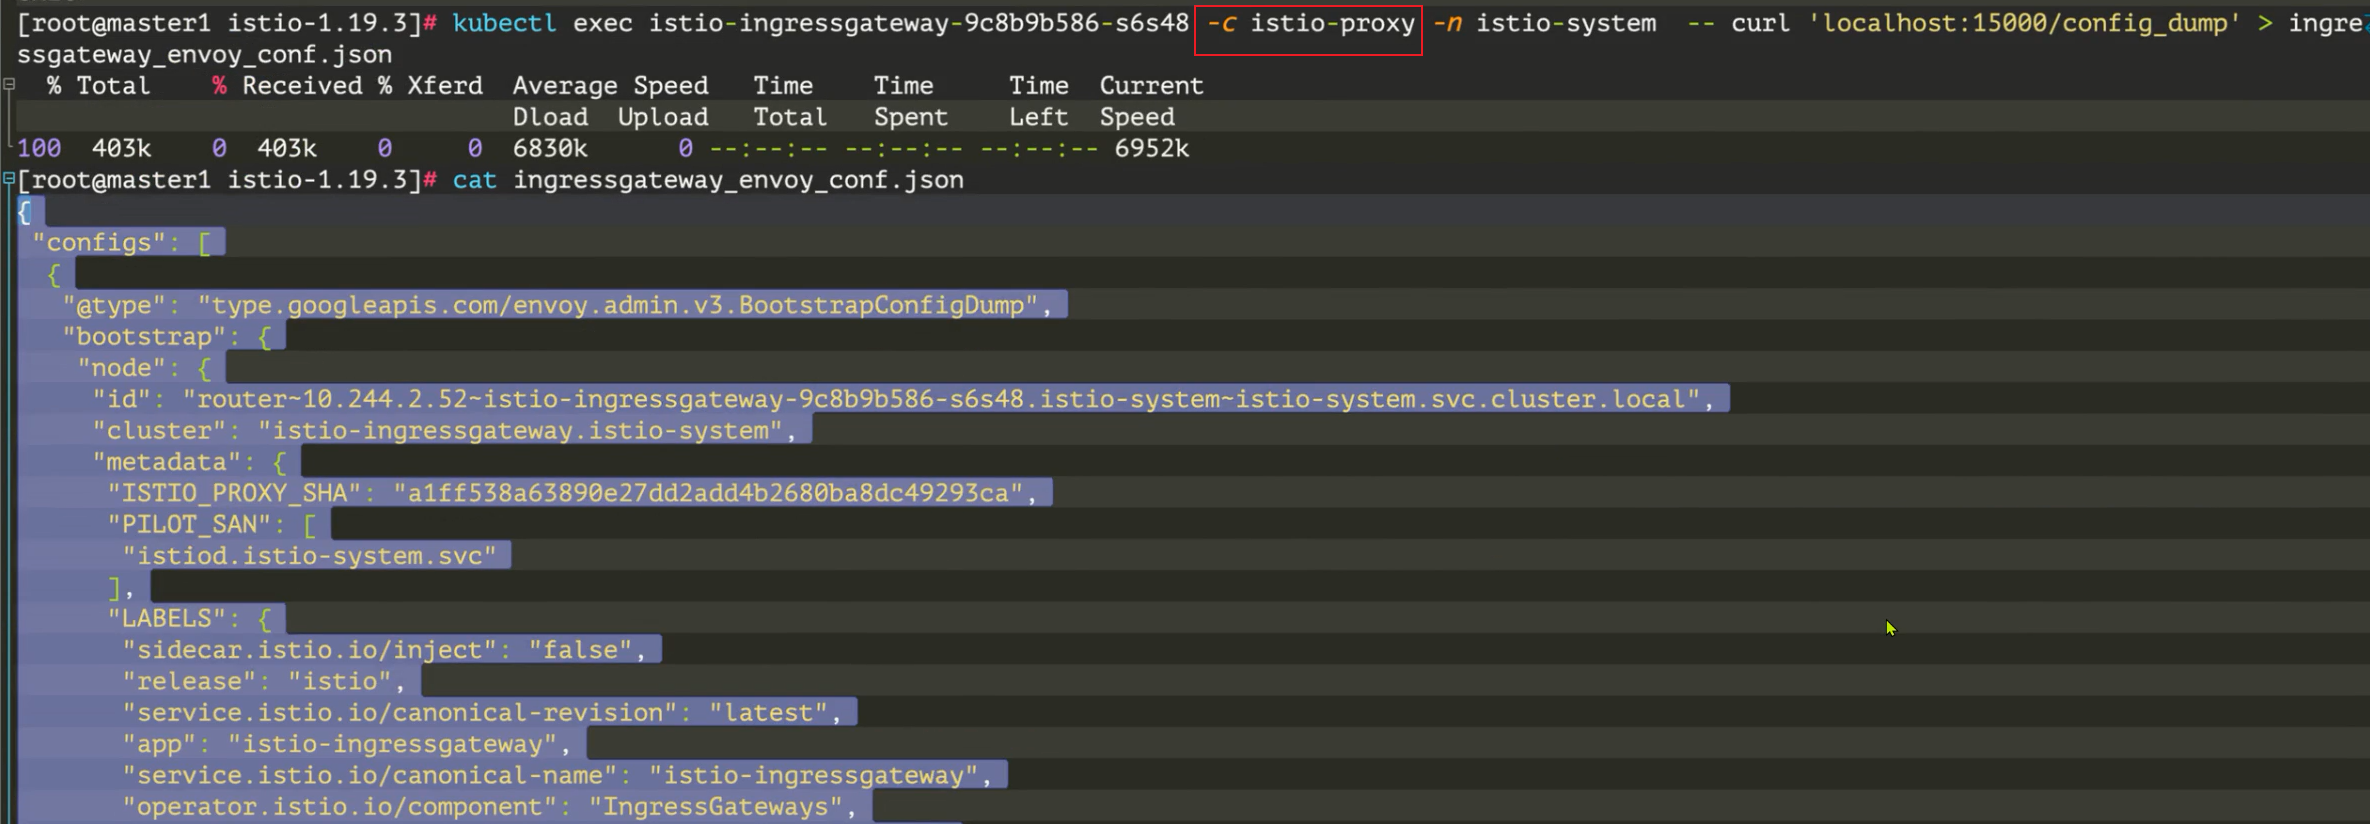
istio envoy 默认配置为 json 格式,导出来的配置文件非常长(有 10000+行),我们可以先只看上层内容:
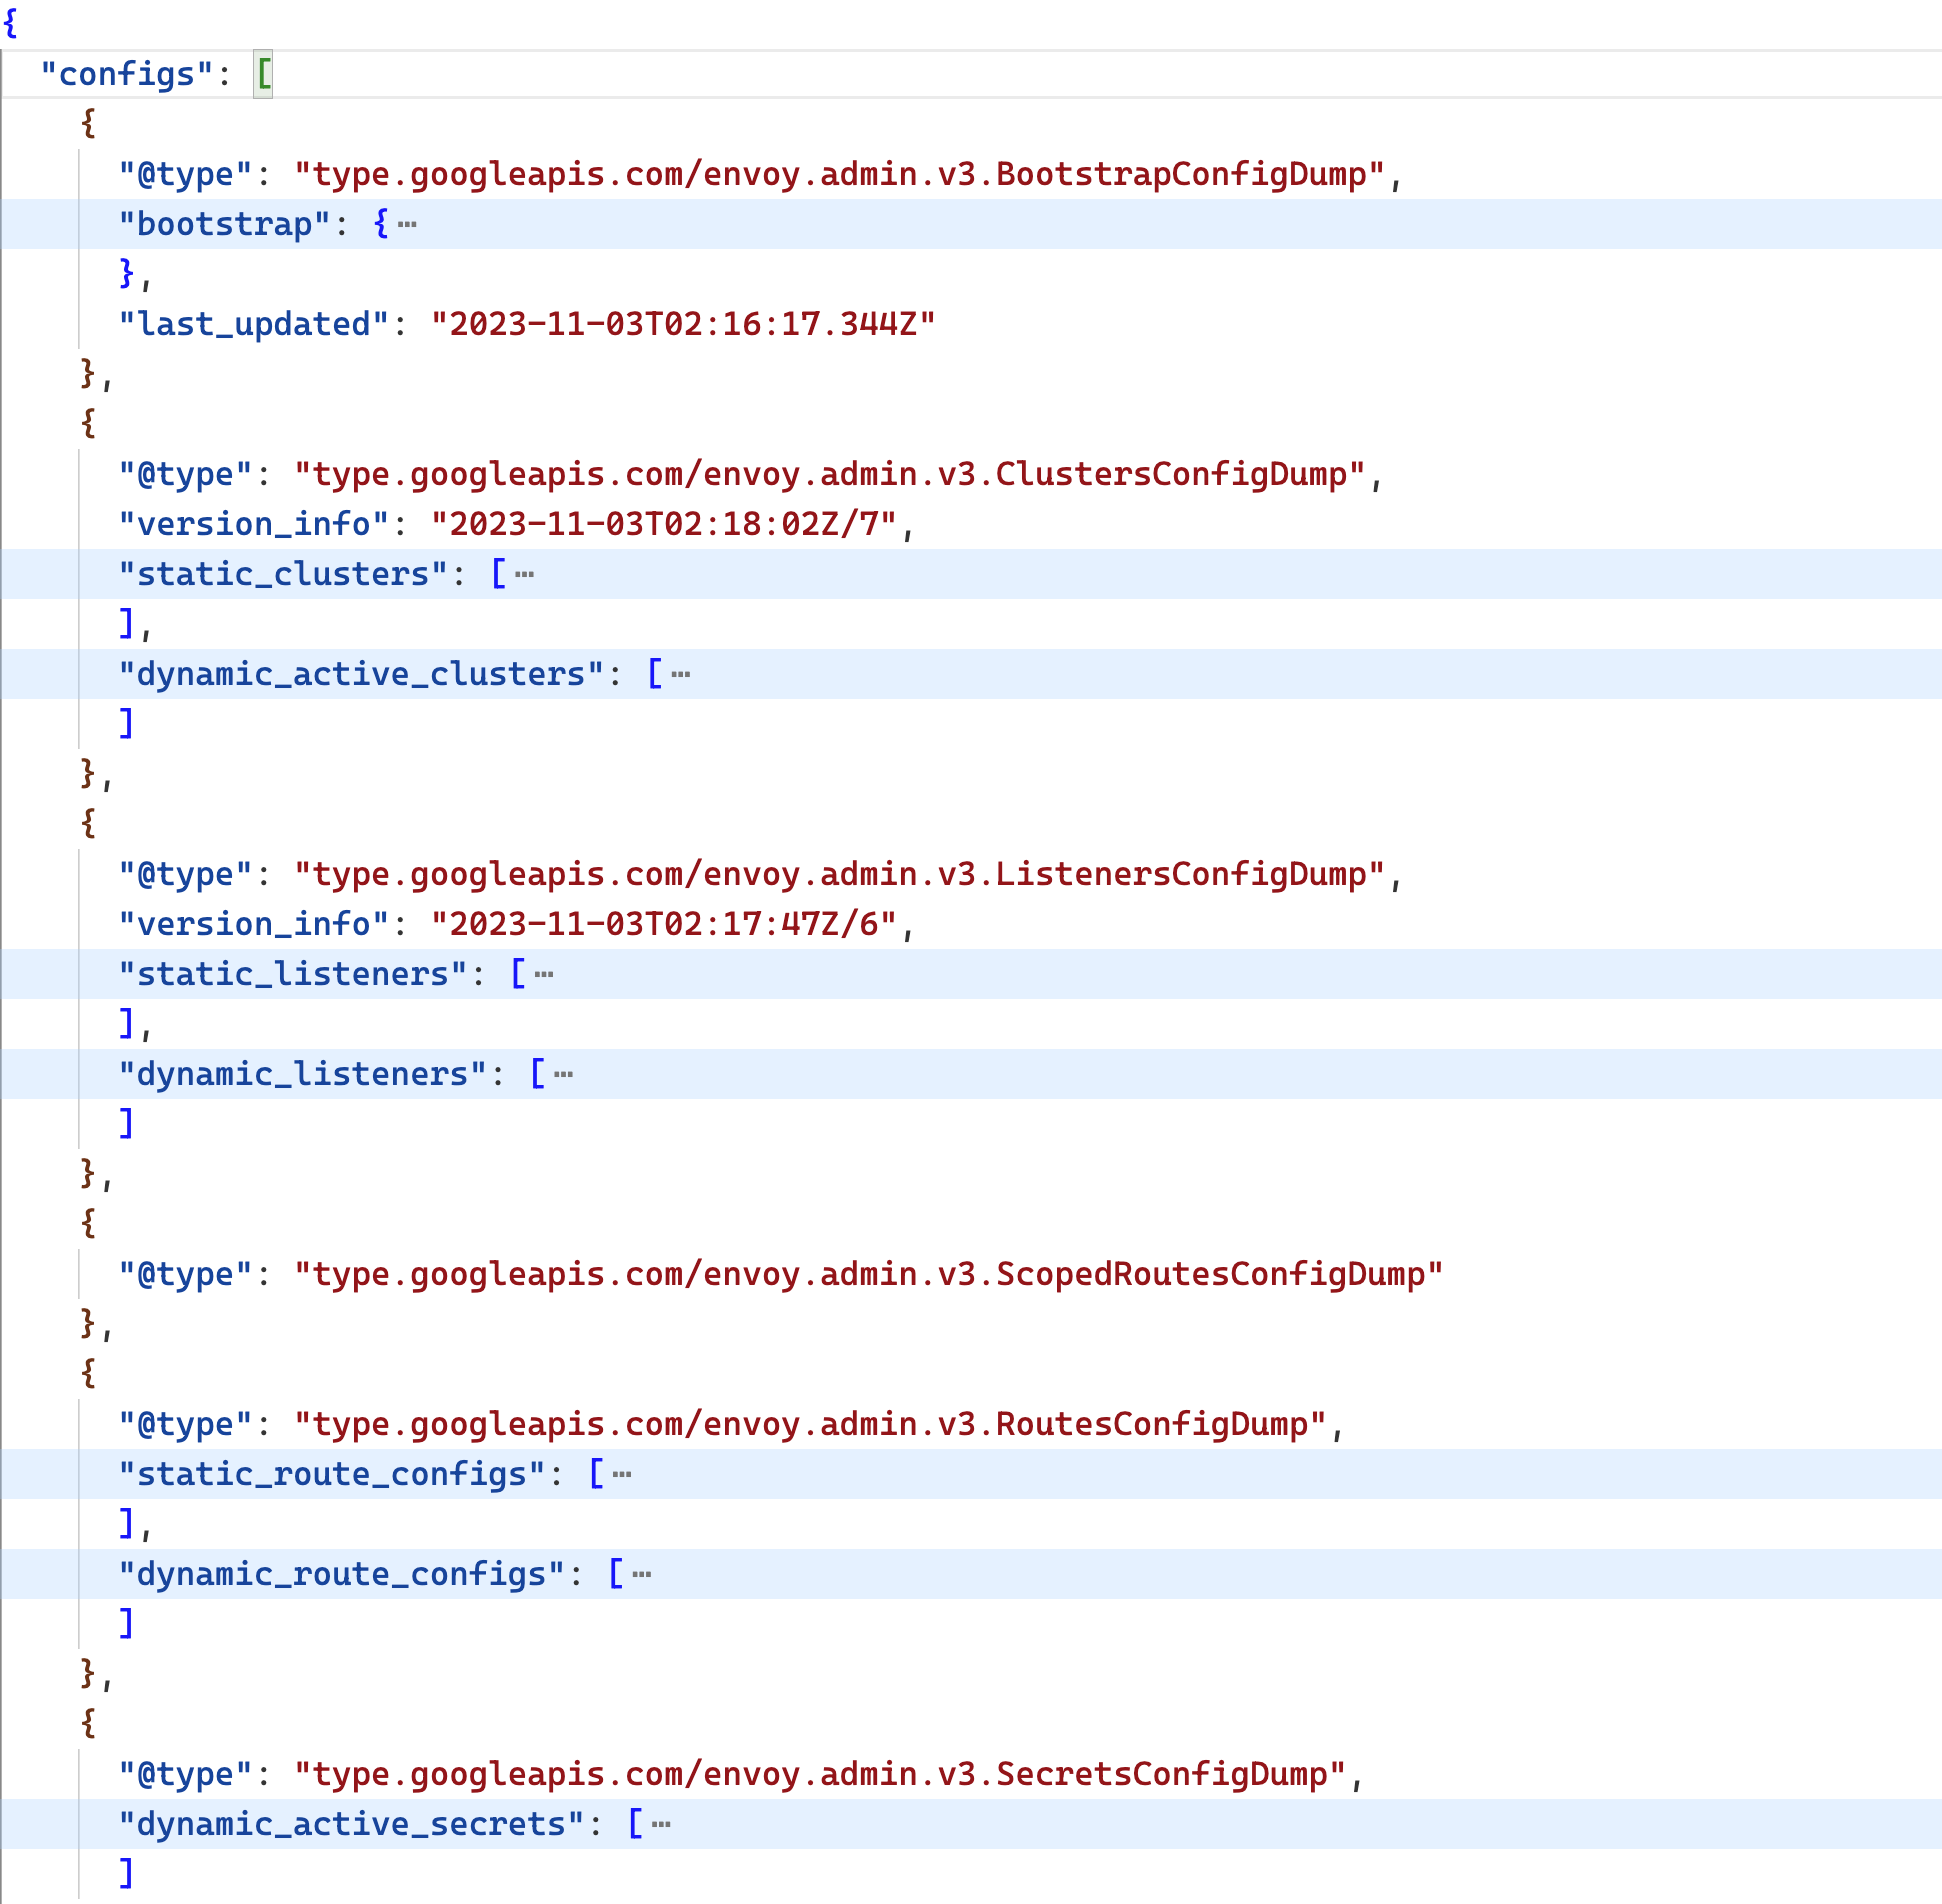
我们可以看到这个配置文件中其实就一个 configs 数组,每个元素都是一项配置,每个配置都指定了一个独特的 @type 字段,来指定该配置是是干嘛的。接下来我们就来看下这个配置文件中的每个配置项都是干嘛的。
BootStrapConfigDump
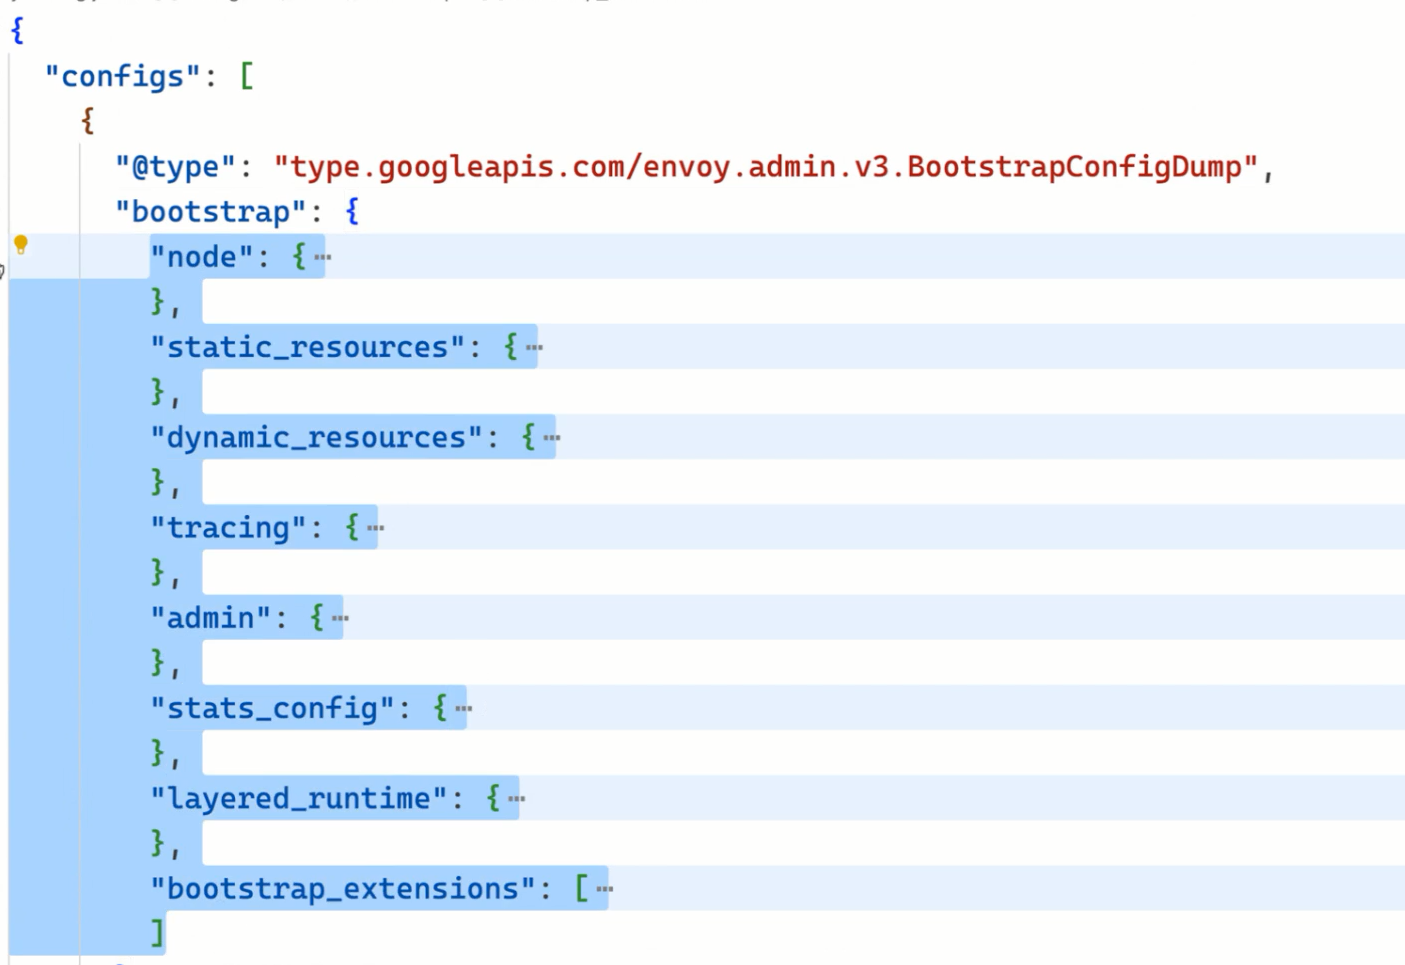
用于在 Envoy 启动时加载的一些静态配置,包括类似 Sidecar 的环境变量等信息。
我们也可以使用 istioctl proxy-config bootstrap 命令来查看这部分配置:
$ istioctl proxy-config bootstrap istio-ingressgateway-9c8b9b586-s6s48 -n istio-system -o yaml
bootstrap:
  admin:
    address:
      socketAddress:
        address: 127.0.0.1
        portValue: 15000
    profilePath: /var/lib/istio/data/envoy.prof
  dynamicResources:  # 动态配置发现服务信息
    adsConfig:
      apiType: GRPC
      grpcServices:
      - envoyGrpc:
          clusterName: xds-grpc
      setNodeOnFirstMessageOnly: true
      transportApiVersion: V3
    cdsConfig:
      ads: {}
      initialFetchTimeout: 0s
      resourceApiVersion: V3
    ldsConfig:
      ads: {}
      initialFetchTimeout: 0s
      resourceApiVersion: V3
  node:  # 节点信息
    cluster: istio-ingressgateway.istio-system
    id: router~10.244.2.52~istio-ingressgateway-9c8b9b586-s6s48.istio-system~istio-system.svc.cluster.local
    # ......
  staticResources:
    clusters:
    - connectTimeout: 0.250s  # prometheus cluster
      loadAssignment:
        clusterName: prometheus_stats
        endpoints:
        - lbEndpoints:
          - endpoint:
              address:
                socketAddress:
                  address: 127.0.0.1
                  portValue: 15000
      name: prometheus_stats
      type: STATIC
    - connectTimeout: 0.250s  # agent cluster
      loadAssignment:
        clusterName: agent
        endpoints:
        - lbEndpoints:
          - endpoint:
              address:
                socketAddress:
                  address: 127.0.0.1
                  portValue: 15020
      name: agent
      type: STATIC
    - connectTimeout: 1s
      loadAssignment:
        clusterName: sds-grpc
        endpoints:
        - lbEndpoints:
          - endpoint:
              address:
                pipe:
                  path: ./var/run/secrets/workload-spiffe-uds/socket
      name: sds-grpc
      type: STATIC
      typedExtensionProtocolOptions:
        envoy.extensions.upstreams.http.v3.HttpProtocolOptions:
          '@type': type.googleapis.com/envoy.extensions.upstreams.http.v3.HttpProtocolOptions
          explicitHttpConfig:
            http2ProtocolOptions: {}
    - circuitBreakers:
        thresholds:
        - maxConnections: 100000
          maxPendingRequests: 100000
          maxRequests: 100000
        - maxConnections: 100000
          maxPendingRequests: 100000
          maxRequests: 100000
          priority: HIGH
      connectTimeout: 1s
      loadAssignment:  # xds-grpc cluster
        clusterName: xds-grpc
        endpoints:
        - lbEndpoints:
          - endpoint:
              address:
                pipe:
                  path: ./etc/istio/proxy/XDS
      maxRequestsPerConnection: 1
      name: xds-grpc
      type: STATIC
      typedExtensionProtocolOptions:
        envoy.extensions.upstreams.http.v3.HttpProtocolOptions:
          '@type': type.googleapis.com/envoy.extensions.upstreams.http.v3.HttpProtocolOptions
          explicitHttpConfig:
            http2ProtocolOptions: {}
      upstreamConnectionOptions:
        tcpKeepalive:
          keepaliveTime: 300
    - connectTimeout: 1s
      dnsLookupFamily: V4_ONLY
      dnsRefreshRate: 30s
      loadAssignment:  # zipkin cluster
        clusterName: zipkin
        endpoints:
        - lbEndpoints:
          - endpoint:
              address:
                socketAddress:
                  address: zipkin.istio-system
                  portValue: 9411
      name: zipkin
      respectDnsTtl: true
      type: STRICT_DNS
    listeners:
    - address:
        socketAddress:
          address: 0.0.0.0
          portValue: 15090  # prometheus listener
      filterChains:
      - filters:
        - name: envoy.filters.network.http_connection_manager
          typedConfig:
            '@type': type.googleapis.com/envoy.extensions.filters.network.http_connection_manager.v3.HttpConnectionManager
            httpFilters:
            - name: envoy.filters.http.router
              typedConfig:
                '@type': type.googleapis.com/envoy.extensions.filters.http.router.v3.Router
            routeConfig:
              virtualHosts:
              - domains:
                - '*'
                name: backend
                routes:
                - match:
                    prefix: /stats/prometheus
                  route:
                    cluster: prometheus_stats
            statPrefix: stats
    - address:
        socketAddress:
          address: 0.0.0.0
          portValue: 15021  # agent listener(健康检查)
      filterChains:
      - filters:
        - name: envoy.filters.network.http_connection_manager
          typedConfig:
            '@type': type.googleapis.com/envoy.extensions.filters.network.http_connection_manager.v3.HttpConnectionManager
            httpFilters:
            - name: envoy.filters.http.router
              typedConfig:
                '@type': type.googleapis.com/envoy.extensions.filters.http.router.v3.Router
            routeConfig:
              virtualHosts:
              - domains:
                - '*'
                name: backend
                routes:
                - match:
                    prefix: /healthz/ready
                  route:
                    cluster: agent
            statPrefix: agent
  statsConfig:
  # ......
  tracing: # 链路追踪
    http:
      name: envoy.tracers.zipkin
      typedConfig:
        '@type': type.googleapis.com/envoy.config.trace.v3.ZipkinConfig
        collectorCluster: zipkin
        collectorEndpoint: /api/v2/spans
        collectorEndpointVersion: HTTP_JSON
        sharedSpanContext: false
        traceId128bit: true
上面的配置和之前我们介绍的 Envoy 配置基本一致,在上面配置中定义了一个 Prometheus 监听器,用来暴露 Prometheus 监控指标,还定义了一个 Agent 监听器,用来暴露健康检查接口,另外还定义了一个 zipkin 集群,用来定义链路追踪的配置。另外通过 dynamicResources 定义了动态配置发现服务信息,xds-grpc 就是用来定义 Envoy 与 Pilot 之间的 xDS 通信的。
ListenersConfigDump
这里存储着 Envoy 的 listeners 配置,也就是 Envoy 的监听器。Envoy 在拦截到请求后,会根据请求的地址与端口,将请求交给匹配的 listener 处理。
我们看到这个 ListenersConfigDump 中的 listener 配置分成了 static_listners 和 dynamic_listeners,分别对应 Envoy 的静态配置和动态配置,静态配置,是 Envoy 配置文件中直接指定的,而 dynamic_listeners的 listener 则是 istiod 通过 xDS 协议为 Envoy 下发的。
同样我们也可以使用 istioctl proxy-config listener 命令来查看这部分配置:
istioctl proxy-config listener istio-ingressgateway-9c8b9b586-s6s48 -n istio-system -o yaml
对应的配置文件如下所示:
- accessLog:
    - filter:
        responseFlagFilter:
          flags:
            - NR
      name: envoy.access_loggers.file
      typedConfig:
        "@type": type.googleapis.com/envoy.extensions.access_loggers.file.v3.FileAccessLog
        logFormat:
          textFormatSource:
            inlineString: |
              [%START_TIME%] "%REQ(:METHOD)% %REQ(X-ENVOY-ORIGINAL-PATH?:PATH)% %PROTOCOL%" %RESPONSE_CODE% %RESPONSE_FLAGS% %RESPONSE_CODE_DETAILS% %CONNECTION_TERMINATION_DETAILS% "%UPSTREAM_TRANSPORT_FAILURE_REASON%" %BYTES_RECEIVED% %BYTES_SENT% %DURATION% %RESP(X-ENVOY-UPSTREAM-SERVICE-TIME)% "%REQ(X-FORWARDED-FOR)%" "%REQ(USER-AGENT)%" "%REQ(X-REQUEST-ID)%" "%REQ(:AUTHORITY)%" "%UPSTREAM_HOST%" %UPSTREAM_CLUSTER% %UPSTREAM_LOCAL_ADDRESS% %DOWNSTREAM_LOCAL_ADDRESS% %DOWNSTREAM_REMOTE_ADDRESS% %REQUESTED_SERVER_NAME% %ROUTE_NAME%
        path: /dev/stdout
  address:
    socketAddress:
      address: 0.0.0.0
      portValue: 8080
  continueOnListenerFiltersTimeout: true
  filterChains:
    - filters:
        - name: istio_authn
          typedConfig:
            "@type": type.googleapis.com/udpa.type.v1.TypedStruct
            typeUrl: type.googleapis.com/io.istio.network.authn.Config
        - name: envoy.filters.network.http_connection_manager
          typedConfig:
            "@type": type.googleapis.com/envoy.extensions.filters.network.http_connection_manager.v3.HttpConnectionManager
            accessLog:
              - name: envoy.access_loggers.file
                typedConfig:
                  "@type": type.googleapis.com/envoy.extensions.access_loggers.file.v3.FileAccessLog
                  logFormat:
                    textFormatSource:
                      inlineString: |
                        [%START_TIME%] "%REQ(:METHOD)% %REQ(X-ENVOY-ORIGINAL-PATH?:PATH)% %PROTOCOL%" %RESPONSE_CODE% %RESPONSE_FLAGS% %RESPONSE_CODE_DETAILS% %CONNECTION_TERMINATION_DETAILS% "%UPSTREAM_TRANSPORT_FAILURE_REASON%" %BYTES_RECEIVED% %BYTES_SENT% %DURATION% %RESP(X-ENVOY-UPSTREAM-SERVICE-TIME)% "%REQ(X-FORWARDED-FOR)%" "%REQ(USER-AGENT)%" "%REQ(X-REQUEST-ID)%" "%REQ(:AUTHORITY)%" "%UPSTREAM_HOST%" %UPSTREAM_CLUSTER% %UPSTREAM_LOCAL_ADDRESS% %DOWNSTREAM_LOCAL_ADDRESS% %DOWNSTREAM_REMOTE_ADDRESS% %REQUESTED_SERVER_NAME% %ROUTE_NAME%
                  path: /dev/stdout
            forwardClientCertDetails: SANITIZE_SET
            httpFilters:
              - name: istio.metadata_exchange
                typedConfig:
                  "@type": type.googleapis.com/udpa.type.v1.TypedStruct
                  typeUrl: type.googleapis.com/io.istio.http.peer_metadata.Config
                  value:
                    upstream_discovery:
                      - istio_headers: {}
                      - workload_discovery: {}
                    upstream_propagation:
                      - istio_headers: {}
              - name: envoy.filters.http.grpc_stats
                typedConfig:
                  "@type": type.googleapis.com/envoy.extensions.filters.http.grpc_stats.v3.FilterConfig
                  emitFilterState: true
                  statsForAllMethods: false
              - name: istio.alpn
                typedConfig:
                  "@type": type.googleapis.com/istio.envoy.config.filter.http.alpn.v2alpha1.FilterConfig
                  alpnOverride:
                    - alpnOverride:
                        - istio-http/1.0
                        - istio
                        - http/1.0
                    - alpnOverride:
                        - istio-http/1.1
                        - istio
                        - http/1.1
                      upstreamProtocol: HTTP11
                    - alpnOverride:
                        - istio-h2
                        - istio
                        - h2
                      upstreamProtocol: HTTP2
              - name: envoy.filters.http.fault
                typedConfig:
                  "@type": type.googleapis.com/envoy.extensions.filters.http.fault.v3.HTTPFault
              - name: envoy.filters.http.cors
                typedConfig:
                  "@type": type.googleapis.com/envoy.extensions.filters.http.cors.v3.Cors
              - name: istio.stats
                typedConfig:
                  "@type": type.googleapis.com/stats.PluginConfig
                  disableHostHeaderFallback: true
              - name: envoy.filters.http.router
                typedConfig:
                  "@type": type.googleapis.com/envoy.extensions.filters.http.router.v3.Router
            httpProtocolOptions: {}
            normalizePath: true
            pathWithEscapedSlashesAction: KEEP_UNCHANGED
            rds:
              configSource:
                ads: {}
                initialFetchTimeout: 0s
                resourceApiVersion: V3
              routeConfigName: http.8080
            requestIdExtension:k
              typedConfig:
                "@type": type.googleapis.com/envoy.extensions.request_id.uuid.v3.UuidRequestIdConfig
                useRequestIdForTraceSampling: true
            serverName: istio-envoy
            setCurrentClientCertDetails:
              cert: true
              dns: true
              subject: true
              uri: true
            statPrefix: outbound_0.0.0.0_8080
            streamIdleTimeout: 0s
            tracing:
              # ......
            upgradeConfigs:
              - upgradeType: websocket
            useRemoteAddress: true
  name: 0.0.0.0_8080
  trafficDirection: OUTBOUND
- address:
    socketAddress:
      address: 0.0.0.0
      portValue: 15090
  # ......
- address:
    socketAddress:
      address: 0.0.0.0
      portValue: 15021
  # ......
虽然上面看到的 listener 配置还是很长,但是我们应该也还是非常熟悉的,本质就是 Envoy 的配置文件中的 listener 配置。我们这里重点看下动态配置对应的配置,静态的就是前面指定 prometheus 和 agent 对应的监听器配置。
我们可以看到上面的动态配置对应的监听器名称为 0.0.0.0_8080,对应的监听地址为 0.0.0.0:8080,也就是说在 Envoy 中监听了 8080 端口:
address:
  socketAddress:
    address: 0.0.0.0
    portValue: 8080
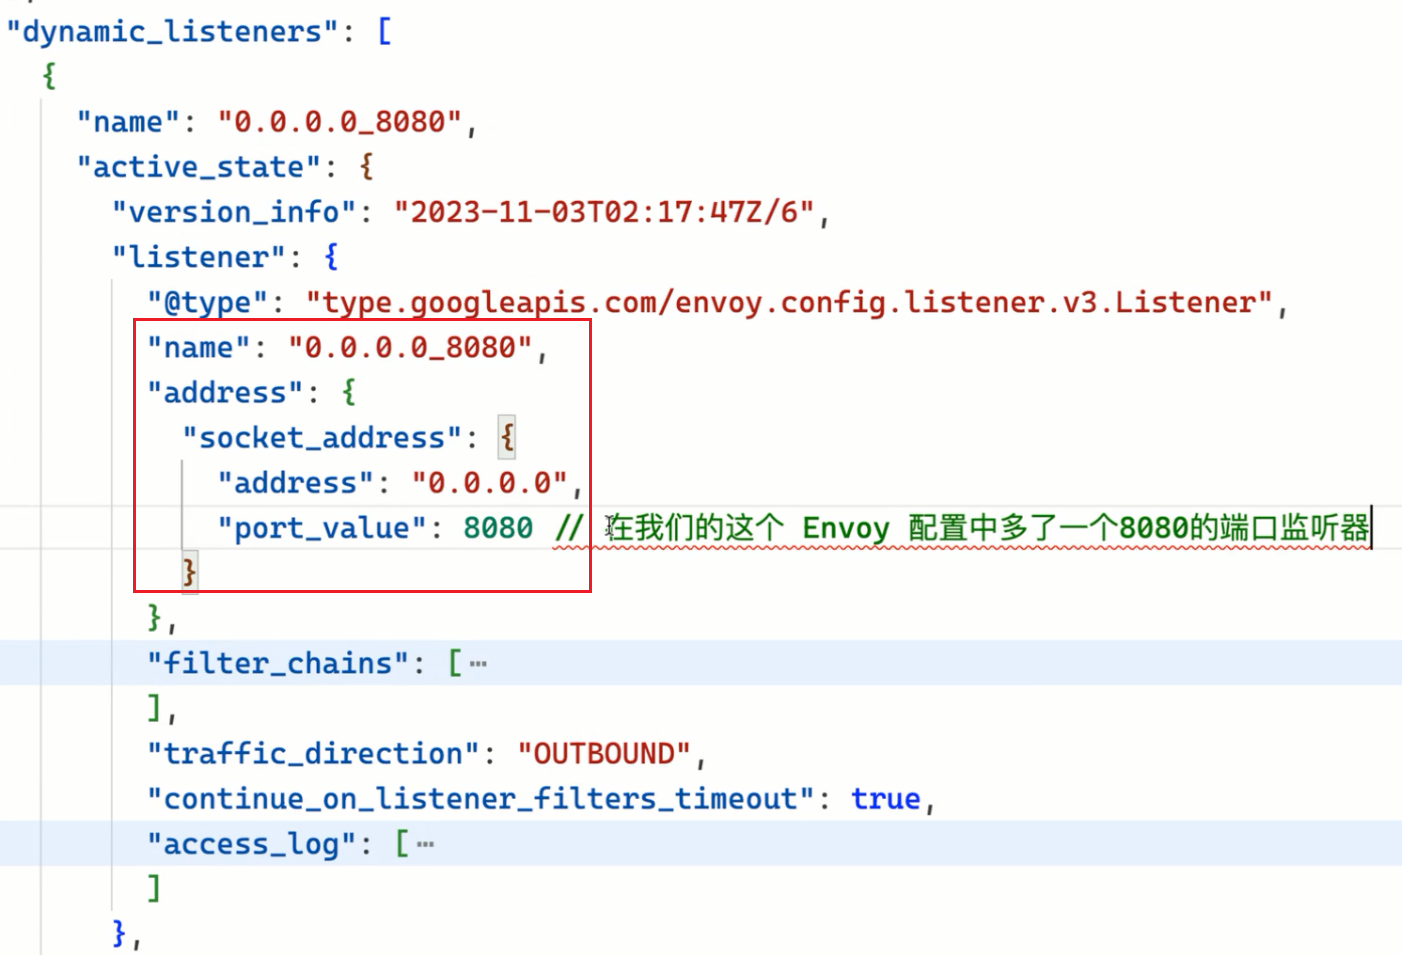
而前面我们是不是创建了一个 Gateway 资源对象,并指定了 8080 端口,其实这个端口就是我们前面创建的 Gateway 对象中定义的端口,这个监听器的配置就是通过 istiod 通过 xDS 协议下发的。
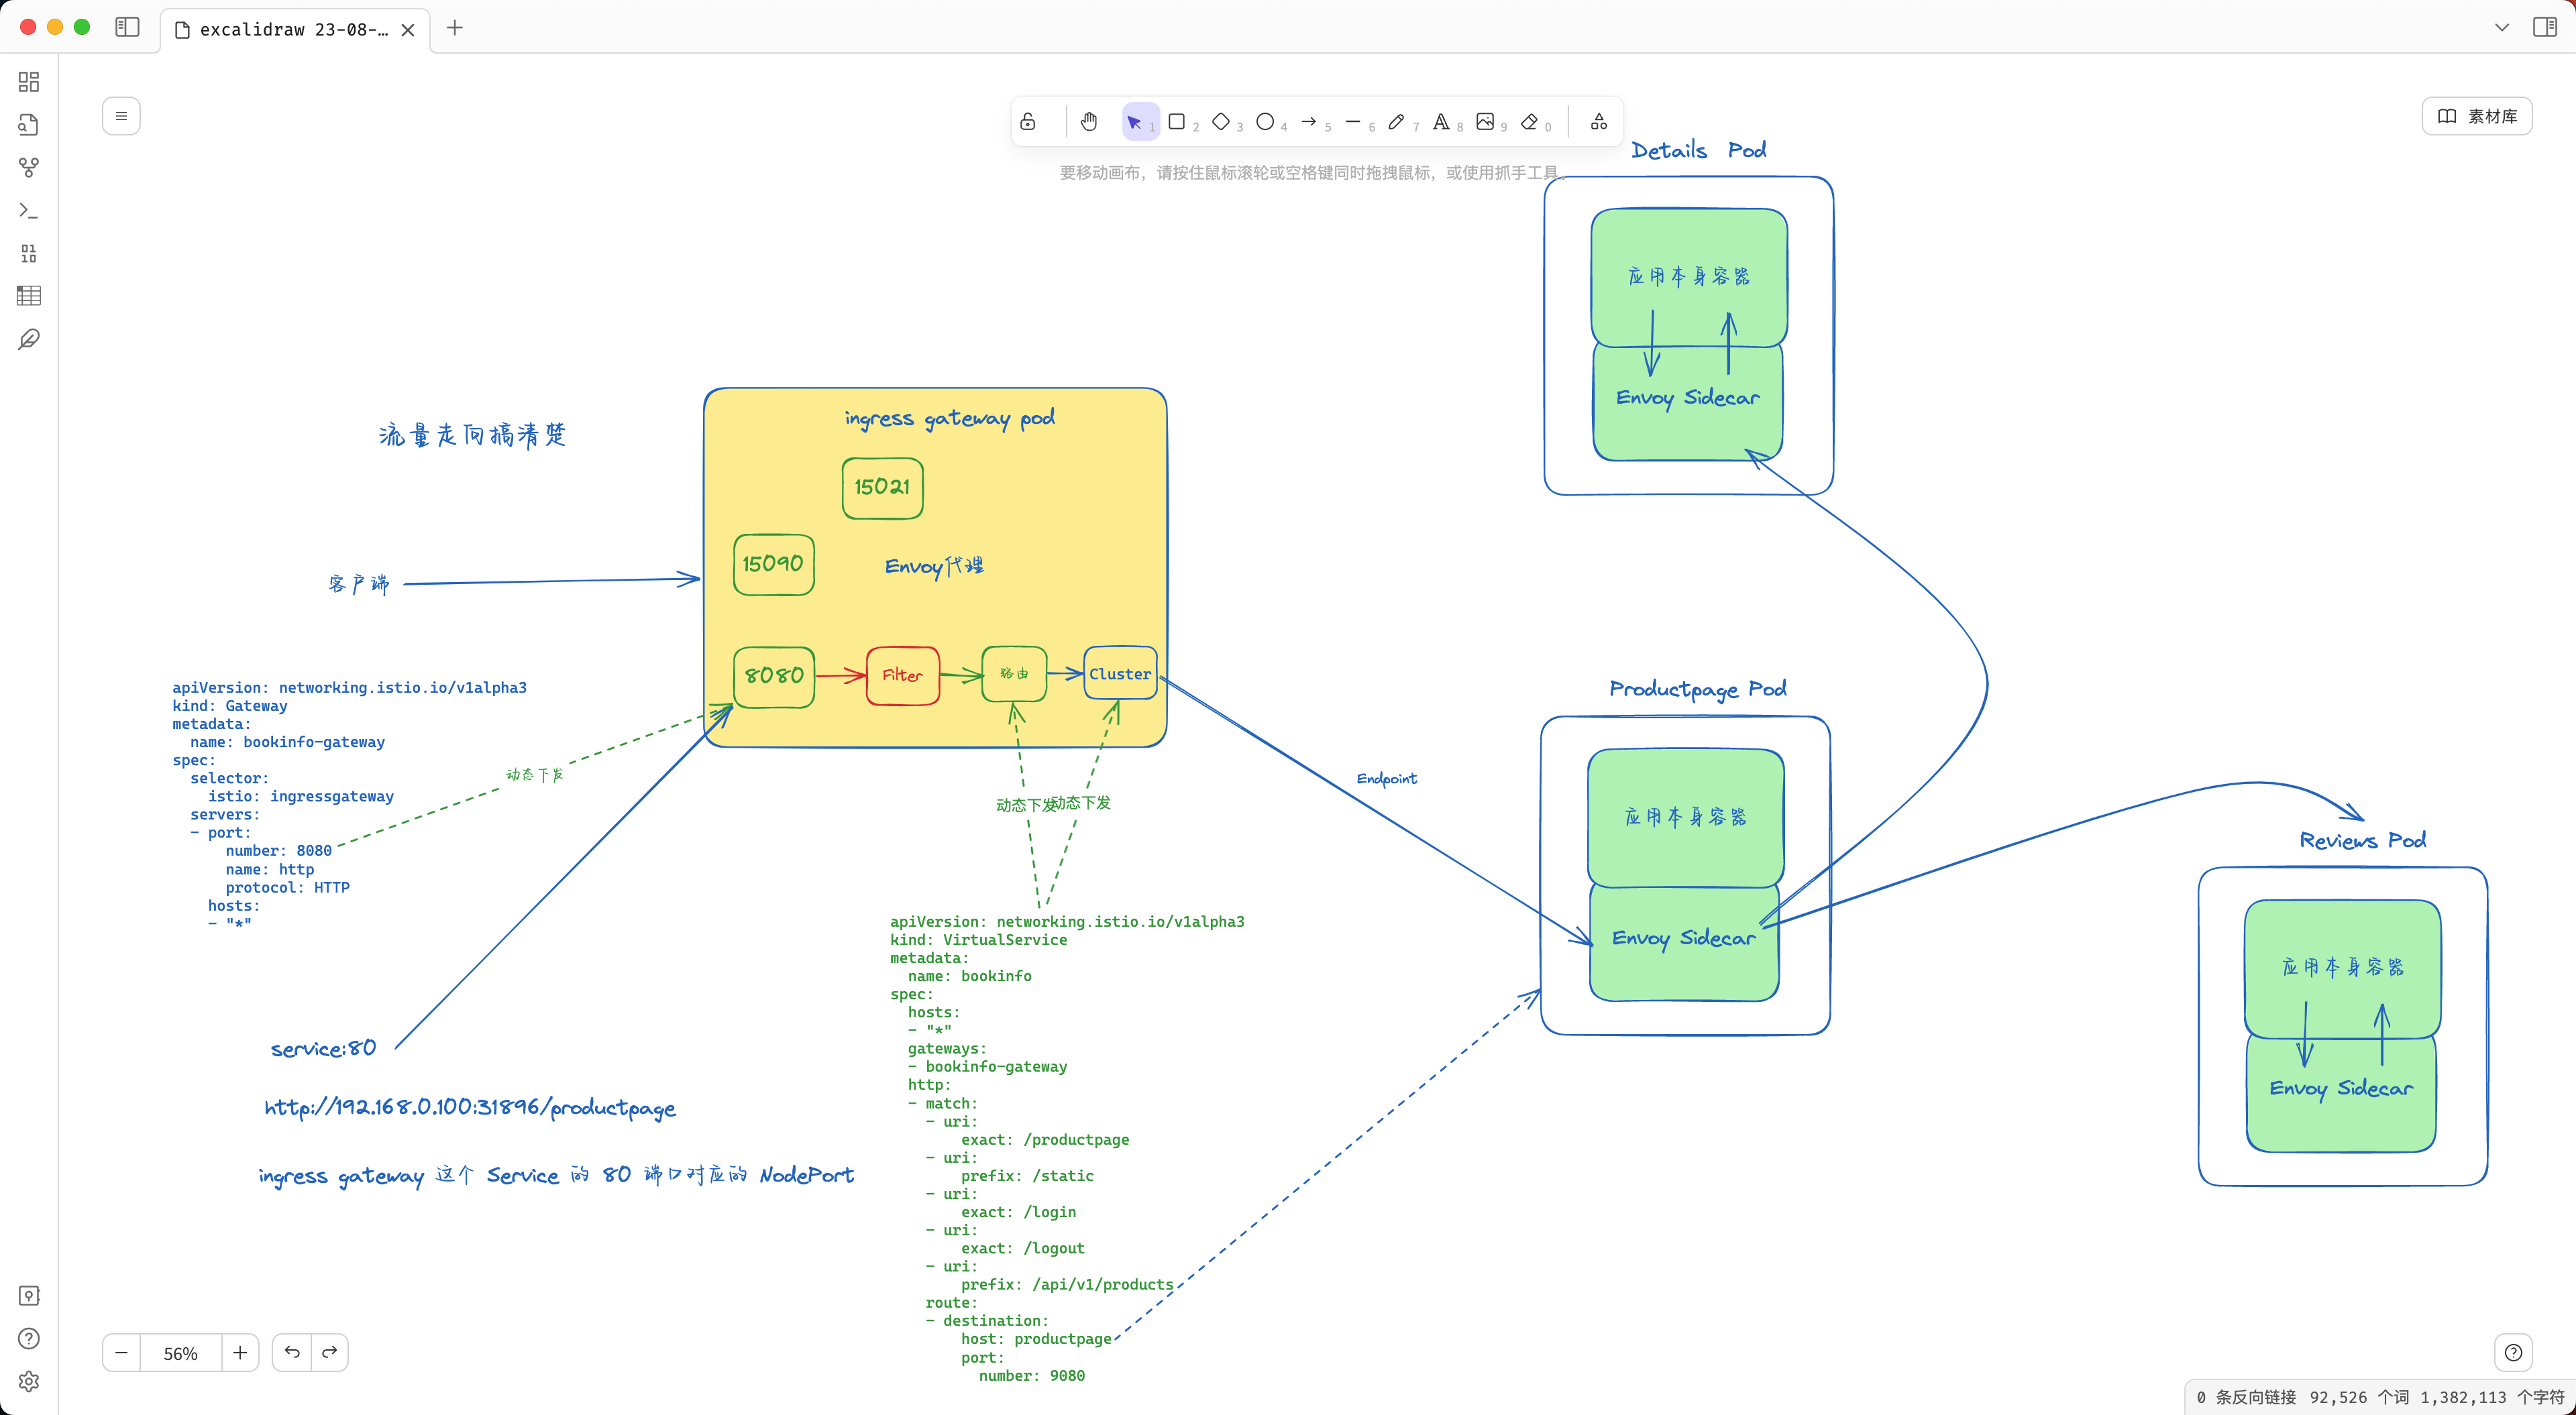
那么请求是如何到达这个监听器的呢?我们可以查看下 istio-ingressgateway 组建的 Service 数据:
$ kubectl get svc istio-ingressgateway -n istio-system
NAME                   TYPE           CLUSTER-IP      EXTERNAL-IP   PORT(S)                                                                      AGE
istio-ingressgateway   LoadBalancer   10.103.227.57   <pending>     15021:32459/TCP,80:31896/TCP,443:30808/TCP,31400:31535/TCP,15443:30761/TCP   46h
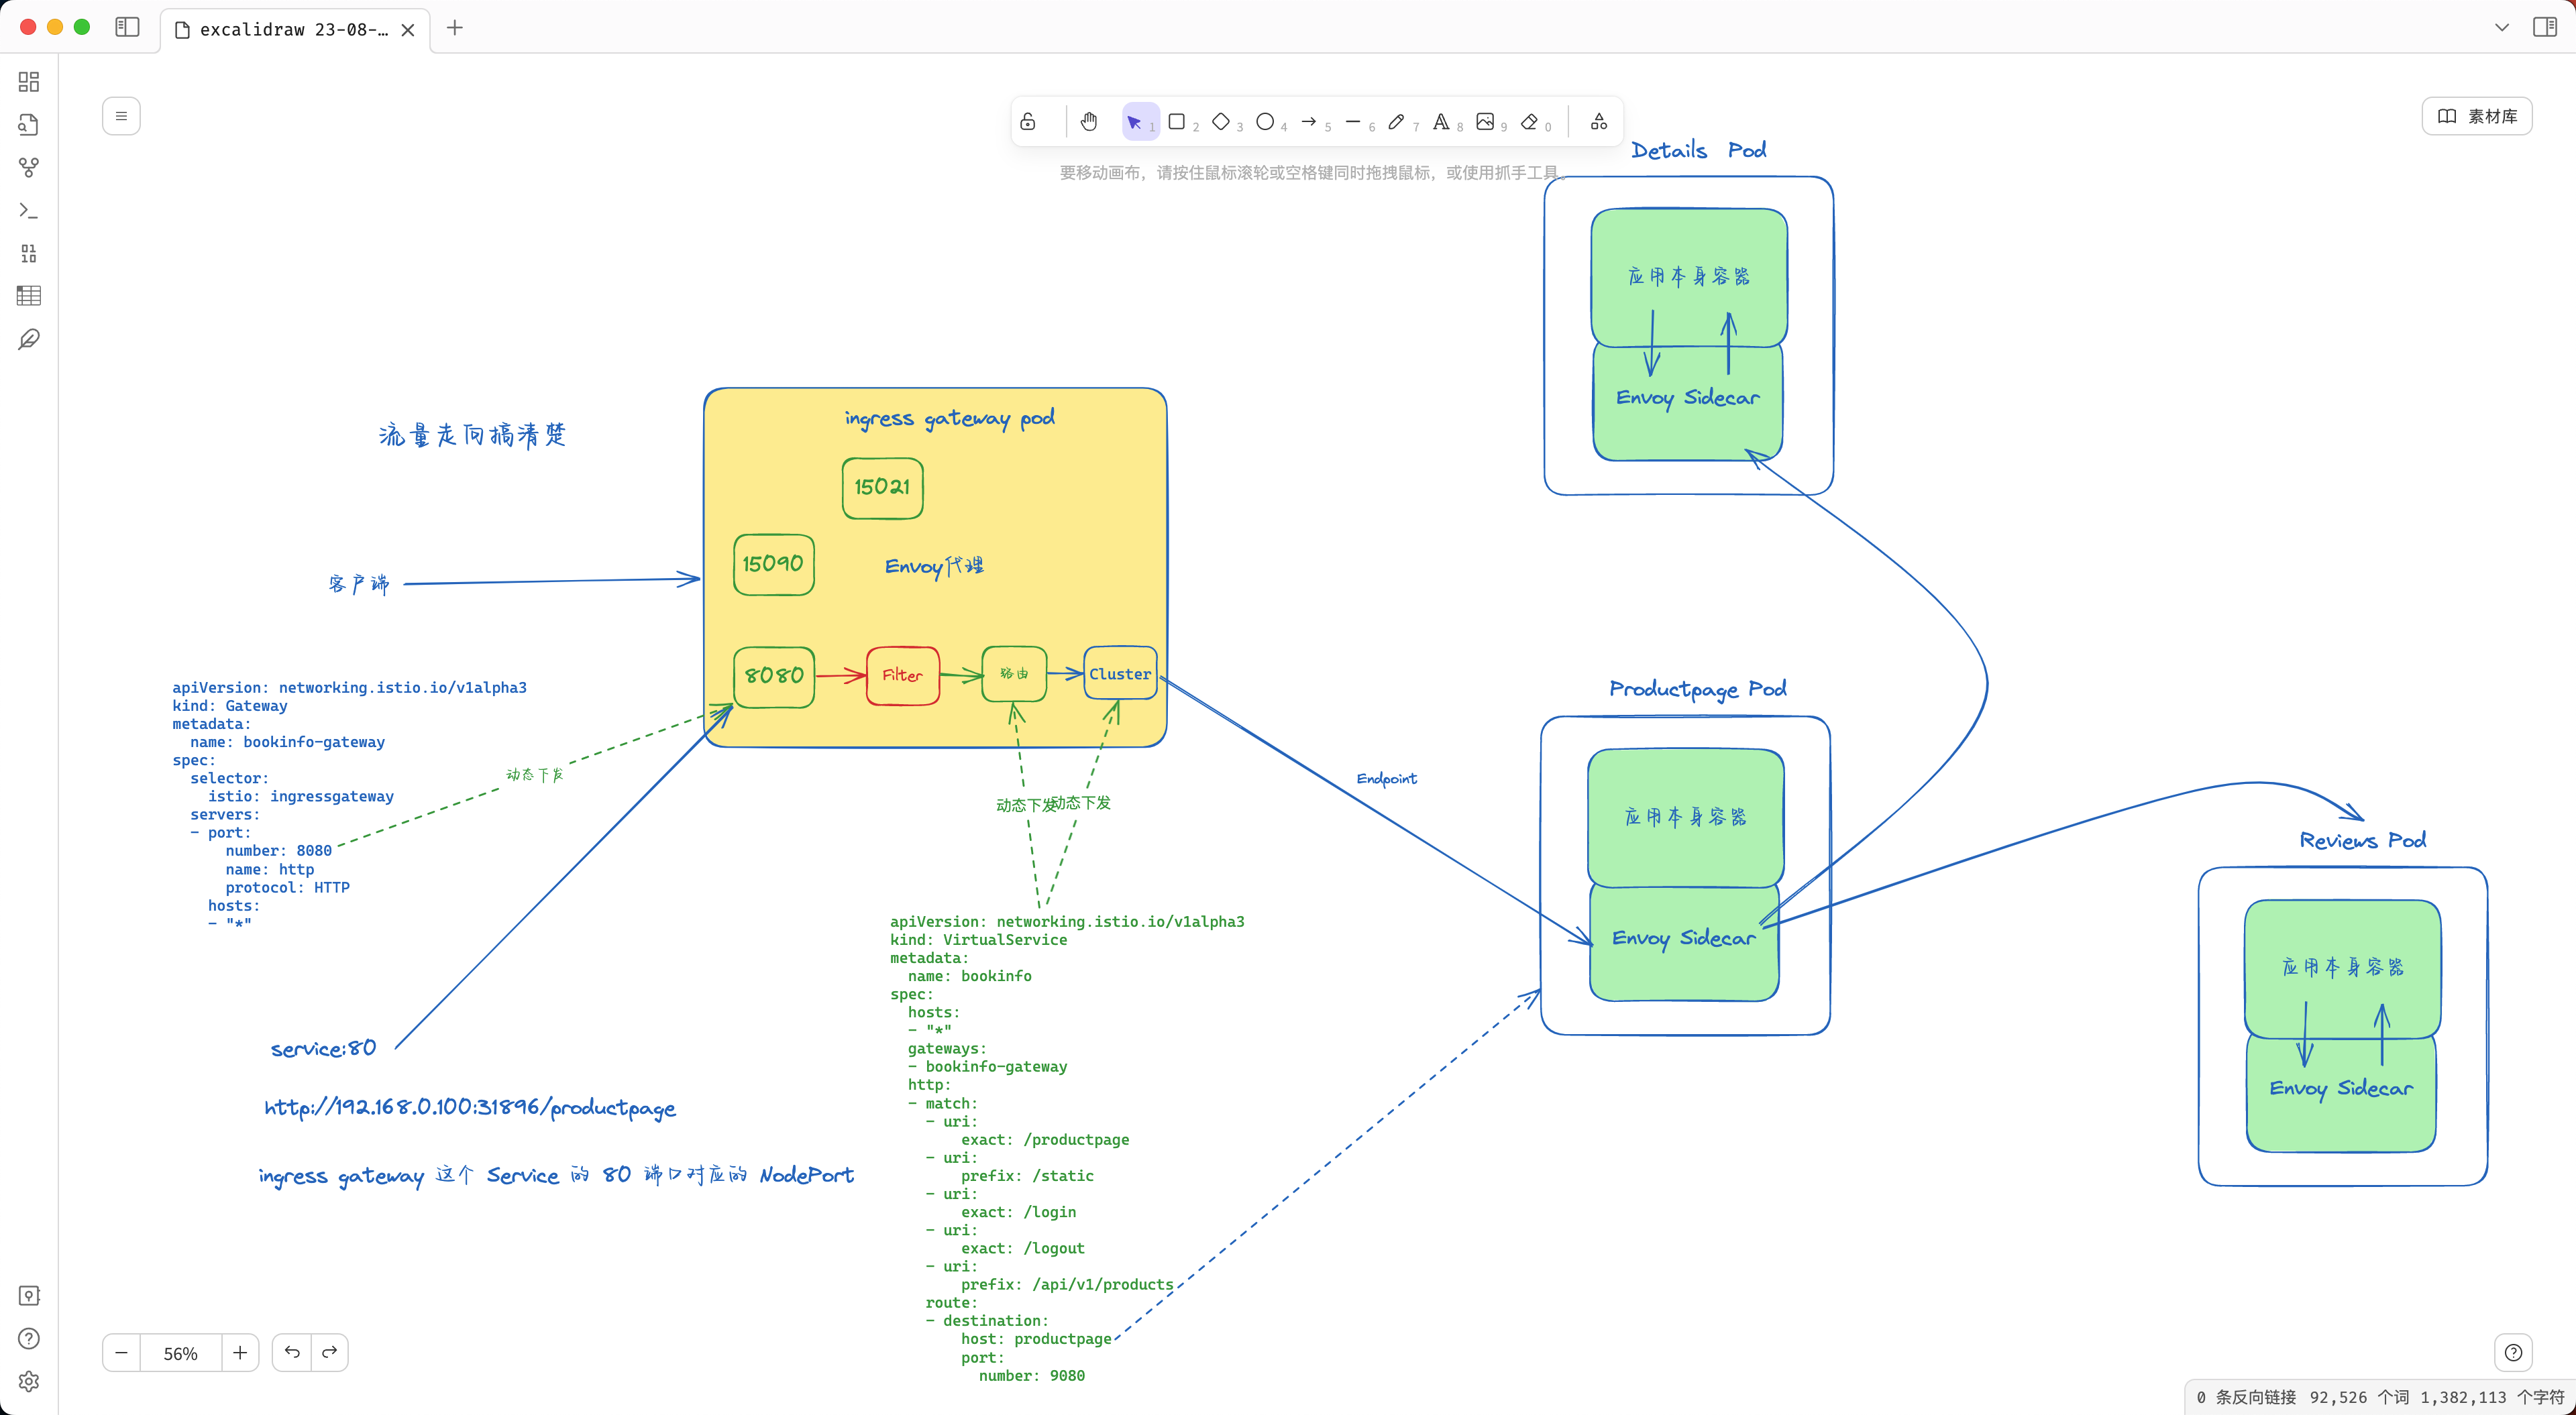
我们可以看到 istio-ingressgateway 组件的 Service 中定义了 5 个端口,还记得前面我们去访问 Productpage 的时候是如何访问的吗?是不是通过 http://$GATEWAY_URL/productpage 访问的,而我们这里没有 LoadBalancer,所以直接使用 NodePort 形式访问就行,最终我们是通过 http://NodeIP:31896/productpage 来访问应用的,而这个 31896 端口对应 istio-ingressgateway 组件的 Service 中定义的 80 端口,也就是说我们的请求是通过 80 端口到达 istio-ingressgateway 组件的,那么这个 80 端口是如何到达 istio-ingressgateway 组件的呢?
$ kubectl describe svc istio-ingressgateway -n istio-system
Name:                     istio-ingressgateway
Namespace:                istio-system
# ......
Port:                     http2  80/TCP
TargetPort:               8080/TCP
NodePort:                 http2  31896/TCP
Endpoints:                10.244.2.52:8080
我们查看 Service 的定义就明白了,实际上 istio-ingressgateway 这个 Service 定义的 80 端口对应的是 istio-ingressgateway 组件 Pod 的 8080 端口,也就是说我们的请求是通过 80 端口到达 istio-ingressgateway 组件的 8080 端口的,而这个 8080 端口就是我们前面在 Envoy 配置中看到的监听器的端口了,所以当我们访问 http://$GATEWAY_URL/productpage 的时候请求到达了 istio-ingressgateway 这个组件的 8080 端口了。
当请求到达 istio-ingressgateway 组件时,就会被这个监听器所匹配,然后将请求交给 http_connection_manager 这个 filter 来处理,当然后面就是用各种具体的 filter 来处理请求了,比如 envoy.filters.http.fault 这个 filter 就是用来处理故障注入的,envoy.filters.http.router 则是用来处理路由转发的、envoy.filters.http.cors 则是用来处理跨域请求的等等。
但是我们的请求进到 Envoy 后是又该如何路由呢?我应该将请求转发到哪里去呢?这个是不是就是 Envoy 中的路由配置来决定的了,对于静态配置我们清楚直接在 Envoy 配置文件中就可以看到,比如:
routeConfig:
  virtualHosts:
    - domains:
        - "*"
      name: backend
      routes:
        - match:
            prefix: /healthz/ready
          route:
            cluster: agent
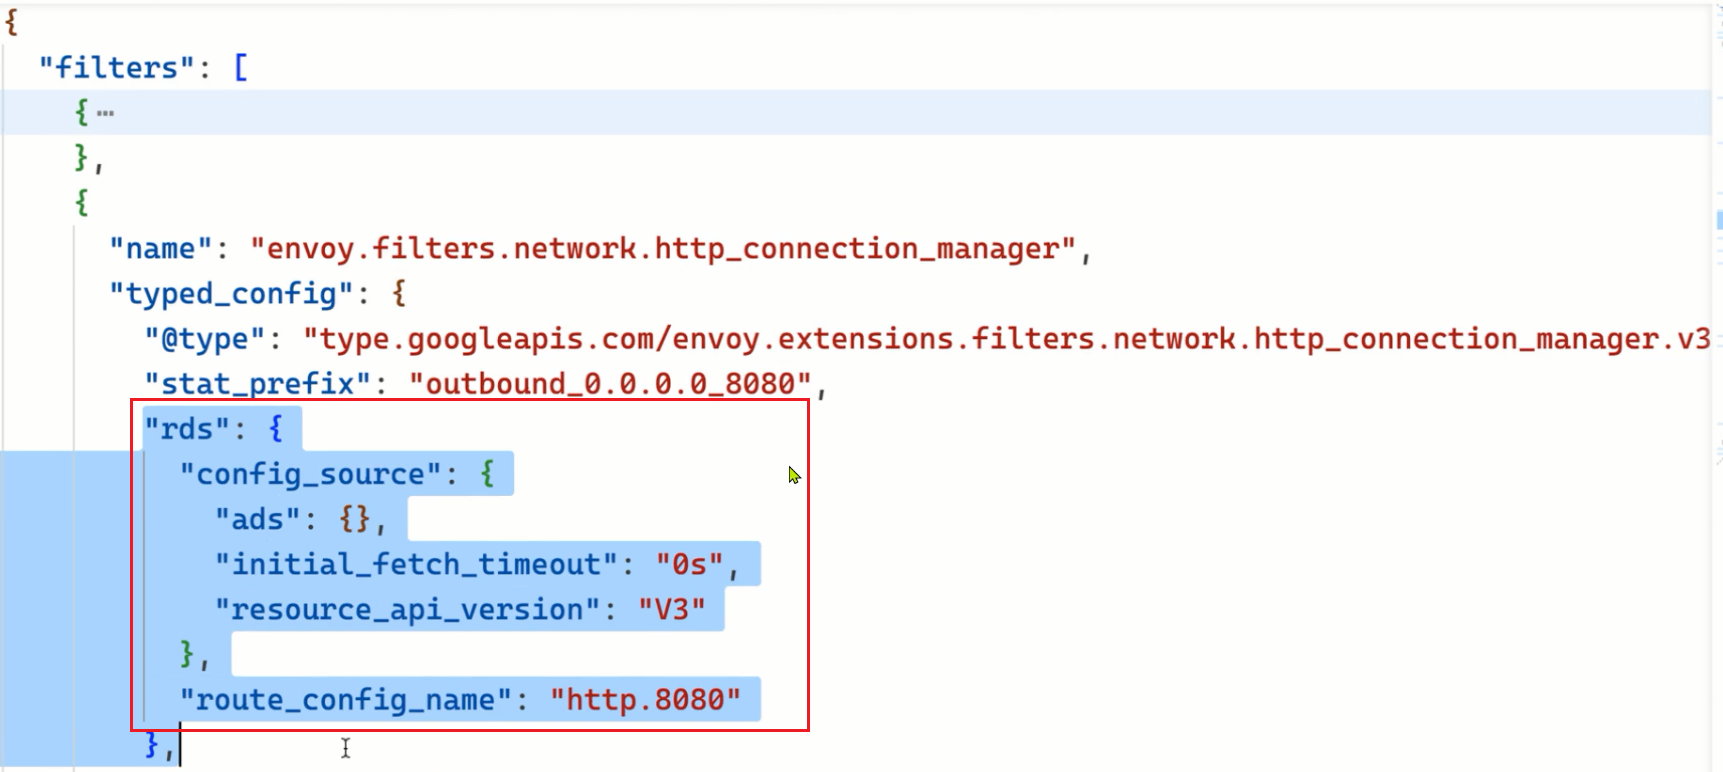
但是我们这里的路由配置是动态配置的,我们看到对应的配置中有一个 rds 字段,这个字段就是用来指定动态路由配置的,其中的 routeConfigName 字段就是用来指定对应的路由配置名称的:
rds:
  configSource:
    ads: {}
    initialFetchTimeout: 0s
    resourceApiVersion: V3
  routeConfigName: http.8080
RoutesConfigDump
这里面保存着 Envoy 的路由配置,和 listeners 一样,RoutesConfigDump 也分为 static_route_configs 和 dynamic_route_configs,分别对应着静态的路由配置和动态下发的路由配置。
同样我们也可以使用 istioctl proxy-config route 命令来查看这部分配置:
istioctl proxy-config route istio-ingressgateway-9c8b9b586-s6s48 -n istio-system -o yaml
对应的配置如下所示:
- ignorePortInHostMatching: true
  maxDirectResponseBodySizeBytes: 1048576
  name: http.8080
  validateClusters: false
  virtualHosts:
    - domains:
        - "*"
      includeRequestAttemptCount: true
      name: "*:8080"
      routes:
        - decorator:
            operation: productpage.default.svc.cluster.local:9080/productpage
          match:
            caseSensitive: true
            path: /productpage
          metadata:
            filterMetadata:
              istio:
                config: /apis/networking.istio.io/v1alpha3/namespaces/default/virtual-service/bookinfo
          route:
            cluster: outbound|9080||productpage.default.svc.cluster.local
            maxGrpcTimeout: 0s
            retryPolicy:
              hostSelectionRetryMaxAttempts: "5"
              numRetries: 2
              retriableStatusCodes:
                - 503
              retryHostPredicate:
                - name: envoy.retry_host_predicates.previous_hosts
                  typedConfig:
                    "@type": type.googleapis.com/envoy.extensions.retry.host.previous_hosts.v3.PreviousHostsPredicate
              retryOn: connect-failure,refused-stream,unavailable,cancelled,retriable-status-codes
            timeout: 0s
        - decorator:
            operation: productpage.default.svc.cluster.local:9080/static*
          match:
            caseSensitive: true
            prefix: /static
          metadata:
            filterMetadata:
              istio:
                config: /apis/networking.istio.io/v1alpha3/namespaces/default/virtual-service/bookinfo
          route:
            cluster: outbound|9080||productpage.default.svc.cluster.local
            maxGrpcTimeout: 0s
            retryPolicy:
              hostSelectionRetryMaxAttempts: "5"
              numRetries: 2
              retriableStatusCodes:
                - 503
              retryHostPredicate:
                - name: envoy.retry_host_predicates.previous_hosts
                  typedConfig:
                    "@type": type.googleapis.com/envoy.extensions.retry.host.previous_hosts.v3.PreviousHostsPredicate
              retryOn: connect-failure,refused-stream,unavailable,cancelled,retriable-status-codes
            timeout: 0s
        - decorator:
            operation: productpage.default.svc.cluster.local:9080/login
          match:
            caseSensitive: true
            path: /login
          metadata:
            filterMetadata:
              istio:
                config: /apis/networking.istio.io/v1alpha3/namespaces/default/virtual-service/bookinfo
          route:
            cluster: outbound|9080||productpage.default.svc.cluster.local
            maxGrpcTimeout: 0s
            retryPolicy:
              hostSelectionRetryMaxAttempts: "5"
              numRetries: 2
              retriableStatusCodes:
                - 503
              retryHostPredicate:
                - name: envoy.retry_host_predicates.previous_hosts
                  typedConfig:
                    "@type": type.googleapis.com/envoy.extensions.retry.host.previous_hosts.v3.PreviousHostsPredicate
              retryOn: connect-failure,refused-stream,unavailable,cancelled,retriable-status-codes
            timeout: 0s
        - decorator:
            operation: productpage.default.svc.cluster.local:9080/logout
          match:
            caseSensitive: true
            path: /logout
          metadata:
            filterMetadata:
              istio:
                config: /apis/networking.istio.io/v1alpha3/namespaces/default/virtual-service/bookinfo
          route:
            cluster: outbound|9080||productpage.default.svc.cluster.local
            maxGrpcTimeout: 0s
            retryPolicy:
              hostSelectionRetryMaxAttempts: "5"
              numRetries: 2
              retriableStatusCodes:
                - 503
              retryHostPredicate:
                - name: envoy.retry_host_predicates.previous_hosts
                  typedConfig:
                    "@type": type.googleapis.com/envoy.extensions.retry.host.previous_hosts.v3.PreviousHostsPredicate
              retryOn: connect-failure,refused-stream,unavailable,cancelled,retriable-status-codes
            timeout: 0s
        - decorator:
            operation: productpage.default.svc.cluster.local:9080/api/v1/products*
          match:
            caseSensitive: true
            prefix: /api/v1/products
          metadata:
            filterMetadata:
              istio:
                config: /apis/networking.istio.io/v1alpha3/namespaces/default/virtual-service/bookinfo
          route:
            cluster: outbound|9080||productpage.default.svc.cluster.local
            maxGrpcTimeout: 0s
            retryPolicy:
              hostSelectionRetryMaxAttempts: "5"
              numRetries: 2
              retriableStatusCodes:
                - 503
              retryHostPredicate:
                - name: envoy.retry_host_predicates.previous_hosts
                  typedConfig:
                    "@type": type.googleapis.com/envoy.extensions.retry.host.previous_hosts.v3.PreviousHostsPredicate
              retryOn: connect-failure,refused-stream,unavailable,cancelled,retriable-status-codes
            timeout: 0s
- virtualHosts:
    - domains:
        - "*"
      name: backend
      routes:
        - match:
            prefix: /stats/prometheus
          route:
            cluster: prometheus_stats
- virtualHosts:
    - domains:
        - "*"
      name: backend
      routes:
        - match:
            prefix: /healthz/ready
          route:
            cluster: agent
后面的两个 virtualHosts 就是我们的静态路由配置,第一个是动态的路由配置,我们可以看到该配置的名称就是 http.8080,是不是和前面的 routeConfigName 是一致的。那么这个配置又是什么地方定义的呢?
其实仔细看这里面的配置和前面我们创建的 VirtualService 这个资源对象是不是很像,我们再看下前面创建的 VirtualService 对象的定义:
apiVersion: networking.istio.io/v1alpha3
kind: VirtualService
metadata:
  name: bookinfo
spec:
  hosts:
    - "*"
  gateways:
    - bookinfo-gateway
  http:
    - match:
        - uri:
            exact: /productpage
        - uri:
            prefix: /static
        - uri:
            exact: /login
        - uri:
            exact: /logout
        - uri:
            prefix: /api/v1/products
      route:
        - destination:
            host: productpage
            port:
              number: 9080
我们可以看到在 VirtualService 对象中定义了 5 个路由规则,而这里的 RoutesConfigDump 中也定义了 5 个路由规则,VirtualService 中定义的 5 个路由分别为 /productpage、/static、/login、/logout、/api/v1/products,而 RoutesConfigDump 中定义的 5 个路由分别为 /productpage、/static、/login、/logout、/api/v1/products,是不是一一对应的。最终匹配这些路由规则的请求是被转发到 productpage 这个服务的 9080 端口的。
比如 /productpage 这个路由规则对应的 Envoy 配置如下所示:
- domains:
    - "*"
  includeRequestAttemptCount: true
  name: "*:8080"
  routes:
    - decorator:
        operation: productpage.default.svc.cluster.local:9080/productpage
      match:
        caseSensitive: true
        path: /productpage
      metadata:
        filterMetadata:
          istio:
            config: /apis/networking.istio.io/v1alpha3/namespaces/default/virtual-service/bookinfo
      route:
        cluster: outbound|9080||productpage.default.svc.cluster.local
        maxGrpcTimeout: 0s
        retryPolicy:
          hostSelectionRetryMaxAttempts: "5"
          numRetries: 2
          retriableStatusCodes:
            - 503
          retryHostPredicate:
            - name: envoy.retry_host_predicates.previous_hosts
              typedConfig:
                "@type": type.googleapis.com/envoy.extensions.retry.host.previous_hosts.v3.PreviousHostsPredicate
          retryOn: connect-failure,refused-stream,unavailable,cancelled,retriable-status-codes
        timeout: 0s
这个配置就是我们熟悉的 Envoy 的关于虚拟主机部分的配置,比如当我们请求的路径为 /productpage 时,就会被这个路由规则匹配到,然后就用通过 route 字段来描述我们的路由目标了,针对这个目录,可以看到有一些类似于 retry_policy、timeout等字段来配置这个目标的超时、重试策略等,不过最重要的还是 cluster 这个字段,它指定了这个路由目标对应着哪个上游集群,Envoy 最终将请求发送到这个 Cluster,比如我们这里的集群名称为 outbound|9080||productpage.default.svc.cluster.local,关于其具体配置我们就要去查看 ClustersConfigDump 中的配置了。
ClustersConfigDump
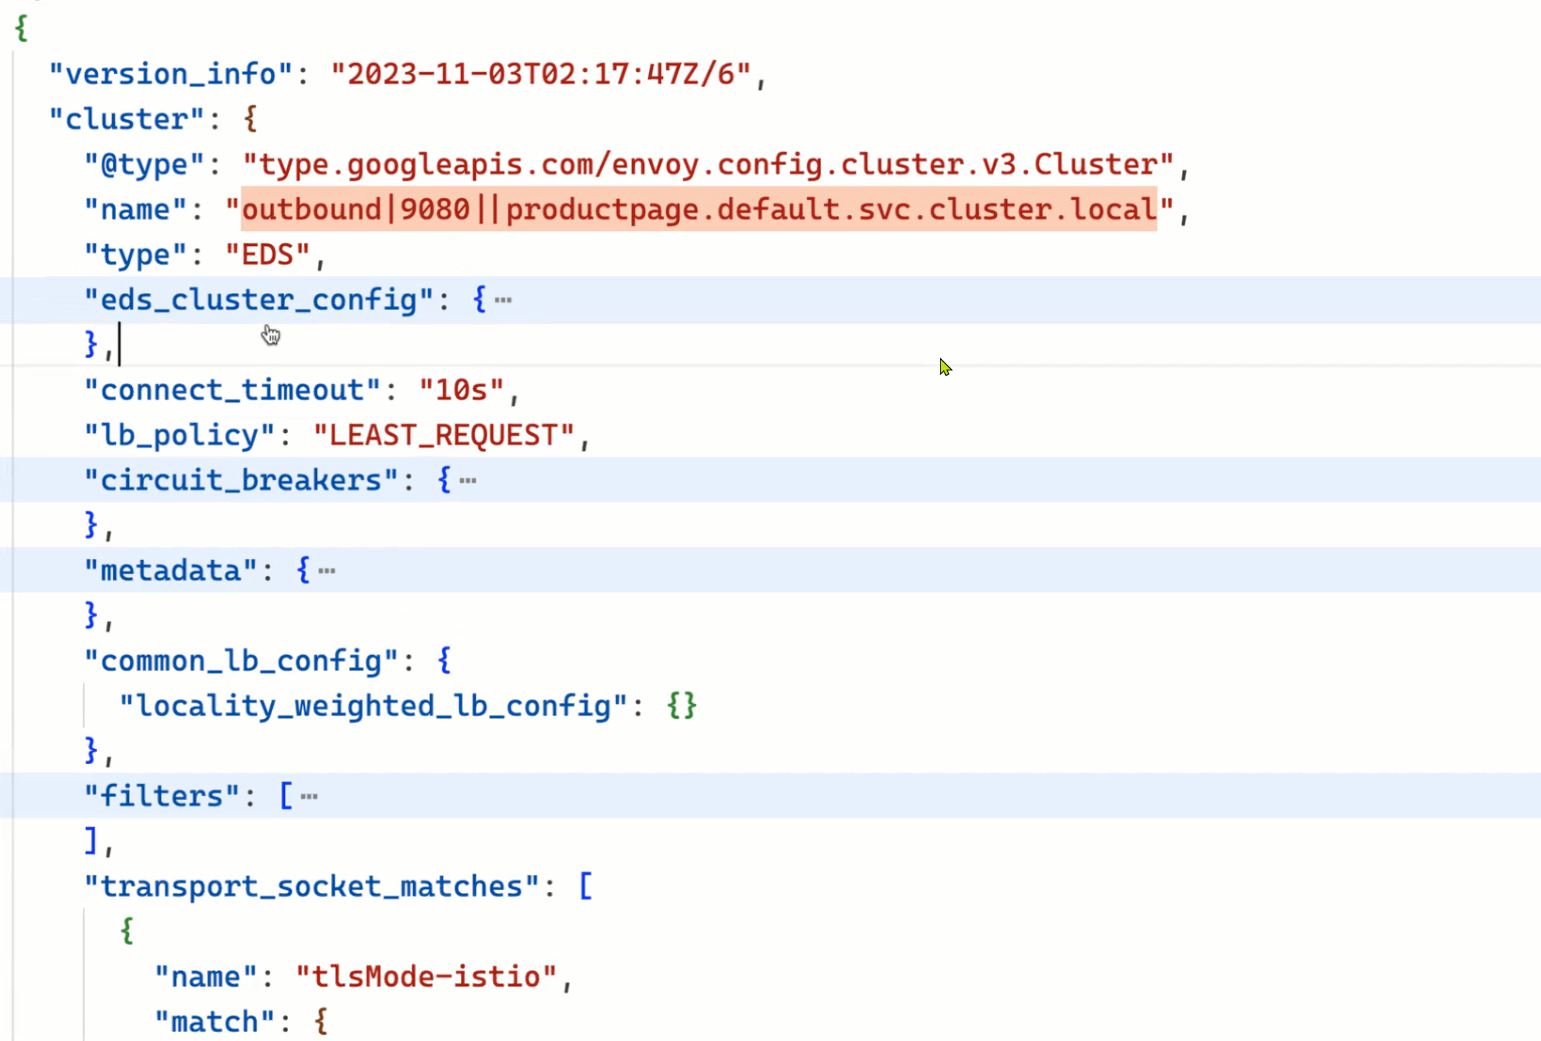
该部分是用来存储 Envoy 的集群配置的,同样也分为 static_clusters 和 dynamic_active_clusters,分别对应着静态配置和动态下发的配置。这里的 Cluster 集群是 Envoy 内部的概念,它是指 Envoy 连接的一组逻辑相同的上游主机,并不是说 K8s 集群,只是大多数情况下我们可以把这个集群理解为 K8s 集群中的一个 Service,一个 Service 通常对应着一组 Pod,由这组 Pod 响应请求并提供同一种服务,而 Envoy 的这个集群实际可以理解成这种Pod 集合。不过 Envoy 的一个集群也不一定就对应着一个 Service,因为集群是一组逻辑相同的上游主机,所以也有可能是别的符合定义的东西,比如说是服务的一个特定版本(如只是 v2 版本的 reviews 服务)。istio 的版本灰度能力就是基于这个做的,因为两个版本的同一服务实际上可以分成两个集群。
同样我们可以使用 istioctl proxy-config cluster 命令来查看这部分配置:
istioctl proxy-config cluster istio-ingressgateway-9c8b9b586-s6s48 -n istio-system -o yaml
该配置文件会非常长,它会将 K8s 集群中的 Service 都转换成 Envoy 的 Cluster,这里我们只看下 productpage 这个服务对应的 Cluster 配置,如下所示:
- circuitBreakers: #
    thresholds:
      - maxConnections: 4294967295
        maxPendingRequests: 4294967295
        maxRequests: 4294967295
        maxRetries: 4294967295
        trackRemaining: true
  commonLbConfig:
    localityWeightedLbConfig: {}
  connectTimeout: 10s
  edsClusterConfig:
    edsConfig:
      ads: {}
      initialFetchTimeout: 0s
      resourceApiVersion: V3
    serviceName: outbound|9080||productpage.default.svc.cluster.local
  filters:
    - name: istio.metadata_exchange
      typedConfig:
        "@type": type.googleapis.com/envoy.tcp.metadataexchange.config.MetadataExchange
        protocol: istio-peer-exchange
  lbPolicy: LEAST_REQUEST
  metadata:
    filterMetadata:
      istio:
        services:
          - host: productpage.default.svc.cluster.local
            name: productpage
            namespace: default
  name: outbound|9080||productpage.default.svc.cluster.local
  transportSocketMatches:
    - match:
        tlsMode: istio
      name: tlsMode-istio
      transportSocket:
        name: envoy.transport_sockets.tls
        typedConfig:
          "@type": type.googleapis.com/envoy.extensions.transport_sockets.tls.v3.UpstreamTlsContext
          commonTlsContext:
            alpnProtocols:
              - istio-peer-exchange
              - istio
            combinedValidationContext:
              defaultValidationContext:
                matchSubjectAltNames:
                  - exact: spiffe://cluster.local/ns/default/sa/bookinfo-productpage
              validationContextSdsSecretConfig:
                name: ROOTCA
                sdsConfig:
                  apiConfigSource:
                    apiType: GRPC
                    grpcServices:
                      - envoyGrpc:
                          clusterName: sds-grpc
                    setNodeOnFirstMessageOnly: true
                    transportApiVersion: V3
                  initialFetchTimeout: 0s
                  resourceApiVersion: V3
            tlsCertificateSdsSecretConfigs:
              - name: default
                sdsConfig:
                  apiConfigSource:
                    apiType: GRPC
                    grpcServices:
                      - envoyGrpc:
                          clusterName: sds-grpc
                    setNodeOnFirstMessageOnly: true
                    transportApiVersion: V3
                  initialFetchTimeout: 0s
                  resourceApiVersion: V3
            tlsParams:
              tlsMaximumProtocolVersion: TLSv1_3
              tlsMinimumProtocolVersion: TLSv1_2
          sni: outbound_.9080_._.productpage.default.svc.cluster.local
    - match: {}
      name: tlsMode-disabled
      transportSocket:
        name: envoy.transport_sockets.raw_buffer
        typedConfig:
          "@type": type.googleapis.com/envoy.extensions.transport_sockets.raw_buffer.v3.RawBuffer
  type: EDS
我们可以看到这个 Envoy Cluster 的名称为 outbound|9080||productpage.default.svc.cluster.local,和前面的路由配置中的 cluster 字段是一致的,名称大多数会由 | 分成四个部分,分别是 inbound 或 outbound 代表入向流量或出向流量、端口号、subcluster 名称(就是对应着 destination rule 里的 subset)、Service FQDN,由 istio 的服务发现进行配置,通过这个 name 我们很容易就能看出来这个集群对应的是 K8s 集群的哪个服务。
然后配置的负载均衡策略是 LEAST_REQUEST,另外比较重要的这里的配置的类型为 type: EDS,也就是会通过 EDS 来发现上游的主机服务,这个 EDS 的配置如下所示:
edsClusterConfig:
  edsConfig:
    ads: {}
    initialFetchTimeout: 0s
    resourceApiVersion: V3
  serviceName: outbound|9080||productpage.default.svc.cluster.local
基于 EDS 去动态发现上游主机的配置,其实在前面的 Envoy 章节我们已经介绍过了,和这里是不是几乎是一致的,serviceName 其实就对应着 K8s 集群中的 productpage 这个 Service 对象的 9080 端口,而这个 Service 对象对应着一组 Pod,这组 Pod 就是我们的上游主机了。当然这是通过 xDS 协议下发的,我们可以通过 istioctl proxy-config endpoint 命令来查看这部分配置:
istioctl proxy-config endpoint istio-ingressgateway-9c8b9b586-s6s48 -n istio-system -o yaml
该部分数据非常多,下面只截取 productpage 相关的数据,如下所示:
- addedViaApi: true
  circuitBreakers:
    thresholds:
    - maxConnections: 4294967295
      maxPendingRequests: 4294967295
      maxRequests: 4294967295
      maxRetries: 4294967295
    - maxConnections: 1024
      maxPendingRequests: 1024
      maxRequests: 1024
      maxRetries: 3
      priority: HIGH
  edsServiceName: outbound|9080||productpage.default.svc.cluster.local
  hostStatuses:
  - address:
      socketAddress:
        address: 10.244.2.62
        portValue: 9080
    healthStatus:
      edsHealthStatus: HEALTHY
    locality: {}
    stats:
    - name: cx_connect_fail
    - name: cx_total
      value: "1"
    - name: rq_error
    - name: rq_success
      value: "4"
    - name: rq_timeout
    - name: rq_total
      value: "4"
    - name: cx_active
      type: GAUGE
    - name: rq_active
      type: GAUGE
    weight: 1
  name: outbound|9080||productpage.default.svc.cluster.local
  observabilityName: outbound|9080||productpage.default.svc.cluster.local
可以看到上面的配置中就包含一个真正的后端服务地址:
address:
  socketAddress:
    address: 10.244.2.62
    portValue: 9080
这个地址其实就是 productpage 这个 K8s Service 关联的 Pod 的地址。这样一个请求从进入到 Envoy 到最终转发到后端服务的过程就清楚了。
SecretsConfigDump
由于网格中的 Envoy 之间互相通信会使用 mTLS 模式,因此每个 Envoy 通信时都需要提供本工作负载的证书,同时为了签发证书还需要 istio ca 的根证书,这些证书的信息保存在该配置项之下。
可视化
到这里我们就把 Envoy 的整个配置文件都理解了一遍,它们分别是 Bootstrap、Listeners、Routes、Clusters、Secrets 几个配置,其中又涉及到 VirtualHost 等细分概念。总体来看,一个典型的 HTTP 请求在 Envoy 内部经历了以下事情:
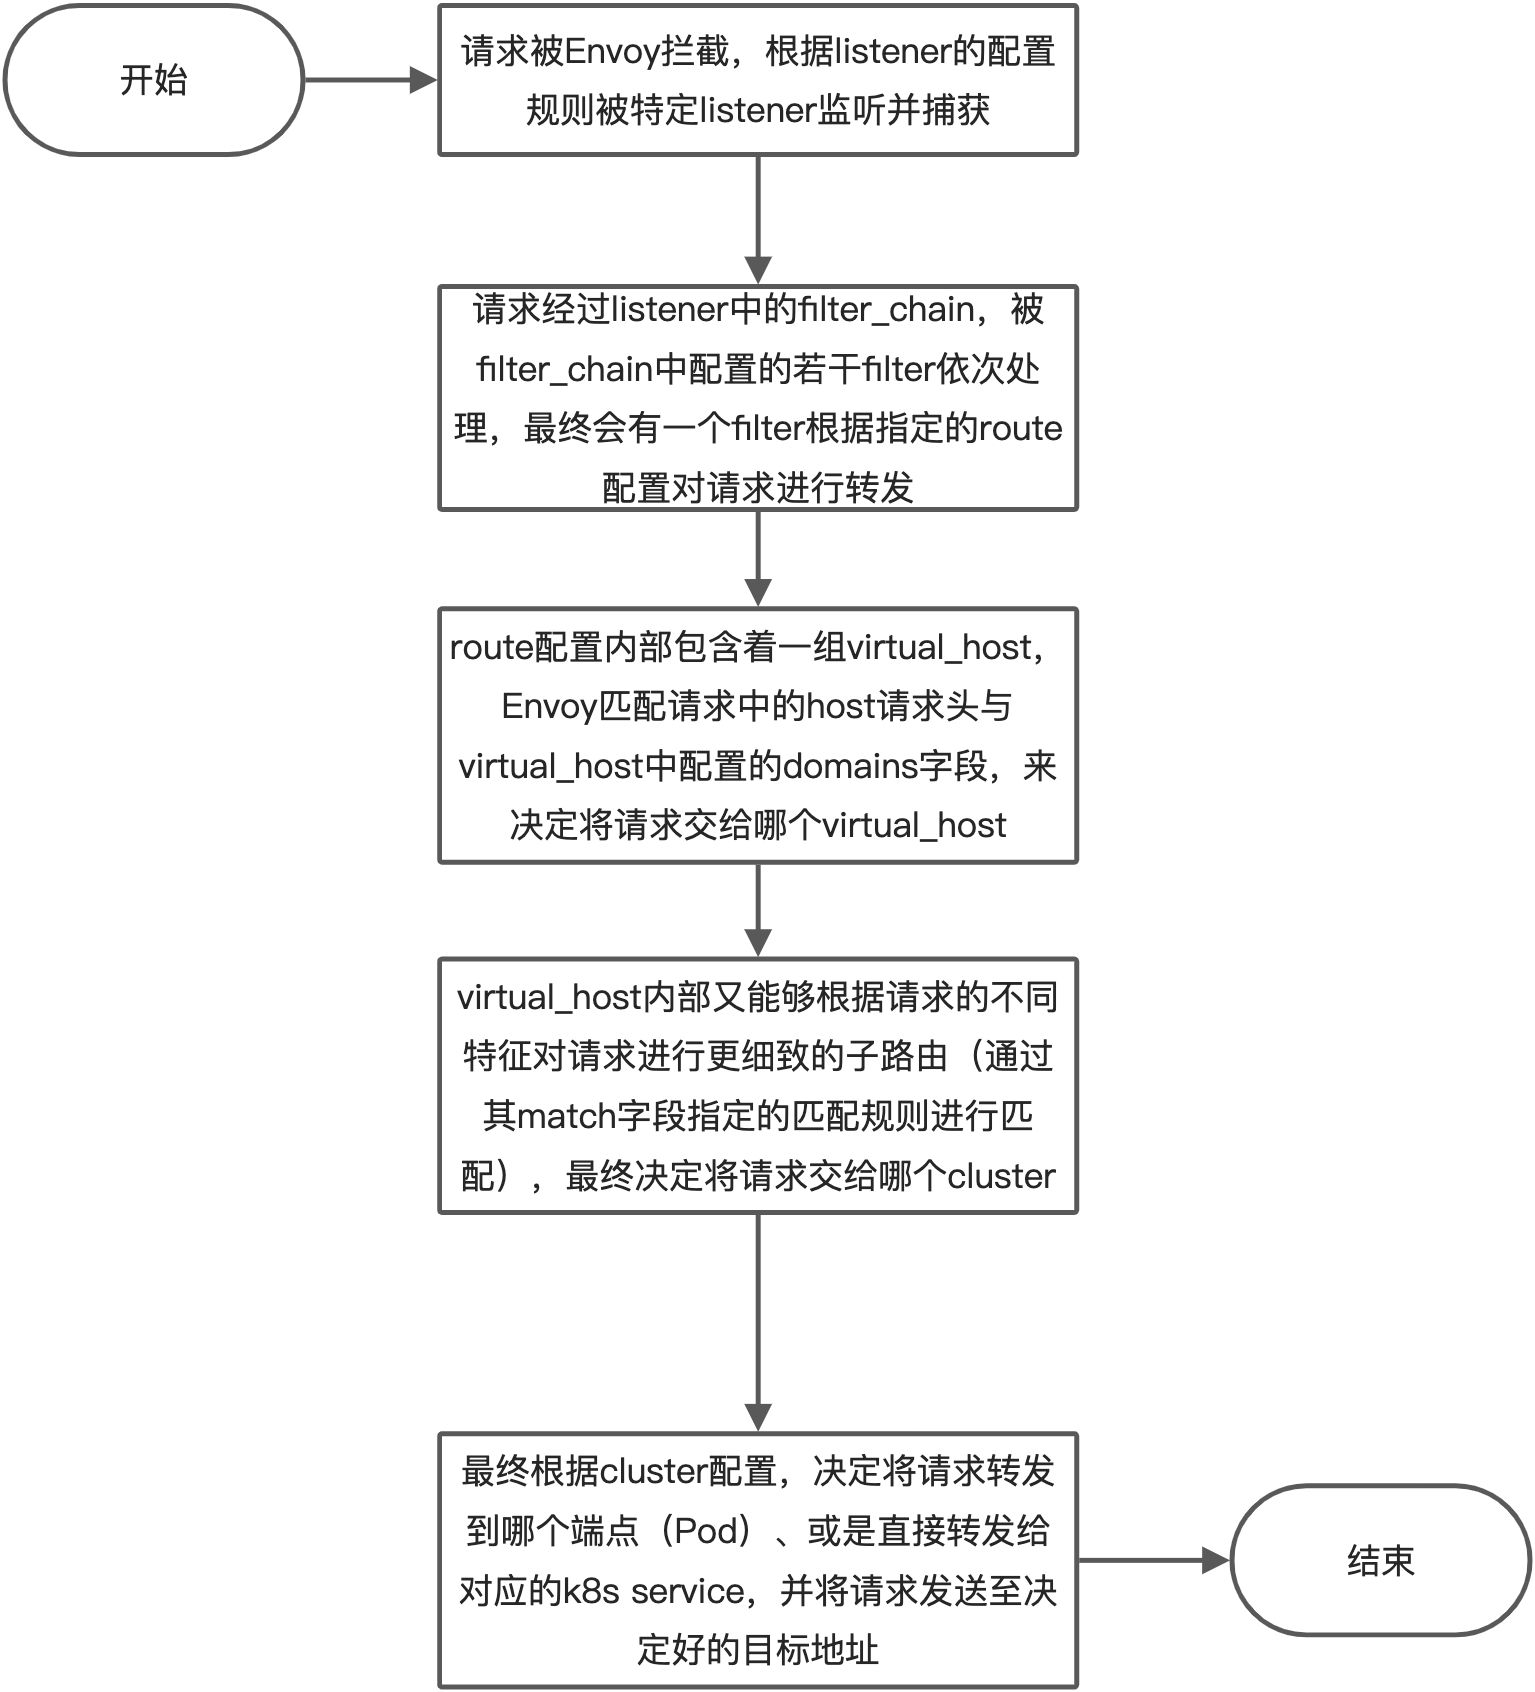
整体上一个请求在 Envoy 内部的处理与转发过程中,listener、route、cluster 这几个配置是环环相扣的,它们通过配置的 name 一层又一层地向下引用(listener 内的 filter 引用 route、route 内的 virtual_host 引用 cluster),形成了一条引用链,最终将请求从 listener 递交到具体的 cluster。
🍀
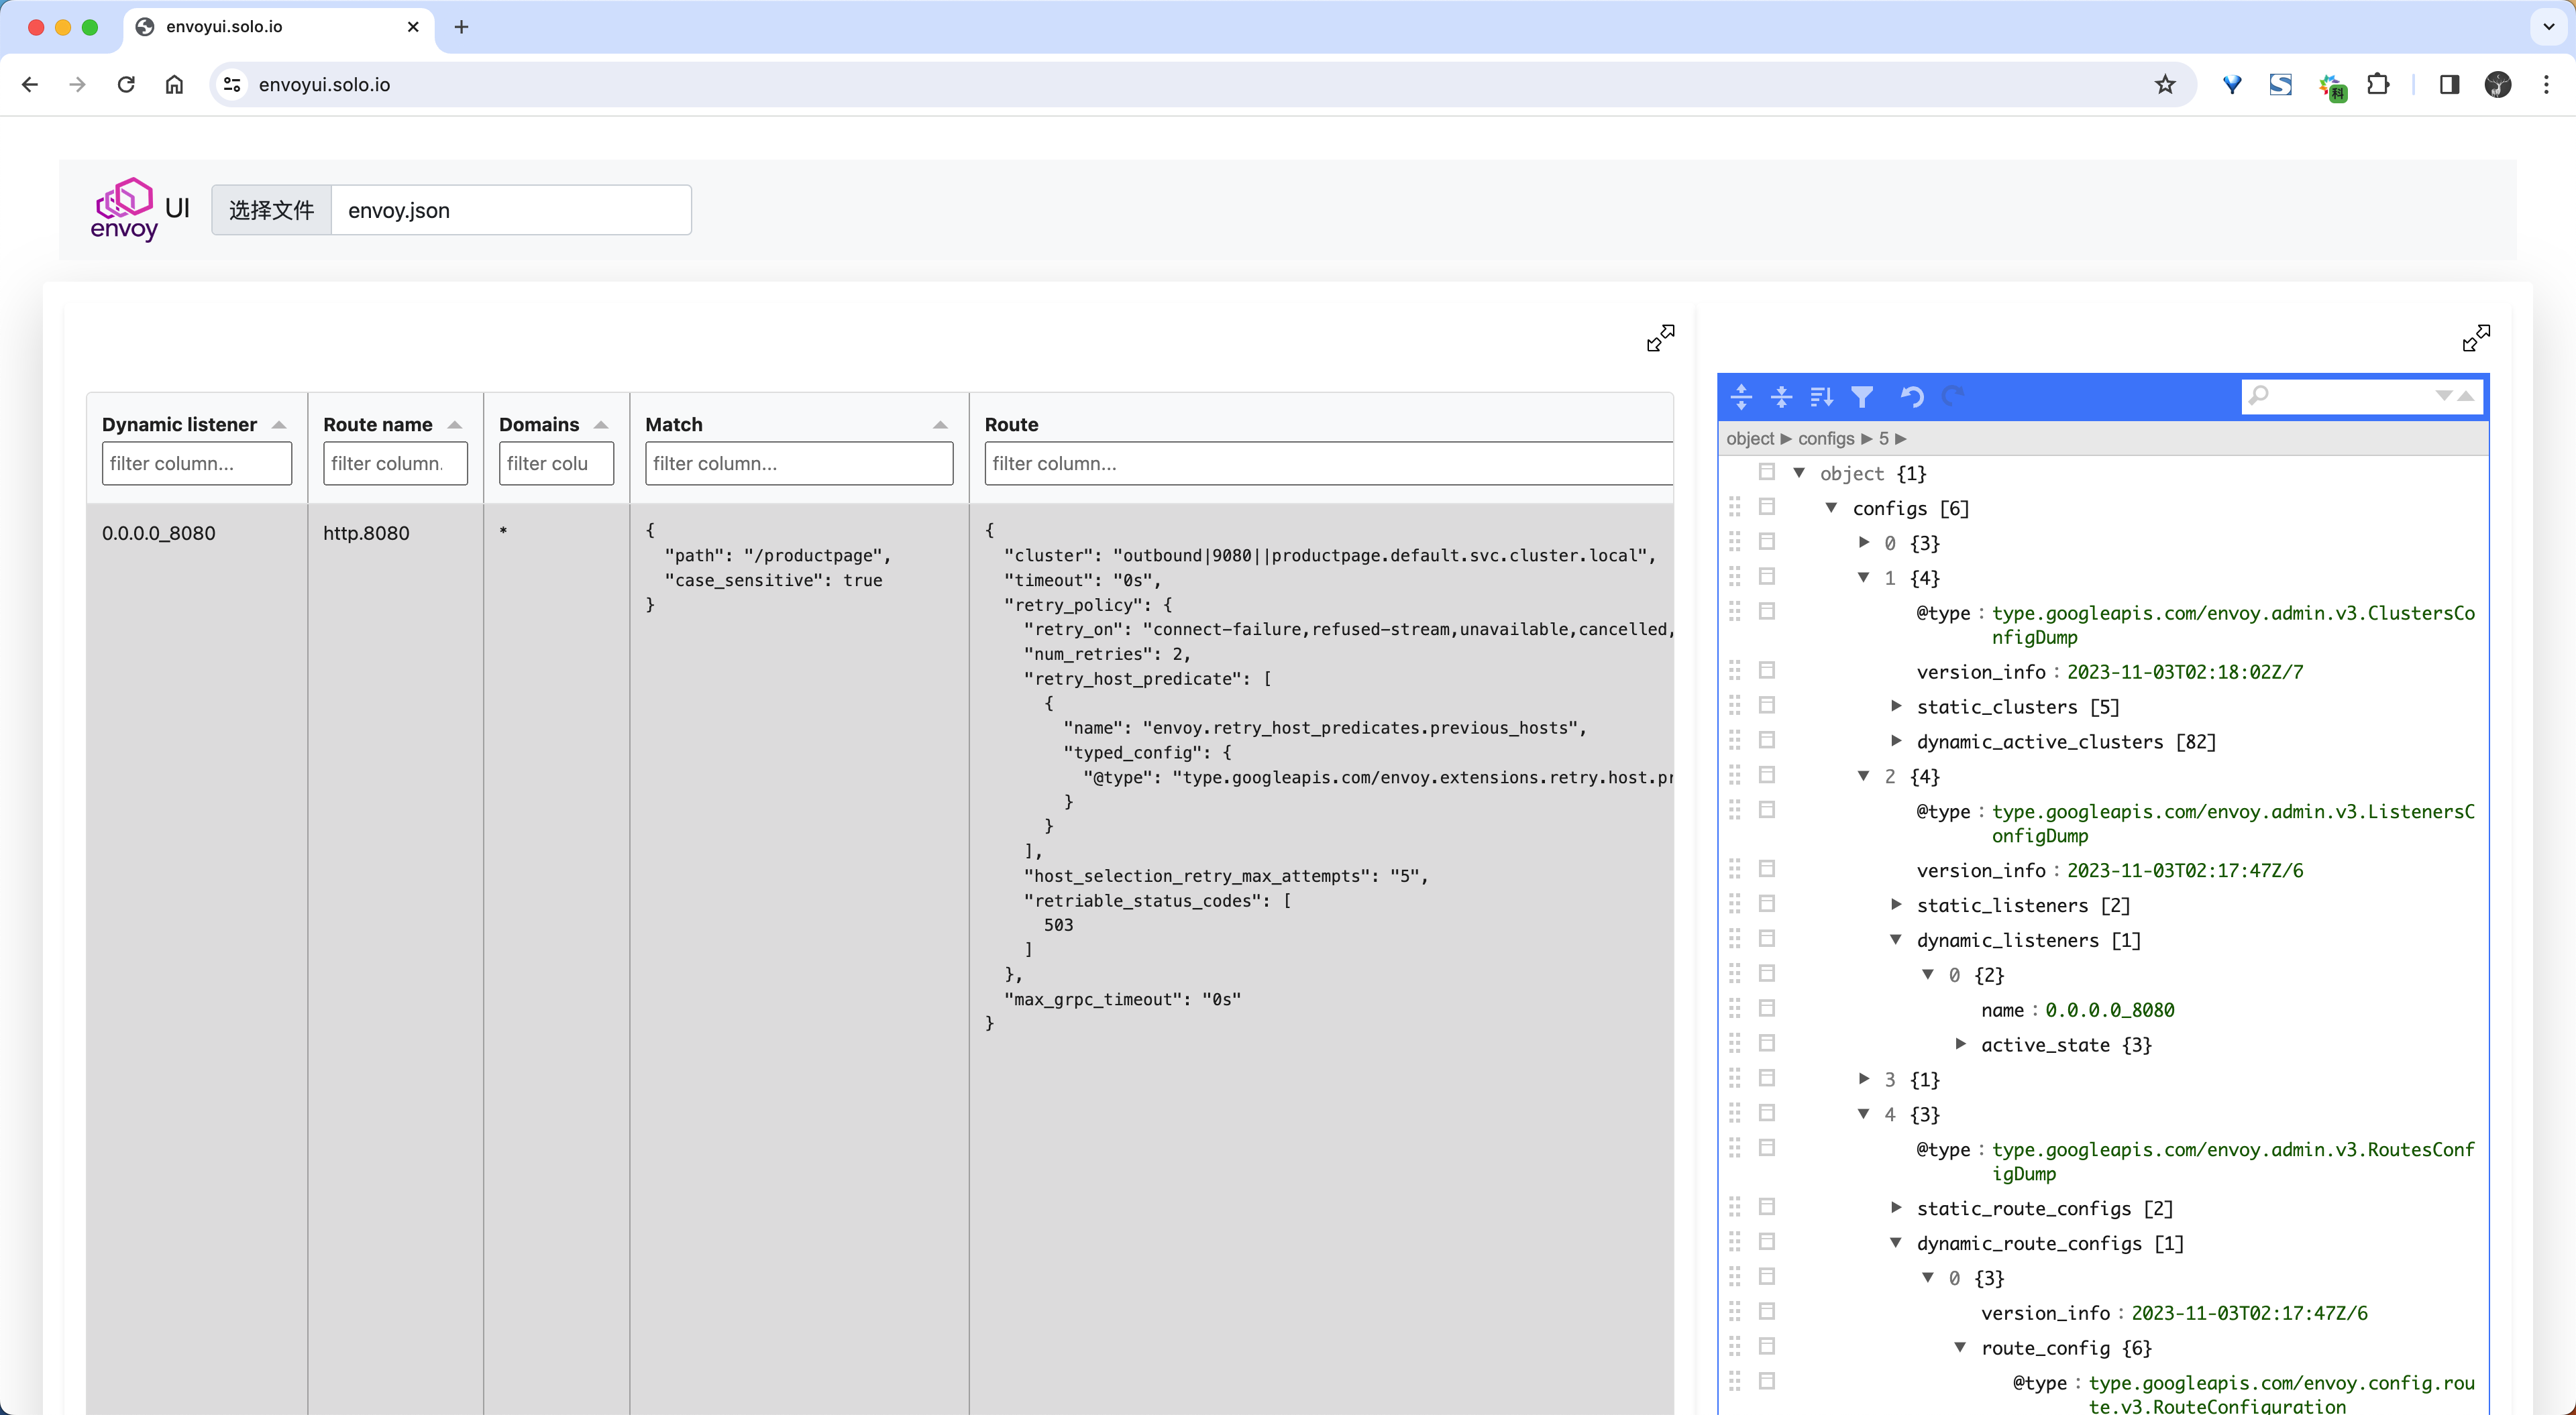
我们可以使用 envoyui.solo.io 这个在线的 Envoy 配置可视化工具来查看 Envoy 的配置,只需要将我们的 Envoy 配置 dump 出来上传上来即可:
经过上面的分析我们也明白了其实 Istio 并没有实现很多复杂的逻辑,服务治理相关的功能比如负载均衡、故障注入、权重路由等都是 Envoy 本身就有的能力,Istio 只是将这些能力抽象成了一个个资源对象,然后通过 Envoy 的 xDS 协议下发到 Envoy 中,这样就能够实现对 Envoy 的流量治理了。所以重点还是需要我们先理解 Envoy 的配置,然后再去理解 Istio 的配置,这样才能更好的理解 Istio,不然你就不清楚 Gateway、VirtualService 等这些资源对象到底是干什么的,它们是如何影响 Envoy 的配置的。
当然我们这里还只是分析的 Istio Ingress Gateway 的配置,而对于 Sidecar 模式的 Envoy 代理又是如何去配置的呢?它又是如何将 Pod 的流量进行拦截的呢?这些我们后面会继续分析。
自定义一个端口访问应用
🚩 实战:自定义一个端口访问应用-2023.11.6(测试成功)
实验环境:
k8s v1.25.4(containerd://1.6.10)

[root@master1 ~]#istioctl version
client version: 1.19.3
control plane version: 1.19.3
data plane version: 1.19.3 (8 proxies)
实验软件:
链接:https://pan.baidu.com/s/1o-GJF88QKWP4WG-FT278Nw?pwd=4pxr
提取码:4pxr
–来自百度网盘超级会员V8的分享
2023.11.6-实战:自定义一个端口访问应用-2023.11.6(测试成功)

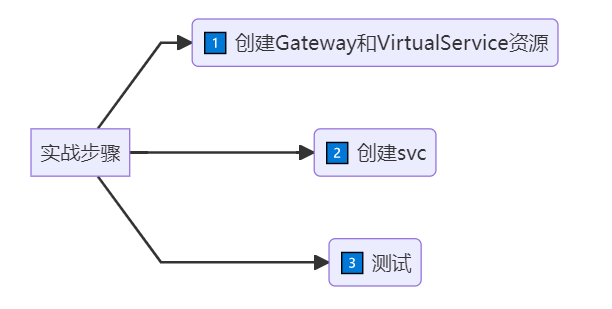
实验步骤:
🍀
业务默认端口:

[root@master1 ~]#kubectl get po -nistio-system
NAME                                    READY   STATUS    RESTARTS   AGE
grafana-86b7d46c86-zphx2                1/1     Running   0          20h
istio-egressgateway-8477dd44c4-jgpcg    1/1     Running   0          33h
istio-ingressgateway-5c58fcb646-df7rz   1/1     Running   0          33h
istiod-5d9595449c-8tt97                 1/1     Running   0          33h
jaeger-594658fc5b-789s6                 1/1     Running   0          20h
kiali-6ff88d695b-2rwtk                  1/1     Running   0          20h
prometheus-67599c8d5c-gdhv9             2/2     Running   0          20h


[root@master1 ~]#kubectl get svc -nistio-system
NAME                   TYPE           CLUSTER-IP       EXTERNAL-IP   PORT(S)                                                                      AGE
grafana                ClusterIP      10.96.218.2      <none>        3000/TCP                                                                     20h
istio-egressgateway    ClusterIP      10.96.171.120    <none>        80/TCP,443/TCP                                                               33h
istio-ingressgateway   LoadBalancer   10.104.174.171   <pending>     15021:32479/TCP,80:31814/TCP,443:31263/TCP,31400:32543/TCP,15443:30806/TCP   33h
istiod                 ClusterIP      10.110.112.56    <none>        15010/TCP,15012/TCP,443/TCP,15014/TCP                                        33h
jaeger-collector       ClusterIP      10.103.124.73    <none>        14268/TCP,14250/TCP,9411/TCP,4317/TCP,4318/TCP                               20h
kiali                  ClusterIP      10.110.11.151    <none>        20001/TCP,9090/TCP                                                           20h
loki-headless          ClusterIP      None             <none>        3100/TCP                                                                     20h
prometheus             ClusterIP      10.107.255.204   <none>        9090/TCP                                                                     20h
tracing                ClusterIP      10.110.109.99    <none>        80/TCP,16685/TCP                                                             20h
zipkin                 ClusterIP      10.103.145.97    <none>        9411/TCP                                                                     20h
我们通过http://172.29.9.61:31814/productpage 来访问
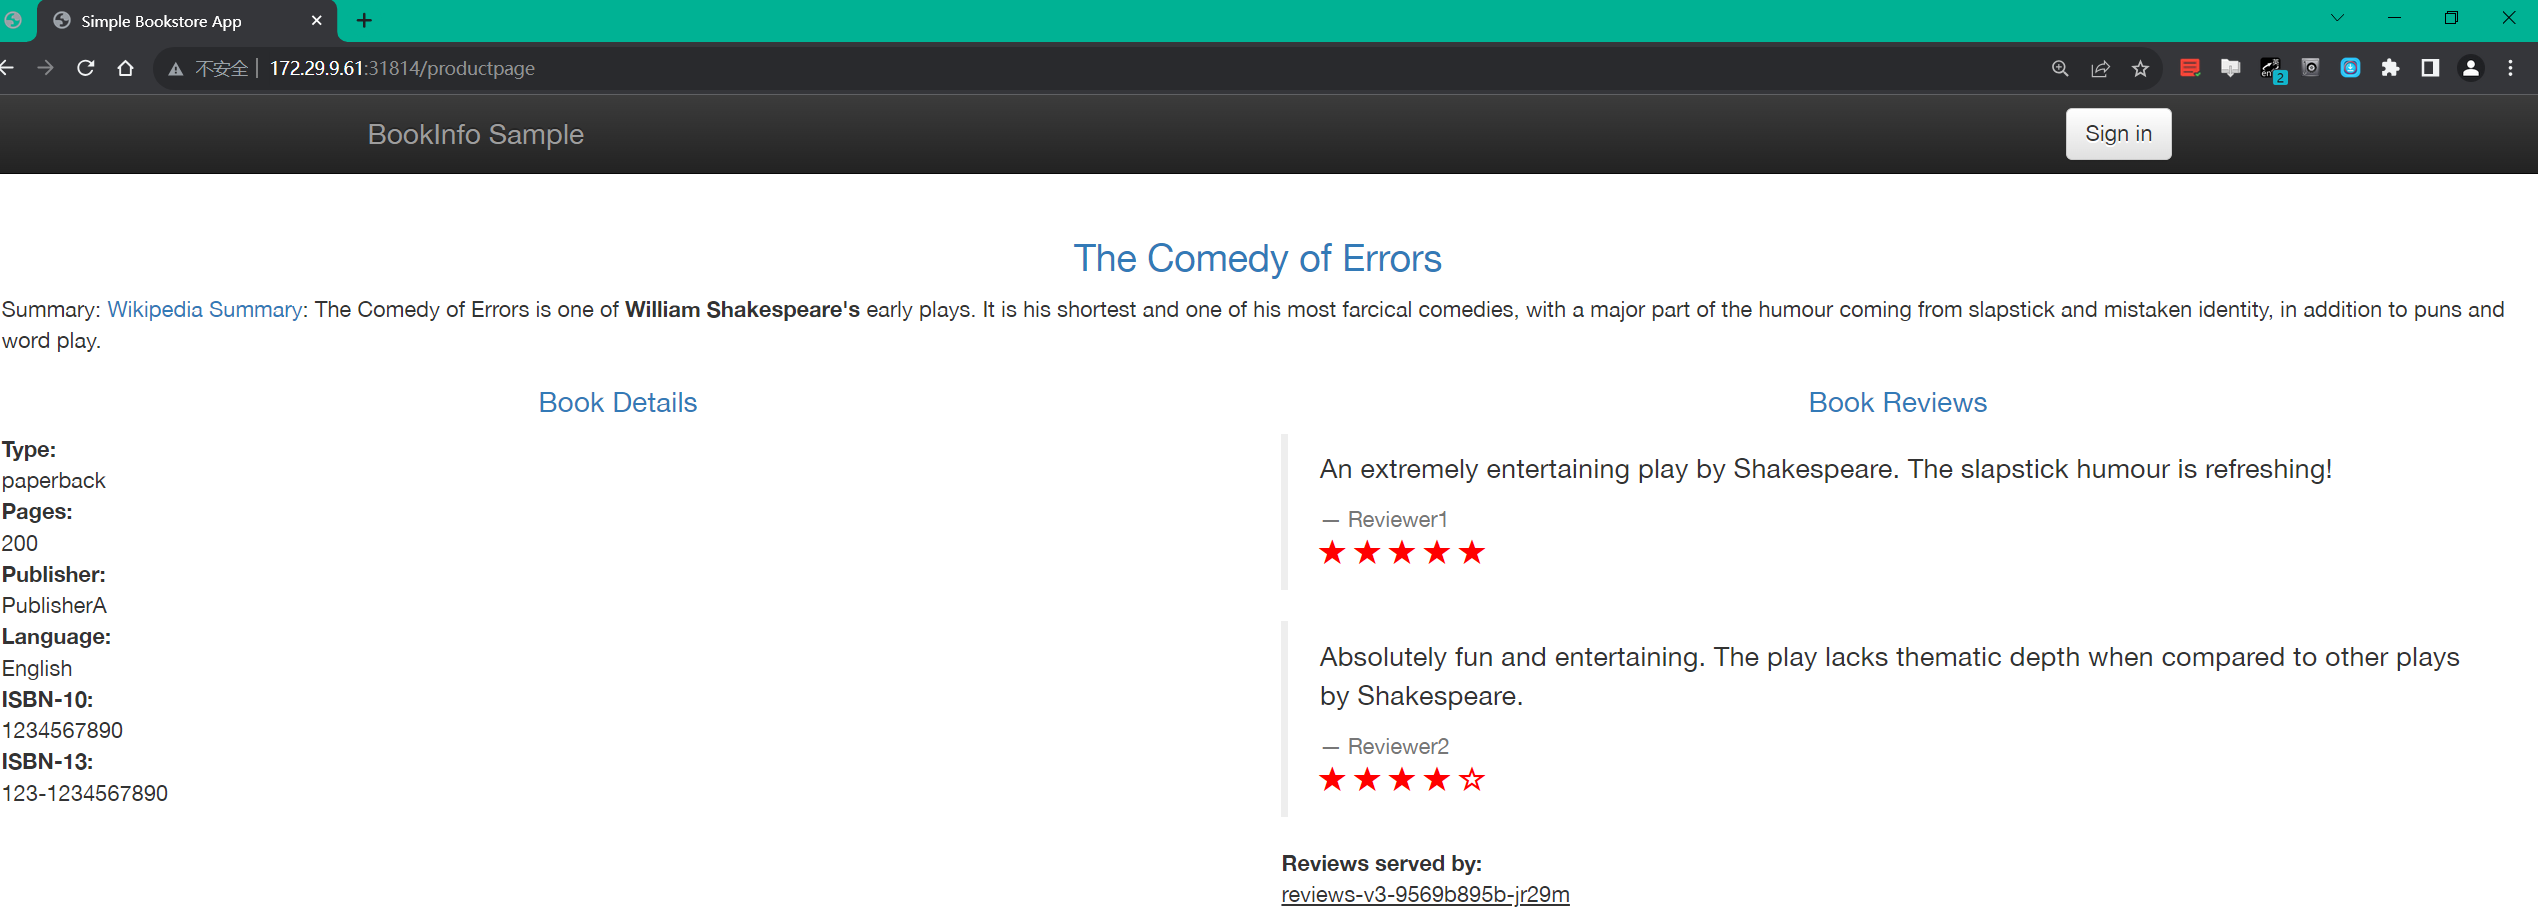
svc:80 --> nodeport
envoy ingress gateway: 8080监听器

[root@master1 istio-1.19.3]#cat samples/bookinfo/networking/bookinfo-gateway.yaml
apiVersion: networking.istio.io/v1alpha3
kind: Gateway
metadata:
  name: bookinfo-gateway
spec:
  # The selector matches the ingress gateway pod labels.
  # If you installed Istio using Helm following the standard documentation, this would be "istio=ingress"
  selector:
    istio: ingressgateway # use istio default controller
  servers:
  - port:
      number: 8080 #监听器
      name: http
      protocol: HTTP
    hosts:
    - "*"
---
apiVersion: networking.istio.io/v1alpha3
kind: VirtualService
metadata:
  name: bookinfo
spec:
  hosts:
  - "*"
  gateways:
  - bookinfo-gateway
  http:
  - match:
    - uri:
        exact: /productpage
    - uri:
        prefix: /static
    - uri:
        exact: /login
    - uri:
        exact: /logout
    - uri:
        prefix: /api/v1/products
    route:
    - destination:
        host: productpage #svc
        port:
          number: 9080
[root@master1 istio-1.19.3]#


#svc
apiVersion: v1
 33 kind: Service
 34 metadata:
 35   name: details
 36   labels:
 37     app: details
 38     service: details
 39 spec:
 40   ports:
 41   - port: 9080
 42     name: http
 43   selector:
 44     app: details

#
[root@master1 istio-1.19.3]#kubectl get svc istio-ingressgateway -n istio-system -oyaml
   - name: http2
    nodePort: 31814
    port: 80
    protocol: TCP
    targetPort: 8080
🍀
现在自己想创建一个新的svc,8088来作为访问应用的入口,该如何配置呢?
🍀
开始配置
[root@master1 istio-1.19.3]#cp  samples/bookinfo/networking/bookinfo-gateway.yaml test-gateway.yaml

[root@master1 istio-1.19.3]#cat test-gateway.yaml
apiVersion: networking.istio.io/v1alpha3
kind: Gateway
metadata:
  name: test-gateway
spec:
  # The selector matches the ingress gateway pod labels.
  # If you installed Istio using Helm following the standard documentation, this would be "istio=ingress"
  selector:
    istio: ingressgateway # use istio default controller
  servers:
  - port:
      number: 8080
      name: http
      protocol: HTTP
    hosts:
    - "*"
---
apiVersion: networking.istio.io/v1alpha3
kind: VirtualService
metadata:
  name: test
spec:
  hosts:
  - "*"
  gateways:
  - test-gateway
  http:
  - match:
    - uri:
        exact: /productpage
    - uri:
        prefix: /static
    - uri:
        exact: /login
    - uri:
        exact: /logout
    - uri:
        prefix: /api/v1/products
    route:
    - destination:
        host: productpage
        port:
          number: 9080
---
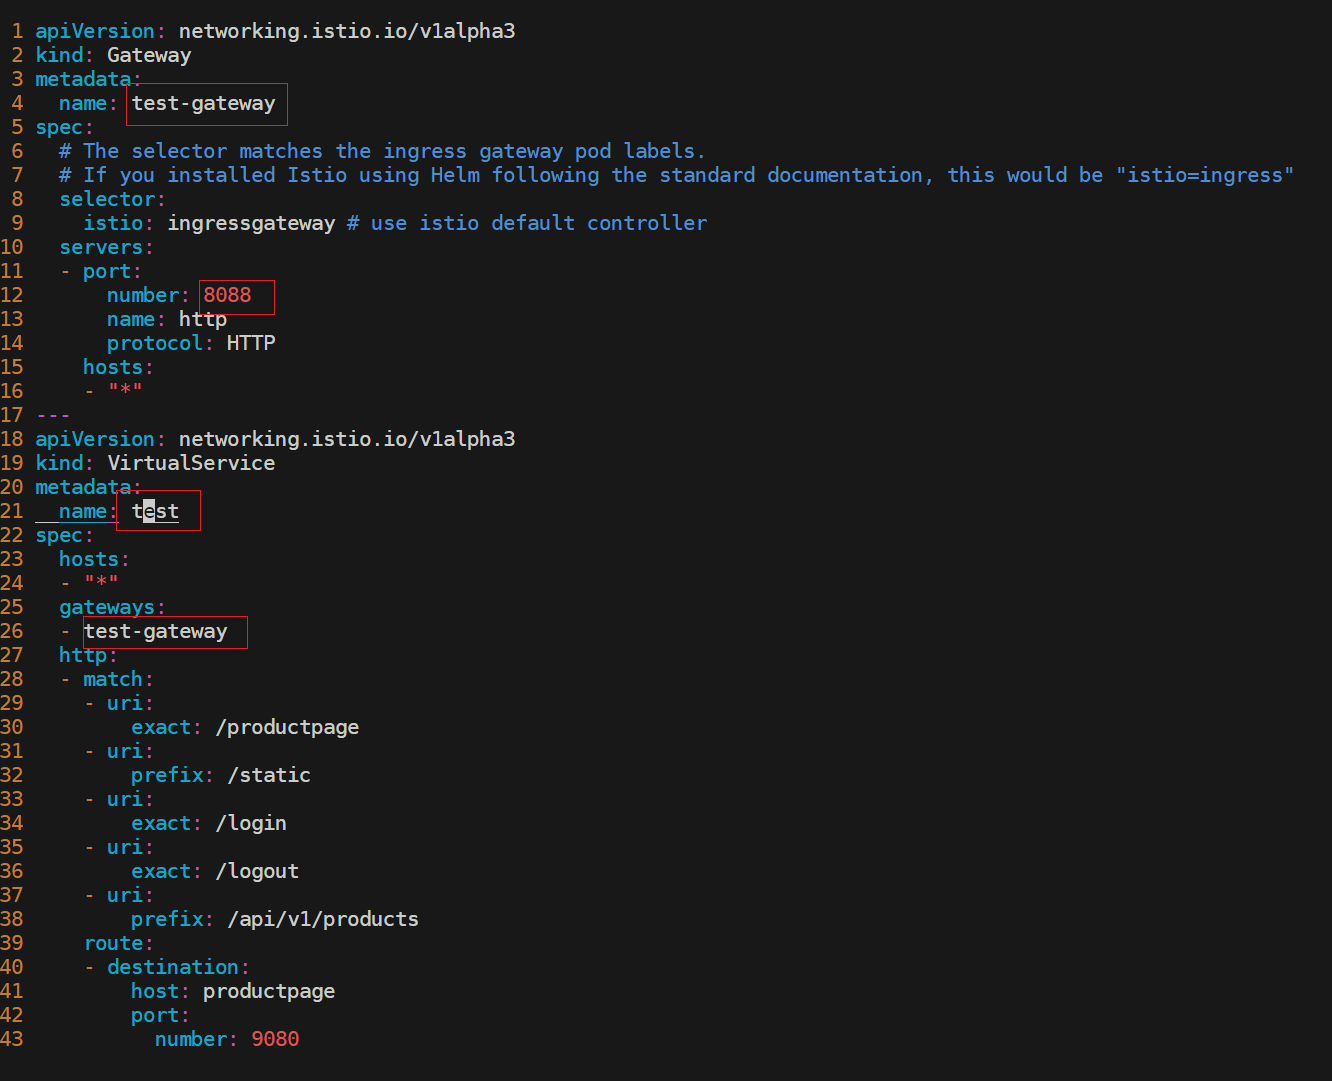
部署:
[root@master1 istio-1.19.3]#kubectl apply -f test-gateway.yaml
gateway.networking.istio.io/test-gateway created
virtualservice.networking.istio.io/test created
可以直接edit这个istio-ingressgateway,或者新创建一个svc也行的。

这里新创建一个svc:
[root@master1 istio-1.19.3]#kubectl apply -f test-gateway.yaml


[root@master1 istio-1.19.3]#cat test-gateway.yaml
apiVersion: v1
kind: Service
metadata:
  labels:
    app: istio-ingressgateway
    install.operator.istio.io/owning-resource: installed-state
    install.operator.istio.io/owning-resource-namespace: istio-system
    istio: ingressgateway
    istio.io/rev: default
    operator.istio.io/component: IngressGateways
    operator.istio.io/managed: Reconcile
    operator.istio.io/version: 1.19.3
    release: istio
  name: test-gatewy
  namespace: istio-system
spec:
  ports:
  - name: test-port
    nodePort: 30080
    port: 8088
    protocol: TCP
    targetPort: 8088
  selector:
    app: istio-ingressgateway
    istio: ingressgateway
  type: LoadBalancer
[root@master1 istio-1.19.3]#
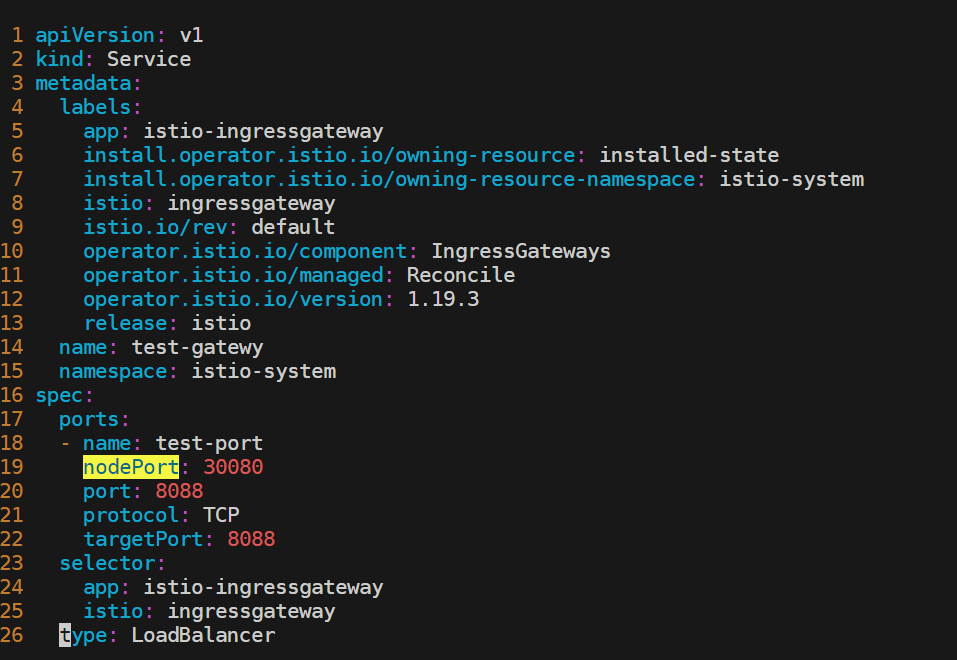
验证:
[root@master1 istio-1.19.3]#kubectl get svc -nistio-system
NAME                   TYPE           CLUSTER-IP       EXTERNAL-IP   PORT(S)                                                                      AGE
grafana                ClusterIP      10.96.218.2      <none>        3000/TCP                                                                     20h
istio-egressgateway    ClusterIP      10.96.171.120    <none>        80/TCP,443/TCP                                                               33h
istio-ingressgateway   LoadBalancer   10.104.174.171   <pending>     15021:32479/TCP,80:31814/TCP,443:31263/TCP,31400:32543/TCP,15443:30806/TCP   33h
istiod                 ClusterIP      10.110.112.56    <none>        15010/TCP,15012/TCP,443/TCP,15014/TCP                                        33h
jaeger-collector       ClusterIP      10.103.124.73    <none>        14268/TCP,14250/TCP,9411/TCP,4317/TCP,4318/TCP                               20h
kiali                  ClusterIP      10.110.11.151    <none>        20001/TCP,9090/TCP                                                           20h
loki-headless          ClusterIP      None             <none>        3100/TCP                                                                     20h
prometheus             ClusterIP      10.107.255.204   <none>        9090/TCP                                                                     20h
test-gatewy            LoadBalancer   10.101.92.232    <pending>     8088:30080/TCP                                                               42s
tracing                ClusterIP      10.110.109.99    <none>        80/TCP,16685/TCP                                                             20h
zipkin                 ClusterIP      10.103.145.97    <none>        9411/TCP                                                                     20h
[root@master1 istio-1.19.3]#
同样也是可以访问的:
http://172.29.9.61:30080/productpage
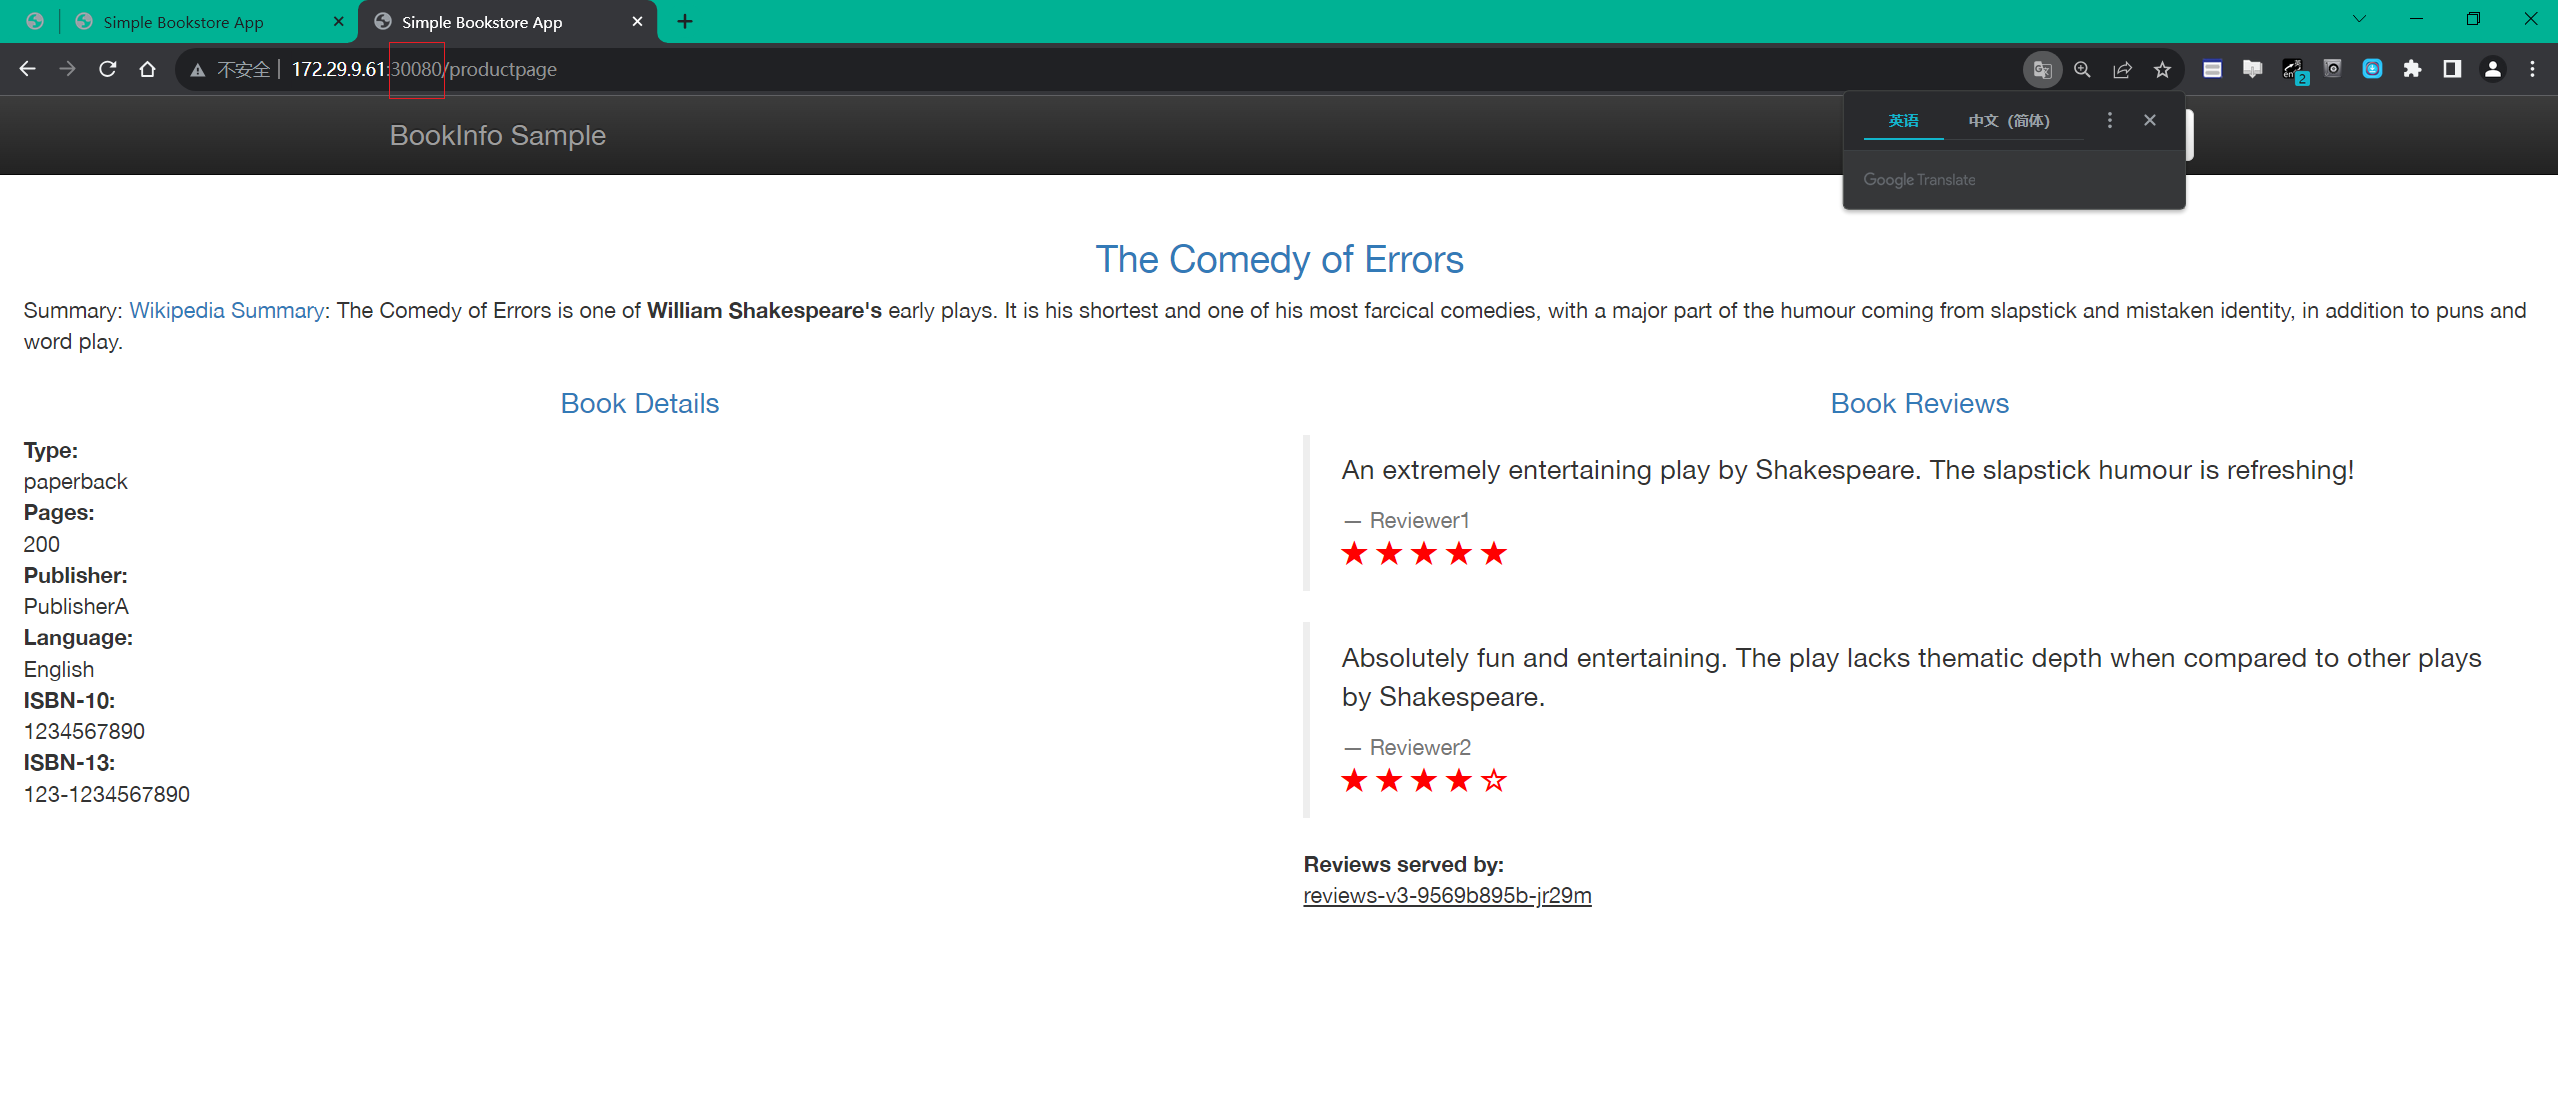
测试结束。😘
关于我
我的博客主旨:
- 排版美观,语言精炼;
- 文档即手册,步骤明细,拒绝埋坑,提供源码;
- 本人实战文档都是亲测成功的,各位小伙伴在实际操作过程中如有什么疑问,可随时联系本人帮您解决问题,让我们一起进步!
🍀 微信二维码
x2675263825 (舍得), qq:2675263825。

🍀 微信公众号
《云原生架构师实战》

🍀 个人博客站点
http://onedayxyy.cn/
🍀 语雀
https://www.yuque.com/xyy-onlyone
🍀 csdn
https://blog.csdn.net/weixin_39246554?spm=1010.2135.3001.5421
🍀 知乎
https://www.zhihu.com/people/foryouone
最后
好了,关于本次就到这里了,感谢大家阅读,最后祝大家生活快乐,每天都过的有意义哦,我们下期见!


