文章目录
- 创建项目
- 开发环境
- 项目目录
- 模板语法
- 属性绑定
- 条件渲染
- 列表渲染
- 事件处理
- 内联事件处理器
- 方法事件处理器(常用)
- 事件参数
- 获取 event 事件
- 事件传参
- 事件修饰符
- 阻止默认事件
- 阻止事件冒泡
- 数组变化侦测
- 变更方法
- 替换一个数组
- 计算属性
- class 绑定
- 单对象绑定
- 多对象绑定
- 绑定数组
- Style 绑定
- 侦听器
- 表单输入绑定
- 单选框
- 复选框
- 修饰符
- 模板引用(操作 DOM)
- 组件组成
- 组成结构
- 案例
- 组件嵌套关系
- Header.vue
- Main.vue
- Aside.vue
- Article.vue
- Item
- 组件注册方式
- 全局注册
- 局部注册
- 组件传递数据
- 静态传递数据
- 动态传递数据
- 组件传递多种数据类型
- 组件传递数据 Props 校验
- 组件事件
- 组件事件配合 V-model
- 组件数据传递
- 透传 Attributes
- 插槽
- 插槽 Slots
- 插槽 Slots
- 具名插槽传递数据
- 组件的声明周期
- 声明周期的应用
- 动态组件
- 组件保持存活
- 异步组件
- 依赖注入
- Vue应用
- 路由
创建项目
- 配置 node.js > 15.0
- 命令行创建命令 npm init vue@latest
- cd 项目名
- npm install
- npm run dev
- cnpm下载方法,更快
- 设置 VSCode 自动保存
- 官方教程
开发环境
- VSCode + Volar
- 格式化代码:Shift + Alt + F
项目目录
- .vscode:VSCode工具的配置文件
- node_modules:Vue项目运行的依赖文件
- public:资源文件夹(浏览器图标)
- src:源码文件夹
- .gitignore:git忽略文件
- index. html:入口HTML文件
- package. json:信息描述文件
- README. md:注释文件
- vite.config.js:Vue配置文件
模板语法
<template>
  <h3>模板语法</h3>
  <p>{{ msg }}</p>
</template>

<script>
export default{
  data(){
    return {
      msg:"神奇的魔法"
    }
  }
}
</script>
- 绑定仅支持单一表达式:简单算数,三目运算法,链式调用,能写在 return 后面
- 想插 HTML,需要使用 v-html
属性绑定
<template>
  <div v-bind:id="dynamicId" v-bind:class="dynamicClass">属性绑定</div>
</template>

<script>
export default{
  data(){
    return{
      dynamicClass:"appClass",
      dynamicId:"appId"
    }
  }
}
</script>

<style>
.appClass{
  color:red;
  font-size: 30px;
}
</style>
- v-bind 可以简写为:
- 动态绑定多个值
<template>
  <div v-bind="objectOfAttrs">属性绑定</div>
</template>

<script>
export default{
  data(){
    return{
      objectOfAttrs:{
        class:"appclass",
        id:"appid"
      }
    }
  }
}
</script>

<style>
.appclass{
  color:red;
  font-size: 30px;
}
</style>
条件渲染
<template>
  <h3>条件渲染</h3>
  <div v-if="flag">你能看见我吗?</div>
  <div v-else>那你还是看看我吧</div>
</template>

<script>
export default{
  data(){
    return{
      flag:false
    }
  }
}
</script>
<template>
  <h3>条件渲染</h3>
  <div v-if="type==='A'">A</div>
  <div v-else-if="type==='B'">B</div>
  <div v-else-if="type==='C'">C</div>
  <div v-else>Not A/B/C</div>

</template>

<script>
export default{
  data(){
    return{
      type:'D'
    }
  }
}
</script>
- v-show 和 v-if 一样但不能配合 v-else
- v-show 有较高初始开销,v-if 有较高切换开销
列表渲染
<template>
  <h3>列表渲染</h3>
  <p v-for="item in names">{{ item }}</p>
</template>

<script>

export default{
  data(){
      return{
          names:["百战程序员","尚学堂","IT"]
      }
  }
}
</script>
<template>
  <h3>列表渲染</h3>
  <div v-for="item in result">
    <p>{{item.title}}</p>
    <img v-bind:src="item.avatar" alt="">
  </div>
</template>

<script>

export default {
  data() {
    return {
      result: [
        {
          "id": 2261677,
          "title": "鄂尔多斯|感受一座城市的璀璨夜景感受一座城市,除了白日里的车水马龙,喧嚣繁华",
          "avatar": "https://pic.qyer.com/avatar/002/25/77/30/200?v=1560226451"
        },
        {
          "id": 2261566,
          "title": "成都这家洞穴暗黑风咖啡厅酷毙了!早C晚A走起\n成都天气这么热\n咖啡\n人必",
          "avatar": "https://pic.qyer.com/avatar/011/07/08/69/200?v=1572185180"
        },
        {
          "id": 2261662,
          "title": "【川西新龙-措卡湖】措卡湖,意为“乱石丛中的黑色海水”,神秘小众原汁原味。深",
          "avatar": "https://pic.qyer.com/avatar/009/88/48/58/200?v=1507386782"
        }
      ]

    }
  }
}
</script>
- items 可以提取出更多内容 (value,key,index)
- in 可以用 of 来替换
- 通过 :key=“item.id” 管理状态,保证数组变化时,不进行重新渲染
事件处理
内联事件处理器
<template>
  <h3>内联事件处理器</h3>
  <!-- <button v-on:click="count++">Add</button> -->
  <button @click="count++">Add</button>
  <p>{{count }}</p>
</template>

<script>
export default{
  data(){
    return{
      count:0
    }
  }
}
</script>
方法事件处理器(常用)
<template>
  <h3>方法事件处理器</h3>
  <button @click="addCount">Add</button>
  <p>{{count }}</p>
</template>

<script>
export default{
  data(){
    return{
      count:0
    }
  },
  //所有的方法函数都放在这里
  methods:{
    addCount(){
      this.count++;
      console.log("点击了")
    }
  }
}
</script>
事件参数
获取 event 事件
<template>
  <h3>Vue 中的 event 对象就是原生的 event</h3>
  <button @click="addCount">Add</button>
  <p>{{count }}</p>
</template>

<script>
export default{
  data(){
    return{
      count:0
    }
  },
  //所有的方法函数都放在这里
  methods:{
    addCount(event){
      this.count++;
      event.target.innerHTML="Add"+this.count;
    }
  }
}
</script>
事件传参
<template>
  <h3>事件传参</h3>
  <p @click="getNameHandle(item, $event)" v-for="(item, index) of names" :key="index">{{ item }}</p>
</template>

<script>
export default {

  data() {
    return {
      names: ["iwen", "ime", "frank"]
    }
  },


  //所有的方法函数都放在这里
  methods: {
    getNameHandle(name, e) {
      console.log(name, e);
    }
  }
}
</script>
事件修饰符
阻止默认事件
<template>
 <h3>事件修饰符</h3>
 <a @click.prevent="clickHandle" href="https://itbaizhan.com">百战程序员</a>
</template>

<script>
export default{
  data(){
    return{

    }
  },
  methods:{
    clickHandle(e){
      //阻止默认事件
      // e.preventDefault();
      console.log("点击了");
    }
  }
}

</script>
阻止事件冒泡
<template>
 <h3>事件修饰符</h3>
 <div @click="clickDiv">
  <p @click.stop="clickP">测试冒泡</p>
 </div>
</template>

<script>
export default{
  data(){
    return{

    }
  },
  methods:{
    clickDiv(){
      console.log("div");
    },
    clickP(){
      console.log("P");
    }
  }
}
</script>
数组变化侦测
变更方法
- push
- pop
- shift
- unshift
- splice
- sort
- reverse
替换一个数组
- filter
- concat
- slice
<template>
 <h3>数组变化侦听</h3>
 <button @click="addListHandle"></button>
 <ul>
    <li v-for="(item,index) of names" :key="index">{{  item }}</li>
  </ul>
  <button @click="concatHandle">合并数组</button>
  <h3>数组1</h3>
  <p v-for="(item,index) of nums1" :key="index">{{ item }}</p>
  <h3>数组 2</h3>
  <p v-for="(item,index) of nums2" :key="index">{{ item }}</p>
</template>

<script>
export default{
  data(){
    return{
      names:["iwen","ime","frank"],
      nums1:[1,2,3,4,5],
      nums2:[6,7,8,9,10]
    }
  },
  methods:{
    addListHandle(){
      //会引起 UI 自动更新
      // this.names.push("sarra")
      //不会引起 UI 自动更新
      //this.names.concat(["sarra"])
      this.names = this.names.concat(["sarra"])
    },
    concatHandle(){
      this.nums1 = this.nums1.concat(this.nums2)
    }
  }
}
</script>
计算属性
- 没引入计算属性,不推荐
<template>
  <h3>{{  itbaizhan.name }}</h3>
  <p>{{ itbaizhan.content.length>0?'Yes':'No' }}</p>
</template>

<script>
export default{
  data(){
    return{
      itbaizhan:{
        name:"百战程序员",
        content:["前端","Java","Python"]
      }
    }
  }
}
</script>
- 引入计算属性
<template>
  <h3>{{  itbaizhan.name }}</h3>
  <p>{{ itbaizhanContent }}</p>
</template>

<script>
export default{
  data(){
    return{
      itbaizhan:{
        name:"百战程序员",
        content:["前端","Java","Python"]
      }
    }
  },
  computed:{
    itbaizhanContent(){
        return this.itbaizhan.content.length>0?'Yes':'No'
    }
  }
}
</script>
- 计算属性会基于响应式依赖被缓存,一个计算属性仅会在响应式依赖更新时才会被重新计算
- 方法:会在重新渲染发生时再次执行函数
class 绑定
单对象绑定
<template>
  <p :class="{ 'active':isActive,'text-danger':hasError}">Class 样式绑定</p>
</template>

<script>
export default{
  data(){
    return{
      isActive:false
    }
  },

}
</script>

<style>
.active{
  color: red;
  font-size: 30px;
}
</style>
<template>
  <p :class="{ 'active':isActive,'text-danger':hasError}">Class 样式绑定</p>
</template>

<script>
export default{
  data(){
    return{
      isActive:true,
      hasError:true
    }
  },

}
</script>

<style>
.active{

  font-size: 30px;
}

.text-danger{
  color: red;
}
</style>
多对象绑定
<template>
  <p :class="classObject">Class 样式绑定</p>
</template>

<script>
export default{
  data(){
    return{
      classObject:{
        'active':true,
        'text-danger':false
      }
    }
  },

}
</script>

<style>
.active{

  font-size: 30px;
}

.text-danger{
  color: red;
}
</style>
绑定数组
<template>
  <p :class="[arrActive,arrHasError]">Class 样式绑定</p>
</template>

<script>
export default{
  data(){
    return{
      arrActive:"active",
      arrHasError:"text-danger"
    }
  },

}
</script>

<style>
.active{
  font-size: 30px;
}

.text-danger{
  color: red;
}
</style>
- 数组可以用三目运算符
- 数组和对象可以嵌套
Style 绑定
<template>
  <div :style="{color:activeColor,fontSize:fontSize+'px'}">Style绑定</div>
</template>

<script>
export default{
  data(){
    return{
      activeColor:'red',
      fontSize:30
    }
  }
}
</script>
<template>
  <div :style="styleObject">Style绑定</div>
</template>

<script>
export default{
  data(){
    return{
      styleObject:{
        color:'red',
        fontSize:'30px'
      }
    }
  }
}
</script>
- 绑定数组(多余)
侦听器
<template>
  <h3>侦听器</h3>
  <p>{{ message }}</p>
  <button @click="updateHandle">修改数据</button>
</template>

<script>
export default{
  data(){
    return{
      message:"Hello"
    }
  },
  methods:{
    updateHandle(){
      this.message = "World"
    }
  },
  watch:{
    message(newValue,oldValue){
      console.log(newValue,oldValue)
    }
  }

}
</script>
表单输入绑定
单选框
<template>
  <input type="text" v-model="message">
  <p>{{ message }}</p>
</template>

<script>
export default{
  data(){
    return{
      message:""
    }
  }
}
</script>
复选框
<template>
  <input type="checkbox" id="checkbox" v-model="checked"/>
  <label for="checkbox">{{  checked }}</label>
</template>

<script>
export default{
  data(){
    return{
      message:"",
      checked:false
    }
  }
}
</script>
修饰符
- .lazy
- .number
- .trim
- 失去焦点后显示:
<template>
  <input type="text" v-model.lazy="message">
  <p>{{ message }}</p>
</template>

<script>
export default{
  data(){
    return{
      message:""
    }
  }
}
</script>
模板引用(操作 DOM)
- 内容改变:{{ 模板语法 }}
- 属性改变:v-bind:指令
- 事件:v-on:click
- 如果没有特别的需求不要操纵 DOM
<template>
  <div ref="container" class="container">{{ content }}</div>
  <button @click="getElementHandle">获取元素</button>
  <input type="text" ref="username">
</template>

<script>
export default{
  data(){
    return{
      content:"内容"
    }
  },
  methods:{
    getElementHandle(){
      this.$refs.container.innerHTML = "hahaha";
      console.log(this.$refs.username.value)
    }
  }
}
</script>
组件组成
- Vue 会单独定义在.Vue 中,叫单文件组件(SFL)
组成结构
- scoped让当前样式只在当前文件中生效,局部样式
<template>
  <div>承载标签</div>
</template>

<script>
export default{}
</script>

<style scoped>
</style>
案例
- MyComponent.vue
<template>
  <div class="container">{{ message }}</div>
</template>

<script>
export default{
  data(){
    return{
      message:"组件基础组成"
    }
  }
}
</script>

<style>
.container{
  font-size:'30px';
  color:red;
}
</style>
- App.vue
<template>
  <!--3 标注组件 -->
  <MyComponent/>
</template>

<script>
//1 引入组件
import MyComponent from "./components/MyComponent.vue"

export default{
  //2 注入组件
  components:{
    MyComponent
  }
}
</script>

<style>

</style>
组件嵌套关系

Header.vue
<template>
    <h3>Header</h3>
</template>

<style scoped>
h3{
    width:100%;
    height: 100px;
    border: 5px solid #999;
    text-align: center;
    line-height: 100px;
    box-sizing: border-box;
}
</style>
Main.vue
<template>
    <div class="main">
        <h3>Main</h3>

    </div>
</template>

<script>
import Article from './Article.vue';
export default{
    components:{
        Article
    }
}
</script>

<style scoped>
.main{
    float: left;
    width: 70%;
    height: 400px;
    border: 5px solid #999;
    box-sizing: border-box;
    border-top: 0px;
}
</style>
Aside.vue
<template>
    <div class="aside">
        <h3>Aside</h3>
        <Item/>
        <Item/>
        <Item/>
    </div>
</template>
<script>
import Item from './Item.vue'
export default{
    components:{
        Item
    }
}
</script>

<style scoped>
.aside{
    float: right;
    width:30%;
    height: 600px;
    border: 5px solid #999;
    box-sizing: border-box;
    border-left: 10;
    border-top: 10;
}
</style>
Article.vue
<template>
    <h3>Article</h3>
</template>

<style scoped>
h3{
    width: 80%;
    margin:0 auto;
    text-align: center;
    line-height: 100px;
    box-sizing: border-box;
    margin-top: 50px;
    background: #999;
}
</style>
Item
<template>
    <h3>Item</h3>
</template>

<style scoped>
h3{
    width:80%;
    margin:0 auto;
    text-align: center;
    line-height: 100px;
    box-sizing: border-box;
    margin-top: 10px;
    background: #999;
}
</style>
组件注册方式
全局注册
最外层注册全局都能用 Main.js 中
import { createApp } from 'vue'
import App from './App.vue'
import Header from './pages/Header.vue'

const app = createApp(App)

app.component("Header",Header)

app.mount("#app")=
局部注册
如上节
- 如果没用该组件,打包会带上
- 大型项目中可维护性低
组件传递数据
- 解决方案:props
静态传递数据
- App.vue
<template>
  <Parent/>
</template>

<script>
import Parent from './components/parent.vue'
export default{
  components:{
    Parent
  }
}
</script>

<style>

</style>
- Parent.vue
<template>
    <h3>Parent</h3>
    <Child title="parent 数据" demo="测试"/>
</template>

<script>
import Child from './child.vue'
export default{
    data(){
        return{

        }
    },
    components:{
        Child
    }
}
</script>
- Child.vue
<template>
    <h3>Child</h3>
    <p>{{ title }}</p>
    <p>{{ demo }}</p>
</template>

<script>
export default{
    data(){
        return{

        }
    },
    props:["title","demo"]
}
</script>
动态传递数据
- parent.vue
<template>
    <h3>Parent</h3>
    <Child :title="message"/>
</template>

<script>
import Child from './child.vue'
export default{
    data(){
        return{
            message:"Parent 数据!"
        }
    },
    components:{
        Child
    }
}
</script>
- child.vue
<template>
    <h3>Child</h3>
    <p>{{ title }}</p>
</template>

<script>
export default{
    data(){
        return{

        }
    },
    props:["title"]
}
</script>
- props 传递数据只能父级传递给子级,不能相反
组件传递多种数据类型
- 任何类型
- parent.vue
<template>
    <h3>Parent</h3>
    <Child :title="message" :age="age" :names="names" :userInfo="userInfo"/>
</template>

<script>
import Child from './child.vue'
export default{
    data(){
        return{
            message:"Parent 数据!",
            age:10,
            names:["iwen","jixiyu"],
            userInfo:{
                name:"iwen",
                age:20
            }
        }
    },
    components:{
        Child
    }
}
</script>
- child.vue
<template>
    <h3>Child</h3>
    <p>{{ title }}</p>
    <p>{{  age }}</p>
    <ul>
        <li v-for="(item,index) of names" :key="index">{{ item }}</li>
    </ul>
    <p>{{ userInfo.name }}</p>
    <p>{{ userInfo.age }}</p>
</template>

<script>
export default{
    data(){
        return{

        }
    },
    props:["title","age","names","userInfo"]
}
</script>
组件传递数据 Props 校验
- 默认值,类型校验,必选项
- Props 传递来的数据是只读的
<template>
    <h3>ComponentA</h3>
    <ComponentB :title="title" :names="names"/>
</template>

<script>
import ComponentB from "./ComponentB.vue"
export default{
    data(){
        return{
            title:"title",
            names:["awin","jiangxiyu"]
        }
    },
    components:{
        ComponentB
    }
}
</script>
组件事件
- 子元素数据传递给父级数据 this.$emit
- 父级数据传递给子数据 props
- Child.vue
<template>
    <h3>Child</h3>
    <button @click="clickEventHandle">传递数据</button>
</template>

<script>
export default{
    data(){
        return{
            msg:"Child 数据!"
        }
    },
    methods:{
        clickEventHandle(){
            this.$emit("someEvent",this.msg)
        }
    }
}
</script>
- ComponentEvent.vue
<template>
    <h3>组件事件</h3>
    <Child @someEvent="getHandle"></Child>
    <p>父元素:{{ message }}</p>
</template>
<script>
import Child from './child.vue'
export default{
    data(){
        return {
            message:""
        }
    },
    components:{
        Child
    },
    methods:{
        getHandle(data){
            this.message = data;
        }
    }
}
</script>
组件事件配合 V-model
- 子组件不断发送数据给父组件,并且实时展示
- SearComponent.vue
<template>
    搜索:<input type="text" v-model="search">
</template>

<script>
export default{
    data(){
        return{
            search:""
        }
    },
    watch:{
        search(newValue,oldValue){
            this.$emit("searchEvent",newValue)
        }
    }
}
</script>
- Main.vue
<template>
    <h3>Main</h3>
    <p>搜索内容为:{{ search }}</p>
    <SearchCompoent @searchEvent="getSearch"/>
</template>

<script>
import SearchCompoent from './SearchCompoent.vue';
export default{
    components:{
        SearchCompoent
    },
    data(){
        return{
            search:""
        }
    },
    methods:{
        getSearch(data){
            this.search = data;
        }
    }
}
</script>
组件数据传递
- props 额外操作方式子传父,函数回调
- ComponentA.vue
<template>
    <h3>ComponentA</h3>
    <p>父元素:{{ message }}</p>
    <ComponentB title="标题" :onEvent="dataFn"/>
</template>

<script>
import ComponentB from './ComponentB.vue'
export default{
    data(){
        return {
            message:""
        }
    },
    components:{
        ComponentB,
    },
    methods:{
        dataFn(data){
            this.message = data
        }
    }
}
</script>
- ComponentB.vue
<template>
    <h3>ComponentB</h3>
    <p>{{ title }}</p>
    <p>{{  onEvent('传递数据') }}</p>
</template>

<script>
export default{
    data(){
        return {

        }
    },
    props:{
        title:String,
        onEvent:Function
    }
}
</script>
透传 Attributes
- 使用率低,了解
- “透传attribute"指的是传递给一个组件却没有被该组件声为props或emits的attribute或者 v-on事件
监听器。最常见的例子就是class、style和id - 当一个组件以单个元素为根作渲染时,透传的attribute会自动被添加到根元素上
- 父组件
<template>
  <AttrComponents class="attr-containder"/>
</template>

<script>
import AttrComponents from './components/AttrComponents.vue'

export default{
  components:{
    AttrComponents
  }
}
</script>

<style>

</style>
- 子组件
<template>
    <!-- 透传属性必须唯一根元素 -->
    <h3>透传属性</h3>
</template>

<script>
export default{
    inheritAttrs:false
}
</script>

<style>
.attr-containder{
    color:red
}
</style>
插槽
- 传递模板,子组件渲染
- slot 插槽出口
- App.vue

<template>
  <SlotsBase>
    <div>
      <h3>插槽标题</h3>
      <p>插槽内容</p>
    </div>
  </SlotsBase>
</template>

<script>
import SlotsBase from './components/SlotsBase.vue'
export default{
  components:{
    SlotsBase
  }
}
</script>

<style>

</style>
- SlotsBase.vue
<template>
    <slot></slot>
    <h3>插槽基础知识</h3>
</template>
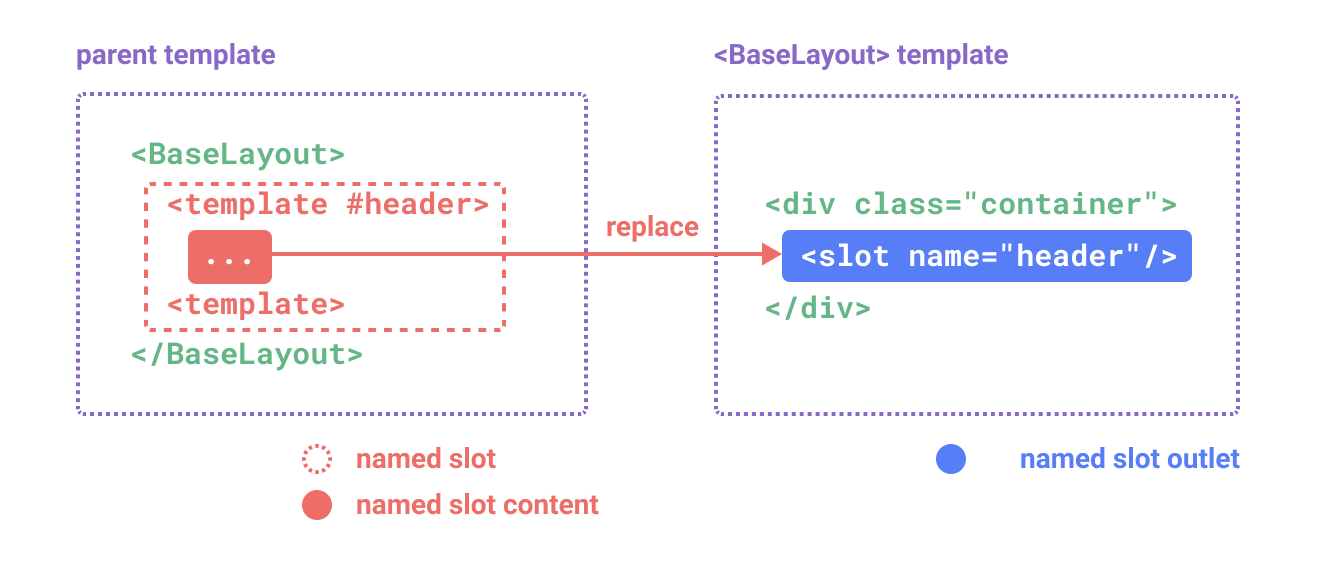
插槽 Slots
- 插槽中的数据应该在父元素内容
- 插槽默认值,在 slot 中直接写
- 具名插槽
-
- v-slot间写为#
- App.vue
<template>
  <SlotsTow>
    <template v-slot:header>
      <h3>{{ message }}</h3>
    </template>
    <template v-slot:main>
      <p>内容</p>
    </template>
  </SlotsTow>
</template>

<script>
import SlotsTow from './components/SlotsTow.vue'
export default{
  components:{
    SlotsTow
  },
  data(){
    return{
      message:"插槽内容续集"
    }
  }
}
</script>

<style>

</style>
- SlotsTow.vue
<template>
    <h3>Slots插槽续集</h3>
    <slot name="header">插槽默认值</slot>
    <hr>
    <slot name="main">插槽默认值</slot>
</template>
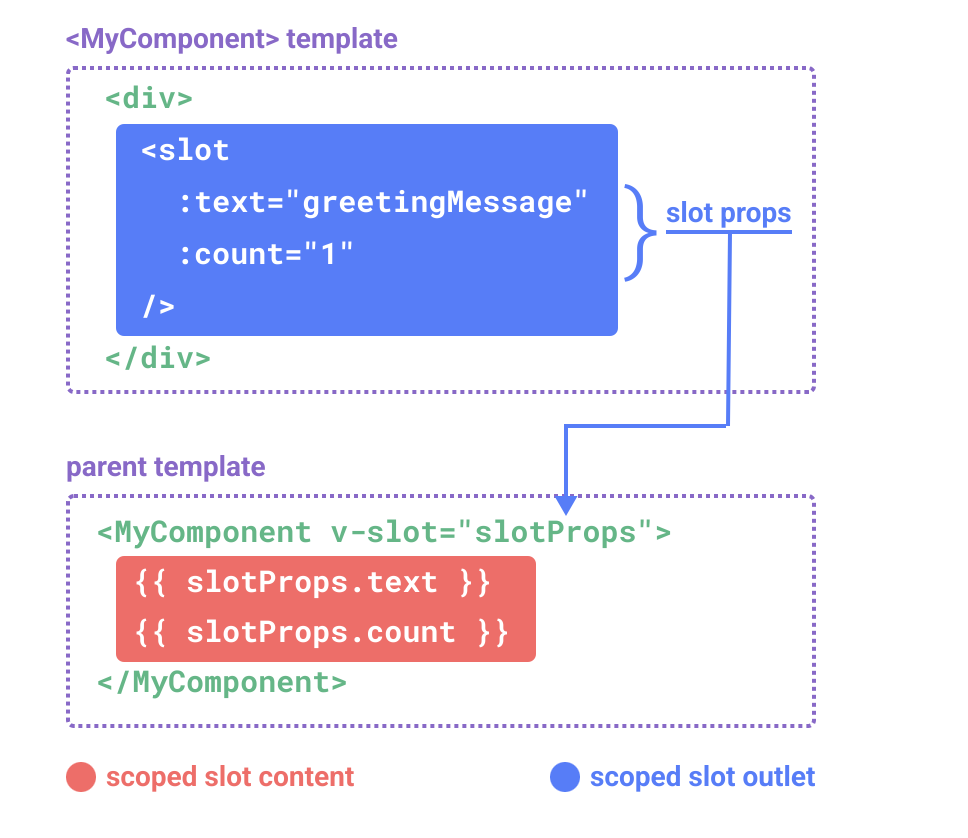
插槽 Slots
- 子元素数据传给父插槽
<template>
  <SlotsAttr v-slot="slotProps">
    <h3>{{  currentTest }} - {{  slotProps.msg }}</h3>
  </SlotsAttr>
</template>

<script>
import SlotsAttr from './components/SlotsAttr.vue'
export default{
  data(){
    return{
      currentTest:"测试内容"
    }
  },
  components:{
    SlotsAttr
  }
}
</script>

<style>

</style>
<template>
    <h3>Slots 再续集</h3>
    <slot :msg="childMessage"></slot>
</template>

<script>
export default{
    data(){
        return{
            childMessage:"子组件数据"
        }
    }
}
</script>
具名插槽传递数据
<template>
  <SlotsAttr>
    <template #header="slotProps">
      <h3>{{ currentTest }}-{{ slotProps.msg }}</h3>
    </template>
    <template #main="slotProps">
      <p>{{ slotProps.job }}</p>
    </template>
  </SlotsAttr>
</template>

<script>
import SlotsAttr from './components/SlotsAttr.vue'
export default{
  data(){
    return{
      currentTest:"测试内容"
    }
  },
  components:{
    SlotsAttr
  }
}
</script>

<style>

</style>
<template>
    <h3>Slots 再续集</h3>
    <slot name="header" :msg="childMessage"></slot>
    <slot name="main" :job="jobMessage"></slot>
</template>

<script>
export default{
    data(){
        return{
            childMessage:"子组件数据",
            jobMessage:"itbaizhan"
        }
    }
}
</script>
组件的声明周期

- 创建:创建后系统才开始初始化数据
- 渲染:显示
- 更新:用户操作导致改变,渲染和显示
- 销毁
<template>
  <h3>组件的声明周期</h3>
  <p>{{ message }}</p>
  <button @click="updateHandle"></button>
</template>

<script>
export default{
  methods:{
    updateHandle(){
      this.message = "更新之后"
    }
  },
  data(){
    return{
      message:"更新之前"
    }
  },
  beforeCreate(){
    console.log("组件创建之前")
  },
  created(){
    console.log("组件创建之后")
  },
  beforeMount(){
    console.log("组件渲染之前")
  },
  mounted(){
    console.log("组件渲染之后")
  },
  beforeUpdate(){
    console.log("组件更新之前")
  },
  updated(){
    console.log("组件更新之后")
  },
  beforeUnmount(){
    console.log("组件销毁之前")
  },
  unmounted(){
    console.log("组件销毁之后")
  }
}
</script>
<style>

</style>
声明周期的应用
- 模拟网络请求渲染数据
- 通过 ref 获取 dom 结构
<template>
  <UserComponent/>
</template>

<script>
import UserComponent from './components/UserComponent.vue'
export default{
  components:{
    UserComponent
  }
}
</script>
<style>

</style>
<template>
    <h3>组件声明周期函数应用</h3>
    <p ref="name">百战程序员</p>
  </template>

  <script>
  export default{
    beforeMount(){
      console.log(this.$refs.name);
    },
    mounted(){
      console.log(this.$refs.name)
    }
  }
  </script>
  <style>

  </style>
- 读取 HTML 的过程放到页面渲染之后
- 并且在渲染页面后再渲染数据
<template>
    <h3>组件声明周期函数应用</h3>
    <p ref="name">百战程序员</p>
    <ul>
        <li v-for="(item, index) of banner" :key ="index">
            <h3>{{ item.title }}</h3>
            <p>{{ item.content }}</p>
        </li>
    </ul>
</template>

<script>
export default {
    data() {
        return {
            banner: []
        }
    },
    mounted() {
        //网络请求
        this.banner = [
            {
                "title": "我在爱尔兰",
                "content": "爱尔兰(爱尔兰语: Poblacht na hEireann;英语: Republic of Ireland),是一个..."
            },
            {
                "title": "一个人的东京",
                "content": "东京(Tokyo)是日本国的首都,是亚洲第一大城市,世界第二大城市。全球最的经济中心..."
            },
            {
                "title": "普罗旺斯的梦",
                "content": "普罗旺斯(Provence)位于法国东南部,毗邻地中海和意大利,从地中海沿岸延伸到内陆..."
            }
        ]
    },
}
</script>
<style></style>
动态组件
<template>
  <ComponentA/>
  <ComponentB/>
  <component :is="tabComponent"></component>
  <button @click="changeHandle">切换组件</button>
</template>

<script>
import ComponentA from './components/ComponentA.vue'
import ComponentB from './components/ComponentB.vue'
export default{
  data(){
    return{
      tabComponent: "ComponentA"
    }
  },
  components:{
    ComponentA,
    ComponentB
  },
  methods:{
    changeHandle(){
      this.tabComponent = this.tabComponent == "ComponentA"?"ComponentB":"ComponentA"
    }
  }
}
</script>
<style>

</style>
组件保持存活
- 切换时会卸载组件
<template>
  <KeepAlive>
    <component :is="tabComponent"></component>
  </KeepAlive>

  <button @click="changeHandle">切换组件</button>
</template>

<script>
import ComponentA from './components/ComponentA.vue'
import ComponentB from './components/ComponentB.vue'
export default{
  data(){
    return{
      tabComponent: "ComponentA"
    }
  },
  components:{
    ComponentA,
    ComponentB
  },
  methods:{
    changeHandle(){
      this.tabComponent = this.tabComponent == "ComponentA"?"ComponentB":"ComponentA"
    }
  }
}
</script>
<style>

</style>
<template>
    <h3>ComponentA</h3>
    <p>{{ message }}</p>
    <button @click="updateHandle">更新数据</button>
</template>

<script>
export default{
    beforeUnmount(){
        console.log("组件卸载前")
    },
    unmounted(){
        console.log("组件卸载后")
    },
    data(){
        return{
            message:"老数据"
        }
    },
    methods:{
        updateHandle(){
            this.message = "新数据"
        }
    }
}
</script>
<template>
    <h3>ComponentB</h3>
</template>
异步组件
- 在第一次进入网页时,没显示出来的网页先不加载,等显示出来后再加载
<template>
  <KeepAlive>
    <component :is="tabComponent"></component>
  </KeepAlive>

  <button @click="changeHandle">切换组件</button>
</template>

<script>
import { defineAsyncComponent } from 'vue'
import ComponentA from './components/ComponentA.vue'
// import ComponentB from './components/ComponentB.vue'
const ComponentB = defineAsyncComponent(()=>
  import("./components/ComponentB.vue")
)
export default{
  data(){
    return{
      tabComponent: "ComponentA"
    }
  },
  components:{
    ComponentA,
    ComponentB
  },
  methods:{
    changeHandle(){
      this.tabComponent = this.tabComponent == "ComponentA"?"ComponentB":"ComponentA"
    }
  }
}
</script>
<style>

</style>
依赖注入
- 父组件作为依赖提供者,无论孩子有多深,都能用依赖获取数据。
- provide 和 inject
- 只能由上到下,不能反向
- 可以在整个应用提供

- 爷爷
<template>
  <h3>祖宗</h3>
  <Father />
</template>

<script>
import Father from './components/Father.vue'
export default{
  // provide:{
  //   message:"爷爷的财产"
  // },
  data(){
    return{
      message:"爷爷的财产"
    }
  },
  provide(){
    return{
      message:this.message
    }
  },
  components:{
    Father
  }
}
</script>
<style>

</style>
- 父亲
<template>
    <h3>父亲</h3>
    <Son />
  </template>

  <script>
  import Son from './Son.vue'
  export default{
    props:{
        title:{
            type:String
        }
    },
    components:{
        Son
    }
  }
  </script>
- 孙子
<template>
    <h3>孩子</h3>
    <p>{{ fullMessage }}</p>
  </template>

  <script>
  export default{
    props:{
        title:{
            type:String
        }
    },
    inject:["message"],
    data(){
        return{
            fullMessage:this.message
        }
    }
  }
  </script>
- 全局数据
import { createApp } from 'vue'
import App from './App.vue'


const app = createApp(App)
app.provide("golabData","我是全局数据")
app.mount("#app")
Vue应用
- src/assets:资源文件夹
<!DOCTYPE html>
<html lang="en">
  <head>
    <meta charset="UTF-8">
    <link rel="icon" href="/favicon.ico">
    <meta name="viewport" content="width=device-width, initial-scale=1.0">
    <title>Vite App</title>
  </head>
  <body>
    <div id="app"></div>
    <script type="module" src="/src/main.js"></script>
  </body>
</html>
import { createApp } from 'vue'
import App from './App.vue'


const app = createApp(App)

app.mount("#app")
路由
- cnpm install --save vue-router@4
- App.vue
<template>
  <router-link to="/home">首页</router-link>
  <router-link to="/blog">博客</router-link>
  <router-view></router-view>
</template>

<script>
export default{
  name:'App'
}
</script>
<style>

</style>
- router.js
import {createRouter,createWebHashHistory} from "vue-router"
import Home from "./components/Home.vue"
import Blog from "./components/Blog.vue"
const router = createRouter({
  history:  createWebHashHistory(),
  routes:[
    {
        path:"/home",
        component:Home
    },
    {
        path:"/blog",
        component:Blog
    }
  ]
})

export default router;
- main.js
import { createApp } from 'vue'
import App from './App.vue'
import router from './router.js'

const app = createApp(App)
app.use(router);
app.mount("#app")
- Home.vue,Blog.vue 略