属性选择器
# 通过标签的属性来查找标签,标签都有属性, id值和class值是每个标签都自带的属性,还 有另外一种:自定义属性
<div class="c1" id="d1" username='kevin' password='123'></div># 针对于username='kevin' password='123'属性就是div标签的自定义属性
伪类选择器(鼠标)
# 分组选择器使用逗号隔开,所有的选择器都是并列的
# 组合(嵌套)选择器使用的是空格隔开,选择器不是并列的,最终生效的还是最后一个选择器
未访问的链接:a:link {color: #FF0000}
鼠标移动到链接上:a:hover {color: #FF00FF}
选定的链接:a:active {color: #0000FF}
已访问的链接:a:visited { color: #00FF00}
input输入框获取焦点时样式:input:focus { outline: none; background-color: #eee;}
<!DOCTYPE html>
<html lang="en">
<head>
    <meta charset="UTF-8">
    <title>Title</title>
    <style>
        a:link {
          color: #FF0000
        }

        a:hover {
          color: #FF00FF
        }

        a:active {
          color: #0000FF
        }

        a:visited {
          color: #00FF00
        }

        input:focus {
          outline: none;
          background-color: #eee;
        }
    </style>
</head>
<body>
<a href="https://www.baidu.com">百度访问</a>'
<input type="text">
</body>
</html>
伪元素选择器(字体)
first-letter:常用的给首字母设置特殊样式
before:在每个元素之前插入内容
after:在每个元素之后插入内容
# before和after多用于清除浮动
<!DOCTYPE html>
<html lang="en">
<head>
    <meta charset="UTF-8">
    <title>Title</title>
    <style>
        .p1:first-letter{
            font-size: 48px;
            color: forestgreen;
        }

        p:before{
            content: '*';
            color: crimson;
        }

        p:after{
            content: '?';
            color: darkviolet;
        }
    </style>
</head>
<body>
<p class="p1">窈窕淑女,君子好逑</p>
</body>
</html>
选择器的优先级
比较选择器的优先级高低
1. 选择器相同的情况下:
# 离谁越近,就听谁的,就近原则.
2. 选择器不同的情况下:
行内选择器 >>> id选择器 >>> 类选择器 >>> 标签选择器
CSS属性--宽和高
width属性可以为元素设置宽度。
height属性可以为元素设置高度。
# 块级标签才能设置宽度,内联标签的宽度由内容来决定。
# 默认情况下,只有块儿级元素才能设置长、宽,内联元素不能设置,设置了也不错,就是没有效果而已"
CSS属性--字体属性
font-family:文字字体
font-weight:用来设置字体的字重(粗细):
normal--默认值,标准粗细
bold--粗体、bolder--更粗
lighter--更细
100~900--设置具体粗细,400等同于normal,而700等同于bold
inherit--继承父元素字体的粗细值文本颜色:颜色属性被用来设置文字的颜色。
● 十六进制值 - 如: #FF0000
● 一个RGB值 - 如: RGB(255,0,0)
● 颜色的名称 - 如: red
# 还有rgba(255,0,0,0.3),第四个值为alpha, 指定了色彩的透明度/不透明度,0.0到1.0之间
text-align :规定元素中文本的水平对齐方式。
left--左边对齐 默认值、right--右对齐、center--居中对齐text-decoration:文字装饰
none--默认,定义标准的文本。
underline--定义文本下的一条线。
overline--定义文本上的一条线。
line-through--定义穿过文本下的一条线text-decoration: none:去掉a标签默认的自划线
text-indent: 32px: 将段落的第一行缩进 32像素
<!DOCTYPE html>
<html lang="en">
<head>
    <meta charset="UTF-8">
    <title>Title</title>
  <style>
        p{
            font-family: 'Malgun Gothic Semilight';   /*文字字体*/
            font-size: 19px;        /*文字大小*/
            font-weight: lighter;   /*文字粗细*/
            color: #5005e8;         /*文字颜色*/
            text-align:left;        /*文字对齐*/
            text-decoration:line-through hotpink;   /*文字装饰*/
            text-indent: 30px;   /*首行缩进*/
        }

        p:hover {color: lightcoral;}  /* 鼠标移动到链接上 */
        p:before {content:"*";color:green;}   /*在每个<p>元素之前插入内容*/

        a{
            font-family: 'Malgun Gothic Semilight';   /*文字字体*/
            font-size: 19px;        /*文字大小*/
            font-weight: lighter;   /*文字粗细*/
            color: #e879da;         /*文字颜色*/
            text-decoration: none;     /*去掉a标签默认的自划线*/
        }

        a:hover {color: #cfd1e7;}  /* 鼠标移动到链接上 */
        a:before {content:"*";color:mediumpurple;}   /*在每个<p>元素之前插入内容*/
        a:after {content:"*";color:mediumpurple;}   /*在每个<p>元素之后插入内容*/
  </style>
</head>
<body>
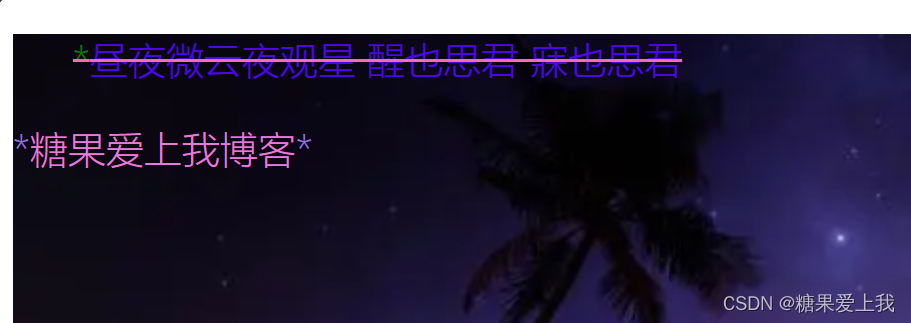
<p>昼夜微云夜观星 醒也思君 寐也思君</p>
<a href="https://blog.csdn.net/qq_48064830?type=blog">糖果爱上我博客</a>
</div>
</body>
</html>
CSS属性--背景属性
background-color: 背景颜色
background-image: url('1.jpg');:背景图片
背景重复: repeat(默认):背景图片平铺排满整个网页
repeat-x:背景图片只在水平方向上平铺
repeat-y:背景图片只在垂直方向上平铺
no-repeat:背景图片不平铺
background-repeat: no-repeat;
background-position: left top;:背景位置
/*background-position: 200px 200px;*/# 支持简写:background:#336699 url('1.png') no-repeat left top;
OCTYPE html>
<html lang="en">
<head>
    <meta charset="UTF-8">
    <title>Title</title>
  <style>
        div{
            width: 1200px;
            height: 600px;
            /*background-color: #01040c;  !*背景颜色*!*/
            /*background-position: left top;  !*背景位置*!*/
            background:  #010911 url('https://img2.baidu.com/it/u=2326653002,1664710340&fm=253&fmt=auto&app=138&f=JPEG?w=889&h=500') no-repeat left top;
            border-repeat: no-repeat;
        }

        p{
            wid;
            font-family: 'Malgun Gothic Semilight';   /*文字字体*/
            font-size: 19px;        /*文字大小*/
            font-weight: lighter;   /*文字粗细*/
            color: #5005e8;         /*文字颜色*/
            text-align:left;        /*文字对齐*/
            text-decoration:line-through hotpink;   /*文字装饰*/
            text-indent: 30px;   /*首行缩进*/
        }

        p:hover {color: lightcoral;}  /* 鼠标移动到链接上 */
        p:before {content:"*";color:green;}   /*在每个<p>元素之前插入内容*/

        a{
            font-family: 'Malgun Gothic Semilight';   /*文字字体*/
            font-size: 19px;        /*文字大小*/
            font-weight: lighter;   /*文字粗细*/
            color: #e879da;         /*文字颜色*/
            text-decoration: none;     /*去掉a标签默认的自划线*/
        }

        a:hover {color: #cfd1e7;}  /* 鼠标移动到链接上 */
        a:before {content:"*";color:mediumpurple;}   /*在每个<p>元素之前插入内容*/
        a:after {content:"*";color:mediumpurple;}   /*在每个<p>元素之后插入内容*/
  </style>
</head>
<body>
<div>
    <p>昼夜微云夜观星 醒也思君 寐也思君</p>
    <a href="https://blog.csdn.net/qq_48064830?type=blog">糖果爱上我博客</a>
</div>
</body>
</html>
CSS属性--边框属性和border-radius
border-width: 边框厚度
border-style: 边框样式
border-color: 边框颜色
# 简写:border: 2px solid red;
# 除了可以统一设置边框外还可以单独为某一个边框设置样式
border-top-style:dotted;
border-top-color: red;
border-right-style:solid;
border-bottom-style:dotted;
border-left-style:none;
<!DOCTYPE html> <html lang="en"> <head> <meta charset="UTF-8"> <title>Title</title> <style> p{ /*border-width:5px;*/ /*border-style: solid;*/ /*border-color: salmon ;*/ /*border:5px solid #e74ad9;*/ /*border-left-style: solid;*/ /*border-left-color: rebeccapurple;*/ } div{ width: 260px; border:5px solid rgba(231, 74, 217, 0.99); /* background: aqua;*/ /* !*border-radius: 50%;*!*/ /* border-top-right-radius: 50%;*/ } </style> </head> <body> <div> <p>你就仗着我爱你所以天天欺负我是吧</p> </div> </body> </html>border-radius:实现圆角边框的效果
<!DOCTYPE html>
<html lang="en">
<head>
    <meta charset="UTF-8">
    <title>Title</title>
  <style>
    div{
      width: 260px;
      height: 260px;
      background: aqua;
      /*border-radius: 130px;*/
      border-top-right-radius: 50%;
    }
  </style>
</head>
<body>
<div></div>
</body>
</html>
CSS属性--display属性
# display:"none" :HTML文档中元素存在,但是在浏览器中不显示。
一般用于配合JavaScript代码使用
display:"block": 默认占满整个页面宽度,如果设置了指定宽度,则会用margin填充剩下部分
display:"inline": 按行内元素显示,此时再设置元素的width、height、margin-top、margin-bottom和float属性都不会有什么影响。
display:"inline-block":使元素同时具有行内元素和块级元素的特点。
CSS盒子模型
# 以快递盒为例:
1. 快递盒和快递盒之间的举例称为是外边距,用margin值表示
2. 快递盒和里面物品之间的举例称为是内边距,用padding来表示
3. 盒子的厚度我们称为是边框,用border来表示
4. 物品的实际大小称为是contentmargin外边距: margin-top:5px;
margin-right:10px;
margin-bottom:15px;
margin-left:20px;/*第一个代表上,第二个代表左右,第三个代表下*/ margin: 10px 20px 30px;padding内填充: padding-top: 5px;
padding-right: 10px;
padding-bottom: 15px;
padding-left: 20px;
float浮动
# 在 CSS 中,任何元素都可以浮动。
# 三种取值: left--向左浮动
right--向右浮动
none--默认值,不浮动
# clear属性规定元素的哪一侧不允许其他浮动元素:
left--在左侧不允许浮动元素、right、both、none、inherit--规定应该从父元素继承
# 注意:clear属性只会对自身起作用,而不会影响其他元素
# 浮动带来的影响:父标签塌陷问题
# 清除浮动:固定高度、伪元素清除法、overflow:hidden
# 伪元素清除法(使用较多):
.clearfix:after {
  content: "";
  display: block;
  clear: both;
}
# 完整清除浮动语法:
<!DOCTYPE html>
<html lang="en">
<head>
    <meta charset="UTF-8">
    <title>Title</title>
  <style>
    .d1{
      width: 100px;
      height: 100px;
      background: hotpink;
      float: left;
    }

    .d2{
      width: 100px;
      height: 100px;
      background: green;
      float: left;
    }

    .d3{
      border: 2px solid black;
    }

    /*.d4{*/
    /*  !*height: 100px;*!*/
    /*  !*清除浮动*!*/
    /*  clear:both;*/
    /*}*/

    /*谁塌陷给谁加*/
    .clearfix:after{
      content: '';
      /*把它设置成快模块*/
      display: block;
      clear: both;
    }
  </style>
</head>
<body>
<div class="d3 clearfix">
  <div class="d1"></div>
  <div class="d2"></div>
<!--  <div class="d4"></div>-->
</div>
</body>
</html>
浮动案例--小米
<!DOCTYPE html>
<html lang="en">
<head>
    <meta charset="UTF-8">
    <title>Title</title>
  <style>
    *{
      margin: 0;
      padding: 0;
    }

    /*去黑点*/
    ul li{
      list-style-type: none;
      float: left;
      margin-right: 20px;
    }

    ul li a{
      text-decoration-line:none;
      color: #757575;
      font-weight: 200;
      font-size: 14px;
    }

    /*鼠标颜色*/
    ul li a:hover{
      color: hotpink;
    }

  </style>
</head>
<body>
<ul>
  <li><a href="">Xiaomi手机</a></li>
  <li><a href="">Redmi手机</a></li>
  <li><a href="">电脑</a></li>
  <li><a href="">电视</a></li>
  <li><a href="">家电</a></li>
  <li><a href="">平板</a></li>
  <li><a href="">路由器</a></li>
  <li><a href="">服务中心</a></li>
  <li><a href="">社区</a></li>

</ul>
</body>
</html>


