1.进程和线程的概念
抛开那些官方的概念,我们可以大致理解为:进程就是手机里运行的一个个应用,他们都是一个个的进程(当然,有些App是多进程的,这个先不谈)。线程则是进程中对应的一个任务的执行控制流。如果将一个进程比喻成一个车间的话,那么这个车间里的每个生产线就可以看作是一个线程。
高速缓冲区的概念:
在最早的时候,计算机只有进程。同一个时间内,是一个进程对内存进行操作。但这样效率比较低。比如我们要进程一个文件的读写操作,需要等这个操作完成,才能干别的事。并发概念出来后,可以多个进程进行轮换切换,以达到相对意义上的“同时”对内存进行操作。
但是这样有一个问题,就是进程与进程之间的切换需要耗费很多资源。因此为了更加的高效,便设计出了线程,将内存中的数据存在高速缓冲区里,每个线程都有其对应的高速缓冲区,线程往高速缓冲区里存取数据,这样原先的进程间切换就变成了线程间的切换,更加轻量化了,从而减少资源耗损。
每个线程都有独立的高速缓冲区,就是寄存器。可以理解为CPU里的内存。一核代表了一个线程,所以假设一个4核8G的手机,一个2核就有2G。
我们知道,平时我们写的java文件,通过javac把.java文件变成.class文件,然后再通过类加载器,classLoader把.class文件加载到内存中,而jvm在运行这个.class字节码文件的时候,会进行一些内存划分。
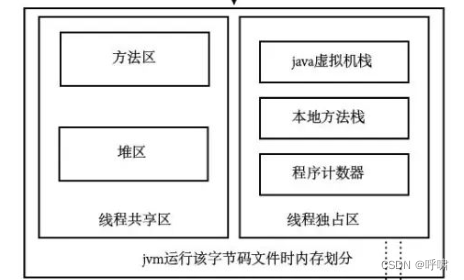
这里面有主要两块的划分,一个是线程共享区,一个是线程独占区。 共享区就包括了方法区和堆区,而独占 区就包括了,java虚拟机栈,本地方法栈,程序计算器。所以大家记住了,堆里面的内容是共享的,而栈里的内容是独占的。所以我们定义在虚拟机栈的数据,彼此之间是不能随便访问的。如果我们用final修饰数据,就将数据从线程A的虚拟机栈中复制到方法区里,这样线程2就能从方法区里访问这个数据。
线程的生命周期:
Thread -> Runnable ->Runing ->Terminated.
在Running之后,也可以经过wait()方法进入到waiting状态。在waiting状态的线程,可以通过notify()或者notifyAll()方法唤醒,使其重新进入Runnable()状态。

在没有锁的情况下,当一个Thread创建之后,start()调用后,就变成了Runable()状态,也就是可执行情况。然后当该线程抢占到时间片后,就变成了Running状态。也就是已经在执行状态了。当执行完成后就到了Termianted,也就是结束了。如果在还没结束的时候,调用了wait状态,就会进入等待waiting状态。然后一直等到其他线程唤醒他,也就是调用notify或者notifyAll.然后进入runnable状态,这个时候,然后如果抢占到时间片,就会再进入running状态。
当然,这是没有锁的情况下。如果涉及到锁,其实也很简单,就是 多了一个阻塞状态。blocked.
如果涉及到锁的状态,当该线程抢到锁之后,其他的线程就会进入Blocked状态,等到该线程释放锁之后,那些阻塞的线程在拿到锁喉进入Runnable状态。

这是一个线程的状态图。需要注意的是, 比如我们调用了Thread.sleep,他就会进入Timed_waiting状态,也就是等待有限时间状态。
我们经常new一个线程,这个线程其实底层是Linux系统的线程,我们可以跟踪来看他的start()方法:
    public synchronized void start() {
        /**
         * This method is not invoked for the main method thread or "system"
         * group threads created/set up by the VM. Any new functionality added
         * to this method in the future may have to also be added to the VM.
         *
         * A zero status value corresponds to state "NEW".
         */
        // Android-changed: Replace unused threadStatus field with started field.
        // The threadStatus field is unused on Android.
        if (started)
            throw new IllegalThreadStateException();

        /* Notify the group that this thread is about to be started
         * so that it can be added to the group's list of threads
         * and the group's unstarted count can be decremented. */
        group.add(this);

        // Android-changed: Use field instead of local variable.
        // It is necessary to remember the state of this across calls to this method so that it
        // can throw an IllegalThreadStateException if this method is called on an already
        // started thread.
        started = false;
        try {
            // Android-changed: Use Android specific nativeCreate() method to create/start thread.
            // start0();
            nativeCreate(this, stackSize, daemon);
            started = true;
        } finally {
            try {
                if (!started) {
                    group.threadStartFailed(this);
                }
            } catch (Throwable ignore) {
                /* do nothing. If start0 threw a Throwable then
                  it will be passed up the call stack */
            }
        }
    }
我们看到try代码块里有关键的一行:
  // Android-changed: Use Android specific nativeCreate() method to create/start thread.
            // start0();
            nativeCreate(this, stackSize, daemon);
在这里可以看到,这是android修改了这个方法,本地创建。
// Android-changed: Use Android specific nativeCreate() method to create/start thread.
    // The upstream native method start0() only takes a reference to this object and so must obtain
    // the stack size and daemon status directly from the field whereas Android supplies the values
    // explicitly on the method call.
    // private native void start0();
    private native static void nativeCreate(Thread t, long stackSize, boolean daemon);
根据前面的注释,我们翻译一下:
//Android更改了此方法,使用android特定的nativeCreate()方法创建/启动线程。
//上游的native方法start0()仅仅引用了这个对象,因此必须获得
//堆栈大小和守护进程状态来自android提供的值。
//在此方法上显示执行
//私有native方法start0()
在android8.0之前是使用start0方法,之后使用natvieCreate方法。
我们跟踪start0()这个native方法:
static JNINativeMethod methods[] = {
    {"start0",           "(JZ)V",        (void *)&JVM_StartThread},
    {"setPriority0",     "(I)V",       (void *)&JVM_SetThreadPriority},
    {"yield",            "()V",        (void *)&JVM_Yield},
    {"sleep",            "(Ljava/lang/Object;J)V",       (void *)&JVM_Sleep},
    {"currentThread",    "()" THD,     (void *)&JVM_CurrentThread},
    {"interrupt0",       "()V",        (void *)&JVM_Interrupt},
    {"isInterrupted",    "(Z)Z",       (void *)&JVM_IsInterrupted},
    {"holdsLock",        "(" OBJ ")Z", (void *)&JVM_HoldsLock},
    {"setNativeName",    "(" STR ")V", (void *)&JVM_SetNativeThreadName},
};
可以看到start0方法,映射为JVM_StartThread()方法,这个方法通过方法名可以看到属于JVM里的函数。找到这个方法:
JVM_ENTRY(void, JVM_StartThread(JNIEnv* env, jobject jthread))
  JVMWrapper("JVM_StartThread");
  JavaThread *native_thread = NULL;

  // We cannot hold the Threads_lock when we throw an exception,
  // due to rank ordering issues. Example:  we might need to grab the
  // Heap_lock while we construct the exception.
  bool throw_illegal_thread_state = false;

  // We must release the Threads_lock before we can post a jvmti event
  // in Thread::start.
  {
    // Ensure that the C++ Thread and OSThread structures aren't freed before
    // we operate.
    MutexLocker mu(Threads_lock);

    // Since JDK 5 the java.lang.Thread threadStatus is used to prevent
    // re-starting an already started thread, so we should usually find
    // that the JavaThread is null. However for a JNI attached thread
    // there is a small window between the Thread object being created
    // (with its JavaThread set) and the update to its threadStatus, so we
    // have to check for this
    if (java_lang_Thread::thread(JNIHandles::resolve_non_null(jthread)) != NULL) {
      throw_illegal_thread_state = true;
    } else {
      // We could also check the stillborn flag to see if this thread was already stopped, but
      // for historical reasons we let the thread detect that itself when it starts running

      jlong size =
             java_lang_Thread::stackSize(JNIHandles::resolve_non_null(jthread));
      // Allocate the C++ Thread structure and create the native thread.  The
      // stack size retrieved from java is signed, but the constructor takes
      // size_t (an unsigned type), so avoid passing negative values which would
      // result in really large stacks.
      size_t sz = size > 0 ? (size_t) size : 0;
      native_thread = new JavaThread(&thread_entry, sz);

      // At this point it may be possible that no osthread was created for the
      // JavaThread due to lack of memory. Check for this situation and throw
      // an exception if necessary. Eventually we may want to change this so
      // that we only grab the lock if the thread was created successfully -
      // then we can also do this check and throw the exception in the
      // JavaThread constructor.
      if (native_thread->osthread() != NULL) {
        // Note: the current thread is not being used within "prepare".
        native_thread->prepare(jthread);
      }
    }
  }
我们重点看下这里:
 jlong size =
             java_lang_Thread::stackSize(JNIHandles::resolve_non_null(jthread));
      // Allocate the C++ Thread structure and create the native thread.  The
      // stack size retrieved from java is signed, but the constructor takes
      // size_t (an unsigned type), so avoid passing negative values which would
      // result in really large stacks.
      size_t sz = size > 0 ? (size_t) size : 0;
      native_thread = new JavaThread(&thread_entry, sz);
翻译下上面的注释:
//分配C++线程结构并创建本机线程。这个从java检索的栈,是带符号的。但构造函数需要无符号的。因此要避免传递负值,导致栈的大小非常的大。
(带符号位的,第一位是符号位,如果把符号位传递给无符号的表示,则会把第一位符号位也当数,就会导致数据非常大)
这里创建了Java线程,并且,把虚拟机栈的大小也传递了进去。所以我们的虚拟机栈(在高速缓冲区)的大小也就是线程的默认大小。我们继续来追踪这个JavaThread()方法:
JavaThread::JavaThread(ThreadFunction entry_point, size_t stack_sz) :
  Thread()
#if INCLUDE_ALL_GCS
  , _satb_mark_queue(&_satb_mark_queue_set),
  _dirty_card_queue(&_dirty_card_queue_set)
#endif // INCLUDE_ALL_GCS
{
  if (TraceThreadEvents) {
    tty->print_cr("creating thread %p", this);
  }
  initialize();
  _jni_attach_state = _not_attaching_via_jni;
  set_entry_point(entry_point);
  // Create the native thread itself.
  // %note runtime_23
  os::ThreadType thr_type = os::java_thread;
  thr_type = entry_point == &compiler_thread_entry ? os::compiler_thread :
                                                     os::java_thread;
  os::create_thread(this, thr_type, stack_sz);
  _safepoint_visible = false;
  // The _osthread may be NULL here because we ran out of memory (too many threads active).
  // We need to throw and OutOfMemoryError - however we cannot do this here because the caller
  // may hold a lock and all locks must be unlocked before throwing the exception (throwing
  // the exception consists of creating the exception object & initializing it, initialization
  // will leave the VM via a JavaCall and then all locks must be unlocked).
  //
  // The thread is still suspended when we reach here. Thread must be explicit started
  // by creator! Furthermore, the thread must also explicitly be added to the Threads list
  // by calling Threads:add. The reason why this is not done here, is because the thread
  // object must be fully initialized (take a look at JVM_Start)
}
可以看到这里创建线程的方法是os::create_thread()这里传递的线程的大小就是栈大小staek_sz,继续看这个方法:
bool os::create_thread(Thread* thread, ThreadType thr_type, size_t stack_size) {
  assert(thread->osthread() == NULL, "caller responsible");

  ...

  // stack size
  if (os::Linux::supports_variable_stack_size()) {
    // calculate stack size if it's not specified by caller
    if (stack_size == 0) {
      stack_size = os::Linux::default_stack_size(thr_type);

      switch (thr_type) {
      case os::java_thread:
        // Java threads use ThreadStackSize which default value can be
        // changed with the flag -Xss
        assert (JavaThread::stack_size_at_create() > 0, "this should be set");
        stack_size = JavaThread::stack_size_at_create();
        break;
      case os::compiler_thread:
        if (CompilerThreadStackSize > 0) {
          stack_size = (size_t)(CompilerThreadStackSize * K);
          break;
        } // else fall through:
          // use VMThreadStackSize if CompilerThreadStackSize is not defined
      case os::vm_thread:
      case os::pgc_thread:
      case os::cgc_thread:
      case os::watcher_thread:
        if (VMThreadStackSize > 0) stack_size = (size_t)(VMThreadStackSize * K);
        break;
      }
    }

    stack_size = MAX2(stack_size, os::Linux::min_stack_allowed);
    pthread_attr_setstacksize(&attr, stack_size);
  } else {
    // let pthread_create() pick the default value.
  }

  ...

    pthread_t tid;
    int ret = pthread_create(&tid, &attr, (void* (*)(void*)) java_start, thread);

    pthread_attr_destroy(&attr);

    ...
}
可以看到,在这个方法中,注释说明了,java的线程大小,默认是ThreadStatckSzie.可以通过 flag -Xs来设置更改。
这个默认的大小,是有一个常量来定义的:
const int os::Linux::_vm_default_page_size = (8 * K);也就是默认8K
所以我们可以默认为如果虚拟机栈的默认大小是8K,所以高速缓冲区的默认大小也是8K。
注意看,这个方法里后面调用了pthread_create方法。这个方法就是linux和unit用来创建线程的方法,所以安卓里创建线程,最终的本质还是属于linux系统的线程。
接下来我们看看nativeCreate()方法,我们追踪下。在java_lang_Thread.cc文件里:
static JNINativeMethod gMethods[] = {
  FAST_NATIVE_METHOD(Thread, currentThread, "()Ljava/lang/Thread;"),
  FAST_NATIVE_METHOD(Thread, interrupted, "()Z"),
  FAST_NATIVE_METHOD(Thread, isInterrupted, "()Z"),
  NATIVE_METHOD(Thread, nativeCreate, "(Ljava/lang/Thread;JZ)V"),
  NATIVE_METHOD(Thread, nativeGetStatus, "(Z)I"),
  NATIVE_METHOD(Thread, nativeHoldsLock, "(Ljava/lang/Object;)Z"),
  FAST_NATIVE_METHOD(Thread, nativeInterrupt, "()V"),
  NATIVE_METHOD(Thread, nativeSetName, "(Ljava/lang/String;)V"),
  NATIVE_METHOD(Thread, nativeSetPriority, "(I)V"),
  FAST_NATIVE_METHOD(Thread, sleep, "(Ljava/lang/Object;JI)V"),
  NATIVE_METHOD(Thread, yield, "()V"),
};
注意这行:
NATIVE_METHOD(Thread, nativeCreate, "(Ljava/lang/Thread;JZ)V"), navtiveCreate被映射成java_lang_thread.cc文件里的Thread_nativeCreate函数:
static void Thread_nativeCreate(JNIEnv* env, jclass, jobject java_thread, jlong stack_size,
                                jboolean daemon) {
  // There are sections in the zygote that forbid thread creation.
  Runtime* runtime = Runtime::Current();
  if (runtime->IsZygote() && runtime->IsZygoteNoThreadSection()) {
    jclass internal_error = env->FindClass("java/lang/InternalError");
    CHECK(internal_error != nullptr);
    env->ThrowNew(internal_error, "Cannot create threads in zygote");
    return;
  }

  Thread::CreateNativeThread(env, java_thread, stack_size, daemon == JNI_TRUE);
}
最后是调用Thread::CreateNativeThread函数,这个函数在Thread.cc文件里:
void Thread::CreateNativeThread(JNIEnv* env, jobject java_peer, size_t stack_size, bool is_daemon) {
  CHECK(java_peer != nullptr);
  Thread* self = static_cast<JNIEnvExt*>(env)->self;

  ...

  Thread* child_thread = new Thread(is_daemon);
  // Use global JNI ref to hold peer live while child thread starts.
  child_thread->tlsPtr_.jpeer = env->NewGlobalRef(java_peer);
  stack_size = FixStackSize(stack_size);

  ...

  int pthread_create_result = 0;
  if (child_jni_env_ext.get() != nullptr) {
    pthread_t new_pthread;
    pthread_attr_t attr;
    child_thread->tlsPtr_.tmp_jni_env = child_jni_env_ext.get();
    CHECK_PTHREAD_CALL(pthread_attr_init, (&attr), "new thread");
    CHECK_PTHREAD_CALL(pthread_attr_setdetachstate, (&attr, PTHREAD_CREATE_DETACHED),
                       "PTHREAD_CREATE_DETACHED");
    CHECK_PTHREAD_CALL(pthread_attr_setstacksize, (&attr, stack_size), stack_size);
    pthread_create_result = pthread_create(&new_pthread,
                                           &attr,
                                           Thread::CreateCallback,
                                           child_thread);
    CHECK_PTHREAD_CALL(pthread_attr_destroy, (&attr), "new thread");

    if (pthread_create_result == 0) {
      // pthread_create started the new thread. The child is now responsible for managing the
      // JNIEnvExt we created.
      // Note: we can't check for tmp_jni_env == nullptr, as that would require synchronization
      //       between the threads.
      child_jni_env_ext.release();
      return;
    }
  }
里面有这句:
stack_size = FixStackSize(stack_size);这个获取栈大小,我们来看下这个FixStackSize方法:
static size_t FixStackSize(size_t stack_size) {
  // A stack size of zero means "use the default".
  if (stack_size == 0) {
    stack_size = Runtime::Current()->GetDefaultStackSize();
  }

  // Dalvik used the bionic pthread default stack size for native threads,
  // so include that here to support apps that expect large native stacks.
  stack_size += 1 * MB;

  ...

  return stack_size;
}
这里可以看到,默认大小是1M,比之前大很多。
我们再回头看上面那个Thread::CreateNativeThread方法,这句代码:
pthread_create_result = pthread_create(&new_pthread,
                                           &attr,
                                           Thread::CreateCallback,
                                           child_thread);
这里,最终,又调用了pthread_create方法。也是LINUX的线程创建机制。
接下来我们看看synchrozie的原理(这点很重要):
我们来模拟下两个线程同时对a进行自增的情况:
package com.example.myapplication.Thread;

public class LockRunnable implements Runnable{
    private static int a = 0;
    @Override
    public void run() {
        for (int i= 0; i< 100000;i++){
            a ++;
        }
    }

    public static void main(String[] args) {
        LockRunnable lockRunnable = new LockRunnable();
        Thread thread1 = new Thread(lockRunnable);
        Thread thread2 = new Thread(lockRunnable);
        thread1.start();
        thread2.start();
        try{
            thread2.join();
            thread1.join();
        }catch (Exception e){
            e.printStackTrace();
        }
        System.out.println(a);
    }
}
大家猜下结果是什么:

并不是20000,而是118161.
这个就是 线程不安全问题。什么原因呢?我们来分析下:
其实就是两个线程没有同步。就是线程2没有等待线程1把run方法执行完,中途加进去执行。如果线程1,在对a进行一次自增后,还没有将增加后的值,写到方法区,线程2从方法区里拿到的值,还是自增前的。比如之前值是1,线程1,自增后,变成2.但是没有更新到方法区。线程2拿到的还是1.线程2给他加1,变成2.然后写到方法区。a的值变成2.然后线程1把刚刚自增后的值2,写到方法区,a的值仍然是2.这里。a自增了2次,却,只从1变成了2.
这个时候我们加锁试下:
  @Override
    public void run() {
        for (int i= 0; i< 100000;i++){
            add();
        }
    }

    private synchronized static void add(){
        a ++;
    }
来看下结果:
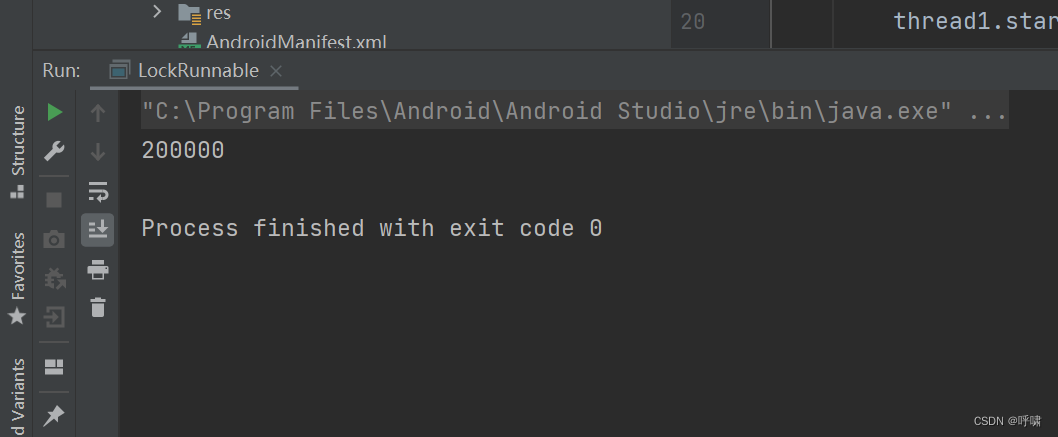
注意,这里锁的是调用该方法的对象。锁同一个对象才有作用。
分析下synchronized关键字,如果大家对一个方法加锁的话,最终编译的字节码文件,可以看出了一些指令:
monitor-enter v1 和 monitor -exit v1。
再看下关于虚拟机里关于这个monitor的函数:
IRT_ENTRY_NO_ASYNC(void, InterpreterRuntime::monitorenter(JavaThread* thread, BasicObjectLock* elem))
#ifdef ASSERT
  thread->last_frame().interpreter_frame_verify_monitor(elem);
#endif
  if (PrintBiasedLockingStatistics) {
    Atomic::inc(BiasedLocking::slow_path_entry_count_addr());
  }
  Handle h_obj(thread, elem->obj());
  assert(Universe::heap()->is_in_reserved_or_null(h_obj()),
         "must be NULL or an object");
  if (UseBiasedLocking) {
    // Retry fast entry if bias is revoked to avoid unnecessary inflation
    ObjectSynchronizer::fast_enter(h_obj, elem->lock(), true, CHECK);
  } else {
    ObjectSynchronizer::slow_enter(h_obj, elem->lock(), CHECK);
  }
  assert(Universe::heap()->is_in_reserved_or_null(elem->obj()),
         "must be NULL or an object");
#ifdef ASSERT
  thread->last_frame().interpreter_frame_verify_monitor(elem);
#endif
IRT_END
可以看到,意思就是UseBiasedLocking是否是偏向锁,如果是的话,则执行快速得到锁的逻辑。
我们知道,如果我们用sychronized关键字修饰一个方法,线程去调用该方法的时候,就会获取锁对象,然后执行,其他线程则要等该线程执行完才能去竞争这个锁对象。如果这个逻辑非常耗时,那么执行效率就会变得很低。所以为了优化这个情况,会定义个Object对象,然后锁上需要同步的代码:
  private Object lockObject = new Object();
    @Override
    public void run() {
        for (int i= 0; i< 100000;i++){
            add();
        }
    }

    private  void add(){
        //。。。。其他耗时代码 开始
        //。。。。其他耗时代码 结束
        synchronized (lockObject){
            //需要同步的代码
            a ++;
        }
    }
这样的话,效率高一些。既然可以锁住Object,那么就可以锁住任何对象。我们来弄清楚,一个对象的锁状态信息是如何记录的:
因为对象是在堆内存区的。所以我们可以知道对象的内存结构:
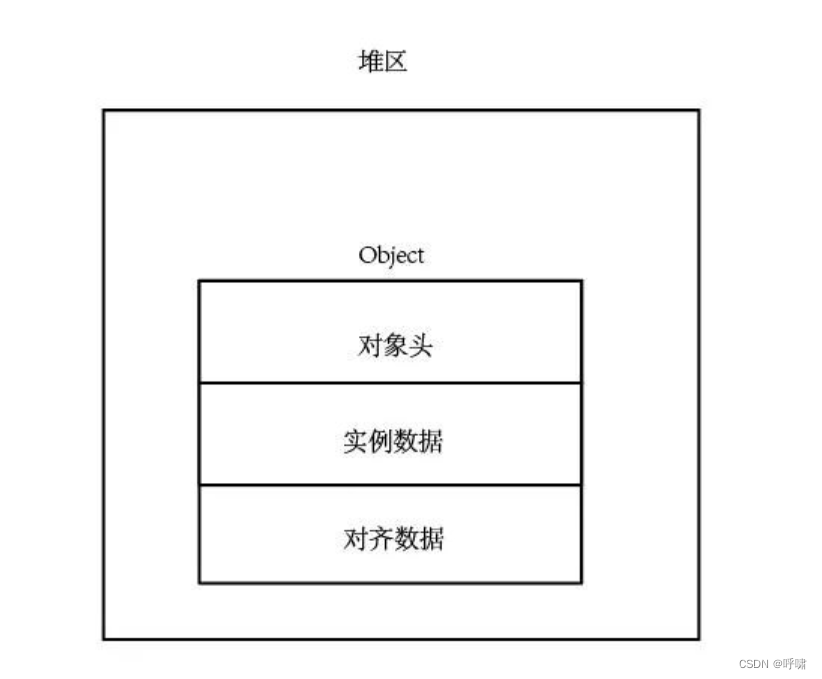
对象的锁状态信息就是记录在对象头里的。
对象的对象头记录的信息比较多,除了锁,还记录了垃圾回收机制的信息。比如是老年代,还是年轻代,还有hashcode等。记录锁状态是根据系统来决定用32位还是64位决定的:
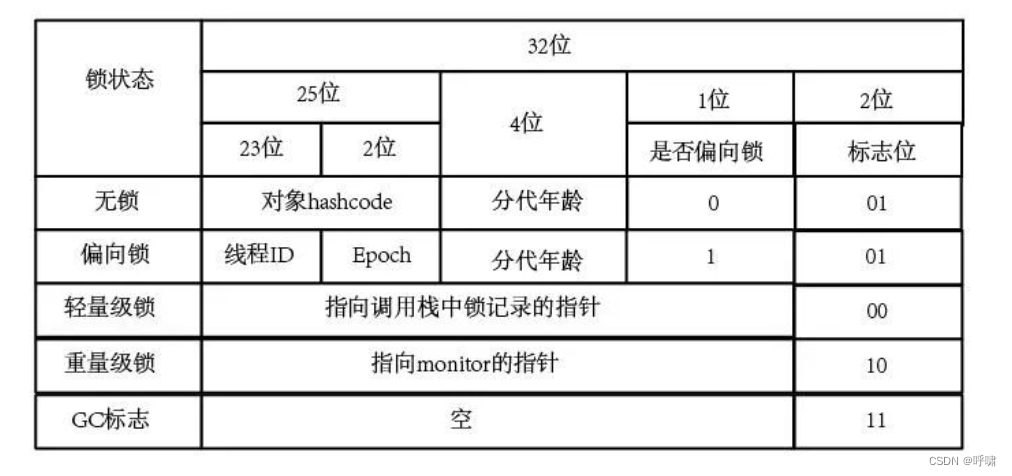
总的来说,就是这里有锁标志位,当两三个线程竞争的时候,是轻量级锁,偏向锁那里记录了锁的ID,EPOCH是一个时间戳,判断是否超时。超时的话就变成无锁状态。没超时表示扔在抢占。多的话就变成重量级。
