广播机制-案例
1.静态注册案例-接收开机广播
1.案例:接收开机的广播
- 创建自定义的BroadcastReceiver用于处理监听到的系统广播。
//接收系统开机的广播事件
public class BootCompleteReceiver extends BroadcastReceiver {
    @Override
    public void onReceive(Context context, Intent intent) {
        Toast.makeText(context, "开机成功!", Toast.LENGTH_SHORT).show();
    }
}
- 注册广播接收器。
   <receiver android:name=".BootCompleteReceiver"
            android:exported="true">
            <intent-filter>
                <action android:name="android.intent.action.BOOT_COMPLETED"/>
            </intent-filter>
        </receiver>
- 开启权限。
   <!--接收开机广播的权限-->
    <uses-permission android:name="android.permission.RECEIVE_BOOT_COMPLETED"/>
重启手机。

2.静/动态注册案例-发送广播
2.1动态注册的方式发送标准广播
- 发送标准广播
- 设置要发送的数据
- 不带权限
(1)布局文件
    <Button
        android:layout_width="match_parent"
        android:layout_height="wrap_content"
        android:text="发送标准广播"
        android:textSize="30dp"
        android:onClick="sendBroadcast" />
(2)Java代码
    //点击按钮发送标准广播
    public void sendBroadcast(View view) {
        //设置发送的数据
        Intent intent =new Intent();
        intent.setAction("com.lxz.app8");
        intent.putExtra("code","我是张三!");
        //动态注册
        IntentFilter filter=new IntentFilter();
        filter.addAction("com.lxz.app8");
        BroadcastReceiver1 receiver=new BroadcastReceiver1();
        registerReceiver(receiver,filter);
        //发送广播
        sendBroadcast(intent);

    }
(3)自定义广播接收器
//接收标准广播
public class BroadcastReceiver1 extends BroadcastReceiver {
    @Override
    public void onReceive(Context context, Intent intent) {
        Toast.makeText(context, "接收信息:"+intent.getStringExtra("code"), Toast.LENGTH_SHORT).show();
    }
}
(4)效果图

2.2在1的基础上设置权限
(1)manifest中定义和设置权限
    <!--定义权限-->
    <permission android:name="com.lxz.app.permission"/>
    <!--设置权限-->
    <uses-permission android:name="com.lxz.app.permission"/>
(2)布局文件
    <Button
        android:layout_width="match_parent"
        android:layout_height="wrap_content"
        android:text="发送标准广播(带权限)"
        android:textSize="30dp"
        android:onClick="sendBroadcast2" />
(3)发送广播的Java代码
  //点击按钮发送标准广播(带权限)
    public void sendBroadcast2(View view) {
        //设置发送的数据
        Intent intent =new Intent();
        intent.setAction("com.lxz.app8");
        intent.putExtra("code","我是张三!有权限!");
        //动态注册
        IntentFilter filter=new IntentFilter();
        filter.addAction("com.lxz.app8");
        BroadcastReceiver1 receiver=new BroadcastReceiver1();
        registerReceiver(receiver,filter);

        //设置权限
        String str="com.lxz.app.permission";
        //发送广播
        sendBroadcast(intent,str);

    }
(4)广播接收器
//接收标准广播
public class BroadcastReceiver1 extends BroadcastReceiver {
    @Override
    public void onReceive(Context context, Intent intent) {
        Toast.makeText(context, "接收信息:"+intent.getStringExtra("code"), Toast.LENGTH_SHORT).show();
    }
}
(5)效果图

2.3有序广播的测试
- 采用静态注册的方式
- 设置优先级
(1)布局文件
    <Button
        android:layout_width="match_parent"
        android:layout_height="wrap_content"
        android:text="发送有序广播"
        android:textSize="30dp"
        android:onClick="sendOrderBroadcast1" />
(2)发送有序广播的方法
 //点击按钮发送有序广播
    public void sendOrderBroadcast1(View view) {
        //设置发送的数据
        Intent intent =new Intent();
        intent.setAction("com.lxz.app8");
        intent.putExtra("code","请依次报号!");

        //发送广播-参数2代表的是自定义的权限
        sendOrderedBroadcast(intent,null);

    }
(3)注册代码
    <!--注册广播-->
        <receiver android:name=".BroadcastOrderReceiver"
            android:exported="true"
            >
            <intent-filter android:priority="0">
                <action android:name="com.lxz.app8"/>
            </intent-filter>
        </receiver>
        <receiver android:name=".BroadcastOrderReceiver1"
            android:exported="true"
            >
            <intent-filter android:priority="1">
                <action android:name="com.lxz.app8"/>
            </intent-filter>
        </receiver>
        <receiver android:name=".BroadcastOrderReceiver2"
            android:exported="true"
            >
            <intent-filter android:priority="2">
                <action android:name="com.lxz.app8"/>
            </intent-filter>
        </receiver>
        <receiver android:name=".BroadcastOrderReceiver3"
            android:exported="true"
            >
            <intent-filter android:priority="3">
                <action android:name="com.lxz.app8"/>
            </intent-filter>
        </receiver>
(4)广播接收者
- 注册顺序从上到下
- 优先级从下到上
- 响应的时候从下到上

- 代码从下到上依次为
public class BroadcastOrderReceiver3 extends BroadcastReceiver {
    @Override
    public void onReceive(Context context, Intent intent) {
        Toast.makeText(context, "接收信息:"+intent.getStringExtra("code")+"我是3号", Toast.LENGTH_SHORT).show();
        Bundle bundle=getResultExtras(true);
        System.out.println("----第3个接收器---");
        System.out.println("附加信息---"+bundle.getString("other"));
        bundle.putString("other",bundle.getString("other")+",我是3号!");
        setResultExtras(bundle);

    }
}

public class BroadcastOrderReceiver2 extends BroadcastReceiver {
    @Override
    public void onReceive(Context context, Intent intent) {
        Toast.makeText(context, "接收信息:"+intent.getStringExtra("code")+"我是2号", Toast.LENGTH_SHORT).show();
        Bundle bundle=getResultExtras(true);
        System.out.println("----第2个接收器---");
        System.out.println("附加信息---"+bundle.getString("other"));
        bundle.putString("other",bundle.getString("other")+",我是2号!");
        setResultExtras(bundle);


    }
}

public class BroadcastOrderReceiver1 extends BroadcastReceiver {
    @Override
    public void onReceive(Context context, Intent intent) {
        Toast.makeText(context, "接收信息:"+intent.getStringExtra("code")+"我是1号", Toast.LENGTH_SHORT).show();
        Bundle bundle=getResultExtras(true);
        System.out.println("----第1个接收器---");
        System.out.println("附加信息---"+bundle.getString("other"));
        bundle.putString("other",bundle.getString("other")+",我是1号!");
        setResultExtras(bundle);
        //停止广播的传递
        abortBroadcast();
        System.out.println("阻断传播");
    }
}

public class BroadcastOrderReceiver extends BroadcastReceiver {
    @Override
    public void onReceive(Context context, Intent intent) {
        Toast.makeText(context, "接收信息:"+intent.getStringExtra("code")+"我是0号", Toast.LENGTH_SHORT).show();
        Bundle bundle=getResultExtras(true);
        System.out.println("----第0个接收器---");
        System.out.println("附加信息---"+bundle.getString("other"));
    }
}
(5)效果图


3.本地广播案例-简单的发送和接收
1.参考代码
(1)布局文件代码
 <Button
        android:layout_width="match_parent"
        android:layout_height="wrap_content"
        android:text="发送本地广播"
        android:textSize="30dp"
        android:onClick="localBroadcast" />
(2)发送本地广播的Java代码
    //发送本地广播
    public void localBroadcast(View view) {
        //设置数据
        Intent intent=new Intent();
        intent.setAction("com.lxz.localapp");
        intent.putExtra("code","我是本地广播");
        //动态注册
        LocalBroadReceiver receiver=new LocalBroadReceiver();
        IntentFilter filter=new IntentFilter();
        filter.addAction("com.lxz.localapp");
        LocalBroadcastManager manager=LocalBroadcastManager.getInstance(getApplicationContext());
        manager.registerReceiver(receiver,filter);

        //发送广播
        manager.sendBroadcast(intent);
    }
(3)本地广播接收者的代码
//接收本地广播
public class LocalBroadReceiver extends BroadcastReceiver {
    @Override
    public void onReceive(Context context, Intent intent) {
        Toast.makeText(context, "接收信息:"+intent.getStringExtra("code"), Toast.LENGTH_SHORT).show();
    }
}
(4)效果图

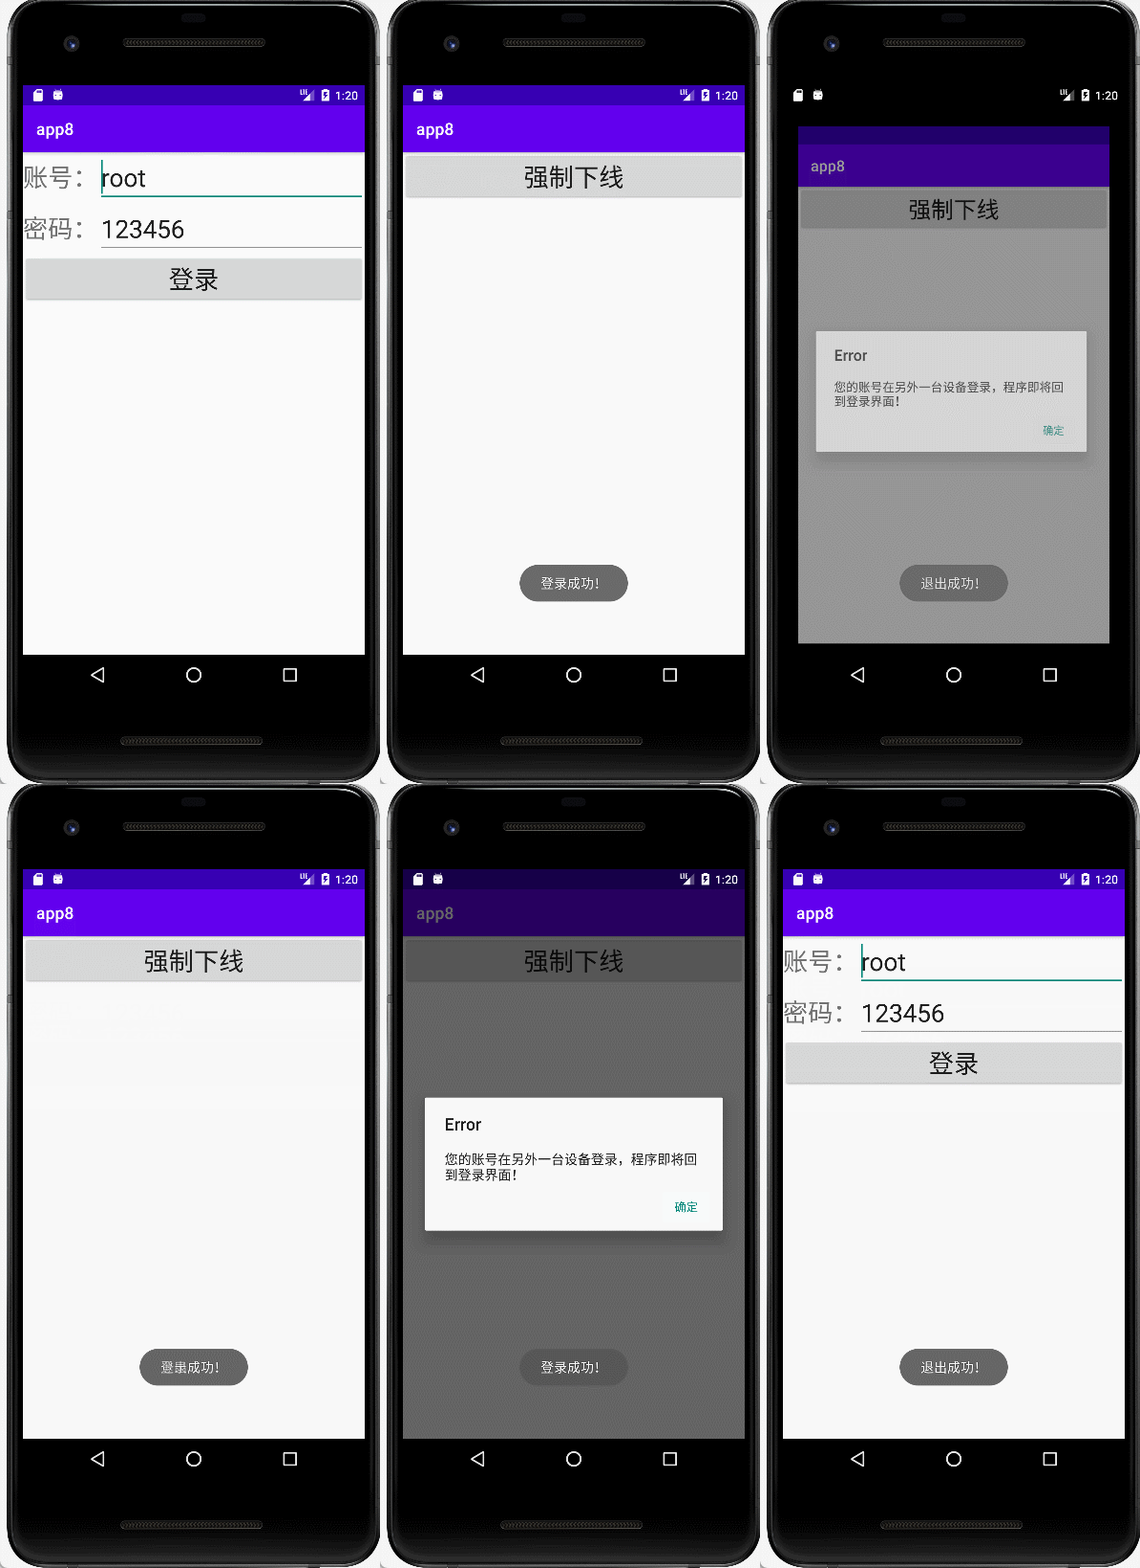
4.本地广播案例-仿qq下线
待实现
1.案例要求
- 像QQ一样,正在运行的QQ,如果我们用别的手机再次登陆自己的账号,前面这个是会提醒账户在别的终端登录,然后把我们打开的app都关掉,然后回到登陆页面。LoginActivity.java
- 注意:需要在模拟器中设置—应用-左上角— —打开应用信息—设置出现在其它应用上
2.参考代码
(1)项目目录结构

(2)ActivityCtroller代码。
- 用于管理所有的Activity
//Activity管理类
public class ActivityController {
    //保存Activity
   private static List<Activity> list=new ArrayList<>();
   //添加Activity
   public  static void addActivity(Activity activity){
        list.add(activity);
   }
    //删除Activity
    public  static void removeActivity(Activity activity){
        list.remove(activity);
    }
    //结束所有的Activity
    public static void finishAllActivity(){
        for (Activity a:list){
           if (!a.isFinishing()){
               a.finish();
           }
        }
    }
}
(3)BaseActivity,是登录成功界面的基类,可以注册BroadcastReceiver。
- 注意必须添加
- android.intent.category.DEFAULT
public class BaseActivity extends AppCompatActivity {
    private LoginOutReceiver receiver;
    @Override
    protected void onCreate(Bundle savedInstanceState) {
        super.onCreate(savedInstanceState);
        ActivityController.addActivity(this);
    }

    @Override
    protected void  onResume() {
        super.onResume();
        //注册广播
        IntentFilter filter = new IntentFilter();
        filter.addAction("com.lxz.loginout");
        filter.addCategory("android.intent.category.DEFAULT");
        receiver = new LoginOutReceiver();
        registerReceiver(receiver, filter);


    }

    @Override
    protected void onPause() {
        super.onPause();

        if (receiver!=null){
            unregisterReceiver(receiver);
        }
    }

    @Override
    protected void onDestroy() {
        super.onDestroy();

    }
}
(4)登录界面的Activity。
//仿qq下线
public class LoginActivity extends AppCompatActivity {

    @Override
    protected void onCreate(Bundle savedInstanceState) {
        super.onCreate(savedInstanceState);
        setContentView(R.layout.activity_login);
    }

    //方法:登录
    public void login(View view) {
        EditText account=findViewById(R.id.account);
        EditText password=findViewById(R.id.password);
        System.out.println(account+","+password);
        if (account.getText().toString().equals("root")&&password.getText().toString().equals("123456")){
             Toast.makeText(this, "登录成功!", Toast.LENGTH_SHORT).show();
            Intent intent=new Intent();
            intent.setClass(getApplicationContext(),LoginSuccessActivity.class);
            startActivity(intent);
            finish();
        }
        else{
            Toast.makeText(this, "账号或密码错误!", Toast.LENGTH_SHORT).show();
        }


    }
}
(5)登录界面activity对应的布局文件。
<?xml version="1.0" encoding="utf-8"?>
<LinearLayout xmlns:android="http://schemas.android.com/apk/res/android"
    xmlns:tools="http://schemas.android.com/tools"
    android:layout_width="match_parent"
    android:layout_height="match_parent"
    android:orientation="vertical"
    tools:context=".LoginActivity">

    <TableLayout
        android:layout_width="match_parent"
        android:layout_height="wrap_content"
        android:orientation="vertical"
        android:stretchColumns="1">

        <TableRow>

            <TextView
                android:layout_width="match_parent"
                android:layout_height="wrap_content"
                android:inputType="text"
                android:text="账号:"
                android:textSize="30dp" />

            <EditText
                android:id="@+id/account"
                android:text="root"
                android:layout_width="match_parent"
                android:layout_height="wrap_content"
                android:hint="账号(root)"
                android:inputType="text"
                android:maxLines="1"
                android:textSize="30dp" />
        </TableRow>

        <TableRow>

            <TextView
                android:layout_width="match_parent"
                android:layout_height="wrap_content"
                android:inputType="text"
                android:text="密码:"
                android:textSize="30dp" />

            <EditText
                android:id="@+id/password"
                android:layout_width="match_parent"
                android:layout_height="wrap_content"
                android:hint="密码(123456)"
                android:inputType="text"
                android:maxLines="1"
                android:text="123456"
                android:textSize="30dp" />
        </TableRow>
    </TableLayout>

    <Button
        android:layout_width="match_parent"
        android:layout_height="wrap_content"
        android:onClick="login"
        android:text="登录"
        android:textSize="30dp" />
</LinearLayout>
(6)登录成功Activity,LoginSuccessActivity的代码。
- 发送广播
//登录成功后的界面
public class LoginSuccessActivity extends BaseActivity {
    @Override
    protected void onCreate(Bundle savedInstanceState) {
        super.onCreate(savedInstanceState);
        setContentView(R.layout.activity_login_success);
        //当登录后的Activity添加到管理类中去
        ActivityController.addActivity(this);


    }

    //方法:强制下线(发布广播)
    public void outlogin(View view) {
            Intent intent=new Intent();
            intent.setAction("com.lxz.loginout");
            intent.addCategory("android.intent.category.DEFAULT");
           sendBroadcast(intent);
    }

}
(7)activity_login_success布局文件代码。
- 有一个强制下线的按钮。
<?xml version="1.0" encoding="utf-8"?>
<LinearLayout xmlns:android="http://schemas.android.com/apk/res/android"
    xmlns:app="http://schemas.android.com/apk/res-auto"
    android:orientation="vertical"
    xmlns:tools="http://schemas.android.com/tools"
    android:layout_width="match_parent"
    android:layout_height="match_parent"
    tools:context=".LoginSuccessActivity">

    <Button
        android:layout_width="match_parent"
        android:layout_height="wrap_content"
        android:onClick="outlogin"
        android:text="强制下线"
        android:textSize="30dp" />
</LinearLayout>
(8)LoginOutReceiver广播接收器代码。
- 设置一个Dialog用于弹窗
- 我目前测试了本地广播和系统广播发现本地广播的context会报错,可能是因为进程号不统一导致的。
//强制下线的界面
public class LoginOutReceiver extends BroadcastReceiver {
    @Override
    public void onReceive(Context context, Intent intent) {
        AlertDialog.Builder builder=new AlertDialog.Builder(context);
        builder.setTitle("Error")
                .setMessage("您的账号在另外一台设备登录,程序即将回到登录界面!")
                .setPositiveButton("确定", new DialogInterface.OnClickListener() {
                    @Override
                    public void onClick(DialogInterface dialogInterface, int i) {
                        ActivityController.finishAllActivity();
                        Toast.makeText(context, "退出成功!", Toast.LENGTH_SHORT).show();
                        Intent intent1=new Intent();
                        intent1.setClass(context,LoginActivity.class);
                        context.startActivity(intent1);
                    }
                })
                ;
                builder.create().show();    }
}
(9)效果图
