1 2023 年 MathorCup 高校数学建模挑战赛——大数据竞赛
赛道 A:基于计算机视觉的坑洼道路检测和识别
使用深度学习模型,pytorch版本进行图像训练和预测,使用ResNet50模型
2 文件夹预处理
因为给定的是所有图片都在一个文件夹里面,所以需要先进行处理,核心代码:
for file_name in file_names:
    source_path = os.path.join(source_folder, file_name)

    # 判断文件名中是否包含'a'字符
    if "normal" in file_name:
        # 如果包含'a'字符,将文件移动到文件夹A
        destination_path = os.path.join(folder_normal, file_name)
        shutil.copy(source_path, destination_path)
    elif "potholes" in file_name:
        # 如果包含'bb'字符,将文件移动到文件夹BB
        destination_path = os.path.join(folder_potholes, file_name)
        shutil.copy(source_path, destination_path)
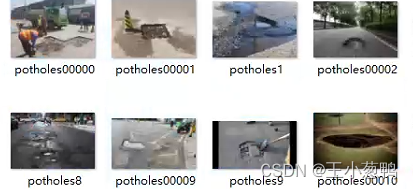
移动后的图片所在文件夹显示

每个文件夹里面包含属于这一类的图片

3 使用ResNet50模型进行建模
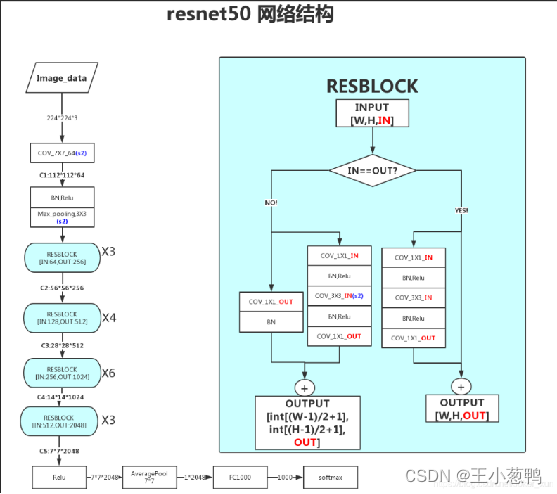
3.1 ResNet50核心原理
- 输入层: 接收输入图像 卷积层1:对输入图像进行卷积操作,得到64个特征图批量标准化层1:对卷积层的输出进行批量标准化
- ReLU激活函数1:对批量标准化后的特征图进行非线性激活
- 残差块1:包含两个残差块,每个残差块由两个卷积层和一个批量标准化层组成ReLU激活函数2:对残差块1的输出进行非线性激活
- 批量标准化层2:对ReLU激活函数2的输出进行批量标准化。
- 卷积层2:对批量标准化后的特征图进行卷积操作,得到128个特征图残差块2:包含两个残差块,每个残差块由两个卷积层和一个批量标准化层组成ReLU激活函数3:对残差块2的输出进行非线性激活批量标准化层3:对ReLU激活函数3的输出进行批量标准化。卷积层3:对批量标准化后的特征图进行卷积操作,得到256个特征图
3.2 核心代码
3.2.1 数据预处理
数据预处理,归一化
transform = T.Compose([
    T.Resize(256),
    T.CenterCrop(224),
    T.ToTensor(),
    T.Normalize(mean=[0.485, 0.456, 0.406], std=[0.229, 0.224, 0.225]),
                       ])
3.2.2 训练集和测试集划分
# 划分数据集为训练集和测试集
validation_split = 0.2
dataset_size = len(custom_dataset)
split = int(validation_split * dataset_size)
indices = list(range(dataset_size))
np.random.shuffle(indices)
train_indices, test_indices = indices[split:], indices[:split]

train_sampler = SubsetRandomSampler(train_indices)
test_sampler = SubsetRandomSampler(test_indices)

# 创建数据加载器
batch_size= 128
train_loader = DataLoader(custom_dataset, batch_size=batch_size, sampler=train_sampler)
test_loader = DataLoader(custom_dataset, batch_size=batch_size, sampler=test_sampler)
3.2.3 加载模型
from torchvision import models
model = models.resnet50(pretrained=True) # 导入resnet50网络

# 修改最后一层,最后一层的神经元数目=类别数目,所以设置为100个
model.fc = torch.nn.Linear(in_features=2048, out_features=2)
3.2.4 训练
        train = Variable(images).cuda()
        labels = Variable(labels).cuda()

        # 梯度清零
        optimizer.zero_grad()

        # 前向计算
        outputs = model(train)

        predicted = torch.max(outputs.data, 1)[1]  # 预测标签
        acc = (predicted == labels).sum() / float(len(labels))  # 计算精度
        loss = error(outputs, labels)  # 计算损失函数

        # 计算梯度
        loss.backward()

        # 更新梯度
        optimizer.step()
        train_loss_list.append(loss.data.cpu().item())
        train_acc_list.append(acc.cpu().item())
3.2.5 模型预测
遍历测试数据集
 with torch.no_grad():
        for inputs, labels in test_loader:
            inputs = Variable(inputs).cuda()
            labels = Variable(labels).cuda()
            outputs = model(inputs)
            _, predicted = torch.max(outputs, 1)  # 获取预测标签
            true_labels.extend(labels.cpu().numpy())  # 将真实标签添加到列表
            predicted_labels.extend(predicted.cpu().numpy())  # 将预测标签添加到列表
4 结果显示
要输出精度、F1 分数和分类报告等多种指标,你可以在训练模型之后使用Scikit-Learn的工具来进行评估和计算这些指标。
train data: 0  Loss: 0.1588  Accuracy: 0.9143
Accuracy: 0.9833333333333333
Precision: 0.9857142857142857
Recall: 0.9833333333333333
F1 Score: 0.9838964773544213
Classification Report:
               precision    recall  f1-score   support

           0       1.00      0.98      0.99        54
           1       0.86      1.00      0.92         6

    accuracy                           0.98        60
   macro avg       0.93      0.99      0.96        60
weighted avg       0.99      0.98      0.98        60
完整代码:https://docs.qq.com/doc/DWEtRempVZ1NSZHdQ


