Qt布局 day11
布局基本流程
- 布局管理器,可以管理widget,让他帮忙管理
- 1.创建好我们想要布局的widgets
- 2.我们创建QBoxLayout对象将其小部件添加到布局中
- 3.我们调用QWidget::setLayout()将QBoxLayout对象安装到小部件上
- 4.布局中国的小部件将重新设置父类,为上面调用setLayout()的窗口
盒子布局(BoxLayout)
-
QBoxLayout可以在水平方向或者垂直方向上排列控件,分别派生QHBoxLayout、QVBoxLayout子类
- QHBoxLayout:水平布局,在水平方向上排列控件,左右排列
- QVBoxLayout:垂直布局,在垂直方向上排列控件,上下排列
- 水平布局、垂直布局除了构造时的方向(LeftToRight、TopToBottom)不同外其他均相同
-
公有函数
| 序号 | 函数&描述 |
|---|---|
| 1 | void addLayout(QLayout* layout,int stretch = 0) 将layout添加到框的末端,使用连续拉伸因子拉伸。 |
| 2 | void addSpacerItem(QSpacerItem * spacerItem) 将spaceeritem添加到该盒子布局的末尾,通常不使用这个函数,请使用addSpacing(int size) |
| 3 | void addSpacing(int size) 添加一个大小为size的不可伸缩空间(QSpacerItem)到这个框布局的末尾 |
| 4 | void addStretch(int stretch = 0) 添加一个可伸缩空间(一个QSpacerItem),最小尺寸为零,拉伸因子stretch到这个框布局的末尾。 |
| 5 | void addStrut(int size) 限制盒子的垂直尺寸最小为size |
| 6 | void addWidget(QWidget* widget,int stretch = 0,Qt::Alignment alignment = 0) 将小部件添加到此框布局的末尾,并使用拉伸因子拉伸和对齐对齐。 |
| 7 | void setDirection(QBoxLayout::Direction direction) 设置此布局的方向为direction。 |
| 8 | void setSpacing(int spacing) 设置小部件之间的间距 |
| 9 | void setStretch(int index,int stretch) 给index位置的控件设置拉伸因子stretch |
| 10 | bool setStretchFactor(QWidget* widget,int stretch) bool setStretchFactor(QWidget* widget,int stretch) 设置小部件的拉伸因子,如果在布局中发现小部件(不包括子布局),则返回true; 否则返回false。 |
- 简单布局
#include <QApplication>
#include <QWidget>
#include <QBoxLayout>
#include <QLabel>
#include <QLineEdit>
class Widget :public QWidget
{
public:

	Widget(QWidget* parent = nullptr) :QWidget(parent)
	{
		boxLayout();

	}
protected:
	void boxLayout()
	{
		//创建控件
		QLabel* userName = new QLabel("userName");
		QLineEdit* userNameEdit = new QLineEdit;

		//创建布局
		QBoxLayout* hLayout = new QHBoxLayout();

		//把控件加入布局
		hLayout->addWidget(userName);
		hLayout->addWidget(userNameEdit);

		//把布局交给窗口(布局到窗口上应用)
		setLayout(hLayout);
	}

private:
};

int main(int argc, char* argv[])
{
	QApplication a(argc, argv);

	Widget w;
	w.setWindowIcon(QIcon(":/Resource/tubiao.ico"));
	w.show();

	return a.exec();
}
#include "main.moc"
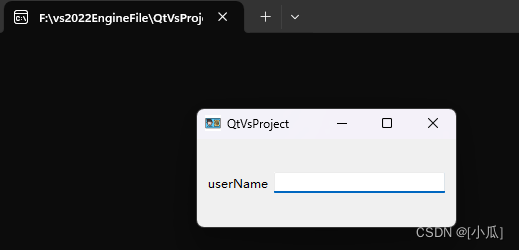
- 运行结果,这个useName会居中在窗口,拖动窗口也会自动居中
布局嵌套
#include <QApplication>
#include <QWidget>
#include <QBoxLayout>
#include <QLabel>
#include <QLineEdit>
class Widget :public QWidget
{
public:

	Widget(QWidget* parent = nullptr) :QWidget(parent)
	{
		boxLayout();

	}
protected:
	void boxLayout()
	{
		//创建控件
		QLabel* userName = new QLabel("userName");
		QLineEdit* userNameEdit = new QLineEdit;

		QLabel* userPassword = new QLabel("userPassword");
		QLineEdit* userPasswordEdit = new QLineEdit;

		//创建布局
		QBoxLayout* hLayout = new QHBoxLayout();
		QBoxLayout* hLayout2 = new QHBoxLayout();
		//把控件加入布局
		hLayout->addWidget(userName);
		hLayout->addWidget(userNameEdit);
		hLayout2->addWidget(userPassword);
		hLayout2->addWidget(userPasswordEdit);

		//嵌套
		QBoxLayout* vLayout = new QVBoxLayout();
		//将这两个水平布局添加到垂直布局中
		vLayout->addLayout(hLayout);
		vLayout->addLayout(hLayout2);

		//把布局交给窗口(布局到窗口上应用)
		this->setLayout(vLayout);

	}

private:

};

int main(int argc, char* argv[])
{
	QApplication a(argc, argv);

	Widget w;
	w.setWindowIcon(QIcon(":/Resource/tubiao.ico"));
	w.show();


	return a.exec();
}
#include "main.moc"
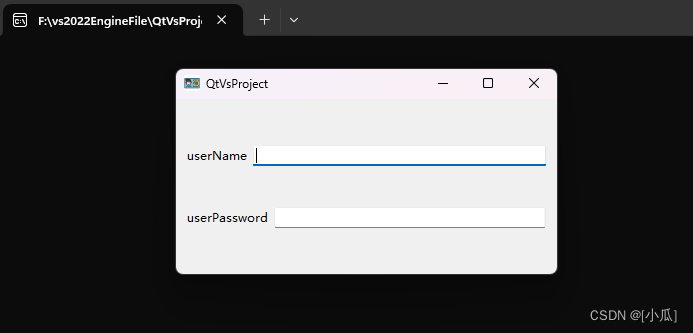
- 运行结果,这两个控件依然是居中的
布局的细节控制
QBoxLayout*hlayout = newQBoxLayout(QBoxLayout::Direction::LeftToRight, this);- QBoxLayout::Direction::LeftToRight:布局方向从左至右水平的
- this:将布局部署到当前窗口

- 设置边距与间距
//设置控件边距(一般默认边距为9)
hlayout->setContentsMargins(0, 0, 0, 0);
//设置控件间距(一般默认间距为6)
hlayout->setSpacing(0);
#include <QApplication>
#include <QWidget>
#include <QBoxLayout>
#include <QLabel>
#include <QLineEdit>
#include <QPushButton>
class Widget :public QWidget
{
public:
	Widget(QWidget* parent = nullptr) :QWidget(parent)
	{
		boxLayout();
	}
protected:
	void boxLayout()
	{
		//创建控件
		QPushButton* one = new QPushButton("one");
		QPushButton* tow = new QPushButton("tow");
		QPushButton* three = new QPushButton("three");
		QPushButton* four = new QPushButton("four");
		QPushButton* five = new QPushButton("five");

		//创建布局,布局方向从左至右水平的,并且设置布局到窗口
		QBoxLayout* hlayout = new QBoxLayout(QBoxLayout::Direction::LeftToRight, this);

		//设置控件边距(一般默认边距为9)
		hlayout->setContentsMargins(0, 0, 0, 0);
		//设置控件间距(一般默认间距为6)
		hlayout->setSpacing(0);

		//将控件添加进布局
		hlayout->addWidget(one);
		hlayout->addWidget(tow);
		hlayout->addWidget(three);
		hlayout->addWidget(four);
		hlayout->addWidget(five);
	}
private:
};

int main(int argc, char* argv[])
{
	QApplication a(argc, argv);
	Widget w;
	w.setWindowIcon(QIcon(":/Resource/tubiao.ico"));
	w.show();
	return a.exec();
}
#include "main.moc"
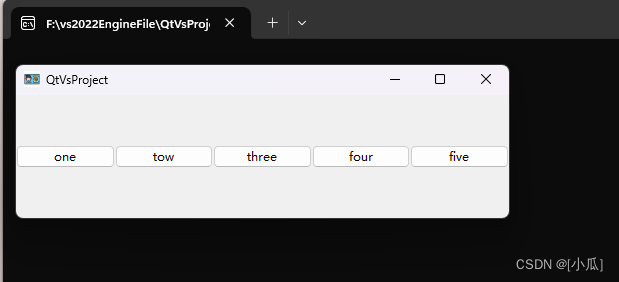
- 运行结果
- 添加弹簧
#include <QApplication>
#include <QWidget>
#include <QBoxLayout>
#include <QLabel>
#include <QLineEdit>
#include <QPushButton>
class Widget :public QWidget
{
public:

	Widget(QWidget* parent = nullptr) :QWidget(parent)
	{
		boxLayout();

	}
protected:
	void boxLayout()
	{
		//创建控件
		QPushButton* one = new QPushButton("one");
		QPushButton* tow = new QPushButton("tow");
		QPushButton* three = new QPushButton("three");
		QPushButton* four = new QPushButton("four");
		QPushButton* five = new QPushButton("five");

		//创建布局,布局方向从左至右水平的,并且设置布局到窗口
		QBoxLayout* hlayout = new QBoxLayout(QBoxLayout::Direction::LeftToRight, this);

		//设置控件边距(一般默认边距为9)
		hlayout->setContentsMargins(0, 0, 0, 0);
		//设置控件间距(一般默认间距为6)
		hlayout->setSpacing(0);

		//将控件添加进布局
		hlayout->addStretch(1);		//添加弹簧(拉伸空间)
		hlayout->addWidget(one);
		hlayout->addWidget(tow);
		hlayout->addWidget(three);
		hlayout->addWidget(four);
		hlayout->addWidget(five);
		hlayout->addStretch(2);		//添加弹簧(拉伸空间)
	}
private:
};

int main(int argc, char* argv[])
{
	QApplication a(argc, argv);

	Widget w;
	w.setWindowIcon(QIcon(":/Resource/tubiao.ico"));
	w.show();


	return a.exec();
}
#include "main.moc"
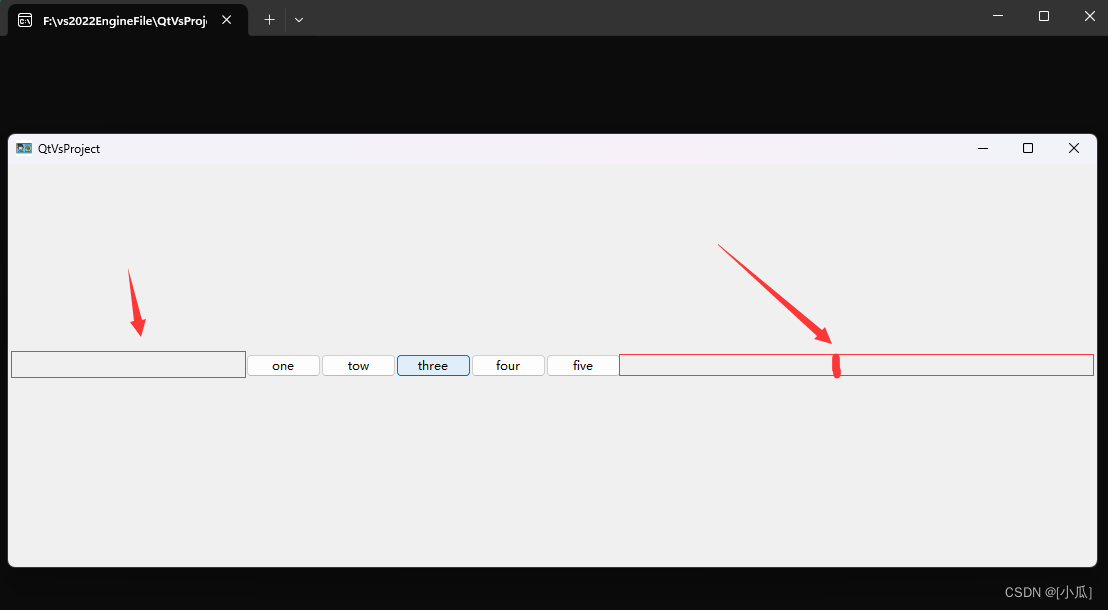
- 运行结果
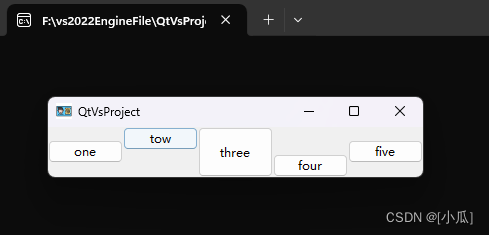
- 其他操作
#include <QApplication>
#include <QWidget>
#include <QBoxLayout>
#include <QLabel>
#include <QLineEdit>
#include <QPushButton>
class Widget :public QWidget
{
public:

	Widget(QWidget* parent = nullptr) :QWidget(parent)
	{
		boxLayout();
	}
protected:
	void boxLayout()
	{
		//创建控件
		QPushButton* one = new QPushButton("one");
		QPushButton* tow = new QPushButton("tow");
		QPushButton* three = new QPushButton("three");
		QPushButton* four = new QPushButton("four");
		QPushButton* five = new QPushButton("five");

		//设置按钮固定高度
		three->setFixedHeight(50);

		//创建布局,布局方向从左至右水平的,并且设置布局到窗口
		QBoxLayout* hlayout = new QBoxLayout(QBoxLayout::Direction::LeftToRight, this);

		//设置控件边距(一般默认边距为9)
		hlayout->setContentsMargins(0, 0, 0, 0);
		//设置控件间距(一般默认间距为6)
		hlayout->setSpacing(0);

		//将控件添加进布局
		hlayout->addStretch(1);		//添加弹簧(拉伸空间)
		hlayout->addWidget(one);
		hlayout->addWidget(tow, 0, Qt::AlignTop);//顶部对齐
		hlayout->addWidget(three);
		hlayout->addWidget(four, 0, Qt::AlignBottom);//底部对齐
		hlayout->addWidget(five);
		hlayout->addStretch(2);		//添加弹簧(拉伸空间)

		//设置布局方向
		//hlayout->setDirection(QBoxLayout::Direction::TopToBottom);//垂直布局
		//hlayout->setStretchFactor(one, 2); 给one设置拉伸系数
	}
private:
};

int main(int argc, char* argv[])
{
	QApplication a(argc, argv);

	Widget w;
	w.setWindowIcon(QIcon(":/Resource/tubiao.ico"));
	w.show();
	return a.exec();
}
#include "main.moc"
- 运行结果
网格布局(GridLayout)
- 网格布局又称格栅布局(多行多列)
- QGridLayout占用它可用的空间(通过它的父布局或parentWidget()),将它分成行和列,并将它管理的每个小部件放入正确的单元格中。
- 网格布局需要自己布局,需要自己有分行列的概念
| 序号 | 函数&描述 |
|---|---|
| 2 | void addLayout(QLayout *layout, int row, int column, Qt::Alignment alignment = 0) void addLayout(QLayout *layout, int row, int column, int rowSpan, int columnSpan, Qt::Alignment alignment = 0) 将layout放置在网格中的位置(row、column)。 左上角的位置是(0,0)。 跨越多行/多列。 该单元格将从跨rowSpan行和columnSpan列的行、列开始。 |
| 3 | void addWidget(QWidget *widget, int row, int column, Qt::Alignment alignment = 0) void addWidget(QWidget *widget, int fromRow, int fromColumn, int rowSpan, int columnSpan, Qt::Alignment alignment = 0) 同上 |
| 4 | void setRowStretch(int row, int stretch) 将row的拉伸因子设置为stretch |
| 5 | void setColumnStretch(int column, int stretch) 将column的拉伸因子设置为stretch |
| 6 | voidsetRowMinimumHeight(int row, int minSize) 将行的最小宽度设置为minSize像素。 |
| 7 | voidsetColumnMinimumWidth(int column, int minSize) 将列的最小宽度设置为minSize像素。 |
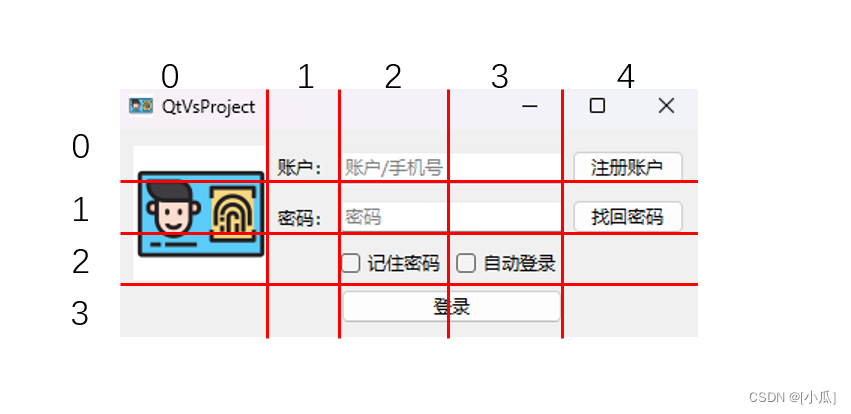
- 网格布局概念
#include <QApplication>
#include <QWidget>
#include <QBoxLayout>
#include <QLabel>
#include <QLineEdit>
#include <QPushButton>
#include <QCheckBox>
#include <QGridLayout>
#include <QPixmap>
class Widget :public QWidget
{
public:

	Widget(QWidget* parent = nullptr) :QWidget(parent)
	{
		LoginLayout();

	}
protected:
	void LoginLayout()
	{
		//创建组件
		QLabel* image = new QLabel;
		QLabel* accoutnText = new QLabel("账户:");
		QLabel* passwordText = new QLabel("密码:");
		QLineEdit* userAccount = new QLineEdit;
		QLineEdit* userPassword = new QLineEdit;
		QCheckBox* rememberPassword = new QCheckBox("记住密码");
		QCheckBox* autoLogin = new QCheckBox("自动登录");
		QPushButton* loginBtn = new QPushButton("登录");
		QPushButton* registerAccountBtn = new QPushButton("注册账户");
		QPushButton* retrievePasswordBtn = new QPushButton("找回密码");

		//组件的一些设置
		image->setPixmap(QPixmap(":/Resource/tubiao.ico"));
		image->setFixedSize(90, 90);
		image->setScaledContents(true);//设置图片的自动缩放到合适大小

		userAccount->setPlaceholderText("账户/手机号");//设置占位文本
		userPassword->setPlaceholderText("密码");

		//设置布局
		QGridLayout* gLayout = new QGridLayout(this);

		//添加组件到网格布局中
		gLayout->addWidget(image,0,0,3,1);					//设置到0行0列,占3行1列
		gLayout->addWidget(accoutnText, 0, 1);				//设置到0行1列,占0行0列
		gLayout->addWidget(passwordText, 1, 1);				//设置到1行1列,占0行0列


		gLayout->addWidget(userAccount, 0, 2, 1, 2);		//设置到0行2列,占1行2列
		gLayout->addWidget(userPassword, 1, 2, 1, 2);		//设置到1行2列,占1行2列

		gLayout->addWidget(rememberPassword, 2, 2);			//设置到2行2列,占0行0列
		gLayout->addWidget(autoLogin, 2, 3);				//设置到2行3列,占0行0列

		gLayout->addWidget(loginBtn, 3, 2, 1, 2);			//设置到3行2列,占1行2列

		gLayout->addWidget(registerAccountBtn, 0, 4);		//设置到0行4列,占0行0列
		gLayout->addWidget(retrievePasswordBtn, 1, 4);		//设置到1行4列,占0行0列

	}

private:

};

int main(int argc, char* argv[])
{
	QApplication a(argc, argv);

	Widget w;
	w.setWindowIcon(QIcon(":/Resource/tubiao.ico"));
	w.show();


	return a.exec();
}
#include "main.moc"
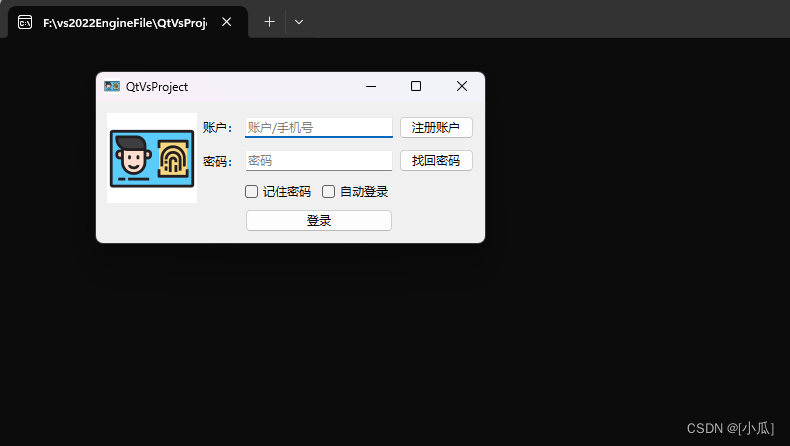
- 运行结果
表单布局(FormLayout)
-
QFormLayout类管理输入小部件的表单及其关联的标签
-
QFormLayout 是一个方便的布局类,它以两列形式布置其子项。 左列由标签组成,右列由“字段”小部件(行编辑器、旋转框等)组成。 传统上,这种两列表单布局是使用 QGridLayout 实现的。
-
QFormLayout 是一种更高级别的替代方案,具有以下优点:
-
遵守不同平台的外观和感觉准则
例如,macOS Aqua 和 KDE 指南指定标签应该右对齐,而 Windows 和 GNOME 应用程序通常使用左对齐。 -
支持长行换行
对于显示较小的设备,QFormLayout可以设置为对长行进行换行,甚至对所有行进行换行。 -
创建标签-字段对,有非常方便的API
我们可以通过addRow(const QString &labelText, QWidget *field)来创建一个带有给定文本的QLabel及QWidget控件行,它们可以自动的设置为伙伴关系。
-
| 序号 | 函数&描述 |
|---|---|
| 1 | void addRow(QWidget* label,QWidget* field) void addRow(QWidget* label,QLayout* field) 使用给定的label和field在此表单布局的底部添加新行 |
| 2 | void addRow(const QString &labelText, QWidget* field) void addRow(const QString &labelText, QLayout* field) 这个重载会在后台自动创建一个以labelText作为文本的QLabel。 field被设置为新的QLabel的伙伴 |
| 3 | void addRow(QWidget widget) void addRow(QLayout layout) 在表单布局的末尾添加指定的小部件。 这个小部件横跨两列 |
| 9 | void setRowWrapPolicy(QFormLayout::RowWrapPolicy policy) 设置行换行策略 |
| 10 | void setSpacing(int spacing) 将垂直和水平间距设置为spacing。 |
| 11 | void setVerticalSpacing(int spacing) 将垂直间距设置为spacing |
| 12 | void setWidget(int row, QFormLayout::ItemRole role, QWidget *widget) 将给定的row中的role设置为widget,必要时使用空行扩展布局。 如果单元格已被占用,则不插入小部件,并将错误消息发送到控制台。 |
- 设置换行策略
void setRowWrapPolicy(QFormLayout::RowWrapPolicy policy)
| 枚举 | 描述 | 效果 |
|---|---|---|
| QFormLayout::DontWrapRows | 字段总是放在它们的标签旁边(默认样式) | 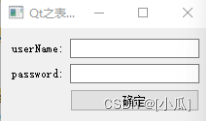 |
| QFormLayout::WrapLongRows | 标签有足够的空间适应,如果字段对的最小大小大于可用空间,输入框会被换到下一行 | 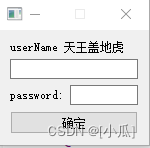 |
| QFormLayout::WrapAllRows | 字段总是在它们的标签下面。 | 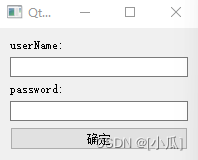 |
#include <QApplication>
#include <QWidget>
#include <QBoxLayout>
#include <QLabel>
#include <QLineEdit>
#include <QPushButton>
#include <QCheckBox>
#include <QGridLayout>
#include <QPixmap>
#include <QFormLayout>
#include <QComboBox>
class Widget :public QWidget
{
public:
Widget(QWidget* parent = nullptr) :QWidget(parent)
{
FormLayout();
}
protected:
void FormLayout()
{
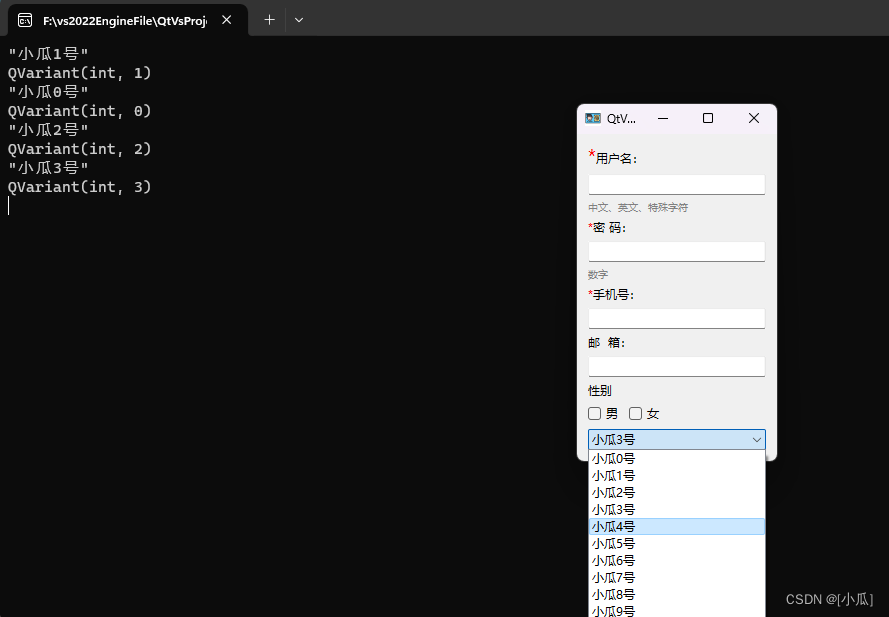
QLineEdit* UserName = new QLineEdit;
QLineEdit* UserPassword = new QLineEdit;
QLineEdit* PhoneEdit = new QLineEdit;
QLineEdit* EmailEdit = new QLineEdit;
QCheckBox* GenderMan = new QCheckBox("男");
QCheckBox* GenderWoman = new QCheckBox("女");
QComboBox* Province = new QComboBox;
for (int i = 0; i < 10; i++)
{
Province->addItem("小瓜" + QString::number(i) + "号", i);//这里的i是建立一种映射关系
}
connect(Province, &QComboBox::currentTextChanged, [=](const QString& text)
{
qDebug() << text;
qDebug() << Province->currentData();//调用映射关系
});
QFormLayout* fLayout = new QFormLayout(this);
//设置换行策略
fLayout->setRowWrapPolicy(QFormLayout::RowWrapPolicy::WrapAllRows);
//支持html标签
fLayout->addRow("<font color = red size = 5>*</font>用户名:", UserName);
fLayout->addWidget(new QLabel("<font color = gray size = 2>中文、英文、特殊字符<\font>"));
fLayout->addRow("<font color = red>*</font>密 码:", UserPassword);
fLayout->addWidget(new QLabel("<font color = gray size = 2>数字<\font>"));
fLayout->addRow("<font color = red>*</font>手机号:", PhoneEdit);
fLayout->addRow("邮 箱:", EmailEdit);
//添加一个布局
QHBoxLayout* hlayout = new QHBoxLayout;
hlayout->addWidget(GenderMan);
hlayout->addWidget(GenderWoman);
hlayout->addStretch();
fLayout->addRow("性别",hlayout);
fLayout->addRow(Province);
}
private:
};
int main(int argc, char* argv[])
{
QApplication a(argc, argv);
Widget w;
w.setWindowIcon(QIcon(":/Resource/tubiao.ico"));
w.show();
return a.exec();
}
#include "main.moc"
- 运行结果
堆栈布局(页面切换)
- QStackedLayout继承自QLayout
- QStackedLayout类提供了多页面切换的布局,一次只能看到一个界面。
#include <QApplication>
#include <QWidget>
#include <QBoxLayout>
#include <QLabel>
#include <QLineEdit>
#include <QPushButton>
#include <QCheckBox>
#include <QGridLayout>
#include <QPixmap>
#include <QFormLayout>
#include <QComboBox>
#include <QStackedLayout>
#include <QButtonGroup>
class Widget :public QWidget
{
public:
Widget(QWidget* parent = nullptr) :QWidget(parent)
{
stackedLayout();
}
protected:
void LoginLayout(QWidget* parent)
{
//创建组件
QLabel* image = new QLabel;
QLabel* accoutnText = new QLabel("账户:");
QLabel* passwordText = new QLabel("密码:");
QLineEdit* userAccount = new QLineEdit;
QLineEdit* userPassword = new QLineEdit;
QCheckBox* rememberPassword = new QCheckBox("记住密码");
QCheckBox* autoLogin = new QCheckBox("自动登录");
QPushButton* loginBtn = new QPushButton("登录");
QPushButton* registerAccountBtn = new QPushButton("注册账户");
QPushButton* retrievePasswordBtn = new QPushButton("找回密码");
//组件的一些设置
image->setPixmap(QPixmap(":/Resource/tubiao.ico"));
image->setFixedSize(90, 90);
image->setScaledContents(true);//设置图片的自动缩放到合适大小
userAccount->setPlaceholderText("账户/手机号");//设置占位文本
userPassword->setPlaceholderText("密码");
//设置布局
QGridLayout* gLayout = new QGridLayout(parent);
//添加组件到网格布局中
gLayout->addWidget(image,0,0,3,1); //设置到0行0列,占3行1列
gLayout->addWidget(accoutnText, 0, 1); //设置到0行1列,占0行0列
gLayout->addWidget(passwordText, 1, 1); //设置到1行1列,占0行0列
gLayout->addWidget(userAccount, 0, 2, 1, 2); //设置到0行2列,占1行2列
gLayout->addWidget(userPassword, 1, 2, 1, 2); //设置到1行2列,占1行2列
gLayout->addWidget(rememberPassword, 2, 2); //设置到2行2列,占0行0列
gLayout->addWidget(autoLogin, 2, 3); //设置到2行3列,占0行0列
gLayout->addWidget(loginBtn, 3, 2, 1, 2); //设置到3行2列,占1行2列
gLayout->addWidget(registerAccountBtn, 0, 4); //设置到0行4列,占0行0列
gLayout->addWidget(retrievePasswordBtn, 1, 4); //设置到1行4列,占0行0列
}
void FormLayout(QWidget* parent)
{
QLineEdit* UserName = new QLineEdit;
QLineEdit* UserPassword = new QLineEdit;
QLineEdit* PhoneEdit = new QLineEdit;
QLineEdit* EmailEdit = new QLineEdit;
QCheckBox* GenderMan = new QCheckBox("男");
QCheckBox* GenderWoman = new QCheckBox("女");
QComboBox* Province = new QComboBox;
for (int i = 0; i < 10; i++)
{
Province->addItem("小瓜" + QString::number(i) + "号", i);//这里的i是建立一种映射关系
}
connect(Province, &QComboBox::currentTextChanged, [=](const QString& text)
{
qDebug() << text;
qDebug() << Province->currentData();//调用映射关系
});
QFormLayout* fLayout = new QFormLayout(parent);
//设置换行策略
fLayout->setRowWrapPolicy(QFormLayout::RowWrapPolicy::WrapAllRows);
//支持html标签
fLayout->addRow("<font color = red size = 5>*</font>用户名:", UserName);
fLayout->addWidget(new QLabel("<font color = gray size = 2>中文、英文、特殊字符<\font>"));
fLayout->addRow("<font color = red>*</font>密 码:", UserPassword);
fLayout->addWidget(new QLabel("<font color = gray size = 2>数字<\font>"));
fLayout->addRow("<font color = red>*</font>手机号:", PhoneEdit);
fLayout->addRow("邮 箱:", EmailEdit);
//添加一个布局
QHBoxLayout* hlayout = new QHBoxLayout;
hlayout->addWidget(GenderMan);
hlayout->addWidget(GenderWoman);
hlayout->addStretch();
fLayout->addRow("性别", hlayout);
fLayout->addRow(Province);
}
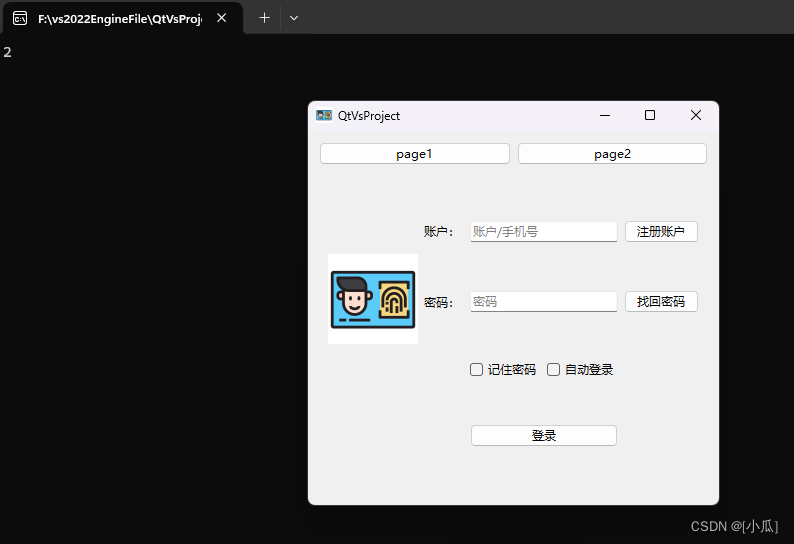
void stackedLayout()
{
//创建按钮组,来管理多个按钮
QButtonGroup* BtnGroup = new QButtonGroup(this);
BtnGroup->addButton(new QPushButton("page1"), 0);
BtnGroup->addButton(new QPushButton("page2"), 1);
//创建一个水平盒子布局来布局按钮
QHBoxLayout* hLayout = new QHBoxLayout;
hLayout->addWidget(BtnGroup->button(0));
hLayout->addWidget(BtnGroup->button(1));
//创建一个堆栈布局用来管理多个页面
QStackedLayout* sLayout = new QStackedLayout;
sLayout->addWidget(CreatePage(0));
sLayout->addWidget(CreatePage(1));
//创建一个垂直盒子布局来布局水平盒子布局于堆栈布局
QVBoxLayout* vLayout = new QVBoxLayout;
vLayout->addLayout(hLayout);
vLayout->addLayout(sLayout);
//设置布局
setLayout(vLayout);
//切换页面
qDebug() << sLayout->count();//获取页面数量
connect(BtnGroup, &QButtonGroup::idClicked, this, [=](int Id) {
sLayout->setCurrentIndex(Id);
});
}
private:
QWidget* CreatePage(int Id)
{
if (Id == 0)
{
QWidget* page = new QWidget;
LoginLayout(page);
return page;
}
else if (Id == 1)
{
QWidget* page = new QWidget;
FormLayout(page);
return page;
}
return nullptr;
}
};
int main(int argc, char* argv[])
{
QApplication a(argc, argv);
Widget w;
w.setWindowIcon(QIcon(":/Resource/tubiao.ico"));
w.show();
return a.exec();
}
#include "main.moc"
- 运行结果
窗口分割器(Splitter)
- QSplitter类实现了一个分离小部件。 splitter允许用户通过拖动子部件之间的边界来控制它们的大小。 任何数量的小部件都可以由单个拆分器控制。QSplitter的典型用法是创建几个小部件并使用 insertWidget()或addWidget()添加它们。
#include <QApplication>
#include <QWidget>
#include <QBoxLayout>
#include <QLabel>
#include <QLineEdit>
#include <QPushButton>
#include <QCheckBox>
#include <QGridLayout>
#include <QPixmap>
#include <QFormLayout>
#include <QComboBox>
#include <QStackedLayout>
#include <QButtonGroup>
#include <QSplitter>
#include <QPlainTextEdit>
class Widget :public QWidget
{
public:

	Widget(QWidget* parent = nullptr) :QWidget(parent)
	{
		splitter();
	}
protected:
	void LoginLayout(QWidget* parent)
	{
		//创建组件
		QLabel* image = new QLabel;
		QLabel* accoutnText = new QLabel("账户:");
		QLabel* passwordText = new QLabel("密码:");
		QLineEdit* userAccount = new QLineEdit;
		QLineEdit* userPassword = new QLineEdit;
		QCheckBox* rememberPassword = new QCheckBox("记住密码");
		QCheckBox* autoLogin = new QCheckBox("自动登录");
		QPushButton* loginBtn = new QPushButton("登录");
		QPushButton* registerAccountBtn = new QPushButton("注册账户");
		QPushButton* retrievePasswordBtn = new QPushButton("找回密码");

		//组件的一些设置
		image->setPixmap(QPixmap(":/Resource/tubiao.ico"));
		image->setFixedSize(90, 90);
		image->setScaledContents(true);//设置图片的自动缩放到合适大小

		userAccount->setPlaceholderText("账户/手机号");//设置占位文本
		userPassword->setPlaceholderText("密码");

		//设置布局
		QGridLayout* gLayout = new QGridLayout(parent);

		//添加组件到网格布局中
		gLayout->addWidget(image,0,0,3,1);					//设置到0行0列,占3行1列
		gLayout->addWidget(accoutnText, 0, 1);				//设置到0行1列,占0行0列
		gLayout->addWidget(passwordText, 1, 1);				//设置到1行1列,占0行0列


		gLayout->addWidget(userAccount, 0, 2, 1, 2);		//设置到0行2列,占1行2列
		gLayout->addWidget(userPassword, 1, 2, 1, 2);		//设置到1行2列,占1行2列

		gLayout->addWidget(rememberPassword, 2, 2);			//设置到2行2列,占0行0列
		gLayout->addWidget(autoLogin, 2, 3);				//设置到2行3列,占0行0列

		gLayout->addWidget(loginBtn, 3, 2, 1, 2);			//设置到3行2列,占1行2列

		gLayout->addWidget(registerAccountBtn, 0, 4);		//设置到0行4列,占0行0列
		gLayout->addWidget(retrievePasswordBtn, 1, 4);		//设置到1行4列,占0行0列

	}
	void FormLayout(QWidget* parent)
	{
		QLineEdit* UserName = new QLineEdit;
		QLineEdit* UserPassword = new QLineEdit;
		QLineEdit* PhoneEdit = new QLineEdit;
		QLineEdit* EmailEdit = new QLineEdit;
		QCheckBox* GenderMan = new QCheckBox("男");
		QCheckBox* GenderWoman = new QCheckBox("女");
		QComboBox* Province = new QComboBox;
		for (int i = 0; i < 10; i++)
		{
			Province->addItem("小瓜" + QString::number(i) + "号", i);//这里的i是建立一种映射关系
		}
		connect(Province, &QComboBox::currentTextChanged, [=](const QString& text)
			{
				qDebug() << text;
		qDebug() << Province->currentData();//调用映射关系
			});

		QFormLayout* fLayout = new QFormLayout(parent);
		//设置换行策略
		fLayout->setRowWrapPolicy(QFormLayout::RowWrapPolicy::WrapAllRows);

		//支持html标签
		fLayout->addRow("<font color = red size = 5>*</font>用户名:", UserName);
		fLayout->addWidget(new QLabel("<font color = gray size = 2>中文、英文、特殊字符<\font>"));

		fLayout->addRow("<font color = red>*</font>密  码:", UserPassword);
		fLayout->addWidget(new QLabel("<font color = gray size = 2>数字<\font>"));

		fLayout->addRow("<font color = red>*</font>手机号:", PhoneEdit);
		fLayout->addRow("邮  箱:", EmailEdit);

		//添加一个布局
		QHBoxLayout* hlayout = new QHBoxLayout;
		hlayout->addWidget(GenderMan);
		hlayout->addWidget(GenderWoman);
		hlayout->addStretch();
		fLayout->addRow("性别", hlayout);

		fLayout->addRow(Province);
	}
	void stackedLayout()
	{
		//创建一个按钮组用来管理按钮
		QButtonGroup* BtnGroup = new QButtonGroup(this);
		BtnGroup->addButton(new QPushButton("page1"), 0);
		BtnGroup->addButton(new QPushButton("page2"), 1);

		//创建一个水平布局来管理这两个按钮
		QHBoxLayout* bLayout = new QHBoxLayout;
		bLayout->addWidget(BtnGroup->button(0));
		bLayout->addWidget(BtnGroup->button(1));


		//创建一个堆栈布局来切换不同页面
		QStackedLayout* sLayout = new QStackedLayout;
		sLayout->addWidget(CreatePage(0));
		sLayout->addWidget(CreatePage(1));

		//创建一个垂直布局来管理上面两个布局
		QVBoxLayout* vLayout = new QVBoxLayout;
		vLayout->addLayout(bLayout);
		vLayout->addLayout(sLayout);


		setLayout(vLayout);

		connect(BtnGroup, &QButtonGroup::idClicked, [=](int Id) {

				sLayout->setCurrentIndex(Id);
			});

	}
	void splitter()
	{
		//创建分割器
		QSplitter* sp = new QSplitter(this);
		sp->addWidget(CreatePage(0));
		sp->addWidget(CreatePage(1));
		sp->setCollapsible(0, false);

		//嵌套分割器,设置分割类别
		QSplitter* vsp = new QSplitter(Qt::Orientation::Vertical);
		vsp->addWidget(sp);
		vsp->addWidget(new QPlainTextEdit);

		//设置布局
		QHBoxLayout* hLayout = new QHBoxLayout(this);
		hLayout->addWidget(vsp);

	}

private:
	QWidget* CreatePage(int Id)
	{
		if (Id == 0)
		{
			QWidget* page = new QWidget;
			LoginLayout(page);
			return page;
		}
		else if (Id == 1)
		{
			QWidget* page = new QWidget;
			FormLayout(page);
			return page;
		}
		return nullptr;
	}
};

int main(int argc, char* argv[])
{
	QApplication a(argc, argv);
	Widget w;
	w.setWindowIcon(QIcon(":/Resource/tubiao.ico"));
	w.show();
	return a.exec();
}
#include "main.moc"
- 运行结果
登录页面小例子
登录页面
#include <QApplication>
#include <QWidget>
#include <QBoxLayout>
#include <QLabel>
#include <QLineEdit>
#include <QPushButton>
#include <QCheckBox>
#include <QGridLayout>
#include <QPixmap>
#include <QFormLayout>
#include <QComboBox>
#include <QStackedLayout>
#include <QButtonGroup>
#include <QSplitter>
#include <QPlainTextEdit>
#include <QDialog>
#include <QSettings>
#include <QDesktopServices>

class LoginDlg :public QDialog
{
public:

	LoginDlg(QWidget* parent = nullptr) :QDialog(parent)
	{

		LoginLayout();
		ReadConfig();

	}

	void LoginLayout()
	{
		image = new QLabel;
		accoutnText = new QLabel("账户:");
		passwordText = new QLabel("密码:");
		userAccount = new QLineEdit;
		userPassword = new QLineEdit;
		rememberPasswordChx = new QCheckBox("记住密码");
		AutoLogin = new QCheckBox("自动登录");
		loginBtn = new QPushButton("登录");
		registerAccountBtn = new QPushButton("注册账户");
		retrievePasswordBtn = new QPushButton("找回密码");

		userPassword->setEchoMode(QLineEdit::EchoMode::Password);

		//组件的一些设置
		image->setPixmap(QPixmap(":/Resource/tubiao.ico"));
		image->setFixedSize(90, 90);
		image->setScaledContents(true);//设置图片的自动缩放到合适大小

		userAccount->setPlaceholderText("账户/手机号");//设置占位文本
		userPassword->setPlaceholderText("密码");

		//设置布局
		QGridLayout* gLayout = new QGridLayout;

		//添加组件到网格布局中
		gLayout->addWidget(image, 0, 0, 3, 1);					//设置到0行0列,占3行1列
		gLayout->addWidget(accoutnText, 0, 1);				//设置到0行1列,占0行0列
		gLayout->addWidget(passwordText, 1, 1);				//设置到1行1列,占0行0列


		gLayout->addWidget(userAccount, 0, 2, 1, 2);		//设置到0行2列,占1行2列
		gLayout->addWidget(userPassword, 1, 2, 1, 2);		//设置到1行2列,占1行2列

		gLayout->addWidget(rememberPasswordChx, 2, 2);			//设置到2行2列,占0行0列
		gLayout->addWidget(AutoLogin, 2, 3);				//设置到2行3列,占0行0列

		gLayout->addWidget(loginBtn, 3, 2, 1, 2);			//设置到3行2列,占1行2列

		gLayout->addWidget(registerAccountBtn, 0, 4);		//设置到0行4列,占0行0列
		gLayout->addWidget(retrievePasswordBtn, 1, 4);		//设置到1行4列,占0行0列

		setLayout(gLayout);

		connect(loginBtn, &QPushButton::clicked, this, &LoginDlg::OnLogin);

		connect(registerAccountBtn, &QPushButton::clicked, this, [=]() {
			QDesktopServices::openUrl(QUrl("https://blog.csdn.net/qq_44924388/article/details/133850918?spm=1001.2014.3001.5501"));
			});
		connect(retrievePasswordBtn, &QPushButton::clicked, this, [=]() {
			QDesktopServices::openUrl(QUrl("https://blog.csdn.net/qq_44924388/article/details/133850918?spm=1001.2014.3001.5501"));
			});
	}

	//记住密码
	void RememberPassword()
	{
		QSettings settings("config.ini", QSettings::IniFormat);
		//账户在第一次登录后永远记住,是否选择了记住密码与自动登录,要看用户是否选择
		settings.setValue("account", userAccount->text());
		settings.setValue("RememberPassword", rememberPasswordChx->isChecked());
		settings.setValue("autoLogin", AutoLogin->isChecked());

		if (!rememberPasswordChx->isChecked())
		{
			//如果去除了是否记住密码就清除掉ini文件中的密码
			settings.setValue("password", QVariant());
		}
		else
		{
			//设置配置文件。将保存的密码放入配置文件
			settings.setValue("password", userPassword->text());
		}
	}

	//读取配置文件
	void ReadConfig()
	{
		QSettings settings("config.ini", QSettings::IniFormat);
		userAccount->setText(settings.value("account").toString());
		//如果配置文件中的记住密码为真就读取密码,并且填写
		bool isRemembel = settings.value("RememberPassword", false).toBool();
		if (isRemembel)
		{

			rememberPasswordChx->setChecked(true);
			userPassword->setText(settings.value("password").toString());
			//如果自动登录为真
			if(settings.value("autoLogin",false).toBool())
			{
				//就让它自己点自己
				loginBtn->click();
			}
		}
	}

public: //slots
	void OnLogin()
	{
		auto accout = userAccount->text();
		auto password = userPassword->text();
		if (true)
		{
			qDebug() << accout << password;
			RememberPassword();
		}
	}

private:
	//组件
	QLabel* image{};
	QLabel* accoutnText{};
	QLabel* passwordText{};
	QLineEdit* userAccount{};
	QLineEdit* userPassword{};
	QCheckBox* rememberPasswordChx{};
	QCheckBox* AutoLogin{};
	QPushButton* loginBtn{};
	QPushButton* registerAccountBtn{};
	QPushButton* retrievePasswordBtn{};
};

int main(int argc, char* argv[])
{
	QApplication a(argc, argv);

	LoginDlg w;
	w.setWindowIcon(QIcon(":/Resource/tubiao.ico"));
	w.show();

	return a.exec();
}
#include "main.moc"
- 运行结果
登录成功后切换布局
#include <QApplication>
#include <QWidget>
#include <QBoxLayout>
#include <QLabel>
#include <QLineEdit>
#include <QPushButton>
#include <QCheckBox>
#include <QGridLayout>
#include <QPixmap>
#include <QFormLayout>
#include <QComboBox>
#include <QStackedLayout>
#include <QButtonGroup>
#include <QSplitter>
#include <QPlainTextEdit>
#include <QDialog>
#include <QSettings>
#include <QDesktopServices>
class LoginDlg :public QDialog
{
public:
LoginDlg(QWidget* parent = nullptr) :QDialog(parent)
{
stackedLayout();
ReadConfig();
}
void HBoxLAyout(QWidget* parent)
{
xiaogua = new QLabel;
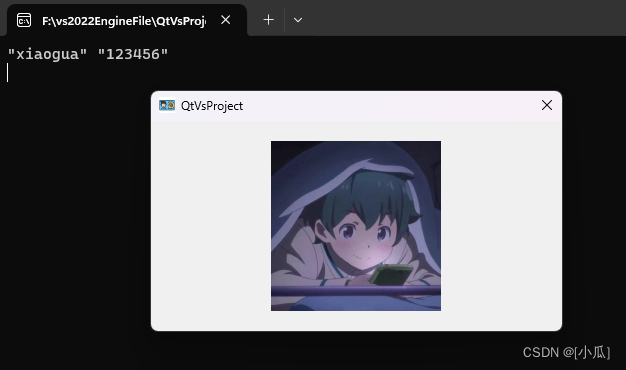
xiaogua->setPixmap(QPixmap(":/Resource/xiaogua.bmp"));
xiaogua->setFixedSize(170, 170);
xiaogua->setScaledContents(true);
QHBoxLayout* hLayout = new QHBoxLayout(parent);
hLayout->addWidget(xiaogua);
}
void LoginLayout(QWidget* parent)
{
image = new QLabel;
accoutnText = new QLabel("账户:");
passwordText = new QLabel("密码:");
userAccount = new QLineEdit;
userPassword = new QLineEdit;
rememberPasswordChx = new QCheckBox("记住密码");
AutoLogin = new QCheckBox("自动登录");
loginBtn = new QPushButton("登录");
registerAccountBtn = new QPushButton("注册账户");
retrievePasswordBtn = new QPushButton("找回密码");
userPassword->setEchoMode(QLineEdit::EchoMode::Password);
//组件的一些设置
image->setPixmap(QPixmap(":/Resource/tubiao.ico"));
image->setFixedSize(90, 90);
image->setScaledContents(true);//设置图片的自动缩放到合适大小
userAccount->setPlaceholderText("账户/手机号");//设置占位文本
userPassword->setPlaceholderText("密码");
//设置布局
QGridLayout* gLayout = new QGridLayout(parent);
//添加组件到网格布局中
gLayout->addWidget(image, 0, 0, 3, 1); //设置到0行0列,占3行1列
gLayout->addWidget(accoutnText, 0, 1); //设置到0行1列,占0行0列
gLayout->addWidget(passwordText, 1, 1); //设置到1行1列,占0行0列
gLayout->addWidget(userAccount, 0, 2, 1, 2); //设置到0行2列,占1行2列
gLayout->addWidget(userPassword, 1, 2, 1, 2); //设置到1行2列,占1行2列
gLayout->addWidget(rememberPasswordChx, 2, 2); //设置到2行2列,占0行0列
gLayout->addWidget(AutoLogin, 2, 3); //设置到2行3列,占0行0列
gLayout->addWidget(loginBtn, 3, 2, 1, 2); //设置到3行2列,占1行2列
gLayout->addWidget(registerAccountBtn, 0, 4); //设置到0行4列,占0行0列
gLayout->addWidget(retrievePasswordBtn, 1, 4); //设置到1行4列,占0行0列
//setLayout(gLayout);
connect(loginBtn, &QPushButton::clicked, this, &LoginDlg::OnLogin);
connect(registerAccountBtn, &QPushButton::clicked, this, [=]() {
QDesktopServices::openUrl(QUrl("https://blog.csdn.net/qq_44924388/article/details/133850918?spm=1001.2014.3001.5501"));
});
connect(retrievePasswordBtn, &QPushButton::clicked, this, [=]() {
QDesktopServices::openUrl(QUrl("https://blog.csdn.net/qq_44924388/article/details/133850918?spm=1001.2014.3001.5501"));
});
}
void stackedLayout()
{
QStackedLayout* sLayout = new QStackedLayout;
sLayout->addWidget(CreateWidget(0));
sLayout->addWidget(CreateWidget(1));
QHBoxLayout* hLayout = new QHBoxLayout;
hLayout->addLayout(sLayout);
//设置布局
setLayout(hLayout);
connect(loginBtn, &QPushButton::clicked, this, [=]()
{
if (accout == "xiaogua" && password == "123456")
{
sLayout->setCurrentIndex(1);
}
});
}
//记住密码
void RememberPassword()
{
QSettings settings("config.ini", QSettings::IniFormat);
//账户在第一次登录后永远记住,是否选择了记住密码与自动登录,要看用户是否选择
settings.setValue("account", userAccount->text());
settings.setValue("RememberPassword", rememberPasswordChx->isChecked());
settings.setValue("autoLogin", AutoLogin->isChecked());
if (!rememberPasswordChx->isChecked())
{
//如果去除了是否记住密码就清除掉ini文件中的密码
settings.setValue("password", QVariant());
}
else
{
//设置配置文件。将保存的密码放入配置文件
settings.setValue("password", userPassword->text());
}
}
//读取配置文件
void ReadConfig()
{
QSettings settings("config.ini", QSettings::IniFormat);
userAccount->setText(settings.value("account").toString());
//如果配置文件中的记住密码为真就读取密码,并且填写
bool isRemembel = settings.value("RememberPassword", false).toBool();
if (isRemembel)
{
rememberPasswordChx->setChecked(true);
userPassword->setText(settings.value("password").toString());
//如果自动登录为真
if(settings.value("autoLogin",false).toBool())
{
//就让它自己点自己
loginBtn->click();
}
}
}
//创建两个布局
QWidget* CreateWidget(int Id)
{
if (Id == 0)
{
QWidget* page = new QWidget;
LoginLayout(page);
return page;
}
if (Id == 1)
{
QWidget* page = new QWidget;
HBoxLAyout(page);
return page;
}
}
public: //slots
void OnLogin()
{
accout = userAccount->text();
password = userPassword->text();
if (accout == "xiaogua" && password == "123456")
{
qDebug() << accout << password;
RememberPassword();
}
else
{
qDebug() << "密码错误";
}
}
private:
//组件
QLabel* image{};
QLabel* accoutnText{};
QLabel* passwordText{};
QLineEdit* userAccount{};
QLineEdit* userPassword{};
QCheckBox* rememberPasswordChx{};
QCheckBox* AutoLogin{};
QPushButton* loginBtn{};
QPushButton* registerAccountBtn{};
QPushButton* retrievePasswordBtn{};
QLabel* xiaogua{};
QString accout;
QString password;
};
int main(int argc, char* argv[])
{
QApplication a(argc, argv);
LoginDlg w;
w.setWindowIcon(QIcon(":/Resource/tubiao.ico"));
w.show();
return a.exec();
}
#include "main.moc"
- 运行结果