自动配置vs自动装配
Spring有两个名字听起来相似的概念:一个是自动装配,一个是自动配置。他们两个只是听起来相似,实际根本不同。自动装配是autowire,自动配置是autoconfiguration,他们之间没有任何关系,概念也相差甚远。
Springboot的自动配置通过@EnableAutoConfiguration注解实现,@EnableAutoConfiguration是Springboot的注解,通过@EnableAutoConfiguration注解,Springboot实现了“约定大于配置”:系统猜测你需要哪些配置,从而帮助你自动实现了这些配置,所以程序员就不需要手动再进行配置了。
这个说起来非常简单的约定,实际上却大大简化了程序员的日常工作,让Spring项目变的非常简单。
@SpringBootApplication
学习SpringBoot,还是要从SpringBoot的入门注解@SpringBootApplication开始:
@Target(ElementType.TYPE)
@Retention(RetentionPolicy.RUNTIME)
@Documented
@Inherited
@SpringBootConfiguration
@EnableAutoConfiguration
@ComponentScan(excludeFilters = { @Filter(type = FilterType.CUSTOM, classes = TypeExcludeFilter.class),
		@Filter(type = FilterType.CUSTOM, classes = AutoConfigurationExcludeFilter.class) })
public @interface SpringBootApplication {
可以看到@SpringBootApplication是一个组合注解,由@SpringBootConfiguration+@EnableAutoConfiguration+@ComponentScan组成。
@SpringBootConfiguration的主要作用其实就是实现@Configuration注解的功能,告诉Spring当前类是一个配置类。
然后再加上@ComponentScan注解,告诉Spring容器包扫描路径,由于我们在@SpringBootApplication注解上其实并没有指定包扫描路径,所以,Spring容器会采用默认的包扫描路径:当前配置类所在的路径。因此才有了一个约定:SpringBoot的启动类(其实准确的叫法应该是配置类,配置类不一定必须是启动类,编写一个其他的配置类送给SpringApplication的run方法也是一样可以启动SpringBoot的)要放在项目的主路径下,因为不放在主路径下、而是放在特定包下的话,就可能会导致除这个特定包之外的其他包下的类不能被Spring容器扫描到。
然后最重要的是这个@EnableAutoConfiguration注解,@EnableAutoConfiguration也是一个组合注解:
@Target(ElementType.TYPE)
@Retention(RetentionPolicy.RUNTIME)
@Documented
@Inherited
@AutoConfigurationPackage
@Import(AutoConfigurationImportSelector.class)
public @interface EnableAutoConfiguration {
主要包含两个注解:@AutoConfigurationPackage和@Import,比较重要的是这个@Import注解。
其实我们可以看到,SpringBoot项目启动时的几个注解实际上都是由Spring注解组合生成的,所以说SpringBoot其实不算是什么新技术,只不过是Spring框架的一个应用,而已。
@EnableAutoConfiguration
接下来我们要重点分析一下@EnableAutoConfiguration注解,因为他是实现“约定大于配置”思想的关键。
前面已经看到了,@EnableAutoConfiguration注解中最重要的其实是@Import注解,所以我们先对@Import注解做一个简单的了解,之后再回来深入学习@EnableAutoConfiguration注解。
@Import注解
@Import注解和@Configuration注解一起作用,放在@Configuration配置类中,作用是通过该配置类引入Bean到Spring IoC容器中。
比如:
@Configuration
@Import(Person.class)
public class MyConfiguration(){
}

public class Person(){
   @Bean
   public Person createPerson(){
      return new Person();
   }
}
以上配置类通过@Import注解将Person对象注入到SpringIoC容器中。
@Import需要通过参数value指定引入类。
@Import是在Spring Ioc容器刷新的时候、通过BeanFactoryPostProcessors生效的。具体的调用路径:
Spring容器refresh方法 -> AbstractApplicationContext.refresh()->
invokeBeanFactoryPostProcessors()->
PostProcessorRegistrationDelegate.invokeBeanFactoryPostProcessors->
ConfigurationClassPostProcessor.processConfigBeanDefinitions ->
ConfigurationClassParser.parse()->
processConfigurationClass()->
doProcessConfigurationClass()
调用链路特别长,代码也特别多,所以我们今天也就没有办法分析全部代码。但是看到这个doProcessConfigurationClass就感觉快要找到核心代码了,因为Spring源码的特点,doxxxx方法是干实事的。
确实,这个ConfigurationClassParser类是专门用来处理配置类的,也就是加了@Configuration注解的类,@Import注解也是这个类负责解析,这也是@Import注解必须和@Configuration注解绑定才能生效的原因。
doProcessConfigurationClass方法源码也特别长,首先处理@Component、@PropertySource、@ComponentScan注解,之后调用processImports方法处理@Import注解。
processImports方法是正儿八经处理@Import注解的地方。
代码也比较长,我们还是简单一点,只关心比较重要的部分:
for (SourceClass candidate : importCandidates) {
                    //1.如果@Import的类实现了ImportSelector接口
					if (candidate.isAssignable(ImportSelector.class)) {
						// Candidate class is an ImportSelector -> delegate to it to determine imports
						Class<?> candidateClass = candidate.loadClass();
						ImportSelector selector = ParserStrategyUtils.instantiateClass(candidateClass, ImportSelector.class,
								this.environment, this.resourceLoader, this.registry);
						Predicate<String> selectorFilter = selector.getExclusionFilter();
						if (selectorFilter != null) {
							exclusionFilter = exclusionFilter.or(selectorFilter);
						}
						if (selector instanceof DeferredImportSelector deferredImportSelector) {
							this.deferredImportSelectorHandler.handle(configClass, deferredImportSelector);
						}
						else {
							String[] importClassNames = selector.selectImports(currentSourceClass.getMetadata());
							Collection<SourceClass> importSourceClasses = asSourceClasses(importClassNames, exclusionFilter);
							processImports(configClass, currentSourceClass, importSourceClasses, exclusionFilter, false);
						}
					}
                    //2.如果@Import的类实现了ImportBeanDefinitionRegistrar接口
					else if (candidate.isAssignable(ImportBeanDefinitionRegistrar.class)) {
						// Candidate class is an ImportBeanDefinitionRegistrar ->
						// delegate to it to register additional bean definitions
						Class<?> candidateClass = candidate.loadClass();
						ImportBeanDefinitionRegistrar registrar =
								ParserStrategyUtils.instantiateClass(candidateClass, ImportBeanDefinitionRegistrar.class,
										this.environment, this.resourceLoader, this.registry);
						configClass.addImportBeanDefinitionRegistrar(registrar, currentSourceClass.getMetadata());
					}
                    //3.@Import引入的是普通类
					else {
						// Candidate class not an ImportSelector or ImportBeanDefinitionRegistrar ->
						// process it as an @Configuration class
						this.importStack.registerImport(
								currentSourceClass.getMetadata(), candidate.getMetadata().getClassName());
						processConfigurationClass(candidate.asConfigClass(configClass), exclusionFilter);
					}
				}
代码中加了注释,其实主要关注的是@Import注解支持引入三种类型的类:
- 第一种是实现了ImportSelector接口的类,这种情况下又判断是否实现了DeferredImportSelector接口,会有不同的处理逻辑,实现了DeferredImportSelector接口的类,最终会调用到其内部接口DeferredImportSelector.Group的process方法,否则,如果没有实现DeferredImportSelector接口,则会调用到ImportSelector的getImports方法。
- 第二种是实现了ImportBeanDefinitionRegistrar接口的类,通过将BeanDefinition注册到Spring容器中从而实现bean加载。
- 第三种是普通类,可以直接加载到SpringIoC容器中。
需要注意的是第一种情况中的DeferredImportSelector接口:
A variation of ImportSelector that runs after all @Configuration beans have been processed. This type of selector can be particularly useful when the selected imports are @Conditional.
Implementations can also extend the org.springframework.core.Ordered interface or use the org.springframework.core.annotation.Order annotation to indicate a precedence against other DeferredImportSelectors.
Implementations may also provide an import group which can provide additional sorting and filtering logic across different selectors.
Since:
4.0
Author:
Phillip Webb, Stephane Nicoll
DeferredImportSelector接口实现类的延迟导入,在所有的@Configuration配置类全部处理之后再运行。这个特性对于@Conditional注解下的条件配置很有用。
实现类也可以扩展Order接口实现对延迟导入配置类的排序,也可以提供一个导入的group实现排序(Group是DeferredImportSelector的子接口)。
以上是DeferredImportSelector类的javaDoc的解释,基本上说清楚了DeferredImportSelector接口的作用,我们今天理解到这个程度就OK了,不影响我们对SpringBoot自动配置原理的理解了。
好了,对于@Import注解的学习就到这里了,有了对@Import注解的基本认识,我们就可以继续深入分析@EnableAutoConfiguration注解了。
@EnableAutoConfiguration
继续研究@EnableAutoConfiguration注解:
@Target(ElementType.TYPE)
@Retention(RetentionPolicy.RUNTIME)
@Documented
@Inherited
@AutoConfigurationPackage
@Import(AutoConfigurationImportSelector.class)
public @interface EnableAutoConfiguration {
@Import注解引入了AutoConfigurationImportSelector类,这个类是SpringBoot自动配置的关键实现类:
public class AutoConfigurationImportSelector implements DeferredImportSelector, BeanClassLoaderAware,
		ResourceLoaderAware, BeanFactoryAware, EnvironmentAware, Ordered {
发现AutoConfigurationImportSelector类实现了DeferredImportSelector接口,根据上面我们对@Import注解的分析,Spring容器的refresh方法最终会调用到DeferredImportSelector.Group的process方法,我们需要从AutoConfigurationImportSelector源码中找一下process方法的实现。
发现AutoConfigurationImportSelector类实现了一个AutoConfigurationGroup类,该类实现了eferredImportSelector.Group接口,我们找到它的process方法:
		@Override
		public void process(AnnotationMetadata annotationMetadata, DeferredImportSelector deferredImportSelector) {
			Assert.state(deferredImportSelector instanceof AutoConfigurationImportSelector,
					() -> String.format("Only %s implementations are supported, got %s",
							AutoConfigurationImportSelector.class.getSimpleName(),
							deferredImportSelector.getClass().getName()));
			AutoConfigurationEntry autoConfigurationEntry = ((AutoConfigurationImportSelector) deferredImportSelector)
				.getAutoConfigurationEntry(annotationMetadata);
			this.autoConfigurationEntries.add(autoConfigurationEntry);
			for (String importClassName : autoConfigurationEntry.getConfigurations()) {
				this.entries.putIfAbsent(importClassName, annotationMetadata);
			}
		}
process方法强转参数deferredImportSelector为AutoConfigurationImportSelector后,调用getAutoConfigurationEntry方法,拿到需要实例化并放入SpringIoC容器中的类的全限定名之后,返回给Spring容器(我们肯定知道Bean的实例化不会在当前阶段完成、一定是Spring IoC容器统一完成的(还记得吗,入口方法是getBean))。
getAutoConfigurationEntry方法源码会揭露SpringBoot自动装配实现机制的真相:
	protected AutoConfigurationEntry getAutoConfigurationEntry(AnnotationMetadata annotationMetadata) {
		if (!isEnabled(annotationMetadata)) {
			return EMPTY_ENTRY;
		}
		AnnotationAttributes attributes = getAttributes(annotationMetadata);
        //找到自动配置,获取需要自动配置的类
		List<String> configurations = getCandidateConfigurations(annotationMetadata, attributes);
        //去重
		configurations = removeDuplicates(configurations);
        //根据排除配置,进行排除
		Set<String> exclusions = getExclusions(annotationMetadata, attributes);
		checkExcludedClasses(configurations, exclusions);
		configurations.removeAll(exclusions);
        //filter方法,实现条件配置,根据条件排除掉不必要的配置
		configurations = getConfigurationClassFilter().filter(configurations);
		fireAutoConfigurationImportEvents(configurations, exclusions);
		return new AutoConfigurationEntry(configurations, exclusions);
	}
上面加了备注的方法是关键方法,我们一个个看一下。
getCandidateConfigurations
从方法名上可以看出,是要获取到备选的配置项。
代码非常简单:
	protected List<String> getCandidateConfigurations(AnnotationMetadata metadata, AnnotationAttributes attributes) {
		List<String> configurations = SpringFactoriesLoader.loadFactoryNames(getSpringFactoriesLoaderFactoryClass(),
				getBeanClassLoader());
		Assert.notEmpty(configurations, "No auto configuration classes found in META-INF/spring.factories. If you "
				+ "are using a custom packaging, make sure that file is correct.");
		return configurations;
	}
关键方法loadFactoryNames:
  public static List<String> loadFactoryNames(Class<?> factoryType, @Nullable ClassLoader classLoader) {
        ClassLoader classLoaderToUse = classLoader;
        if (classLoader == null) {
            classLoaderToUse = SpringFactoriesLoader.class.getClassLoader();
        }

        String factoryTypeName = factoryType.getName();
        return (List)loadSpringFactories(classLoaderToUse).getOrDefault(factoryTypeName, Collections.emptyList());
    }
又调用了方法loadSpringFactories:
private static Map<String, List<String>> loadSpringFactories(ClassLoader classLoader) {
        Map<String, List<String>> result = (Map)cache.get(classLoader);
        if (result != null) {
            return result;
        } else {
            HashMap result = new HashMap();

            try {
                //读取配置文件META-INF/spring.factories
                Enumeration urls = classLoader.getResources("META-INF/spring.factories");

                while(urls.hasMoreElements()) {
                    URL url = (URL)urls.nextElement();
                    UrlResource resource = new UrlResource(url);
                    Properties properties = PropertiesLoaderUtils.loadProperties(resource);
                    Iterator var6 = properties.entrySet().iterator();

                    while(var6.hasNext()) {
                        Entry<?, ?> entry = (Entry)var6.next();
                        String factoryTypeName = ((String)entry.getKey()).trim();
                        String[] factoryImplementationNames = StringUtils.commaDelimitedListToStringArray((String)entry.getValue());
                        String[] var10 = factoryImplementationNames;
                        int var11 = factoryImplementationNames.length;

                        for(int var12 = 0; var12 < var11; ++var12) {
                            String factoryImplementationName = var10[var12];
                            ((List)result.computeIfAbsent(factoryTypeName, (key) -> {
                                return new ArrayList();
                            })).add(factoryImplementationName.trim());
                        }
                    }
                }

                result.replaceAll((factoryType, implementations) -> {
                    return (List)implementations.stream().distinct().collect(Collectors.collectingAndThen(Collectors.toList(), Collections::unmodifiableList));
                });
                cache.put(classLoader, result);
                return result;
            } catch (IOException var14) {
                throw new IllegalArgumentException("Unable to load factories from location [META-INF/spring.factories]", var14);
            }
        }
    }
我们先有一个认识:类加载器可以在当前类加载上下文环境下找到指定位置的配置文件。
代码虽然比较长,但是实现的功能比较简单:通过类加载器读取配置文件“META-INF/spring.factories”,加工配置文件内容、放入Map之后返回。
我们简单看一眼META-INF/spring.factories文件的内容:
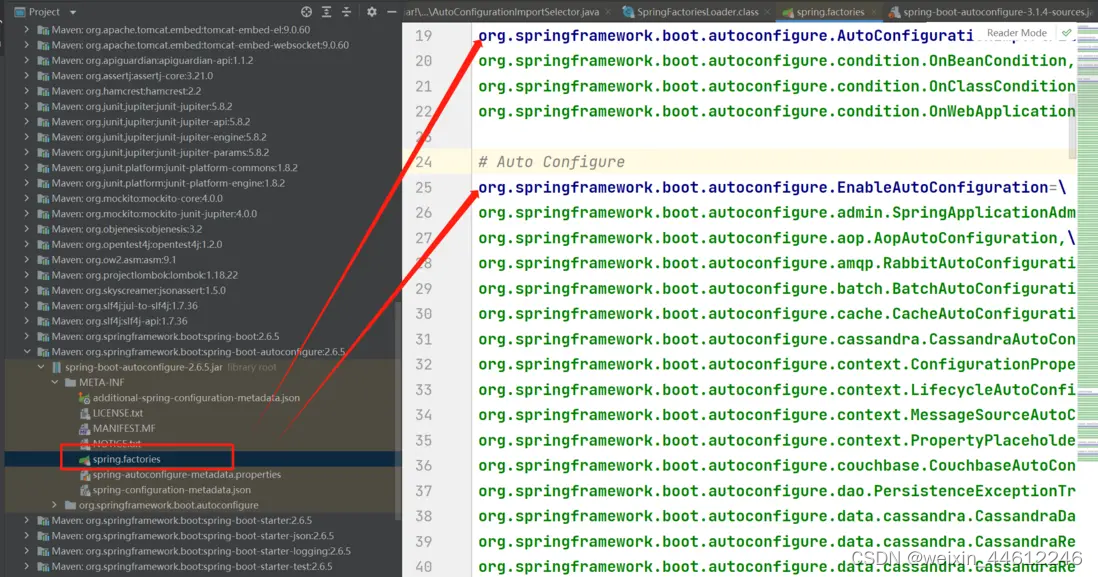
其中的org.springframework.boot.autoconfigure.AutoConfigurationImportFilter、以及org.springframework.boot.autoconfigure.EnableAutoConfiguration是key,后面的内容是value(是一个list),读取该文件的配置后最终以map的形式返回。
这样的话,getCandidateConfigurations方法就通过类加载器返回配置在META-INF/spring.factories文件中的内容并返回。
这段代码逻辑其实就是SpringBoot自动配置的核心内容,SpringBoot帮助程序员完成配置的机密就在这个META-INF/spring.factories文件中,其实如果没有META-INF/spring.factories文件,SpringBoot也不可能知道他究竟要自动加载哪些Bean!
getExclusions
getExclusions方法完成的功能比较简单,就是检查@Import注解是否有exclude的配置,根据配置对返回的自动配置结合进行排除。
getConfigurationClassFilter().filter
getConfigurationClassFilter().filter方法也非常关键,因为配置文件META-INF/spring.factories中的自动配置类非常多,但是我们的项目中不一定需要,比如RabbitMQ,在META-INF/spring.factories文件中就有关于RabbitMQ的配置,但是如果我们的项目不需要mq的话,SpringBoot就没有必要加载他。
SpringBoot就是通过filter方法来过滤上述不必要加载的组件的。过滤的方法是:
- SpringBoot通过META-INF/spring.factories配置文件指定了AutoConfigurationImportFilter过滤器
- filter方法中通过过滤器,以及各组件的自动配置类完成过滤
比如,RabbitMQ的自动配置类:
@Configuration(proxyBeanMethods = false)
@ConditionalOnClass({ RabbitTemplate.class, Channel.class })
@EnableConfigurationProperties(RabbitProperties.class)
@Import({ RabbitAnnotationDrivenConfiguration.class, RabbitStreamConfiguration.class })
public class RabbitAutoConfiguration {
其中@ConditionalOnClass注解,指定如果当前项目中有RabbitTemplate.class, 以及Channel.class,两个类存在的情况下就执行自动配置,否则,如果不存在的话,RabbitMQ的自动配置类RabbitAutoConfiguration就会被这个filter方法过滤掉,不会被Spring容器加载进来。
而这个“过滤掉”的具体工作,就是由AutoConfigurationImportFilter过滤器完成的。
OK,SpringBoot自动配置的实现原理就搞清楚了!
但是还是有必要提一下SpringBoot3.0,实现自动配置的逻辑和我们上面看到的有变化。
SpringBoot3.0
如果你的项目使用的是SpringBoot3.0,你会发现我上面写的这些内容是在胡说。
因为压根就没有META-INF/spring.factories这个东西!
META-INF/spring.factories其实是在SpringBoot2.7之后就被移除了。
看一下源码,从getCandidateConfigurations开始:
	protected List<String> getCandidateConfigurations(AnnotationMetadata metadata, AnnotationAttributes attributes) {
		List<String> configurations = ImportCandidates.load(AutoConfiguration.class, getBeanClassLoader())
			.getCandidates();
		Assert.notEmpty(configurations,
				"No auto configuration classes found in "
						+ "META-INF/spring/org.springframework.boot.autoconfigure.AutoConfiguration.imports. If you "
						+ "are using a custom packaging, make sure that file is correct.");
		return configurations;
	}
关键是这个ImportCandidates.load方法:
	public static ImportCandidates load(Class<?> annotation, ClassLoader classLoader) {
		Assert.notNull(annotation, "'annotation' must not be null");
        //获取类加载器
		ClassLoader classLoaderToUse = decideClassloader(classLoader);
		String location = String.format(LOCATION, annotation.getName());
		//在类加载器的帮助下,获取到指定位置的配置
        Enumeration<URL> urls = findUrlsInClasspath(classLoaderToUse, location);
		List<String> importCandidates = new ArrayList<>();
		while (urls.hasMoreElements()) {
			URL url = urls.nextElement();
			importCandidates.addAll(readCandidateConfigurations(url));
		}
		return new ImportCandidates(importCandidates);
	}
要找到的就是location指定的文件,其中LOCATION定义为:
private static final String LOCATION = "META-INF/spring/%s.imports";
发现配置文件META-INF/spring.factories被META-INF/spring/org.springframework.boot.autoconfigure.AutoConfiguration.imports取代!
这个变化对既有项目的影响很大!因为虽然SpringBoot自己的自动配置很容易就完成了修改,但是你项目中使用的那些第三方包不一定能够无缝支持!
有关第三方包的自动配置,我们下一篇文章分析。
上一篇 Spring MVC 十一:@EnableWebMvc


![Android [SPI,AutoSerivce,ServiceLoader]](https://img-blog.csdnimg.cn/fe896f23fed64ee28e64a36f4f407eb3.png)