🎬 艳艳耶✌️:个人主页
🔥 个人专栏 :《Spring与Mybatis集成整合》《Vue.js使用》
⛺️ 越努力 ,越幸运。

1.了解微信授权登录
微信登录官网:
小程序登录![]() https://developers.weixin.qq.com/miniprogram/dev/framework/open-ability/login.html 小程序微信登录图解:
https://developers.weixin.qq.com/miniprogram/dev/framework/open-ability/login.html 小程序微信登录图解:
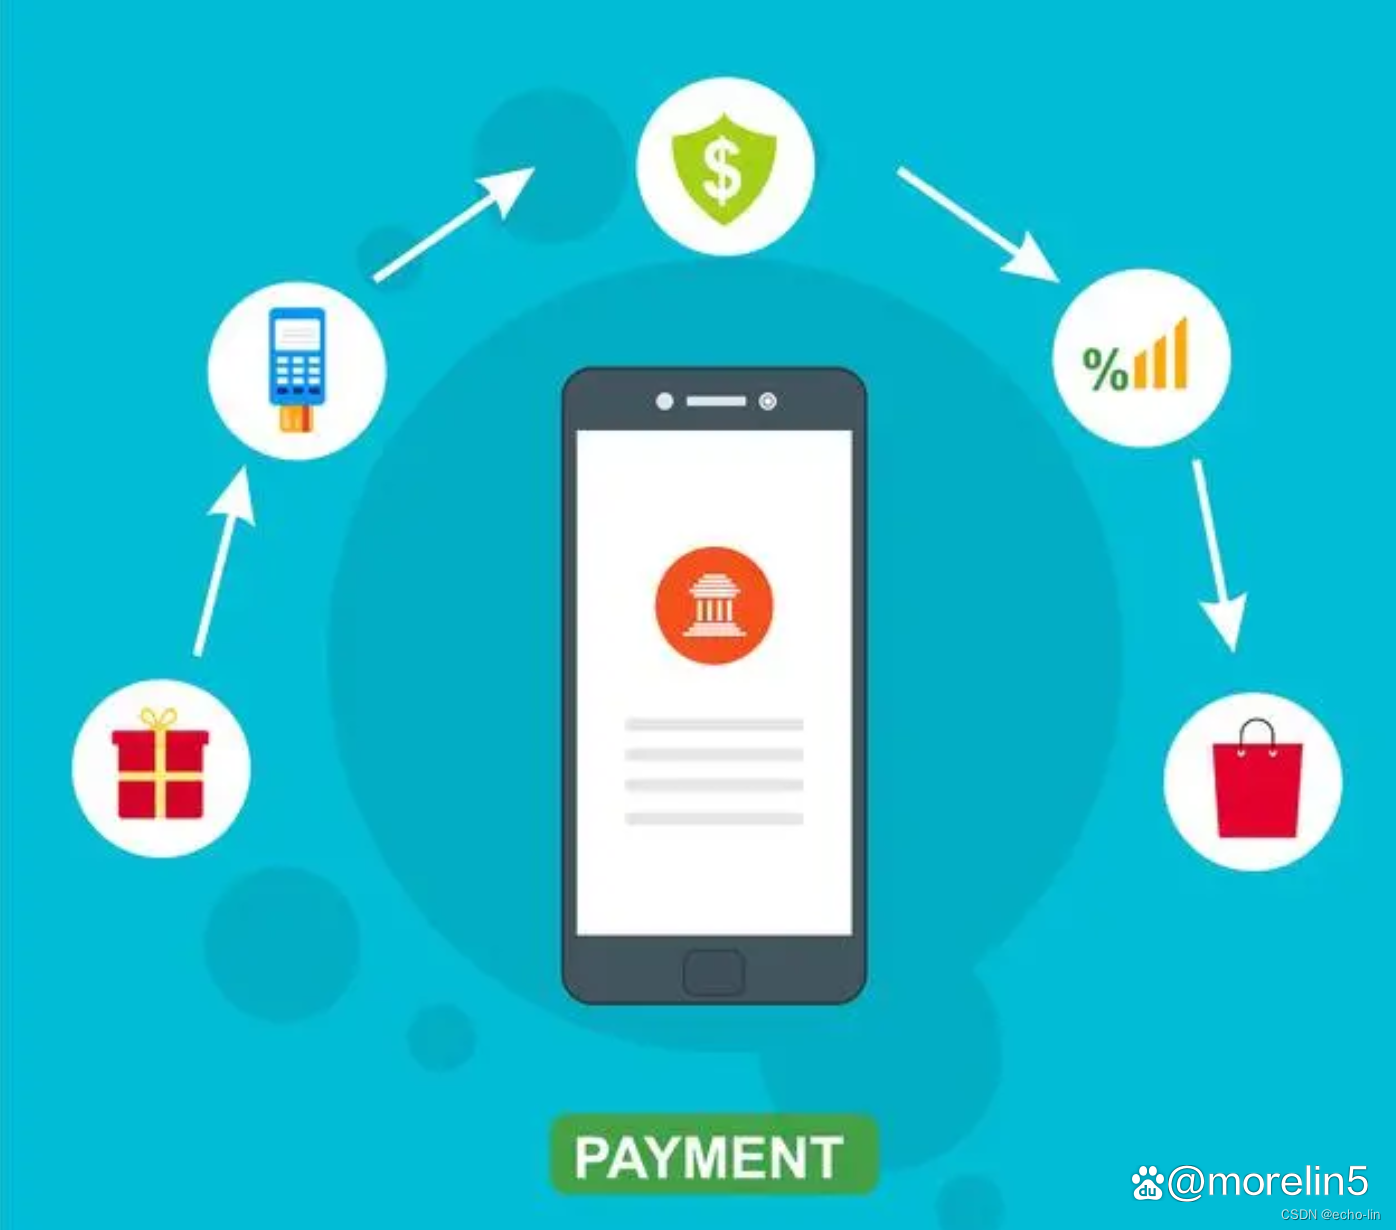
小程序登录授权基本原理:
小程序登录授权的基本原理是通过微信用户的微信账号来进行身份验证。用户在小程序中点击登录按钮后,小程序会调用微信提供的登录接口,将登录凭证code发送给开发者的后台服务器。后台服务器通过微信提供的接口,使用code换取用户的唯一标识openid和会话密钥session_key。开发者可以使用openid标识用户的唯一身份,session_key用于解密用户敏感数据。
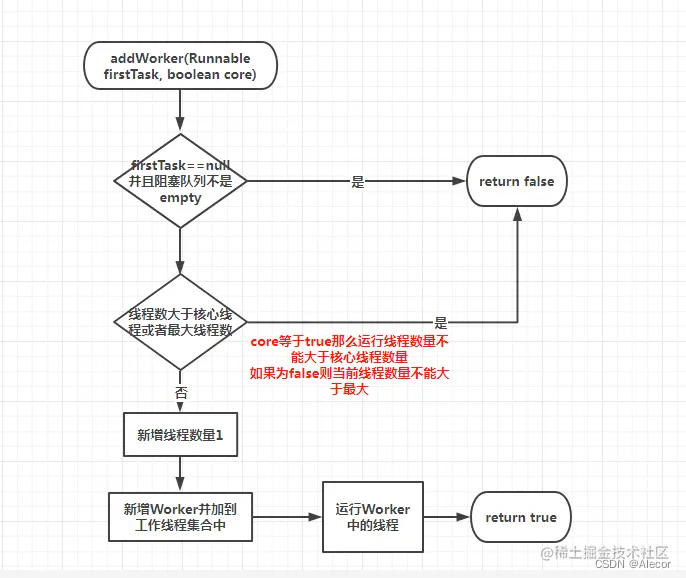
1.2. 图解
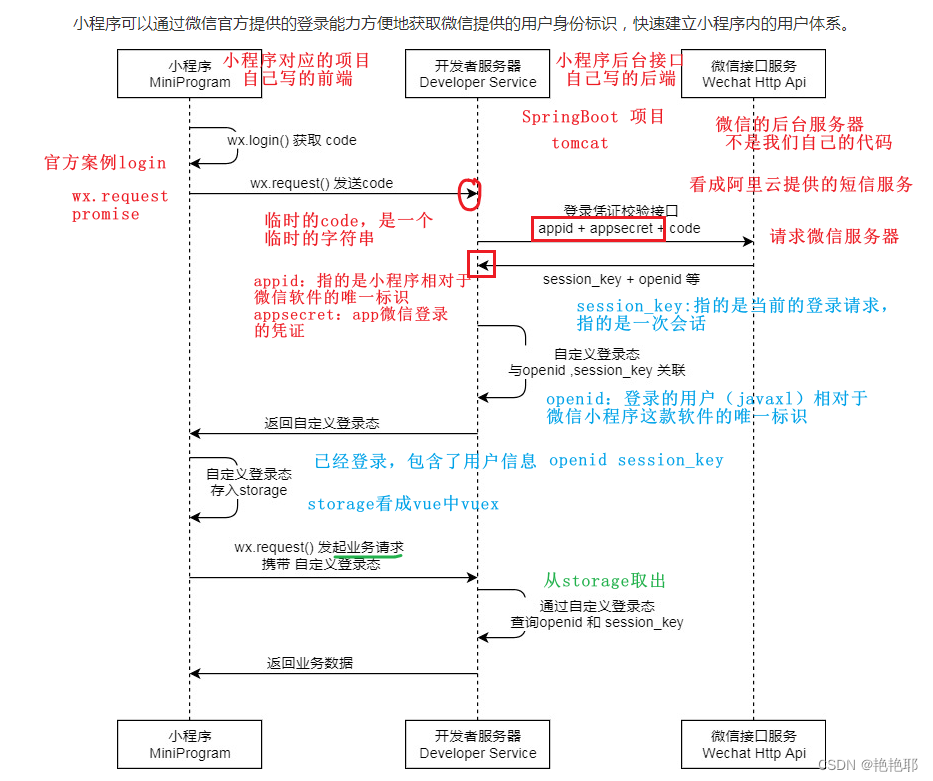
流程图展示了使用微信官方提供的登录能力来获取用户身份标识的过程。下面是对流程图中的一些关键步骤的解释:
1. 小程序通过微信官方提供的登录能力获取微信提供的用户身份标识,以便在小程序内建立用户体系。
2. 开发者需要在小程序中调用wx.login()方法来获取一个临时的code,该code是一个临时的字符串,再通过wx.request() 发起网络请求,将 code 传给后台服务端。
3. 开发者服务器通过发送code及AppID(小程序ID)和AppSecret(小程序密钥)[ 后面发送的ID对于微信接口服务来说是唯一标识 ]调用微信接口服务(Wechat Http Api),以获取session_key和openid等信息。session_key指的是当前的登录请求,是一次会话的标识。
4. 开发者服务器将session_key和openid ( 微信接口转过来的openid对于3微信小程序来说是授权的唯一标识 ) 等用户信息与自定义登录态关联起来,返回自定义登录态给小程序。
5. 小程序在后续的业务请求中,可以携带自定义登录态来向开发者服务器发起请求,以获取业务数据。
6. 开发者服务器通过验证自定义登录态,返回相应的业务数据给小程序。
总的来说,微信小程序授权登录的流程包括小程序端调用wx.login()方法获取临时code,开发者服务器通过code+AppID+AppSecret获取session_key和openid等信息,并将其与自定义登录态关联起来,最后小程序可以使用自定义登录态来向开发者服务器发起业务请求。
1.2进入官网
在官方文档中,有通过授权登入的方法及代码,我这里将其复制到项目中,进行一个演示。
其中有两个方法,有分别不同的用户体验及安全问题。以下就给大家演示:
-
wxLogin
调用接口获取登录凭证(code)。通过凭证进而换取用户登录态信息,包括用户在当前小程序的唯一标识(openid)、微信开放平台账号下的唯一标识(unionid,若当前小程序已绑定到微信开放平台账号)及本次登录的会话密钥(session_key)等。用户数据的加解密通讯需要依赖会话密钥完成。
展示效果 :

-
wx.getUserProfile
获取用户信息。页面产生点击事件(例如
button上bindtap的回调中)后才可调用,每次请求都会弹出授权窗口,用户同意后返回userInfo。该接口用于替换wx.getUserInfo,详见 用户信息接口调整说明。
1.3代码
index.wxml
<!--pages/index/index.wxml-->
<view>
  <button wx:if="{{canIUseGetUserProfile}}" type="primary" class="wx-login-btn" bindtap="getUserProfile">微信直接登录1</button>
  <button wx:else open-type="getUserInfo" type="primary" class="wx-login-btn" bindgetuserinfo="wxLogin">微信直接登录2</button>
  <image mode="scaleToFill" src="{{userInfo.avatarUrl}}" />
  <text>昵称:{{userInfo.nickName}}</text>
</view>
index.js
// pages/index/index.js
Page({
  data: {
    userInfo: {},
    canIUseGetUserProfile: true,
  },
  onLoad() {
    // if (wx.getUserProfile) {
    //   this.setData({
    //     canIUseGetUserProfile: true
    //   })
    // }
  },
  getUserProfile(e) {
    console.log('getUserProfile')
    // 推荐使用 wx.getUserProfile 获取用户信息,开发者每次通过该接口获取用户个人信息均需用户确认
    // 开发者妥善保管用户快速填写的头像昵称,避免重复弹窗
    wx.getUserProfile({
      desc: '用于完善会员资料', // 声明获取用户个人信息后的用途,后续会展示在弹窗中,请谨慎填写
      success: (res) => {
        console.log(res);
        this.setData({
          userInfo: res.userInfo,
          hasUserInfo: true
        })
      }
    })
  },
  wxLogin: function(e) {
    // debugger
    console.log('wxLogin')
    console.log(e.detail.userInfo);
    this.setData({
      userInfo: e.detail.userInfo
    })
    if (e.detail.userInfo == undefined) {
      app.globalData.hasLogin = false;
      util.showErrorToast('微信登录失败');
      return;
    }
  },
  /**
   * 生命周期函数--监听页面初次渲染完成
   */
  onReady() {

  },

  /**
   * 生命周期函数--监听页面显示
   */
  onShow() {

  },

  /**
   * 生命周期函数--监听页面隐藏
   */
  onHide() {

  },

  /**
   * 生命周期函数--监听页面卸载
   */
  onUnload() {

  },

  /**
   * 页面相关事件处理函数--监听用户下拉动作
   */
  onPullDownRefresh() {

  },

  /**
   * 页面上拉触底事件的处理函数
   */
  onReachBottom() {

  },

  /**
   * 用户点击右上角分享
   */
  onShareAppMessage() {

  }
})
js文件中 canIUseGetUserProfile 属性值为 : true时,就是wx.getUserProfile方法,当为false,就是wxLogin方法。
2.数据交互授权登入
以下代码是基于我博客中进行的续写 : 微信小程序数据交互------WXS的使用
2.1. 前端代码
在项目中编写 api.js 文件中的请求访问地址
// 以下是业务服务器API地址
 // 本机开发API地址
var WxApiRoot = 'http://localhost:8080/oapro/wx/';
// 测试环境部署api地址
// var WxApiRoot = 'http://192.168.191.1:8080/oapro/wx/';
// 线上平台api地址
//var WxApiRoot = 'https://www.oa-mini.com/demo/wx/';

module.exports = {
  IndexUrl: WxApiRoot + 'home/index', //首页数据接口
  SwiperImgs: WxApiRoot+'swiperImgs',
  MettingInfos: WxApiRoot+'meeting/list',
  AuthLoginByWeixin: WxApiRoot + 'auth/login_by_weixin', //微信登录
  UserIndex: WxApiRoot + 'user/index', //个人页面用户相关信息
  AuthLogout: WxApiRoot + 'auth/logout', //账号登出
  AuthBindPhone: WxApiRoot + 'auth/bindPhone' //绑定微信手机号
};
个人中心
在个人中心页面的 index.wxml 文件中进行编写:
<view class="page-container">
    <view class="user-info-container">
        <view class="user-info"  bindtap="goLogin">
            <image class="user-img" mode="scaleToFill" src="{{userInfo.avatarUrl}}" />
            <text class="user-info-name">{{userInfo.nickName}}</text>
        </view>
        <image class="user-update" src="/static/tabBar/component.png" bindtap='goPages' data-url='/pages/ucenter/user/user'/>
    </view>

    <view class="boundary" />
    <view class="cells-container">
        <view class="cell-wrap">
            <image class="cell-icon" src="/static/tabBar/sdk.png" />
            <text class="cell-text">我主持的会议</text>
            <view class="cell-right">
                <view class="cell-list-num">{{metting_pubs}}</view>
                <view class="cell-arrow"></view>
            </view>
        </view>
        <view class="cell-wrap">
            <image class="cell-icon" src="/static/tabBar/sdk.png" />
            <text class="cell-text">我参与的会议</text>
            <view class="cell-right">
                <view class="cell-list-num">{{metting_joins}}</view>
                <view class="cell-arrow"></view>
            </view>
        </view>
    </view>
    <view class="boundary" />
    <view class="cells-container">
        <view class="cell-wrap">
            <image class="cell-icon" src="/static/tabBar/sdk.png" />
            <text class="cell-text">我发布的投票</text>
            <view class="cell-right">
                <view class="cell-list-num">1</view>
                <view class="cell-arrow"></view>
            </view>
        </view>
        <view class="cell-wrap">
            <image class="cell-icon" src="/static/tabBar/sdk.png" />
            <text class="cell-text">我参与的投票</text>
            <view class="cell-right">
                <view class="cell-list-num">10</view>
                <view class="cell-arrow"></view>
            </view>
        </view>
    </view>
    <view class="boundary" />
    <view class="cells-container">
        <view class="cell-wrap">
            <image class="cell-icon" src="/static/tabBar/template.png" />
            <text class="cell-text">消息</text>
            <view class="cell-right">
                <view class="cell-list-num"></view>
                <view class="cell-arrow"></view>
            </view>
        </view>
        <view class="cell-wrap">
            <image class="cell-icon" src="/static/tabBar/component.png" />
            <text class="cell-text">设置</text>
            <view class="cell-right">
                <view class="cell-list-num"></view>
                <view class="cell-arrow"></view>
            </view>
        </view>
    </view>
</view>
在 index.js 中编写数据请求及方法
// pages/ucenter/index/index.js
var util = require('../utils/util.js');
var api = require('../config/api.js');
const app = getApp();
Page({

    /**
     * 页面的初始数据
     */
    data: {
        userInfo: {
            nickName: '点击登录',
            avatarUrl: '/static/images/avatar.png'
        },
        hasLogin: false,
        metting_pubs: '',
        metting_joins: ''
    },

    /**
     * 生命周期函数--监听页面加载
     */
    onLoad(options) {

    },


    /**
     * 生命周期函数--监听页面显示
     */
    onShow() {
        this.getUserInfo();
    },
    getUserInfo() {
      // console.log('ucenter.index.app.globalData.hasLogin='+app.globalData.hasLogin)
        //获取用户的登录信息
        if (app.globalData.hasLogin) {
            let userInfo = wx.getStorageSync('userInfo');
            this.setData({
                userInfo: userInfo,
                hasLogin: true
            });
            //查询个人统计信息
            util.request(api.UserIndex).then(res => {
                if (res.errno === 0) {
                    this.setData({
                        metting_pubs: res.data.metting_pubs,
                        metting_joins: res.data.metting_joins
                    });
                }
            });
        }
    },
    goLogin() {
        if (!this.data.hasLogin) {
            wx.navigateTo({
                url: "/pages/auth/login/login"
            });
        }
    },
    /**
     * 页面跳转
     */
    goPages: function (e) {
        if (this.data.hasLogin) {
            wx.navigateTo({
                url: e.currentTarget.dataset.url
            });
        } else {
            wx.navigateTo({
                url: "/pages/auth/login/login"
            });
        };
    }

})
创建一个用户登入后的设置页面为 : user
user.wxml
<!--pages/ucenter/user/user.wxml-->
<form bindsubmit="formSubmit">
    <view class='personal-data'>
        <view class='list'>
            <view class='item acea-row row-between-wrapper'>
                <view>头像</view>
                <view class='pictrue'>
                    <image src='{{userInfo.avatarUrl}}'></image>
                </view>
            </view>
            <view class='item acea-row row-between-wrapper'>
                <view>名字</view>
                <view class='input'><input type='text' disabled='true' name='nickname' value='{{userInfo.nickName}}'></input></view>
            </view>
            <view class='item acea-row row-between-wrapper'>
                <view>手机号码</view>
                <button name='phone' class='phoneW' value='{{userInfo.phone}}' wx:if="{{!userInfo.phone}}" bindgetphonenumber="getPhoneNumber" hover-class='none' open-type='getPhoneNumber'>
                    点击获取
                </button>
                <view class='input acea-row row-between-wrapper' wx:else>
                    <input type='text' disabled='true' name='phone' value='{{userInfo.phone}}' class='id'></input>
                    <text class='iconfont icon-suozi'></text>
                </view>
            </view>

            <view class='item acea-row row-between-wrapper'>
                <view>ID号</view>
                <view class='input acea-row row-between-wrapper'>
                    <input type='text' value='1000{{userInfo.userId}}' disabled='true' class='id'></input>
                    <text class='iconfont icon-suozi'></text>
                </view>
            </view>
        </view>
        <button class='modifyBnt' bindtap="exitLogin">退 出</button>
    </view>
</form>
user.wxss
@import '/static/font/iconfont.wxss';
.personal-data .list {
    margin-top: 15rpx;
    background-color: #fff;
}

.personal-data .list .item {
    padding: 30rpx 30rpx 30rpx 0;
    border-bottom: 1rpx solid #f2f2f2;
    margin-left: 30rpx;
    font-size: 32rpx;
    color: #282828;
}

.personal-data .list .item .phone {
    background-color: #85c43f;
    width: 160rpx;
    height: 56rpx;
    font-size: 24rpx;
    color: #fff;
    line-height: 56rpx;
    border-radius: 32rpx
}

.personal-data .list .item .pictrue {
    width: 88rpx;
    height: 88rpx;
}

.personal-data .list .item .pictrue image {
    width: 100%;
    height: 100%;
    border-radius: 50%;
}

.personal-data .list .item .input {
    width: 415rpx;
    text-align: right;
    color: #868686;
}

.personal-data .list .item .input .id {
    width: 365rpx;
}

.personal-data .list .item .input .iconfont {
    font-size: 35rpx;
}

.personal-data .modifyBnt {
    /* background-color: #85c43f; */
    /* background: linear-gradient(to left right, #85c43f, #fefefd); */
    background: radial-gradient(circle at 50%,#85c43f,#CDDC39);
    font-size: 32rpx;
    color: #fff;
    width: 690rpx;
    height: 90rpx;
    border-radius: 50rpx;
    display: flex;
    justify-content: center;
    align-items: center;
    line-height: 90rpx;
    margin: 76rpx auto 0 auto;
}


.acea-row{display:flex;flex-wrap:wrap;}
.acea-row.row-top{align-items:flex-start;}
.acea-row.row-middle{align-items:center;}
.acea-row.row-bottom{align-items:flex-end;}
.acea-row.row-left{justify-content:flex-start;}
.acea-row.row-center{justify-content:center;}
.acea-row.row-right{justify-content:flex-end;}
.acea-row.row-between{justify-content:space-between;}
.acea-row.row-around{justify-content:space-around;}
.acea-row.row-column{flex-direction:column;}
.acea-row.row-column-between{flex-direction:column;justify-content:space-between;}
.acea-row.row-column-around{flex-direction:column;justify-content:space-around;}
.acea-row.row-center-wrapper{align-items:center;justify-content:center;}
.acea-row.row-between-wrapper{align-items:center;justify-content:space-between;}
view, image, text, navigator {
    box-sizing: border-box;
    padding: 0;
    margin: 0;
}
user.js
var util = require('../../../utils/util.js');
var api = require('../../../config/api.js');
var user = require('../../../utils/user.js');
var app = getApp();
Page({

  /**
   * 页面的初始数据
   */
  data: {
    userInfo: {},
    hasLogin: false,
    userSharedUrl: ''
  },

  /**
      * 生命周期函数--监听页面加载
   */
  onLoad: function (options) {

  },
  onShow: function () {
    let that = this;
    //获取用户的登录信息
    let userInfo = wx.getStorageSync('userInfo');
    this.setData({
      userInfo: userInfo,
      hasLogin: true
    });

  },
  getPhoneNumber: function (e) {
      console.log(e);
    let that = this;
    if (e.detail.errMsg !== "getPhoneNumber:ok") {
      // 拒绝授权
      return;
    }

    if (!this.data.hasLogin) {
      wx.showToast({
        title: '绑定失败:请先登录',
        icon: 'none',
        duration: 2000
      });
      return;
    }

    util.request(api.AuthBindPhone, {
      iv: e.detail.iv,
      encryptedData: e.detail.encryptedData
    }, 'POST').then(function (res) {
      if (res.errno === 0) {
        let userInfo = wx.getStorageSync('userInfo');
        userInfo.phone = res.data.phone;//设置手机号码
        wx.setStorageSync('userInfo', userInfo);
        that.setData({
          userInfo: userInfo,
          hasLogin: true
        });
        wx.showToast({
          title: '绑定手机号码成功',
          icon: 'success',
          duration: 2000
        });
      }
    });
  },
  exitLogin: function () {
    wx.showModal({
      title: '',
      confirmColor: '#b4282d',
      content: '退出登录?',
      success: function (res) {
        if (!res.confirm) {
          return;
        }

        util.request(api.AuthLogout, {}, 'POST');
        app.globalData.hasLogin = false;
        wx.removeStorageSync('token');
        wx.removeStorageSync('userInfo');
        wx.reLaunch({
          url: '/pages/index/index'
        });
      }
    })
  }
})
2.2后端代码
在后台编写的控制器,来进行出来前端的请求及数据处理并且反馈带前端
WxAuthController :
package com.zking.ssm.wxcontroller;

/**
 * @Autho donkee
 * @Since 2022/6/27
 */

import cn.binarywang.wx.miniapp.bean.WxMaPhoneNumberInfo;
import com.alibaba.fastjson.JSONObject;
import com.sy.ssm.annotation.LoginUser;
import com.sy.ssm.model.UserInfo;
import com.sy.ssm.model.WxLoginInfo;
import com.sy.ssm.model.WxUser;
import com.sy.ssm.service.UserToken;
import com.sy.ssm.service.UserTokenManager;
import com.sy.ssm.service.WxUserService;
import com.sy.ssm.util.JacksonUtil;
import com.sy.ssm.util.ResponseUtil;
import com.sy.ssm.util.UserTypeEnum;
import lombok.extern.slf4j.Slf4j;
import org.springframework.beans.factory.annotation.Autowired;
import org.springframework.util.StringUtils;
import org.springframework.web.bind.annotation.PostMapping;
import org.springframework.web.bind.annotation.RequestBody;
import org.springframework.web.bind.annotation.RequestMapping;
import org.springframework.web.bind.annotation.RestController;

import cn.binarywang.wx.miniapp.api.WxMaService;
import cn.binarywang.wx.miniapp.bean.WxMaJscode2SessionResult;
import javax.servlet.http.HttpServletRequest;
import java.text.DateFormat;
import java.text.SimpleDateFormat;
import java.util.Date;
import java.util.HashMap;
import java.util.Map;

/**
 * 鉴权服务
 */
@Slf4j
@RestController
@RequestMapping("/wx/auth")
public class WxAuthController {
    @Autowired
    private WxMaService wxService;
    @Autowired
    private WxUserService userService;
    /**
     * 微信登录
     *
     * @param wxLoginInfo
     *            请求内容,{ code: xxx, userInfo: xxx }
     * @param request
     *            请求对象
     * @return 登录结果
     */
    @PostMapping("login_by_weixin")
    public Object loginByWeixin(@RequestBody WxLoginInfo wxLoginInfo, HttpServletRequest request) {

        //客户端需携带code与userInfo信息
        String code = wxLoginInfo.getCode();
        UserInfo userInfo = wxLoginInfo.getUserInfo();
        if (code == null || userInfo == null) {
            return ResponseUtil.badArgument();
        }
        //调用微信sdk获取openId及sessionKey
        String sessionKey = null;
        String openId = null;
        try {
            long beginTime = System.currentTimeMillis();
            //
            WxMaJscode2SessionResult result = this.wxService.getUserService().getSessionInfo(code);
//            Thread.sleep(6000);
            long endTime = System.currentTimeMillis();
            log.info("响应时间:{}",(endTime-beginTime));
            sessionKey = result.getSessionKey();//session id
            openId = result.getOpenid();//用户唯一标识 OpenID
        } catch (Exception e) {
            e.printStackTrace();
        }

        if (sessionKey == null || openId == null) {
            log.error("微信登录,调用官方接口失败:{}", code);
            return ResponseUtil.fail();
        }else{
            log.info("openId={},sessionKey={}",openId,sessionKey);
        }
        //根据openId查询wx_user表
        //如果不存在,初始化wx_user,并保存到数据库中
        //如果存在,更新最后登录时间
        WxUser user = userService.queryByOid(openId);

        if (user == null) {
            user = new WxUser();
            user.setUsername(openId);
            user.setPassword(openId);
            user.setWeixinOpenid(openId);
            user.setAvatar(userInfo.getAvatarUrl());
            user.setNickname(userInfo.getNickName());
            user.setGender(userInfo.getGender());
            user.setUserLevel((byte) 0);
            user.setStatus((byte) 0);
            user.setLastLoginTime(new Date());
            user.setLastLoginIp(IpUtil.client(request));
            user.setShareUserId(1);

            userService.add(user);

        } else {
            user.setLastLoginTime(new Date());
            user.setLastLoginIp(IpUtil.client(request));
            if (userService.updateById(user) == 0) {
                log.error("修改失败:{}", user);
                return ResponseUtil.updatedDataFailed();
            }
        }
        // token
        UserToken userToken = null;
        try {
            userToken = UserTokenManager.generateToken(user.getId());
        } catch (Exception e) {
            log.error("微信登录失败,生成token失败:{}", user.getId());
            e.printStackTrace();
            return ResponseUtil.fail();
        }
        userToken.setSessionKey(sessionKey);
        log.info("SessionKey={}",UserTokenManager.getSessionKey(user.getId()));
        Map<Object, Object> result = new HashMap<Object, Object>();
        result.put("token", userToken.getToken());
        result.put("tokenExpire", userToken.getExpireTime().toString());
        userInfo.setUserId(user.getId());
        if (!StringUtils.isEmpty(user.getMobile())) {// 手机号存在则设置
            userInfo.setPhone(user.getMobile());
        }
        try {
            DateFormat df = new SimpleDateFormat("yyyy-MM-dd");
            String registerDate = df.format(user.getAddTime() != null ? user.getAddTime() : new Date());
            userInfo.setRegisterDate(registerDate);
            userInfo.setStatus(user.getStatus());
            userInfo.setUserLevel(user.getUserLevel());// 用户层级
            userInfo.setUserLevelDesc(UserTypeEnum.getInstance(user.getUserLevel()).getDesc());// 用户层级描述
        } catch (Exception e) {
            log.error("微信登录:设置用户指定信息出错:"+e.getMessage());
            e.printStackTrace();
        }
        result.put("userInfo", userInfo);


        log.info("【请求结束】微信登录,响应结果:{}", JSONObject.toJSONString(result));

        return ResponseUtil.ok(result);
    }
    /**
     * 绑定手机号码
     *
     * @param userId
     * @param body
     * @return
     */
    @PostMapping("bindPhone")
    public Object bindPhone(@LoginUser Integer userId, @RequestBody String body) {
        log.info("【请求开始】绑定手机号码,请求参数,body:{}", body);

        String sessionKey = UserTokenManager.getSessionKey(userId);
        String encryptedData = JacksonUtil.parseString(body, "encryptedData");
        String iv = JacksonUtil.parseString(body, "iv");
        WxMaPhoneNumberInfo phoneNumberInfo = null;
        try {
            phoneNumberInfo = this.wxService.getUserService().getPhoneNoInfo(sessionKey, encryptedData, iv);
        } catch (Exception e) {
            log.error("绑定手机号码失败,获取微信绑定的手机号码出错:{}", body);
            e.printStackTrace();
            return ResponseUtil.fail();
        }
        String phone = phoneNumberInfo.getPhoneNumber();
        WxUser user = userService.selectByPrimaryKey(userId);
        user.setMobile(phone);
        if (userService.updateById(user) == 0) {
            log.error("绑定手机号码,更新用户信息出错,id:{}", user.getId());
            return ResponseUtil.updatedDataFailed();
        }
        Map<Object, Object> data = new HashMap<Object, Object>();
        data.put("phone", phone);

        log.info("【请求结束】绑定手机号码,响应结果:{}", JSONObject.toJSONString(data));
        return ResponseUtil.ok(data);
    }
    /**
     * 注销登录
     */
    @PostMapping("logout")
    public Object logout(@LoginUser Integer userId) {
        log.info("【请求开始】注销登录,请求参数,userId:{}", userId);
        if (userId == null) {
            return ResponseUtil.unlogin();
        }
        try {
            UserTokenManager.removeToken(userId);
        } catch (Exception e) {
            log.error("注销登录出错:userId:{}", userId);
            e.printStackTrace();
            return ResponseUtil.fail();
        }

        log.info("【请求结束】注销登录成功!");
        return ResponseUtil.ok();
    }
}
在 application.yml 文件中进行配置后台的数据库及微信小程序的AppID(小程序ID)及AppSecret(小程序密钥),来帮助访问微信的接口服务。
server:
  port: 8080 #指服器端口号
  servlet:
    context-path: /oapro

spring:
  datasource:
    #type连接池类型 DBCP,C3P0,Hikari,Druid,默认为Hikari
    type: com.zaxxer.hikari.HikariDataSource
    driver-class-name: com.mysql.jdbc.Driver
    url: jdbc:mysql://localhost:3306/mybatis_oapro?useUnicode=true&characterEncoding=UTF-8&useSSL=false
    username: root
    password: 123456
mybatis:
  mapper-locations: classpath*:mapper/*.xml #指定mapper文件位置
  type-aliases-package: com.zking.ssm.model #指定自动生成别名所在包

logging:
  level:
    root:  info
    org.springframework:  info
    org.mybatis:  ERROR
    com.zking.ssm.mapper: debug

oa:
  wx:
    app-id: wxae5ee9d4ca8b54ee
    app-secret: 826ff3944813815084dd61f2a79cb192
    msgDataFormat: JSON
效果展示:

今日分享就结束啦!!!


![解决使用WebTestClient访问接口报[185c31bb] 500 Server Error for HTTP GET “/**“](https://img-blog.csdnimg.cn/3dac1dcd794f4a03aafb03d6ef634b6a.png#pic_center)