目录
一、创建工作空间及配置Maven环境
二、创建springboot项目整合web操作
三、http请求参数获取及登录页面访问操作
四、数据库设计、数据库创建及导入sql
五、使用mybatis-plus逆向工程生成代码【vaccinum】
六、JavaEE三层架构概念及user查询实现
七、mybatis-plus逆向工程通用API实现原理分析及user模块的接口实现【添删改查】
八、前端环境配置【Vscode、Node.js】【安装直接默认下一步即可】
一、创建工作空间及配置Maven环境
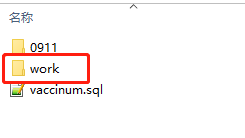
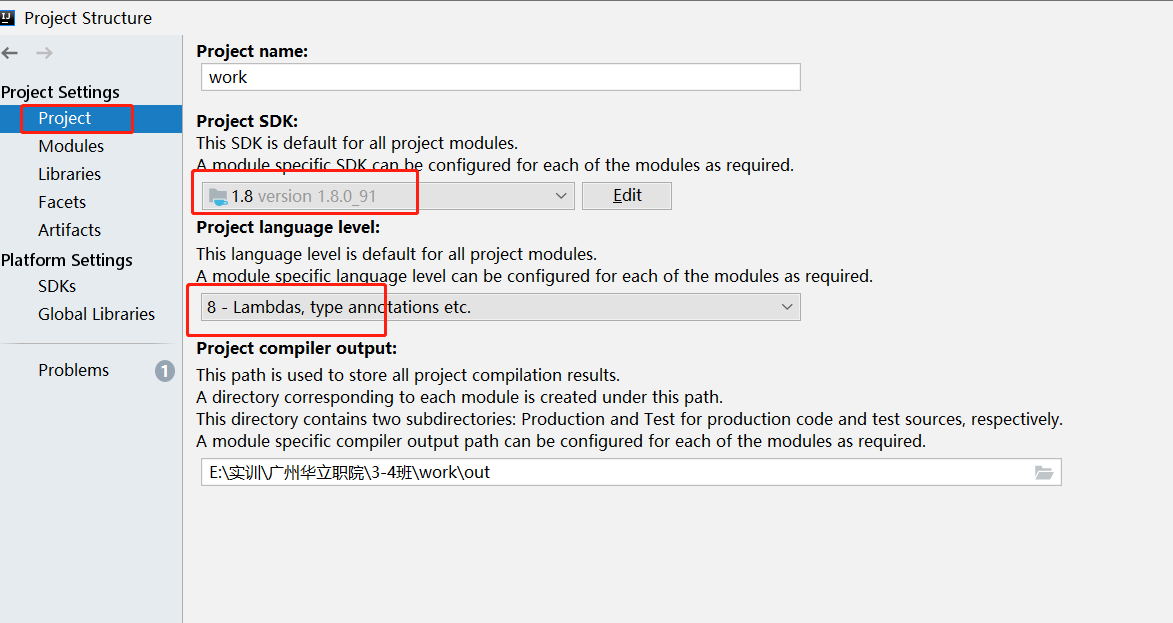
先创建work文件夹,然后在IDEA中打开、然后设置sdk
--解压maven压缩文件
在conf/settings.xml 文件中配置本地仓库位置(maven 的安装目录下):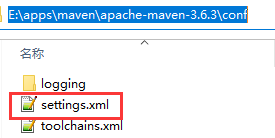
【一】打开 settings.xml文件,配置本地仓库位置(也就是本地文件夹):
<localRepository>D:\JavaSoftware\mavenlib</localRepository>Maven中央仓库配置
【二】继续配置settings.xml文件,找到mirrors标签,配置中央仓库位置:
 <mirror>
		<id>alimaven</id>
		<name>aliyun maven</name>
      	<url>http://maven.aliyun.com/nexus/content/groups/public/</url>
      	<mirrorOf>central</mirrorOf>
</mirror> 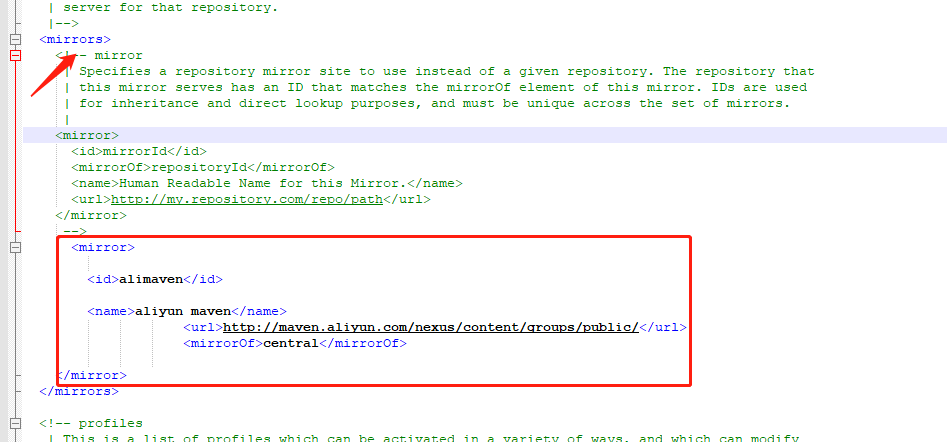
在idea中绑定Maven ,然后关掉idea重新打开

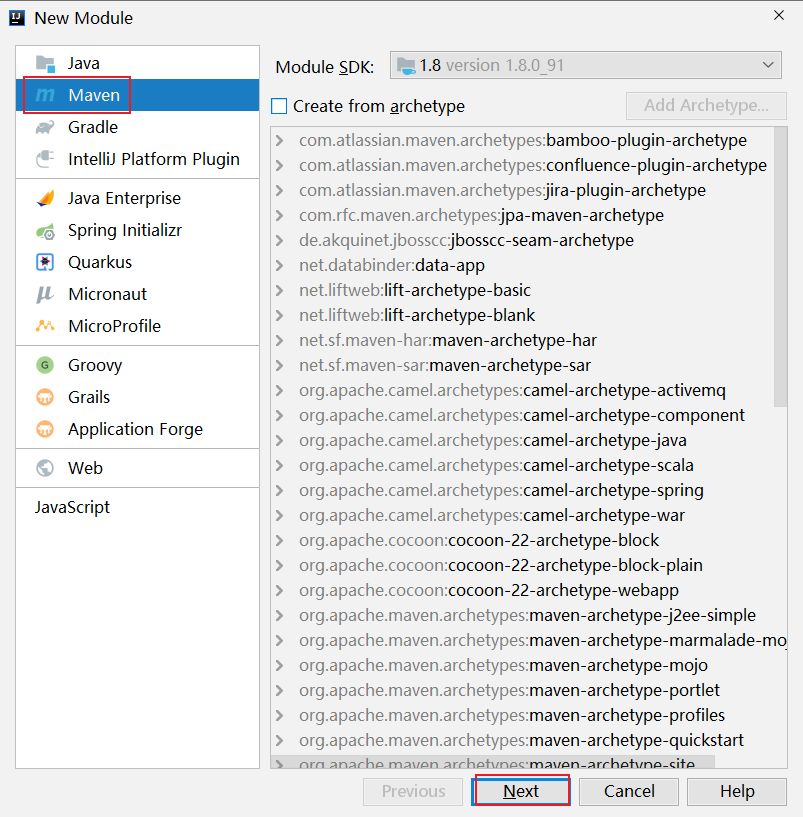
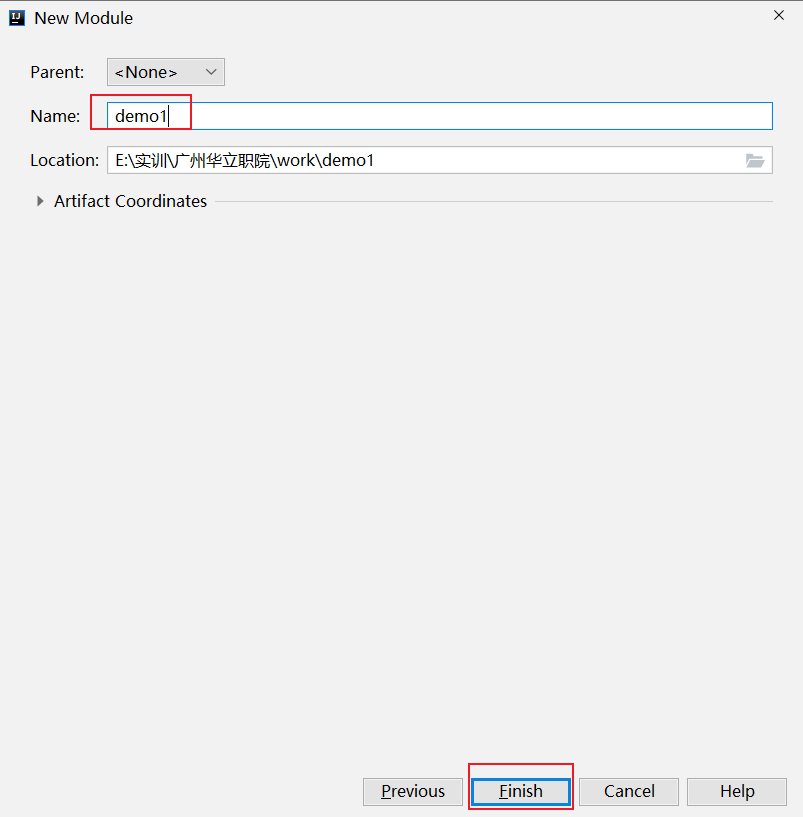
 --在ideza中进行测试、创建maven项目
二、创建springboot项目整合web操作
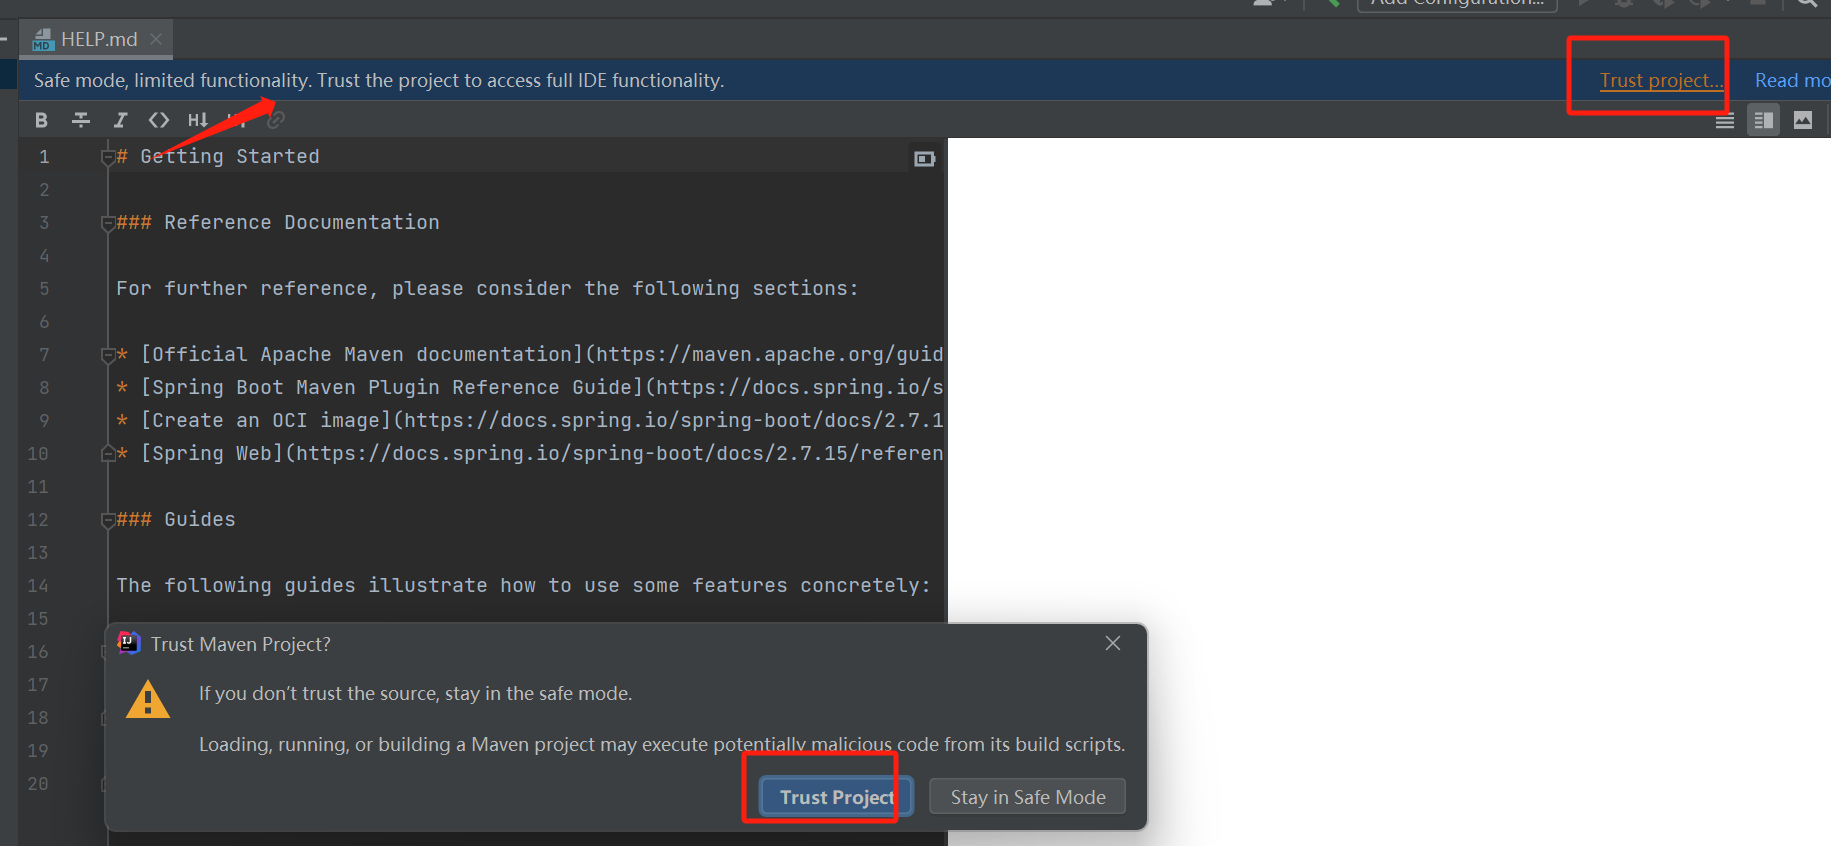
在工作空间中new module,使用spring初始化器【springboot选择maven方式构建、选择2.7.1x的springboot版本】

--选择springboot的版本和项目的web依赖

--在项目中创建Java类、提供controller代码【注意controller代码要和启动类在同一个package下】
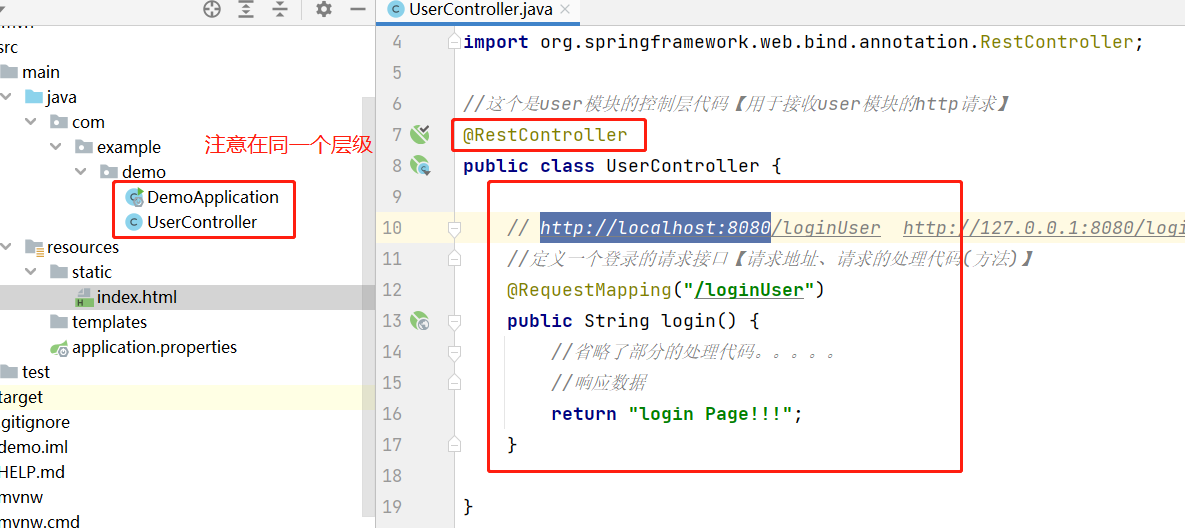
//这个是user模块的控制层代码【用于接收user模块的http请求】
@RestController
public class UserController {

    // http://localhost:8080/loginUser  http://127.0.0.1:8080/loginUser
    //定义一个登录的请求接口【请求地址、请求的处理代码(方法)】
    @RequestMapping("/loginUser")
    public String login() {
        //省略了部分的处理代码。。。。。
        //响应数据
        return "login Page!!!";
    }

}
三、http请求参数获取及登录页面访问操作
--修改Controller中的代码,获取请求参数及实现业务判断
// http://127.0.0.1:8080/loginUser?name=admin&password=123456
//定义功能的http请求接口  【登录】
@RequestMapping("loginUser")
public String login(String name,String password){
    //判断账号
    if(name.equals("admin")&&password.equals("123456")){
        return "login 成功!!!!";
    }else{
        return "login 失败!!!!";
    }
}
--在resources文件中的static文件夹中创建login.html页面
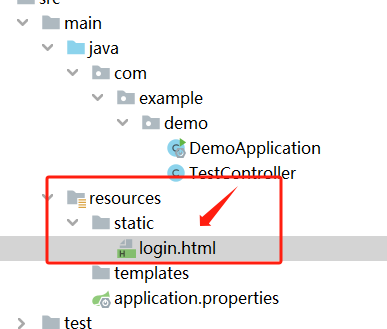
<!DOCTYPE html>
<html lang="en">
<head>
    <meta charset="UTF-8">
    <title>登录页面</title>
</head>
<body>
<!-- form表单   action表示为请求提交的地址 -->
<form action="/loginUser">
    用户名:<input type="text" name="name"/><br>
    密码:<input type="text" name="password"/><br>
    <input type="submit" value="登录"/><br>
</form>
</body>
</html>
--测试,访问

http://127.0.0.1:8080/login.html四、数据库设计、数据库创建及导入sql
--1在MySQL链接中创建vaccinum数据库、指定编码和排序规则
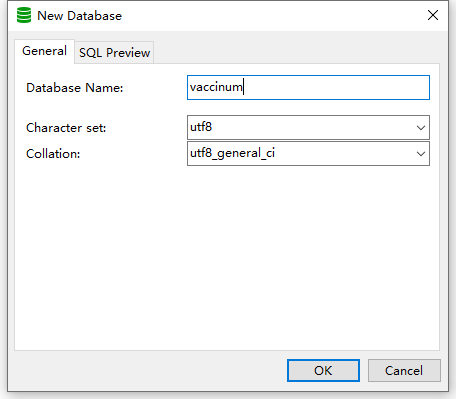
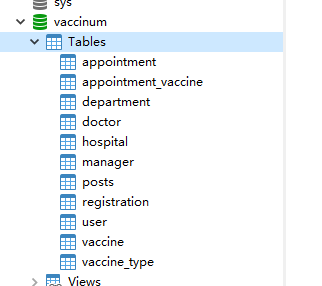
--2然后双击选中vaccinum数据库,右键执行sql文件、导入数据、最后f5刷新即可

--3刷新
五、使用mybatis-plus逆向工程生成代码【vaccinum】
--1创建springboot项目(MybatisPlusDemo)、选择对应的依赖
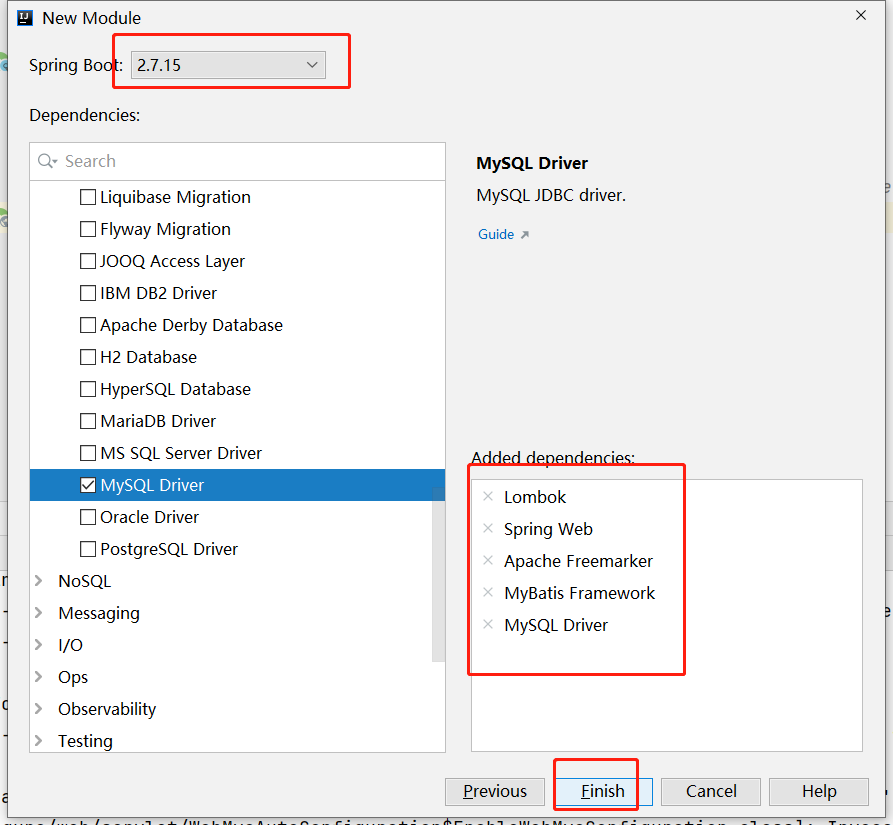
--2、在项目的pom.xml文件中的dependencies内添加依赖、然后更新依赖
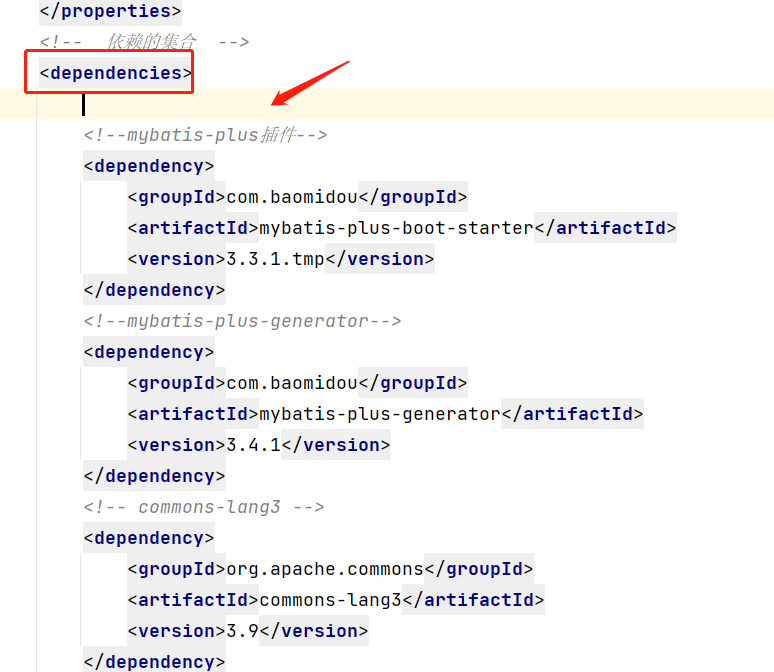
<!--mybatis-plus插件-->
<dependency>
    <groupId>com.baomidou</groupId>
    <artifactId>mybatis-plus-boot-starter</artifactId>
    <version>3.3.1.tmp</version>
</dependency>
<!--mybatis-plus-generator-->
<dependency>
    <groupId>com.baomidou</groupId>
    <artifactId>mybatis-plus-generator</artifactId>
    <version>3.4.1</version>
</dependency>
<!-- commons-lang3 -->
<dependency>
    <groupId>org.apache.commons</groupId>
    <artifactId>commons-lang3</artifactId>
    <version>3.9</version>
</dependency>
3、提供CodeGenerator.java程序【逆向工程的执行程序】、执行生成代码
import com.baomidou.mybatisplus.core.exceptions.MybatisPlusException;
import com.baomidou.mybatisplus.core.toolkit.StringPool;
import com.baomidou.mybatisplus.core.toolkit.StringUtils;
import com.baomidou.mybatisplus.generator.AutoGenerator;
import com.baomidou.mybatisplus.generator.InjectionConfig;
import com.baomidou.mybatisplus.generator.config.*;
import com.baomidou.mybatisplus.generator.config.po.TableInfo;
import com.baomidou.mybatisplus.generator.config.rules.NamingStrategy;
import com.baomidou.mybatisplus.generator.engine.FreemarkerTemplateEngine;

import java.util.ArrayList;
import java.util.List;
import java.util.Scanner;

// 演示例子,执行 main 方法控制台输入模块表名回车自动生成对应项目目录中
public class CodeGenerator {

    /**
     * <p>
     * 读取控制台内容   appointment,appointment_vaccine,department,doctor,hospital,manager,posts,registration,user,vaccine,vaccine_type
     * </p>
     */
    public static String scanner(String tip) {
        Scanner scanner = new Scanner(System.in);
        StringBuilder help = new StringBuilder();
        help.append("请输入" + tip + ":");
        System.out.println(help.toString());
        if (scanner.hasNext()) {
            String ipt = scanner.next();
            if (StringUtils.isNotBlank(ipt)) {
                return ipt;
            }
        }
        throw new MybatisPlusException("请输入正确的" + tip + "!");
    }

    public static void main(String[] args) {
        // 代码生成器
        AutoGenerator mpg = new AutoGenerator();

        // 全局配置
        GlobalConfig gc = new GlobalConfig();
        String projectPath = System.getProperty("user.dir");
        gc.setOutputDir(projectPath + "/vaccinum/src/main/java");
        gc.setAuthor("jerry");
        gc.setOpen(false);
        // gc.setSwagger2(true); 实体属性 Swagger2 注解
        mpg.setGlobalConfig(gc);

        // 数据源配置 example.demo  user,doctor
        DataSourceConfig dsc = new DataSourceConfig();
        dsc.setUrl("jdbc:mysql://localhost:3306/vaccinum?useUnicode=true&characterEncoding=utf8&serverTimezone=UTC");
        // dsc.setSchemaName("public");
        dsc.setDriverName("com.mysql.cj.jdbc.Driver");
        dsc.setUsername("root");
        dsc.setPassword("");
        mpg.setDataSource(dsc);

        // 包配置
        PackageConfig pc = new PackageConfig();
        pc.setModuleName(scanner("模块名"));
        pc.setParent("com");//com.example.springmybatisdemo  输入example.springmybatisdemo
        mpg.setPackageInfo(pc);

        // 自定义配置
        InjectionConfig cfg = new InjectionConfig() {
            @Override
            public void initMap() {
                // to do nothing
            }
        };

        // 如果模板引擎是 freemarker
        String templatePath = "/templates/mapper.xml.ftl";
        // 如果模板引擎是 velocity
        // String templatePath = "/templates/mapper.xml.vm";

        // 自定义输出配置
        List<FileOutConfig> focList = new ArrayList<>();
        // 自定义配置会被优先输出
        focList.add(new FileOutConfig(templatePath) {
            @Override
            public String outputFile(TableInfo tableInfo) {
                // 自定义输出文件名 , 如果你 Entity 设置了前后缀、此处注意 xml 的名称会跟着发生变化!!
                return projectPath + "/src/main/resources/mapper/" + tableInfo.getEntityName() + "Mapper" + StringPool.DOT_XML;
            }
        });
        cfg.setFileOutConfigList(focList);
        mpg.setCfg(cfg);

        // 配置模板
        TemplateConfig templateConfig = new TemplateConfig();

        templateConfig.setXml(null);
        mpg.setTemplate(templateConfig);

        // 策略配置
        StrategyConfig strategy = new StrategyConfig();
        strategy.setNaming(NamingStrategy.underline_to_camel);
        strategy.setColumnNaming(NamingStrategy.underline_to_camel);
        // strategy.setSuperEntityClass("BaseBean");
        strategy.setEntityLombokModel(true);
        strategy.setRestControllerStyle(true);
        // 公共父类
        //strategy.setSuperControllerClass("BaseController");
        // 写于父类中的公共字段
        strategy.setSuperEntityColumns("id");
        strategy.setInclude(scanner("表名,多个英文逗号分割").split(","));
        strategy.setControllerMappingHyphenStyle(true);
        strategy.setTablePrefix(pc.getModuleName() + "_");
        mpg.setStrategy(strategy);
        mpg.setTemplateEngine(new FreemarkerTemplateEngine());
        mpg.execute();
    }

}
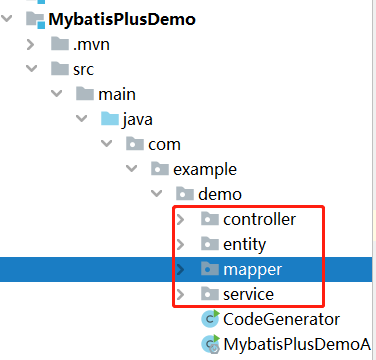
--效果如下:
六、JavaEE三层架构概念及user查询实现
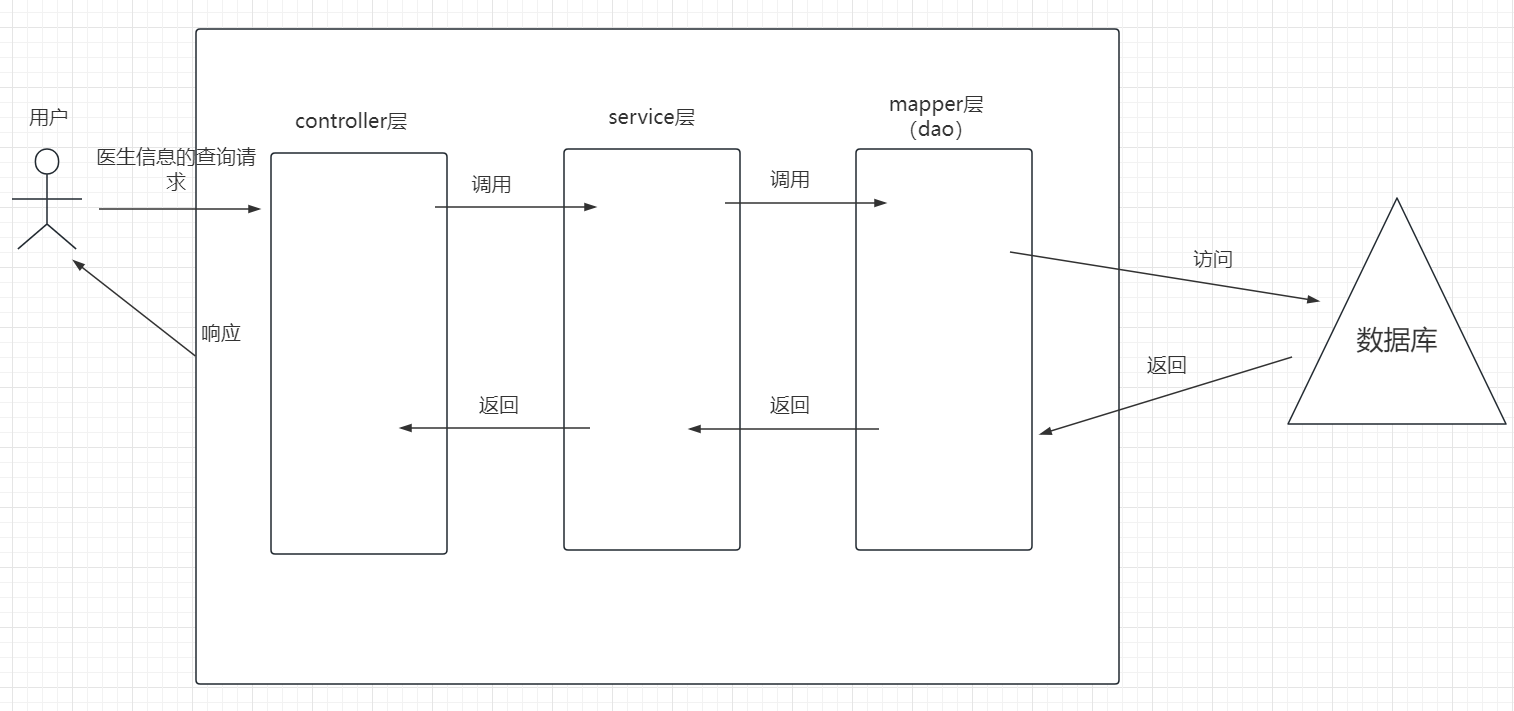
每个package的作用:
controller【控制层:http的请求控制处理类(接收和响应)】
service 【业务层:功能的业务实现逻辑代码】
mapper 【数据持久层:数据库的操作】
entity【实体-数据模型-JavaBean:封装数据(比如学生、老师、医生)】
JavaEE经典三层架构(controller、service、dao{mapper})
调用关系:
controller调用service、service调用dao{mapper}
编写程序时的顺序:
dao{mapper}、service、controller
--1、在mapper层中给所有mapper文件都添加上@Mapper注解
 --在User类中加入主键
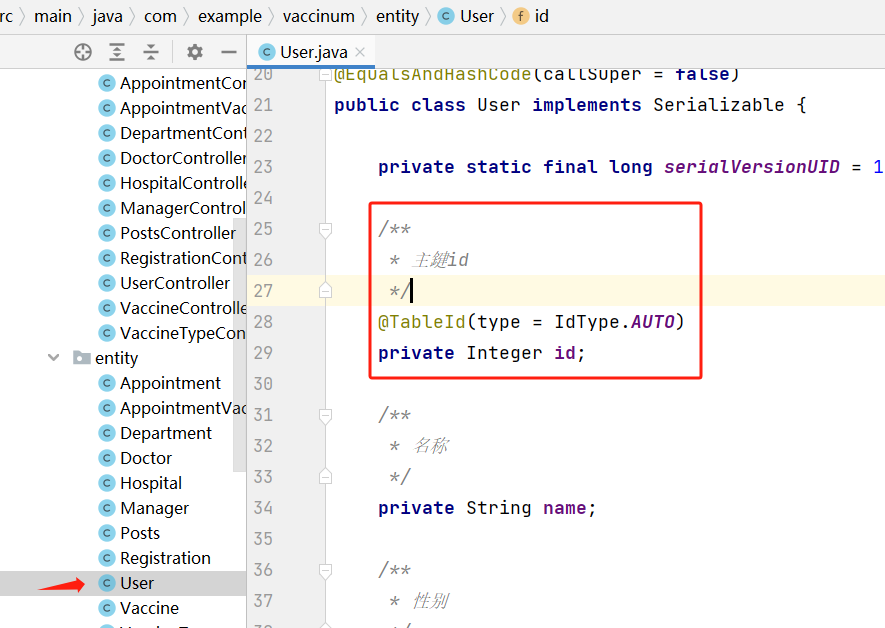
/**
 * 主键、设置为自增策略
 */
@TableId(type = IdType.AUTO)
private Integer id;
--2、在controller中的UserController中定义查询请求接口
@RestController
@RequestMapping("/user") //功能模块的请求地址的前缀
public class UserController {

    //依赖User模块的业务层对象
    @Autowired  //自动注入对象
    IUserService userService;

    //    http://127.0.0.1:8085/user/query
    //定义一个请求功能的请求接口(处理方法)
    @RequestMapping("/query")
    public List<User> query(){
        //查询所有的user、返回是一个集合
        List<User> list = userService.list();
        //返回list集合对象
        return list;
    }


}
--3、将项目的resources文件夹中的配置文件修改为application.yml、然后加入配置信息(要注意格式缩进)

#数据库的链接配置
spring:
  datasource:
    driver-class-name: com.mysql.cj.jdbc.Driver
    url: jdbc:mysql://localhost:3306/vaccinum?useUnicode=true&useSSL=false&characterEncoding=utf8&serverTimezone=UTC
    username: root
    password:
#服务器的配置
server:
  port: 8085
  tomcat:
    uri-encoding: UTF-8
  servlet:
    encoding:
      charset: UTF-8
#打印sql日志信息
mybatis-plus:
  configuration:
    log-impl: org.apache.ibatis.logging.stdout.StdOutImpl
--4、启动项目的application启动类,然后访问http请求测试
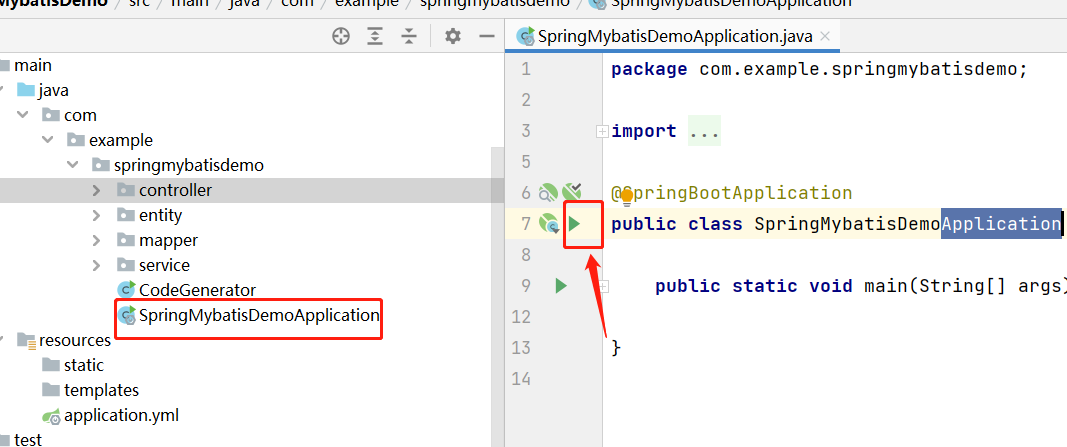
http://localhost:8085/user/query七、mybatis-plus逆向工程通用API实现原理分析及user模块的接口实现【添删改查】
--1、在UserController中定义添删改查的请求接口
@RestController
@RequestMapping("/user")
public class UserController {

    //依賴user业务层对象
    @Autowired //自动注入
    IUserService userService;

    // http://localhost:8085/user/query
    //    定义查询user的请求接口
    @RequestMapping("/query")
    public List<User> query(){
        //調用业务层的查询方法,返回list
        List<User> list = userService.list();
        //返回
        return list;
    }

    // http://localhost:8085/user/insert?name=sdfdsf&password=sdfdsfd&codeid=sdfsdffdss&phone=13545631253
    //    定义查询user的添加请求接口
    @RequestMapping("/insert")//注意请求提交的参数key要和实体类的变量名一致
    public boolean insert(User user){
        //調用业务层的方法
        boolean save = userService.save(user);
        //返回
        return save;
    }

    // http://localhost:8085/user/update?id=15&name=123456s&password=123456&codeid=45698465sddd&phone=aa13545631253
    //    定义查询user的修改请求接口
    @RequestMapping("/update")//注意请求提交的参数key要和实体类的变量名一致
    public boolean update(User user){
        //調用业务层的方法
        boolean update = userService.updateById(user);
        //返回
        return update;
    }

    // http://localhost:8085/user/delete?id=15
    //    定义查询user的删除请求接口
    @RequestMapping("/delete")//注意请求提交的参数key要和实体类的变量名一致
    public boolean delete(Integer id){
        //調用业务层的方法
        boolean delete = userService.removeById(id);
        //返回
        return delete;
    }


}
--2、重启服务,并通过http请求进行测试。
八、前端环境配置【Vscode、Node.js】【安装直接默认下一步即可】
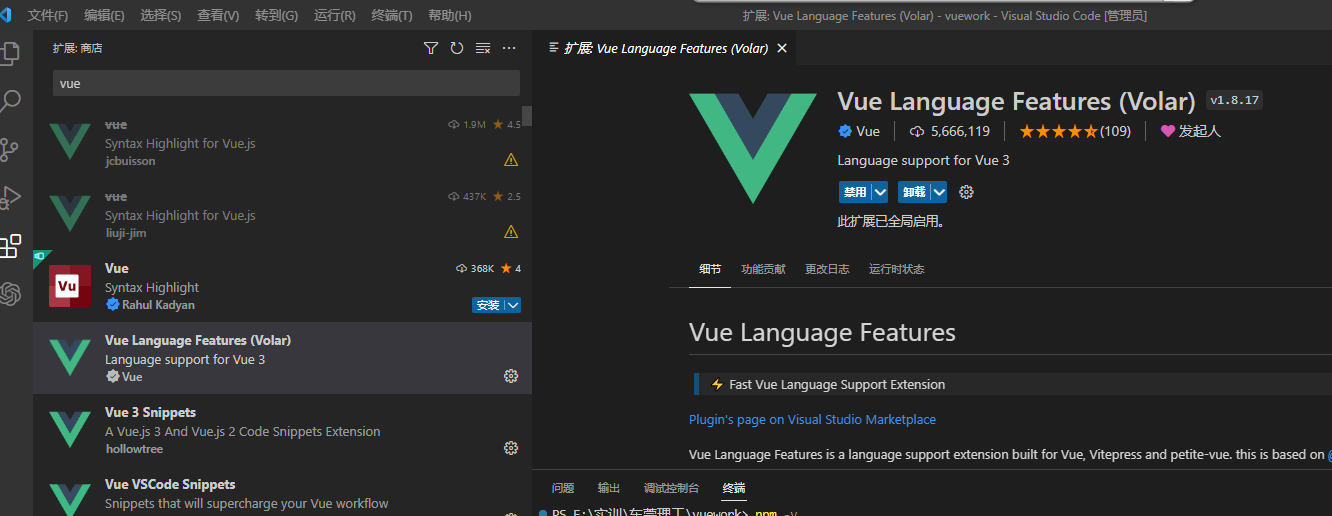
安装VSCode、然后扩展插件中安装以下的插件

--配置“vue”插件
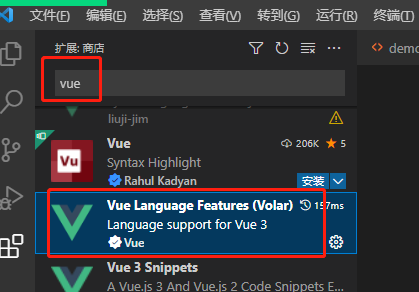
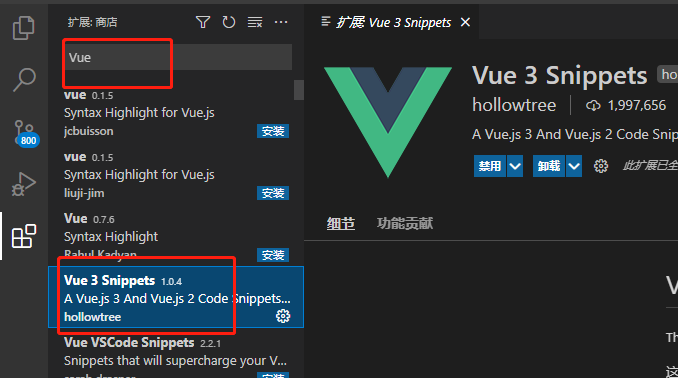
--重新启动VSCode即可
--安装node.js
![]()
--创建前端项目的工作空间,然后使用vscode软件打开工作空间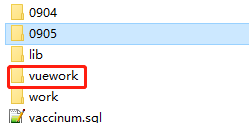
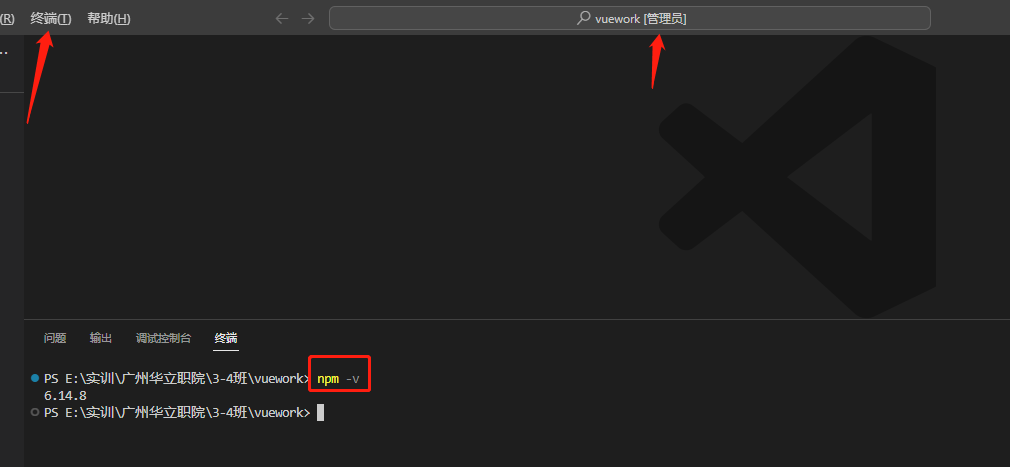
--使用终端打开dos命令行界面、测试环境【npm -v】
VSCode快捷键:
--新建一个文件使用:ctrl+n
--使用英文的感叹号+提示,回车即可(生成html的命名空间)
--注释代码:ctrl+/
---通过使用alt+b快速运行html在浏览器中
---快速复制一行代码: alt+shift+方向键
---移动代码: alt+方向键
--回撤:ctrl+z
--快速删除一行代码:ctrl+x
--格式化代码: alt+shift+f





![[Spring] SpringBoot2 简介(一)—— 基础配置](https://img-blog.csdnimg.cn/4f342c1f34384d9a8fee0f12b8b00391.png)
![[AUTOSAR][诊断管理][$10] 会话模式控制](https://img-blog.csdnimg.cn/e407f5754ea941f9a34d29c83555b82b.png)


