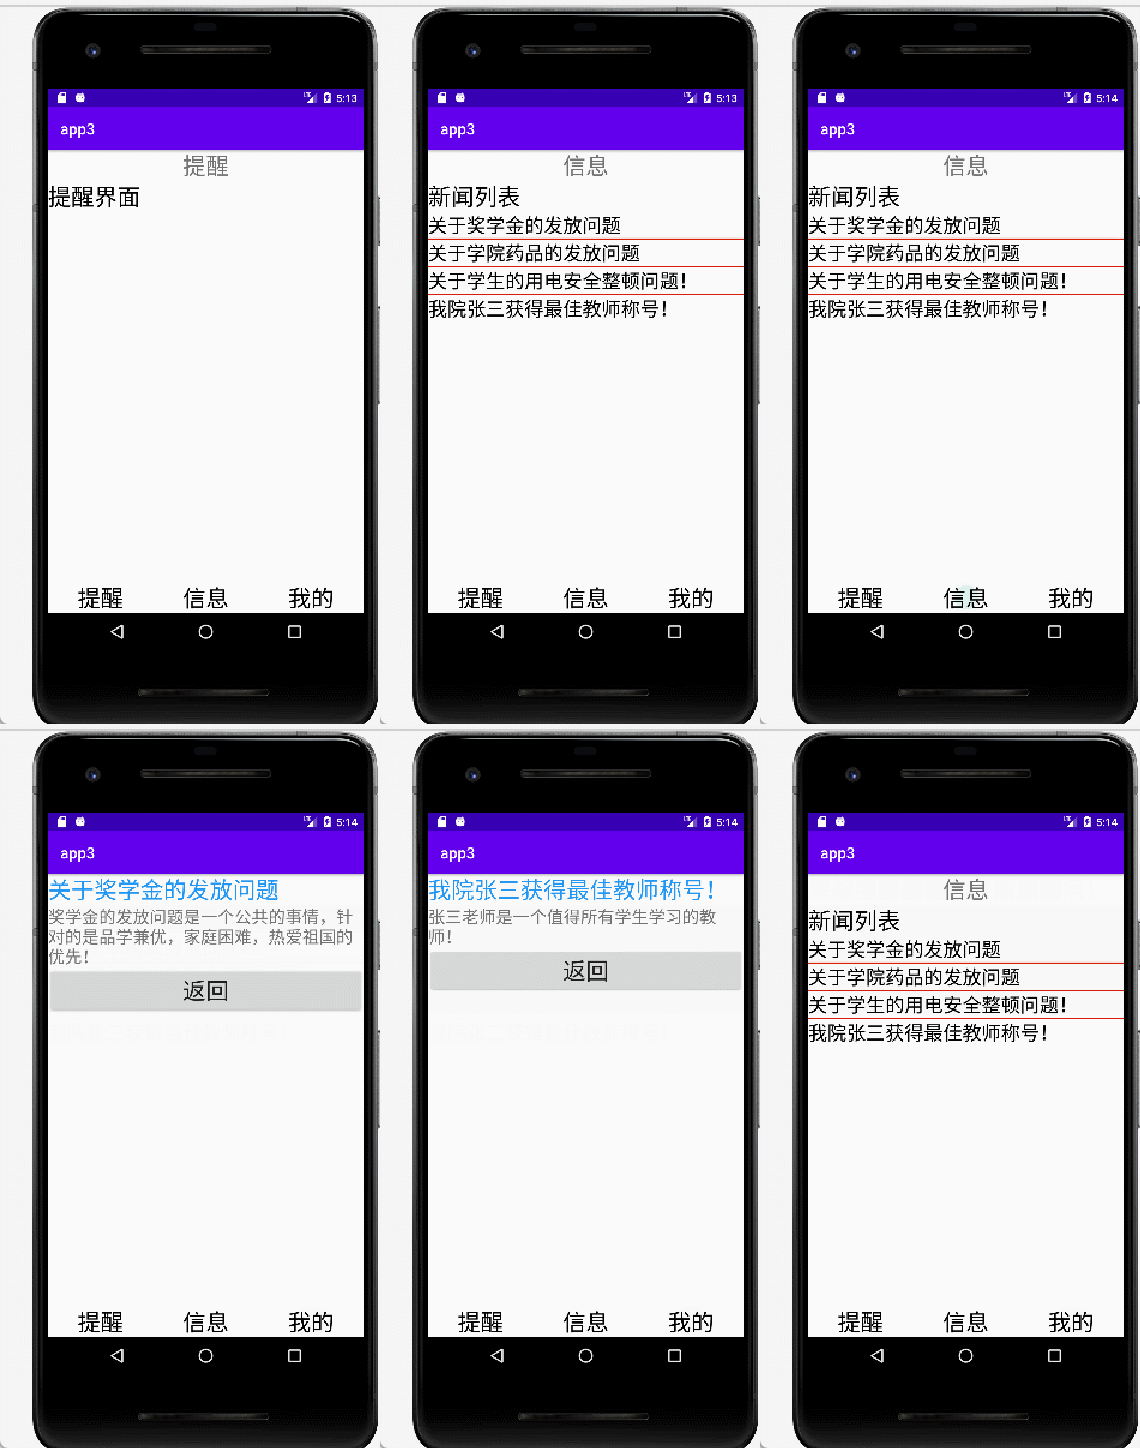
Fragment案例
1.案例要求
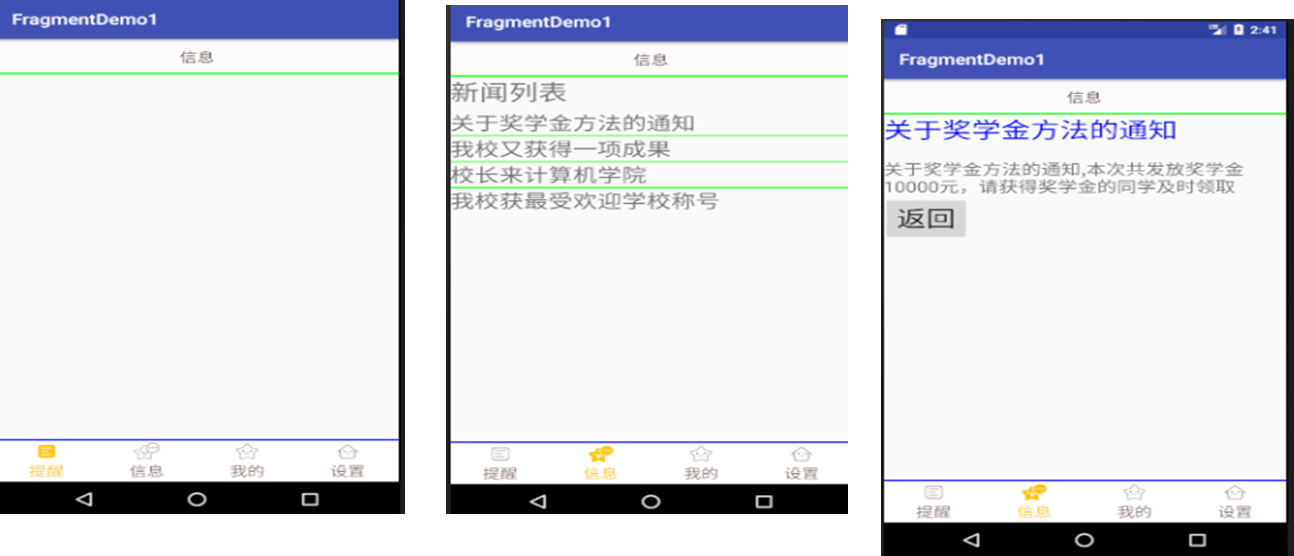
- 框架布局

- 项目难点:
1 导航栏的实现,显示导航按钮、切换Fragment
2 每个Fragment的创建、显示
3 Fragment的跳转(从新闻列表到新闻详情,再返回)
- 涉及的技术:
用RadioGroup及RadioButton实现导航栏
Activity传递参数到要展现的Fragment
从Fragment传递参数给Activity,并调用Activity的某些功能方法
2.案例实现
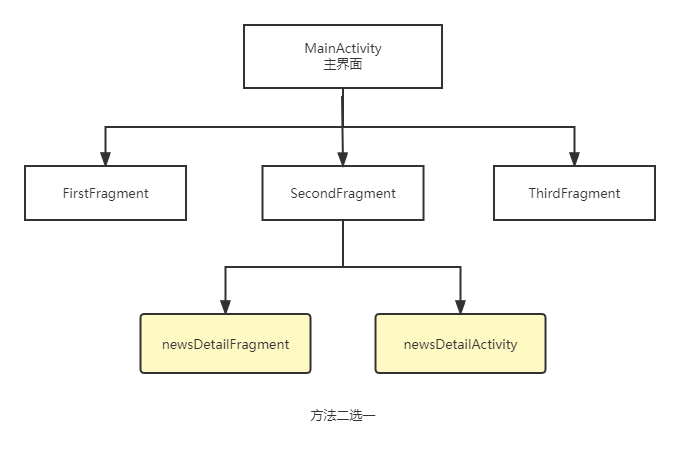
1)项目结构
2)涉及到的传值的方式
- Activity往Fragment传值
- Fragment往Fragment传值或者是Fragment往Activity传值
3)涉及到的布局
- news_item.xml新闻列表的单项布局
- fragment_first.xml
- fragment_second.xml
- fragment_third.xml
- main_activity.xml
4)Fragment传值方法
(1)Fragment往Activity

(2)Fragment往Fragment

3.参考代码
1)项目目录
- 提醒界面
- 信息界面
- 我的

2)主布局文件
<?xml version="1.0" encoding="utf-8"?>
<LinearLayout xmlns:android="http://schemas.android.com/apk/res/android"
    xmlns:app="http://schemas.android.com/apk/res-auto"
    xmlns:tools="http://schemas.android.com/tools"
    android:orientation="vertical"
    android:layout_width="match_parent"
    android:layout_height="match_parent"
    tools:context=".MainActivity">

    <TextView
        android:id="@+id/title"
        android:layout_width="match_parent"
        android:layout_height="wrap_content"
        android:text="信息"
        android:textSize="30dp"
        android:gravity="center"
         />
    <LinearLayout
        android:id="@+id/fragment_space"
        android:layout_width="match_parent"
        android:orientation="vertical"
        android:layout_height="0dp"
        android:layout_weight="1"
        ></LinearLayout>
    <RadioGroup
        android:id="@+id/radio_group"
        android:layout_width="match_parent"
        android:layout_height="wrap_content"
        android:orientation="horizontal"
        android:background="@color/white"
        >
    <RadioButton
        android:id="@+id/btn1"
        android:layout_width="0dp"
        android:layout_weight="1"
        android:layout_height="wrap_content"
        android:text="提醒"
        android:textSize="30dp"
        android:gravity="center"
        android:button="@null"
        />
        <RadioButton
            android:id="@+id/btn2"
            android:layout_width="0dp"
            android:layout_weight="1"
            android:layout_height="wrap_content"
            android:text="信息"
            android:textSize="30dp"
            android:gravity="center"
            android:button="@null"
            />
        <RadioButton
            android:id="@+id/btn3"
            android:layout_width="0dp"
            android:layout_weight="1"
            android:layout_height="wrap_content"
            android:text="我的"
            android:textSize="30dp"
            android:gravity="center"
            android:button="@null"
            />
    </RadioGroup>
</LinearLayout>
3)MainActivity代码
public class MainActivity extends AppCompatActivity  implements SecondFragment.MyListener, NewsDetailFragment.FragmentListener {
    RadioGroup group=null;
    RadioButton btn1,btn2,btn3;
    TextView title;
    Fragment secondFragment;
    @Override
    protected void onCreate(Bundle savedInstanceState) {
        super.onCreate(savedInstanceState);
        setContentView(R.layout.activity_main);
        initView();
        btn1.setChecked(true);
    }


    //初始化控件
   public void initView(){
        group=findViewById(R.id.radio_group);
       btn1=findViewById(R.id.btn1);
       btn2=findViewById(R.id.btn2);
       btn3=findViewById(R.id.btn3);
        title=findViewById(R.id.title);
    group.setOnCheckedChangeListener(
        new RadioGroup.OnCheckedChangeListener() {
          @Override
          public void onCheckedChanged(RadioGroup radioGroup, int id) {
            System.out.println(id);
            if (btn1.getId() == id) {
              Fragment firstFragment = new FristFragment();
              FragmentManager manager = getFragmentManager();
              FragmentTransaction transaction = manager.beginTransaction();
              if (manager.findFragmentById(R.id.fragment_space) != null) {
                transaction.remove(manager.findFragmentById(R.id.fragment_space));
              }
              title.setText("提醒");
              transaction.add(R.id.fragment_space, firstFragment);
              transaction.commit();
            }
            if (btn2.getId() == id) {
                secondFragment = new SecondFragment();
              FragmentManager manager = getFragmentManager();
              FragmentTransaction transaction = manager.beginTransaction();
              if (manager.findFragmentById(R.id.fragment_space) != null) {
                transaction.remove(manager.findFragmentById(R.id.fragment_space));
              }
              title.setText("信息");
              ArrayList<News> list = new ArrayList<News>();
              list.add(new News("关于奖学金的发放问题","奖学金的发放问题是一个公共的事情,针对的是品学兼优,家庭困难,热爱祖国的优先!"));
              list.add(new News("关于学院药品的发放问题","即时对有困难的同学进行药品的免费发放!"));
              list.add(new News("关于学生的用电安全整顿问题!","用电问题是一个非常严重的问题!"));
              list.add(new News("我院张三获得最佳教师称号!","张三老师是一个值得所有学生学习的教师!"));
              Bundle bundle = new Bundle();
              bundle.putParcelableArrayList("list", list);
              secondFragment.setArguments(bundle);
              transaction.add(R.id.fragment_space, secondFragment);
              transaction.commit();
            }
            if (btn3.getId() == id) {
              Fragment thirdFragment = new ThirdFragment();
              FragmentManager manager = getFragmentManager();
              FragmentTransaction transaction = manager.beginTransaction();
              if (manager.findFragmentById(R.id.fragment_space) != null) {
                transaction.remove(manager.findFragmentById(R.id.fragment_space));
              }
                title.setText("我的");
              transaction.add(R.id.fragment_space, thirdFragment);
              transaction.commit();
            }
          }
        });
   }

   //回传的数据
    @Override
    public void sendValue(Bundle bundle) {
        /*Intent intent=new Intent();
        intent.setClass(getApplicationContext(),NewsDetailActivity.class);
        intent.putExtras(bundle);
        startActivity(intent);*/
        Fragment newsDetailFragment = new NewsDetailFragment();
        FragmentManager manager = getFragmentManager();
        FragmentTransaction transaction = manager.beginTransaction();
        if (manager.findFragmentById(R.id.fragment_space) != null) {
            transaction.remove(manager.findFragmentById(R.id.fragment_space));
        }
        newsDetailFragment.setArguments(bundle);
        title.setVisibility(View.GONE);
        transaction.replace(R.id.fragment_space, newsDetailFragment);
        transaction.commit();
    }

    //重新显示新闻列表
    @Override
    public void sendCode(Bundle bundle) {
        if (bundle.getInt("code")==200){
          title.setVisibility(View.VISIBLE);
          FragmentManager manager=  getFragmentManager();
          Fragment fragment=secondFragment;
          FragmentTransaction transaction=  manager.beginTransaction();
          transaction.replace(R.id.fragment_space,fragment);
          transaction.commit();
        }
    }
}
4)新闻实体类
//新闻类
public class News implements Serializable, Parcelable {
    private String title;
    private String desc;

    public News(String title, String desc) {
        this.title = title;
        this.desc = desc;
    }

    public News() {
    }

    protected News(Parcel in) {
        title = in.readString();
        desc = in.readString();
    }

    public static final Creator<News> CREATOR = new Creator<News>() {
        @Override
        public News createFromParcel(Parcel in) {
            return new News(in);
        }

        @Override
        public News[] newArray(int size) {
            return new News[size];
        }
    };

    public String getTitle() {
        return title;
    }

    public void setTitle(String title) {
        this.title = title;
    }

    public String getDesc() {
        return desc;
    }

    public void setDesc(String desc) {
        this.desc = desc;
    }

    @Override
    public String toString() {
        return "News{" +
                "title='" + title + '\'' +
                ", desc='" + desc + '\'' +
                '}';
    }

    @Override
    public int describeContents() {
        return 0;
    }

    @Override
    public void writeToParcel(Parcel parcel, int i) {
        parcel.writeString(title);
        parcel.writeString(desc);
    }
}
5)FirstFragment代码和布局文件
(1)Java代码
//提醒
public class FristFragment extends Fragment {

    @Override
    public View onCreateView(LayoutInflater inflater, ViewGroup container,
                             Bundle savedInstanceState) {

        return inflater.inflate(R.layout.fragment_frist, container, false);
    }
}
(2)布局文件
<?xml version="1.0" encoding="utf-8"?>
<LinearLayout xmlns:android="http://schemas.android.com/apk/res/android"
    xmlns:tools="http://schemas.android.com/tools"
    android:orientation="vertical"
    android:layout_width="match_parent"
    android:layout_height="match_parent"
    tools:context=".FristFragment">

    <!-- TODO: Update blank fragment layout -->
    <TextView
        android:layout_width="match_parent"
        android:layout_height="wrap_content"
        android:textSize="30dp"
        android:textColor="@color/black"
        android:text="提醒界面" />

</LinearLayout>
6)SecondFragment和布局文件
(1)Java代码
public class SecondFragment extends Fragment {
    ArrayList<News> list;

    @Override
    public void onAttach(Context context) {
        super.onAttach(context);
        myListener=(MyListener) context;
    }

    @Override
    public void onStart() {
        super.onStart();
    }

    @Override
    public View onCreateView(LayoutInflater inflater, ViewGroup container,
                             Bundle savedInstanceState) {
        // Inflate the layout for this fragment
        Bundle bundle=getArguments();
        list=bundle.getParcelableArrayList("list");
        return inflater.inflate(R.layout.fragment_second, container, false);
    }
    @Override
    public void onActivityCreated(@Nullable Bundle savedInstanceState) {
        super.onActivityCreated(savedInstanceState);
        //创建列表项

        if (list!=null){
            for (Object s:list){
                System.out.println(s);
                ListView listView=getActivity().findViewById(R.id.listview);
                List<Map<String,String>>  newsList=new ArrayList<>();
                for(int i = 0; i < list.size(); i++) {
                    Map map=new HashMap<>();
                    map.put("newstitle",list.get(i).getTitle());
                    newsList.add(map);
                }
                SimpleAdapter adapter=new SimpleAdapter(getActivity().getApplicationContext(),newsList,R.layout.news_item,new String[]{"newstitle"},new int[]{R.id.newstitle});
                listView.setAdapter(adapter);
                //设置事件监听
                listView.setOnItemClickListener(new AdapterView.OnItemClickListener() {
                    @Override
                    public void onItemClick(AdapterView<?> adapterView, View view, int position, long id) {
                    //方法1:直接从Fragment给Activity传递数据
                    /*    TextView this_news= view.findViewById(R.id.newstitle);
                       Intent intent=new Intent();
                        intent.setClass(getActivity().getApplicationContext(),NewsDetailActivity.class);
                        intent.putExtra("this_newsTitle",list.get(position).getTitle());
                        intent.putExtra("this_newsDesc",list.get(position).getDesc());
                        getActivity().startActivity(intent);*/

                        //方法2:从Fragment往Activity传递数据(回调接口的方式)
                        Bundle bundle=new Bundle();
                        bundle.putString("this_newsTitle",list.get(position).getTitle());
                        bundle.putString("this_newsDesc",list.get(position).getDesc());
                        myListener.sendValue(bundle);
                    }
                });
            }
        }


    }
    //定义回调接口
    public interface MyListener{
        public void sendValue(Bundle bundle);
    }

    private MyListener myListener;
}
(2)布局文件
<?xml version="1.0" encoding="utf-8"?>
<LinearLayout xmlns:android="http://schemas.android.com/apk/res/android"
    xmlns:tools="http://schemas.android.com/tools"
    android:layout_width="match_parent"
    android:orientation="vertical"
    android:layout_height="match_parent"
    tools:context=".SecondFragment">

    <!-- TODO: Update blank fragment layout -->
    <TextView
        android:layout_width="match_parent"
        android:layout_height="wrap_content"
        android:textSize="30dp"
        android:textColor="@color/black"
        android:text="新闻列表" />
    <ListView
        android:id="@+id/listview"
        android:layout_width="match_parent"
        android:layout_height="wrap_content"
        android:divider="@mipmap/divider"
        android:showDividers="end"
        >

    </ListView>

</LinearLayout>
7)ThirdFragment和布局文件
(1)Java代码
public class ThirdFragment extends Fragment {

    @Override
    public View onCreateView(LayoutInflater inflater, ViewGroup container,
                             Bundle savedInstanceState) {
        return inflater.inflate(R.layout.fragment_third, container, false);
    }
}
(2)布局文件
<?xml version="1.0" encoding="utf-8"?>
<LinearLayout xmlns:android="http://schemas.android.com/apk/res/android"
    xmlns:tools="http://schemas.android.com/tools"
    android:orientation="vertical"
    android:layout_width="match_parent"
    android:layout_height="match_parent"
    tools:context=".ThirdFragment">

    <!-- TODO: Update blank fragment layout -->
    <TextView
        android:layout_width="match_parent"
        android:layout_height="wrap_content"
        android:textSize="30dp"
        android:textColor="@color/black"
        android:text="我的界面" />
</LinearLayout>
8)显示具体的新闻信息
- 方案1:采用Activity显示的,代码中被注释的就是被启动的方式
- 方案2:用Fragment进行显示
(1)方案1代码
(一)Java代码
//显示跳转后的页面的信息
public class NewsDetailActivity extends AppCompatActivity {

    @Override
    protected void onCreate(Bundle savedInstanceState) {
        super.onCreate(savedInstanceState);
        setContentView(R.layout.activity_news_detail);
        String newsTitle= getIntent().getExtras().getString("this_newsTitle");
        String newsDesc= getIntent().getExtras().getString("this_newsDesc");
        TextView this_newsTitle=findViewById(R.id.this_newsTitle);
        TextView this_newsDesc=findViewById(R.id.this_newsDesc);
        this_newsTitle.setText(newsTitle);
        this_newsDesc.setText(newsDesc);
    }

    //返回到展示信息的Fragment
    public void backNewsFrgment(View view) {
        finish();
    }
}
(二)布局文件
<?xml version="1.0" encoding="utf-8"?>
<LinearLayout xmlns:android="http://schemas.android.com/apk/res/android"
    xmlns:app="http://schemas.android.com/apk/res-auto"
    xmlns:tools="http://schemas.android.com/tools"
    android:orientation="vertical"
    android:layout_width="match_parent"
    android:layout_height="match_parent"
    tools:context=".NewsDetailActivity">

    <TextView
        android:id="@+id/this_newsTitle"
        android:layout_width="match_parent"
        android:layout_height="wrap_content"
        android:textSize="30dp"
        android:textColor="@color/blue"
        />
    <TextView
        android:id="@+id/this_newsDesc"
        android:layout_width="match_parent"
        android:layout_height="wrap_content"
        android:textSize="22dp"
        />
    <Button
        android:layout_width="match_parent"
        android:layout_height="wrap_content"
        android:text="返回"
        android:textSize="30dp"
        android:onClick="backNewsFrgment"
        />
</LinearLayout>
(2)方案2:采用Fragment
(一)Java代码
//采用Fragment的方式显示详情的信息
public class NewsDetailFragment extends Fragment {
     String this_newsTitle,this_newsDesc;
    @Override
    public View onCreateView(LayoutInflater inflater, ViewGroup container,
                             Bundle savedInstanceState) {
        Bundle bundle=getArguments();
        this_newsTitle=bundle.getString("this_newsTitle");
        this_newsDesc=bundle.getString("this_newsDesc");
        return inflater.inflate(R.layout.fragment_news_detail, container, false);
    }

    @Override
    public void onActivityCreated(@Nullable Bundle savedInstanceState) {
        super.onActivityCreated(savedInstanceState);
        TextView this_newsTitle2=getActivity().findViewById(R.id.this_newsTitle2);
        TextView this_newsDesc2=getActivity().findViewById(R.id.this_newsDesc2);
        Button backNewsFrgment2=getActivity().findViewById(R.id.backNewsFrgment2);
        this_newsTitle2.setText(this_newsTitle);
        this_newsDesc2.setText(this_newsDesc);
        backNewsFrgment2.setOnClickListener(new View.OnClickListener() {
            @Override
            public void onClick(View view) {
                Bundle bundle=new Bundle();
                bundle.putInt("code",200);
                fragmentListener.sendCode(bundle);
            }
        });


    }

    @Override
    public void onAttach(Context context) {
        super.onAttach(context);
        fragmentListener= (FragmentListener) context;
    }

    private FragmentListener fragmentListener;
    interface FragmentListener{
        public void sendCode(Bundle bundle);
    }
}
(2)布局文件
<?xml version="1.0" encoding="utf-8"?>
<LinearLayout xmlns:android="http://schemas.android.com/apk/res/android"
    xmlns:tools="http://schemas.android.com/tools"
        android:orientation="vertical"
    android:layout_width="match_parent"
    android:layout_height="match_parent"
    tools:context=".NewsDetailFragment">
    <TextView
        android:id="@+id/this_newsTitle2"
        android:layout_width="match_parent"
        android:layout_height="wrap_content"
        android:textSize="30dp"
        android:textColor="@color/blue"
        />
    <TextView
        android:id="@+id/this_newsDesc2"
        android:layout_width="match_parent"
        android:layout_height="wrap_content"
        android:textSize="22dp"
        />
    <Button
        android:id="@+id/backNewsFrgment2"
        android:layout_width="match_parent"
        android:layout_height="wrap_content"
        android:text="返回"
        android:textSize="30dp"
        />

</LinearLayout>
9)效果图
