1. BroadcastReceiver
1.1 知识点
(1)掌握广播接收器的主要作用及基本实现;
(2)可以使用广播启动Service;
(3)理解闹钟服务的使用;
1.2 具体内容
广播这个名词大家并不陌生,就像电视信号一样,打开电视都可以接受到信号。广播是一种发出后不管的机制,不管接受者能否正常接受,广播发送者只管发送。在android中经常使用到广播机制,向各个应用程序发送消息。
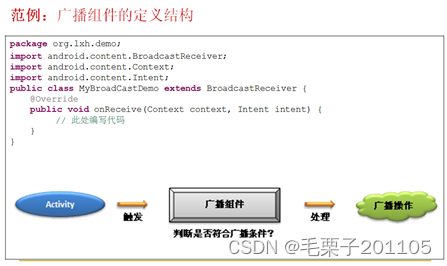
通过这个图我们可以明白,广播机制里面还是需要使用Activity程序,如果说想要建立广播的话,还必须准备一个广播接收器。
package com.example.broadcast;

import android.content.BroadcastReceiver;
import android.content.Context;
import android.content.Intent;
import android.widget.Toast;

public class MyBroadcastReceiver extends BroadcastReceiver {
	public MyBroadcastReceiver(){
		System.out.println("=======每次广播都会实例化一个新的广播组件进行操作======");
	}
	@Override
	public void onReceive(Context context, Intent intent) {
		Toast.makeText(context, "广播已经启动", Toast.LENGTH_SHORT).show();//显示信息
	}

}
此时一个广播组件就定义好了,那么定义好了之后,我们需要在AndroidMainfest.xml进行注册。
<receiver
            android:name="com.example.broadcast.MyBroadcastReceiver"
            android:enabled="true" –启用广播
            >
            <intent-filter>--匹配action操作是的广播
				<action android:name="android.intent.action.EDIT"/>
            </intent-filter>
        </receiver>
现在发现广播配置中需要配置一个<intent-filter>节点,表示此节点对一个指定的action操作的时候才会去启用广播。现在我们可以编写Activity程序进行广播的操作。现在通过按钮的事情启动广播。
<LinearLayout xmlns:android="http://schemas.android.com/apk/res/android"
    xmlns:tools="http://schemas.android.com/tools"
    android:layout_width="match_parent"
    android:layout_height="match_parent"
    android:orientation="vertical">
    <Button
        android:id="@+id/but"
        android:layout_width="match_parent"
        android:layout_height="wrap_content"
        android:text="开始广播"/>

</LinearLayout>
现在的广播和服务一样,都需要通过Activity程序去启动,但是大家要记住一点,广播可以根据系统的状态进行启动。
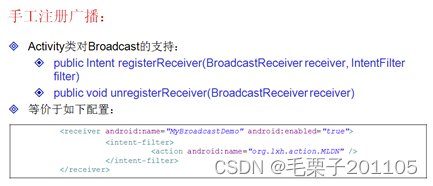
对于广播的注册也可以由程序完成。
package com.example.broadcast;

import android.app.Activity;
import android.content.Intent;
import android.content.IntentFilter;
import android.os.Bundle;
import android.view.View;
import android.view.View.OnClickListener;
import android.widget.Button;

public class BroadcastActivity extends Activity {
	private Button but = null;
	private MyBroadcastReceiver myBroadcastReceiver = null;
	@Override
	protected void onCreate(Bundle savedInstanceState) {
		super.onCreate(savedInstanceState);
		super.setContentView(R.layout.activity_broadcast);
		this.but = (Button) super.findViewById(R.id.but);
		this.but.setOnClickListener(new OnClickListener() {
			@Override
			public void onClick(View v) {
				Intent it = new Intent("www.wanczy.com");//启动Action
				it.putExtra("msg", "jjm是万策的职工");
				//start 通过程序去注册广播
				BroadcastActivity.this.myBroadcastReceiver = new MyBroadcastReceiver();
				IntentFilter filter = new IntentFilter("www.wanczy.com");
				BroadcastActivity.this.registerReceiver(BroadcastActivity.this.myBroadcastReceiver, filter);
				//end 以上就是广播在程序进行注册
				BroadcastActivity.this.sendBroadcast(it);//进行广播
			}
		});
	}

}
以上的广播就是手工在程序进行注册的。
现在我们也可以对程序进行稍稍的修改,因为现在不是针对所有的Action都进收听广播,必须针对过滤的Action进行。
建议大家以后在开发中使用配置文件的形式进行配置。

package com.example.broadcast;

import android.app.Service;
import android.content.Intent;
import android.os.IBinder;

public class MyService extends Service {
	@Override
	public IBinder onBind(Intent intent) {
		return null;
	}

	@Override
	public void onCreate() {
		System.out.println("=========onCreate=============");
		super.onCreate();
	}

	@Override
	public void onDestroy() {
		System.out.println("=========onDestroy=============");
		super.onDestroy();
	}

	@Override
	public int onStartCommand(Intent intent, int flags, int startId) {
		System.out.println("=========onStartCommand========="+intent);
		return Service.START_CONTINUATION_MASK;
	}

}
定义Bordcast:
package com.example.broadcast;

import android.content.BroadcastReceiver;
import android.content.Context;
import android.content.Intent;
import android.widget.Toast;

public class MyBroadcastReceiver extends BroadcastReceiver {
	public MyBroadcastReceiver(){
		System.out.println("=======每次广播都会实例化一个新的广播组件进行操作======");
	}
	@Override
	public void onReceive(Context context, Intent intent) {
//			Toast.makeText(context, "广播已经启动,"+intent.getStringExtra("msg") , Toast.LENGTH_SHORT).show();//显示信息
		context.startService(new Intent(context,MyService.class));//启动Service
	}

}
对于广播来说,并没有太多复杂的操作,广播里面也可以不做任何的Action的过滤。我们现在对于服务来说,Activity可以启动,广播也可以启动,但是广播是可以在耨写特定的条件下启动服务的。例如手机开机的时候,或者一些特定的应用程序运行的时候才会去启动服务。
范例:设置闹钟

定义一个闹钟的提示类:
package com.example.alarmproject;

import java.text.SimpleDateFormat;
import java.util.Date;

import android.app.Activity;
import android.app.AlertDialog;
import android.content.DialogInterface;
import android.os.Bundle;

public class AlarmMessage extends Activity {
	@Override
	protected void onCreate(Bundle savedInstanceState) {
		super.onCreate(savedInstanceState);
		new AlertDialog.Builder(this)
		.setIcon(R.drawable.logo)
		.setTitle("闹钟时间已到")
		.setMessage("闹钟响起,现在时间是:"+new SimpleDateFormat("yyyy-MM-dd HH:mm:ss").format(new Date(System.currentTimeMillis())))
		.setPositiveButton("关闭", new DialogInterface.OnClickListener() {

			@Override
			public void onClick(DialogInterface dialog, int which) {
				AlarmMessage.this.finish();
			}
		}).show();
	}
}
package com.example.alarmproject;

import android.content.BroadcastReceiver;
import android.content.Context;
import android.content.Intent;

public class MyAlarmReceive extends BroadcastReceiver {
	@Override
	public void onReceive(Context context, Intent intent) {
		Intent it = new Intent(context,AlarmMessage.class);
		it.addFlags(Intent.FLAG_ACTIVITY_NEW_TASK);//传递一个新的任务标记
		context.startActivity(it);//启动Intent
	}

}
现在打开这个对话框的操作肯定是需要广播。
<LinearLayout xmlns:android="http://schemas.android.com/apk/res/android"
    xmlns:tools="http://schemas.android.com/tools"
    android:layout_width="match_parent"
    android:layout_height="match_parent"
    android:orientation="vertical"
    android:gravity="center_horizontal">
	<TimePicker
	    android:id="@+id/time"
		android:layout_width="match_parent"
        android:layout_height="wrap_content"
	    />
    <TextView
        android:id="@+id/msg"
        android:layout_width="match_parent"
        android:layout_height="wrap_content"
        android:text="当前没有设置闹钟" />
	<Button
        android:id="@+id/set"
        android:layout_width="match_parent"
        android:layout_height="wrap_content"
        android:text="设置闹钟" />
	<Button
        android:id="@+id/delete"
        android:layout_width="match_parent"
        android:layout_height="wrap_content"
        android:text="删除闹钟" />
</LinearLayout>
通过定义的时间选择器,选择时间设置闹钟。
package com.example.alarmproject;

import java.util.Calendar;

import android.app.Activity;
import android.app.AlarmManager;
import android.app.PendingIntent;
import android.content.Context;
import android.content.Intent;
import android.os.Bundle;
import android.view.View;
import android.view.View.OnClickListener;
import android.widget.Button;
import android.widget.TextView;
import android.widget.TimePicker;
import android.widget.TimePicker.OnTimeChangedListener;
import android.widget.Toast;

public class MyAlarmManagerActivity extends Activity {
	private AlarmManager alarm = null;
	private Button set = null;
	private Button delete = null;
	private TextView msg = null;
	private TimePicker time = null;
	private Calendar calendar = Calendar.getInstance();// 取得日历操作类
	private int hourOfDay = 0;// 保存我们设置的小时数
	private int minute = 0;// 保存分钟

	@Override
	protected void onCreate(Bundle savedInstanceState) {
		super.onCreate(savedInstanceState);
		super.setContentView(R.layout.activity_my_alarm_manager);
		this.time = (TimePicker) super.findViewById(R.id.time);
		this.set = (Button) super.findViewById(R.id.set);
		this.delete = (Button) super.findViewById(R.id.delete);
		this.msg = (TextView) super.findViewById(R.id.msg);
		this.alarm = (AlarmManager) super
				.getSystemService(Context.ALARM_SERVICE);// 取得闹钟服务
		this.time.setOnTimeChangedListener(new OnTimeChangedListenerImpl());
		this.set.setOnClickListener(new SetOnClickListenerImpl());
		this.delete.setOnClickListener(new DeleteOnClickListenerImpl());
		this.time.setIs24HourView(true);// 设置24小时制
	}

	private class OnTimeChangedListenerImpl implements OnTimeChangedListener {
		@Override
		public void onTimeChanged(TimePicker view, int hourOfDay, int minute) {
			MyAlarmManagerActivity.this.calendar.setTimeInMillis(System
					.currentTimeMillis());// 设置当前时间
			MyAlarmManagerActivity.this.calendar.set(Calendar.HOUR_OF_DAY,
					hourOfDay);
			MyAlarmManagerActivity.this.calendar.set(Calendar.MINUTE, minute);
			MyAlarmManagerActivity.this.calendar.set(Calendar.SECOND, 0);
			MyAlarmManagerActivity.this.calendar.set(Calendar.MILLISECOND, 0);
			MyAlarmManagerActivity.this.hourOfDay = hourOfDay;
			MyAlarmManagerActivity.this.minute = minute;
		}
	}

	private class SetOnClickListenerImpl implements OnClickListener {
		public void onClick(View v) {
			Intent intent = new Intent(MyAlarmManagerActivity.this,
					MyAlarmReceive.class);
			intent.setAction("www.wanczy.com");
			PendingIntent sender = PendingIntent.getBroadcast(
					MyAlarmManagerActivity.this, 0, intent,
					PendingIntent.FLAG_UPDATE_CURRENT);// 指定PendingIntent
			MyAlarmManagerActivity.this.alarm.set(AlarmManager.RTC_WAKEUP,
					MyAlarmManagerActivity.this.calendar.getTimeInMillis(),
					sender);
			MyAlarmManagerActivity.this.msg.setText("闹钟响起的时间是:"
					+ MyAlarmManagerActivity.this.hourOfDay + "时"
					+ MyAlarmManagerActivity.this.minute + "分");
			Toast.makeText(MyAlarmManagerActivity.this, "设置闹钟成功",
					Toast.LENGTH_SHORT).show();
		}
	}

	private class DeleteOnClickListenerImpl implements OnClickListener {
		public void onClick(View v) {
			if (null != MyAlarmManagerActivity.this.alarm) {// 只有闹钟设置之后才能取消设置
				Intent intent = new Intent(MyAlarmManagerActivity.this,
						MyAlarmReceive.class);
				PendingIntent sender = PendingIntent.getBroadcast(
						MyAlarmManagerActivity.this, 0, intent,
						PendingIntent.FLAG_UPDATE_CURRENT);
				MyAlarmManagerActivity.this.alarm.cancel(sender);//取消闹钟
				MyAlarmManagerActivity.this.msg.setText("当前没有设置闹钟");
				Toast.makeText(MyAlarmManagerActivity.this, "闹钟删除成功",
						Toast.LENGTH_SHORT).show();
			}
		}
	}
}
  <receiver
            android:name="com.example.alarmproject.MyAlarmReceive"
            android:enabled="true"
            android:process=":remote"—开辟一个新的进程
            >
			<intent-filter>
			    <action android:name="www.wanczy.com"/>
			</intent-filter>
        </receiver>
1.3 小结
(1)广播属于触发式操作,当有了指定操作之后会自动启动广播;
(2)通过广播可以实现Service程序的启动;



![ubuntu 18.04 LTS交叉编译opencv 3.4.16并编译工程[全记录]](https://img-blog.csdnimg.cn/028695f95dc44dd480853b7abb22d0ed.png)
