目录
PCLVisualizer简单的点云可视化
createViewPort创建视窗
代码
效果
点云视窗上打印文本信息
使用addText
合并多个点云
xyz+xyz
xyz + nxnynz
新建自己的Point类型
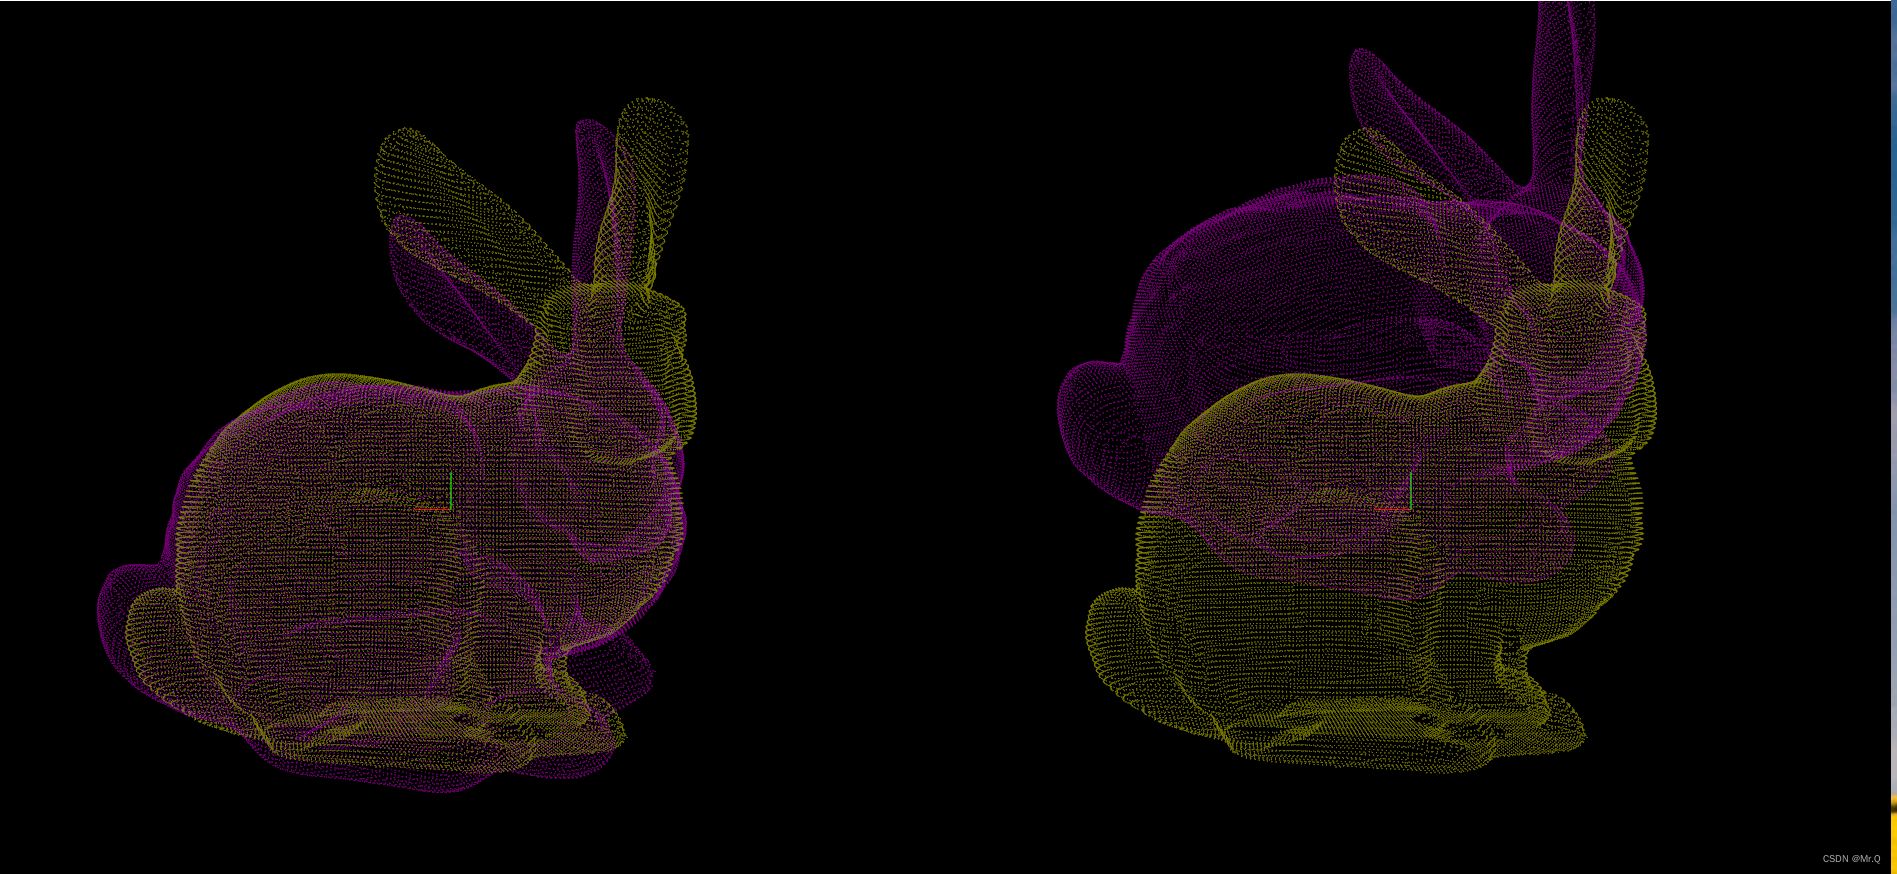
点云的刚体变换(旋转+平移)
以下是pcl点云基本操作,后面会慢慢更新。
PCLVisualizer简单的点云可视化
#include <iostream>
#include <pcl\io\pcd_io.h>
#include <pcl\visualization\pcl_visualizer.h>

using namespace std;

int main()
{
	// 加载数据
	pcl::PointCloud<pcl::PointXYZ>::Ptr cloud(new pcl::PointCloud<pcl::PointXYZ>);
	pcl::PCDReader reader;
	if (reader.read(".\\models\\horse.pcd", *cloud) < 0)
	{
		PCL_ERROR("not exists!\n");
		system("pause");
		return -1;
	}

	// 可视化点云
	boost::shared_ptr<pcl::visualization::PCLVisualizer> viewer(new pcl::visualization::PCLVisualizer("viewer_window_name"));
	viewer->addPointCloud<pcl::PointXYZ>(cloud, "horse_cloud");  // 将点云附加到视窗中,并对该点云定义唯一的ID“horse_cloud”
	while (!viewer->wasStopped())
	{
		viewer->spinOnce(100);  // 100 ms 刷新一次
	}

	return 0;
}
createViewPort创建视窗
代码
#include <pcl/visualization/cloud_viewer.h>

int main()
{
	boost::shared_ptr<pcl::visualization::PCLVisualizer> viewer(new pcl::visualization::PCLVisualizer("PCL Viewer"));
	viewer->initCameraParameters();  // 初始化相机默认参数
	// 一个视窗
	//int v1(0);
	//viewer->createViewPort(0.0, 0.0, 1.0, 1.0, v1);   // x[0,1], y[0,1]
	//viewer->setBackgroundColor(255, 0, 255, v1);

	// 两个视窗
	//int v1(0), v2(1);
	//viewer->createViewPort(0.0, 0.0, 0.5, 1.0, v1);  // x1[0,0.5], y1[0,1]
	//viewer->createViewPort(0.5, 0.0, 1.0, 1.0, v2);  // x2[0.5,1], y2[0,1]
	//viewer->setBackgroundColor(255, 0, 255, v1);
	//viewer->setBackgroundColor(0, 255, 255, v2);

	// 三个视窗
	//int v1(0), v2(1), v3(2);
	//viewer->createViewPort(0.0, 0.0, 0.33, 1.0, v1);  // x1[0,0.33], y1[0,1]
	//viewer->createViewPort(0.33, 0.0, 0.66, 1.0, v2);  // x2[0.33,0.66], y2[0,1]
	//viewer->createViewPort(0.66, 0.0, 1.0, 1.0, v3);  // x3[0.66,1], y3[0,1]
	//viewer->setBackgroundColor(255, 0, 255, v1);
	//viewer->setBackgroundColor(0, 255, 255, v2);
	//viewer->setBackgroundColor(255, 255, 0, v3);

	// 四个视窗
	int v1(0), v2(1), v3(2), v4(3);
	viewer->createViewPort(0.0, 0.0, 0.5, 0.5, v1);  // x1[0,0.5], y1[0,0.5]
	viewer->createViewPort(0.5, 0.0, 1.0, 0.5, v2);  // x2[0.5,1], y2[0,0.5]
	viewer->createViewPort(0.0, 0.5, 0.5, 1.0, v3);  // x3[0.,0.5], y3[0.5,1]
	viewer->createViewPort(0.5, 0.5, 1.0, 1.0, v4);  // x3[0.5,1], y3[0.5,1]
	viewer->setBackgroundColor(255, 0, 255, v1);
	viewer->setBackgroundColor(0, 255, 255, v2);
	viewer->setBackgroundColor(255, 255, 0, v3);
	viewer->setBackgroundColor(255, 0, 0, v4);

	viewer->addCoordinateSystem();  // 在viewer对象下所有的视窗都可视化坐标系
	viewer->spin();  // 显示交互界面
}
效果
一个视窗。

两个视窗。

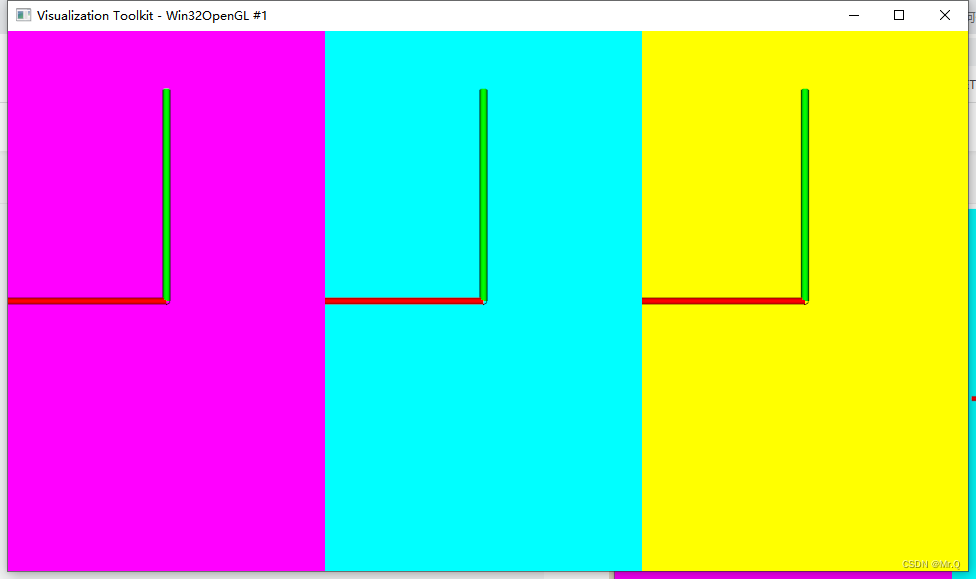
三个视窗。
四个视窗。

点云视窗上打印文本信息
使用addText
addText参数说明,注意最后一个参数可以指定在哪个视窗上显示文本。
bool addText (const std::string &text, int xpos, int ypos, int fontsize, double r, double g, double b, const std::string &id = "", int viewport = 0);
view/** \brief Add a text to screen
* \param[in] text the text to add
* \param[in] xpos the X position on screen where the text should be added
* \param[in] ypos the Y position on screen where the text should be added
* \param[in] fontsize the fontsize of the text
* \param[in] r the red color value
* \param[in] g the green color value
* \param[in] b the blue color value
* \param[in] id the text object id (default: equal to the "text" parameter)
* \param[in] viewport the view port (default: all)
*/
pcl::visualization::PCLVisualizer viewer("demo");  // 创建可视化对象
viewer.createViewPort(0.0, 0.0, 0.5, 1.0, 0);  // 定义viewport位置. 可以定义多个视角
viewer.addText("Original point cloud\n", 10, 15, 16, 1, 1, 1, "text_id", 0);
合并多个点云
xyz+xyz
点的类型都是pcl::PointXYZ类型
#include <pcl/point_types.h>
#include <pcl/io/file_io.h>
#include <pcl/io/pcd_io.h>
#include <pcl/point_cloud.h>
#include <iostream>

int
main(int argc, char** argv)
{
	pcl::PointCloud<pcl::PointXYZ> cloud_a, cloud_b;
	pcl::PointCloud<pcl::PointXYZ> cloud_c;

	// 创建点云数据
	cloud_a.width = 3;  // 点数3
	cloud_a.height = cloud_b.height = 1;  // 设置为无序点云
	cloud_a.points.resize(cloud_a.width * cloud_a.height);

	cloud_b.width = 2;
	cloud_b.points.resize(cloud_b.width * cloud_b.height);

	// 赋值
	for (size_t i = 0; i < cloud_a.points.size(); ++i)
	{
		cloud_a.points[i].x = 1024 * rand() / (RAND_MAX + 1.0f);
		cloud_a.points[i].y = 1024 * rand() / (RAND_MAX + 1.0f);
		cloud_a.points[i].z = 1024 * rand() / (RAND_MAX + 1.0f);
	}
	for (size_t i = 0; i < cloud_b.points.size(); ++i)
	{
		cloud_b.points[i].x = 1024 * rand() / (RAND_MAX + 1.0f);
		cloud_b.points[i].y = 1024 * rand() / (RAND_MAX + 1.0f);
		cloud_b.points[i].z = 1024 * rand() / (RAND_MAX + 1.0f);
	}
	cloud_c = cloud_a;
    cloud_c += cloud_b;
	pcl::io::savePCDFile("test.pcd", cloud_c);

}
结果:
# .PCD v0.7 - Point Cloud Data file format
VERSION 0.7
FIELDS x y z
SIZE 4 4 4
TYPE F F F
COUNT 1 1 1
WIDTH 5
HEIGHT 1
VIEWPOINT 0 0 0 1 0 0 0
POINTS 5
DATA ascii
1.28125 577.09375 197.9375
828.125 599.03125 491.375
358.6875 917.4375 842.5625
764.5 178.28125 879.53125
727.53125 525.84375 311.28125
xyz + nxnynz
#include <pcl/point_types.h>
#include <pcl/io/file_io.h>
#include <pcl/io/pcd_io.h>
#include <pcl/point_cloud.h>
#include <pcl/visualization/pcl_visualizer.h>


int
main(int argc, char** argv)
{
	pcl::PointCloud<pcl::PointXYZ> cloud_a;  // 向量a
	pcl::PointCloud<pcl::Normal> n_cloud_b;  // 法向量
	pcl::PointCloud<pcl::PointNormal> p_n_cloud_c;  // xyz + nxnynz = (x,y,z,nx,ny,nz)

	// 创建点云数据
	cloud_a.width = 3;  // 点数3
	cloud_a.height = 1;  // 设置为无序点云
	cloud_a.points.resize(cloud_a.width * cloud_a.height);

	n_cloud_b.width = 3;
	n_cloud_b.height = 1;
	n_cloud_b.points.resize(n_cloud_b.width * n_cloud_b.height);

	// 赋值
	for (size_t i = 0; i < cloud_a.points.size(); ++i)
	{
		cloud_a.points[i].x = 1024 * rand() / (RAND_MAX + 1.0f);
		cloud_a.points[i].y = 1024 * rand() / (RAND_MAX + 1.0f);
		cloud_a.points[i].z = 1024 * rand() / (RAND_MAX + 1.0f);
	}
	for (size_t i = 0; i < n_cloud_b.points.size(); ++i)
	{
		n_cloud_b.points[i].normal[0] = 1024 * rand() / (RAND_MAX + 1.0f);
		n_cloud_b.points[i].normal[1] = 1024 * rand() / (RAND_MAX + 1.0f);
		n_cloud_b.points[i].normal[2] = 1024 * rand() / (RAND_MAX + 1.0f);
	}

	pcl::concatenateFields(cloud_a, n_cloud_b, p_n_cloud_c);
	pcl::io::savePCDFile("test.pcd", p_n_cloud_c);

}
结果:
# .PCD v0.7 - Point Cloud Data file format
VERSION 0.7
FIELDS x y z normal_x normal_y normal_z curvature
SIZE 4 4 4 4 4 4 4
TYPE F F F F F F F
COUNT 1 1 1 1 1 1 1
WIDTH 3
HEIGHT 1
VIEWPOINT 0 0 0 1 0 0 0
POINTS 3
DATA ascii
1.28125 577.09375 197.9375 764.5 178.28125 879.53125 0
828.125 599.03125 491.375 727.53125 525.84375 311.28125 0
358.6875 917.4375 842.5625 15.34375 93.59375 373.1875 0
新建自己的Point类型
步骤:先定义结构体,再注册。
#include <pcl/point_types.h>
#include <pcl/point_cloud.h>
#include <pcl/io/pcd_io.h>

struct MyPointType  // 定义点类型说明
{
	PCL_ADD_POINT4D;  // 该点类型有4个元素
	float val;
	EIGEN_MAKE_ALIGNED_OPERATOR_NEW  // 确保new操作符对齐操作
}EIGEN_ALIGN16;  // 强制SSE对齐

POINT_CLOUD_REGISTER_POINT_STRUCT(
	MyPointType,  // 注册点类型宏
	(float, x, x)
	(float, y, y)
	(float, z, z)
	(float, val, val)
	)

int
main(int argc, char** argv)
{
	// 创建1行2列的点云
	pcl::PointCloud<MyPointType> cloud;
	cloud.points.resize(2);
	cloud.width = 2;
	cloud.height = 1;

	// 对每个点赋值
	cloud.points[0].val = 1;
	cloud.points[0].x = cloud.points[0].y = cloud.points[0].z = 0;
	cloud.points[1].val = 2;
	cloud.points[1].x = cloud.points[1].y = cloud.points[1].z = 3;

	pcl::io::savePCDFile("test.pcd", cloud);
}
保存的test.pcd文件内容如下。
# .PCD v0.7 - Point Cloud Data file format
VERSION 0.7
FIELDS x y z val
SIZE 4 4 4 4
TYPE F F F F
COUNT 1 1 1 1
WIDTH 2
HEIGHT 1
VIEWPOINT 0 0 0 1 0 0 0
POINTS 2
DATA ascii
0 0 0 1
3 3 3 2
点云的刚体变换(旋转+平移)
#include <pcl/point_types.h>
#include <pcl/io/file_io.h>
#include <pcl/io/pcd_io.h>
#include <pcl/point_cloud.h>
#include <pcl/visualization/pcl_visualizer.h>
#include <pcl/kdtree/kdtree_flann.h>
#include <pcl/filters/voxel_grid.h>
#include <iostream>
#include <pcl/registration/ndt.h>
#include <pcl/registration/icp.h>

#include <iostream>


int main()
{
    pcl::PointCloud<pcl::PointXYZ>::Ptr cloud_in(new pcl::PointCloud<pcl::PointXYZ>);  // 原始点云
    pcl::PointCloud<pcl::PointXYZ>::Ptr cloud_rotate(new pcl::PointCloud<pcl::PointXYZ>);  // 只是旋转
    pcl::PointCloud<pcl::PointXYZ>::Ptr cloud_rotate_shift(new pcl::PointCloud<pcl::PointXYZ>);  // 旋转加平移
	if (pcl::io::loadPCDFile("E:\\code\\c++\\PCL_demo\\PCL_demo\\models\\rabbit.pcd", *cloud_in) < 0)
    {
        PCL_ERROR("Error loading cloud %s.\n");
        return (-1);
    }

    // 旋转
    rigid_transformation(cloud_in, cloud_rotate, M_PI / 4, "x", 0, 0, 0);
    rigid_transformation(cloud_in, cloud_rotate_shift, M_PI / 4, "x", 0, 5, 0);

    // 可视化
    boost::shared_ptr<pcl::visualization::PCLVisualizer> viewer(new pcl::visualization::PCLVisualizer("Trans viewer"));
    viewer->initCameraParameters();
    int v1(0), v2(1);
    viewer->createViewPort(0.0, 0.0, 0.5, 1.0, v1);
    viewer->createViewPort(0.5, 0.0, 1.0, 1.0, v2);

    viewer->addCoordinateSystem(1);
    pcl::visualization::PointCloudColorHandlerCustom<pcl::PointXYZ> cloud_in_color_r(cloud_in, 128, 128, 0);
    pcl::visualization::PointCloudColorHandlerCustom<pcl::PointXYZ> cloud_in_color_b(cloud_rotate, 128, 0, 128);
    viewer->addPointCloud(cloud_in, cloud_in_color_r, "orig1", v1);
    viewer->addPointCloud(cloud_rotate, cloud_in_color_b, "trans1", v1);
    viewer->addPointCloud(cloud_in, cloud_in_color_r, "orig2", v2);
    viewer->addPointCloud(cloud_rotate_shift, cloud_in_color_b, "trans2", v2);

    viewer->spin();
}