本节对应的视频讲解:B_站_视_频
https://www.bilibili.com/video/BV16W4y1g7dM
经过前面几节课的讲解,学会了绘制点、线、多段线、多边形、矩形、圆角矩形
到这里就可以学习画笔和画刷的设置了,本节先讲解画笔的设置
Qt 中画笔的类是 QPen
QPainter 在绘制时,是有一个默认的画笔的。我们也可以设置一个自定义的画笔给它
可以设置画笔的线宽、颜色、样式、连接、末端等的样式
1. 相关 API
1.1 画笔宽度
// 获取和设置画笔的宽度
int width() const;
void setWidth(int width);

qreal widthF() const;
void setWidthF(qreal width);
1.2 画笔颜色
// 获取和设置画笔的颜色
QColor color() const;
void setColor(const QColor &color);
1.3 样式
// 获取和设置画笔的样式
Qt::PenStyle style() const;
void setStyle(Qt::PenStyle style);
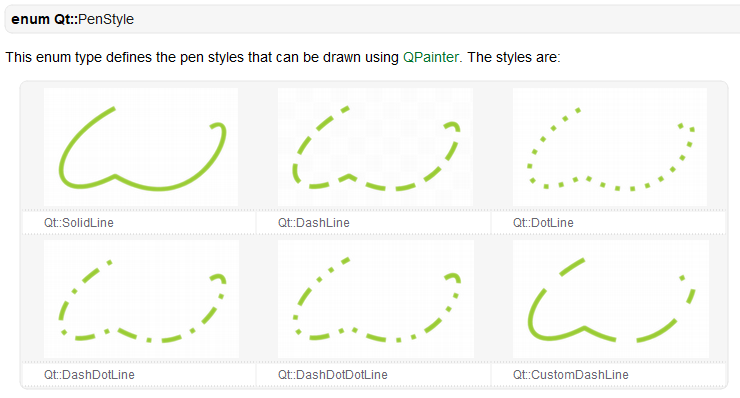
其中,Qt::PenStyle 是一个枚举,取值和效果,如下:
1.4 连接
// 获取和设置画笔的 Join 样式
Qt::PenJoinStyle joinStyle() const;
void setJoinStyle(Qt::PenJoinStyle style)
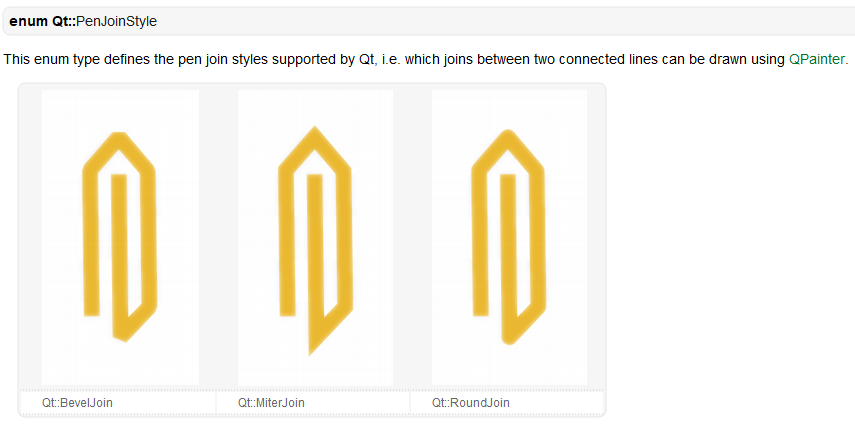
其中,Qt::PenJoinStyle 是一个枚举,取值和效果,如下:
1.5 末端
// 获取和设置画笔的 Cap 样式
Qt::PenCapStyle capStyle() const;
void setCapStyle(Qt::PenCapStyle style)
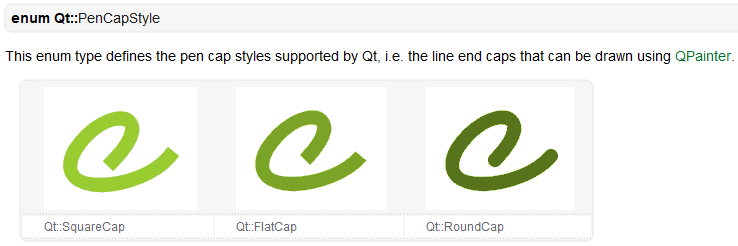
其中,Qt::PenCapStyle 是一个枚举,取值和效果,如下:
2. 具体实现
2.1 关联信号槽
为宽度、颜色、样式、连接、末端,这 5 个设置选项,关联信号槽:
Widget::Widget(QWidget *parent) : QWidget(parent), ui(new Ui::Widget)
{
    ui->setupUi(this);

    // 画笔宽度
    connect(ui->sbPenWidth, SIGNAL(valueChanged(int)), this, SLOT(penChanged()));
    // 画笔颜色
    connect(ui->btnPenColor, SIGNAL(clicked()), this, SLOT(onBtnPenColorClicked()));
    // 画笔样式
    connect(ui->cboPenStyle, SIGNAL(activated(QString)), this, SLOT(penChanged()));
    // 画笔末端
    connect(ui->cboPenCap, SIGNAL(activated(QString)), this, SLOT(penChanged()));
    // 画笔连接
    connect(ui->cboPenJoin, SIGNAL(activated(QString)), this, SLOT(penChanged()));
}
2.2 声明并实现槽函数
首先,在 widget.h 中声明 penChanged 和 onBtnPenColorClicked 这两个槽函数:
class Widget : public QWidget
{
private slots:
    void onBtnPenColorClicked();
    void penChanged();
};
然后,在 widget.cpp 中实现这两个槽函数:
#include <QColorDialog>

void Widget::onBtnPenColorClicked()
{
    QColor color = QColorDialog::getColor(QColor(255, 0, 0), this, "画笔颜色");

    if ( !color.isValid() ) {
        return;
    }

    // 回显画笔颜色
    QPalette pal = ui->btnPenColor->palette();
    pal.setColor(QPalette::Button, color);
    ui->btnPenColor->setPalette(pal);
    ui->btnPenColor->setAutoFillBackground(true);
    ui->btnPenColor->setFlat(true);

    penChanged();
}

void Widget::penChanged()
{
    // 获取画笔宽度
    int width = ui->sbPenWidth->value();

    // 获取画笔颜色
    QPalette pal = ui->btnPenColor->palette();
    QColor color = pal.color(QPalette::Button);

    int styleIndex = ui->cboPenStyle->currentIndex();
    Qt::PenStyle style = (Qt::PenStyle)ui->cboPenStyle->itemData(styleIndex).toInt();

    int capIndex = ui->cboPenCap->currentIndex();
    Qt::PenCapStyle cap = Qt::PenCapStyle(ui->cboPenCap->itemData(capIndex).toInt());

    int joinIndex = ui->cboPenJoin->currentIndex();
    Qt::PenJoinStyle join = Qt::PenJoinStyle(ui->cboPenJoin->itemData(joinIndex).toInt());

    ui->paintWidget->setPen(QPen(color, width, style, cap, join));
}
2.3 实现 setPen 函数
在 widget.cpp 中的 penChanged 槽函数中,最终调用 PaintWidget 类中的 setPen 来设置画笔,完成绘制。
首先,在 PaintWidget.h 中声明 setPen 函数,并定义一个成员变量 mPen,如下:
#include <QPen>

class PaintWidget : public QWidget
{
public slots:
    void setPen(const QPen &pen);

private:
    QPen mPen;
};
然后,在 PaintWidget.cpp 中,实现 setPen 函数:
void PaintWidget::setPen(const QPen &pen)
{
    this->mPen = pen;
    update();
}
最后,由于上边调用了 update 之后,系统会自动调用 paintEvent
因此,在 paintEvent 中需要将画笔设置给 QPainter,来完成绘制
void PaintWidget::paintEvent(QPaintEvent *event)
{

    QPainter painter(this);
    painter.setPen(mPen);
}
这样就完成了画笔的设置
2.4 优化
修改 widget.cpp,设置画笔的默认颜色为红色
Widget::Widget(QWidget *parent) : QWidget(parent), ui(new Ui::Widget)
{
    ui->setupUi(this);

    // 6. 初始化
    // 回显画笔颜色
    QPalette pal = ui->btnPenColor->palette();
    pal.setColor(QPalette::Button, QColor(255, 0, 0));
    ui->btnPenColor->setPalette(pal);
    ui->btnPenColor->setAutoFillBackground(true);
    ui->btnPenColor->setFlat(true);

    penChanged();
}


