代码版本V6.0 源码
YOLOv5 v6.0 release 改动速览
推出了新的 P5 和 P6 ‘Nano’ 模型: YOLOV5n和YOLOV5n6。
Nano 将 YOLOv5s 的深度倍数保持为 0.33,但将 YOLOv5 的宽度倍数从 0.50 降低到 0.25,从而将参数从 7.5M 降低到 1.9M,非常适合移动和 CPU 解决方案。
yolov5-6.0
- 使用
- 修改
- test1: IOU→DIOU_nms
- test2: 设置网络结构为mobilenet-V2
- test3: 加入SE注意力模块
- test4: MobileNetV3(2)ShuffleNetV2(3)
- test5: Facal Loss 改为 VFLoss
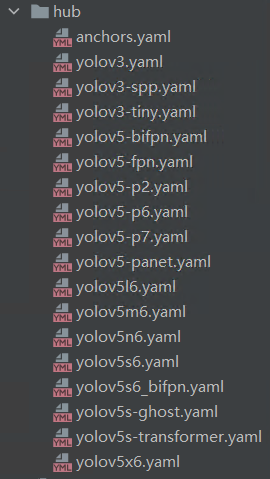
- test6: v6.0==内置== TRANSFORMERS 训练
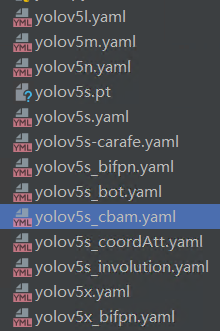
- test7: CBAM模块添加(cbam,bifpn,carafe,bot(CTR3),cooratt,involution)
- New.改进
- bottleneckCSP改进
- 数据集太少
- 针对小目标
- 针对样本不均衡问题
- 针对复杂背景问题
- else
- 姿态估计
- qt界面
使用
copy数据集到yolov5-6.0文件夹
data文件夹下test.yaml 修改train val nc names
models文件夹下用yolov5s: 修改yolov5s.yaml 的 nc
下载预训练模型weights 下载 注意版本对应
train.py 修改

训练结果保存在run文件夹。
中断之后继续训练:resume default= True
val.py 修改 评估模型

detect.py 模型推理

yolov5如何控制检测视频的速度
- 预训练模型有无“6”的区别:
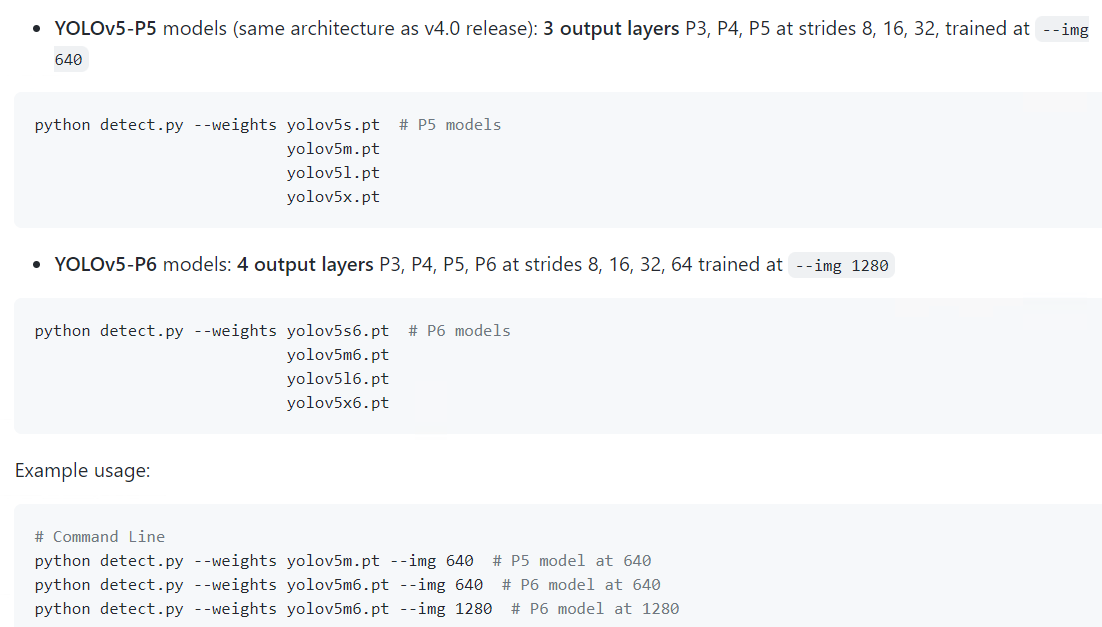
- train出现错误 libiomp5md.dll 的 解决方案
修改
test1: IOU→DIOU_nms
参考
一图看清IoU,GIoU,DIoU,CIoU
Yolov5中采用加权nms的方式。
将nms中IOU修改成DIOU_nms。对于一些遮挡重叠的目标,会有一些改进。
CIOU Loss的性能要比DIOU Loss好,那为什么不用CIOU_nms,而用DIOU_nms?
因为CIOU_loss,是在DIOU_loss的基础上,添加了一个的影响因子,包含groundtruth标注框的信息,在训练时用于回归。但是NMS在推理过程中,并不需要groundtruth的信息,所以CIOU NMS不可使用。
utils/general.py
non_max_suppression函数中,将
i = torchvision.ops.nms(boxes, scores, iou_thres) # NMS
改为
i = NMS(boxes, scores, iou_thres, GIoU=False, DIoU=True, CIoU=False)
定义函数NMS
def NMS(boxes, scores, iou_thres, GIoU=False, DIoU=False, CIoU=False):
    """
    :param boxes:  (Tensor[N, 4])): are expected to be in ``(x1, y1, x2, y2)
    :param scores: (Tensor[N]): scores for each one of the boxes
    :param iou_thres: discards all overlapping boxes with IoU > iou_threshold
    :return:keep (Tensor): int64 tensor with the indices
            of the elements that have been kept
            by NMS, sorted in decreasing order of scores
    """
    # 按conf从大到小排序
    B = torch.argsort(scores, dim=-1, descending=True)
    keep = []
    while B.numel() > 0:
        # 取出置信度最高的
        index = B[0]
        keep.append(index)
        if B.numel() == 1: break
        # 计算iou,根据需求可选择GIOU,DIOU,CIOU
        iou = bbox_iou(boxes[index, :], boxes[B[1:], :], GIoU=GIoU, DIoU=DIoU, CIoU=CIoU)
        # 找到符合阈值的下标
        inds = torch.nonzero(iou <= iou_thres).reshape(-1)
        B = B[inds + 1]
    return torch.tensor(keep)
定义函数bbox_iou
这里的计算IOU的函数——bbox_iou则是直接引用了YOLOV5中的代码,其简洁的集成了对与GIOU,DIOU,CIOU的计算。
def bbox_iou(box1, box2, x1y1x2y2=True, GIoU=False, DIoU=False, CIoU=False, eps=1e-9):
    # Returns the IoU of box1 to box2. box1 is 4, box2 is nx4
    box2 = box2.T

    # Get the coordinates of bounding boxes
    if x1y1x2y2:  # x1, y1, x2, y2 = box1
        b1_x1, b1_y1, b1_x2, b1_y2 = box1[0], box1[1], box1[2], box1[3]
        b2_x1, b2_y1, b2_x2, b2_y2 = box2[0], box2[1], box2[2], box2[3]
    else:  # transform from xywh to xyxy
        b1_x1, b1_x2 = box1[0] - box1[2] / 2, box1[0] + box1[2] / 2
        b1_y1, b1_y2 = box1[1] - box1[3] / 2, box1[1] + box1[3] / 2
        b2_x1, b2_x2 = box2[0] - box2[2] / 2, box2[0] + box2[2] / 2
        b2_y1, b2_y2 = box2[1] - box2[3] / 2, box2[1] + box2[3] / 2

    # Intersection area
    inter = (torch.min(b1_x2, b2_x2) - torch.max(b1_x1, b2_x1)).clamp(0) * \
            (torch.min(b1_y2, b2_y2) - torch.max(b1_y1, b2_y1)).clamp(0)

    # Union Area
    w1, h1 = b1_x2 - b1_x1, b1_y2 - b1_y1 + eps
    w2, h2 = b2_x2 - b2_x1, b2_y2 - b2_y1 + eps
    union = w1 * h1 + w2 * h2 - inter + eps

    iou = inter / union
    if GIoU or DIoU or CIoU:
        cw = torch.max(b1_x2, b2_x2) - torch.min(b1_x1, b2_x1)  # convex (smallest enclosing box) width
        ch = torch.max(b1_y2, b2_y2) - torch.min(b1_y1, b2_y1)  # convex height
        if CIoU or DIoU:  # Distance or Complete IoU https://arxiv.org/abs/1911.08287v1
            c2 = cw ** 2 + ch ** 2 + eps  # convex diagonal squared
            rho2 = ((b2_x1 + b2_x2 - b1_x1 - b1_x2) ** 2 +
                    (b2_y1 + b2_y2 - b1_y1 - b1_y2) ** 2) / 4  # center distance squared
            if DIoU:
                return iou - rho2 / c2  # DIoU
            elif CIoU:  # https://github.com/Zzh-tju/DIoU-SSD-pytorch/blob/master/utils/box/box_utils.py#L47
                v = (4 / math.pi ** 2) * torch.pow(torch.atan(w2 / h2) - torch.atan(w1 / h1), 2)
                with torch.no_grad():
                    alpha = v / ((1 + eps) - iou + v)
                return iou - (rho2 / c2 + v * alpha)  # CIoU
        else:  # GIoU https://arxiv.org/pdf/1902.09630.pdf
            c_area = cw * ch + eps  # convex area
            return iou - (c_area - union) / c_area  # GIoU
    else:
        return iou  # IoU
test2: 设置网络结构为mobilenet-V2
参考
在models/common.py里,实现MobileNetv2的 bottleneck(InvertedResidual) 和 Pwconv(Pointwise Convolution)
#mobilenet Bottleneck InvertedResidual
class BottleneckMOB(nn.Module):
#c1:inp c2:oup s:stride expand_ratio:t
def __init__(self, c1, c2, s, expand_ratio):
super(BottleneckMOB, self).__init__()
self.s = s
hidden_dim = round(c1 * expand_ratio)
self.use_res_connect = self.s == 1 and c1 == c2
if expand_ratio == 1:
self.conv = nn.Sequential(
# dw
nn.Conv2d(hidden_dim, hidden_dim, 3, s, 1, groups=hidden_dim, bias=False),
nn.BatchNorm2d(hidden_dim),
nn.ReLU6(inplace=True),
# pw-linear
nn.Conv2d(hidden_dim, c2, 1, 1, 0, bias=False),
nn.BatchNorm2d(c2),
)
else:
self.conv = nn.Sequential(
# pw
nn.Conv2d(c1, hidden_dim, 1, 1, 0, bias=False),
nn.BatchNorm2d(hidden_dim),
nn.ReLU6(inplace=True),
# dw
nn.Conv2d(hidden_dim, hidden_dim, 3, s, 1, groups=hidden_dim, bias=False),
nn.BatchNorm2d(hidden_dim),
nn.ReLU6(inplace=True),
# pw-linear
nn.Conv2d(hidden_dim, c2, 1, 1, 0, bias=False),
nn.BatchNorm2d(c2),
)
def forward(self, x):
if self.use_res_connect:
return x + self.conv(x)
else:
return self.conv(x)
class PW_Conv(nn.Module):
def __init__(self, c1, c2): # ch_in, ch_out
super(PW_Conv, self).__init__()
self.conv = nn.Conv2d(c1, c2, 1, 1, 0, bias=False)
self.bn = nn.BatchNorm2d(c2)
self.act = nn.ReLU6(inplace=True)
def forward(self, x):
return self.act(self.bn(self.conv(x)))
yolov5的读取模型配置文件的代码(models/yolo.py的parse_model函数)进行修改,使得能够调用到上面的模块,只需修改下面这部分代码:
n = n_ = max(round(n * gd), 1) if n > 1 else n  # depth gain
if m in [nn.Conv2d, Conv, Bottleneck, SPP, DWConv, MixConv2d, Focus, CrossConv, BottleneckCSP, C3, PW_Conv, BottleneckMOB]:
    c1, c2 = ch[f], args[0]
将yolov5s的backbone替换成mobilenetv2,重新建立了一个模型配置文件yolov5-mobilenetV2.yaml
# parameters
nc: 3 # number of classes
depth_multiple: 0.33 # model depth multiple
width_multiple: 0.50 # layer channel multiple
# anchors
anchors:
- [116,90, 156,198, 373,326] # P5/32
- [30,61, 62,45, 59,119] # P4/16
- [10,13, 16,30, 33,23] # P3/8
# YOLOv5 backbone: mobilenet v2
backbone:
# [from, number, module, args]
[[-1, 1, nn.Conv2d, [32, 3, 2]], # 0-P1/2 oup, k, s 640
[-1, 1, BottleneckMOB, [16, 1, 1]], # 1-P2/4 oup, s, t 320
[-1, 2, BottleneckMOB, [24, 2, 6]], # 320
[-1, 1, PW_Conv, [256]], #4 output p3 160
[-1, 3, BottleneckMOB, [32, 2, 6]], # 3-P3/8 160
[-1, 4, BottleneckMOB, [64, 1, 6]], # 5 80
[-1, 1, PW_Conv, [512]], #7 output p4 6 40
[-1, 3, BottleneckMOB, [96, 2, 6]], # 7 80
[-1, 3, BottleneckMOB, [160, 1, 6,]], # 40
[-1, 1, BottleneckMOB, [320, 1, 6,]], # 40
[-1, 1, nn.Conv2d, [1280, 1, 1]], # 40
[-1, 1, SPP, [1024, [5, 9, 13]]], #11 # 40
]
# YOLOv5 head
head:
[[-1, 3, BottleneckCSP, [1024, False]], # 12 40
[-1, 1, Conv, [512, 1, 1]], # 40
[-1, 1, nn.Upsample, [None, 2, 'nearest']], # 40
[[-1, 6], 1, Concat, [1]], # cat backbone P4-7 # 80
[-1, 3, BottleneckCSP, [512, False]], # 16 # 80
[-1, 1, Conv, [256, 1, 1]], # 80
[-1, 1, nn.Upsample, [None, 2, 'nearest']], # 160
[[-1, 3], 1, Concat, [1]], # cat backbone P3-4 160
[-1, 3, BottleneckCSP, [256, False]], # 160
[-1, 1, nn.Conv2d, [na * (nc + 5), 1, 1]], # 21 (P3/8-small) # 160
[-2, 1, Conv, [256, 3, 2]], # 160
[[-1, 17], 1, Concat, [1]], # cat head P4 # 160
[-1, 3, BottleneckCSP, [512, False]], # 160
[-1, 1, nn.Conv2d, [na * (nc + 5), 1, 1]], # 25 (P4/16-medium) # 160
[-2, 1, Conv, [512, 3, 2]], # 160
[[-1, 13], 1, Concat, [1]], # cat head P5-13 # 160
[-1, 3, BottleneckCSP, [1024, False]], # 160
[-1, 1, nn.Conv2d, [na * (nc + 5), 1, 1]], # 29 (P5/32-large) 160
[[21, 25, 29], 1, Detect, [nc, anchors]], # Detect(P5, P4, P3) nc:number class, na:number of anchors
]
train.py: 使用时将网络结构配置参数—cfg修改成 –cfg yolov5-mobilenet.yaml
test3: 加入SE注意力模块
参考1和参考2博客是从yolov5x改的,我是从yolov5s改的
配置文件yolov5s_se.yaml:在backbone最后一层添加了SELayer
[-1, 1, SELayer, [1024, 4]], #10
common.py中添加SELayer
class SELayer(nn.Module):
    def __init__(self, c1, r=16):
        super(SELayer, self).__init__()
        self.avgpool = nn.AdaptiveAvgPool2d(1)
        self.l1 = nn.Linear(c1, c1//r, bias=False)
        self.relu = nn.ReLU(inplace=True)
        self.l2 = nn.Linear(c1//r, c1, bias=False)
        self.sig = nn.Sigmoid()

    def forward(self, x):
        b, c, _, _ = x.size()
        y = self.avgpool(x).view(b, c)
        y = self.l1(y)
        y = self.relu(y)
        y = self.l2(y)
        y = self.sig(y)
        y = y.view(b, c, 1, 1)
        return x * y.expand_as(x)
yolo.py 添加

elif m is SELayer:  # ----------这里是修改的部分-----------
        channel, re = args[0], args[1]
        channel = make_divisible(channel * gw, 8) if channel != no else channel
        args = [channel, re]
train.py: 使用时将网络结构配置参数—cfg修改成 –cfg yolov5s_se.yaml
test4: MobileNetV3(2)ShuffleNetV2(3)
参考YOLOv5-ShuffleNetV2,下载五个yaml文件
1.加入模块代码
models/common.py导入
from torch import Tensor
from typing import Callable, Any, List
ShuffleNetV2和MobileNetV3相关的函数都加入到common.py的底部
# -------------------------------------------------------------------------
# ShuffleNetV2
def channel_shuffle(x: Tensor, groups: int) -> Tensor:
    batchsize, num_channels, height, width = x.size()
    channels_per_group = num_channels // groups

    # reshape
    x = x.view(batchsize, groups,
               channels_per_group, height, width)

    x = torch.transpose(x, 1, 2).contiguous()

    # flatten
    x = x.view(batchsize, -1, height, width)

    return x


class conv_bn_relu_maxpool(nn.Module):
    def __init__(self, c1, c2):  # ch_in, ch_out
        super(conv_bn_relu_maxpool, self).__init__()
        self.conv = nn.Sequential(
            nn.Conv2d(c1, c2, kernel_size=3, stride=2, padding=1, bias=False),
            nn.BatchNorm2d(c2),
            nn.ReLU(inplace=True),
        )
        self.maxpool = nn.MaxPool2d(kernel_size=3, stride=2, padding=1, dilation=1, ceil_mode=False)

    def forward(self, x):
        return self.maxpool(self.conv(x))


class ShuffleNetV2_InvertedResidual(nn.Module):
    def __init__(
            self,
            inp: int,
            oup: int,
            stride: int
    ) -> None:
        super(ShuffleNetV2_InvertedResidual, self).__init__()

        if not (1 <= stride <= 3):
            raise ValueError('illegal stride value')
        self.stride = stride

        branch_features = oup // 2
        assert (self.stride != 1) or (inp == branch_features << 1)

        if self.stride > 1:
            self.branch1 = nn.Sequential(
                self.depthwise_conv(inp, inp, kernel_size=3, stride=self.stride, padding=1),
                nn.BatchNorm2d(inp),
                nn.Conv2d(inp, branch_features, kernel_size=1, stride=1, padding=0, bias=False),
                nn.BatchNorm2d(branch_features),
                nn.ReLU(inplace=True),
            )
        else:
            self.branch1 = nn.Sequential()

        self.branch2 = nn.Sequential(
            nn.Conv2d(inp if (self.stride > 1) else branch_features,
                      branch_features, kernel_size=1, stride=1, padding=0, bias=False),
            nn.BatchNorm2d(branch_features),
            nn.ReLU(inplace=True),
            self.depthwise_conv(branch_features, branch_features, kernel_size=3, stride=self.stride, padding=1),
            nn.BatchNorm2d(branch_features),
            nn.Conv2d(branch_features, branch_features, kernel_size=1, stride=1, padding=0, bias=False),
            nn.BatchNorm2d(branch_features),
            nn.ReLU(inplace=True),
        )

    @staticmethod
    def depthwise_conv(
            i: int,
            o: int,
            kernel_size: int,
            stride: int = 1,
            padding: int = 0,
            bias: bool = False
    ) -> nn.Conv2d:
        return nn.Conv2d(i, o, kernel_size, stride, padding, bias=bias, groups=i)

    def forward(self, x: Tensor) -> Tensor:
        if self.stride == 1:
            x1, x2 = x.chunk(2, dim=1)
            out = torch.cat((x1, self.branch2(x2)), dim=1)
        else:
            out = torch.cat((self.branch1(x), self.branch2(x)), dim=1)

        out = channel_shuffle(out, 2)

        return out


# -------------------------------------------------------------------------
# Pelee: A Real-Time Object Detection System onMobileDevices

class StemBlock(nn.Module):
    def __init__(self, c1, c2, k=3, s=2, p=None, g=1, act=True):
        super(StemBlock, self).__init__()
        self.stem_1 = Conv(c1, c2, k, s, p, g, act)
        self.stem_2a = Conv(c2, c2 // 2, 1, 1, 0)
        self.stem_2b = Conv(c2 // 2, c2, 3, 2, 1)
        self.stem_2p = nn.MaxPool2d(kernel_size=2, stride=2, ceil_mode=True)
        self.stem_3 = Conv(c2 * 2, c2, 1, 1, 0)

    def forward(self, x):
        stem_1_out = self.stem_1(x)
        stem_2a_out = self.stem_2a(stem_1_out)
        stem_2b_out = self.stem_2b(stem_2a_out)
        stem_2p_out = self.stem_2p(stem_1_out)
        out = self.stem_3(torch.cat((stem_2b_out, stem_2p_out), 1))
        return out


# -------------------------------------------------------------------------


# MobileNetV3

class h_sigmoid(nn.Module):
    def __init__(self, inplace=True):
        super(h_sigmoid, self).__init__()
        self.relu = nn.ReLU6(inplace=inplace)

    def forward(self, x):
        return self.relu(x + 3) / 6


class h_swish(nn.Module):
    def __init__(self, inplace=True):
        super(h_swish, self).__init__()
        self.sigmoid = h_sigmoid(inplace=inplace)

    def forward(self, x):
        y = self.sigmoid(x)
        return x * y


class SELayer(nn.Module):
    def __init__(self, channel, reduction=4):
        super(SELayer, self).__init__()
        self.avg_pool = nn.AdaptiveAvgPool2d(1)
        self.fc = nn.Sequential(
            nn.Linear(channel, channel // reduction),
            nn.ReLU(inplace=True),
            nn.Linear(channel // reduction, channel),
            h_sigmoid()
        )

    def forward(self, x):
        b, c, _, _ = x.size()
        y = self.avg_pool(x)
        y = y.view(b, c)
        y = self.fc(y).view(b, c, 1, 1)
        return x * y


class conv_bn_hswish(nn.Module):
    """
    This equals to
    def conv_3x3_bn(inp, oup, stride):
        return nn.Sequential(
            nn.Conv2d(inp, oup, 3, stride, 1, bias=False),
            nn.BatchNorm2d(oup),
            h_swish()
        )
    """

    def __init__(self, c1, c2, stride):
        super(conv_bn_hswish, self).__init__()
        self.conv = nn.Conv2d(c1, c2, 3, stride, 1, bias=False)
        self.bn = nn.BatchNorm2d(c2)
        self.act = h_swish()

    def forward(self, x):
        return self.act(self.bn(self.conv(x)))

    def fuseforward(self, x):
        return self.act(self.conv(x))


class MobileNetV3_InvertedResidual(nn.Module):
    def __init__(self, inp, oup, hidden_dim, kernel_size, stride, use_se, use_hs):
        super(MobileNetV3_InvertedResidual, self).__init__()
        assert stride in [1, 2]

        self.identity = stride == 1 and inp == oup

        if inp == hidden_dim:
            self.conv = nn.Sequential(
                # dw
                nn.Conv2d(hidden_dim, hidden_dim, kernel_size, stride, (kernel_size - 1) // 2, groups=hidden_dim,
                          bias=False),
                nn.BatchNorm2d(hidden_dim),
                h_swish() if use_hs else nn.ReLU(inplace=True),
                # Squeeze-and-Excite
                SELayer(hidden_dim) if use_se else nn.Sequential(),
                # pw-linear
                nn.Conv2d(hidden_dim, oup, 1, 1, 0, bias=False),
                nn.BatchNorm2d(oup),
            )
        else:
            self.conv = nn.Sequential(
                # pw
                nn.Conv2d(inp, hidden_dim, 1, 1, 0, bias=False),
                nn.BatchNorm2d(hidden_dim),
                h_swish() if use_hs else nn.ReLU(inplace=True),
                # dw
                nn.Conv2d(hidden_dim, hidden_dim, kernel_size, stride, (kernel_size - 1) // 2, groups=hidden_dim,
                          bias=False),
                nn.BatchNorm2d(hidden_dim),
                # Squeeze-and-Excite
                SELayer(hidden_dim) if use_se else nn.Sequential(),
                h_swish() if use_hs else nn.ReLU(inplace=True),
                # pw-linear
                nn.Conv2d(hidden_dim, oup, 1, 1, 0, bias=False),
                nn.BatchNorm2d(oup),
            )

    def forward(self, x):
        y = self.conv(x)
        if self.identity:
            return x + y
        else:
            return y
2.更改解析模块,告诉YOLOv5,加入了InvertedResidual模块
265行左右
        if m in [Conv, GhostConv, Bottleneck, GhostBottleneck, SPP, SPPF, DWConv, MixConv2d, Focus, CrossConv,
                 BottleneckCSP, C3, C3TR, C3SPP, C3Ghost, ShuffleNetV2_InvertedResidual, StemBlock,
                 conv_bn_relu_maxpool, conv_bn_relu_maxpool, conv_bn_hswish, MobileNetV3_InvertedResidual]:
3.配置
目录models下粘贴下载好的yaml文件,改参数(配置的参数说明)
train.py修改cfg
exp:MobileNetV3 Small
test5: Facal Loss 改为 VFLoss
VariFocalNet
util/loss.py
替换ComputeLoss中的FL
class VFLoss(nn.Module):
    def __init__(self, loss_fcn, gamma=1.5, alpha=0.25):
        super(VFLoss, self).__init__()
        # 传递 nn.BCEWithLogitsLoss() 损失函数  must be nn.BCEWithLogitsLoss()
        self.loss_fcn = loss_fcn  #
        self.gamma = gamma
        self.alpha = alpha
        self.reduction = loss_fcn.reduction
        self.loss_fcn.reduction = 'mean'  # required to apply VFL to each element

    def forward(self, pred, true):

        loss = self.loss_fcn(pred, true)

        pred_prob = torch.sigmoid(pred)  # prob from logits

        focal_weight = true * (true > 0.0).float() + self.alpha * (pred_prob - true).abs().pow(self.gamma) * (true <= 0.0).float()
        loss *= focal_weight

        if self.reduction == 'mean':
            return loss.mean()
        elif self.reduction == 'sum':
            return loss.sum()
        else:
            return loss
test6: v6.0内置 TRANSFORMERS 训练
TRANSFORMERS论文
test7: CBAM模块添加(cbam,bifpn,carafe,bot(CTR3),cooratt,involution)
作用:帮助网络在区域覆盖范围大的图像中找到感兴趣的区域参考。
参考 ASFFV5和CBAM模块添加 (CBAM) 和 代码 。
这个代码作者还改了bottleneckCSP的LeakyRELU为SILU,common.py209-210行。SILU效果相对好一点
asffv5在head最后detect,Detect可以改为ASFF_Detect,现在测试运行不了,没有使用
involution不能运行//11.6可以运行
Coordinate Attention注意力机制(cooratt)目前效果最好
New.改进
bottleneckCSP改进
改动1 bottleneckCSP:lacky relu→silu

数据集太少
三帧帧差法
爬虫
imgaug+天气
更改data/hyps/hyp.scratch.yaml中:mosaic、mixup
针对小目标
yolov5数据强化方法并不是越多越好
data/hyps/hyp.scratch.yaml中:
- mosaic设置为0.小目标非常多,因此不使用mosaic反而会增加模型的训练效果
data/hyps/hyp.finetune.yaml中:
-
scale=0.898改小,0.4或0.5
-
yolov5增加检测层、针对小目标识别
针对样本不均衡问题
-
train.py中的参数设置:有代码解决了这个问题。
根据样本种类分布使用图像调用频率不同的方法解决。
1、将样本中的groundtruth读出来,存为一个列表;
2、统计训练样本列表中不同类别的矩形框个数,然后给每个类别按相应目标框数的倒数赋值,(数目越多的种类权重越小),形成按种类的分布直方图;
3、对于训练数据列表,每个epoch训练按照类别权重筛选出每类的图像作为训练数据,如使用random.choice(population, weights=None, *, cum_weights=None, k=1)更改训练图像索引,可达到样本均衡的效果。 -
utils/loss.py中focalloss解决
在目标检测领域focal loss主要解决的是前景和背景样本不均衡的问题,即是anchor box中背景过多,positive的太少,是解决这个问题的
使用focal loss并没有很好的结果,反而让结果变差了。
训练时 样本类别不均衡2
针对复杂背景问题
添加注意力机制 参考test8,SE、CBAM、CA
else
yolov5添加注意力机制–以EPSA为例
损失函数的改进
yolov5软剪枝(一):模型代码重构,(二),(三)
卷积层和BN层的融合
旋转目标
专栏
理论:目标检测 YOLOv5 - 如何提高模型的指标,提高精确率,召回率,mAP等.数据集、AI
错误较多:
垂直旋转的增强,损失修改了置信度的赋值,所有类别参与NMS
PANet层改为BiFPN
YoloV5 + deepsort + Fast-ReID 完整行人重识别系统
YOLO-Fastest训练自己的数据
姿态估计
yolov5 + 姿态估计
AlphaPose推理demo复现
AlphaPose_yolov5复现
AlphaPose_yolov4推理demo复现
谷歌极速人脸、手、人体姿态分析Blaze算法家族 知乎
项目主页
BlazePose: On-device Real-time Body Pose tracking
CVPRW 2020 论文 code
qt界面
用 pyqt5给深度学习目标检测+跟踪(yolov3+siamrpn)搭建界面(3)
YOLOv5检测界面-PyQt5实现
Pyqt搭建YOLOV5目标检测界面
使用PyQt5为YoloV5添加界面(一)
基于MobileNet-v3和YOLOv5的餐饮有害虫鼠识别及防治系统的设计与实现
pip install pyQt5 -i https://pypi.tuna.tsinghua.edu.cn/simple

pip install pyqt5-tools  -i https://pypi.tuna.tsinghua.edu.cn/simple






![[C++ 网络协议] 异步通知I/O模型](https://img-blog.csdnimg.cn/6107f8eecc204eedb99d161d0d3d838e.png)

