文章目录
- 前言
- 队列的概念
- 队列的结构
- 队列的实现
- 结构设计
- 接口总览
- 初始化
- 销毁
- 入队列
- 出队列
- 取对头数据
- 取队尾数据
- 判空
- 计算队列大小
- OJ题
- 用队列实现栈
- 用栈实现队列
- 设计循环队列
- 结语
前言
今天的内容分为两大块:队列讲解 和 OJ题。队列讲解部分内容为:队列概念,结构的简述、C语言实现队列;OJ题部分内容为三道结构较复杂且代码量较多的题,分别为:用队列实现栈、用栈实现队列、设计循环队列。话不多说,我们这就开始。
队列的概念
队列 和栈一样,是一个 特殊的线性表。
队列只允许在一端进行插入数据操作,在另一端进行删除数据操作的特殊线性表。进行 插入操作 的一端称为 队尾,进行 删除操作 的一端称为队头。
队列中的元素遵守 先进先出(First In First Out) 的原则。就和排队一样,队列是绝对公平的,先来的先到队头,不存在插队行为,只能后面排队,前面离开。

队列的结构
队列的结构可以用 数组 或 链表 来实现。哪个结构更好?
数组:
数组左边为队头右边为队尾:队尾(右)插入数据 为 顺序表尾插 很方便,但是 队头(左)删除数据 需要挪动数据,很麻烦。
数组左边为队尾右边为队头:队头(右)删除数据 为尾删,队尾(左)插入数据 需要挪动数据,也很麻烦。
所以 数组结构 并不适合队列。
链表:
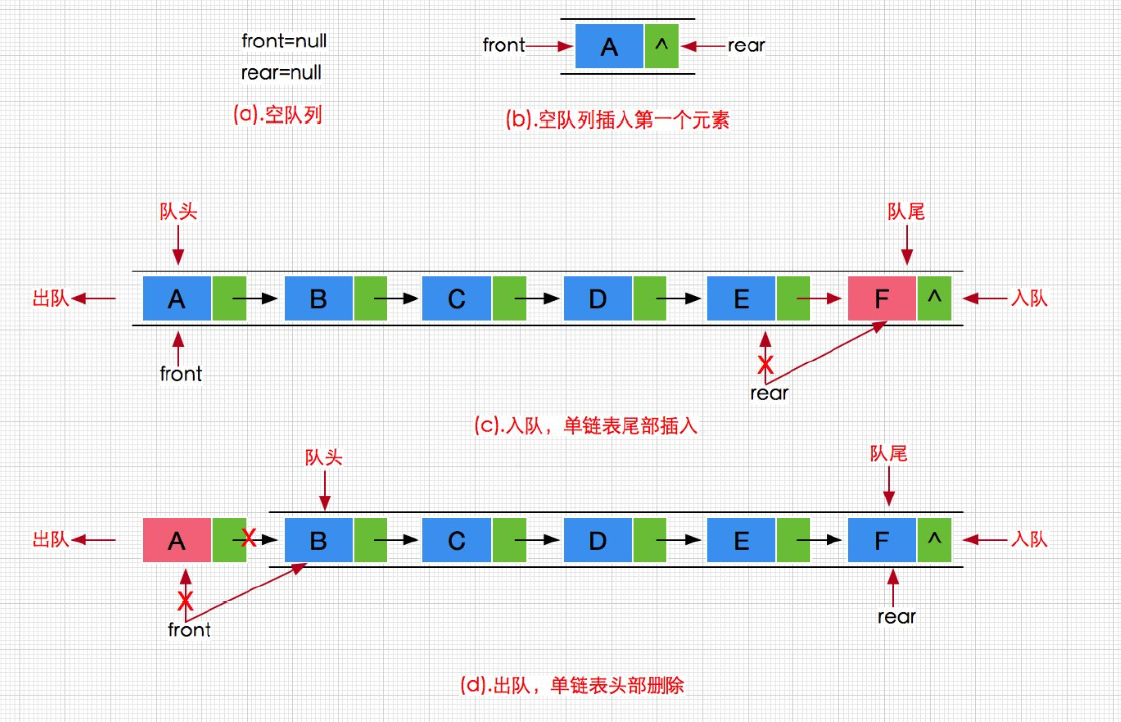
结构选择:单/双 循环/非循环 带头/不带头
带不带头?可要可不要,带头就是方便尾插,少一层判断,没什么影响。
双向吗?没必要找前一个元素,队列只需要队头队尾出入数据。
循环吗?价值不大。双向循环可以找尾,但是没有必要。
可以使用双向链表,但是没必要,小题大做了,使用单链表就可以。
队列的实现
结构设计
上面确定了用 单链表实现,所以就一定要有结构体表示 节点:
typedef struct QueueNode
{
	QDataType data;
	struct QueueNode* next;
}QNode;
由于链表的尾插比较麻烦,而队列的入数据为尾插。所以定义队列的结构体时,可以定义两个指针 head 和 tail 分别对应 队头 和 队尾 ,tail 的引入就是方便尾插再在给定一个 sz 实时记录队列的大小。
typedef struct Queue
{
	QNode* head;
	QNode* tail;
	int sz;
}Queue;
接口总览
void QueueInit(Queue* pq); // 初始化
void QueueDestroy(Queue* pq); // 销毁
void QueuePush(Queue* pq, QDataType x); // 入队列
void QueuePop(Queue* pq); // 出队列
QDataType QueueFront(Queue* pq); // 取队头元素
QDataType QueueBack(Queue* pq); // 取队尾元素
bool QueueEmpty(Queue* pq); // 判空
int QueueSize(Queue* pq); // 计算队列大小
初始化
队列初始化,就只需要结构中指针初始化为 NULL,并将 sz 初始化为0。
void QueueInit(Queue* pq)
{
	assert(pq);

	pq->head = pq->tail = NULL;
	pq->sz = 0;
}
这里我是通过结构体的地址来找到结构体中的两个指针,通过结构体来改变指针的。
销毁
我们实现的队列结构为 链式 的,所以本质为一条 单链表。
那么销毁时,就需要迭代销毁链表的节点。
void QueueDestroy(Queue* pq)
{
	assert(pq);

	QNode* cur = pq->head;

	while (cur)
	{
		QNode* next = cur->next;
		free(cur);
		cur = next;
	}

	pq->head = pq->tail = NULL;
	pq->sz = 0;
}
入队列
对于单链表的尾插,需要创建节点,找尾,然后链接。
但是我们设计队列结构时,给定了一个 tail 作为队尾,这时插入就比较方便了。但是需要注意一下 第一次尾插 的情况。
在 入队列 之后,记得调整 sz。
而且队列只会从队尾入数据,所以创建节点的一步,并没有必要封装一个接口专门调用,直接在函数中创建即可。
void QueuePush(Queue* pq, QDataType x)
{
	assert(pq);

	QNode* newnode = (QNode*)malloc(sizeof(QNode));
	if (newnode == NULL)
	{
		perror("malloc fail");
		exit(-1);
	}
	else
	{
		newnode->data = x;
		newnode->next = NULL;
	}

	// 尾插
	if (pq->tail == NULL)
	{
		pq->head = pq->tail = newnode;
	}
	else
	{
		pq->tail->next = newnode;
		pq->tail = pq->tail->next;
	}

	pq->sz++;
}
出队列
首先明确,队列为空不能出队列,出队列是从 队头 出数据。
其次,需要考虑删除时会不会有什么特殊情况。
一般删除时,可以记录 head 的下一个节点,然后释放 head ,再重新为 head 赋值。
但是,当 只有一个节点 呢?此刻 head == tail,它们的地址相同,如果此时仅仅释放了 head,最后head走到 NULL,但是tail 此刻指向被释放的节点,且没有置空,此刻风险就产生了。
之后一旦我 入队列 时,tail != NULL,那么必定就会走到 else 部分,对 tail 进行访问,此刻程序就会奔溃,所以需要处理一下,将 tail 也置空。
同样的,出队列 成功后 sz 需要发生调整。
void QueuePop(Queue* pq)
{
	assert(pq);

	assert(!QueueEmpty(pq));
	// 一个节点时删除的特殊情况
	// 需要将头尾都变为空
	if (pq->head->next == NULL)
	{
		free(pq->head);
		pq->head = pq->tail = NULL;
	}
	else
	{
		QNode* newhead = pq->head->next;
		free(pq->head);
		pq->head = newhead;
	}

	pq->sz--;
}
取对头数据
队列非空,取 head 出数据
QDataType QueueFront(Queue* pq)
{
	assert(pq);
	assert(!QueueEmpty(pq));

	return pq->head->data;
}
取队尾数据
队列非空,取 tail 处数据。
QDataType QueueBack(Queue* pq)
{
	assert(pq);
	assert(!QueueEmpty(pq));

	return pq->tail->data;
}
判空
当 head 和 tail 都为空指针时,说明队列中无元素。
bool QueueEmpty(Queue* pq)
{
	assert(pq);

	return pq->head == NULL && pq->tail == NULL;
}
计算队列大小
从这个接口处,就可以看出我们设计结构时,设计的还是很精妙的,因为有 sz 直接返回即可。
int QueueSize(Queue* pq)
{
	assert(pq);

	return pq->sz;
}
试想一下,如果没有这个 sz,我们如何计算队列大小?是不是又得遍历链表了?这样接口的时间复杂度就为O(N),而其他接口几乎都是O(1)的复杂度,是不是不太理想?所以结构设计时加上一个 sz 的效果是极好的!
下面贴上没有 sz 时的代码:
int QueueSize(Queue* pq)
{
	assert(pq);

	QNode* cur = pq->head;
	int size = 0;
	while (cur)
	{
		cur = cur->next;
		++size;
	}
	return size;
}
OJ题
用队列实现栈
链接:225. 用队列实现栈
描述:
请你仅使用两个队列实现一个后入先出(LIFO)的栈,并支持普通栈的全部四种操作(push、top、pop 和 empty)。
实现 MyStack 类:
- void push(int x) 将元素 x 压入栈顶。
- int pop() 移除并返回栈顶元素。
- int top() 返回栈顶元素。
- boolean empty() 如果栈是空的,返回 true ;否则,返回 false 。
注意:
- 你只能使用队列的基本操作 —— 也就是 push to back、peek/pop from front、size 和 is empty 这些操作。
- 你所使用的语言也许不支持队列。 你可以使用 list (列表)或者 deque(双端队列)来模拟一个队列 , 只要是标准的队列操作即可。
示例:
输入:
[“MyStack”, “push”, “push”, “top”, “pop”, “empty”]
[[], [1], [2], [], [], []]
输出:
[null, null, null, 2, 2, false]解释:
MyStack myStack = new MyStack();
myStack.push(1);
myStack.push(2);
myStack.top(); // 返回 2
myStack.pop(); // 返回 2
myStack.empty(); // 返回 False
提示:
1 <= x <= 9- 最多调用
100次push、pop、top和empty - 每次调用
pop和top都保证栈不为空
思路:
队列 是 先进先出,栈 是 后进先出,要用队列实现栈,那么就要使用两个队列完成后进先出的操作。
栈的结构设计就是两个队列 q1、q2。
而实现栈,我们的重点就在于 后进先出。
那么可以使用这样的思想:
我们需要时刻需要保持一个队列为空。
入数据时,往不为空的队列入数据,如果两个队列都为空,则入任意一个。
出数据时,将不为空的队列中的元素转移到空队列中直到队列中元素只剩一个,出栈原先非空队列的数据,原先非空队列变为空,出栈数据就是模拟栈的栈顶数据。
其他接口的实现相对比较简单,走读代码就可以看懂。

typedef int QDataType;

typedef struct QueueNode
{
	QDataType data;
	struct QueueNode* next;
}QNode;

typedef struct Queue
{
	QNode* head;
	QNode* tail;
	int sz;
}Queue;

void QueueInit(Queue* pq);
void QueueDestroy(Queue* pq);
void QueuePush(Queue* pq, QDataType x);
void QueuePop(Queue* pq);
QDataType QueueFront(Queue* pq);
QDataType QueueBack(Queue* pq);
bool QueueEmpty(Queue* pq);
int QueueSize(Queue* pq);

void QueueInit(Queue* pq)
{
	assert(pq);

	pq->head = NULL;
    pq->tail = NULL;
	pq->sz = 0;
}

void QueueDestroy(Queue* pq)
{
	assert(pq);

	QNode* cur = pq->head;

	while (cur)
	{
		QNode* next = cur->next;
		free(cur);
		cur = next;
	}

	pq->head = pq->tail = NULL;
	pq->sz = 0;
}

// 尾插
void QueuePush(Queue* pq, QDataType x)
{
	assert(pq);

	QNode* newnode = (QNode*)malloc(sizeof(QNode));
	if (newnode == NULL)
	{
		perror("malloc fail");
		exit(-1);
	}
	else
	{
		newnode->data = x;
		newnode->next = NULL;
	}

	// 尾插
	if (pq->tail == NULL)
	{
		pq->head = pq->tail = newnode;
	}
	else
	{
		pq->tail->next = newnode;
		pq->tail = newnode;
	}

	pq->sz++;
}

void QueuePop(Queue* pq)
{
	assert(pq);

	assert(!QueueEmpty(pq));
	// 一个节点时删除的特殊情况
	// 需要将头尾都变为空
	if (pq->head->next == NULL)
	{
		free(pq->head);
		pq->head = pq->tail = NULL;
	}
	else
	{
		QNode* del = pq->head;
		pq->head = pq->head->next;
        free(del);
	}

	pq->sz--;
}

QDataType QueueFront(Queue* pq)
{
	assert(pq);
	assert(!QueueEmpty(pq));

	return pq->head->data;
}

QDataType QueueBack(Queue* pq)
{
	assert(pq);
	assert(!QueueEmpty(pq));

	return pq->tail->data;
}

bool QueueEmpty(Queue* pq)
{
	assert(pq);

	return pq->head == NULL && pq->tail == NULL;
}

int QueueSize(Queue* pq)
{
	assert(pq);

	/*QNode* cur = pq->head;
	int size = 0;
	while (cur)
	{
		cur = cur->next;
		++size;
	}
	return size;*/

	return pq->sz;
}

// ------------------------上方为队列实现---------------------------

typedef struct
{
    Queue q1;
    Queue q2;
} MyStack;


MyStack* myStackCreate()
{
    MyStack* obj = (MyStack*)malloc(sizeof(MyStack));
    QueueInit(&obj->q1);
    QueueInit(&obj->q2);

    return obj;
}

void myStackPush(MyStack* obj, int x)
{
    if (!QueueEmpty(&obj->q1))
        QueuePush(&obj->q1, x);
    else
        QueuePush(&obj->q2, x);
}

int myStackPop(MyStack* obj)
{
    QNode* empty = &obj->q1;
    QNode* unempty = &obj->q2;
    if (!QueueEmpty(&obj->q1))
    {
        unempty = &obj->q1;
        empty = &obj->q2;
    }
    while (QueueSize(unempty) > 1)
    {
        QueuePush(empty, QueueFront(unempty));
        QueuePop(unempty);
    }
    int top = QueueFront(unempty);
    QueuePop(unempty);
    return top;
}

int myStackTop(MyStack* obj)
{
    if (!QueueEmpty(&obj->q1))
        return QueueBack(&obj->q1);
    else
        return QueueBack(&obj->q2);
}

bool myStackEmpty(MyStack* obj)
{
    return QueueEmpty(&obj->q1) && QueueEmpty(&obj->q2);
}

void myStackFree(MyStack* obj)
{
    QueueDestroy(&obj->q1);
    QueueDestroy(&obj->q2);
    free(obj);
}
用栈实现队列
链接:232. 用栈实现队列
描述:
请你仅使用两个栈实现先入先出队列。队列应当支持一般队列支持的所有操作(push、pop、peek、empty):
实现 MyQueue 类:
- void push(int x) 将元素 x 推到队列的末尾
- int pop() 从队列的开头移除并返回元素
- int peek() 返回队列开头的元素
- boolean empty() 如果队列为空,返回 true ;否则,返回 false
说明:
- 你 只能 使用标准的栈操作 —— 也就是只有 push to top, peek/pop from top, size, 和 is empty 操作是合法的。
- 你所使用的语言也许不支持栈。你可以使用 list 或者 deque(双端队列)来模拟一个栈,只要是标准的栈操作即可。
示例1:
输入:
[“MyQueue”, “push”, “push”, “peek”, “pop”, “empty”]
[[], [1], [2], [], [], []]
输出:
[null, null, null, 1, 1, false]解释:
MyQueue myQueue = new MyQueue();
myQueue.push(1); // queue is: [1]
myQueue.push(2); // queue is: [1, 2] (leftmost is front of the queue)
myQueue.peek(); // return 1
myQueue.pop(); // return 1, queue is [2]
myQueue.empty(); // return false
提示:
- 1 <= x <= 9
- 最多调用 100 次 push、pop、peek 和 empty
- 假设所有操作都是有效的 (例如,一个空的队列不会调用 pop 或者 peek 操作)
思路:
队列 要求先进先出,而 栈 为后进先出。
我们将队列的结构设定为两个栈,接下来思考该如何实现操作?
我们先看看这个操作可不可行。我们把两个栈分别叫做 st1 和 st2。假设 st1 中有数据,出队列时,就把 st1 中数据转移到 st2中,直到 st1 中数据只剩一个,然后将 st1 中数据出掉,这样可行;但是入队列呢?队列要求先进先出,那么肯定不能往 st2 中入数据,因为这样会改变出队列顺序。那么就需要把 st2 中数据导回 st1 中,再入数据,然后出栈时,再重复之前的操作。
这样是不是太麻烦了?有没有更好的办法?
我们把两个栈分别叫做 pushST 和 popST。
当入队列时,就把数据入到 pushST 中。
当出队列时,如果 popST 中无数据,就把 pushST 中元素导入 popST 中,出栈;如果有数据则直接出栈。
这样就保证了入队列数据在 pushST 中,只要出队列,那么就把元素全部导入 popST 中出掉,栈在出数据时会改变顺序,恰好就对应了队列的规律。
这样也不必来回转移数据,轻松多了。

typedef int STDatatype;

typedef struct Stack
{
	STDatatype* a;
	int capacity;
	int top;   // 初始为0,表示栈顶位置下一个位置下标
}ST;

void StackInit(ST* ps);
void StackDestroy(ST* ps);
void StackPush(ST* ps, STDatatype x);
void StackPop(ST* ps);
STDatatype StackTop(ST* ps);

bool StackEmpty(ST* ps);
int StackSize(ST* ps);

void StackInit(ST* ps)
{
	assert(ps);
	ps->a = (STDatatype*)malloc(sizeof(STDatatype) * 4);
	if (ps->a == NULL)
	{
		perror("malloc fail");
		exit(-1);
	}
	ps->capacity = 4;
	ps->top = 0;
}

void StackDestroy(ST* ps)
{
	assert(ps);
	free(ps->a);
	ps->a = NULL;
	ps->capacity = ps->top = 0;
}

void StackPush(ST* ps, STDatatype x)
{
	assert(ps);
	if (ps->top == ps->capacity)
	{
		STDatatype* tmp = (STDatatype*)realloc(ps->a, sizeof(STDatatype) * ps->capacity * 2);
		if (tmp == NULL)
		{
			perror("realloc fail");
			exit(-1);
		}
		ps->a = tmp;
		ps->capacity *= 2;
	}
	ps->a[ps->top++] = x;
}

void StackPop(ST* ps)
{
	assert(ps);
	assert(!StackEmpty(ps));
	ps->top--;
}

STDatatype StackTop(ST* ps)
{
	assert(ps);
	assert(!StackEmpty(ps));
	return ps->a[ps->top - 1];
}

bool StackEmpty(ST* ps)
{
	assert(ps);
	return ps->top == 0;
}

int StackSize(ST* ps)
{
	assert(ps);
	return ps->top;
}

typedef struct
{
    ST pushST;
    ST popST;
} MyQueue;


MyQueue* myQueueCreate()
{
    MyQueue* queue = (MyQueue*)malloc(sizeof(MyQueue));
    StackInit(&queue->pushST);
    StackInit(&queue->popST);

    return queue;
}

void myQueuePush(MyQueue* obj, int x)
{
    assert(obj);

    StackPush(&obj->pushST, x);
}

// 声明
bool myQueueEmpty(MyQueue* obj);
int myQueuePeek(MyQueue* obj);

int myQueuePop(MyQueue* obj)
{
    assert(obj);
    assert(!myQueueEmpty(obj));

    int peek = myQueuePeek(obj);
    StackPop(&obj->popST);

    return peek;
}

// 返回队头元素
int myQueuePeek(MyQueue* obj)
{
    assert(obj);

    assert(!myQueueEmpty(obj));

    if (StackEmpty(&obj->popST))
    {
        while (!StackEmpty(&obj->pushST))
        {
            // 将元素全部倒入 popST 中
            int pushEle = StackTop(&obj->pushST);
            StackPush(&obj->popST, pushEle);
            // 出栈 pushST 中元素
            StackPop(&obj->pushST);
        }
    }
    // 出栈popST的第一个元素
    int peek = StackTop(&obj->popST);

    return peek;
}

bool myQueueEmpty(MyQueue* obj)
{
    assert(obj);

    return StackEmpty(&obj->pushST) && StackEmpty(&obj->popST);
}

void myQueueFree(MyQueue* obj)
{
    assert(obj);

    StackDestroy(&obj->pushST);
    StackDestroy(&obj->popST);
    free(obj);
}
设计循环队列
链接:622. 设计循环队列
描述:
设计你的循环队列实现。 循环队列是一种线性数据结构,其操作表现基于 FIFO(先进先出)原则并且队尾被连接在队首之后以形成一个循环。它也被称为“环形缓冲器”。
循环队列的一个好处是我们可以利用这个队列之前用过的空间。在一个普通队列里,一旦一个队列满了,我们就不能插入下一个元素,即使在队列前面仍有空间。但是使用循环队列,我们能使用这些空间去存储新的值。
你的实现应该支持如下操作:
- MyCircularQueue(k): 构造器,设置队列长度为 k 。
- Front: 从队首获取元素。如果队列为空,返回 -1 。
- Rear: 获取队尾元素。如果队列为空,返回 -1 。
- enQueue(value): 向循环队列插入一个元素。如果成功插入则返回真。
- deQueue(): 从循环队列中删除一个元素。如果成功删除则返回真。
- isEmpty(): 检查循环队列是否为空。
- isFull(): 检查循环队列是否已满。
示例:
MyCircularQueue circularQueue = new MyCircularQueue(3); // 设置长度为 3
circularQueue.enQueue(1); // 返回 true
circularQueue.enQueue(2); // 返回 true
circularQueue.enQueue(3); // 返回 true
circularQueue.enQueue(4); // 返回 false,队列已满
circularQueue.Rear(); // 返回 3
circularQueue.isFull(); // 返回 true
circularQueue.deQueue(); // 返回 true
circularQueue.enQueue(4); // 返回 true
circularQueue.Rear(); // 返回 4
提示:
- 所有的值都在 0 至 1000 的范围内;
- 操作数将在 1 至 1000 的范围内;
- 请不要使用内置的队列库。
思路:
在本题中,循环队列的大小是固定的,可重复利用之前的空间。
那么接下来,就开始分析结构。
题目给定循环队列的大小为 k ,不论数组和链表,构建的大小为 k ,可行吗?
给定 front 和 rear 为0,front 标识队头,rear 标识队尾的下一个数据的位置,每当 入数据, rear++,向后走。
由于是循环队列,空间可以重复利用,当放置完最后一个数据后,rear需要回到头部。
那么问题来了,如何判空和判满 ?无论队列空或满,front 和 rear 都在一个位置。
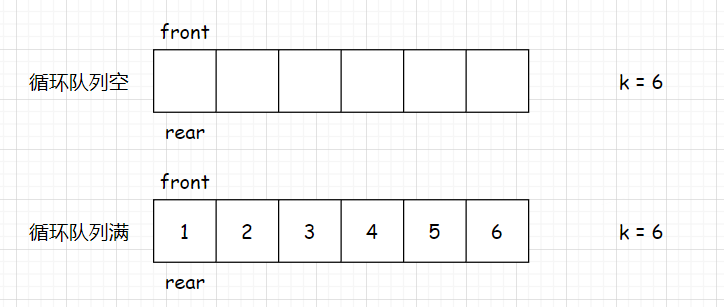
所以,需要加以改进。
解决方法有二:
- 结构设计时,多加一个
size,标识队列数据个数。 - 创建队列时,额外创建一个空间。
这里我们讲一下 方案二 :
数组:
对于数组,那么我们就开上 k + 1 个空间。
front 和 rear 分别标识队头和队尾。
每当入数据,rear 向后走一步,front 不动;每当出数据,front 向后走一步,rear 不动。当走过下标 k 处后,front 和 rear 的位置需要加以调整。比如,rear 下一步应该走到第一个空间:下标0位置。
队列空 时,front == rear。
队列满 时, rear 的下一个位置是 front 。平常只需要看 rear + 1 是否等于 front 即可。但是 放置的元素在 k 下标处时,此刻的 rear 需要特殊处理,rear 的位置会移动到 0 下标。经公式推导:(rear + 1) % (k + 1) == front 时,队列满,平常状况也不会受到公式影响。
入数据时,在 rear 位置入数据,然后 rear 向后移动,同样的,当入数据时到 k 下标的空间后,rear 需要特殊处理:rear %= k + 1。
出数据时,将 front 向后移动,当出数据到 k 下标的空间后,front 需要特殊处理:front %= k + 1。
取队头数据时,不为空取 front 处元素即可。
取队尾数据时,需要取rear 前一个位置,当队列非空时且 rear 不在 0下标时,直接取前一个;当队列非空且 rear 在 0 位置时,需要推导一下公式,前一个数据的下标为:(rear + k) % (k + 1),两种情况都适用。
其他接口相对比较简单,走读代码就可以。

typedef struct
{
    int* a;
    int front;
    int rear;
    int k;
} MyCircularQueue;


MyCircularQueue* myCircularQueueCreate(int k)
{
    MyCircularQueue* cq = (MyCircularQueue*)malloc(sizeof(MyCircularQueue));
    cq->a = (int*)malloc(sizeof(int) * (k + 1));
    cq->front = cq->rear = 0;
    cq->k = k;
    return cq;
}

bool myCircularQueueIsEmpty(MyCircularQueue* obj)
{
    return obj->front == obj->rear;
}

bool myCircularQueueIsFull(MyCircularQueue* obj)
{
    return (obj->rear + 1) % (obj->k + 1) == obj->front;
}

bool myCircularQueueEnQueue(MyCircularQueue* obj, int value)
{
    if (myCircularQueueIsFull(obj))
        return false;
    obj->a[obj->rear++] = value;
    obj->rear %= (obj->k + 1);
    return true;
}

bool myCircularQueueDeQueue(MyCircularQueue* obj)
{
    if (myCircularQueueIsEmpty(obj))
        return false;
    obj->front++;
    obj->front %= (obj->k + 1);
    return true;
}

int myCircularQueueFront(MyCircularQueue* obj)
{
    if (myCircularQueueIsEmpty(obj))
        return -1;
    else
        return obj->a[obj->front];
}

int myCircularQueueRear(MyCircularQueue* obj)
{
    if (myCircularQueueIsEmpty(obj))
        return -1;
    else
        return obj->a[(obj->rear + obj->k) % (obj->k + 1)];
}

void myCircularQueueFree(MyCircularQueue* obj)
{
    free(obj->a);
    free(obj);
}
链表:
其实对于循环队列而言,使用链表来构建是最清晰的。
当构建链表时,构建的是 k + 1 个节点的 单向循环链表,这个需要注意一下。
front 和 rear 分别标识 队头 和 队尾。
队列空,front == rear 。
队列满,rear 的下一个节点就是 front 节点,rear->next == front。
入数据时,比数组设计简单很多,就直接让 rear 迭代到下一个节点就可以。
出数据时,队列非空时,直接让 front 迭代到下一个节点。
取队头元素时,如果非空,直接取 front 节点处的值。
取队尾元素时,如果非空,则从头开始迭代到rear 的前一个节点,取出元素。
这里的销毁需要注意一下!!!由于链表不带头,所以销毁的时候可以从第二个节点开始迭代销毁,然后销毁第一个节点,最后销毁队列本身。这里比较细节,过会可以看一下代码。
typedef struct  CQNode
{
    struct CQNode* next;
    int data;
}CQNode;

typedef struct
{
    CQNode* front;
    CQNode* rear;
} MyCircularQueue;
bool myCircularQueueIsEmpty(MyCircularQueue* obj);
bool myCircularQueueIsFull(MyCircularQueue* obj);
// 创建节点
CQNode* BuyNode()
{
    CQNode* newnode = (CQNode*)malloc(sizeof(CQNode));
    newnode->next = NULL;

    return newnode;
}

MyCircularQueue* myCircularQueueCreate(int k)
{
    // 构建长度 k + 1 的单向循环链表
    // 多开一个空间,防止边界问题
    CQNode* head = NULL, *tail = NULL;
    int len = k + 1;
    while (len--)
    {
        CQNode* newnode = BuyNode();
        if (tail == NULL)
        {
            head = tail = newnode;
        }
        else
        {
            tail->next = newnode;
            tail = newnode;
        }
        tail->next = head;
    }
    MyCircularQueue* cq = (MyCircularQueue*)malloc(sizeof(MyCircularQueue));
    cq->front = cq->rear = head;
    return cq;
}

bool myCircularQueueEnQueue(MyCircularQueue* obj, int value)
{
    if (myCircularQueueIsFull(obj))
        return false;
    // 直接插入在rear位置,rear后移
    obj->rear->data = value;
    obj->rear = obj->rear->next;
    return true;
}

bool myCircularQueueDeQueue(MyCircularQueue* obj)
{
    if (myCircularQueueIsEmpty(obj))
        return false;
    obj->front = obj->front->next;
    return true;
}

int myCircularQueueFront(MyCircularQueue* obj)
{
    if (myCircularQueueIsEmpty(obj))
        return -1;
    return obj->front->data;
}

int myCircularQueueRear(MyCircularQueue* obj)
{
    if (myCircularQueueIsEmpty(obj))
        return -1;
    // 取rear前一个元素
    CQNode* cur = obj->front;
    while (cur->next != obj->rear)
    {
        cur = cur->next;
    }
    return cur->data;
}

bool myCircularQueueIsEmpty(MyCircularQueue* obj)
{
    return obj->front == obj->rear;
}

bool myCircularQueueIsFull(MyCircularQueue* obj)
{
    return obj->rear->next == obj->front;
}

void myCircularQueueFree(MyCircularQueue* obj)
{
    // 销毁需要逐个销毁
    CQNode* cur = obj->front->next;
    // 从第二个节点开始,防止找不到头
    while (cur != obj->front)
    {
        CQNode* next = cur->next;
        free(cur);
        cur = next;
    }
    // 销毁
    free(cur);
    free(obj);
}

/**
 * Your MyCircularQueue struct will be instantiated and called as such:
 * MyCircularQueue* obj = myCircularQueueCreate(k);
 * bool param_1 = myCircularQueueEnQueue(obj, value);

 * bool param_2 = myCircularQueueDeQueue(obj);

 * int param_3 = myCircularQueueFront(obj);

 * int param_4 = myCircularQueueRear(obj);

 * bool param_5 = myCircularQueueIsEmpty(obj);

 * bool param_6 = myCircularQueueIsFull(obj);

 * myCircularQueueFree(obj);
*/
结语
到这里,本篇博客就到此结束了。本次博客讲解内容较多,特别是OJ题部分,结构的复杂程度和代码量一下子就上去了。本篇博客创作的时间比较赶,所以图画的比较少,博主大多是口述讲解的。大家如果走读代码没明白的话,可以画画图,或者找博主答疑。还是老话,多写多练~
如果觉得anduin写的还不错的话,还请一键三连!如有错误,还请指正!
我是anduin,一名C语言初学者,我们下期见!

![[附源码]java毕业设计健身房管理系统论文2022](https://img-blog.csdnimg.cn/d5c1a9455794499f935109f61552aebc.png)
