本文作者为 360 奇舞团前端开发工程师
前言
本文中使用的
React版本为18,在摘取代码的过程中删减了部分代码,具体以源代码为准。
在React 18里,通过ReactDOM.createRoot创建根节点。并且通过调用原型链上的render来渲染。 本文主要是从以下两个方法来介绍展开。
import React from 'react';
import ReactDOM from 'react-dom/client';
import App from './App.tsx';

ReactDOM.createRoot(document.getElementById('root')).render(
  <React.StrictMode>
    <App />
  </React.StrictMode>
);
一、createRoot()
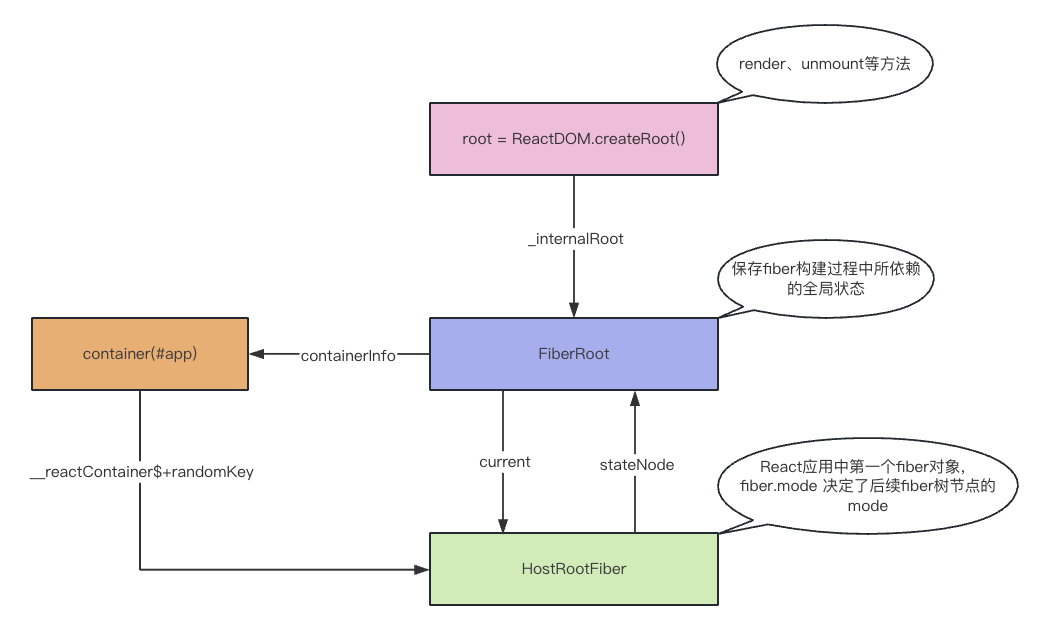
createRoot这个方法主要是用来创建FiberRoot(全局唯一,保存全局状态)和RootFiber(是应用里的第一个fiber对象),并将其关系关联起来。主要有以下过程:
校验
container有效性,以及处理options参数创建
FiberRoot和rootFiber,并关联起来事件代理
返回
ReactDOMRoot实例
function createRoot(
  container: Element | Document | DocumentFragment,
  options?: CreateRootOptions,
): RootType {
  // 校验合法性,以及处理options参数,此处省略
  if (!isValidContainer(container)) {
    //...
  }

  // 调用 createFiberRoot,创建FiberRoot和rootFiber,并关联关系,最终返回FiberRoot。FiberRoot.current = rootFiber; rootFiber.stateNode = FiberRoot;
  const root = createContainer(
    container,
    ConcurrentRoot,
    null,
    isStrictMode,
    concurrentUpdatesByDefaultOverride,
    identifierPrefix,
    onRecoverableError,
    transitionCallbacks,
  );

  // 标记container和rootFiber关系  container['__reactContainer$' + randomKey] = root.current
  markContainerAsRoot(root.current, container);

  const rootContainerElement: Document | Element | DocumentFragment =
    container.nodeType === COMMENT_NODE
      ? (container.parentNode: any)
      : container;

  listenToAllSupportedEvents(rootContainerElement); // 事件代理

  // 实例化,挂载render,unmount方法
  return new ReactDOMRoot(root); // this._internalRoot = root;
}
关系结构示意图
二、render()
render主要是通过调用updateContainer,将组件渲染在页面上。
ReactDOMHydrationRoot.prototype.render = ReactDOMRoot.prototype.render = function(
  children: ReactNodeList,
): void {
  const root = this._internalRoot;
  if (root === null) {
    throw new Error('Cannot update an unmounted root.');
  }
  updateContainer(children, root, null, null);
};
updateContainer
updateContainer主要执行了以下步骤:
获取当前时间
eventTime和任务优先级lane,调用createUpdate生成update;执行
enqueueUpdate将更新添加到更新队列里,并返回FiberRoot;scheduleUpdateOnFiber调度更新;
function updateContainer(
  element: ReactNodeList,
  container: OpaqueRoot,
  parentComponent: ?React$Component<any, any>,
  callback: ?Function,
): Lane {
  const current = container.current; // rootFiber
  const eventTime = requestEventTime(); // 更新触发时间
  const lane = requestUpdateLane(current); // 获取任务优先级

  // ... context 处理

  // 创建update:{eventTime, lane, tag: UpdateState // 更新类型, payload: null, callback: null, next: null, // 下一个更新}
  const update = createUpdate(eventTime, lane);
  update.payload = {element}; // element首次渲染时为App

  callback = callback === undefined ? null : callback;
  if (callback !== null) {
    update.callback = callback;
  }

  const root = enqueueUpdate(current, update, lane); // 将update添加到concurrentQueues队列里,返回 FiberRoot
  if (root !== null) {
    scheduleUpdateOnFiber(root, current, lane, eventTime); // 调度
    entangleTransitions(root, current, lane);
  }

  return lane;
}
调度阶段
调度入口:scheduleUpdateOnFiber
主要有以下过程:
在
root上标记更新通过执行
ensureRootIsScheduled来调度任务
function scheduleUpdateOnFiber(
  root: FiberRoot,
  fiber: Fiber,
  lane: Lane,
  eventTime: number,
) {
  markRootUpdated(root, lane, eventTime); // 在root上标记更新
  // root.pendingLanes |= lane; 将update的lane放到root.pendingLanes
  // 设置lane对应事件时间 root.eventTimes[laneToIndex(lane)] = eventTime;

  if (
    (executionContext & RenderContext) !== NoLanes &&
    root === workInProgressRoot
  ) {
    // 更新是在渲染阶段调度提示错误 ...
  } else { // 正常更新
    // ...
    ensureRootIsScheduled(root, eventTime); // 调度任务
    // ...
  }
}
调度优先级:ensureRootIsScheduled
该函数用于调度任务,一个root只能有一个任务在执行
设置任务的过期时间,有过期任务加入到
expiredLanes中获取下一个要处理的优先级,没有要执行的则退出
判断优先级相等则复用,否则取消当前执行的任务,重新调度。
function ensureRootIsScheduled(root: FiberRoot, currentTime: number) {
  const existingCallbackNode = root.callbackNode; // 正在执行的任务

  // 遍历root.pendingLanes,没有过期时间设置root.expirationTimes,有过期时间判断是否过期,是则加入到root.expiredLanes中
  markStarvedLanesAsExpired(root, currentTime);
  // 过期时间设置 root.expirationTimes = currentTime+t(普通任务5000ms,用户输入250ms);

  // 获取要处理的下一个lanes
  const nextLanes = getNextLanes(
    root,
    root === workInProgressRoot ? workInProgressRootRenderLanes : NoLanes,
  );

  // 没有要执行的lanes
  if (nextLanes === NoLanes) {
    if (existingCallbackNode !== null) {
      // 取消正在执行的任务
      cancelCallback(existingCallbackNode);
    }
    root.callbackNode = null;
    root.callbackPriority = NoLane;
    return;
  }

  const newCallbackPriority = getHighestPriorityLane(nextLanes); // 获取最高优先级的lane

  const existingCallbackPriority = root.callbackPriority;
  // 优先级相等复用已有的任务
  if (
    existingCallbackPriority === newCallbackPriority &&
    !(
      __DEV__ &&
      ReactCurrentActQueue.current !== null &&
      existingCallbackNode !== fakeActCallbackNode
    )
  ) {
    return;
  }
  // 优先级变化,取消正在执行的任务,重新调度
  if (existingCallbackNode != null) {
    cancelCallback(existingCallbackNode);
  }

  let newCallbackNode; // 注册调度任务
  // 同步任务,不可中断
  // 1. 调用scheduleSyncCallback将任务添加到队列syncQueue里;
  // 2. 创建微任务,调用flushSyncCallbacks,遍历syncQueue队列执行performSyncWorkOnRoot,清空队列;
  if (newCallbackPriority === SyncLane) {
    if (root.tag === LegacyRoot) {
      scheduleLegacySyncCallback(performSyncWorkOnRoot.bind(null, root));
    } else {
      scheduleSyncCallback(performSyncWorkOnRoot.bind(null, root));
    }
    if (supportsMicrotasks) {
      // 支持微任务
        scheduleMicrotask(() => {
          if (
            (executionContext & (RenderContext | CommitContext)) ===
            NoContext
          ) {
            flushSyncCallbacks();
          }
        });
    } else {
      scheduleCallback(ImmediateSchedulerPriority, flushSyncCallbacks);
    }
    newCallbackNode = null;
  } else {
    let schedulerPriorityLevel;
    switch (lanesToEventPriority(nextLanes)) {
      // ...
      case DefaultEventPriority:
        schedulerPriorityLevel = NormalSchedulerPriority;
        break;
      default:
        schedulerPriorityLevel = NormalSchedulerPriority;
        break;
    }
    // 非同步任务,可中断
    // 1. 维护了两个队列 timerQueue taskQueue
    // 2. 通过requestHostCallback开启宏任务执行任务
    newCallbackNode = scheduleCallback(
      schedulerPriorityLevel,
      performConcurrentWorkOnRoot.bind(null, root),
    );
  }

  root.callbackPriority = newCallbackPriority;
  root.callbackNode = newCallbackNode;
}
调度任务 scheduleSyncCallback or scheduleCallback
scheduleSyncCallback只有一个队列,将任务添加到队列里。按照顺序同步执行,不能中断。
function scheduleSyncCallback(callback: SchedulerCallback) { // callback =》performSyncWorkOnRoot
  if (syncQueue === null) {
    syncQueue = [callback];
  } else {
    syncQueue.push(callback);
  }
}scheduleCallback有两个队列(小顶堆),timerQueue存放未就绪的任务,taskQueue存放已就绪任务。每次循环,判断timerQueue里是否有可执行任务,并将其移动到taskQueue中,然后从taskQueue中取出任务执行。
function unstable_scheduleCallback(priorityLevel, callback, options) {
  // ... startTime timeout expirationTime 等初始化
  var newTask = { // 新的调度任务
    id: taskIdCounter++,
    callback, // render时为performConcurrentWorkOnRoot.bind(null, root),
    priorityLevel,
    startTime, // getCurrentTime()
    expirationTime, // startTime + timeout(根据priorityLevel,-1、250、1073741823、10000、5000、)
    sortIndex: -1, // startTime > currentTime ? startTime: expirationTime,
  };
  // 按照是否过期将任务推到队列timerQueue或者taskQueue里
  if (startTime > currentTime) {
    newTask.sortIndex = startTime;
    push(timerQueue, newTask);
    if (peek(taskQueue) === null && newTask === peek(timerQueue)) {
      if (isHostTimeoutScheduled) {
        cancelHostTimeout(); // 取消当前的timeout
      } else {
        isHostTimeoutScheduled = true;
      }
      // 本质上是从timerQueue去取可以执行的任务放到taskQueue里,然后执行requestHostCallback
      requestHostTimeout(handleTimeout, startTime - currentTime);
    }
  } else {
    newTask.sortIndex = expirationTime;
    push(taskQueue, newTask);

    // 调度任务
    if (!isHostCallbackScheduled && !isPerformingWork) {
      isHostCallbackScheduled = true;
      requestHostCallback(flushWork); // 设置isMessageLoopRunning,开启宏任务【schedulePerformWorkUntilDeadline】(优先级:setImmediate > MessageChannel > setTimeout)执行 performWorkUntilDeadline()
    }
  }

  return newTask;
}
这里要注意下,一直以来都认为是
MessageChannel优先级大于setTimeout,但在浏览器打印之后发现事实相反。这个原因是chrome在某次更新里修改了二者的优先级顺序。想了解更多可以查看这篇文章:聊聊浏览器宏任务的优先级 - 掘金
执行任务 performWorkUntilDeadline
当监听到MessageChannel message的时候,执行该方法。通过调用scheduledHostCallback(即flushWork->workLoop返回的)结果,判断是否还有任务,若有则开启下一个宏任务。
const performWorkUntilDeadline = () => {
  if (scheduledHostCallback !== null) {
    const currentTime = getCurrentTime();
    startTime = currentTime;
    const hasTimeRemaining = true;

    let hasMoreWork = true;
    try {
      hasMoreWork = scheduledHostCallback(hasTimeRemaining, currentTime); // scheduledHostCallback = flushWork ->workLoop
    } finally {
      if (hasMoreWork) {
        schedulePerformWorkUntilDeadline(); // 开启下一个宏任务MessageChannel,执行 performWorkUntilDeadline()
      } else {
        isMessageLoopRunning = false;
        scheduledHostCallback = null;
      }
    }
  } else {
    isMessageLoopRunning = false;
  }
  needsPaint = false;
};
workLoop
从taskQueue取出任务执行task.callback即(performConcurrentWorkOnRoot)。如果callback返回的是函数,则表示任务被中断。否则任务执行完毕,则弹出该任务。
function workLoop(hasTimeRemaining, initialTime) {
  let currentTime = initialTime;
  advanceTimers(currentTime); // 将 timerQueue里到时间执行的定时任务移动到 taskQueue 里
  currentTask = peek(taskQueue); // 从 taskQueue 取任务
  while (
    currentTask !== null &&
    !(enableSchedulerDebugging && isSchedulerPaused)
  ) {
    // 任务未过期并且任务被中断
    if (
      currentTask.expirationTime > currentTime &&
      (!hasTimeRemaining || shouldYieldToHost())
    ) {
      break;
    }
    const callback = currentTask.callback; // 在scheduleCallback接受的第二个参数:performConcurrentWorkOnRoot
    if (typeof callback === 'function') {
      currentTask.callback = null;
      currentPriorityLevel = currentTask.priorityLevel;
      const didUserCallbackTimeout = currentTask.expirationTime <= currentTime;
      // 如果返回是函数,则代表要重新执行;
      const continuationCallback = callback(didUserCallbackTimeout);
      currentTime = getCurrentTime();
      if (typeof continuationCallback === 'function') {
        // 任务暂停重新赋值callback
        currentTask.callback = continuationCallback;
      } else {
        // 任务完成弹出
        if (currentTask === peek(taskQueue)) {
          pop(taskQueue);
        }
      }
      advanceTimers(currentTime); // 每次执行完,去timerQueue查看有没有到时间的任务
    } else {
      pop(taskQueue); // 弹出该任务
    }
    currentTask = peek(taskQueue);
  }
  // 返回给外部判断是否还有任务需要执行,即performWorkUntilDeadline里面的hasMoreWork
  if (currentTask !== null) {
    return true;
  } else {
    // taskQueue里面没有任务了,从timerQueue取任务
    const firstTimer = peek(timerQueue);
    if (firstTimer !== null) {
      // 目的将timerQueue里的任务,移动到taskQueue里执行
      requestHostTimeout(handleTimeout, firstTimer.startTime - currentTime);
    }
    return false;
  }
}
Render 阶段
这里render不是实际的dom render,而是fiber树的构建阶段。
Render入口
performSyncWorkOnRoot: 同步更新 =》 renderRootSync =》 workLoopSync
performConcurrentWorkOnRoot: 异步更新 =》 renderRootConcurrent =》 workLoopConcurrent
二者的区别主要是是否调用shouldYield,判断是否中断循环。
render之后就进入了commit阶段。
function performConcurrentWorkOnRoot(root, didTimeout) {
  currentEventTime = NoTimestamp;
  currentEventTransitionLane = NoLanes;

  const originalCallbackNode = root.callbackNode;
  const didFlushPassiveEffects = flushPassiveEffects();
  if (didFlushPassiveEffects) {
   // ...
  }

  let lanes = getNextLanes(
    root,
    root === workInProgressRoot ? workInProgressRootRenderLanes : NoLanes,
  );
  if (lanes === NoLanes) {
    return null;
  }

  // 判断是否有用户输入、过期任务打断,需要同步渲染
  const shouldTimeSlice =
    !includesBlockingLane(root, lanes) &&
    !includesExpiredLane(root, lanes) &&
    (disableSchedulerTimeoutInWorkLoop || !didTimeout);
  // renderRootConcurrent|renderRootSync里都会调用prepareFreshStack:构建新的workInProgress树
  let exitStatus = shouldTimeSlice
    ? renderRootConcurrent(root, lanes)
    : renderRootSync(root, lanes);
  // render执行完成或抛出异常
  if (exitStatus !== RootInProgress) {
    if (exitStatus === RootErrored) {
    }
    if (exitStatus === RootFatalErrored) {
    }

    if (exitStatus === RootDidNotComplete) {
      markRootSuspended(root, lanes);
    } else {
      // render完成
      const renderWasConcurrent = !includesBlockingLane(root, lanes);
      const finishedWork: Fiber = (root.current.alternate: any);
      if (
        renderWasConcurrent &&
        !isRenderConsistentWithExternalStores(finishedWork)
      ) {
        exitStatus = renderRootSync(root, lanes);

        if (exitStatus === RootErrored) {
        }
        if (exitStatus === RootFatalErrored) {
        }
      }
      // 将新的fiber树赋值给root.finishedWork
      root.finishedWork = finishedWork;
      root.finishedLanes = lanes;

      // 进入commit阶段->调用 commitRoot-> commitRootImpl;
      // commitRootImpl 执行完成之后会清空重置root.callbackNode和root.callbackPriority;以及重置workInProgressRoot、workInProgress、workInProgressRootRenderLanes。
      finishConcurrentRender(root, exitStatus, lanes);
    }
  }

  ensureRootIsScheduled(root, now()); // 退出前检测,是否有其他更新,需要发起调度
  if (root.callbackNode === originalCallbackNode) { // 没有改变,说明任务被中断,返回function,等待调用
    return performConcurrentWorkOnRoot.bind(null, root);
  }
  return null;
}
是否可中断循环
workLoopSync 和 workLoopConcurrent
共同点:用于构建fiber树,
workInProgress从根开始,遍历创建fiber节点。区别是:
workLoopConcurrent里面增加了shouldYield判断。
function workLoopSync() {
while (workInProgress !== null) {
performUnitOfWork(workInProgress);
}
}
function workLoopConcurrent() {
while (workInProgress !== null && !shouldYield()) {
performUnitOfWork(workInProgress);
}
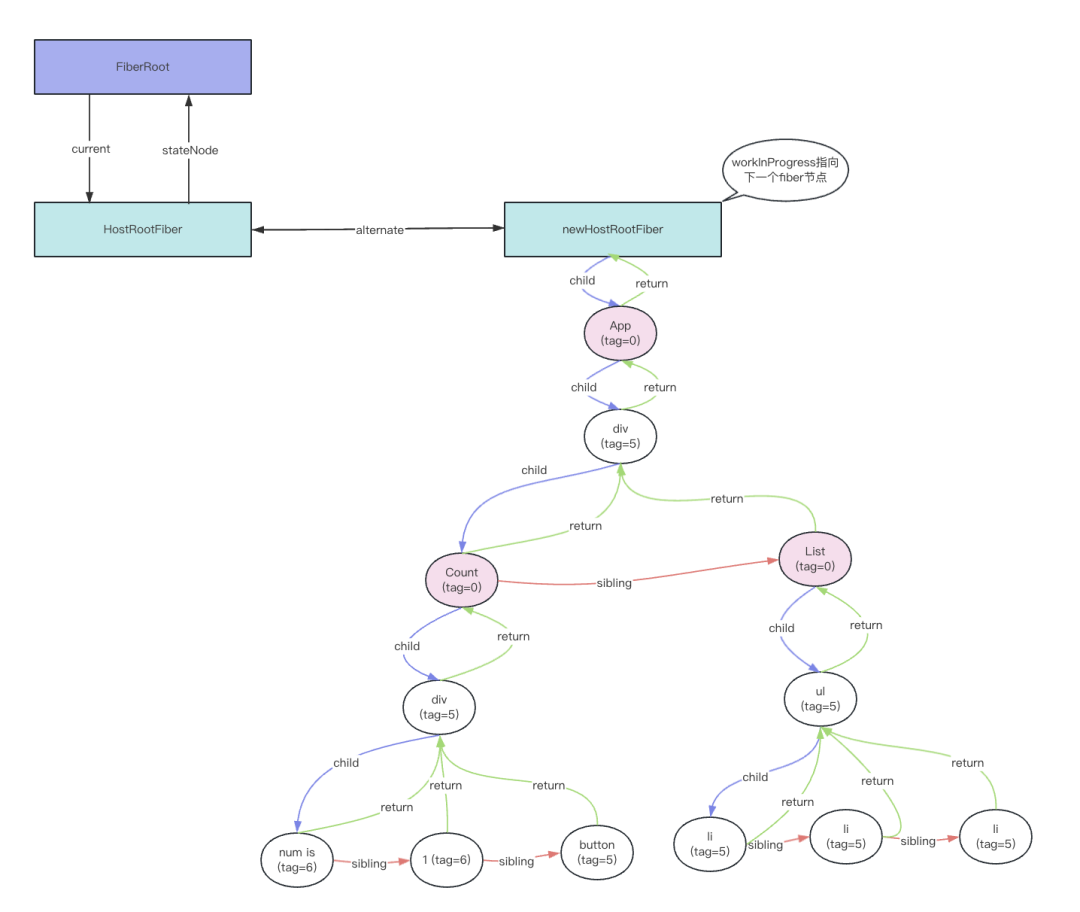
}递归阶段 performUnitOfWork
遍历过程:从rootFiber向下采用深度优先遍历,当遍历到叶子节点时(递),然后会进入到归阶段,即遍历该节点的兄弟节点,如果没有兄弟节点则返回父节点。然后进行递归的交错执行。
递阶段
beginWork: 创建或复用fiber节点。diff过程在此发生;归阶段
completeWork: 由下至上根据fiber创建或复用真实节点,并赋值给fiber.stateNode;
function performUnitOfWork(unitOfWork: Fiber): void { // unitOfWork即workInProgress,指向下一个节点
  const current = unitOfWork.alternate;
  let next;
  next = beginWork(current, unitOfWork, renderLanes);

  unitOfWork.memoizedProps = unitOfWork.pendingProps;
  if (next === null) {
    // 遍历到叶子节点后,开始归阶段,并创建dom节点
    completeUnitOfWork(unitOfWork);
  } else {
    workInProgress = next; // workInProgress指向next
  }

  ReactCurrentOwner.current = null;
}
递归后的新的fiber树
Commit 阶段
通过commitRoot进入commit阶段。此阶段是同步执行的,不可中断。接下来经历了三个过程:
before mutation阶段(执行DOM操作前):处理DOM节点渲染/删除后的focus、blur逻辑;调用getSnapshotBeforeUpdate生命周期钩子;调度useEffect。
mutation阶段(执行DOM操作):DOM 插入、更新、删除
layout阶段(执行DOM操作后):调用类组件的
componentDidMount、componentDidUpdate、setState的回调函数;或函数组件的useLayoutEffect的create函数;更新ref。
页面渲染结果
import { useState } from 'react';

export default function Count() {
  const [num, setNum] = useState(1);
  const onClick = () => {
    setNum(num + 1);
  };
  return (
    <div>
      num is {num}
      <button onClick={onClick}>点击+1</button>
    </div>
  );
}

function List() {
  const arr = [1, 2, 3];
  return (
    <ul>
      {arr.map((item) => (
        <li key={item}>{item}</li>
      ))}
    </ul>
  );
}

function App() {
  return (
    <div>
      <Count />
      <List />
    </div>
  );
}

export default App;
参考文章
[1] React https://github.com/facebook/react
[2] React技术揭秘 https://react.iamkasong.com/
[3] 图解React https://7km.top/main/macro-structure/
[4] 聊聊浏览器宏任务的优先级 https://juejin.cn/post/7202211586676064315
- END -
关于奇舞团
奇舞团是 360 集团最大的大前端团队,代表集团参与 W3C 和 ECMA 会员(TC39)工作。奇舞团非常重视人才培养,有工程师、讲师、翻译官、业务接口人、团队 Leader 等多种发展方向供员工选择,并辅以提供相应的技术力、专业力、通用力、领导力等培训课程。奇舞团以开放和求贤的心态欢迎各种优秀人才关注和加入奇舞团。


![[python 刷题] 42 Trapping Rain Water](https://img-blog.csdnimg.cn/6974ce2533274defb76be788aea3c1d5.png)