C语言中文件的相关操作
文件的打开
-
使用文件的打开函数需要引入这个头文件:
#include <fcntl.h> -
open函数int open(char const *pathname, int flags, mode_t mode)- 功能:打开已有的文件或者创建新文件
- 参数
pathname:文件路径名,可以是相对路径或绝对路径flags:打开文件的标志,状态标志,多选使用|,常用的有以下几种O_RDONLY:只读O_WRONLY:只写O_RDWR:读写O_APPEND:追加O_CREAT:不存在即创建,已存在即打开O_EXCL:不存在即创建,已存在即报错O_TRUNC:不存在即报错,一般配合O_CREAT使用,已存在即清空O_RDONLY,O_WRONLY,O_RDWR三者只能选择一个
mode:权限模式,格式例如0777、0755
- 返回值:反回非负整数作为文件描述符。如果返回
-1,表示打开文件失败
-
使用示例
#include <stdio.h>  // 使用perror
#include <fcntl.h>  // 使用open


int main(void)
{
    // 打开文件,不存在就创建
    int fd = open("./test.txt", O_WRONLY | O_CREAT | O_TRUNC, 0755);
    if(fd == -1)
    {
        perror("open");
        return -1;
    }

    // 操作文件

    // 关闭文件
    return 0;
}
文件的关闭
-
使用文件的关闭函数需要引入这个头文件:
#include <unistd.h> -
close函数int close(int fd);- 功能:关闭处于打开状态的文件描述符
- 参数:
fd表示的是处于打开状态的文件描述符 - 返回值:成功返回0,失败返回-1
-
使用示例
#include <stdio.h>  // 使用perror
#include <fcntl.h>  // 使用open
#include <unistd.h>  // 使用close


int main(void)
{
    // 打开文件,不存在就创建
    int fd = open("./test.txt", O_WRONLY | O_CREAT | O_TRUNC, 0755);
    if(fd == -1)
    {
        perror("open");
        return -1;
    }

    // 操作文件

    // 关闭文件
    int ret = close(fd);
    if(ret == -1)
    {
        perror("close");
        return -1;
    }
    return 0;
}
文件打开和关闭在内核中的结构
-
多次打开同一个文件,无论是在同一个进程中还是在不同的进程中,都会在系统内核中产生一个v节点
-
每次打开文件都会产生一个新的文件表项,各自维护各自的文件状态标志和当前文件偏移
-
多个进程打开同一个文件,其实是产生了多个文件表项,而v节点其实只有一个
-
以下是使用一个进程打开一个文件的示例图

-
下面是使用多个进程打开一个文件的示例图

文件描述符
-
为了便于管理在系统中运行的各个进程,内核会维护一张存有各进程信息的列表,称为进程表。系统中的每个进程在进程表中都占有一个表项。每个进程表项都包含了针对特定进程的描述信息,如
PID、UID、GID,其中也包含了一个称为文件描述符表的数据结构。 -
文件描述符的每个表项都至少包含两个数据项–文件描述符表中和文件表项指针,所谓文件描述符,其实就是文件描述符表项在文件描述符表中从0开始的下标,
open函数的返回值就是文件描述符表项在文件描述符表中的下标 -
文件描述符表中,前三个都是默认的,在
unistd.h头文件中被定义#define STDIN_FILENO 0标准输入#define STDOUT_FILENO 1标准输出#define STDERR_FILENO 2标准错误
-
以下是示例图

-
下面是根据文件描述表的前三个默认被定义的特性写的一个示例
#include <stdio.h> #include <fcntl.h> #include <unistd.h> int main(void) { // 如果这里直接使用open,那返回的文件描述符表项一般都是3 // 所以我这里做了一些操作,让open返回的文件描述符表项为0 close(1); // 关闭1,标准输出 int fd = open("./stdout.txt", O_WRONLY | O_CREAT | O_TRUNC, 0755); if(fd == -1) { perror("open"); return -1; } printf("fd = %d\n", fd); // 这里如果关闭了fd,会出现写不进去 // if(close(fd) == -1) // { // perror("close"); // return -1; // } return 0; } -
上面一个例子在写的时候发现了一些问题,目前还不知道是啥原因,不能关闭文件,关闭了就会发现写不进去,下面是我用
dup2函数写的#include <stdio.h> #include <fcntl.h> #include <unistd.h> int main(void) { int fd = open("./stdout.txt", O_WRONLY | O_CREAT | O_TRUNC, 0755); if (fd == -1) { perror("open"); return -1; } // 使用dup2函数将新的文件描述符复制到文件描述符1 if (dup2(fd, STDOUT_FILENO) == -1) { perror("dup2"); return -1; } printf("输出重定向到文件\n"); printf("此时fd=%d\n", fd); if (close(fd) == -1) { perror("close"); return -1; } return 0; }
文件的写入
-
使用文件的写入函数需要引入这个头文件:
#include <unistd.h> -
write函数ssize_t wirte(int fd, void const *buf, size_t count);- 功能:向指定的文件写入数据
- 参数
fd:文件描述符,即open函数的返回值buf:内存缓冲区,即要写入的数据count:期望写入的字节数
- 返回值:成功返回实际写入的字节数,失败返回-1
-
示例
#include <stdio.h>  // perror
#include <fcntl.h>  // open
#include <unistd.h>  // close wirte
#include <string.h>  // strlen

int main(void)
{
    // 1. 打开文件
    int fd = open("./test.txt", O_WRONLY | O_CREAT | O_TRUNC, 0755);
    if(fd == -1)
    {
        perror("open");
        return -1;
    }

    // 2. 写入数据
    char *buf = "哈哈";
    ssize_t size = write(fd, buf, strlen(buf));
    if(size == -1)
    {
        perror("write");
        return -1;
    }
    printf("实际写入了%ld个字节\n", size);

    // 3. 关闭文件
    if(close(fd) == -1)
    {
        perror("close");
        return -1;
    }
    return 0;
}
文件的读取
-
使用文件的读取函数需要引入这个头文件:
#include <unistd.h> -
read函数ssize_t read(int fd, void *buf, size_t count);- 功能:从指定的文件中读取数据
- 参数:
fd:文件描述符buf:内存缓冲区,存读取到的数据count:期望读取的字节数
- 返回值:成功返回实际读取的字节数,失败返回-1
-
示例
#include <stdio.h>  // perror
#include <fcntl.h>  // open
#include <unistd.h>  // close read

int main(void)
{
    // 1. 打开文件,这里使用的是 int open(const char *pathname, int flags);,直接读取的
    int fd = open("./test.txt", O_RDONLY);

    // 2. 读取数据
    char buf[16] = {};
    ssize_t size = read(fd, buf, sizeof(buf));
    if(size == -1)
    {
        perror("read");
        return -1;
    }
    printf("读取的字节数是%ld,读取到内容是 %s\n", size, buf);

    // 3. 关闭文件
    if(close(fd) == -1)
    {
        perror("close");
        return-1;
    }
    return 0;
}
补充部分
在 Unix-like 操作系统中,man 命令后面的数字参数用于指定手册页面的节(section)。不同的节对应于不同类型的手册页面,每个节有其特定的内容和用途。以下是常见的 man 命令数字参数及其对应的节:
man 1:用户命令(User Commands)。该节包含系统中可用的一般用户命令和可执行程序的手册页面。例如,man 1 ls将显示与列表命令ls相关的手册页面。man 2:系统调用(System Calls)。该节包含操作系统提供的内核级别函数和系统调用接口的手册页面。这些函数和接口用于访问低级别的操作系统功能。例如,man 2 open将显示与文件系统调用open相关的手册页面。man 3:C 库函数(Library Functions)。该节包含标准 C 库函数和其他库函数的手册页面。它提供了函数的接口、参数和返回值等详细信息。例如,man 3 printf将显示与打印函数printf相关的手册页面。- 其他节:除了上述常见的节之外,还存在其他节,用于特定目的或特定类型的手册页面。例如,
man 5用于文件格式和配置文件的手册页面,man 7用于杂项的手册页面。
因此,根据所选择的数字参数,man 命令可以用来查看不同类型的手册页面,从用户命令、系统调用到库函数等。可以根据需要选择适当的数字参数来浏览相关的手册页面,以获取相关命令、函数或系统的详细信息和用法说明。
文件读写的位置
-
使用
lseek函数可以改变文件读写位置,使用它需要引用unistd.h头文件 -
lseek函数off_t lseek(int fd, off_t offset, int whence);- 功能: 调整文件读写位置
- 参数
fd:文件描述符offset:文件读写位置偏移字节数whence:offset参数的偏移起点SEEK_SET:文件头SEEK_CUR:当前位置(最后被读写字节下一个字节)SEEK_END:文件尾
- 返回值:成功返回文件读写位置,失败返回0
-
示意图

-
示例代码
#include <stdio.h>
#include <fcntl.h>
#include <unistd.h>
#include <string.h>

int main(void)
{
    // 打开文件
    int fd = open("./test.txt", O_RDWR | O_CREAT | O_TRUNC, 0644);
    if(fd == -1)
    {
        perror("open");
        return -1;
    }
    // 写入数据
    char *w_data = "aaaaaaa";
    if(write(fd, w_data, strlen(w_data)) == -1)
    {
        perror("write");
        return -1;
    }

    // 跳转文件读写位置到开头
    if(lseek(fd, 0, SEEK_SET) == -1)
    {
        perror("lseek");
        return -1;
    }
    // 写入数据,这里会将之前的数据覆盖,并不会将原来的数据自动往后移
    char *w_data2 = "abcdefghij";
    if(write(fd, w_data2, strlen(w_data2)) == -1)
    {
        perror("write");
        return -1;
    }

    // 调整文件读写位置 3 SEEK_SET
    if(lseek(fd, 3, SEEK_SET) == -1)
    {
        perror("lseek");
        return -1;
    }
    // 读取文件数据
    char r_data1[100] = {};
    if(read(fd, r_data1, sizeof(r_data1)) == -1)
    {
        perror("read1");
        return -1;
    }
    printf("第一次读取数据: %s\n", r_data1);

    // 调整文件读写位置 -5 SEEK_CUR,如果这里填 4 SEEK_CUR,因为上一个读取操作已经将指针移到最后了
    if(lseek(fd, -5, SEEK_CUR) == -1)
    {
        perror("lseek");
        return -1;
    }
    // 读取文件数据
    char r_data2[100] = {};
    if(read(fd, r_data2, sizeof(r_data2)) == -1)
    {
        perror("read1");
        return -1;
    }
    printf("第二次读取数据: %s\n", r_data2);

    // 调整文件读写位置 -2 SEEK_END
    if(lseek(fd, -2, SEEK_END) == -1)
    {
        perror("lseek");
        return -1;
    }
    // 读取数据
    char r_data3[100] = {};
    if(read(fd, r_data3, sizeof(r_data3)) == -1)
    {
        perror("read");
        return -1;
    }
    printf("第三次读取数据: %s\n", r_data3);

    // 关闭文件
    if(close(fd) == -1)
    {
        perror("close");
        return -1;
    }
    return 0;
}
文件描述符的复制
dup函数
-
dup函数可以复制文件描述项,可以将指定的文件描述项复制到最小的空闲项中,使用这个函数需要引入unistd.h头文件 -
dup函数int dup(int oldfd);- 功能:复制文件描述符表的特定条目到最小可用项
- 参数
oldfd:源文件描述符
- 返回值:成功返回模板文件描述符,失败返回-1
-
示例图

-
示例代码
#include <stdio.h>
#include <fcntl.h>
#include <string.h>
#include <unistd.h>

int main(void)
{
    // 打开文件
    int fd = open("./test.txt", O_RDWR | O_CREAT | O_TRUNC, 0644);
    if(fd == -1)
    {
        perror("open");
        return -1;
    }

    // 写入数据
    char *w_data = "abcdefg";
    if(write(fd, w_data, strlen(w_data)) == -1)
    {
        perror("write");
        return -1;
    }

    // 使用dup赋值
    int newfd = dup(fd);
    if(newfd == -1)
    {
        perror("dup");
        return -1;
    }

    // 移动fd的文件读写位置到d
    if(lseek(fd, 3, SEEK_SET) == -1)
    {
        perror("lseek");
        return -1;
    }

    // 读取newfd的数据,看是否随着fd的读写位置而改变
    char r_data[100] = {};
    if(read(fd, r_data, sizeof(r_data)) == -1)
    {
        perror("read");
        return -1;
    }
    printf("读取newfd的数据: %s\n", r_data);  // defg

    // 关闭文件
    if(close(newfd) == -1)
    {
        perror("newfd close");
        return -1;
    }
    if(close(fd) == -1)
    {
        perror("fd close");
        return -1;
    }

    return 0;
}
dup2函数
-
dup2函数可以复制文件描述项,可以将指定的文件描述项复制到指定的空闲项中,使用这个函数需要引入unistd.h头文件 -
dup2函数int dup2(int oldfd, int newfd);- 功能:复制文件描述符表中特定条目到指定项
- 参数
oldfd:源文件描述符newfd:目标文件描述符
- 返回值:成功返回目标文件描述符
newfd,失败返回-1 - 使用前一定要确保
newfd是空闲的
-
示例代码
#include <stdio.h>
#include <fcntl.h>
#include <string.h>
#include <unistd.h>

int main(void)
{
    // 打开文件
    int fd = open("./test.txt", O_RDWR | O_CREAT | O_TRUNC, 0644);
    if(fd == -1)
    {
        perror("open");
        return -1;
    }

    // 复制文件描述项
    int newfd = dup2(fd, STDOUT_FILENO);
    if(newfd == -1)
    {
        perror("dup2");
        return -1;
    }

    // 测试是否复制成功
    printf("test,hahah");

    // 关闭文件(复制的不需要手动关闭,手动关闭会发现上一步printf写不进去)
    if(close(fd) == -1)
    {
        perror("close");
        return -1;
    }
    return 0;
}
访问测试
-
想要查看操作文件的权限,可以使用
access函数,使用这个函数需要引入unistd.h头文件 -
access函数int access(char const *pathname, int mode);- 功能:判断当前进程是否可以对某个给定的文件执行某种访问。
- 参数:
pathname:文件路径mode:被测试的权限R_OK:是否可读W_OK:是否可写X_OK:是否可执行F_OK:是否存在
- 返回值:成功返回0,失败返回-1
-
示例代码
#include <stdio.h>
#include <unistd.h>

int main(int argc, char *argv[])
{
    // 判断是否输入文件名
    if(argc < 2)
    {
        fprintf(stderr, "用法: %s <filename/filepath>\n", argv[0]);
        return -1;
    }

    // 判断文件是否存在
    if(access(argv[1], F_OK) == -1)
    {
        printf("%s is no such file!\n", argv[1]);
        return -1;
    }
    printf("%s: ", argv[1]);

    // 判断文件是否可读
    if(access(argv[1], R_OK) ==  0)
        printf("read ");

    // 判断文件是否可写
    if(access(argv[1], W_OK) == 0)
        printf("write ");

    // 判断文件是否可执行
    if(access(argv[1], X_OK) == 0)
        printf("execute");
    printf("\n");
    return 0;
}
修改文件大小
-
以下两个函数是用于修改文件大小的函数,一般在下载的时候都会用到这类函数,使用这两个函数需要引入
unistd.h头文件 -
truncate函数-
int truncate(char const *path, off_t length);- 功能:修改指定文件的大小
- 参数
path:文件路径length:文件大小
- 返回值:成功返回0,失败返回-1
-
示例代码(这里展示的是截断的效果,会从尾部往前开始截短)
#include <stdio.h>
#include <string.h>
#include <fcntl.h>
#include <unistd.h>

int main(void)
{
    // 打开文件
    int fd = open("./test.txt", O_RDWR | O_CREAT | O_TRUNC, 0644);
    if(fd == -1)
    {
        perror("open");
        return -1;
    }

    // 写入数据
    char *data = "hello bhlu";  // 10字节
    if(write(fd, data, strlen(data)) == -1)
    {
        perror("write");
        return -1;
    }

    // 将读写位置移到最后,看返回的位置
    int pos1 = lseek(fd, 0, SEEK_END);
    if(pos1 == -1)
    {
        perror("lseek");
        return -1;
    }
    printf("初始状态: 文件字节长度: %d\n", pos1);

    // 截短文件为4字节
    if(truncate("./test.txt", 4) == -1)
    {
        perror("truncate");
        return -1;
    }
    printf("截短成功\n");

    // 将读写位置移到最后,看返回的位置
    int pos2 = lseek(fd, 0, SEEK_END);
    if(pos2 == -1)
    {
        perror("lseek");
        return -1;
    }
    printf("截短后: 文件字节长度: %d\n", pos2);

    // 关闭文件
    if(close(fd) == -1)
    {
        perror("close");
        return -1;
    }
    return 0;
}

/*
初始状态: 文件字节长度: 10
截短成功
截短后: 文件字节长度: 4

此时文件: hell
*/
-
-
ftruncate函数-
int ftruncate(int fd, off_t length);- 功能:修改指定文件的大小
- 参数
fd:文件描述符length:文件大小
- 返回值:成功返回0,失败返回-1
-
示例代码(这里展示的加长的效果,加长之后会在尾部空字符填充)
#include <stdio.h>
#include <string.h>
#include <fcntl.h>
#include <unistd.h>

int main(void)
{
    // 打开文件
    int fd = open("./test.txt", O_RDWR | O_CREAT | O_TRUNC, 0644);
    if(fd == -1)
    {
        perror("open");
        return -1;
    }

    // 写入数据
    char *data = "hello";  // 5字节
    if(write(fd, data, strlen(data)) == -1)
    {
        perror("write");
        return -1;
    }

    // 将读写位置移到最后,看返回的位置
    int pos1 = lseek(fd, 0, SEEK_END);
    if(pos1 == -1)
    {
        perror("lseek");
        return -1;
    }
    printf("初始状态: 文件字节长度: %d\n", pos1);

    // 加长文件为10个字节
    if(ftruncate(fd, 10) == -1)
    {
        perror("truncate");
        return -1;
    }
    printf("加长成功\n");

    // 将读写位置移到最后,看返回的位置
    int pos2 = lseek(fd, 0, SEEK_END);
    if(pos2 == -1)
    {
        perror("lseek");
        return -1;
    }
    printf("加长后: 文件字节长度: %d\n", pos2);

    // 关闭文件
    if(close(fd) == -1)
    {
        perror("close");
        return -1;
    }
    return 0;
}

/*
初始状态: 文件字节长度: 5
加长成功
加长后: 文件字节长度: 10

此时文件: hello^@^@^@^@^@   ^@就是ASCII码中的空字符
*/
-
文件锁
当一个文件同时被多个进程进行写操作的时候,就会出现造成数据错乱,以下是一个每秒往文件里写一个字符的示例代码。
#include <stdio.h>
#include <string.h>
#include <fcntl.h>
#include <unistd.h>

int main(int argc, char *argv[])
{
    if(argc < 2)
    {
        fprintf(stderr, "用法: %s <string>\n", argv[0]);
        return -1;
    }
    // 打开文件
    int fd = open("./test.txt", O_WRONLY | O_CREAT | O_APPEND, 0644);
    if(fd == -1)
    {
        perror("open");
        return -1;
    }

    // 写入数据,一秒写一个
    for(int i = 0; i < strlen(argv[1]); i++)
    {
        if(write(fd, &argv[1][i], sizeof(argv[1][i])) == -1)
        {
            perror("write");
            return -1;
        }
        sleep(1);
    }

    // 关闭文件
    if(close(fd) == -1)
    {
        perror("close");
        return -1;
    }

    return 0;
}
下面使用使用两个进程同时执行这个代码./write haha & ./write bhlu &

可以看到写入的数据是错乱的,所以才需要使用文件锁,来保证写入数据的正确性。
使用文件锁需要用到fcntl函数,使用这个函数需要引入fcntl.h头文件
-
fcntl函数-
int fcntl(int fd, F_SETLK/F_SETLKW, struct flock *lock);-
功能:加解锁
-
参数
-
F_SETLK非阻塞模式加锁,F_SETLKW阻塞模式加锁 -
lock对文件要加的锁-
struct flock {
    short l_type;  // 锁类型:F_RDLCK/F_WRLCK/F_UNLCK
    short l_whence;  // 锁区偏移起点: SEEK_SET/SEEK_CUR/SEEK_END
    off_t l_start;  // 锁区偏移字节数
    off_t l_len;  // 锁区字节数
    pid_t l_pid;  // 加锁进程的PID,-1表示自动设置
}
-
-
-
返回值:成功返回0.失败返回-1
-
-
-
示例代码
#include <stdio.h> #include <string.h> #include <fcntl.h> #include <unistd.h> int main(int argc, char *argv[]) { if(argc < 2) { fprintf(stderr, "用法: %s <string>\n", argv[0]); return -1; } // 打开文件 int fd = open("./test.txt", O_WRONLY | O_CREAT | O_APPEND, 0644); if(fd == -1) { perror("open"); return -1; } // 创建锁 struct flock lock; lock.l_type = F_WRLCK; // 写锁 lock.l_whence = SEEK_SET; // 头部开始 lock.l_start = 0; lock.l_len = 0; // 锁到文件尾 lock.l_pid = -1; // 阻塞加锁 if(fcntl(fd, F_SETLKW, &lock) == -1) { perror("fcntl"); return -1; } // 写入数据 for(int i = 0; i < strlen(argv[1]); i++) { if(write(fd, &argv[1][i], sizeof(argv[1][i])) == -1) { perror("write"); return -1; } sleep(1); } // 解锁 struct flock unlock; unlock.l_type = F_UNLCK; // 解锁 unlock.l_whence = SEEK_SET; unlock.l_start = 0; unlock.l_len = 0; unlock.l_pid = -1; if(fcntl(fd, F_SETLKW, &unlock) == -1) { perror("fcntl"); return -1; } // 关闭文件 if(close(fd) == -1) { perror("close"); return -1; } return 0; } -
使用阻塞加锁的展示图

-
非阻塞加锁部分代码
// 非阻塞加锁 while(fcntl(fd, F_SETLK, &lock) == -1) { if(errno == EACCES || errno == EAGAIN) { printf("文件被锁定,稍等一下!\n"); sleep(1); }else { perror("fcntl"); return -1; } } // 非阻塞解锁 if(fcntl(fd, F_SETLK, &unlock) == -1) { perror("fcntl"); return -1; } -
非阻塞加锁效果

文件锁的内核结构
- 每次对给定文件的特定区域加锁,都会通过
fcntl函数向系统内核传递flock结构体,该结构体中包含了锁的一些信息,具体可以参考上面的函数介绍。 - 系统内核收集到所有进程所加的各种锁,就会将
flock结构体中的信息以链表的形式形成一张锁表,锁表的起始地址就保存在该文件的v节点中 - 任何一个进程通过
fcntl函数对文件加锁,系统内核都要遍历这张表,当出现已经存在冲突锁的情况下,会出现阻塞或报错。 - 解锁其实就是调整或删除锁表中的相应节点

文件的元数据
-
可以通过以下三个函数获取文件的元数据,使用这三个函数都必须引用
sys/stat.h头文件 -
int stat(char const *path, struct stat *buf); -
int fstat(int fd, struct stat *buf); -
int lstat(char const *path, struct stat *buf);-
lstat函数与另外两个函数的区别在于它不跟踪符号链接,假设有一个文件a,现在有一个b软连接指向a,它返回的是b的信息,前面两个都会返回a的信息。 -
功能:三个函数功能都差不多,从i节点中提取文件的元数据,即文件的属性信息
-
参数
-
path:文件路径 -
buf:文件元数据结构struct stat { dev_t st_dev; // 设备ID ino_t st_ino; // i节点号 mode_t st_mode; // 文件的类型和权限 nlink_t st_nlink; // 硬链接数 uid_t st_uid; // 拥有者用户id gid_t st_git; // 拥有者组id dev_t st_rdev; // 特殊设备ID off_t st_size; // 总字节数 blksize_t st_blksize; // I/O块字节数 blkcnt_t st_blocks; // 存储块数 time_t st_atime; // 最后访问时间 time_t st_mtime; // 最后修改时间 time_t st_ctime; // 最后状态改变时间 } /* 其中mode_t类型,其原始类型在32位系统中被定义unsigned int,但目前只有低16位有意义,即B0-B15 B15 - B12:文件类型 B11 - B9:设置用户ID,设置组ID,粘滞 B8 - B6:属主权限 B5 - B3:数组权限 B2 - B0:其他用户权限 */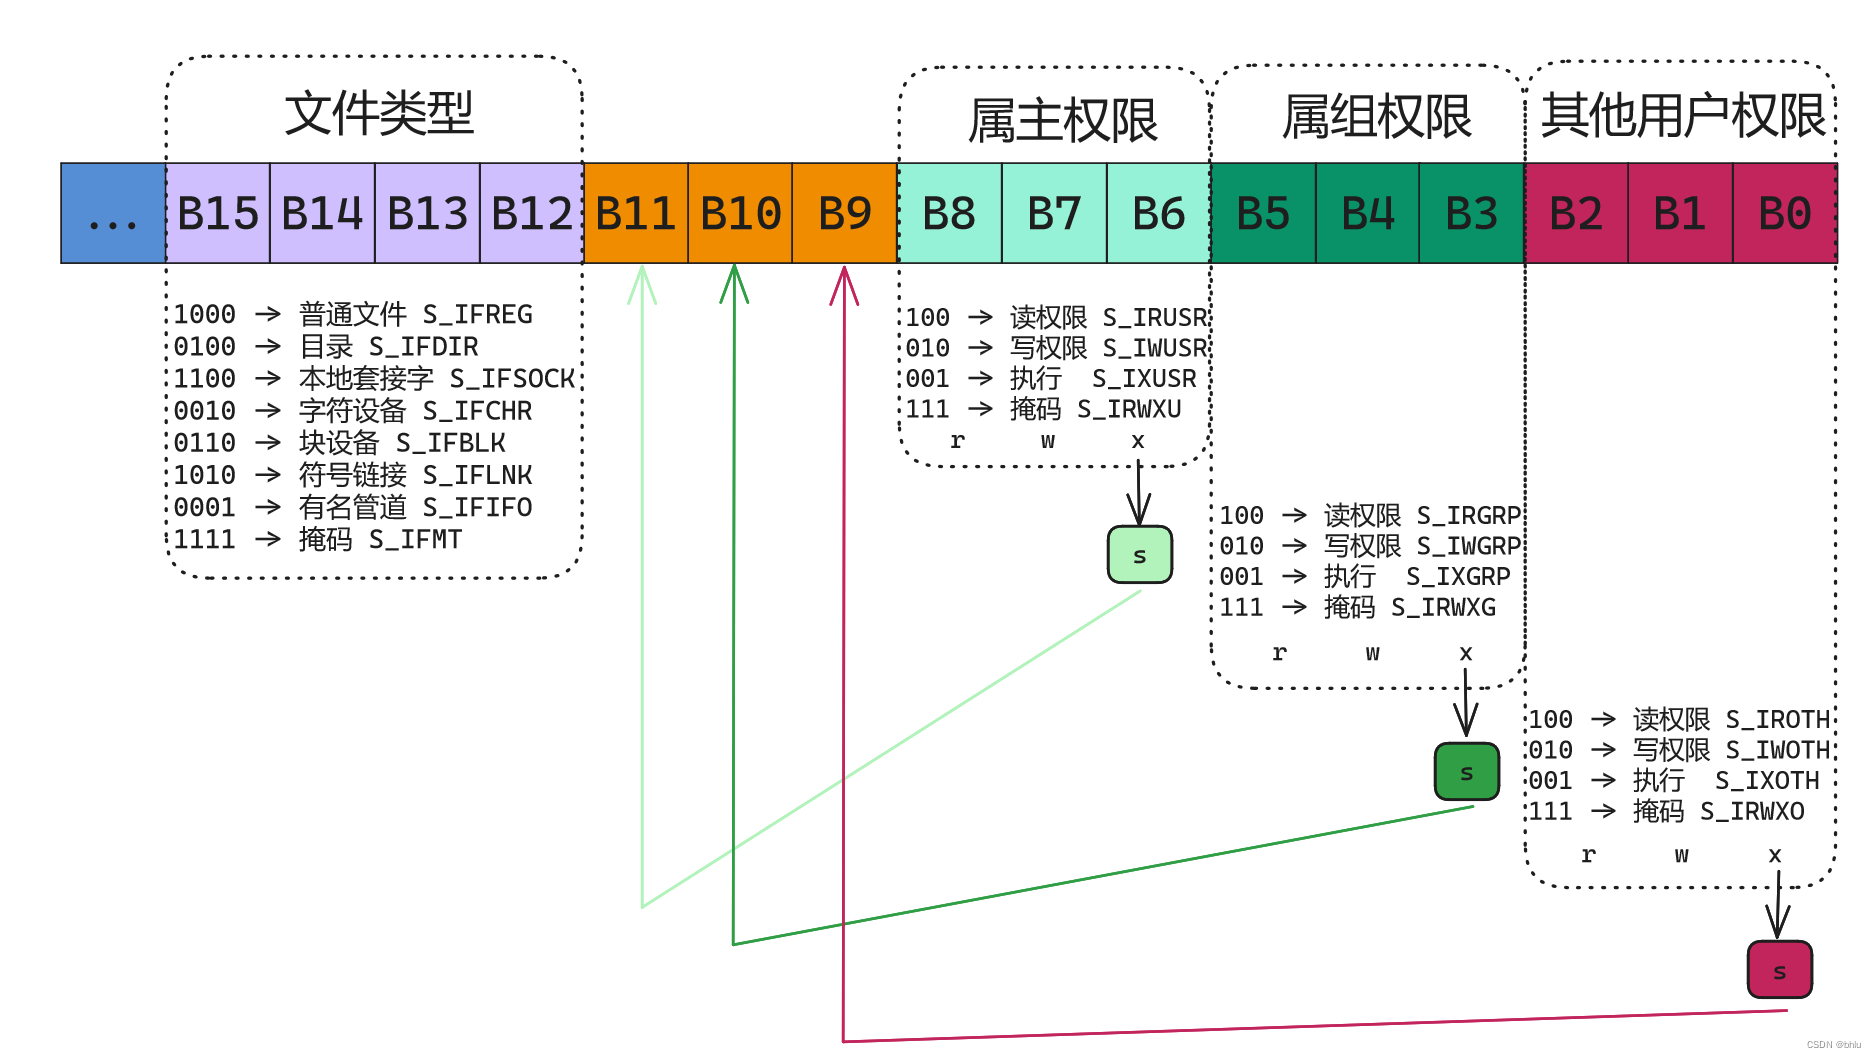
-
fd:文件描述符
-
-
返回值:成功返回0,失败返回-1
-
-
示例代码
// 输出文件的元数据
#include <stdio.h>
#include <string.h>
#include <sys/stat.h>
#include <time.h>

// 转类型和权限
char *f_mode(mode_t m)
{
    static char s[11];
    if (S_ISDIR(m))
    {
        strcpy(s, "d");  // 目录
    }
    else if(S_ISSOCK(m))
    {
        strcpy(s, "s");  // 本地套接字
    }
    else if(S_ISCHR(m))
    {
        strcpy(s, "c");  // 字符设备
    }
    else if(S_ISBLK(m))
    {
        strcpy(s, "b");  // 块设备
    }
    else if(S_ISLNK(m))
    {
        strcpy(s, "l");  // 符号链接
    }
    else if(S_ISFIFO(m))
    {
        strcpy(s, "p");  // 有名管道
    }
    else
    {
        strcpy(s, "-");
    }

    // 属主 属组 其他用户 权限
    strcat(s, m & S_IRUSR ? "r" : "-");
    strcat(s, m & S_IWUSR ? "w" : "-");
    strcat(s, m & S_IXUSR ? "x" : "-");
    strcat(s, m & S_IRGRP ? "r" : "-");
    strcat(s, m & S_IWGRP ? "w" : "-");
    strcat(s, m & S_IXGRP ? "x" : "-");
    strcat(s, m & S_IROTH ? "r" : "-");
    strcat(s, m & S_IWOTH ? "w" : "-");
    strcat(s, m & S_IXOTH ? "x" : "-");

    return s;
}

// 转换时间
char *f_time(time_t t)
{
    static char time[20];
    struct tm *l = localtime(&t);
    sprintf(time, "%04d-%02d-%02d %02d:%02d:%02d",
                l->tm_year + 1900, l->tm_mon + 1, l->tm_mday, l->tm_hour, l->tm_min, l->tm_sec);
    return time;
}

int main(int argc, char *argv[])
{
    if(argc < 2)
    {
        fprintf(stderr, "用法: %s <文件名>\n", argv[0]);
        return -1;
    }
    // 获取文件的元数据
    struct stat s;
    if(stat(argv[1], &s) == -1)
    {
        perror("stat");
        return -1;
    }

    printf("设备ID: %lu\n", s.st_dev);
    printf("i节点号: %ld\n", s.st_ino);
    printf("硬链接数: %lu\n", s.st_nlink);
    printf("用户ID: %u\n", s.st_uid);
    printf("组ID: %u\n", s.st_gid);
    printf("特殊设备ID: %lu\n", s.st_rdev);
    printf("总字节数: %ld\n", s.st_size);
    printf("IO块字节数: %ld\n", s.st_size);
    printf("存储块数: %ld\n", s.st_blksize);
    printf("文件类型和权限: %s\n", f_mode(s.st_mode));
    printf("最后访问时间: %s\n", f_time(s.st_atime));
    printf("最后修改时间: %s\n", f_time(s.st_mtime));
    printf("最后状态修改时间: %s\n", f_time(s.st_ctime));
    return 0;
}
内存映射文件
之前已经介绍过内存映射的建立与解除,以下是使用内存映射文件的例子
// 通过映射打开文件并写入数据
#include <stdio.h>
#include <string.h>
#include <sys/mman.h>
#include <fcntl.h>
#include <unistd.h>

int main(void)
{
    // 打开文件
    int fd = open("./mmap.txt", O_RDWR | O_CREAT | O_TRUNC);
    if(fd == -1)
    {
        perror("open");
        return -1;
    }

    // 修改文件大小
    if(ftruncate(fd, 4096) == -1)
    {
        perror("ftruncate");
        return -1;
    }

    // 获取文件大小
    int f_len = lseek(fd, 0, SEEK_END);
    if(f_len == -1)
    {
        perror("lseek");
        return -1;
    }

    // 建立文件映射
    char *start = mmap(NULL, f_len, PROT_READ | PROT_WRITE, MAP_SHARED, fd, 0);
    if(start == MAP_FAILED)
    {
        perror("mmap");
        return -1;
    }

    // 写入数据
    strcpy(start, "haha\n");

    // 解除映射
    if(munmap(start, f_len) == -1)
    {
        perror("munmap");
        return -1;
    }

    // 关闭文件描述符
    close(fd);
    return 0;
}
